
20 Inner Arm Tattoo Ideas for Women: Simple (September 2026)
Inner arm tattoo ideas for women run from a single fine-line sprig on the inner bicep to a quarter sleeve that wraps the forearm. The inner surface of the arm is one of the least forgiving canvases you’ll pick, and also one of the most flattering: it curves, it catches light, and it stays mostly to yourself.
That combination explains why the same design looks flat on a forearm in a reference photo and completely different once it’s wrapped over a flexing bicep. Below, I’ve split 20 designs by style and size, with honest notes on pain, ageing and the sub-placement each one actually suits.
If you’re booking in the next few months, that’s fine. A lot of people get inner-arm work tattooed in winter and early spring precisely so the fresh ink spends its first weeks under a sleeve rather than in direct sun.
Quick Guide: Every Design at a Glance
| Idea | Style | Best placement | Size | Pain |
|---|---|---|---|---|
| 1. Wildflower sprig | Fine line | Inner bicep | 2-3 in (5-8 cm) | Medium |
| 2. Curved name in script | Script | Inner forearm | 2-4 in (5-10 cm) | Medium-high |
| 3. Ginkgo leaf half | Minimalist | Inner forearm | 2 in (5 cm) | Medium |
| 4. Lavender bundle | Fine line botanical | Inner bicep | 3-4 in (8-10 cm) | Medium-high |
| 5. Dragonfly in dotwork | Dotwork | Inner forearm | 2-3 in (5-8 cm) | Medium |
| 6. Rose and snake | Neo-traditional | Inner bicep | 4-5 in (10-13 cm) | High |
| 7. Sun and moon | Ornamental | Inner upper arm | 3-4 in (8-10 cm) | Medium |
| 8. Olive branch vine | Botanical linework | Inner forearm | 4-6 in (10-15 cm) | Medium |
| 9. Star map fragment | Fine line | Inner bicep | 3-5 in (8-13 cm) | Medium |
| 10. Cherry blossom branch | Colour botanical | Inner forearm | 4-5 in (10-13 cm) | Medium-high |
| 11. Mountain range | Fine line | Inner forearm | 2-3 in (5-8 cm) | Low-medium |
| 12. Single wave line | Minimalist | Inner forearm | 2 in (5 cm) | Medium |
| 13. Hand mirror with vines | Ornamental | Inner upper arm | 4-6 in (10-15 cm) | Medium |
| 14. Retro flower bouquet | Retro linework | Inner bicep | 3-4 in (8-10 cm) | Medium-high |
| 15. Anchor with rope | Traditional | Inner forearm | 2-3 in (5-8 cm) | Medium |
| 16. Serif initial with vine | Lettering | Inner bicep | 1.5-2 in (4-5 cm) | Medium |
| 17. Jellyfish in blackwork | Blackwork | Inner forearm | 3-5 in (8-13 cm) | Medium |
| 18. Fern and eucalyptus set | Botanical patchwork | Inner forearm | 2 in (5 cm) each | Medium |
| 19. Date in thin script | Fine line lettering | Inner upper arm | 1-2 in (3-5 cm) | Medium-high |
| 20. Hummingbird and blossom | Micro-realism | Inner forearm | 2-3 in (5-8 cm) | Medium-high |
1. Fine-Line Wildflower Sprig on the Inner Bicep
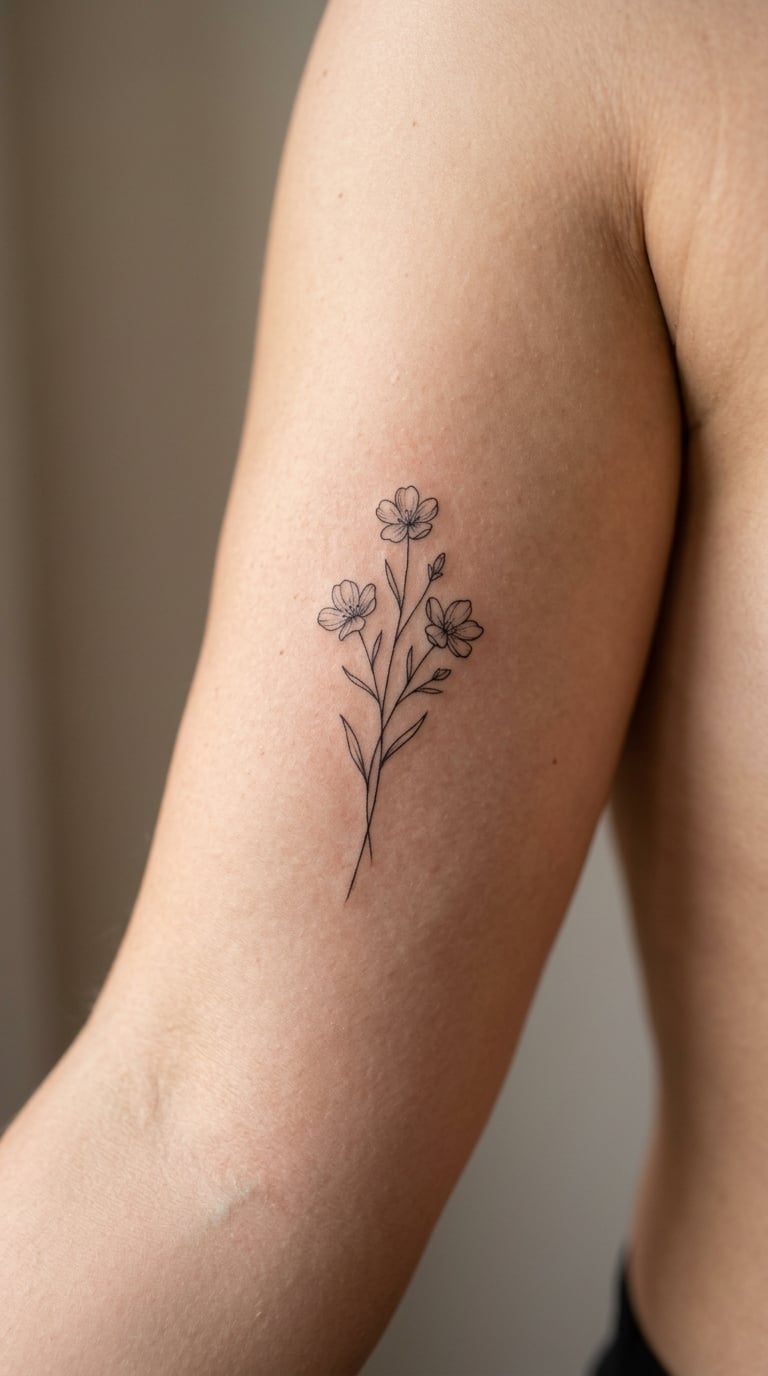
A wildflower sprig is three stems, a handful of small blossoms and one curved line of stem. Nothing more. The whole thing can be read at arm’s length, which is the point: on the inner arm most people only ever see it up close.
People choose it because it grows upward with the body and looks like it belongs there, whether the arm is bent or straight.
Placement: inner bicep, sitting between the elbow crease and the middle of the upper arm. Size: 2-3 in (5-8 cm) tall. Style: fine line with one pass of shading inside the petals. Pain: medium, and it stings more when the bicep flexes mid-session. Fine line here softens noticeably over the years, so ask for a slightly heavier line than looks right on paper. Make it yours: use the flowers from a real bouquet or meadow walk you took.
2. Curved Name in Script Along the Inner Forearm
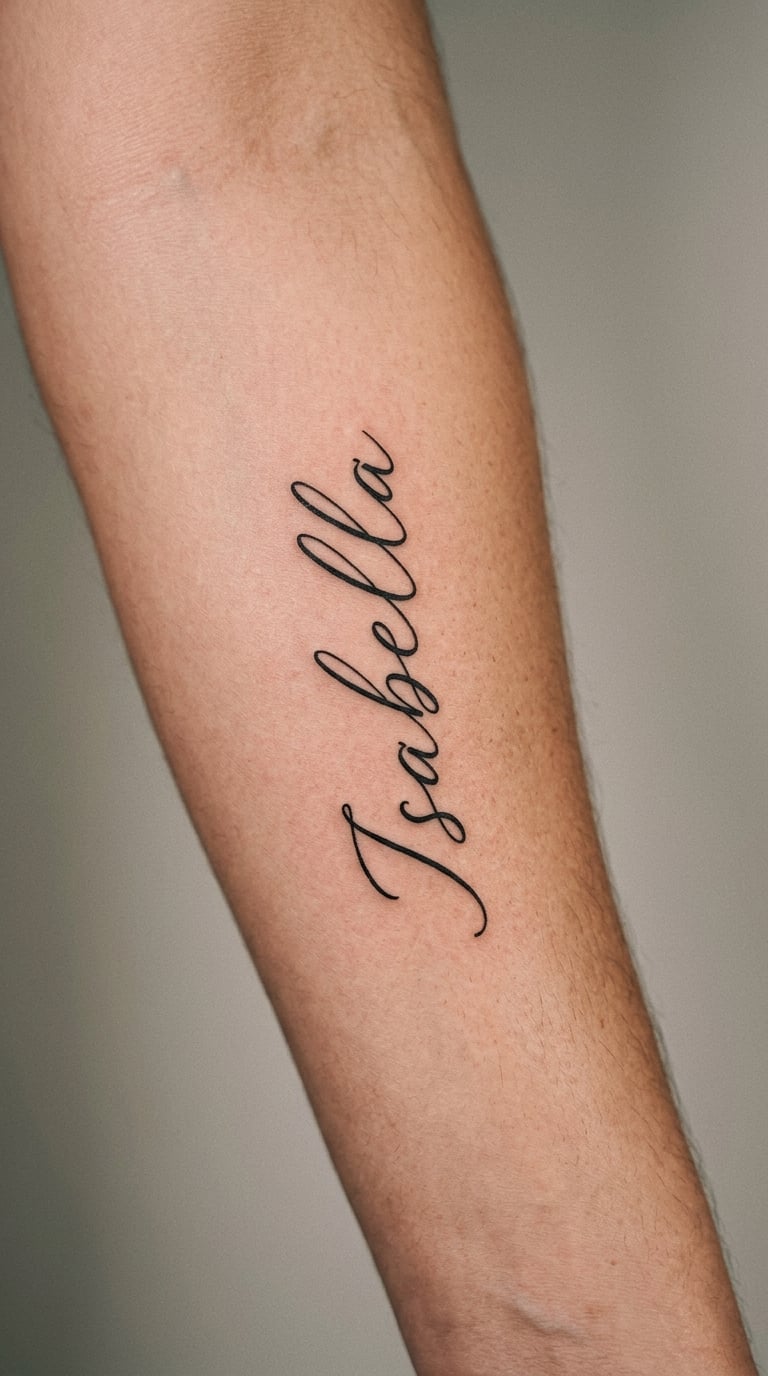
The most common lettering placement is a name set in a connected script and curved to follow the forearm from elbow toward wrist. The letters are joined, the baseline arcs with the arm, and the thickest strokes sit where the wrist narrows.
A name here stays private in a way an outer-arm piece doesn’t, so it’s often a family member, a partner or a child rather than a signature.
Placement: inner forearm, centred two inches above the wrist bone. Size: 2-4 in (5-10 cm) long. Style: script or modern calligraphy. Pain: medium to high, and the inner forearm has thin skin over visible bone, so you feel every pass. Curved script on this spot also distorts as the wrist bends, so keep the arc gentle. Make it yours: add a small matching piece on the opposite forearm at the same height.
3. Half Ginkgo Leaf in Single Black Line
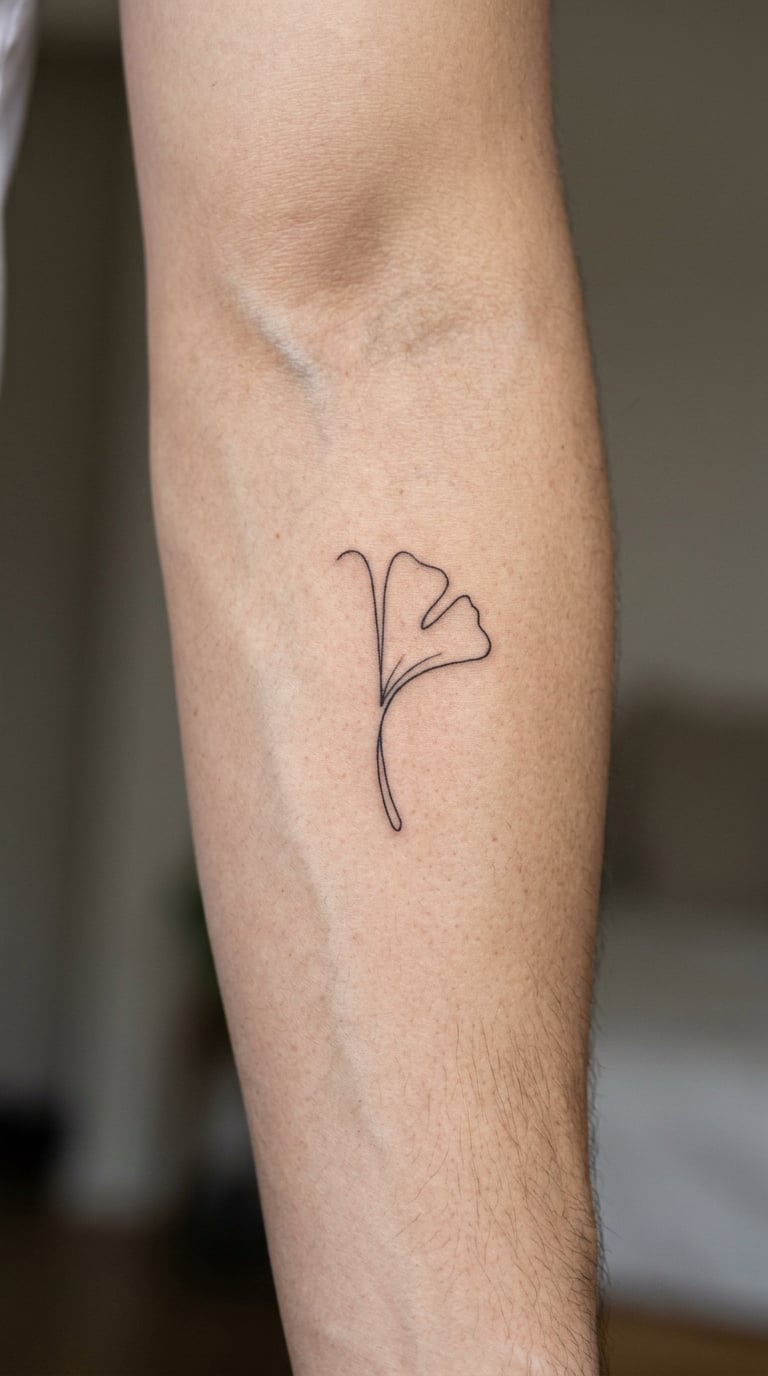
A ginkgo leaf is drawn from a single line that splits into a fan of narrow ribs. Doing only half the leaf and letting the fan fade into blank skin gives you a minimal design that still has movement in it.
The shape has been a favourite for a while because it reads clean at any size and never competes with a sleeve. People often pair it with a second one later, mirrored on the other arm.
Placement: inner forearm, just below the elbow. Size: 2 in (5 cm). Style: monoline minimalist. Pain: medium. The half-leaf outline is quick, so the session is short, but single-line work needs a steady hand and a patient artist. Make it yours: have the fan fade out with a light wash of grey instead of ending abruptly.
4. Lavender Bundle in Fine Line
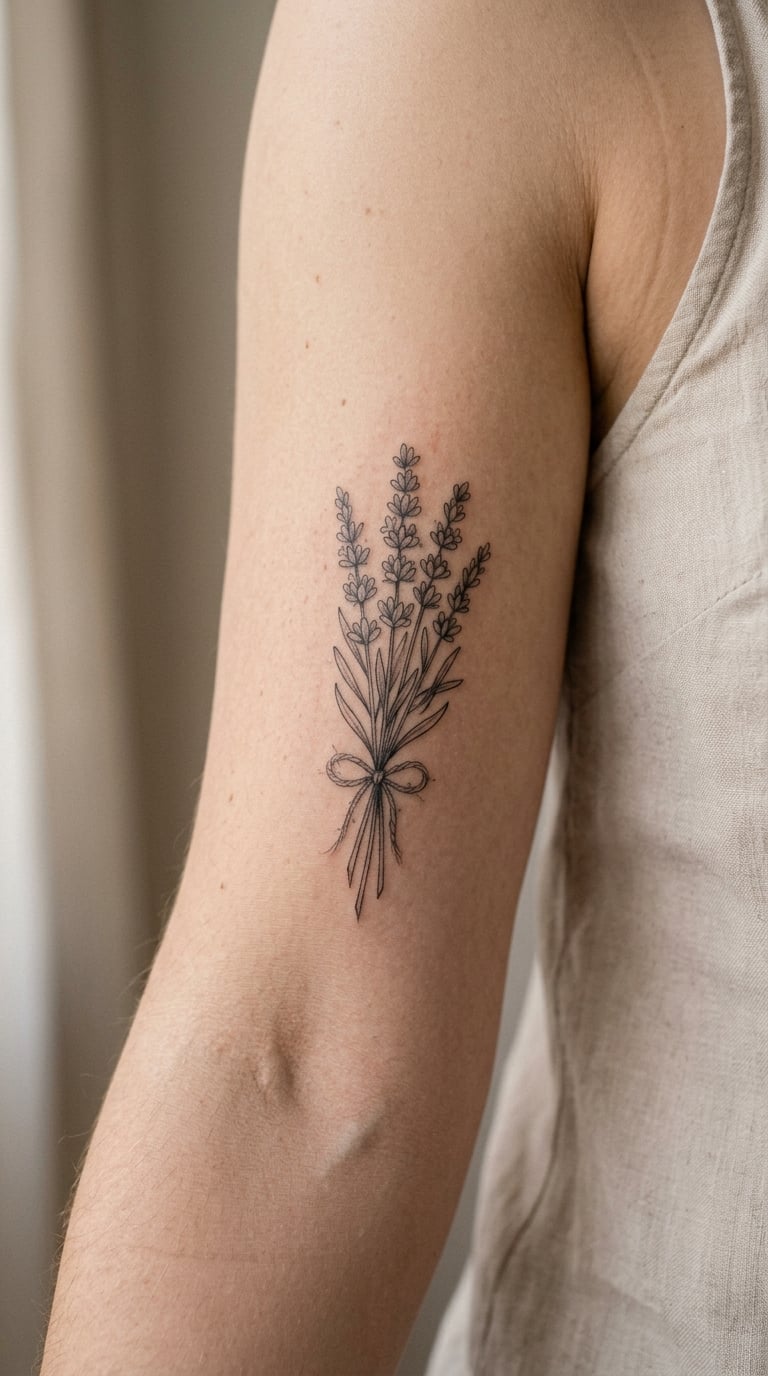
A lavender bundle is a dozen upright stems of varying height tied with one thin line of twine. Fine line and black-and-grey shading inside the flower heads is what makes it read as lavender rather than a bundle of sticks.
It’s a calm, repetitive piece to get tattooed, and the repetitive rhythm of the stems is a common reason people pick it as a first larger piece.
Placement: inner bicep, which gives the stems a vertical run. Size: 3-4 in (8-10 cm). Style: fine line botanical with grey shading. Pain: medium to high, and the bicep crease is the sore part. The stems run parallel to the arm so they stretch less than a starburst would. Make it yours: tie it with a thin coloured ribbon in a single hue, or leave it entirely in black and grey.
5. Dragonfly Built From Dotwork
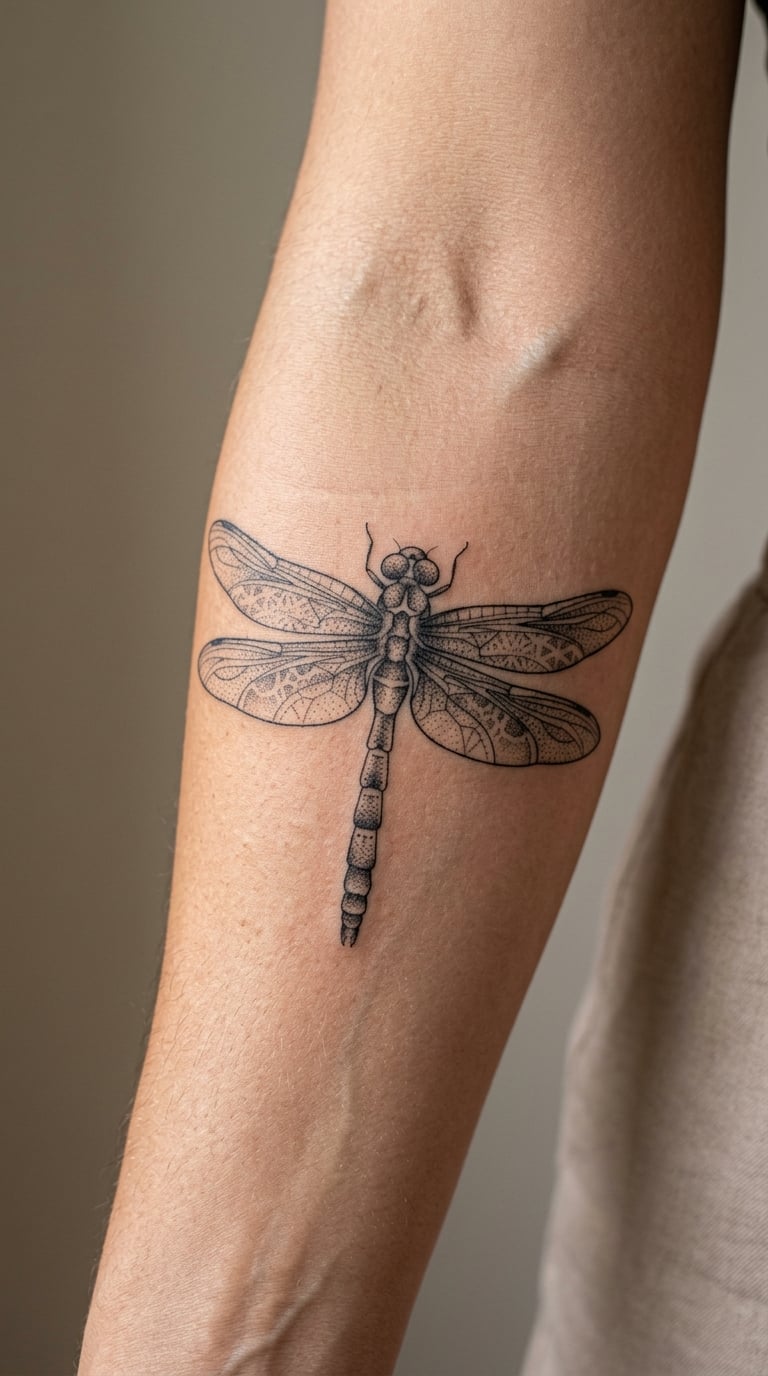
A dotwork dragonfly is thousands of tiny dots graded from dense near the body to sparse at the wing tips. Nothing is outlined, so the insect appears and disappears depending on the light. It looks like one shape at two inches and like a completely different drawing at six.
Dotwork suits people who want something nobody will recognise from across the room, but who want a conversation every time they roll a sleeve.
Placement: inner forearm, where a flat patch of skin lets the dot gradient read. Size: 2-3 in (5-8 cm). Style: dotwork with optional fine wing lines. Pain: medium. Dotwork takes far longer than the finished size suggests, so budget a long appointment and expect to get restless well before the gradient is finished. Make it yours: use a species from your own region rather than a generic dragonfly.
6. Rose and Snake in Neo-Traditional
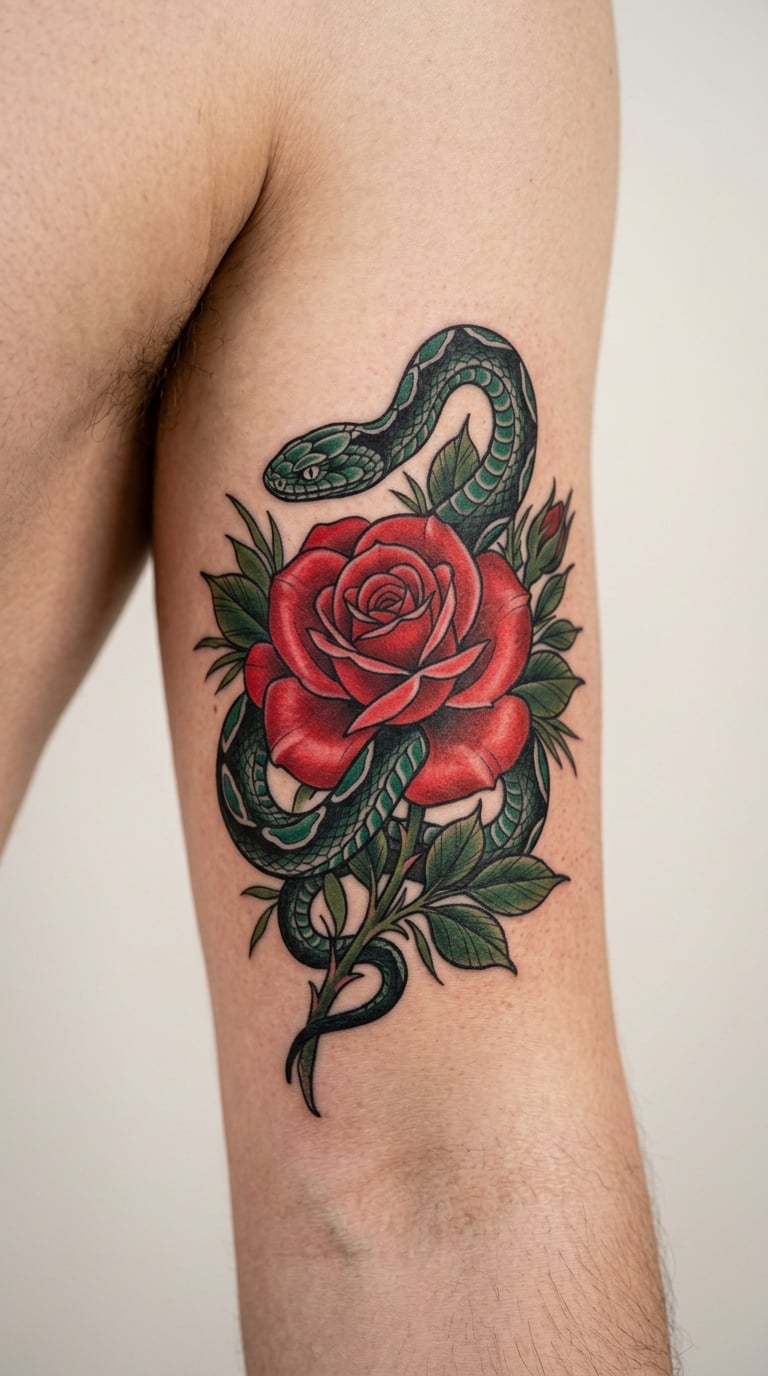
A neo-traditional rose is built from a few flat red shapes with heavy black outlines and grey shading, then a snake coils in and out of the stem. The colour is limited and the blackwork carries the drawing, so it holds up even as the reds fade towards orange.
It’s a bold choice on an arm that most people choose for delicate work, and that contrast is exactly the appeal for a lot of women.
Placement: inner bicep, large enough that the composition doesn’t get squeezed. Size: 4-5 in (10-13 cm). Style: neo-traditional with red and green accents. Pain: high, and the inner bicep near the crease is the most tender zone here. Bold outline work means fewer, deeper passes. Make it yours: swap the red for a single deep colour and let the rose sit in black and grey.
7. Sun and Moon Facing Each Other in Ornamental Linework
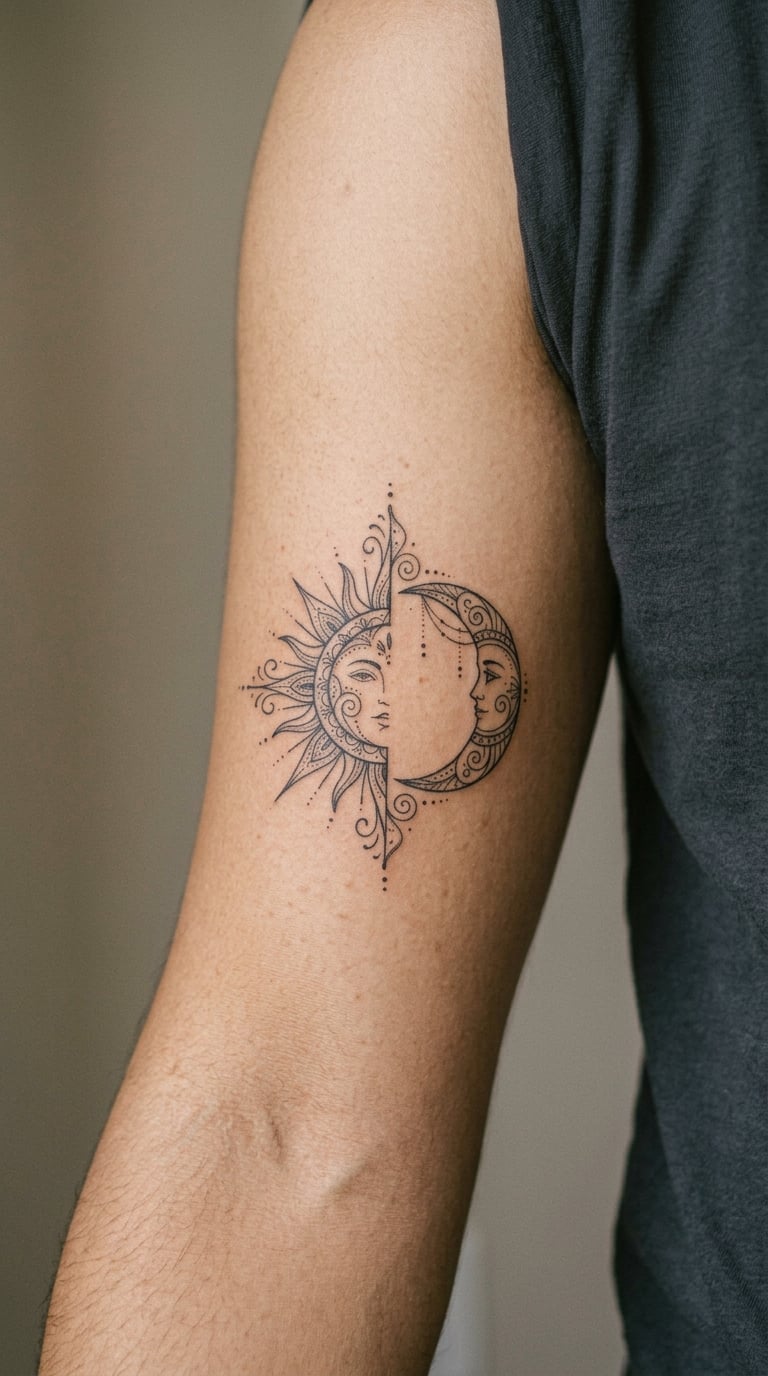
Sun and moon designs are usually two halves that don’t quite touch, drawn with ornamental linework: teardrop curves, tiny dots, a few filigree lines filling the space between them. Kept to a line-only version, it stays delicate enough for the inner upper arm.
It’s the classic pick for people who want a design that means something without having to explain it, and the two-halves composition photographs well in black and white.
Placement: inner upper arm, higher than most, so it appears when you lift your arm rather than when you flex. Size: 3-4 in (8-10 cm). Style: ornamental linework. Pain: medium. Thin ornamental detail on the upper arm ages more gracefully than on the forearm, because skin there moves less. Make it yours: add a small star or an eclipse dot between the two halves.
8. Olive Branch Vine Along the Inner Forearm
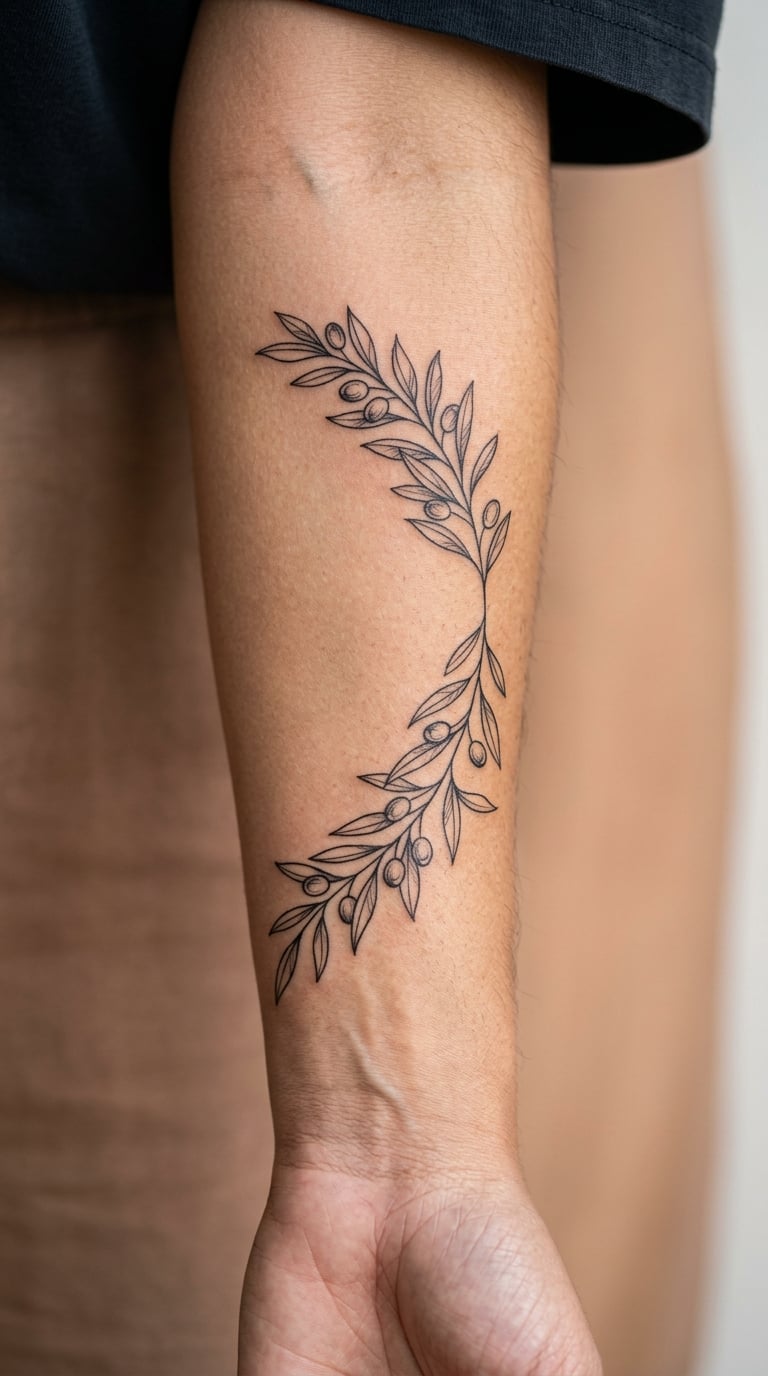
An olive branch is a single stem that curves along the arm with paired leaves alternating on either side. Drawn lengthwise, it follows the line of the forearm so naturally that it looks drawn by the body rather than on it.
Peace is the usual meaning people attach to it, and a branch with leaves and fruit reads as growth or a new stage rather than a memorial.
Placement: inner forearm, running elbow to wrist. Size: 4-6 in (10-15 cm) as a single branch. Style: fine line botanical. Pain: medium, rising slightly at the elbow end. A long branch gives you a natural reason to come back and add a second one later. Make it yours: have the leaves alternate thin and solid so the rhythm stays visible at small sizes.
9. Star Map Fragment From a Real Night Sky
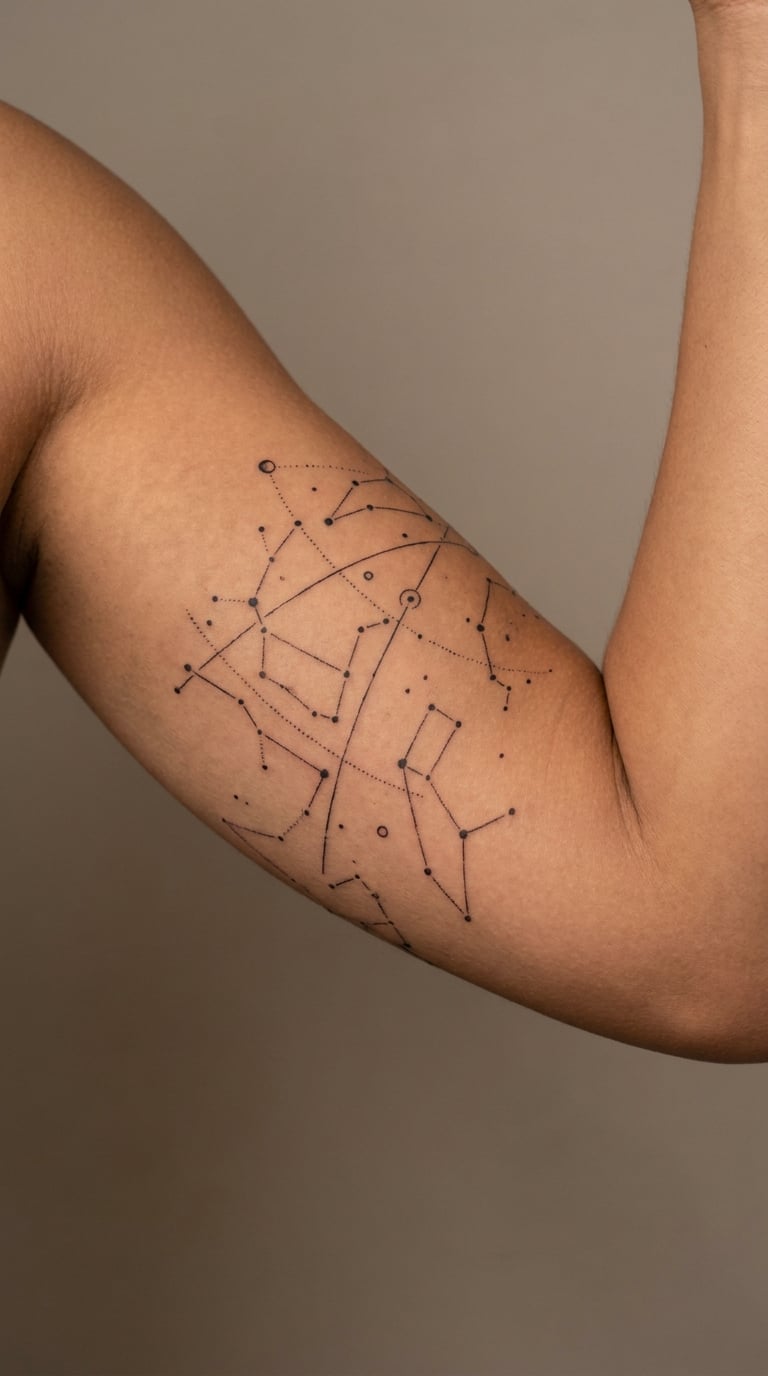
A star map tattoo is a scatter of dots of different sizes joined by faint lines, copied from the sky over a specific place and date. The real ones have uneven spacing, which is the whole appeal. Perfectly even star fields look manufactured.
It’s personal in a way that survives changing tastes, because it’s a record of one sky on one night and nobody else has the same coordinates.
Placement: inner bicep, where the wide flat area gives the scatter room. Size: 3-5 in (8-13 cm). Style: fine line with dotwork stars. Pain: medium. The faintest constellation lines are the first thing to disappear over time, so ask your artist to keep them at a visible weight. Make it yours: use the sky over a location that matters, and put the date in script underneath.
10. Cherry Blossom Branch in Colour
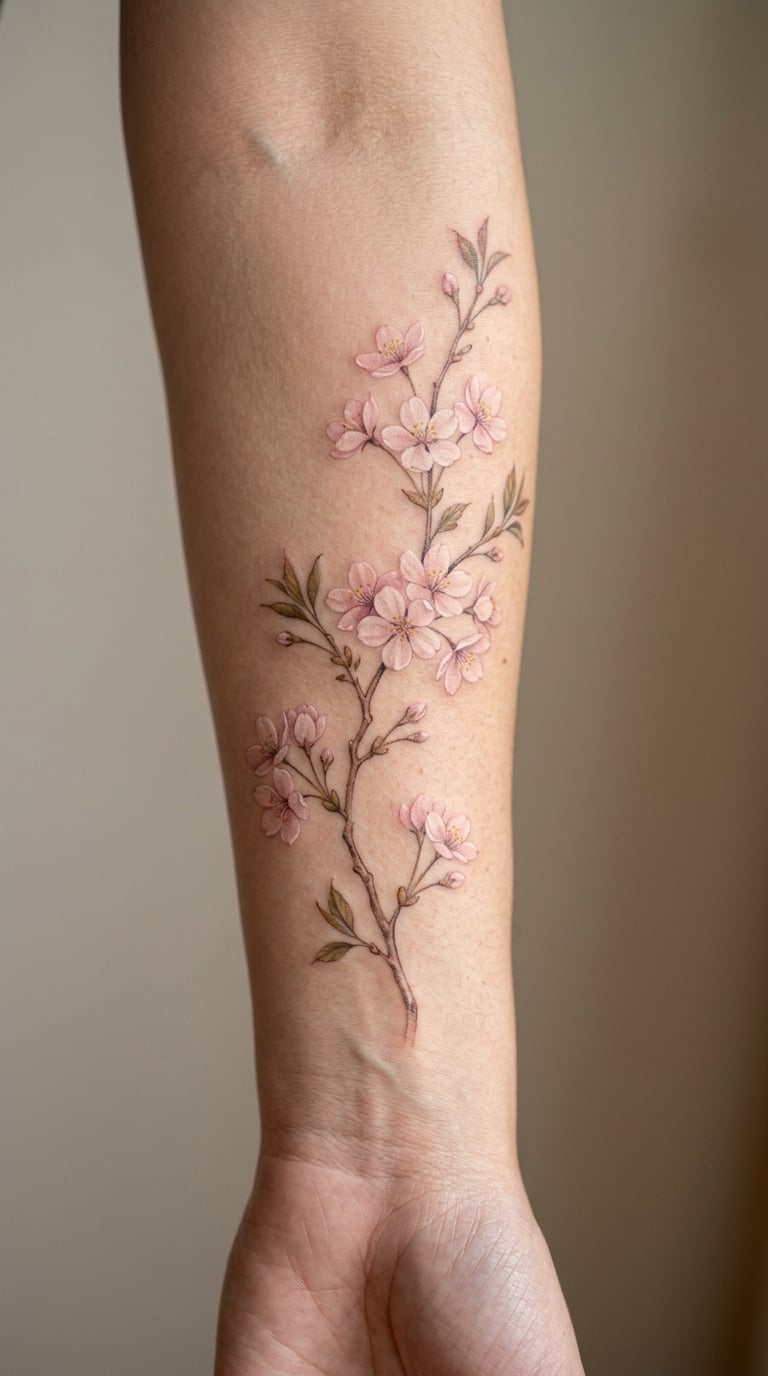
A cherry blossom branch is thin brown stems with five-petal flowers in a pale pink that fades lighter toward the petal edges. The colour work is the hard part, and it’s what separates a good one from a flat sticker.
Blossoms are chosen for a beginning rather than an ending, which is why this one often shows up as a first colour piece or alongside a birth date.
Placement: inner forearm, angled slightly off the arm so the branch crosses the forearm rather than running straight down it. Size: 4-5 in (10-13 cm). Style: colour botanical. Pain: medium to high, and colour means more passes over the same skin. Pale pinks on the inner arm are the first to fade, partly from sun and partly from friction. Make it yours: get the branch from a real tree and let a petal or two fall below the main stem.
11. Fine-Line Mountain Range on the Inner Forearm
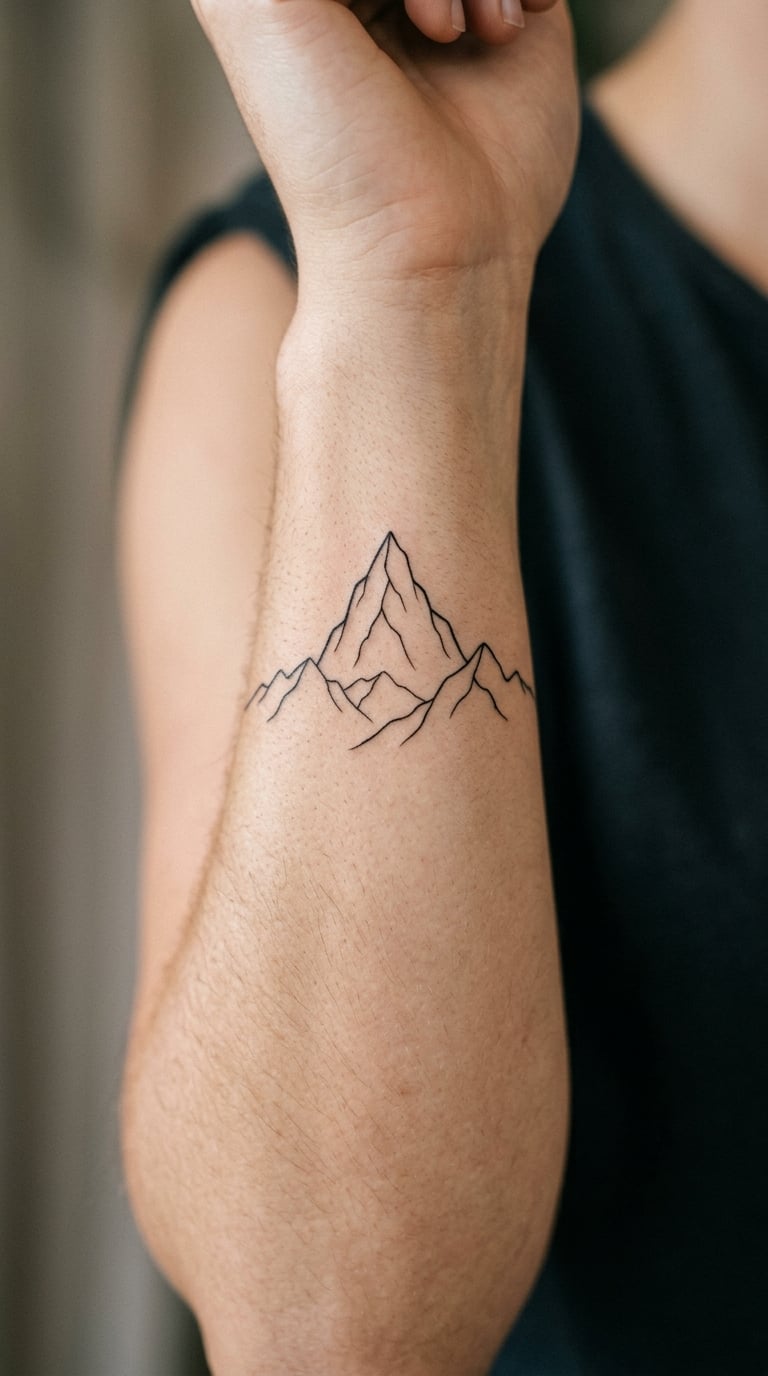
A mountain range here is one continuous line: a series of peaks and valleys, no shading, no texture, sometimes a single sun or star above. Done as pure outline it is the least demanding design in this list and one of the most frequently requested.
People pick the range that matches somewhere they’ve hiked, been, or want to be. It’s personal without being obvious, and it hides under a long sleeve completely.
Placement: inner forearm, with the peaks pointing toward the elbow. Size: 2-3 in (5-8 cm). Style: fine line minimalism. Pain: low to medium. As a first tattoo it’s a good one, because a single line of work is quick and there’s no shading to overwork the skin. Make it yours: draw the peaks from the real skyline of your favourite place rather than a stock outline.
12. One Continuous Wave Line
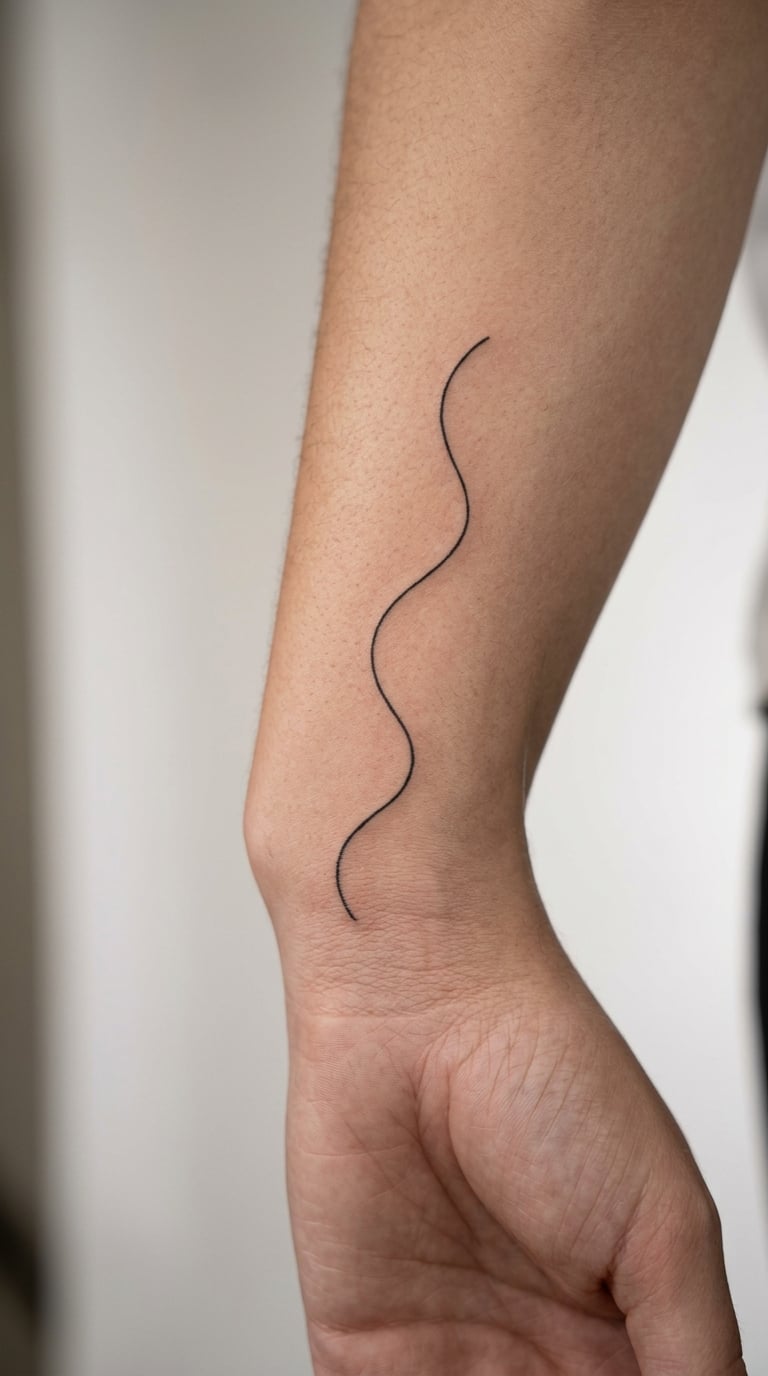
A single wave line is one unbroken stroke of varying weight, thick in the trough and thin at the crest, drawn along the length of the forearm. It’s the smallest design here and the hardest to make look effortless, because the weight has to change smoothly without the line breaking.
It reads as water, as the ocean, or as nothing in particular, which is part of why it suits people who don’t want a tattoo with an explanation attached.
Placement: inner forearm, close to the wrist. Size: 2 in (5 cm). Style: monoline. Pain: medium. This one fades faster than almost anything else on the inner arm, because wrist skin is thin and constantly moving, so build in a slightly heavier line. Make it yours: have the wave carry a tiny salt-texture section so it reads as water rather than a line.
13. Hand Mirror Framed by Vines
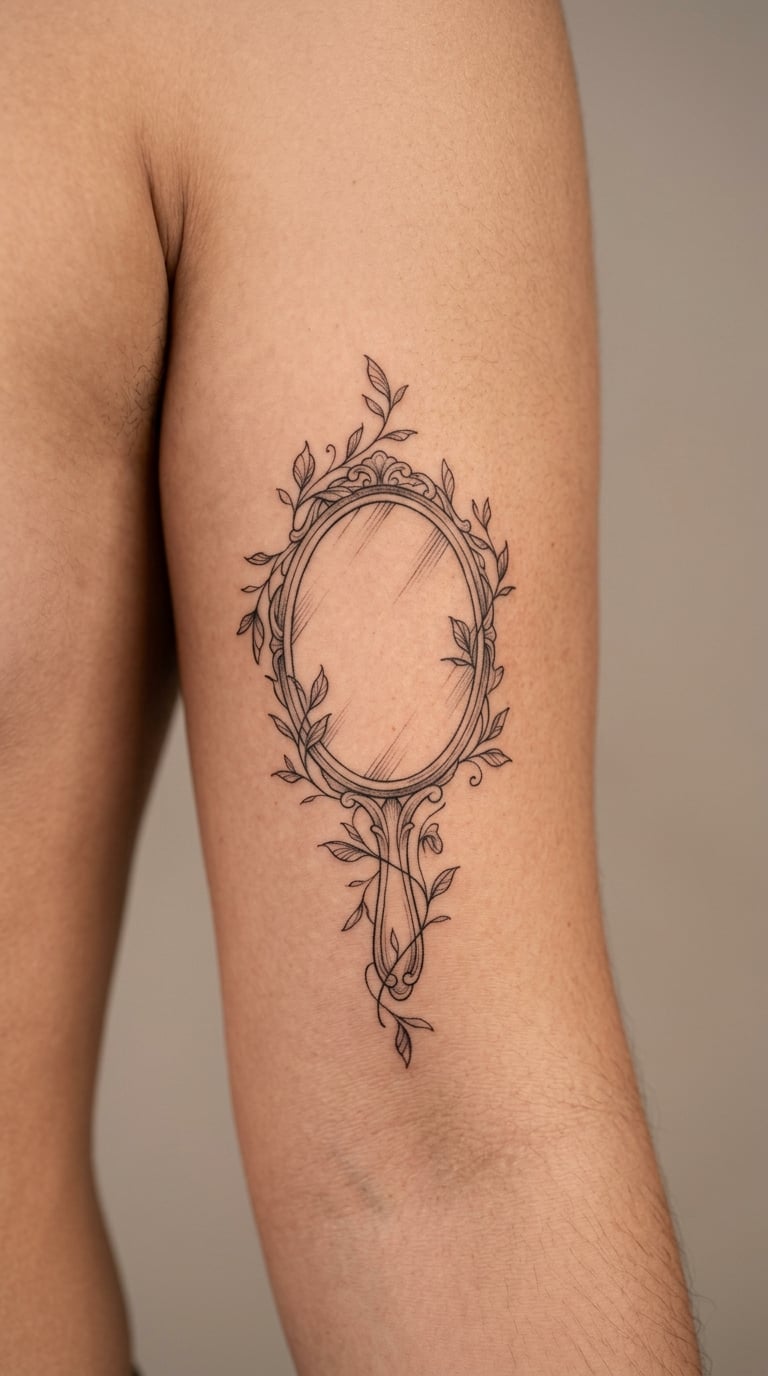
A hand mirror here is an oval frame with filigree at the top, held at an angle, with vines and small leaves curling out from the handle end. The reflective surface is left blank, which is what keeps it a line drawing rather than a heavy shaded object.
It sits in the same family as the vintage beauty illustrations that went popular a few years ago, and it works well as the anchor piece of a patchwork set.
Placement: inner upper arm, angled so the top of the mirror points toward the shoulder. Size: 4-6 in (10-15 cm). Style: ornamental linework. Pain: medium. The filigree takes time, so expect a session that runs past a single sitting for a design this size. Make it yours: have one small flower replacing a section of the frame so the ornament isn’t perfectly symmetrical.
14. Retro Flower Bouquet in Sixties Linework
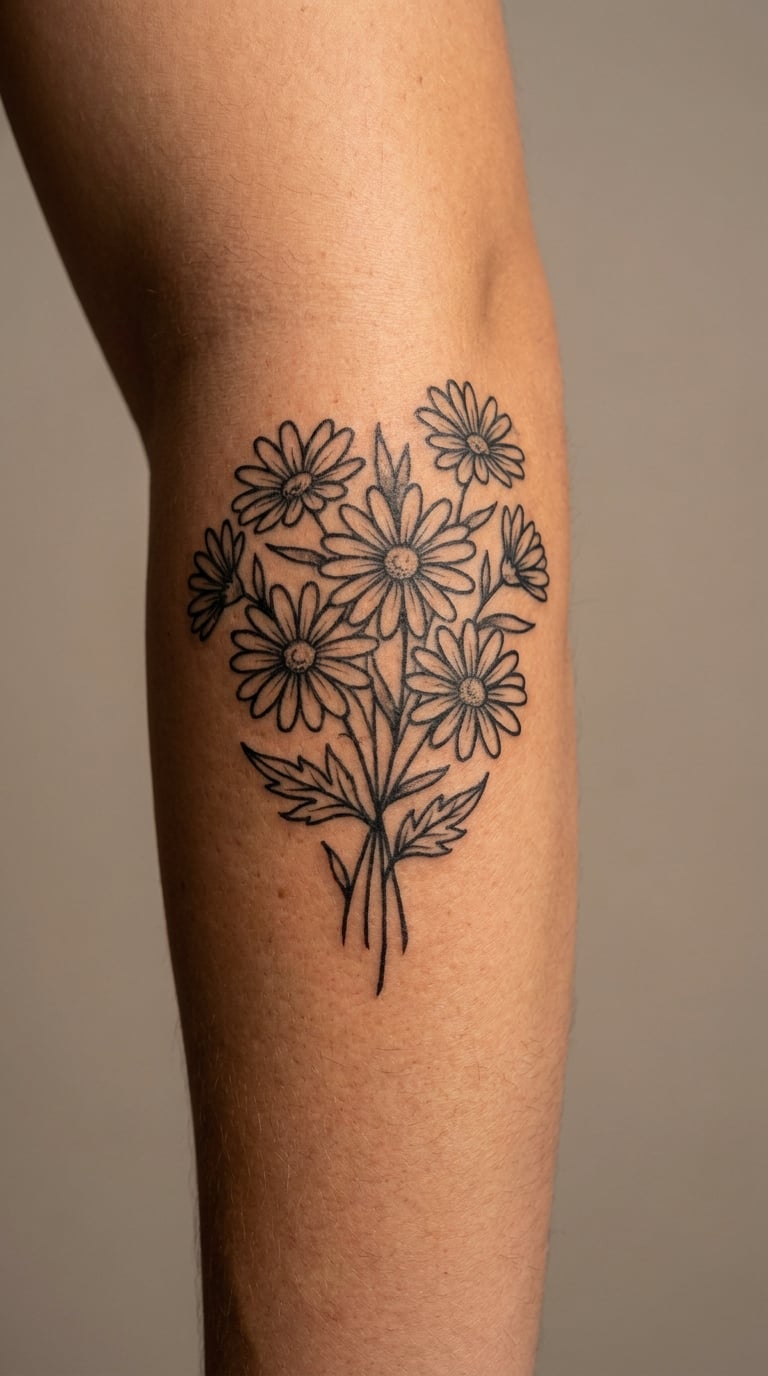
A retro bouquet uses thick, confident black outlines with flat fills of two or three colours, the way a mid-century fabric print would be drawn. Petals are simple shapes rather than shaded forms, and the whole thing leans slightly as if held.
It’s a bolder sister to the fine-line florals, and it holds its shape better because the outlines are heavy enough to survive softer skin.
Placement: inner bicep, with the bouquet tilted so the stems point down. Size: 3-4 in (8-10 cm). Style: retro linework with flat colour. Pain: medium to high, mostly from the elbow crease if the design sits near it. Bold outlines need fewer passes but each one sits deeper. Make it yours: pick a real bundle of flowers from a market and let your artist work from the photograph.
15. Traditional Anchor with Loose Rope
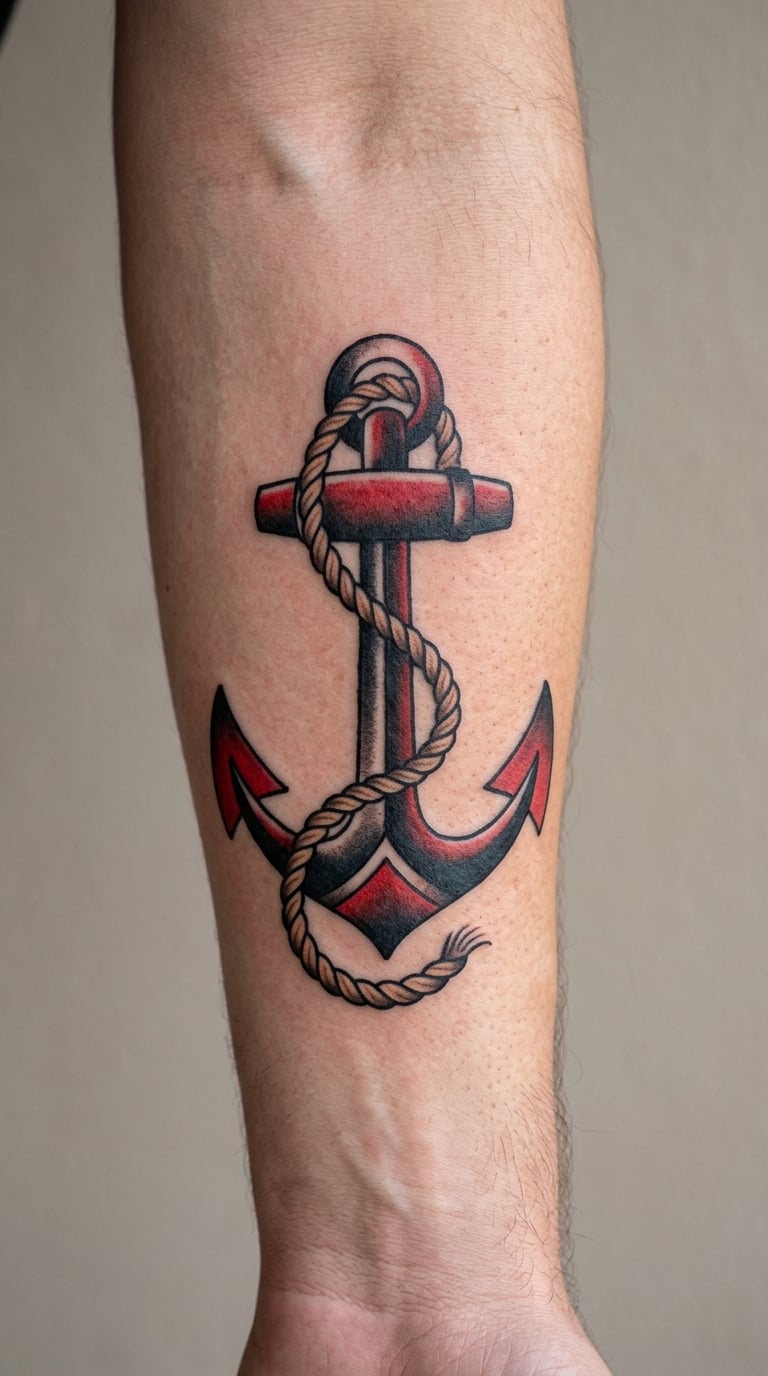
A traditional anchor is a black outline with red accents in the flukes, and the difference between a good one and a flat one is the rope. Loose rope with a little slack is what stops it looking like a clip art symbol.
Stability, holding on, the person or place you keep coming back to. It reads nautical to most people and personal to the person wearing it.
Placement: inner forearm, upright. Size: 2-3 in (5-8 cm). Style: traditional with red accents. Pain: medium. Traditional work with grey shading takes more passes than the size suggests, so plan for a two-sitting piece if it’s near the elbow. Make it yours: have the rope tied rather than hanging, or wrap it once around a small compass rose.
16. Serif Initial Wrapped by a Vine
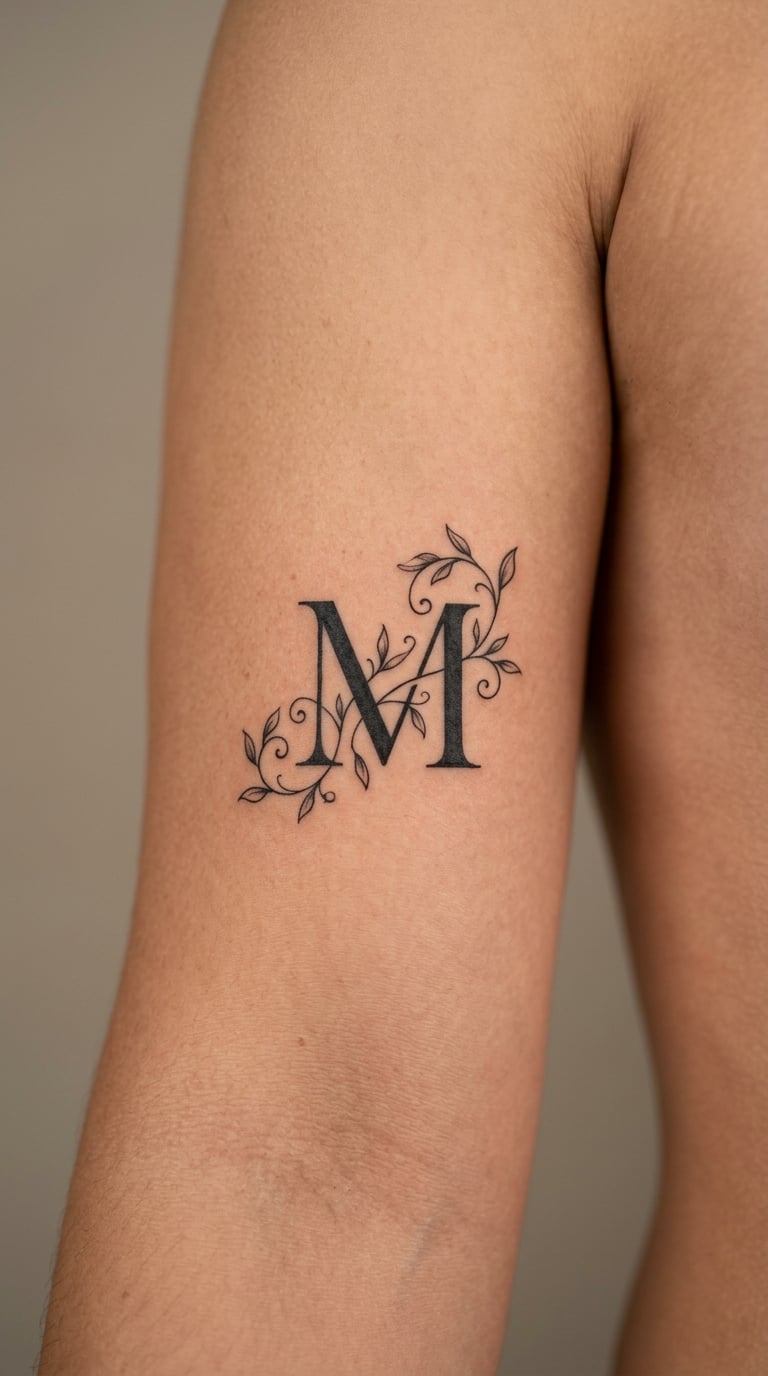
A serif initial is a single letter in a high-contrast typeface, tall and narrow, with a thin vine that loops around the stem and out into a small leaf. The contrast between the heavy serif and the hairline vine is the whole design.
It’s a discreet way to carry something with you, and the vine is what keeps it from looking like a typewriter key.
Placement: inner bicep. Size: 1.5-2 in (4-5 cm). Style: lettering with linework. Pain: medium. Hairline details on the inner arm soften first, so ask for a heavier vine weight than you think you need. Make it yours: use a letter from your own initials, or a letter that carries a family surname.
17. Jellyfish in Solid Blackwork
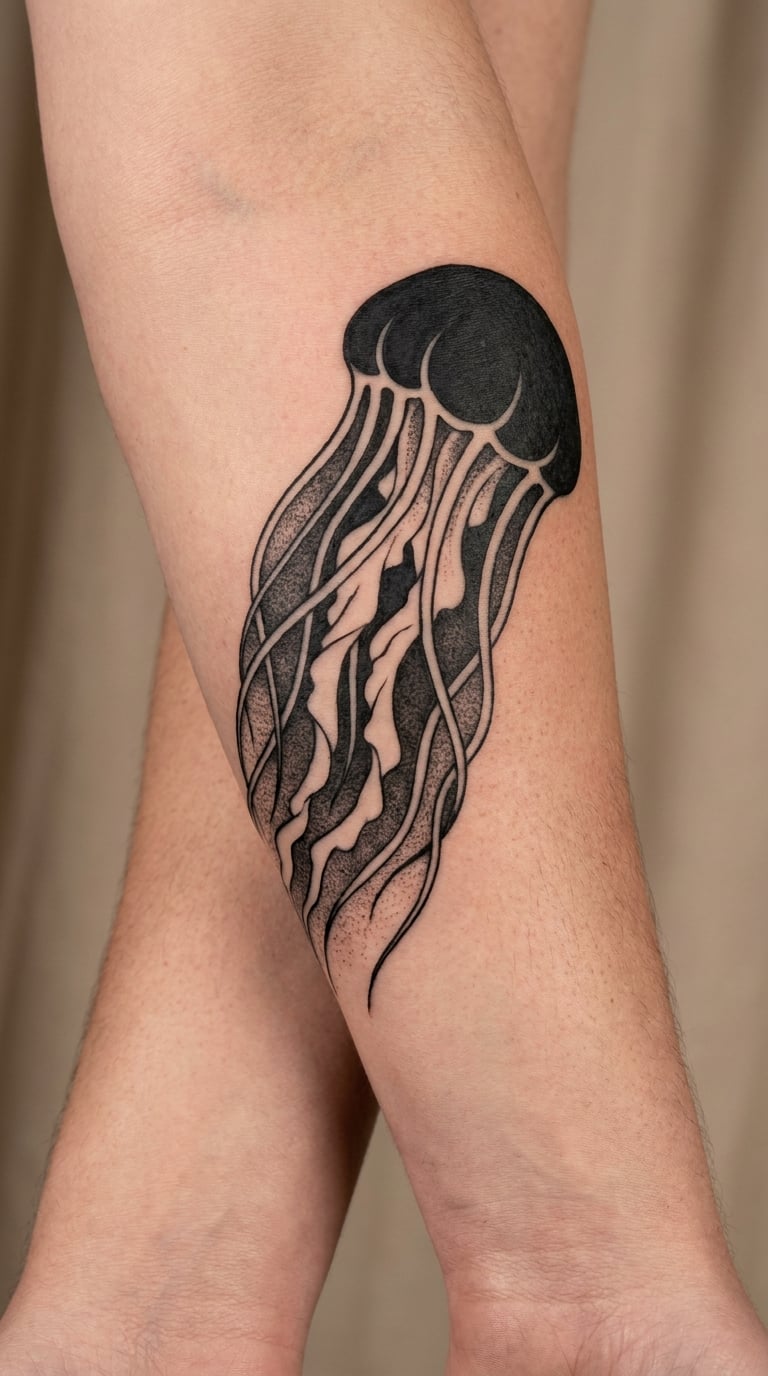
A blackwork jellyfish is a heavy filled bell with the tentacles left as negative space, so the shape is described by what’s missing rather than what’s drawn. A wash of grey inside the bell gives it depth and keeps it from looking like a solid blob.
It’s an organic shape that moves beautifully on a curved arm, and the tentacles follow the forearm line without needing to be symmetrical.
Placement: inner forearm, bell near the elbow, tentacles trailing toward the wrist. Size: 3-5 in (8-13 cm). Style: blackwork with grey wash. Pain: medium. Solid black areas need repeated passes and the inner forearm is sensitive, so a long single session can get rough. Make it yours: have the tentacles end at different lengths, tied to real hair lengths or birth dates.
18. Fern and Eucalyptus Patchwork Set
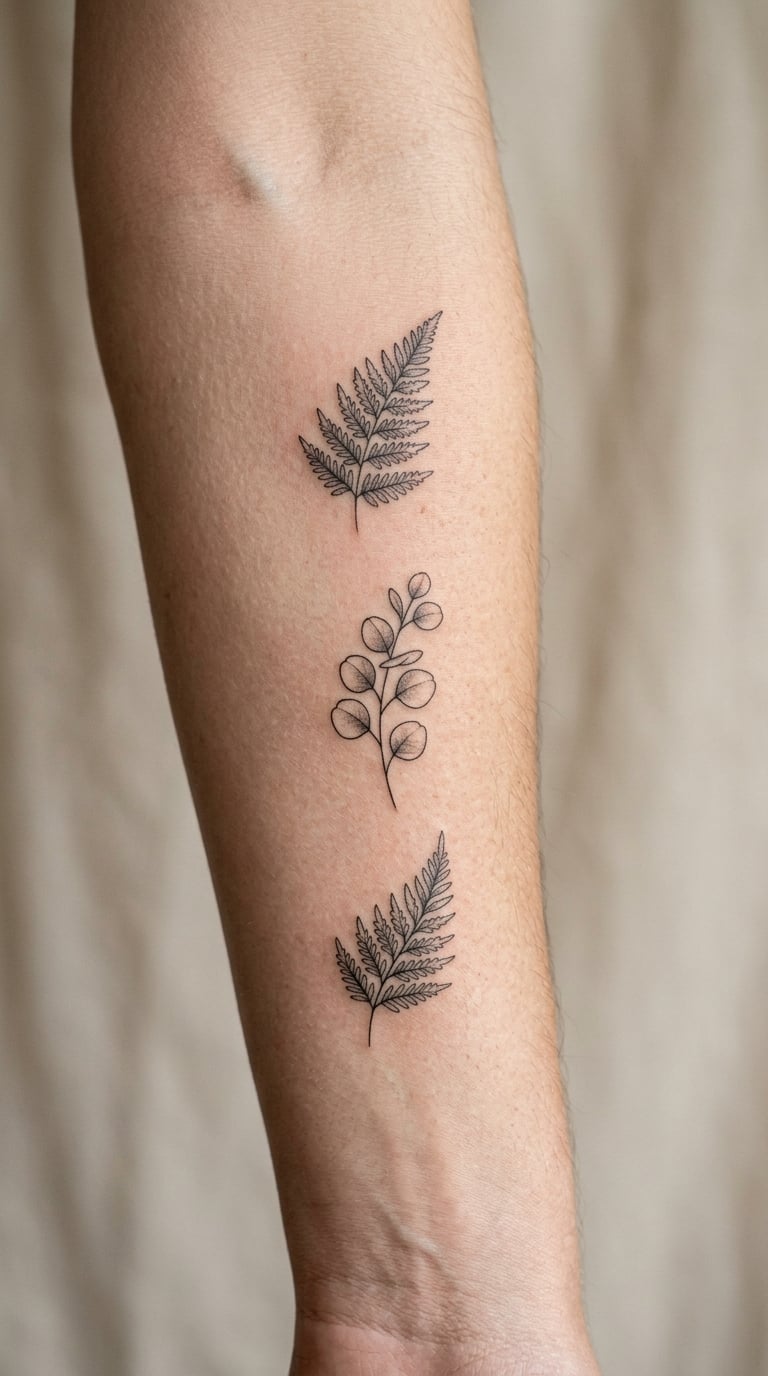
This is not one design but a set: a fern, a eucalyptus sprig and a small trailing stem, each roughly the same size, each intended to sit on the forearm with even gaps between them. Matching line weight across all three is what makes a patchwork set look planned rather than accidental.
Small botanical sets are the easiest way for someone to start collecting arm tattoos without ending up with awkward blank space later.
Placement: inner forearm, spaced along the length. Size: 2 in (5 cm) each. Style: fine line botanical. Pain: medium per session, and the advantage is three short appointments rather than one long one. Make it yours: have your artist draw all three from a single photograph so the shading matches.
19. A Date in Thin Script Near the Armpit
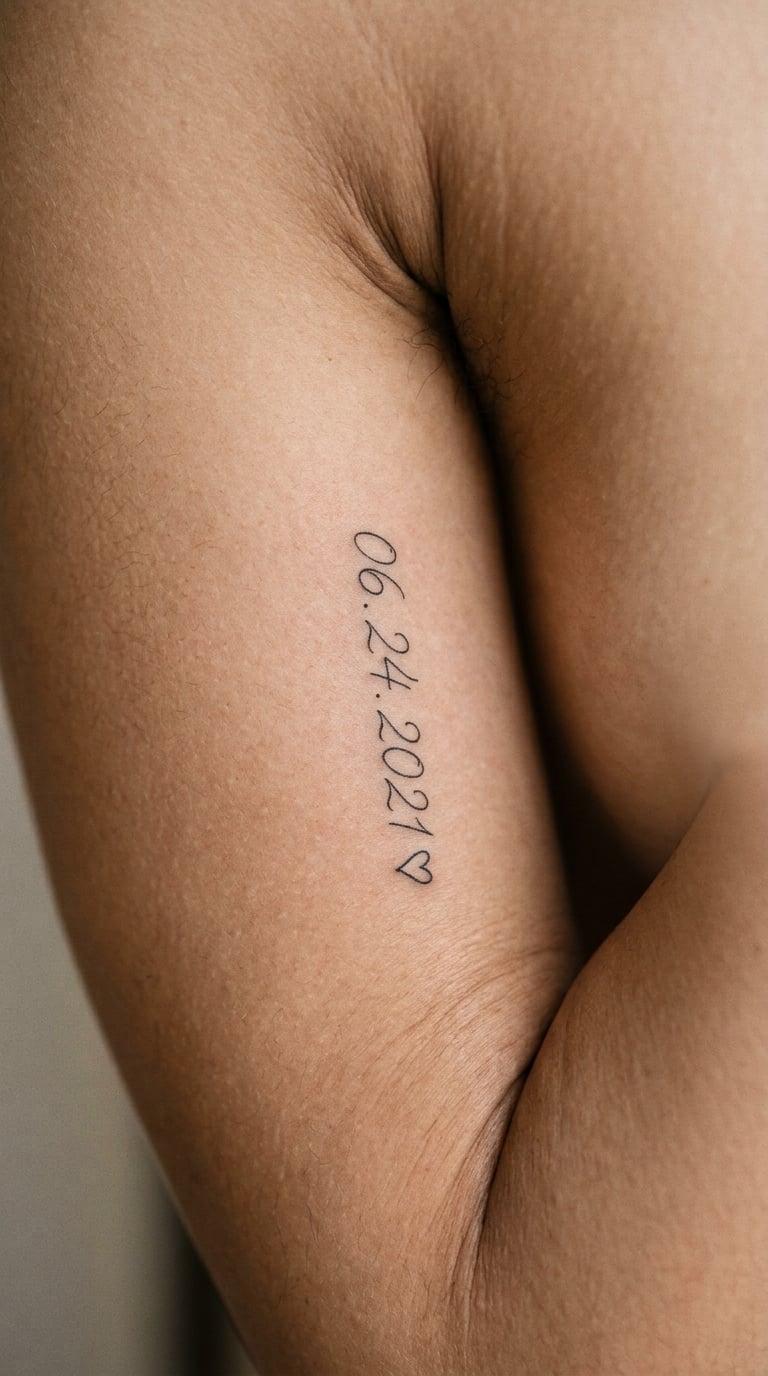
A date in script is the smallest lettering option here, often just four numbers and a year in a hand-written style with one small accent. Placing it high on the inner upper arm means it only appears when you reach overhead.
It’s a genuinely private piece. Most people who have one say almost nobody has ever seen it.
Placement: inner upper arm, above the bicep. Size: 1-2 in (3-5 cm). Style: fine line script. Pain: medium to high, and the skin near the armpit is sensitive and constantly in motion. Hair in that area also affects stencil placement, so plan for a patch. Make it yours: use handwriting from a card or letter rather than a typed font.
20. Hummingbird in Micro-Realism
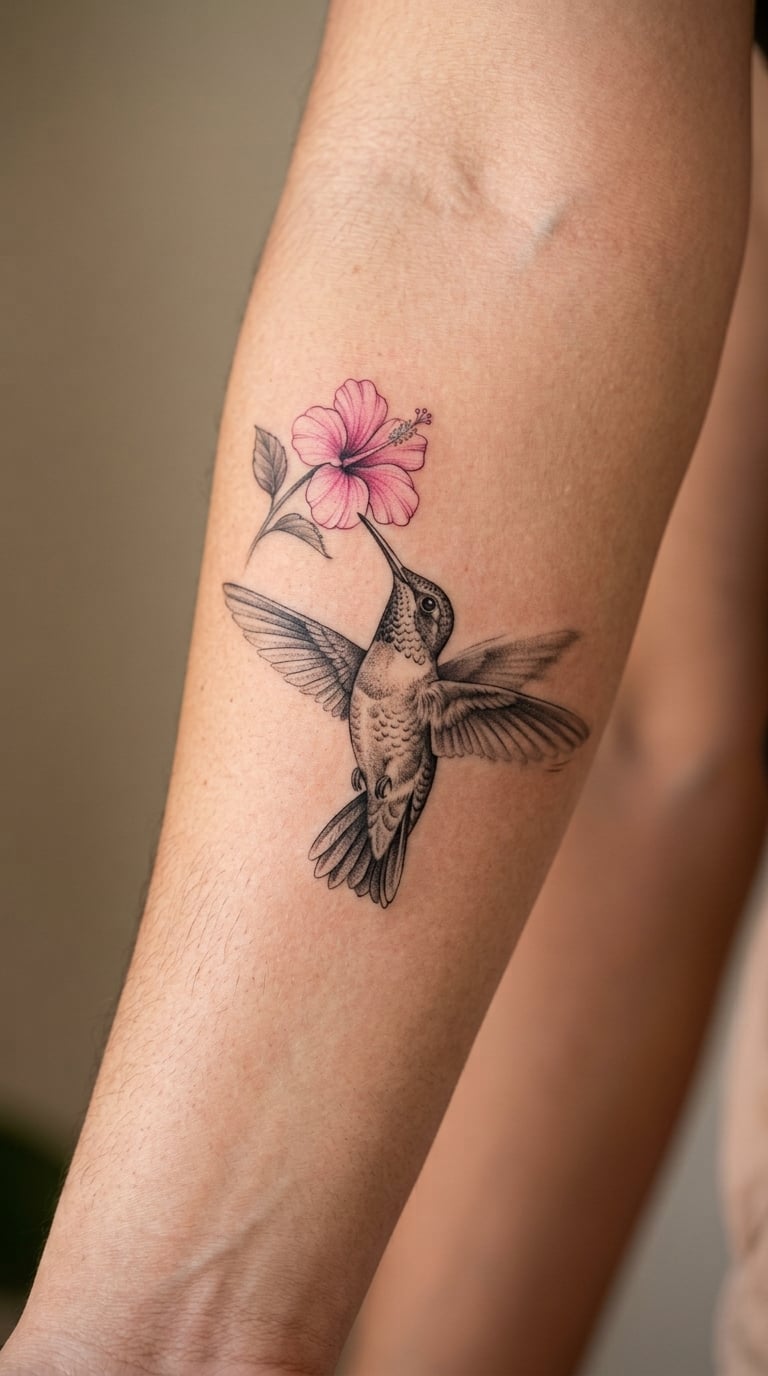
A micro-realism hummingbird is small, mostly black and grey, with one colour accent and a wing that’s shaded soft rather than outlined. The size is deliberately tight, so every feather has to be suggested with two or three lines rather than drawn fully.
It’s a good choice for a first realism piece because the small canvas limits the amount of detail that can go wrong, and the blur hides where a beginner’s work would otherwise look stiff.
Placement: inner forearm, where the bird can be angled along the arm rather than sitting flat. Size: 2-3 in (5-8 cm). Style: micro-realism. Pain: medium to high, since small realism work packs a lot of passes into a small area. The green in a hummingbird’s throat goes yellow-grey without sun protection. Make it yours: match the accent colour to a flower you want tattooed later in the same patch.
How to Choose Inner Arm Tattoo Ideas for Women That Fit
Most disappointing inner-arm tattoos aren’t bad designs. They’re good designs in the wrong patch of skin, drawn at a size the sub-placement can’t hold. Getting the sub-placement right first is the fastest way to a result you’ll still like in ten years.
Match the sub-placement to the size
| Sub-placement | Best for | Width available | Movement | Healing watch-outs |
|---|---|---|---|---|
| Inner bicep | Florals, patchwork, portrait pieces | 3-4 in (8-10 cm) | High | Bumpy or raised healing is common here |
| Bicep crease | Almost nothing, if you can avoid it | Very limited | Very high | Lines distort and blur fastest |
| Inner forearm | Script, linework, small realism | 2-3 in (5-8 cm) wide | Medium-high | Bone is close, fading from sun |
| Near wrist | Small symbols, single lines | 1.5-2 in (4-5 cm) | Constant | Fastest fade of any spot here |
| Upper inner arm | Ornamental, longer vertical designs | 4-6 in (10-15 cm) | Low | Hair, sensitivity near armpit |
Fine line, blackwork and ornamental styles compared
Fine line is the most requested style on this placement and the least forgiving. It needs a healed reference more than a fresh one, because the difference between good and weak fine line only shows up months later. Blackwork holds contrast better and forgives a slightly rough healed texture, which is why a bumpy inner bicep heal often ends up with a blackwork cover or a second piece planned over the top.
Ornamental linework sits between the two. It has enough structure to stay legible and enough thin detail to need careful placement. A single style does not rule out the others: a botanical set with a blackwork stem and fine-line leaves is a normal combination, and asking about it early gives the artist time to plan line weights that will actually match once healed.
What to tell your artist at the consult
Bring references and a placement in mind, then talk about the canvas rather than the drawing. The useful questions are short and specific: where exactly the design sits, how it will look in your arm’s natural position rather than flexed, what happens to it when you bend the elbow, and whether the line weight is realistic for that patch of skin.
Ask to see healed work from that same placement, not just fresh photos. And mention the one thing you can hide under a shirt, because it changes the answer entirely for someone who needs a first tattoo to stay invisible at work.
Building a patchwork collection without gaps
The gap problem is real and it’s the most common regret people describe. Arm tattoos were once evenly spaced small pieces that now sit in a line with dead skin between them.
The fix is to treat the inner arm as a sleeve from the start. Pick one piece large enough to anchor a zone, usually 3 in (8 cm) or more, and place the smaller ones around it with the anchor as the centre rather than the first piece. All three in the set idea above were designed at the same size and weight for exactly this reason.
Leave deliberate negative space. A gap you planned looks intentional, and a gap you forgot looks like a mistake.
Cost and Session Time
Tattoos are priced by the hour or by the piece, and both depend mostly on size, detail and how many times the needle has to go over the same skin. The inner arm is no cheaper than any other placement, and fine-line and realism work can run long because the detail is small and the skin is sensitive.
Session time by size
| Piece size | Typical appointment length | Sessions likely |
|---|---|---|
| Under 2 in (5 cm), single line or symbol | Under an hour | 1 |
| 2-3 in (5-8 cm), fine line or small script | 1-2 hours | 1 |
| 3-5 in (8-13 cm), botanicals or colour | 2-4 hours | 1-2 |
| 5 in (13 cm) and up, blackwork or realism | 3-5 hours | 2-3 |
What sets the fee
Shop minimums, hourly rates and artist experience move the number far more than the motif does, and prices vary by city and by artist. A flash sheet from a shop in a high-rent city and a shop a few hours away will not land in the same range for the same drawing.
Before you book, ask what the hourly rate is, whether the design needs a custom drawing fee, and what the shop minimum is. If your design needs a custom drawing fee, expect that back when you pick it up, and it belongs in your planning from the start rather than as a surprise at the counter.
Take the stencil placement seriously too. A design that fits on paper but not on the curve of your inner forearm is the most common reason an artist asks you to change your mind, and it happens before the first line is ever placed.
Aftercare Basics
Start with your artist’s aftercare instructions, because they know what they did in the session. Beyond that, the inner arm has a few specific things to watch.
- Movement is the main variable. The inner bicep and forearm flex constantly, which is the reason those placements are the most likely to heal raised or bumpy. Follow whatever guidance you were given on daily activity and stretching while the surface settles.
- Keep loose sleeves off it. A shirt cuff or a tight knit rubbing the same strip of inner forearm every day is the quietest cause of a patchy heal. If your clothing catches the area, hold off on that garment for a couple of weeks if you can.
- Sun protection matters more here than anywhere else. The inner arm is exposed whenever you wear a short or sleeveless top. Keep it covered or use sunscreen on it while the ink is still settling, especially with pale colour like the cherry blossom pink.
- Wash it, don’t soak it. Clean gently, pat dry, and avoid soaking the new tattoo in water in the first weeks.
- Expect lumps in the first fortnight. A slightly raised and flaky surface is normal in the early days. It usually settles on its own, and picking or scratching at it is what turns a normal heal into a problem.
- Judge the result late. The surface settles in about two to three weeks, and the whole tattoo continues to settle for two to three months. A tattoo that looks slightly different after a few days is usually fine.
Frequently Asked Questions
Do inner arm tattoos hurt more than tattoos elsewhere?
Usually yes. The inner arm is thin-skinned, close to bone in places, and constantly flexing, so most people rate it higher on the pain scale than an outer arm or thigh. Within the inner arm the ranking goes inner wrist and bicep crease first, then the bicep itself, then the mid forearm. Expect to feel every pass, especially on shading.
Is the inner bicep the most painful place to get a tattoo?
The bicep crease is usually the most sensitive spot on the inner arm, not the belly of the bicep itself. It is thin, moves constantly and the skin there stretches as the arm bends. A design that sits just above the crease avoids most of that. Pieces that cross the crease are the ones most likely to heal raised, because the lines stretch with the joint every time you bend it.
What is the best tattoo for the inner forearm?
Linework, small script and micro-realism suit the inner forearm better than solid blocks. The area gives you a long narrow canvas, roughly two to three inches wide, and it flatters designs that run along the arm rather than sit across it. A botanical branch, a curved name or a small hummingbird all read well there. Large solid blackwork on that surface tends to look heavy.
Do inner arm tattoos heal bumpy?
They can, and the inner bicep and forearm are the placements where it happens most often. Constant movement and skin tension in those spots are the usual cause, not the aftercare product. Patches of raised texture that persist past a few weeks are worth showing to your artist, who can tell you whether it needs laser or just time. A fully settled tattoo usually takes two to three months.
What size should a first inner arm tattoo be?
For a first piece, two to three inches, or 5-8 cm, is the sweet spot. It is small enough for one short appointment and easy to hide, but large enough that the design has room to breathe. Anything smaller than an inch of fine detail on the inner arm tends to blur within a few years. Ask your artist what the placement can actually hold before you commit to a size.
How long does an inner arm tattoo take to heal?
The surface usually settles in two to three weeks, when the flaking and redness are gone. The full heal takes longer, around two to three months, because ink under the skin keeps settling and fine line keeps sharpening. Keep it covered or protected from sun during that period, and avoid garments that rub the inner bicep.
Where to Start With Your Inner Arm Tattoo
If this is your first tattoo, start with idea 11, the fine-line mountain range. It is one line of work, it takes under an hour, and there is no shading to overwork a sensitive area. If you want something with a little more drawing in it, idea 1, the wildflower sprig, is the same idea with a bit more of a composition, and it sits in a part of the arm that heals more predictably than the crease.
If you already have a few small tattoos and you’re thinking about the inner arm as a home for more, work from idea 18 or idea 9 instead. Both are designed to sit in a set with deliberate gaps and a shared line weight, which is the difference between a collection that looks planned and one that leaves you with blank skin you don’t know what to do with.