
20 Best Side Foot Tattoo Ideas for Sandal Season (September 2026)
A side of the foot tattoo sits along the outer edge or the inner arch, running from the little toe down toward the heel. That strip is long, narrow and curved, which is why script, trailing vines and single-line botanical pieces fit it so well and why a dense block of black usually does not. The skin here is thin, the movement never stops, and socks rub against it all day, so these are among the placements that need the most thought before you book.
These 20 side foot tattoo ideas are grouped so you can see what actually works on that canvas. Each one lists the best placement, a realistic size, the style it suits, what it feels like, and one way to make it yours. I have watched a lot of foot work heal in person, and the same pattern keeps repeating: the designs people are happiest with years later are the ones an artist scaled for the shape of the foot rather than the shape of the reference photo.
If you are booking around sandal season, plan a few weeks ahead. Most of these are small, quiet pieces that read best in summer and hide completely in boots the rest of the year, so there is no reason to rush the healing window.
Quick Guide: All 20 Ideas at a Glance
| Idea | Style | Best placement | Size | Pain |
|---|---|---|---|---|
| Vertical script quote | Script | Outer edge, toe to mid-foot | 2-3 inch tall | 4-5 |
| Cherry blossom branch | Traditional soft | Inner arch | 4-5 inch trail | 5-6 |
| Eucalyptus sprig | Single-line | Inner arch | 3-4 inch | 4 |
| Birth flower stem | Botanical fine line | Outer edge | 2-3 inch | 4 |
| Moon phases | Fine line | Above ankle bone | 2 inch | 5 |
| Compass rose | Minimal line | Outer ankle | 1.5 inch | 5 |
| Half mandala | Geometric | Mid-foot outer edge | 3 inch | 6 |
| Breaking wave | Blackwork | Outer edge | 3-4 inch | 5 |
| Sun and moon | Fine line | Inner arch | 2.5 inch | 4 |
| Wrapped chain | Illusion line | Above ankle | Full ankle | 6 |
| Coordinates and date | Fine numerals | Outer edge | 2 inch | 5 |
| Butterfly wings | Micro-realism | Inner arch | 3 inch | 5 |
| Mountain range | Micro-realism | Outer edge | 2.5 inch | 5 |
| Single feather | Fine line | Inner arch | 3 inch | 4 |
| Lotus outline | Minimal outline | Mid-foot | 2.5 inch | 5 |
| Holly branch | Traditional soft | Outer edge | 3 inch | 5 |
| Koi with red fin | Fine line with colour | Inner arch | 3.5 inch | 5 |
| Constellation | Dotwork | Outer edge | 2 inch | 4 |
| Red poppy | Single-colour ink | Outer edge | 2 inch | 5 |
| Serpent | Blackwork outline | Inner arch | 4 inch | 6 |
Pain numbers above are a 1 to 10 scale, with 1 as barely noticeable. Read the placement column before anything else, because a 5 on the mid-foot and a 5 just above the ankle bone feel nothing alike.
Popular Side Foot Tattoo Ideas by Style
1. Vertical Script Quote Down the Outer Edge
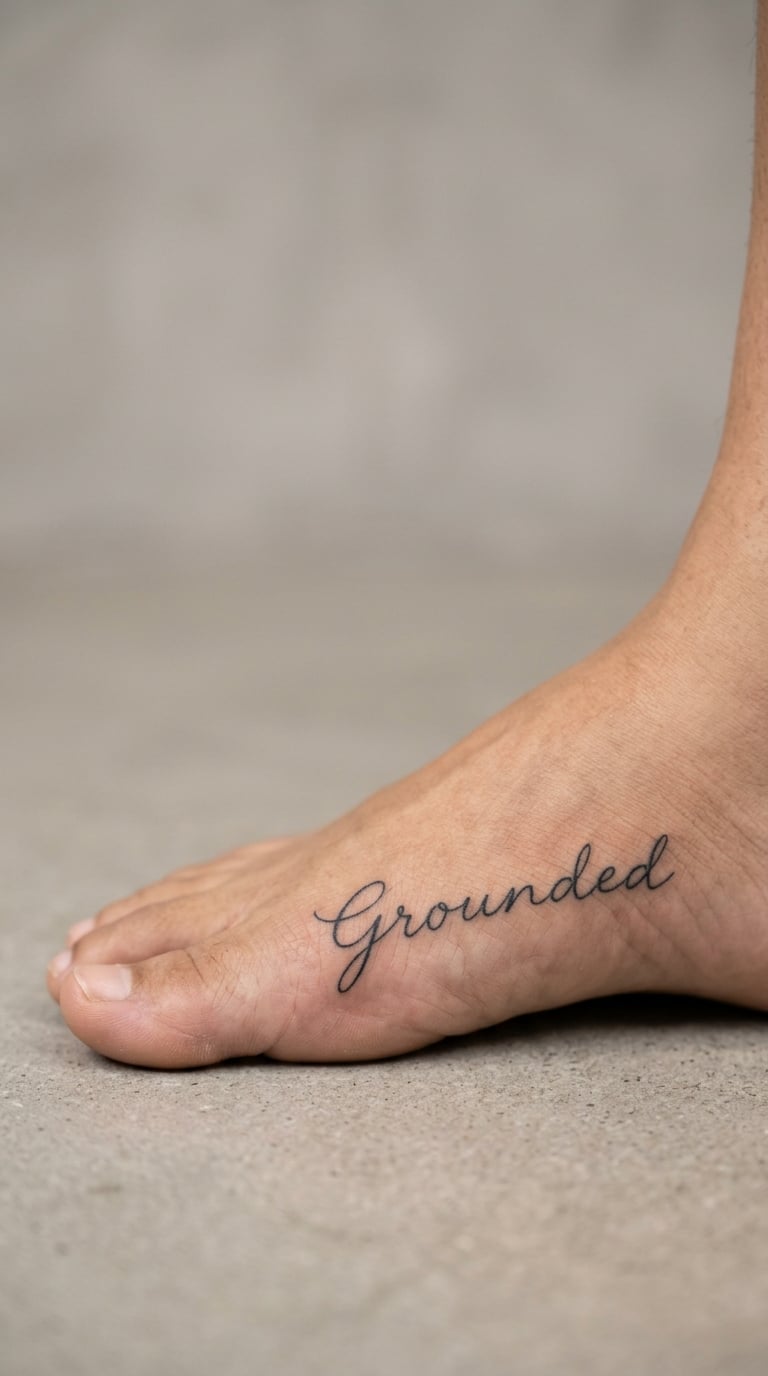
Script runs vertically down the outer edge, the letters rotated so they read with the foot rather than across it. A short phrase, three or four words, is the whole piece. The artist keeps the line thin but not hair-thin, around a millimetre, so it survives five years of sock friction instead of blurring in eight months.
People choose it for something someone said, or a date, or a word that has carried weight for them. A vertical script foot tattoo is one of the most personal designs on this canvas because almost nobody else can see it.
Placement: outer edge from the base of the little toe to the mid-foot, sitting in the flat strip of skin beside the metatarsals. Size: 2-3 inch tall by 1 inch wide. Style: fine-line script.
Pain: 4-5. It gets sharper where the needle crosses the bony ridge near the ankle. Fine line on the outer edge fades faster than anywhere else on the body, so expect a touch-up on the letters every couple of years.
Make it yours: put the words slightly above the arch, where the skin is flatter, rather than right at the ankle bone where movement pulls the line open as it heals.
2. Trailing Cherry Blossom Branch on the Inner Arch
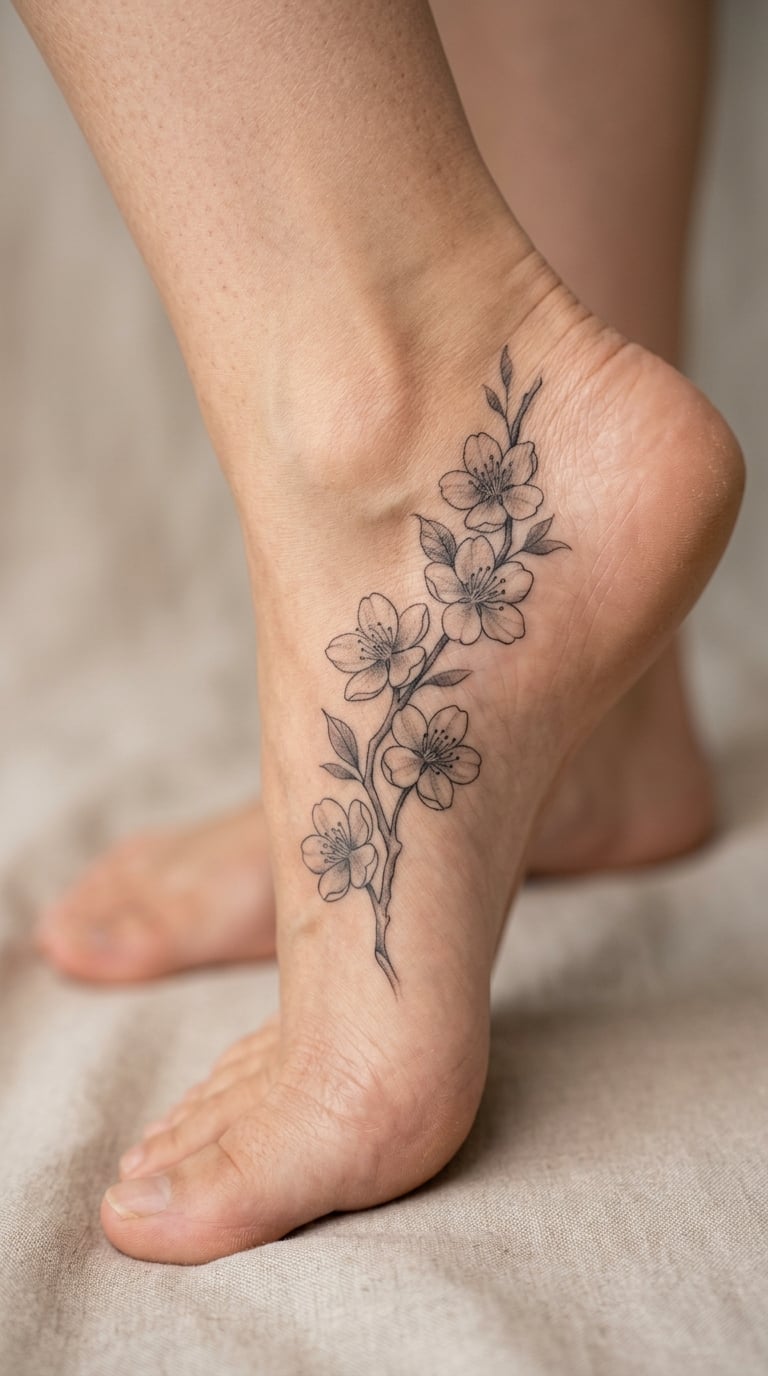
One branch of cherry blossom starts near the heel and travels up the inner arch, five or six blossoms opening as it goes, with small buds filling the gaps. Shading is soft grey wash rather than hard black, which keeps the piece light on skin that is already thin.
Blossom on a foot usually means renewal, the short-lived nature of good years, or a specific person who came and went. What it means is yours to set, and most people explain it themselves rather than repeat a stock definition.
Placement: inner arch, following the curve from just above the heel to the base of the big toe. Size: 4-5 inch trail, 1.5 inch at its widest. Style: soft traditional with grey wash.
Pain: 5-6, the top of the range for this placement. The inner arch is nerve-dense and the skin moves constantly. Petal edges are the first thing to soften, so keep blossoms slightly larger than the reference photo suggests.
Make it yours: add one loose petal below the lowest flower so the branch reads as falling rather than climbing.
3. Eucalyptus Sprig in One Continuous Line
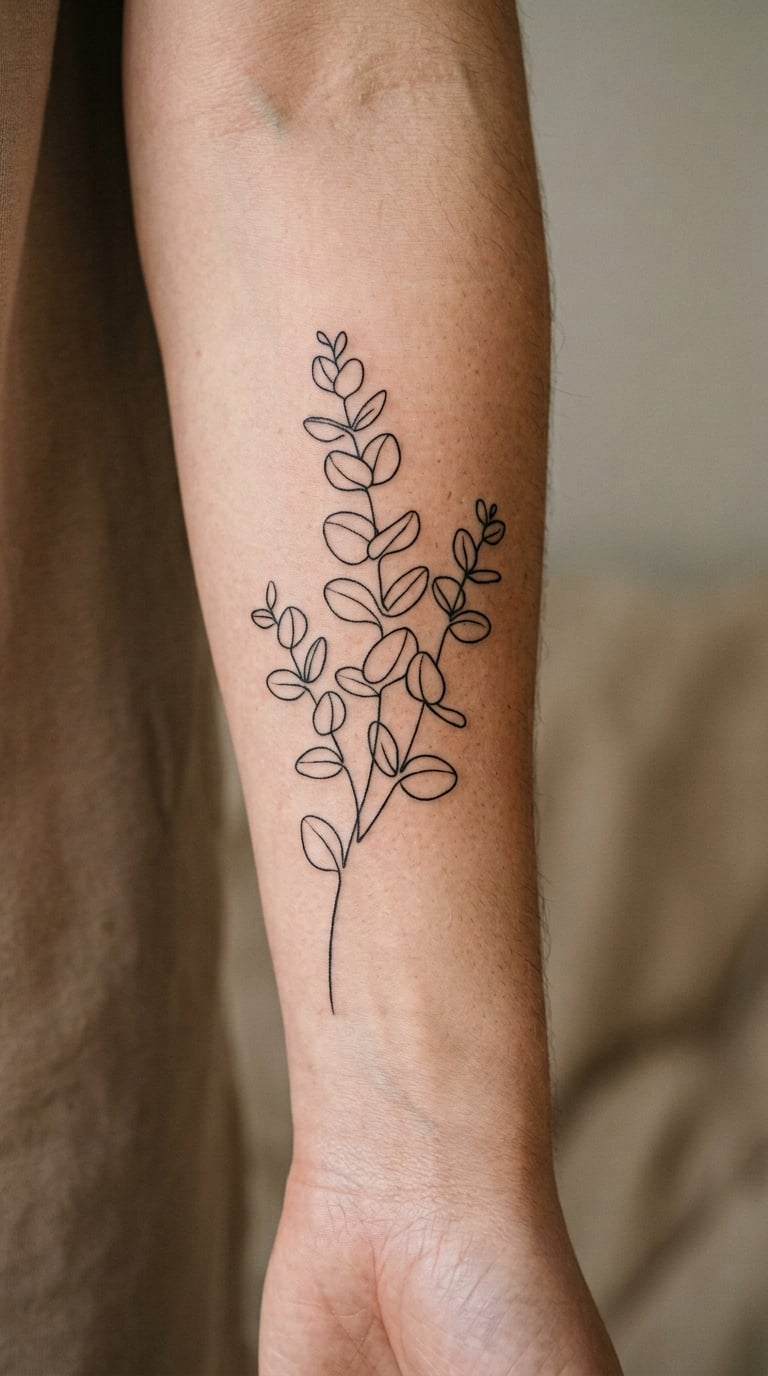
A eucalyptus sprig is the simplest good idea on this list. Round leaves alternate up a single unbroken line, each one the same weight, no shading, no background. The whole thing is the width of a pencil line, which is exactly what a narrow canvas wants.
It reads as something that keeps going quietly, which is why it turns up on people who describe themselves as patient. It also photographs well healed, which is not true of every fine-line piece.
Placement: inner arch, centred along the curve. Size: 3-4 inch long, half an inch wide. Style: single-line art.
Pain: 4. This one goes on quickly, often inside 30 minutes, which keeps the skin irritation short. Eucalyptus line work softens noticeably in year three, so a touch-up is close to routine.
Make it yours: change the leaf count to match the number of people or years that matter, and have the artist angle the line to follow your actual arch.
4. Birth Flower Stem With a Small Date
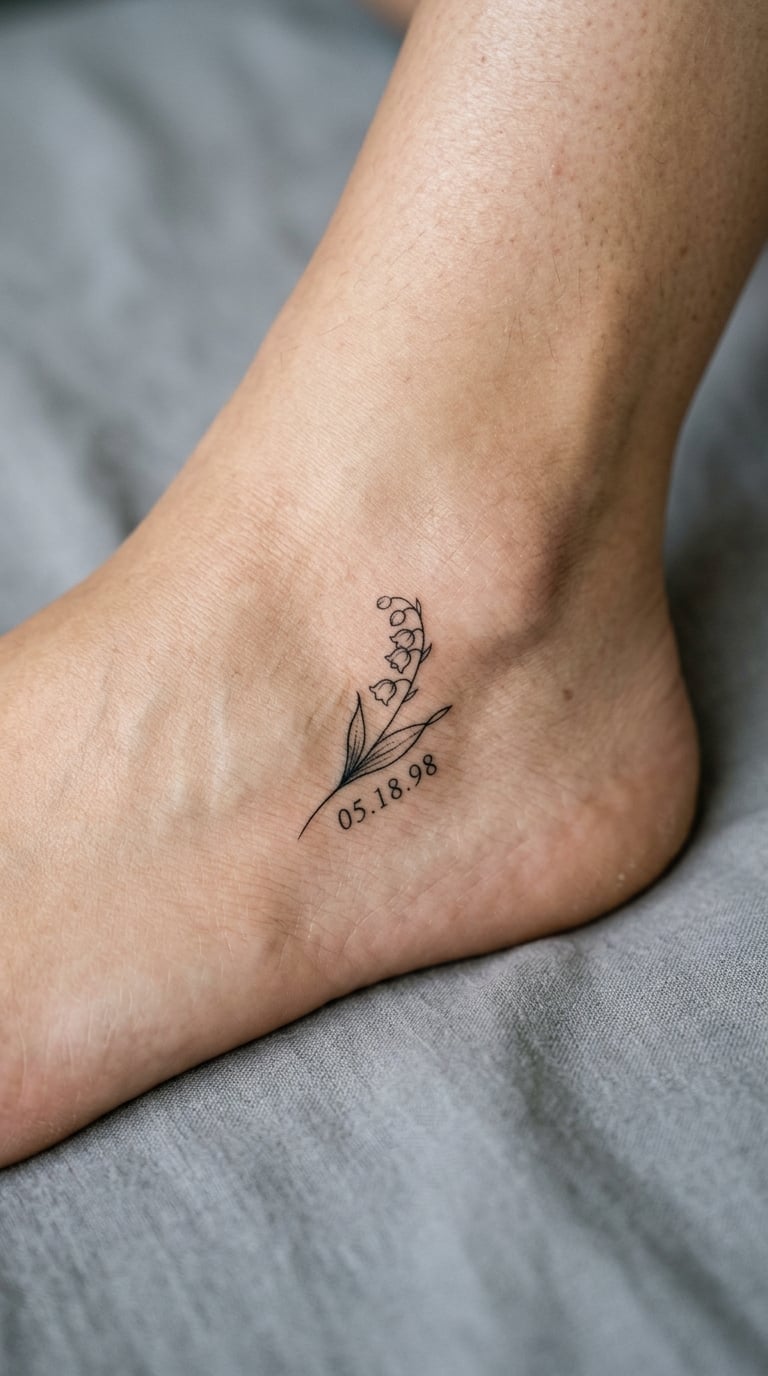
One flower, one stem, two leaves, and a small date under the bloom. Birth flower tattoos are popular here because the shape is naturally vertical and naturally small, so the design does not fight the surface.
Each birth flower carries a traditional association, from loyalty for the rose to renewal for the lotus, and people usually pick the month they were born without overthinking it. Adding the birth year underneath turns a small idea into the only piece of that plant on that foot.
Placement: outer edge, mid-foot to just above the arch. Size: 2-3 inch, bloom about half an inch across. Style: fine-line botanical.
Pain: 4, low enough that most people talk through it. The date in small numerals is the fiddly part, so agree the height of those numbers before the stencil goes on.
Make it yours: have the stem curve away from the arch so it frames the foot instead of following it, which makes the piece look deliberate at any angle.
5. Moon Phases in Fine Line Above the Ankle
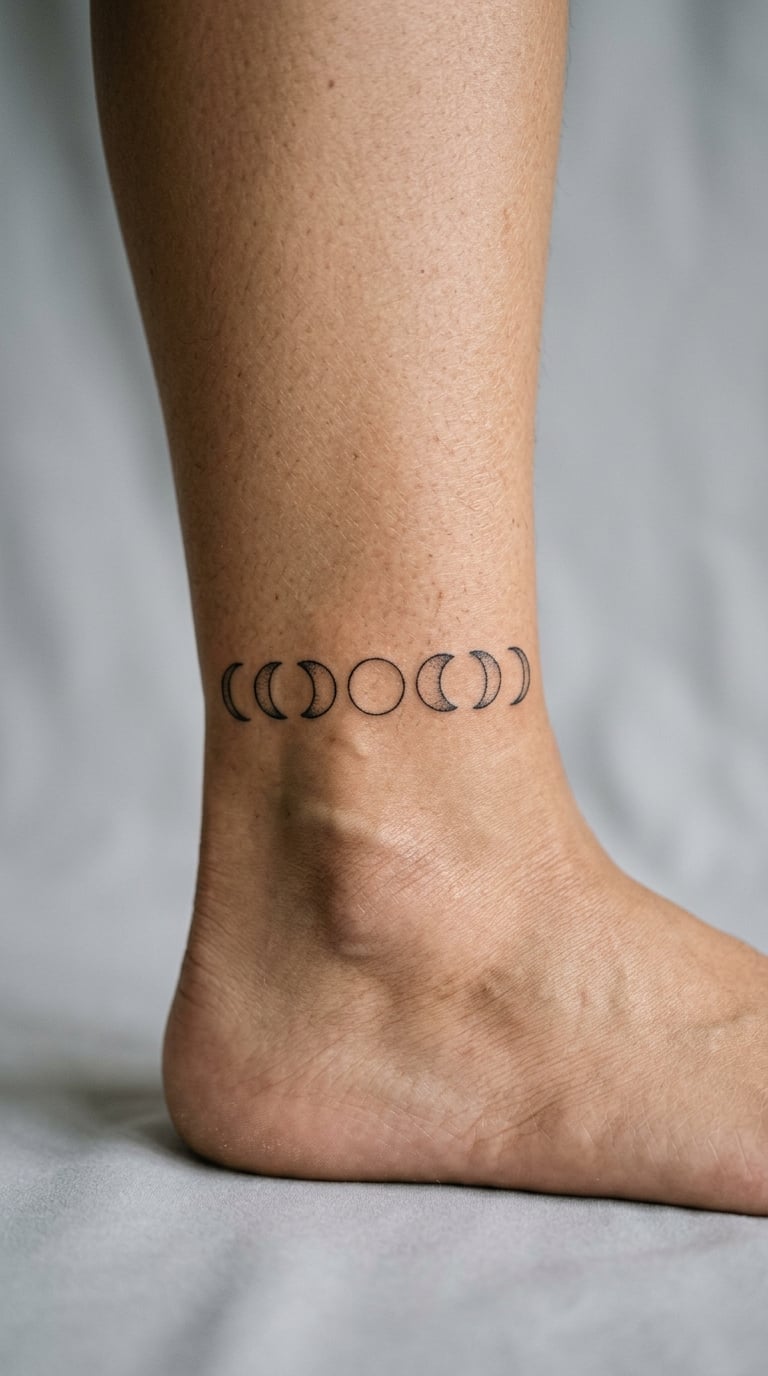
Seven phases in a row, each a circle of a different size, drawn as outline crescents rather than solid black discs. Slight variance in circle size makes it look drawn by hand rather than stamped, and that is the point.
Phases show a full cycle, so people read them as a life passed through, an intention to see it through, or a specific transition they wanted marked.
Placement: inner side just above the ankle bone, where there is a flat band of skin. Size: 2 inch wide, each moon a third of an inch. Style: fine line.
Pain: 5 near the ankle bone, because there is almost no soft tissue over the bone there. Socks sit right on top of the finished piece, so keep the row tight to the bone rather than spreading it into the arch.
Make it yours: start the row at the phase you were born under and run it forward, so the piece is a small personal record rather than a generic moon set.
6. Tiny Compass Rose Just Above the Ankle Bone
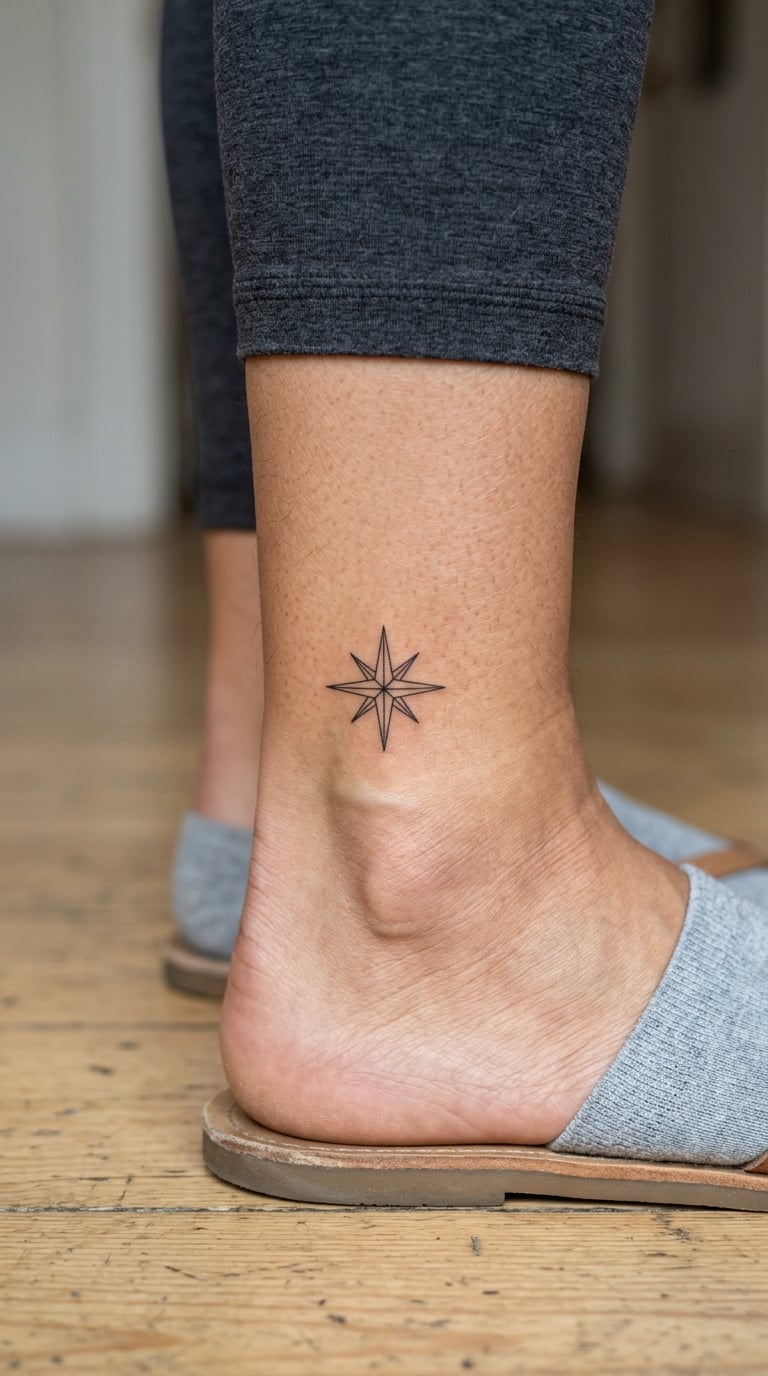
A compass rose here is four or eight points, one needle-width line each, sometimes with an N tucked at the top. Scale is the whole design decision: a compass that looks right on paper becomes a smudge at full size on a foot.
Direction and travel are the usual readings, and plenty of people use it to mark a place that mattered or a move they are still proud of.
Placement: outer ankle, just behind and below the ankle bone. Size: 1.5 inch across. Style: minimal line work.
Pain: 5. Small and precise means the needle spends longer in one area, and the bone is close. Expect it to blur more than the rest of your collection if you are the kind of person who wears boots daily.
Make it yours: skip the letter N and put a real coordinate or town name at the base instead.
7. Half Mandala Curved Across the Mid-Foot
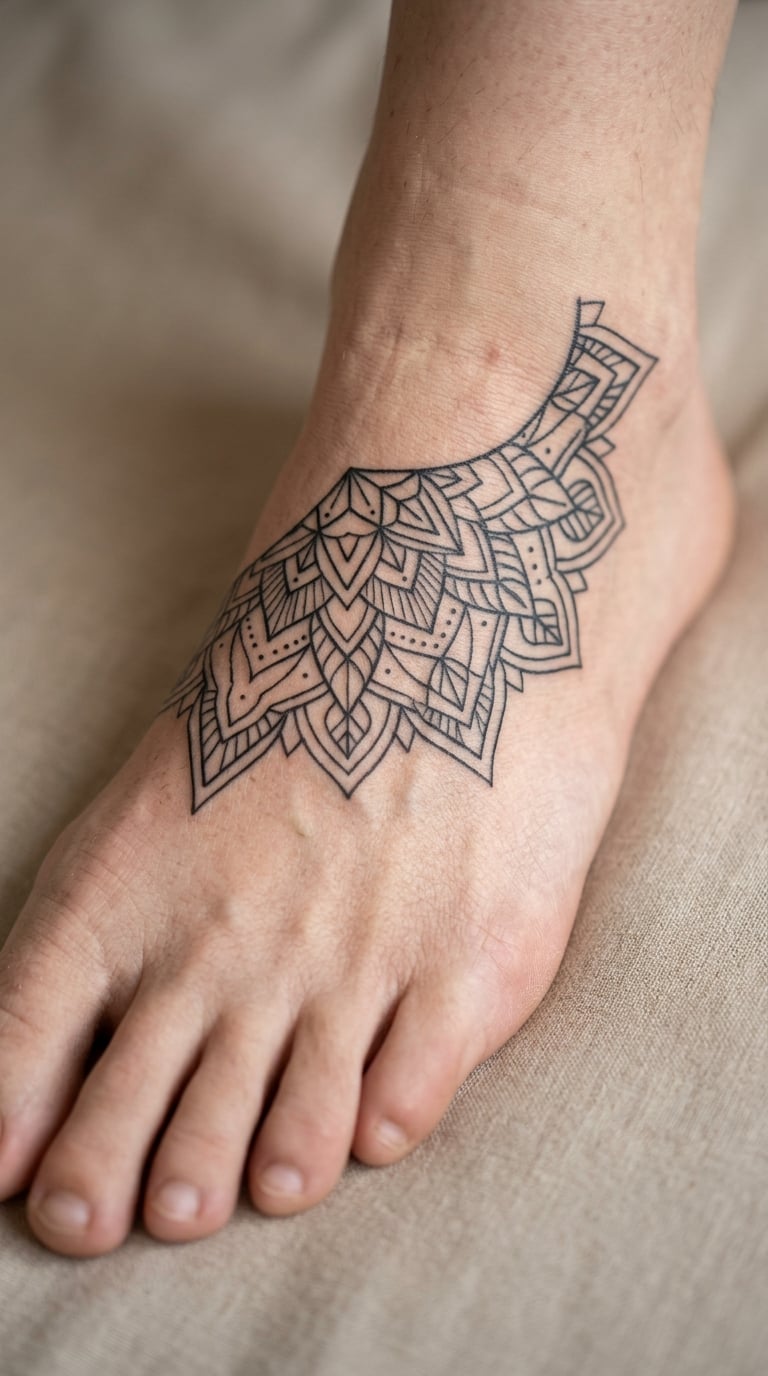
Half a mandala sits on the mid-foot, cut so the straight edge runs along the foot and the patterned half arcs upward. Fine line and dot detail keeps it from turning into a solid block on a curved surface.
Mandala work usually reads as balance, wholeness or something completing, and a half version quietly plays on that. It also works as a matching pair split between the two feet.
Placement: outer mid-foot, spanning from the arch toward the top of the foot. Size: 3 inch across the straight edge. Style: geometric fine line.
Pain: 6, the higher end. Large filled-in areas here bruise visibly and stay tender for days. If you want this design, keep the interior open and let the skin breathe between passes.
Make it yours: mirror it on the other foot, slightly smaller, so the two pieces read as a pair rather than a duplicate.
8. Breaking Wave in Bold Blackwork
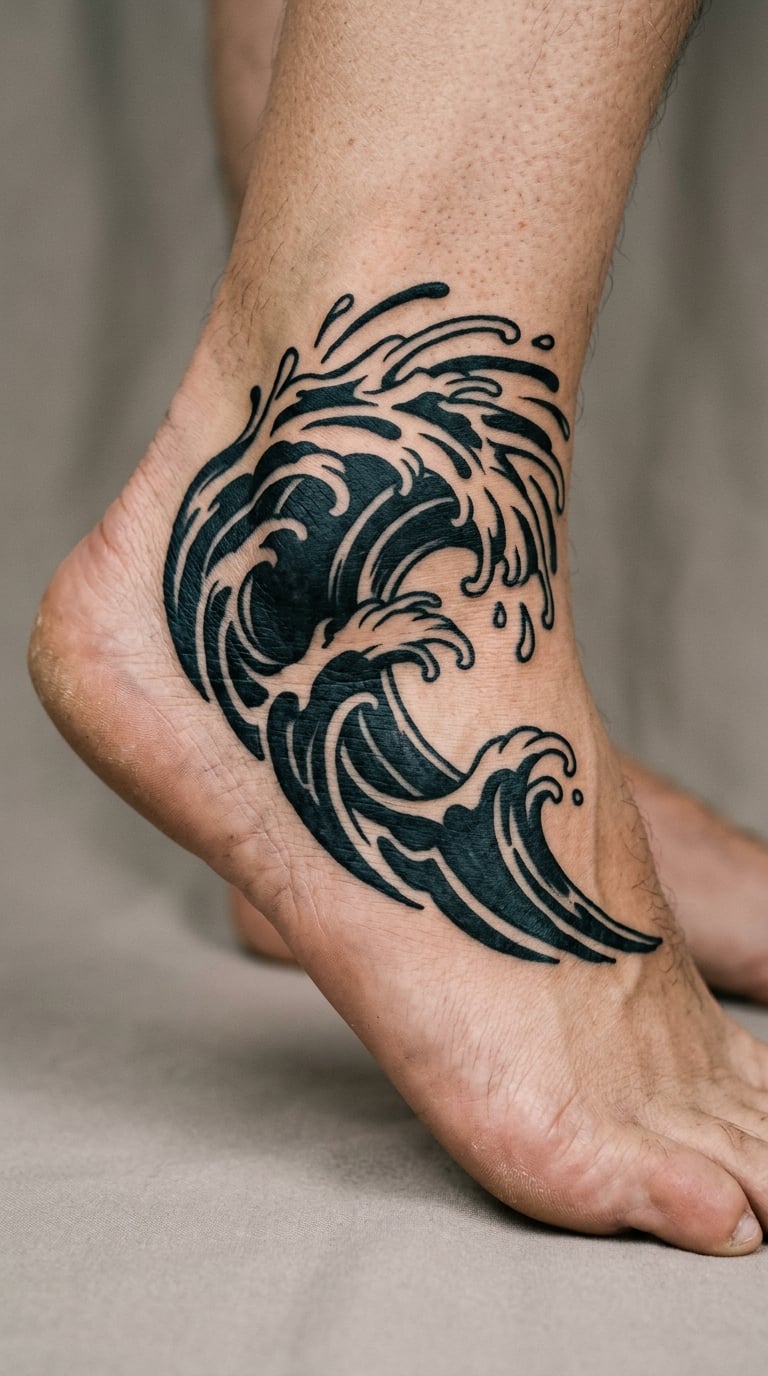
A single wave with a curling crest, done in solid black with sharp spray lines and foam left as white skin. Blackwork works on this canvas precisely because the contrast carries the design when fine detail would not.
Water suits this placement. The curve of the arch already suggests movement, and people tend to choose wave work for a sense of momentum or for a place they surf, dive or grew up near the sea.
Placement: outer edge, centred between the arch and the ankle. Size: 3-4 inch long, 1.5 inch tall. Style: bold blackwork.
Pain: 5, and the solid black passes sting more than the outline work. This is the one design on the list that holds its shape best through years of shoe contact.
Make it yours: have the foam break toward the heel rather than the toes, following the direction the foot naturally points.
9. Sun and Moon Joined by a Hairline
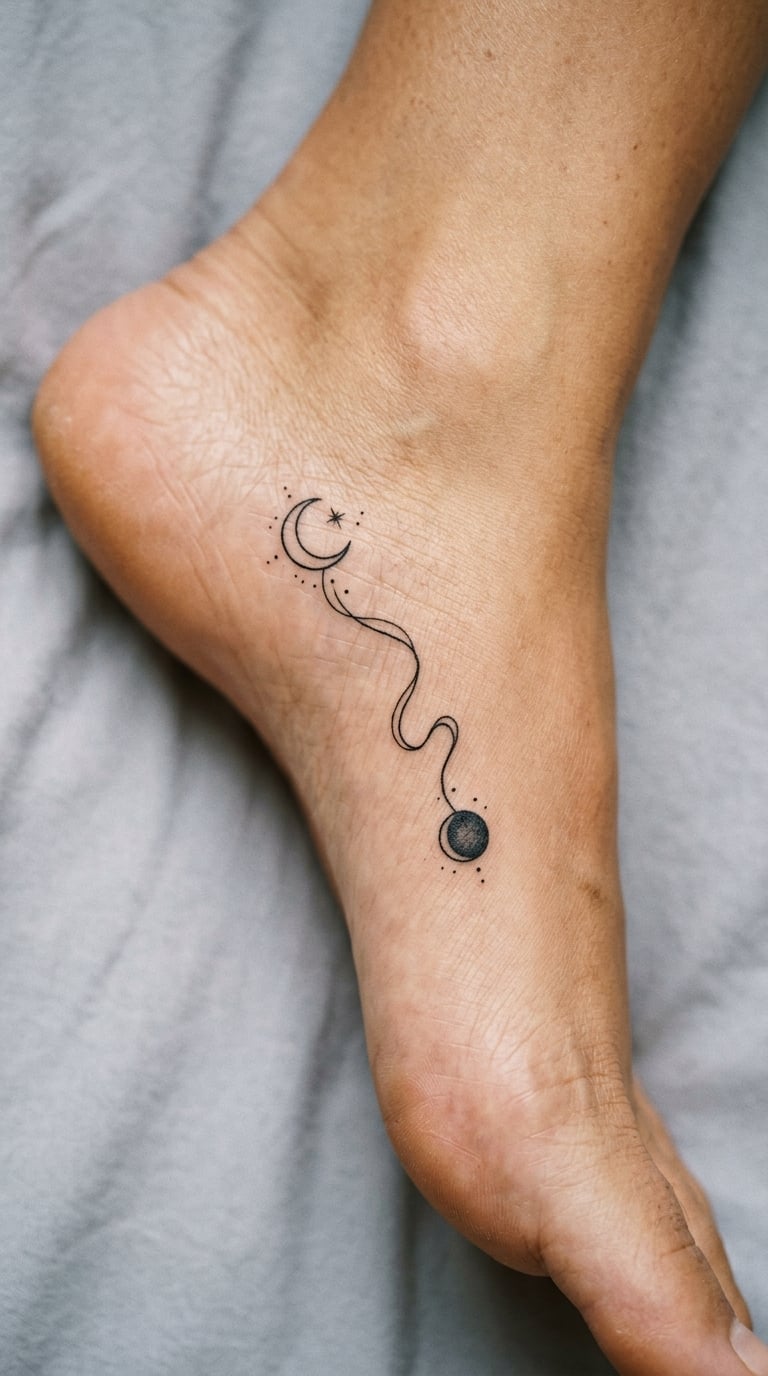
A crescent moon and a small sun sit at opposite ends of one hairline path that loops once between them. The connecting line is the trick, because it fills the length of the arch without crowding either shape.
The pairing is one of the oldest balance symbols in tattooing, and people pick it for relationships, for two halves of themselves, or simply because they want two small shapes instead of one big one.
Placement: inner arch, following the curve. Size: 2.5 inch end to end. Style: fine line with a single unbroken connector.
Pain: 4. Fast work, low irritation, and the shapes are large enough relative to the line to stay legible. Sun rays drawn as separate short lines blur first, so keep them few.
Make it yours: put the sun on the toe side and the moon on the heel side, and let the artist draw the connecting line to follow your arch curve exactly.
10. Wrapped Chain Anklet Illusion
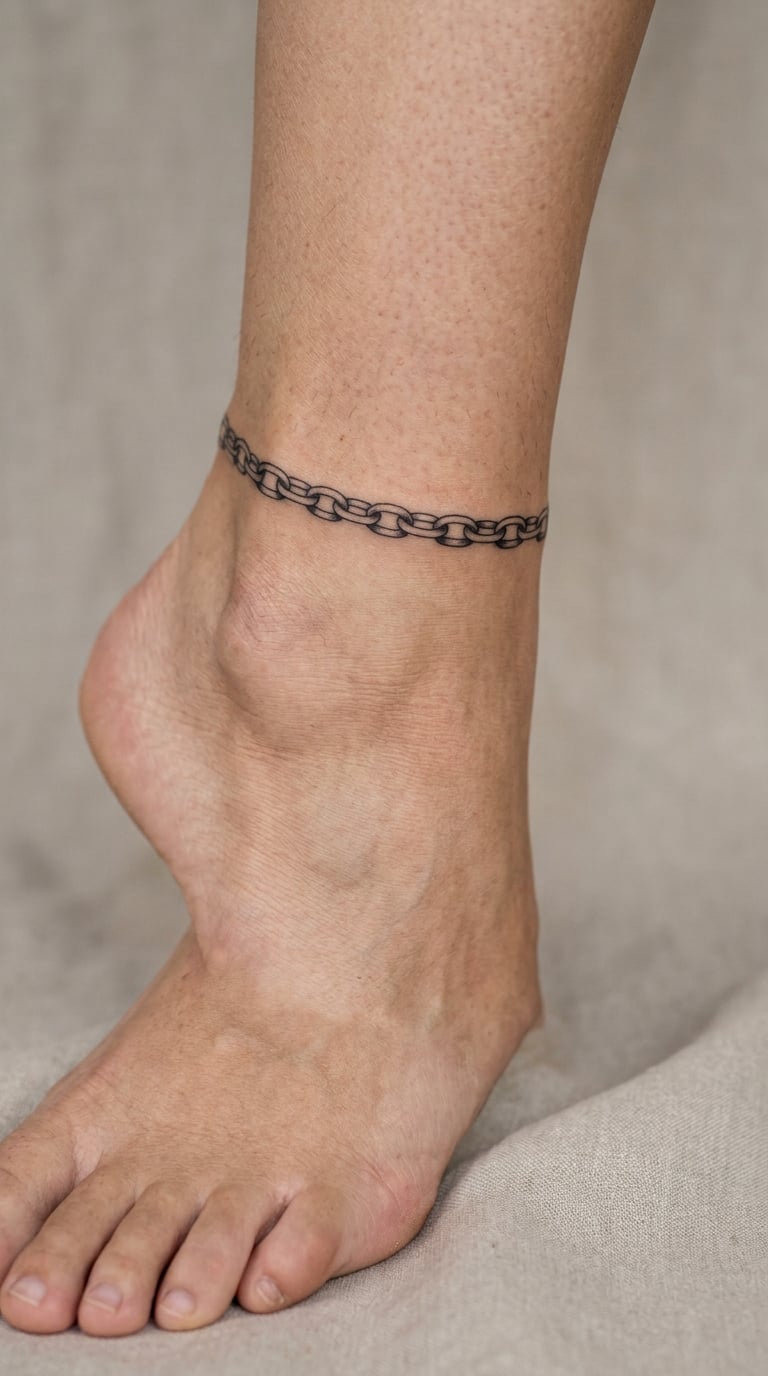
A chain drawn in perspective so it looks like a real anklet circling the ankle, with the far links lighter than the near ones. The trick to it is even spacing, because uneven links are what make illusion work look flat.
Most people get this because it is the one foot tattoo that reads as an accessory rather than artwork, and it layers under a real bracelet. It suits anyone who wants something on the foot that still looks like a choice about jewellery.
Placement: above the ankle, running around the full circumference. Size: a band roughly half an inch tall. Style: illusion realism with fine line.
Pain: 6, because the ankle is a bony ring and the work wraps right over both projections. Budget an hour for the full circuit rather than the half.
Make it yours: have one link carry a small initial, the only break in an otherwise perfect chain.
11. Coordinates and a Date in Fine Numerals
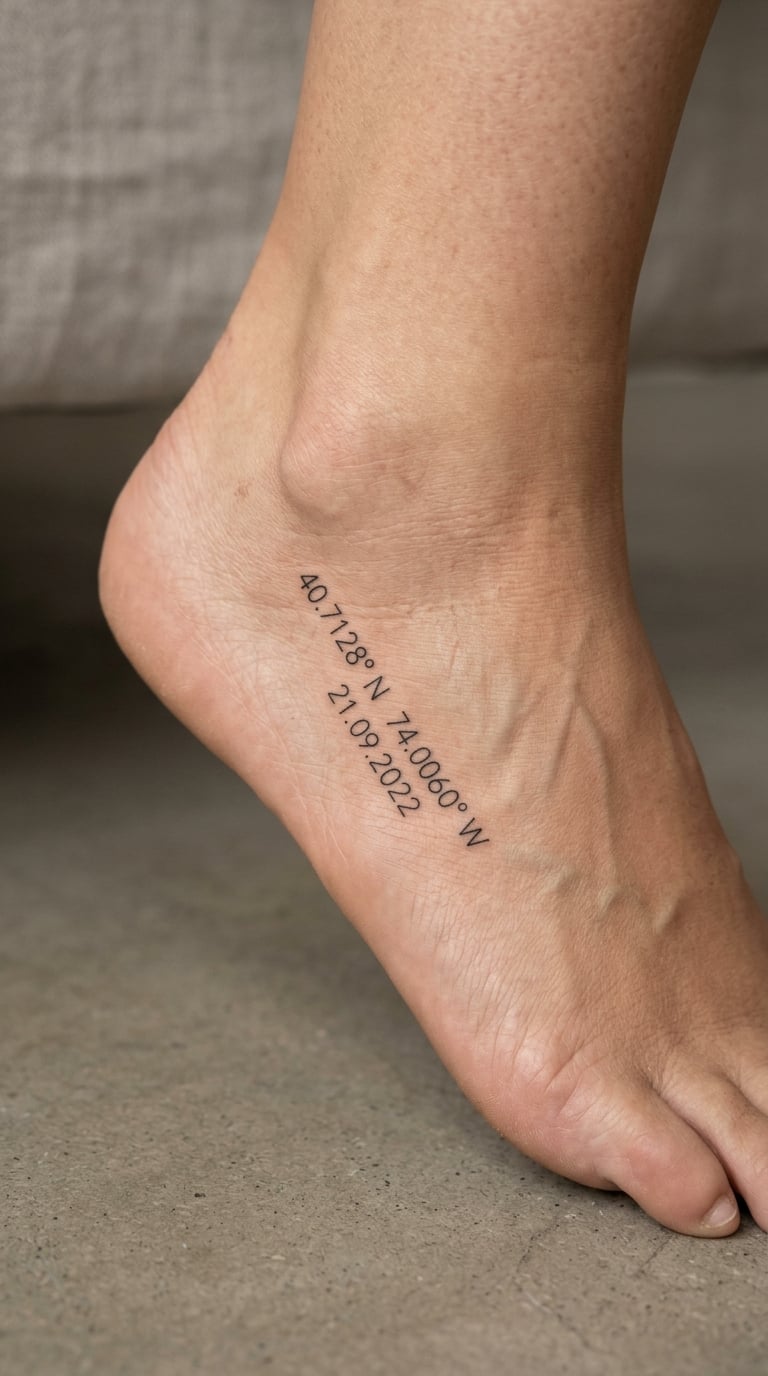
A latitude and longitude line with a date beneath it, in neat thin numerals with no other decoration. The coordinates usually point to somewhere that mattered: a birthplace, a meeting, a home.
Coordinates are personal in a way that is hard to explain to anyone else, which is most of the appeal. They also sit within the foot-tattoo tradition of hidden meanings that the wearer can read and nobody else can.
Placement: outer edge, mid-foot. Size: 2 inch wide, numerals about 5 mm tall. Style: fine-line typography.
Pain: 5. Small numerals mean repeated passes over the same skin, so the area gets tender faster than a single line would. Check the spelling of the coordinates at the stencil stage, because a corrected digit means a new piece of skin.
Make it yours: include only the coordinates, and keep the meaning between you and your phone until you are ready to explain it.
12. Butterfly Wings Trailing Up the Arch
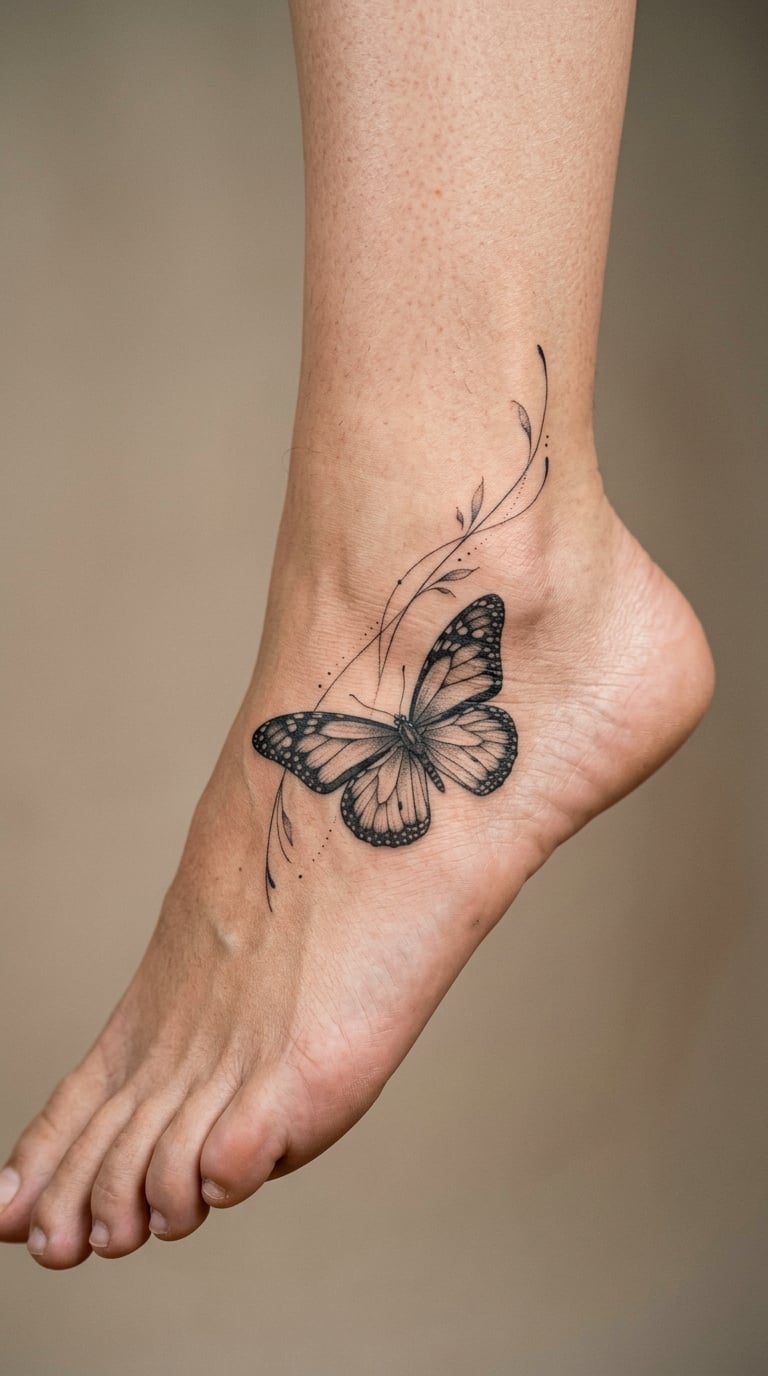
A butterfly angled so the body sits near the heel and the wings trail up the arch, with veins drawn in and a few flecks of grey in the upper wing. The tilt is what stops it looking like a sticker.
Butterfly work usually stands for change or transformation, though a lot of people just like how a wing curves into the line of the foot. Seen in sandals from the side, the wing catches the light in a way a flat symbol never does.
Placement: inner arch, body low, wings rising toward the ankle. Size: 3 inch tall. Style: micro-realism.
Pain: 5. The wing veins are the slow part and the area gets hot under the machine, which is normal here. Grey shading on the arch fades noticeably faster than black, so expect the veins to soften first.
Make it yours: add a second, much smaller butterfly above the first so the pair reads as one moving scene.
13. Mountain Range in Micro-Realism
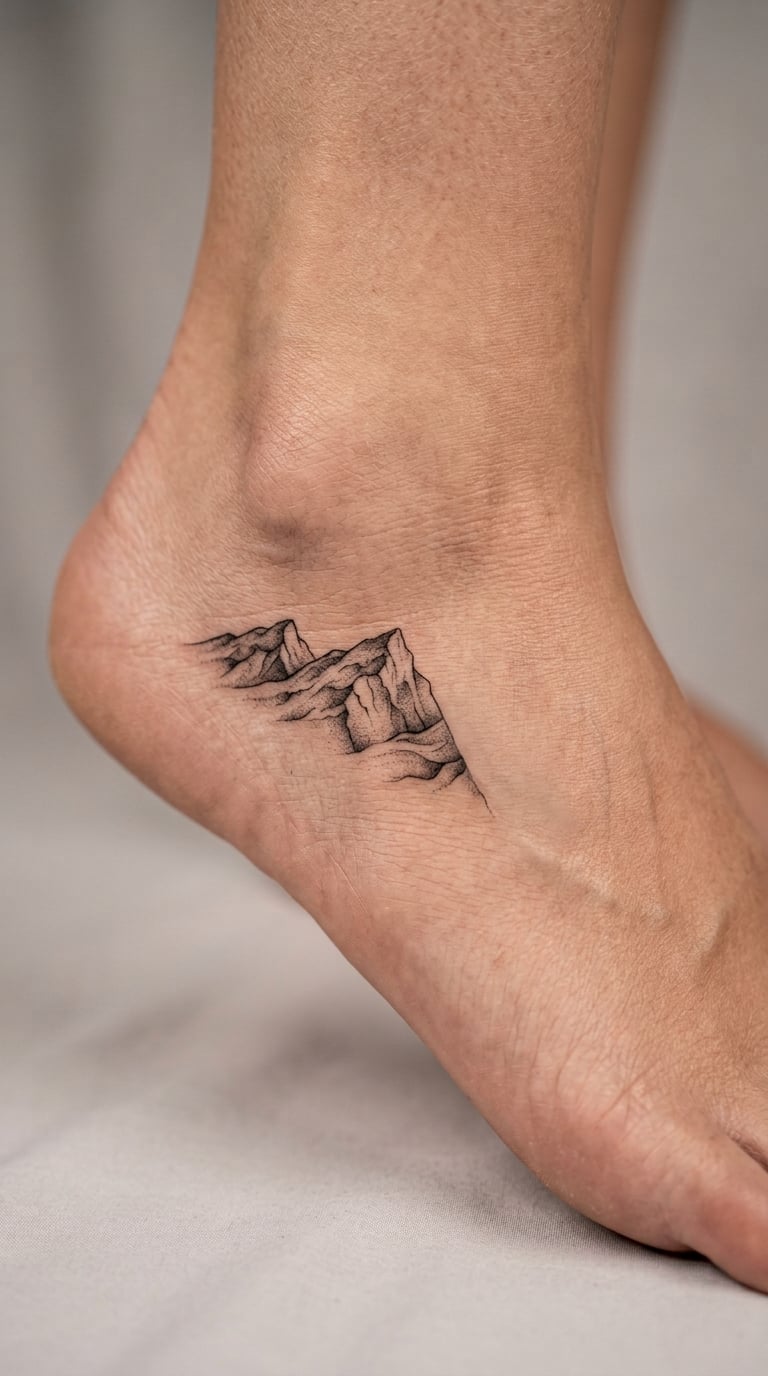
Three or four peaks in a row, shaded with a soft gradient rather than hard edges, sitting low on the outer edge so the ridgeline follows the top line of the foot. Tiny pines in the valleys are the detail that sells the scale.
Mountains are usually a place rather than an idea, and this design is the most common one I see from people who grew up somewhere with a skyline they still think about.
Placement: outer edge, just above the arch, wider than it is tall. Size: 2.5 inch wide, 1 inch tall. Style: micro-realism in black and grey.
Pain: 5. The gradient shading means several light passes, and shaded skin on the foot bruises. Keep sessions short, one area, then a break.
Make it yours: have the tallest peak sit exactly over the bony prominence of your ankle, so the anatomy and the artwork line up when you stand.
14. Single Feather in Fine Line
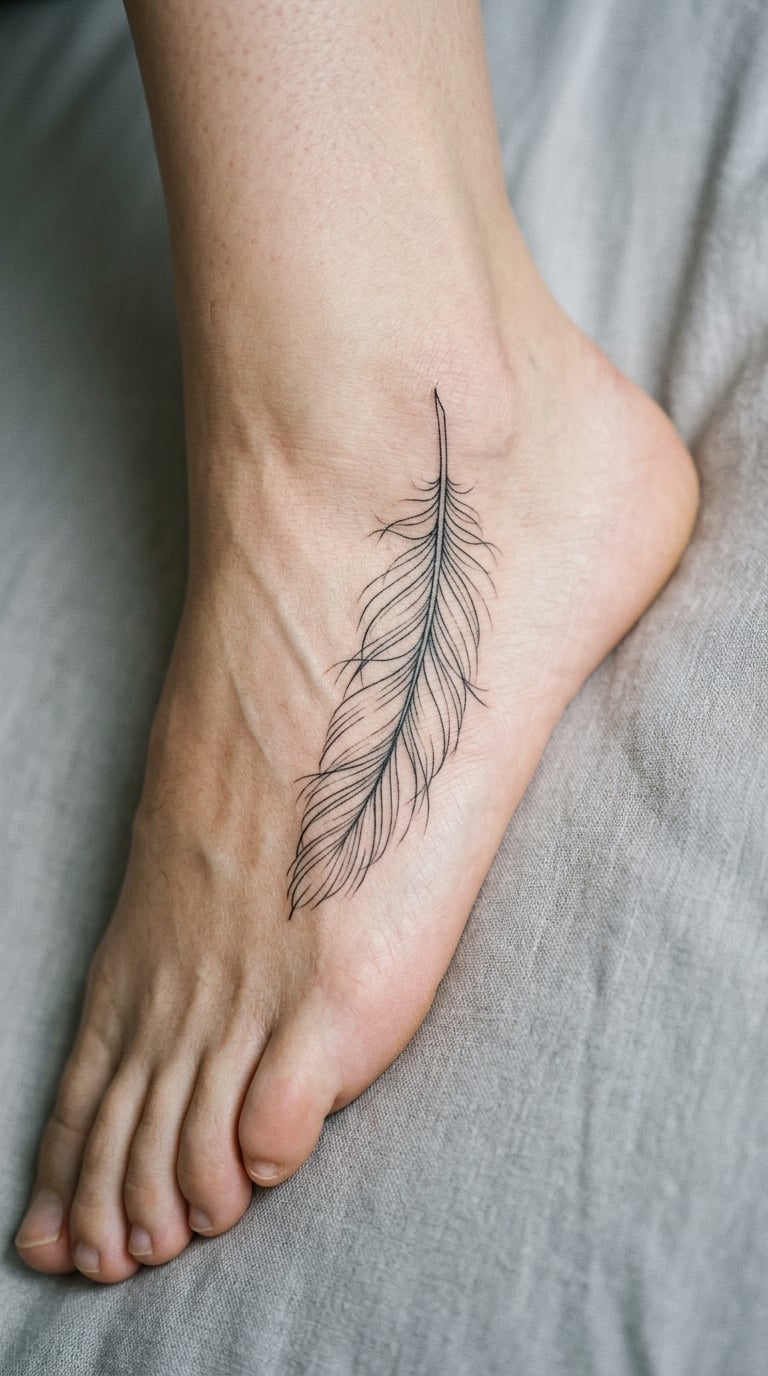
One feather, drawn with a central shaft and fine barbs either side, no shading, slightly curved to follow the foot. The barbs are spaced rather than solid, which is what keeps it delicate instead of heavy.
Feathers read as freedom, or as something worn in memory of a person or a bird that mattered. It is also the easiest idea here to hand to an artist as a single reference image.
Placement: inner arch or outer mid-foot. Size: 3 inch long. Style: fine line.
Pain: 4. One shaft, repeated light passes for the barbs, and it is over quickly. The barbs are what fade, so the design is worth a touch-up at around two years.
Make it yours: angle the tip of the feather toward the floor so it points down the leg rather than up it.
15. Lotus Outline Running With the Arch
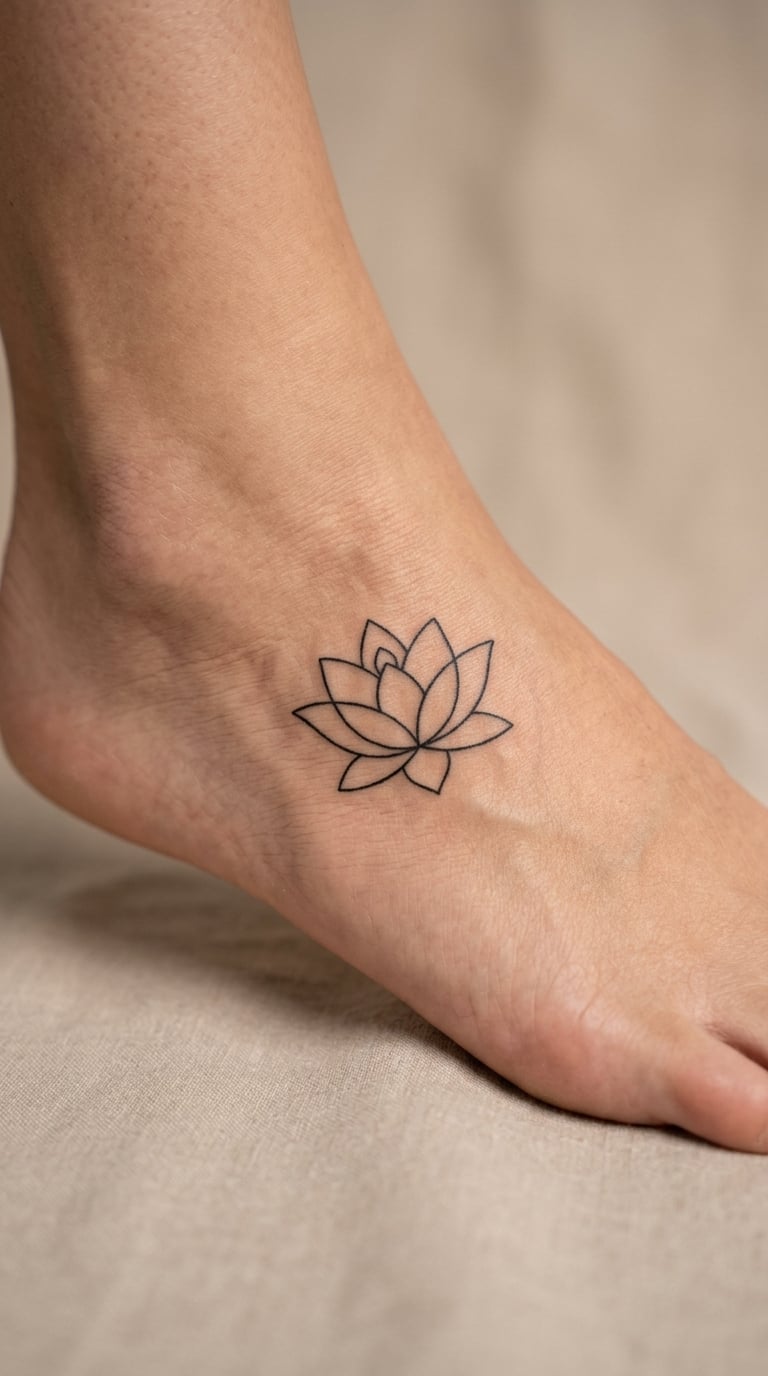
A lotus in plain outline, petals as clean contour lines with no fill and no shading, the bottom petals sitting low so the flower follows the arch. Simplicity is what makes this one work on a curved surface.
The lotus carries a long association with awakening and with starting again after something difficult, which is why it turns up more often than the amount of open space on the foot would suggest.
Placement: mid-foot, centred over the arch. Size: 2.5 inch across. Style: minimal outline.
Pain: 5 over the arch, lower on the flat part of the foot. Outline-only work is kinder to healing skin than anything filled, and this design needs no touch-up on the first year.
Make it yours: have one petal left open, as if the flower is still unfolding, instead of drawing all of them at full width.
16. Holly Branch With Berries for Autumn Ink
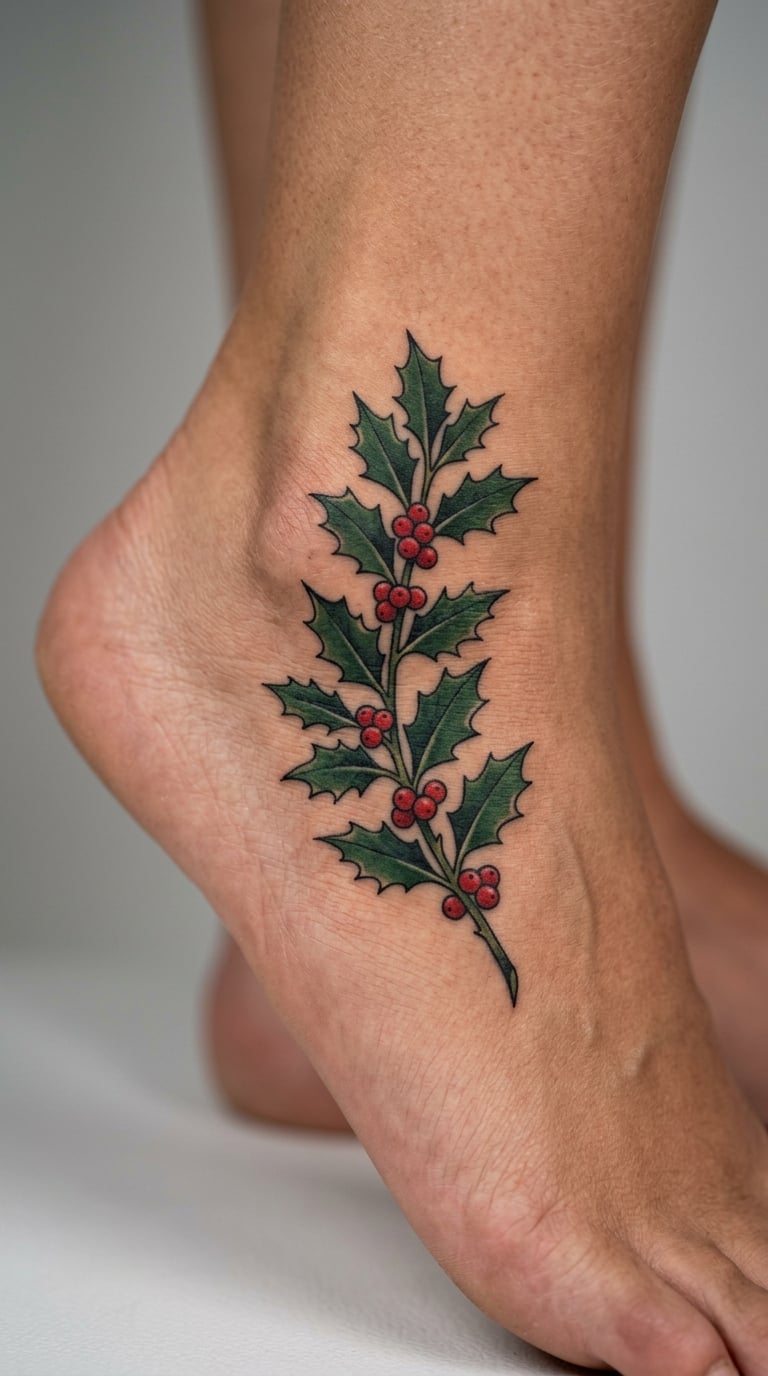
Spiky holly leaves with a scatter of small round berries, done in traditional colour with a bold outline and a small red accent. The leaves are the whole design, and the berries are the only place colour is allowed.
Holly is winter and endurance, and on a foot it often turns into a seasonal piece that gets covered up for most of the year. Traditional colour suits it because the flat shading holds together better here than soft gradient work.
Placement: outer edge, mid-foot to ankle. Size: 3 inch. Style: traditional colour.
Pain: 5. Colour passes are more passes, and the green needs to be laid before the red so the berries stay clean. Friction wears the tips of the spines down over time.
Make it yours: use deep green instead of bright green, which fades to a duller tone far more gracefully than the lighter shades do on this placement.
17. Koi in Fine Line With One Red Fin
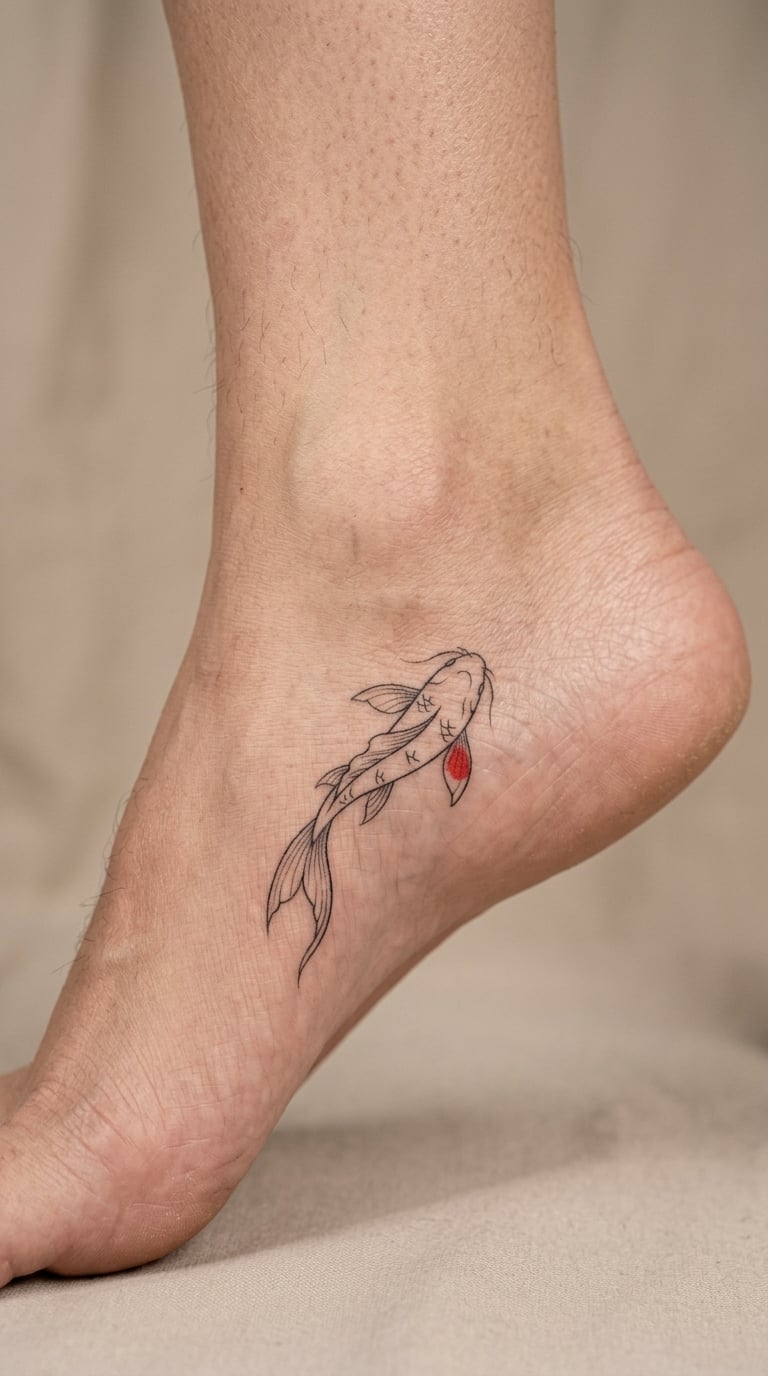
A koi swimming up the arch, drawn in fine line with simple scale marks, and one fin picked out in red. That single colour accent is what stops it reading as a plain outline and gives the eye somewhere to land.
Koi are persistence, endurance and moving upstream against something. Plenty of people choose it for that, and plenty choose it because the curved body of the fish suits the shape of the arch better than most subjects.
Placement: inner arch, head low near the heel. Size: 3.5 inch. Style: fine line with one colour accent.
Pain: 5, rising toward 6 near the heel. Scales done as individual marks take a while, so ask the artist to keep them loose. The red patch needs a clean touch-up because red is the first colour to leave the foot.
Make it yours: have a few bubbles trail upward behind the fish, using the empty arch space that the design would otherwise ignore.
18. Constellation Cluster in Dotwork
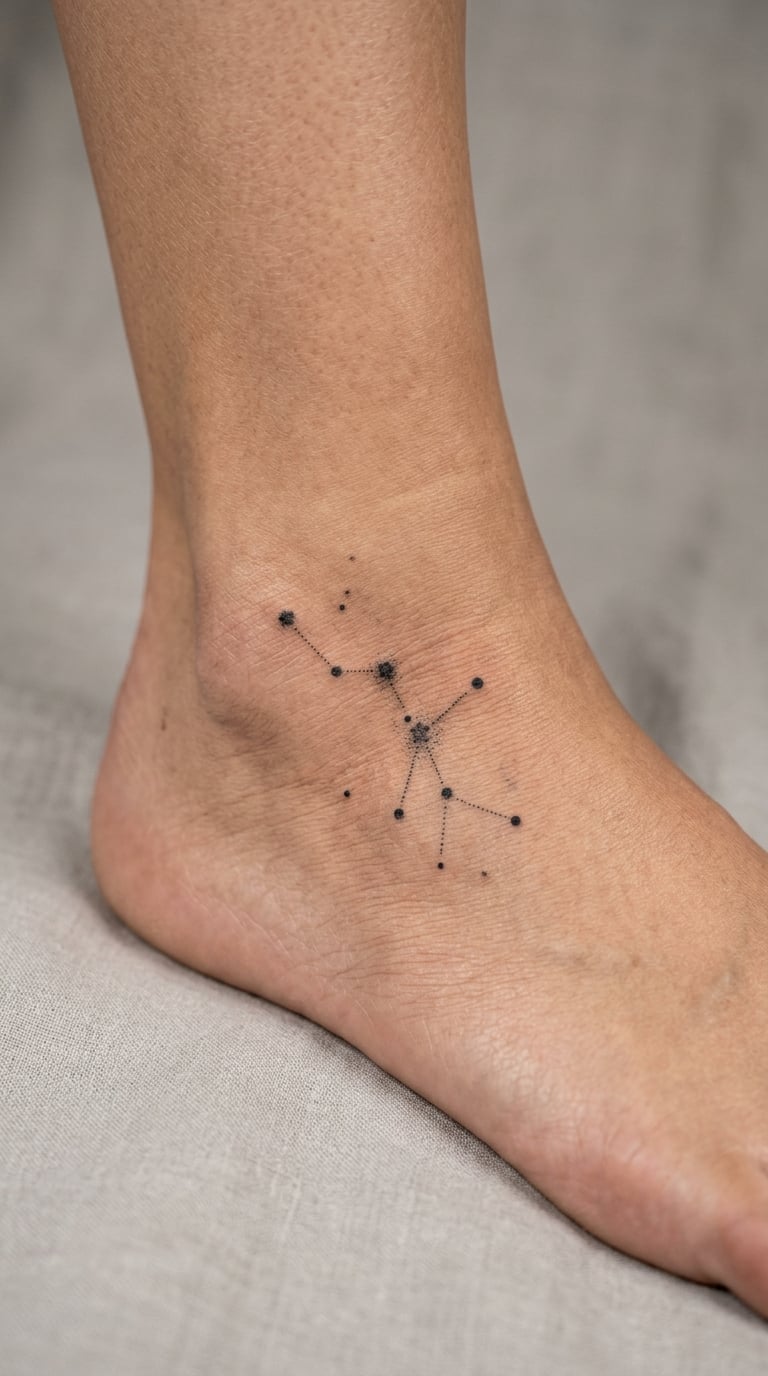
A cluster of dots at different sizes joined by hairline paths, like a small section of a star chart. The dots are placed to follow the curve of the foot, so the constellation looks like it is sitting in space rather than printed on.
Constellations usually mean a specific person, family group or date, and the dotwork style is the most discreet way to carry a private reference on a public part of the body.
Placement: outer edge, mid-foot, following the arch line. Size: 2 inch across. Style: dotwork with fine line.
Pain: 4. Dots are quick, which keeps the session short and the irritation low. Small dots are the first thing to disappear under sock pressure, so ask for slightly larger ones than the reference photo shows.
Make it yours: use the real star pattern for a date, not a generic shape, and let the artist cut the lines to follow your own veins rather than running them straight.
19. Poppy in Single-Colour Red Ink
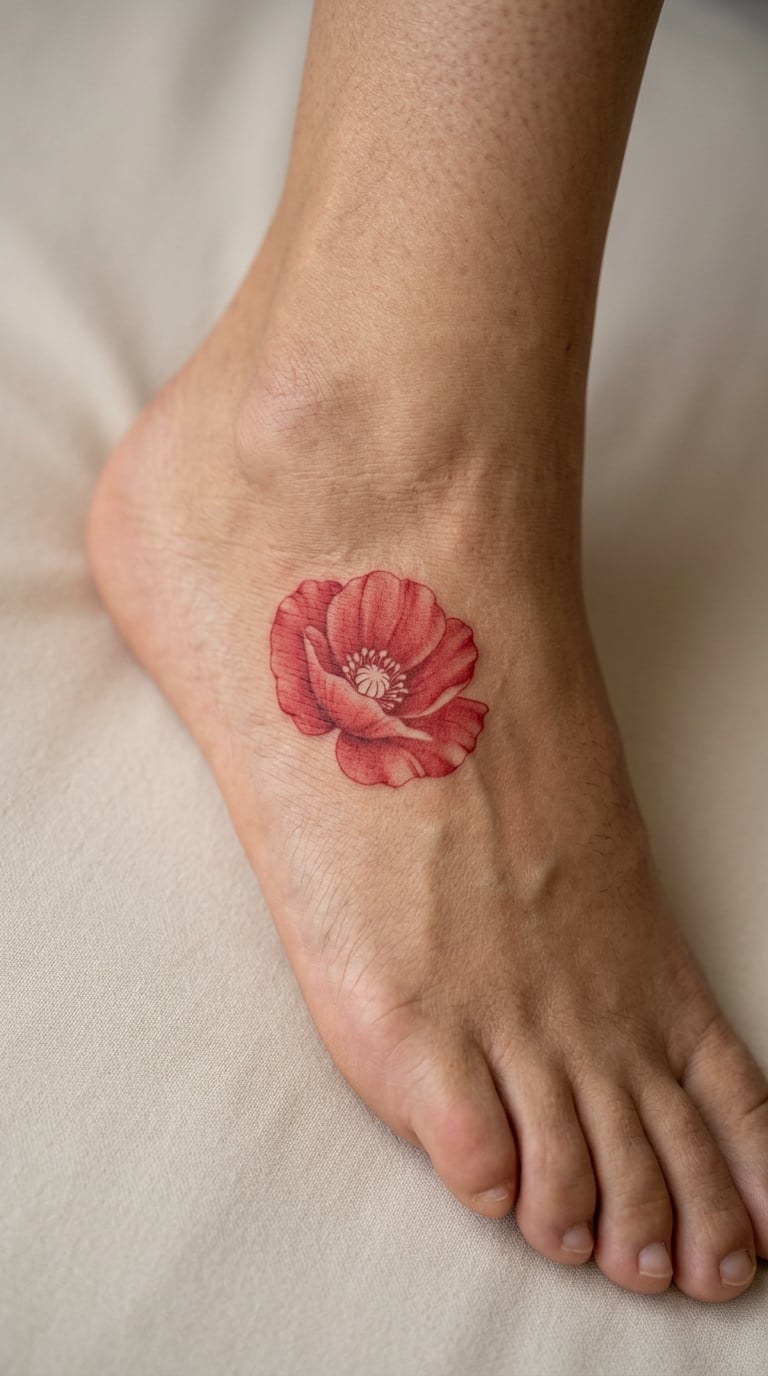
A poppy in one shade of red, no black outline, the petals built from solid colour and white space rather than shading. On skin this thin, colour without a heavy outline is the version that ages best.
Poppies carry remembrance, and in some places they carry protest. Either way it is a design people recognise without needing it explained, which is unusual for something this small.
Placement: outer edge, mid-foot. Size: 2 inch. Style: single-colour realism.
Pain: 5. Red goes on warm and stays tender longer than black work, and the swelling on the side of the foot is more obvious for a day or two. Sit down for the session and keep it off your feet for the rest of the day.
Make it yours: add a single stem and one leaf running down toward the heel so the flower looks picked rather than floating.
20. Serpent Curving Along the Arch
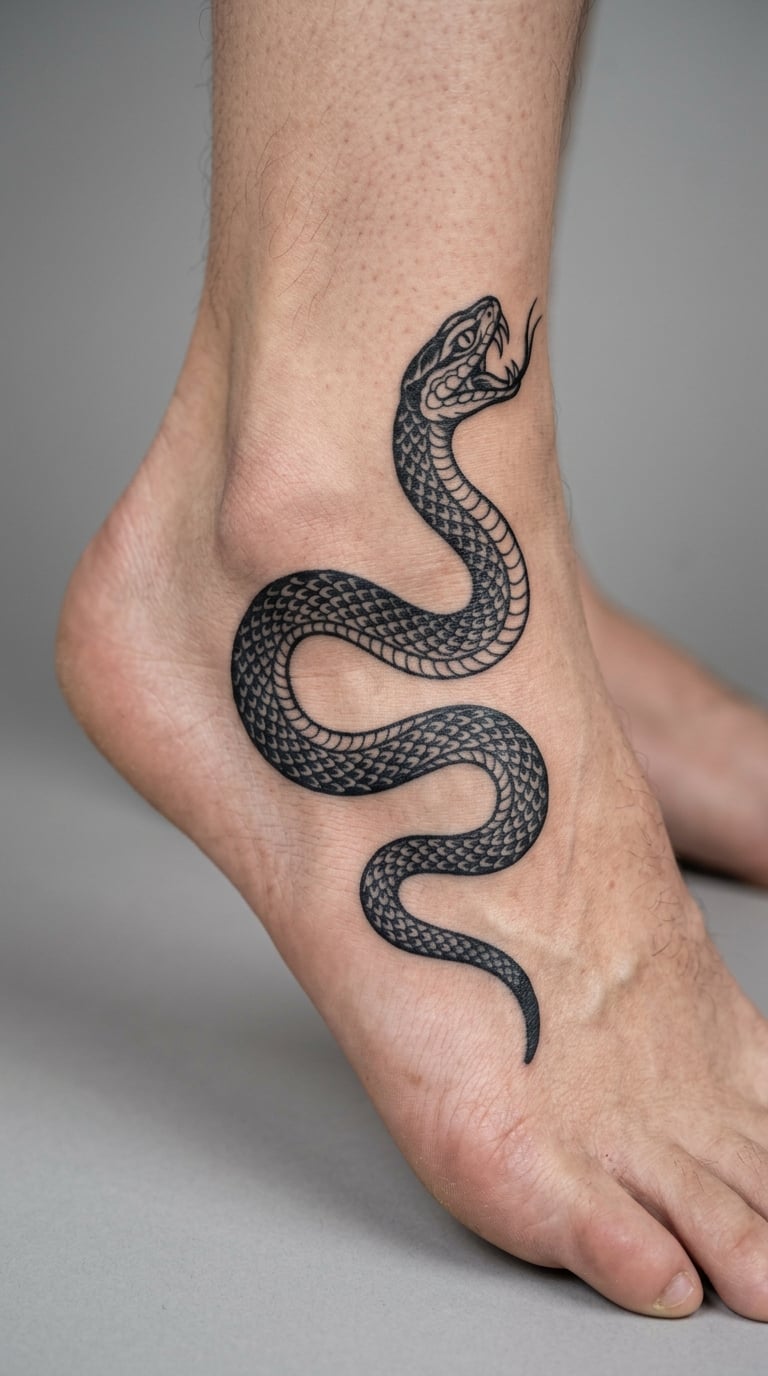
A serpent following the arch in an S curve, bold black outline with a simple scale pattern, head raised near the ankle and tail tapering toward the heel. The S is the design: it uses the full length of the strip without crowding it.
Serpents mean transformation, protection or renewal, and the snake has one of the few bodies that genuinely fits this shape better than a straight or round arrangement would.
Placement: inner arch, head up toward the ankle. Size: 4 inch. Style: bold outline blackwork.
Pain: 6, the top end for this placement. Four inches of continuous work over a nerve-dense stretch needs a proper break partway through. Scales left as open line instead of solid black keep the session and the healing shorter.
Make it yours: give the serpent a red tongue. One small colour note, placed where the tongue meets skin rather than out in the open, holds up far better.
Inner vs Outer Side of the Foot: Which Should You Choose?
This is the first question worth answering honestly, because the two edges feel and wear completely differently. Ask your artist to draw the stencil on both and stand in front of the mirror before you commit to one.
| Detail | Inner side of the foot | Outer edge of the foot |
|---|---|---|
| Best designs | Trailing vines, butterflies, koi, anything that follows the arch | Script, blackwork, geometric patterns, single-line botanicals |
| Pain level | 5-6, nerve-dense | 4-5, less nerve contact |
| Visibility | Only visible from the other foot or from above | Visible from the side in sandals and most open shoes |
| Shoe friction | High, from the arch of the shoe | Moderate, from the side seam and lace area |
| Skin movement | Constant, the arch flexes with every step | Fairly flat, easier to keep straight |
| Longest-lasting style | Bold blackwork | Solid blackwork, larger fine line |
| Common mistake | Too much detail over the flex point | Script placed right on the ankle bone |
One practical note. If you wear closed shoes for work, the outer edge takes less daily contact than the inner arch, and the ink lasts noticeably longer there.
What Does a Side Foot Tattoo Mean?
The placement itself usually reads as grounded, travelling, or quietly kept. Feet sit at the bottom of the body and close to the ground, and people often describe a foot tattoo as something that keeps them steady. Others treat it purely as a spot to put a small private design, which is just as valid.
Meanings then come from the design rather than the location. Here is the short version, family by family.
- Script and quotes carry words someone else said, a date, or an instruction the wearer repeats to themselves.
- Flowers such as blossom, lotus, poppy and holly are read as renewal, endurance, remembrance and awakening.
- Water, waves and koi read as movement, persistence and going against a current.
- Celestial work, moons, stars and coordinates mark a time, a place or a person, and are the most private family of the four.
- Serpents, mandalas and chains are less about meaning and more about pattern, protection and how the design looks on a narrow strip of skin.
On the gendered readings people ask about most: nothing about this placement is inherently masculine or feminine, and the designs most often framed as for women, small florals and fine-line script, are worn by everyone. What the foot carries is chosen by the person, not the style.
Design Ideas to Avoid on the Side of the Foot
A handful of designs consistently disappoint here, and it is worth knowing why before you fall in love with a reference photo.
- Dense solid black fills across the whole edge. The skin is thin and mobile, and a large solid block scabs, cracks and then fades patchy. Small separated blocks heal far better.
- Micro-detail work under a quarter inch. Sock pressure and years of movement erase tiny detail first. If it cannot be read at arm’s length before the session, it will not be there in five years.
- Designs that ignore the arch. Anything rigid and rectangular stretches and distorts every time the foot flexes. Follow the curve or go somewhere else.
- Long chains of unreadable tiny text. Script needs line weight and room. A quote longer than four words on the outer edge will blur.
- Full colour realism with heavy shading. Soft shading on a curved, thin surface goes grey and patchy fastest. One bold colour or plain black survives.
- Anything placed right on the ankle bone. Movement there pulls healing lines apart, and the bone makes the session genuinely difficult.
- Designs that vanish when you point your foot. Check the stencil both relaxed and pointed, the way you will actually stand most of the day.
How to Choose the Right Side Foot Design
Six questions worth settling before the consult, and every one of them makes the tattoo better.
- Will you see it, or hide it? Decide that first. It changes everything about scale and placement, and it is the one thing you cannot reverse.
- How much space do you actually have? Measure from the ankle bone to the toe base along the curve. Most people underestimate by about half an inch.
- Does the design follow the line of the foot? Trailing and curved subjects fit. Boxy, rigid ones do not.
- What style do you already have? A fine-line foot piece sitting next to a bold blackwork collection looks accidental. Match line weight to the rest of your work.
- Can your artist show healed foot tattoos? Ask for healed photos of their own work on the same placement, not a portfolio full of outer arm pieces.
- Which ankle or arch, exactly? Say it out loud in words: inner arch, outer edge, above the ankle bone, and how far up from the heel. Vague placement language is where most disagreements come from.
One more thing. Have the stencil checked while you are standing and again while you are seated. The foot looks completely different in a flip-flop than it does on a chair, and that is the moment to fix it, before the needle starts.
Cost and Session Time
What you pay is driven by three things: the size of the design, how many sessions it needs, and your artist’s rate. Most of the pieces on this list fall into the small single-session range, roughly one to two hours including the stencil and the first clean-up. A full wrapped chain or a four inch serpent runs longer than that, and shaded pieces like the mountain range often need a second sitting rather than one long one.
Every shop also sets a minimum charge, and that minimum is what a small simple piece ends up costing. Ask for the total before you start, including whether the artist expects a touch-up visit and whether that one is included. Rates vary a great deal between cities and between artists with a foot portfolio and those without one, which is the argument for paying a little more for someone who works this placement regularly.
On timing, if you have a holiday, a wedding or sandal season in mind, plan the tattoo four to six weeks ahead. The surface looks healed long before the deeper layers have finished settling, and the touch-up window opens around two to three months.
Aftercare Basics for Side of the Foot Tattoos
Start by following your artist’s aftercare instructions, since they know exactly what they did. On top of that, these are the basics for this placement.
- Keep it clean and follow the wash and moisturise routine your artist sets for the first few days.
- Expect swelling in the foot for the first 48 hours, and elevate it if you can. Feet swell more than any other part of the body after a session.
- Wear loose, open footwear or nothing at all while the surface is healing. Tight laces and a tight shoe edge are the fastest way to a scab.
- Do not soak the foot in a pool, hot tub or sea until the skin has fully closed, and keep it out of lakes and rivers where infection risk is higher.
- Do not pick flakes or scabs, however tempting they look around day four.
- Once healed, put sunscreen on it whenever it is exposed. This placement sees a lot of sun in sandals and it is the biggest cause of fading here.
- Book a free touch-up check around two to three months, and expect a free or low-cost touch-up around six to twelve months for fine-line work.
- Get medical advice promptly for spreading redness, pain that gets worse instead of better, pus, red streaks or a fever.
One habit worth building early. Keep whatever moisturiser you use on the tattoo somewhere in your bag, because the skin on the side of the foot dries out faster than anywhere else on the body, especially in summer.
Frequently Asked Questions
How painful is a side of the foot tattoo?
On a 1 to 10 scale, most side of the foot tattoos sit between 4 and 6. The outer edge near the mid-foot is toward the lower end, the inner arch is more nerve-dense, and the spot just above the ankle bone is the sharpest because there is almost no soft tissue there. Sessions on this placement are usually short, and the discomfort is more of a constant scratchy sting than a sharp pain.
Do tattoos on the side of your foot fade faster?
Yes, compared with an arm or a thigh. Socks rub against the area every day, shoes press on the arch, and sandals leave it in direct sun. Bold blackwork holds up far better than fine line or soft shading here. Line work on the outer edge often needs a touch-up every couple of years, and keeping sunscreen on the area once healed makes a real difference.
What are the top tattoos to avoid on the side of the foot?
Dense solid black fills, micro-detail under a quarter inch, long stretches of tiny text, heavy colour realism with soft shading, and anything rigid that does not follow the arch. All of them either scab and crack during healing, stretch every time the foot flexes, or fade patchy. Small separated shapes with generous spacing are what hold up on this placement.
What does a tattoo on the foot symbolize?
Most often it reads as grounded, steady or quietly kept, because the foot sits at the bottom of the body and close to the ground. A lot of people choose the placement for privacy rather than meaning. The meaning usually comes from the design itself, such as flowers for renewal, waves for movement, celestial work for a date or a place, and script for words someone said.
Is a foot tattoo a good idea?
It is a good idea if you want something discreet that you can show in sandals and hide in boots, and you are comfortable with a placement that needs more attention than most. The skin is thin, it rubs against footwear daily, and fine line fades faster here, so expect a touch-up or two over the years. If you want low-maintenance ink, choose bold blackwork over anything delicate.
What not to do after a foot tattoo?
Do not soak it in pools, hot tubs or seawater until the skin has fully closed, do not wear tight shoes or laces across it while it heals, and do not pick at flakes or scabs around day four. Keep it clean, elevate the foot if it swells, and leave it out of lakes and rivers. Once healed, use sunscreen whenever the area is exposed or the colour will fade faster.
Which Side Foot Idea to Book First
If this is your first tattoo, start with the eucalyptus sprig or a single fine-line feather. Both are small, quick, low-pain and forgiving of a first session, and neither asks much of you before the needle starts.
If you already have pieces and are adding to a collection, the wrapped chain is the one that changes how a foot looks while still matching line weight on the rest of your body. Bring your references, your line weight decision and your inner-or-outer answer to the appointment, and check the stencil standing up before anything else happens.