
20 Military Tattoo Ideas for Men: Best Designs (October 2026)
Military tattoo ideas for men fall into two very different families: designs that tell anyone who looks that you served, and designs that only read properly to you. That second group is where most of the good work lives. Whether you want a bold blackwork eagle or something small enough to hide under a shirt cuff, the marks below cover the full range, with the placement, realistic size and pain level for each one spelled out.
What makes a military design hold up on skin is restraint. Dense black, clean negative space and one idea per design beat a crowded composition every time. Start from the list, pick the two that feel closest to your own story, and bring reference photos to your appointment.
If you are still building a body of ink rather than a single piece, my black sleeve tattoo ideas for men roundup will give you the filler work that goes between the main subjects without turning into noise.
20 Military Tattoo Ideas for Men: Quick Guide
Here is the whole list in one place, with the practical details for each design side by side. The order matches the numbered entries below.
| Idea | Style | Best placement | Size | Pain |
|---|---|---|---|---|
| 1. Dog tags with coordinates | Fine line, black and grey | Inner forearm | 2.5-3.5 in (6-9 cm) | Medium |
| 2. Winged dagger | Blackwork | Outer forearm | 4-6 in (10-15 cm) | Medium |
| 3. Camo sleeve panel | Realistic colour | Upper arm | 5-7 in (13-18 cm) | Medium |
| 4. Globe with latitude lines | Fine line | Inner forearm, calf | 3-4 in (8-10 cm) | Medium |
| 5. Armored vehicle silhouette | Blackwork, traditional | Outer forearm, thigh | 4-5 in (10-13 cm) | Medium |
| 6. Eagle with star halo | Blackwork | Upper arm, chest | 5-7 in (13-18 cm) | Medium to high |
| 7. Topographic map | Black and grey | Calf, shoulder | 4-6 in (10-15 cm) | Medium |
| 8. Anchor with rope | Traditional, blackwork | Outer forearm, calf | 3.5-5 in (9-13 cm) | Medium |
| 9. Aircrew wings | Traditional, blackwork | Upper arm, back | 4-6 in (10-15 cm) | Medium |
| 10. Field radio | Micro line art | Inner forearm, wrist | 2-2.5 in (5-6 cm) | Medium |
| 11. Compass rose with grid | Geometric, blackwork | Shoulder, chest | 3.5-4.5 in (9-11 cm) | Medium |
| 12. Five-point battle star | Traditional, solid black | Forearm, upper arm | 1.5-2.5 in (4-6 cm) | Low to medium |
| 13. Parachute and canopy | Blackwork | Upper arm, calf | 4-5 in (10-13 cm) | Medium |
| 14. Combat boots and route | Black and grey | Calf, forearm | 4-6 in (10-15 cm) | Medium to high |
| 15. Service ribbon bar | Flat colour, illustrative | Inner forearm | 3-4 in (8-10 cm) | Low to medium |
| 16. Barbed-wire laurel | Blackwork, traditional | Upper arm, back | 5-7 in (13-18 cm) | Medium to high |
| 17. Aircraft over mountain range | Black and grey realism | Upper arm, back | 6-9 in (15-23 cm) | High |
| 18. Morse code band | Fine line | Wrist, inner arm | 2-2.5 in (5-6 cm) | Medium |
| 19. Field helmet with star | Blackwork | Outer forearm, calf | 3.5-4.5 in (9-11 cm) | Medium |
| 20. Formation lines and horizon | Minimalist | Inner upper arm, ribs | 5-8 in (13-20 cm) | Medium to high |
1. Minimal Dog Tags with Service Coordinates
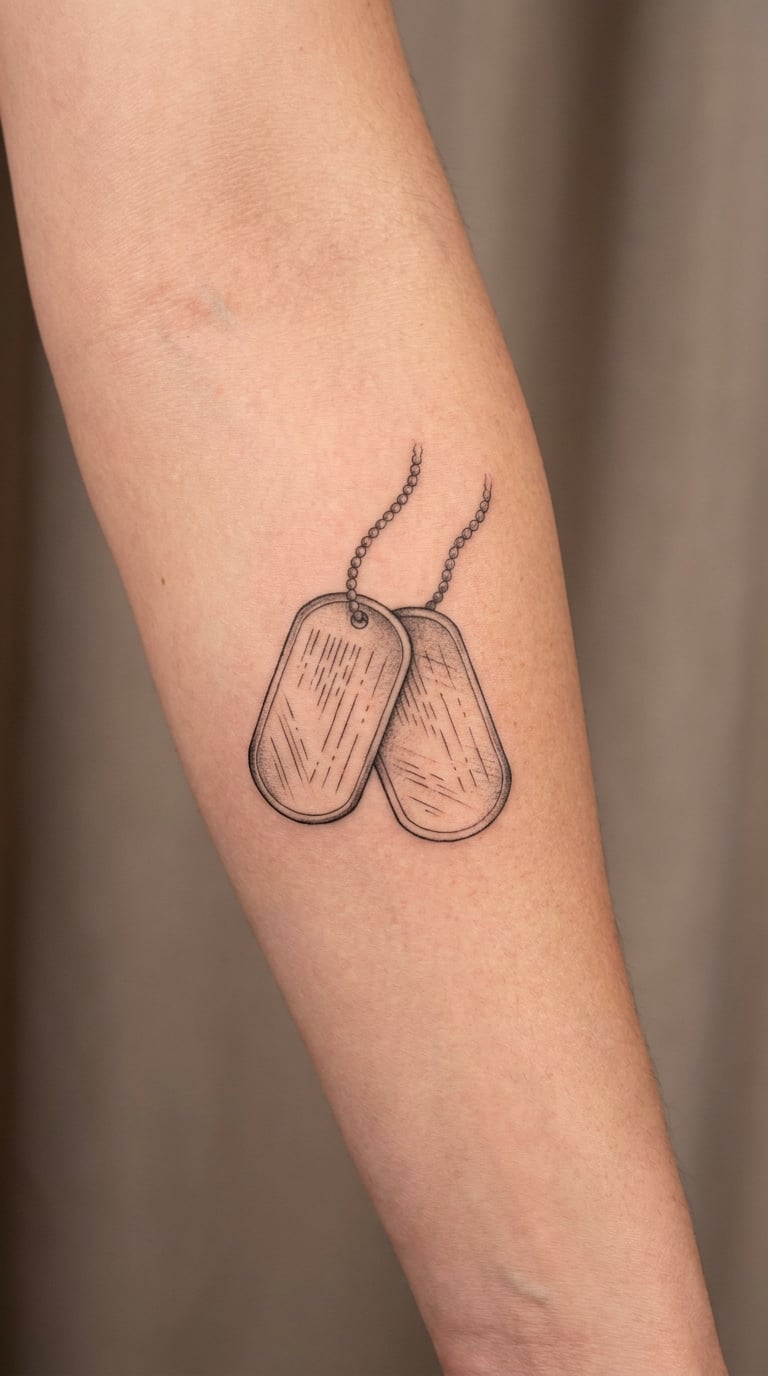
This is the quiet version of the most recognizable military motif. Two tags hang from a short chain or a loop of line, drawn in fine black outlines with a light grey wash inside the metal, and the engraving is suggested with short line details rather than readable characters.
Most people add coordinates of somewhere that mattered to them. A home town, a training range, a deployment location, the spot where a group of them waited out a storm.
Placement: inner forearm reads best, where the tags sit flat and the chain can run toward the wrist. Bicep or rib also work if you want it larger.
Size: 2.5 to 3.5 inches (6 to 9 cm) wide is enough for the detail to survive healing.
Style: fine line or black and grey realism.
Pain: medium on the inner forearm, and the chain line sits close to tender skin. Plan on the grey wash softening noticeably after a decade, so keep contrast high at the outlines.
Make it yours: one coordinate instead of two, or a matching mini version on a partner’s wrist.
2. Winged Dagger in Blackwork
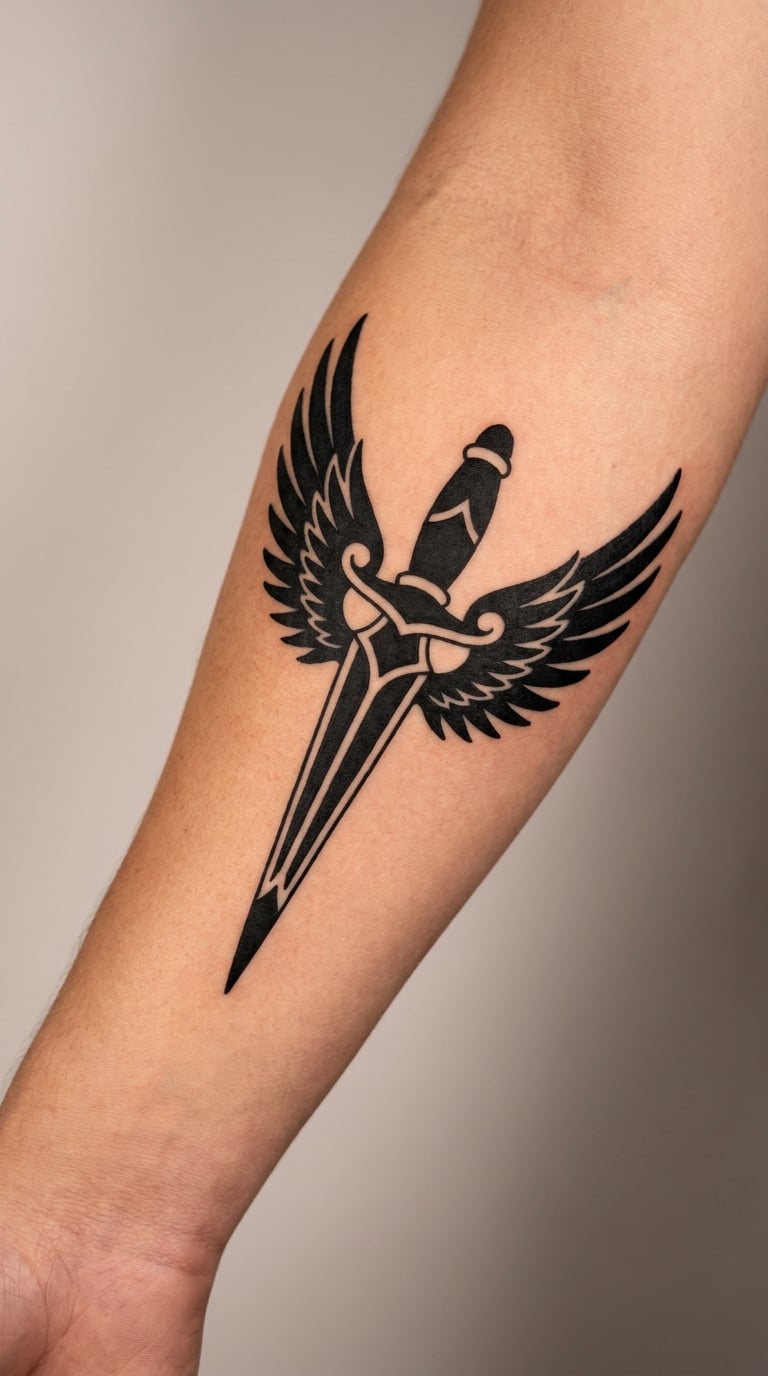
A dagger down the middle with a symmetrical pair of wings behind it, the whole thing built from solid black and a few deliberate gaps of skin. The traditional version of this design lives in 1940s flash and it still holds up because the composition is symmetrical and the silhouette is instant.
It reads as speed, readiness and a willingness to move. Plenty of people pair it with a set of coordinates underneath so the piece is not only an image.
Placement: outer forearm, centred along the bone, or across the chest where the wings can spread. Avoid placing it over a joint.
Size: 4 to 6 inches (10 to 15 cm) long. Under 3 inches the wings lose their shape.
Style: blackwork, or traditional if you want bold colour and a drop shadow.
Pain: medium. Dense black across the forearm is a long, steady burn rather than a sharp one.
Make it yours: have the artist redraw the wing feathers as simple chevrons so the piece looks designed for you rather than pulled from a flash sheet.
3. Olive Drab Camo Sleeve Panel
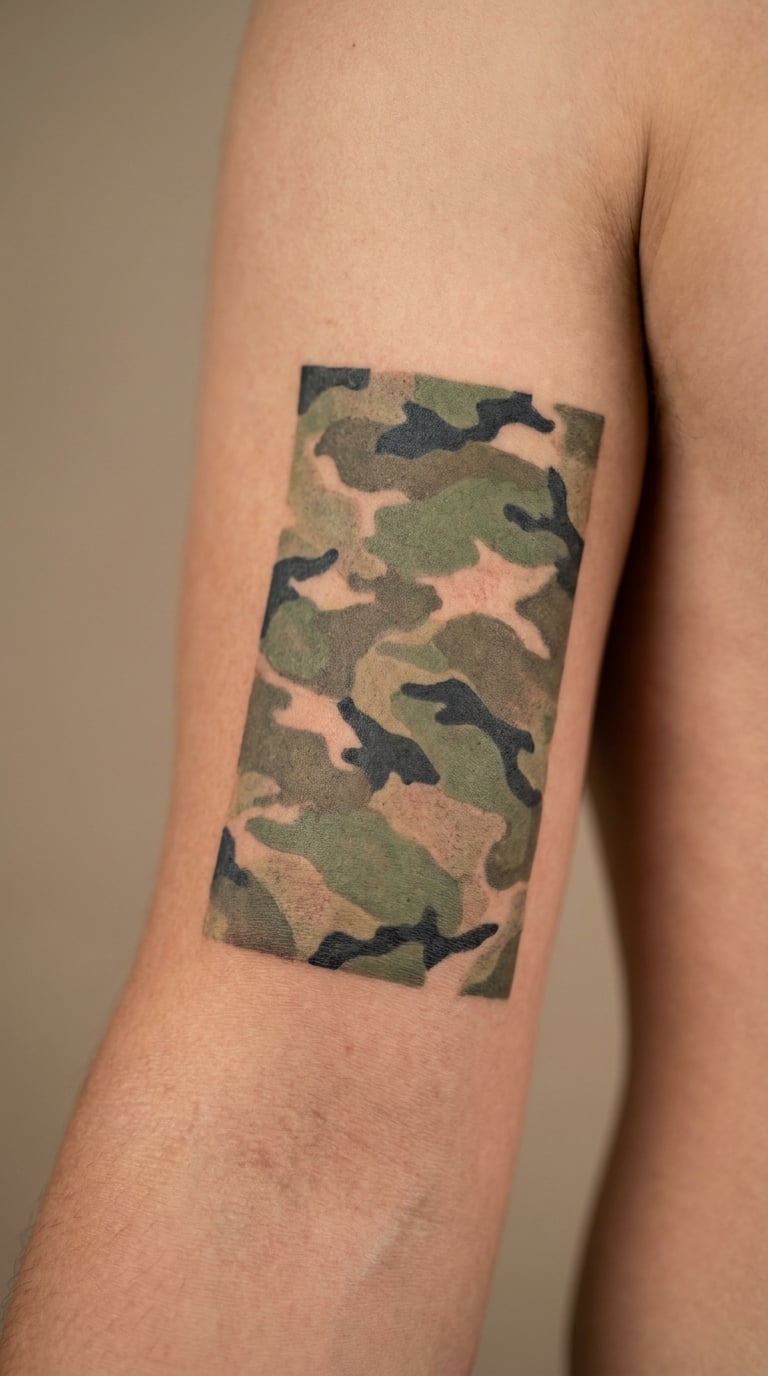
Camouflage is a pattern that behaves differently on skin than on fabric. Too many tones and it turns to mud, so the version that works uses three or four layered colours: dark olive, dry khaki, a warm mid green and near-black shadow shapes.
It started as something to hide in and stuck around as a way of showing time served, usually as the first layer of a sleeve. If you want to keep going, the mountain and ocean tattoo pairings give you a direction once the camo base is down.
Placement: outer upper arm, ideally as a panel that a sleeve can grow out from. Flat surfaces only; camo over a bicep or knee distorts badly.
Size: 5 to 7 inches (13 to 18 cm) across.
Style: realistic colour with soft edges between the tone blocks.
Pain: medium, and colour layering means a longer session than a blackwork piece of the same size. Greens and yellows are the first to fade in sun, so ask for a touch of white in the highlights.
Make it yours: use a pattern from a specific region you trained in, not a generic woodland blend.
4. Military Globe with Latitude Lines
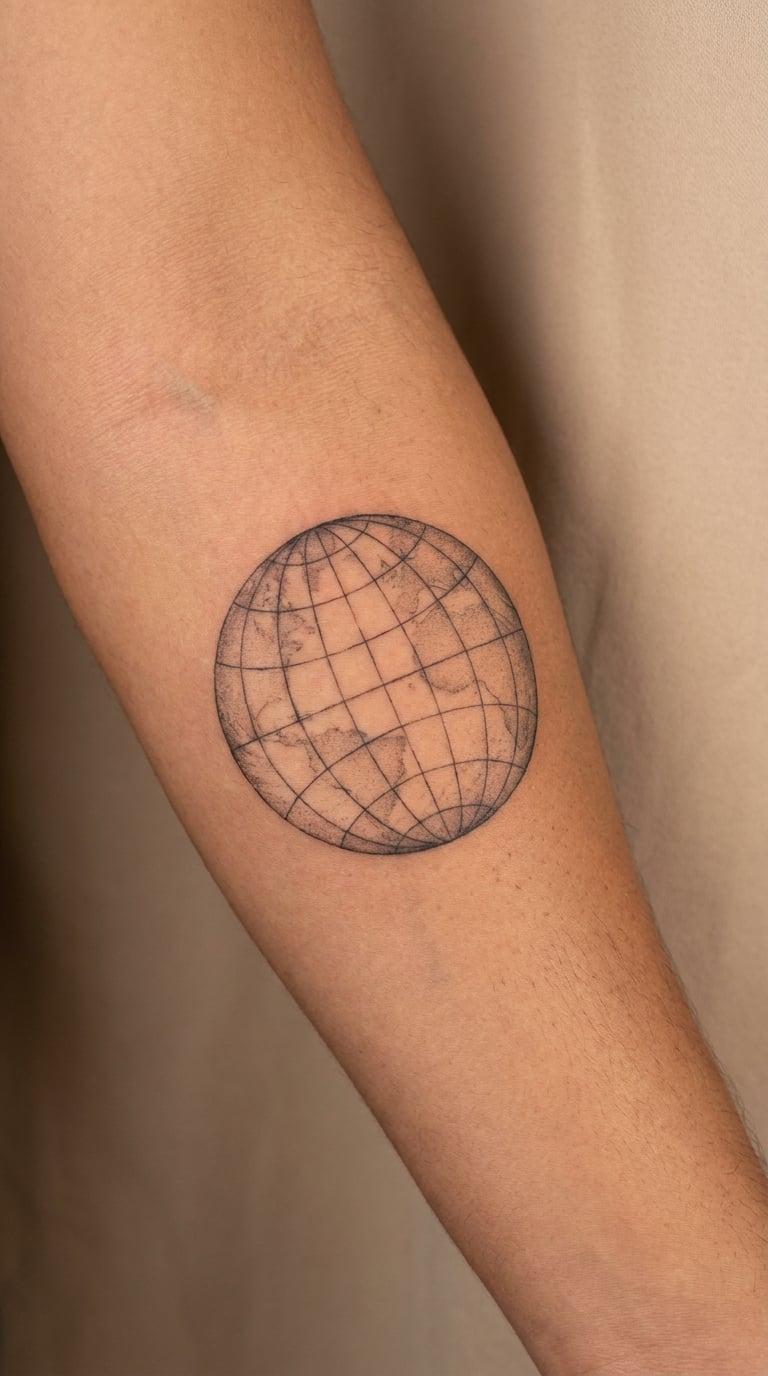
A sphere built from contour and one clean equator line, with a few longitude curves crossing it. Some versions add two short lines of coordinates pointing at one spot on the surface, and that is usually the reason the piece exists.
It is a map of where you have been rather than a badge of what you were. That makes it work for people who served without wanting a branch motif read at a glance.
Placement: inner forearm, calf, or upper chest. The curvature of a forearm gives the sphere some natural roundness, which helps.
Size: 3 to 4 inches (8 to 10 cm) in diameter. At 2 inches the latitude lines merge into grey.
Style: fine line or thin black and grey.
Pain: medium. Lots of short lines means a long, needle-heavy session for a small area, so book more time than you think you need.
Make it yours: have the coordinates engraved in the same thin hand as the lines so the text never looks pasted on.
5. Armored Vehicle Silhouette
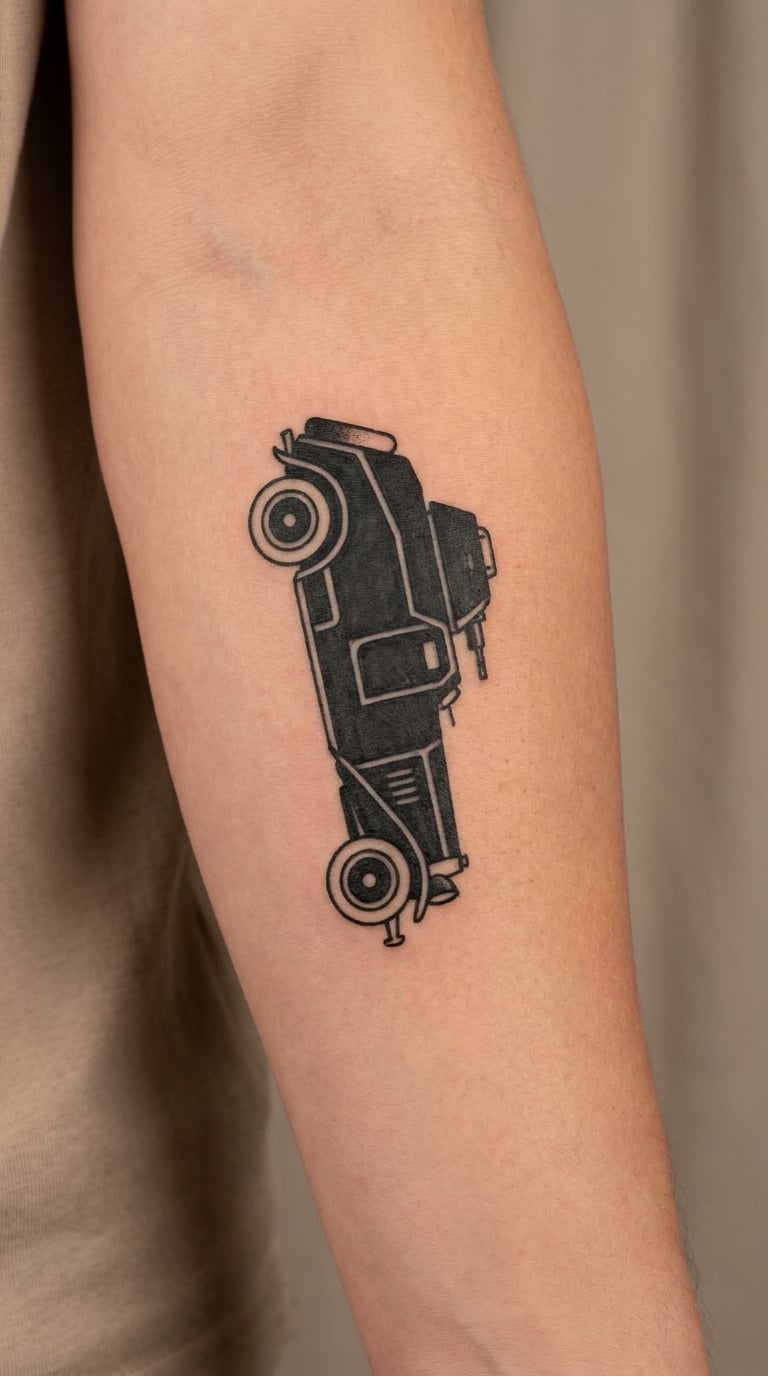
A tracked vehicle in side profile, drawn with a handful of confident lines: hull, road wheels, turret, gun tube. The trick is stopping before the drawing turns into a technical manual, because the moment you add every hatch and bolt it becomes a blueprint instead of a tattoo.
For most wearers this is about a specific vehicle rather than warfare in general. A crew who served on one often has clear memories attached to it.
Placement: outer forearm runs along the natural line of the limb. The outer thigh gives more room for a longer hull.
Size: 4 to 5 inches (10 to 13 cm) long for a recognisable profile.
Style: blackwork silhouette, or traditional with two or three colours if the vehicle has a strong scheme.
Pain: medium, less than you would expect, since large areas of single-density black are quick going.
Make it yours: add a small crew number or a nickname on the turret in the same ink weight.
6. Eagle with Clean Star Halo
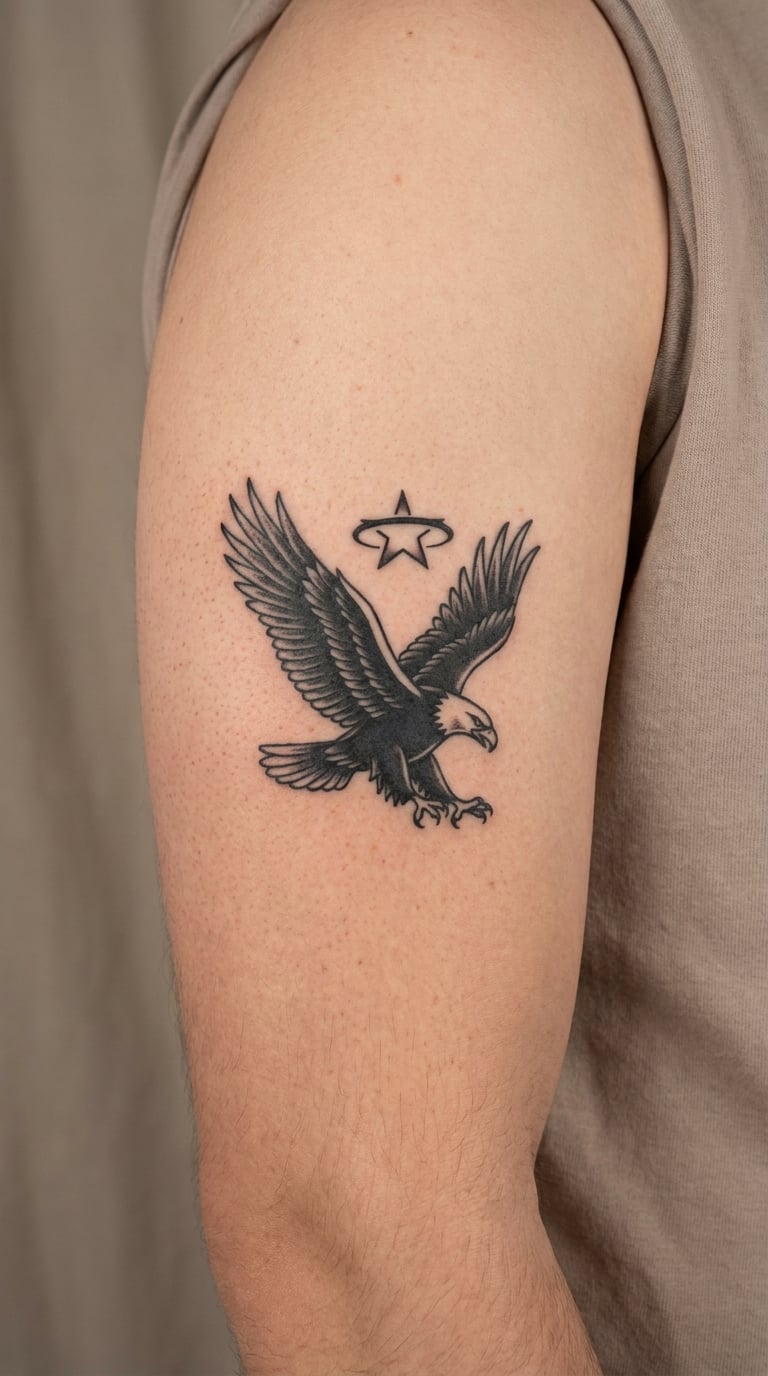
An eagle in profile, wings mid-downstroke, wrapped by a ring of a handful of stars rather than a full circle. The star halo is what keeps it contemporary, and it lets you avoid lifting a service emblem straight off a patch.
Eagles carry the heaviest symbolism in this whole list: freedom, vigilance, the nation. It is a strong piece, which is exactly why plenty of artists push clients toward a more restrained version.
Placement: upper arm, shoulder cap or chest. A full back piece works if the wings are given real room.
Size: 5 to 7 inches (13 to 18 cm) across. Feathers need that width to hold detail.
Style: blackwork or black and grey realism with a soft feather fade.
Pain: medium to high across the upper arm, and high on the ribs or chest. Feather shading is slow, needle-heavy work.
Make it yours: put the coordinates of a home town in the negative space between the wings.
7. Topographic Map With Grid Reference
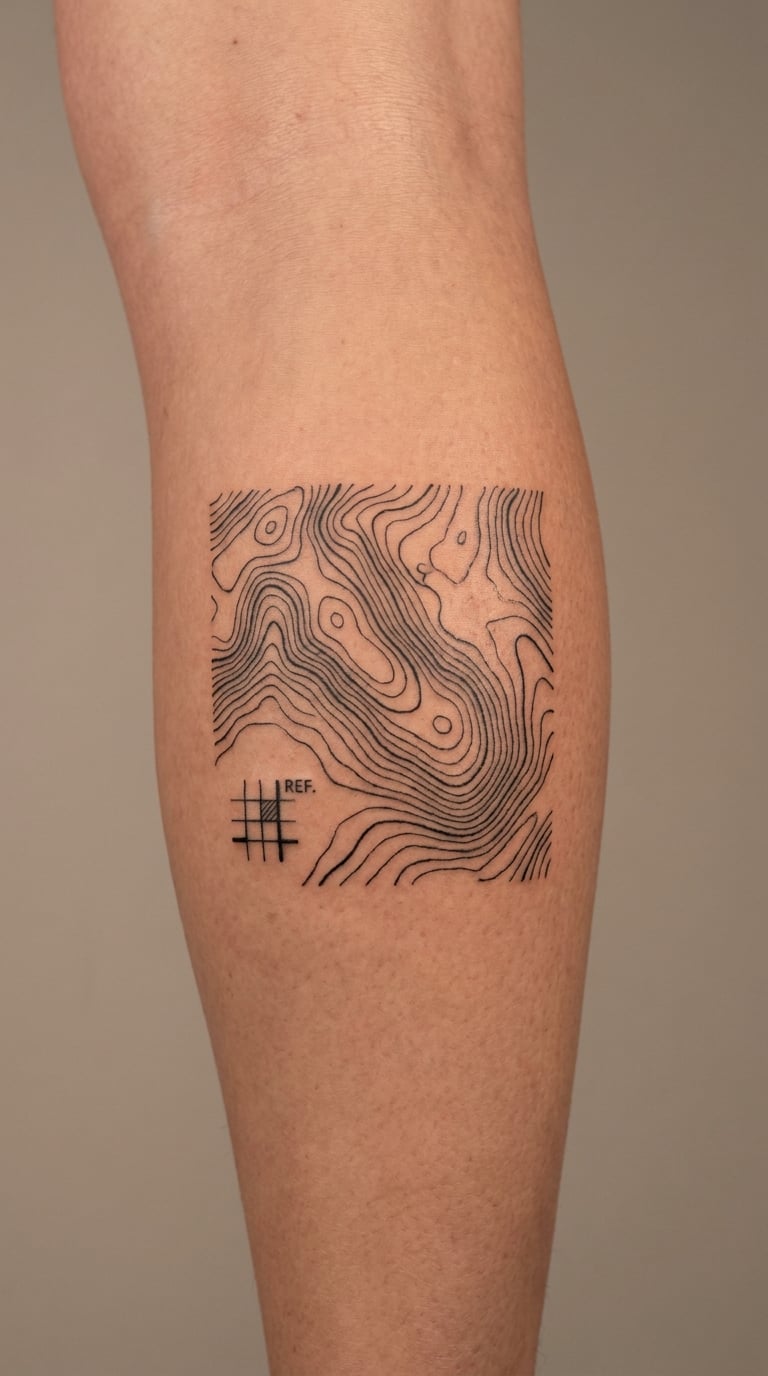
Contour lines, tightly nested, with one square grid marker set into the corner. Draw the terrain from somewhere real: the area a unit trained in, a route walked on leave, the hills above a hometown.
It reads as terrain to a stranger and as a specific place to you, which makes it one of the most quietly personal options here. It also ages well, since contour lines are pure line work rather than shaded blocks.
Placement: calf, shoulder, or across the upper back. The calf is the classic home for terrain work.
Size: 4 to 6 inches (10 to 15 cm) wide. Large enough that you can fit in readable contour detail.
Style: black and grey, thin line weight.
Pain: medium on the calf, more on the inner calf where the skin is thinner. Every contour line is a separate needle pass, so this is a slow session.
Make it yours: hide the grid reference as a four-figure and two-letter code that only your group reads.
8. Naval Anchor Wrapped in Rope
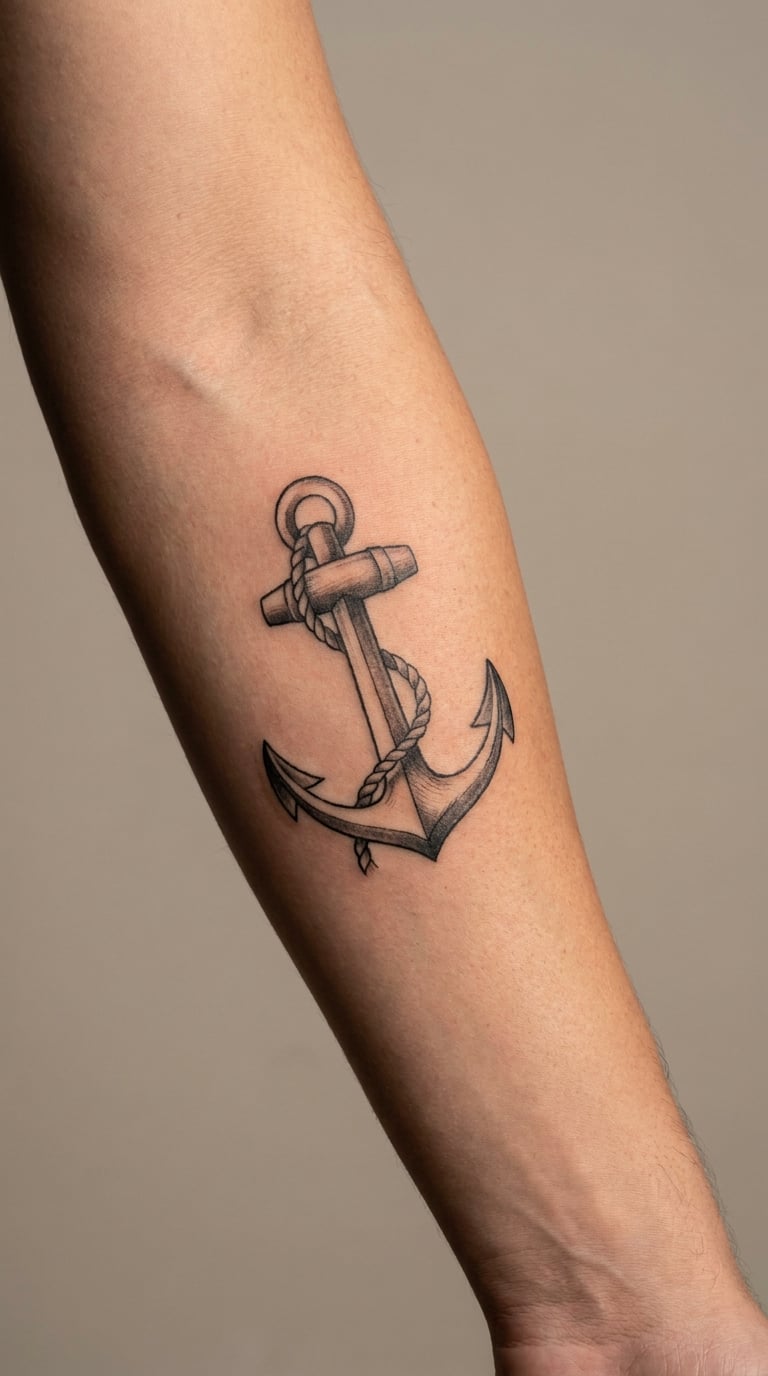
A stock anchor with a single rope loop crossing the shank, drawn in bold outlines with a light wash in the shadow areas. Traditional versions add red rope and a banner; the monochrome version is quieter and holds its shape better in later life.
Anchors are the most portable naval motif. Non-US service members use the same imagery, which is why it shows up on forearms far from any coastline.
Placement: outer forearm, calf, or shoulder. It tucks neatly into the space above the elbow bone.
Size: 3.5 to 5 inches (9 to 13 cm) tall.
Style: traditional for the classic look, blackwork if you want it to sit with a black-and-grey sleeve.
Pain: medium, and the rope wrapping is the tender part since it crosses the forearm repeatedly.
Make it yours: have the banner blank or reduced to a single line, so you can add a date later in a matching style.
9. Aircrew Wings With Streamline Dashes
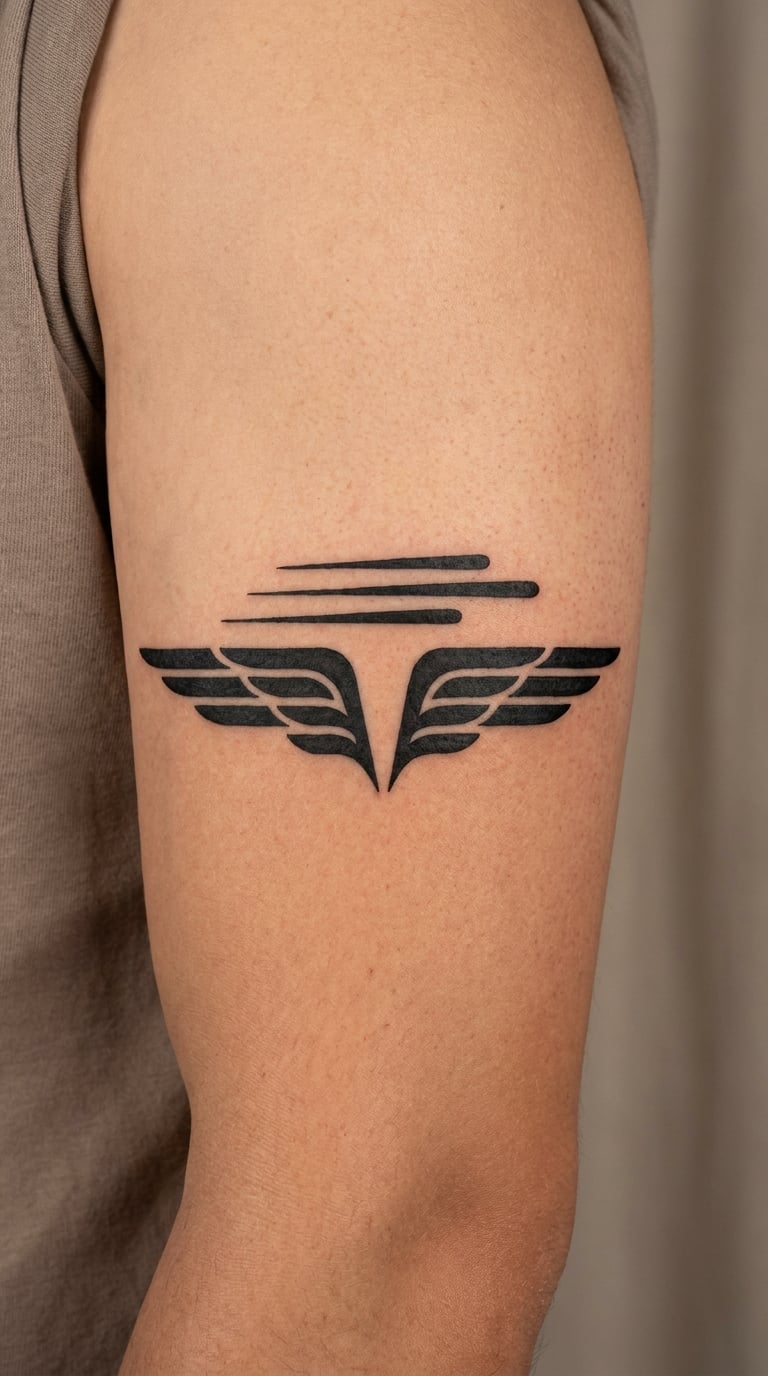
A symmetrical pair of wings with a row of short horizontal dashes running through them, the way a speed graphic is drawn. The wings are generic on purpose: real crew wings carry a design, an aircraft type and numbers, and those belong to the service that issues them.
It marks an aviation or aircrew background without claiming a qualification. Most wearers put their aircraft type in a text line underneath instead.
Placement: upper arm across the deltoid, or centred high on the back between the shoulder blades.
Size: 4 to 6 inches (10 to 15 cm) wide.
Style: blackwork or traditional, with the dashes kept to a consistent weight.
Pain: medium on the deltoid, which is meaty. Across the shoulder blades it climbs toward high because the skin is thin over bone.
Make it yours: set the number of dashes to match something specific, then have them line up with the wing feathers.
10. Field Radio in Micro-Line Art
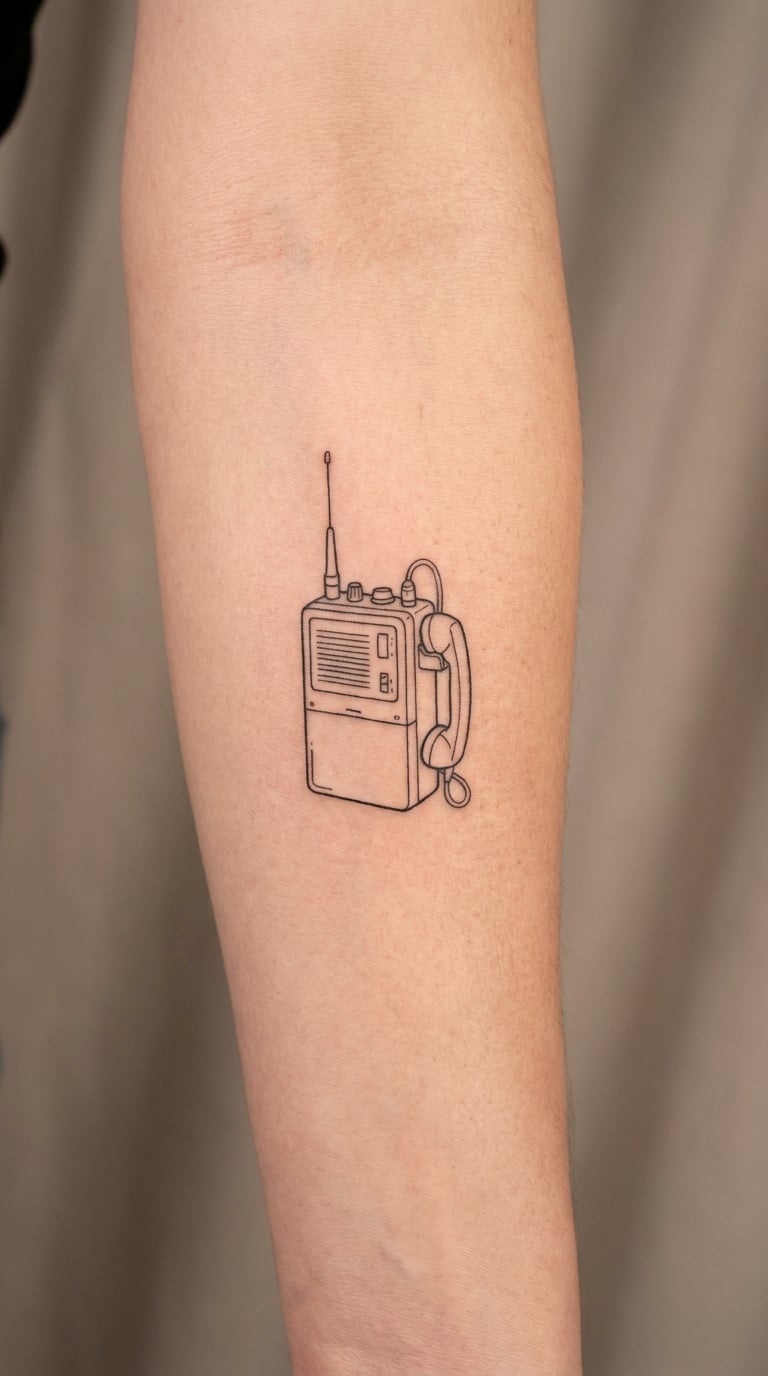
A boxy set with a tall antenna, one round dial, a speaker grille of short parallel lines and a row of keys. Drawn entirely in single-weight line work with no fill, this is the sort of design that rewards a steady hand rather than a heavy one.
Comms equipment carries the idea of staying in touch with a unit, which is why it pairs well with a set of initials or a single date on the same arm.
Placement: inner forearm or the inner bicep. Avoid the wrist crease if you want the dial to stay crisp.
Size: 2 to 2.5 inches (5 to 6 cm) tall.
Style: micro line art or fine line.
Pain: medium, and the sting of many short lines adds up fast on the inner arm. This is one of the designs that softens fastest, so ask the artist for a slightly heavier line than looks right on paper.
Make it yours: give the dial a marker at one position, like a frequency setting you used to know by heart.
11. Compass Rose with Tactical Grid
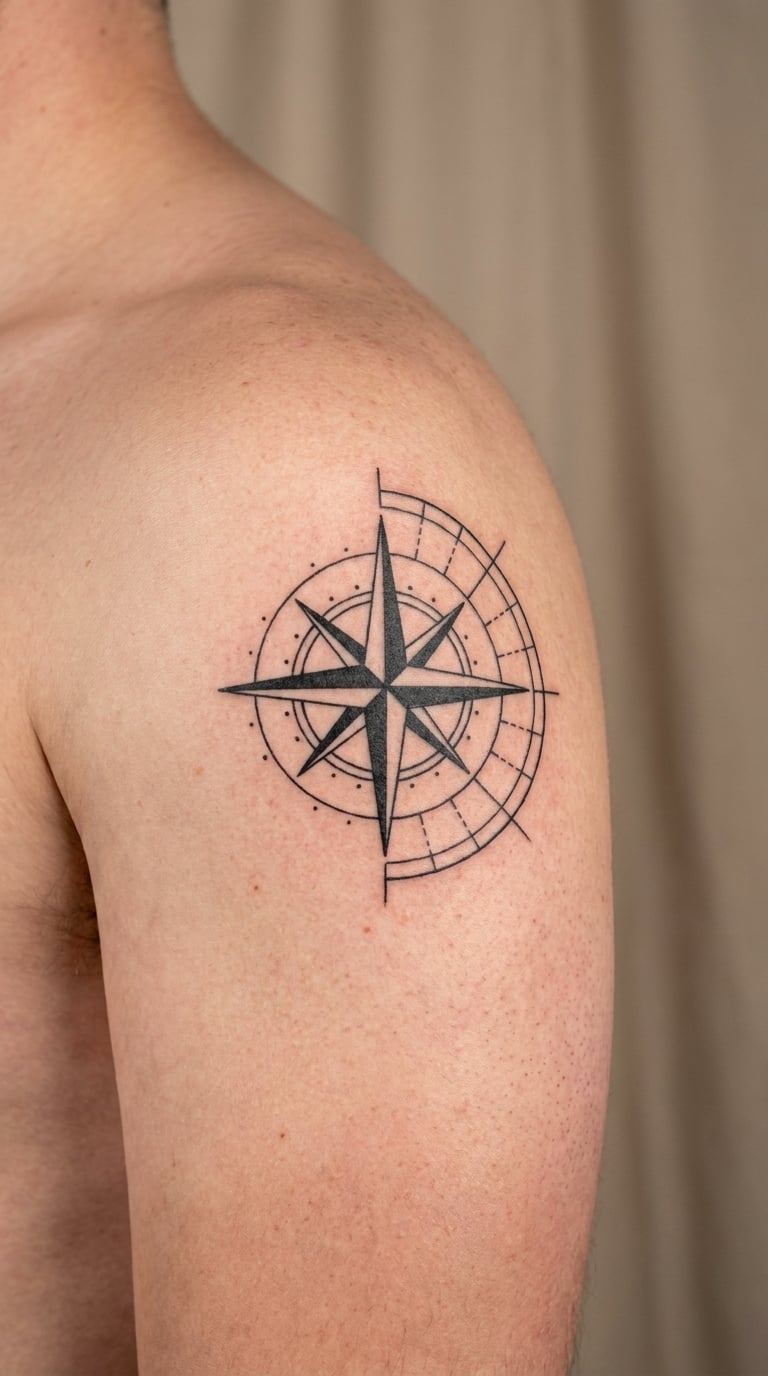
A four-point compass rose built from clean triangles, overlapped by a partial grid that stops before it reaches the edge of the design. The clash between a very old navigational symbol and a modern geometric overlay is the whole point of the piece.
Compasses show up constantly in military tattoos because navigation is one of the oldest military skills there is, and because a directional mark ages unusually well.
Placement: shoulder cap, chest, or the top of the forearm. A round design wants a round surface to sit on.
Size: 3.5 to 4.5 inches (9 to 11 cm) in diameter.
Style: geometric line work or blackwork with solid black points.
Pain: medium, though the shoulder cap catches the needle more than the bicep does.
Make it yours: have one grid square marked, and leave the rest of the grid open so it fades back into skin over time.
12. Five-Point Battle Star
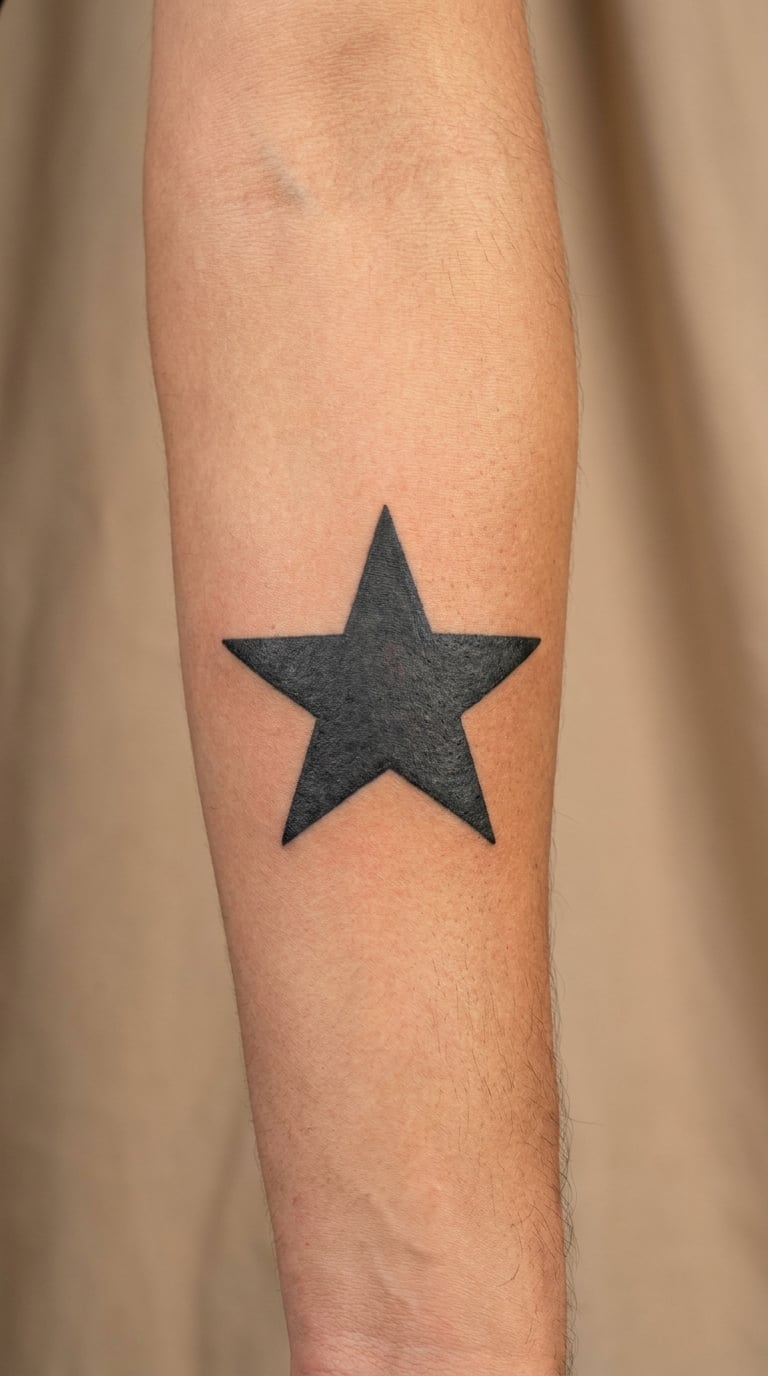
One star, outlined, with a second slightly smaller star tucked inside it. That nested arrangement is the traditional American way of drawing a campaign star, and it takes almost no skill to execute but a lot of planning to place well.
Stars have been used for service awards since the Second World War, and the meaning depends on the number of stars, the colours and where they were earned. If that history matters to you, check the specific award with the people who would know rather than going off a flash sheet.
Placement: anywhere flat and visible. Forearm, chest, upper arm all work.
Size: 1.5 to 2.5 inches (4 to 6 cm) wide. This is one of the few designs that works at genuinely small scale.
Style: traditional or solid black line work.
Pain: low to medium. Outlines only, small area, and the forearm is a friendly spot for a first tattoo.
Make it yours: stack two or three stars in a vertical line and add a small year beneath the lowest one.
13. Parachute and Open Canopy
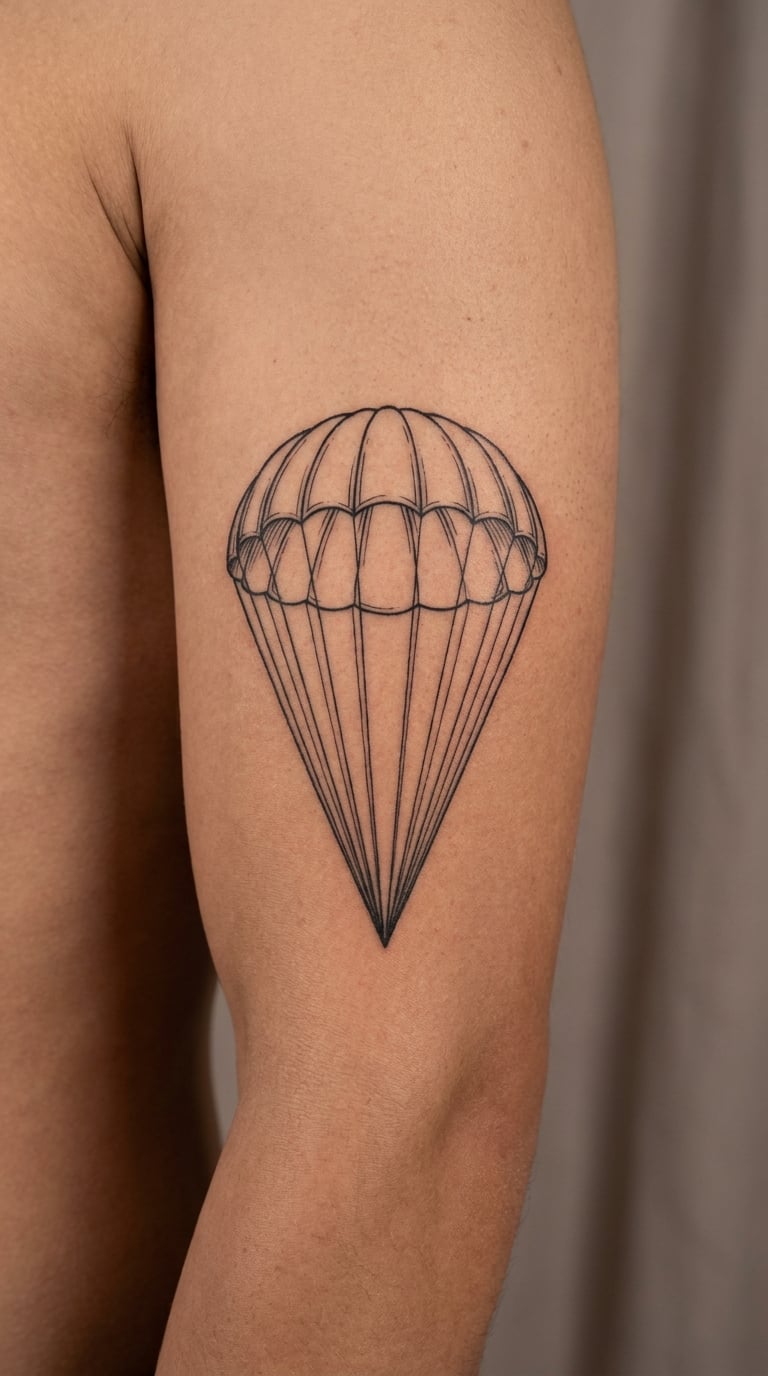
An open canopy drawn as a wide arc with panel lines, and a bundle of suspension lines converging down to a small figure or weight. Getting the convergence right is what makes it read as a parachute rather than a lampshade.
It is airborne imagery without the winged badge, and it holds a lot of personal weight for anyone who jumped. Shading stays simple: a soft gradient inside the canopy and solid black on the lines.
Placement: outer upper arm, calf, or mid-back. The triangular shape suits a flat area with room below it.
Size: 4 to 5 inches (10 to 13 cm) tall.
Style: blackwork with grey wash.
Pain: medium on the upper arm, high on the ribs if you push it there. Fine suspension lines are slow work.
Make it yours: have the figure below the canopy simplified to a single silhouette of someone specific.
14. Combat Boots With Dotted Route
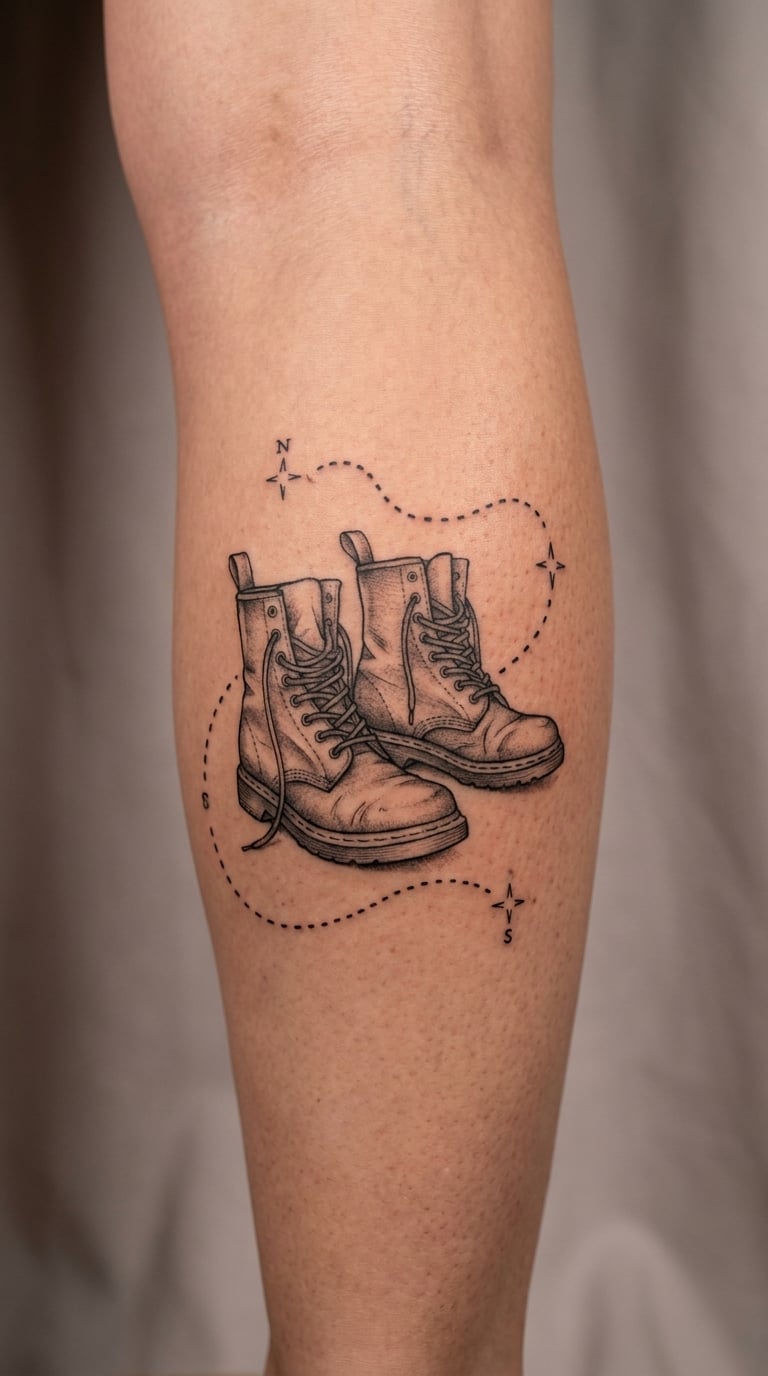
A pair of boots in profile, drawn with real proportions and light shading, joined by a dotted route line that travels between them and off the edge of the design. The route usually ends at a set of coordinates or a date, and that is the part people look at twice.
Boots are the most narrative object in the list. They represent walking somewhere, coming back, or leaving someone behind, and the route line turns a picture into a story.
Placement: calf, outer forearm, or vertically on the upper arm. A vertical arrangement suits the two-boot stack better than a horizontal one.
Size: 4 to 6 inches (10 to 15 cm) tall.
Style: black and grey realism.
Pain: medium to high on the outer calf, which is a sensitive area and wraps around the leg. Ask for a break partway through.
Make it yours: let the route run off the edge of the design and continue on a separate later session, so the map grows over years.
15. Service Ribbon Bar
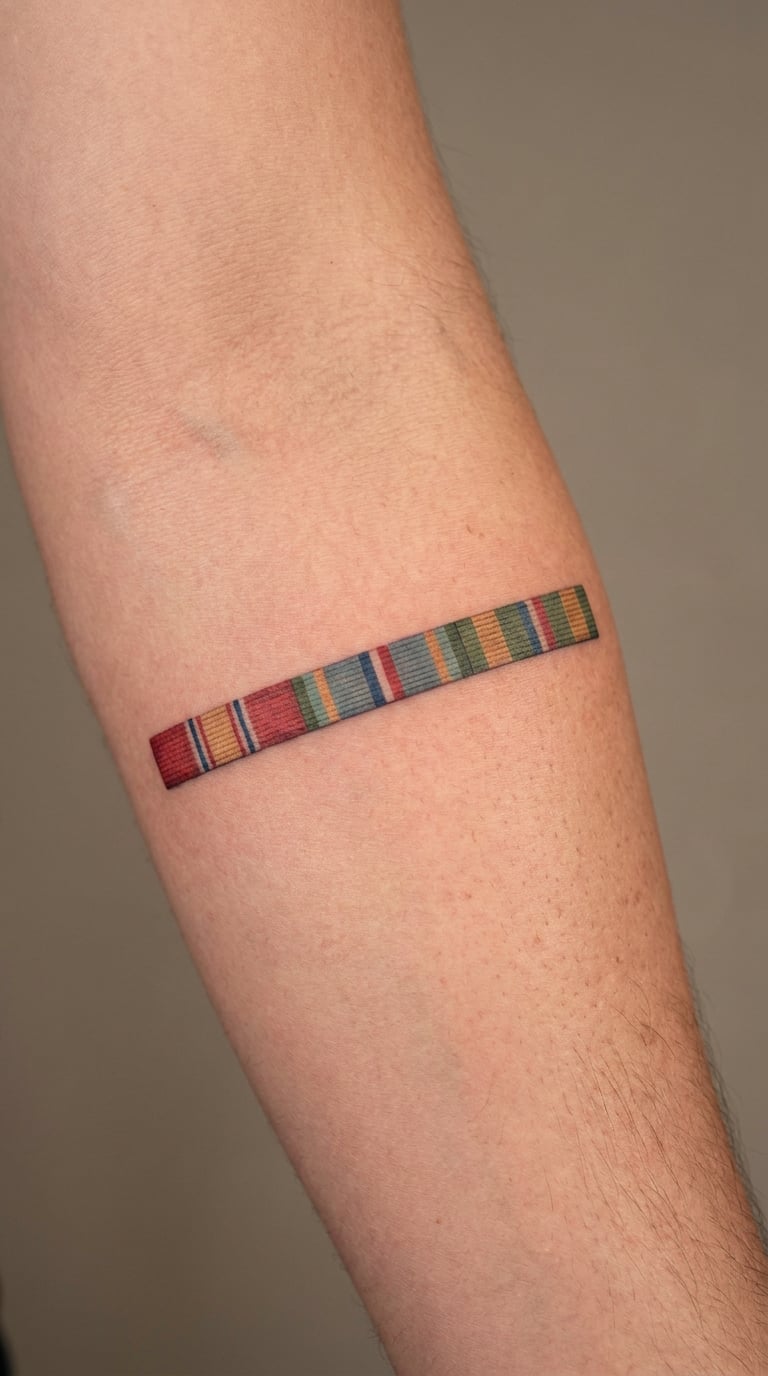
A single horizontal bar of small colour blocks, each one the width and stripe pattern of a specific ribbon, stacked in the order you wore them. Flat colour, no shading, hard edges between the blocks. It is the one design here that is genuinely a diagram rather than an illustration.
Wear only the ribbons you are entitled to reference, and check the colour order and stripe count with someone who was there. Getting a ribbon wrong is the fastest way for a piece that was meant to be personal to read as costume.
Placement: inner forearm reads like a wristwatch. Chest, above the heart, also works if the bar is wider.
Size: 3 to 4 inches (8 to 10 cm) wide and about half an inch tall.
Style: illustrative, flat colour, no gradients.
Pain: low to medium. The block fills go quickly; the thin gaps between them are the slow part.
Make it yours: keep one ribbon in a different colour order than the rest, marking a qualification or a specific tour.
16. Barbed-Wire Laurel
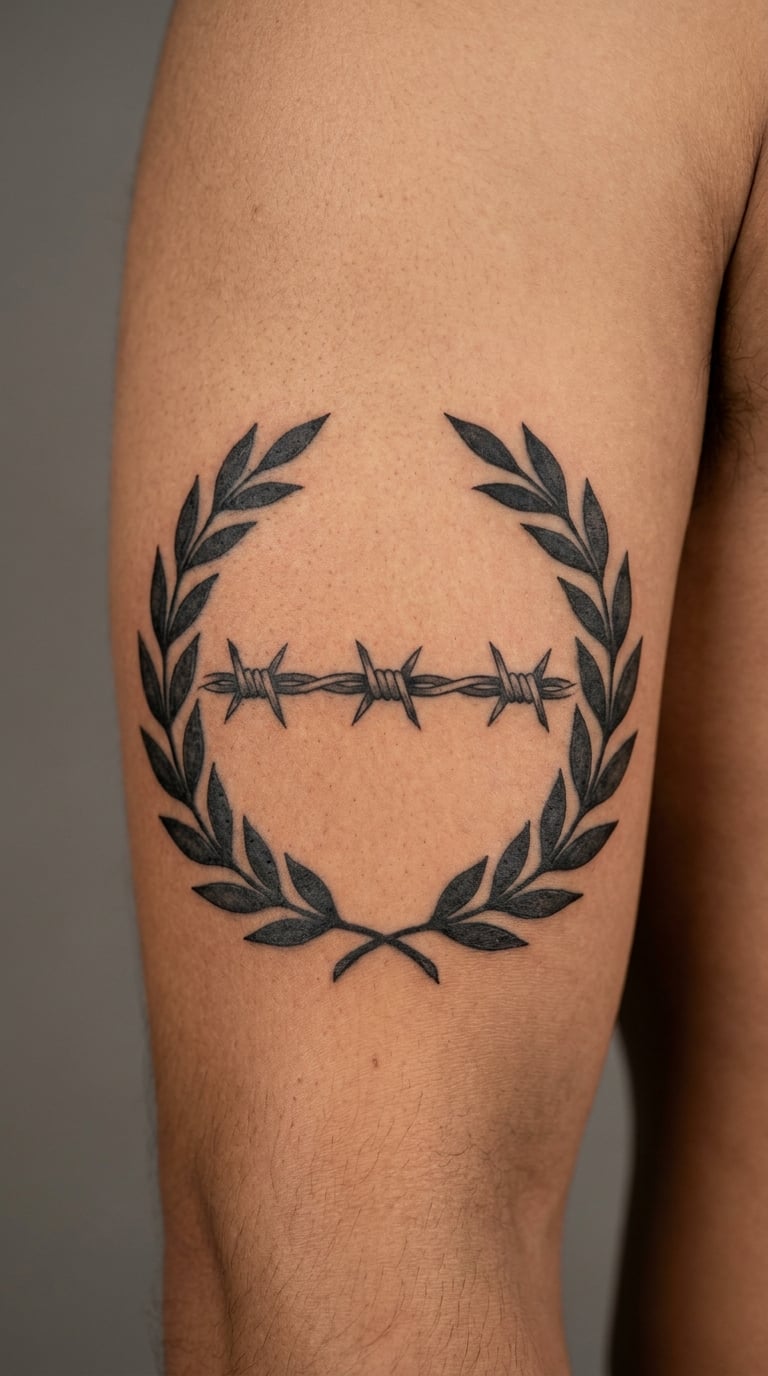
A laurel wreath with leaves worked individually along two arcs, and a single barbed-wire line running straight through the middle rather than forming the circle. The tension between the two shapes is the design. A wire bent into a wreath loses the contrast and turns decorative.
It is a memorial-leaning piece. The laurel has been a symbol of honour for a long time, and pairing it with wire keeps the meaning in the memorial register rather than the punishment one.
Placement: upper arm, back, or chest. The wreath wants a wide flat area, and half-sleeve panels are the natural home.
Size: 5 to 7 inches (13 to 18 cm) wide. Below 4 inches the leaves have nowhere to sit.
Style: blackwork or traditional with two or three greens in the leaves.
Pain: medium to high, and the sharp points of the barbs land hardest. This is a two-hour-plus piece for most people.
Make it yours: have the wire end open rather than closed, and let it trail off toward a name placed elsewhere on the body.
17. Vintage Aircraft Over Mountain Range
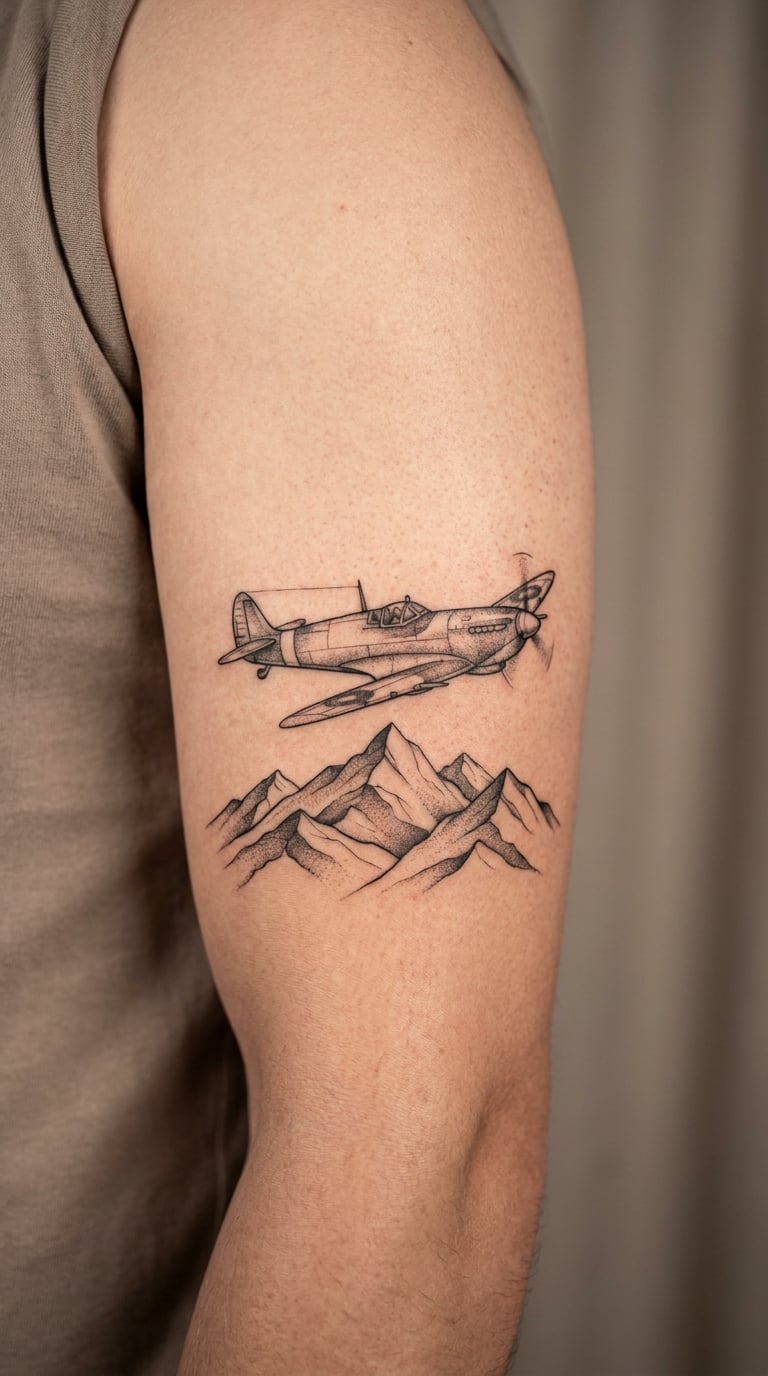
A side-profile aircraft in the upper third, three or four layers of mountain ridges below it in fading grey, and open sky above with a single band of cloud. It is a scenic piece rather than a single-motif one, which changes everything about how it has to be sized.
This is the design to pick when you have a large flat area and want something that reads from across a room. It fits the way the larger tattoos that symbolize protection do: broad, layered, and legible at distance.
Placement: outer upper arm, shoulder cap, or a broad back panel. It will not work on a forearm.
Size: 6 to 9 inches (15 to 23 cm) wide. Anything under 5 inches turns the ridges into grey smudges.
Style: black and grey realism with atmospheric perspective in the ridges.
Pain: high. Large-scale shading over the deltoid or upper back is long, sore and usually split across two sessions.
Make it yours: put the aircraft on the exact type you flew or worked on, drawn from a three-view reference sheet.
18. Morse Code Identification Line
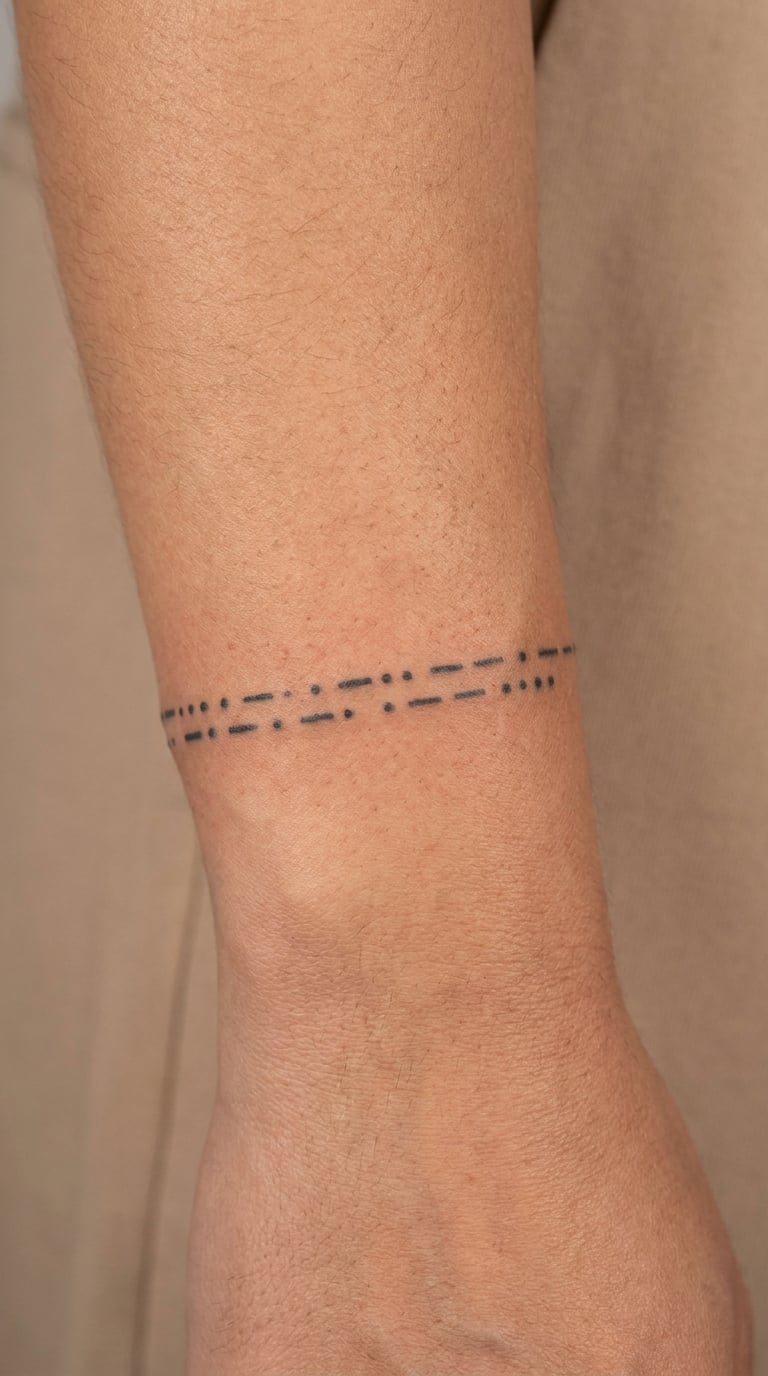
A narrow band of dots and dashes, nothing else, sometimes with a small engraved-style label at one end. It reads as a line of text to anyone who does not know the code and as a specific call sign to the people who do.
Spacing matters more than anything else here. Morse runs on the gap between symbols, not only the symbols themselves, and a compressed band that looks right on screen will read as noise once it is on skin. Have the artist verify every character with you before the outline goes down.
Placement: wrist, inner forearm, or a ring of the upper arm.
Size: 2 to 2.5 inches (5 to 6 cm) wide, and no taller than a few millimetres.
Style: fine line, solid black dots and dashes.
Pain: medium, and the wrist is tender in a specific wrist-bone way. The band itself is quick work; you mostly feel the wrist.
Make it yours: use a personal callsign, a surname in code, or a date in the standard numeric run.
19. Field Helmet With Star Accent
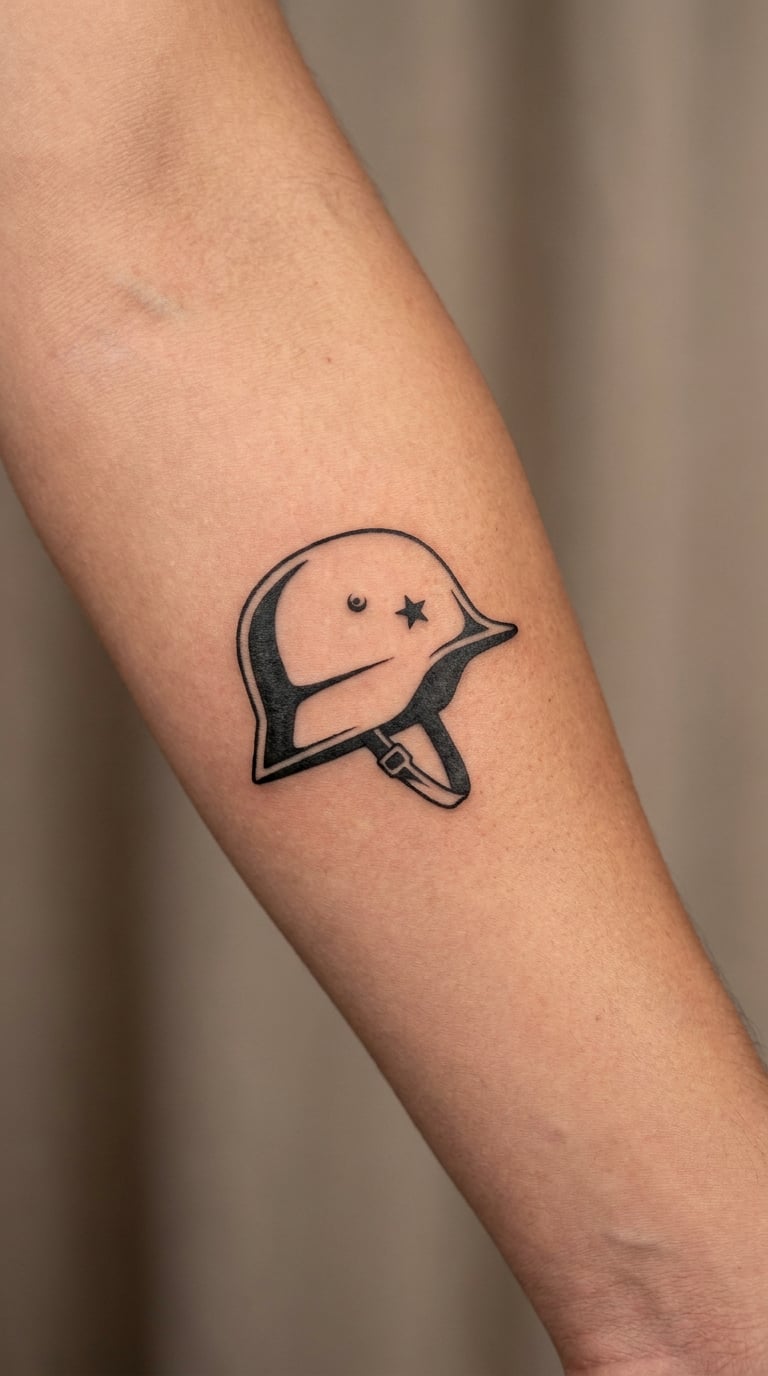
A helmet in side profile drawn as solid black shapes with a few highlight cuts left as bare skin, and a single star accent placed above the brow line. The highlight cuts are what make the black read as curved metal rather than a flat blob.
It is object portraiture more than symbolism, and it works well for someone who wants gear rather than badges on the skin.
Placement: outer forearm, calf, or upper arm. A horizontal profile suits the forearm better than the shoulder.
Size: 3.5 to 4.5 inches (9 to 11 cm) long.
Style: blackwork, or traditional with two colours.
Pain: medium. Solid black fields are fast, and the cut-out highlights are quick passes, so this is a shorter session than it looks.
Make it yours: have the chin strap hanging open rather than fastened, drawn with a couple of confident lines.
20. Minimal Formation Lines and Horizon
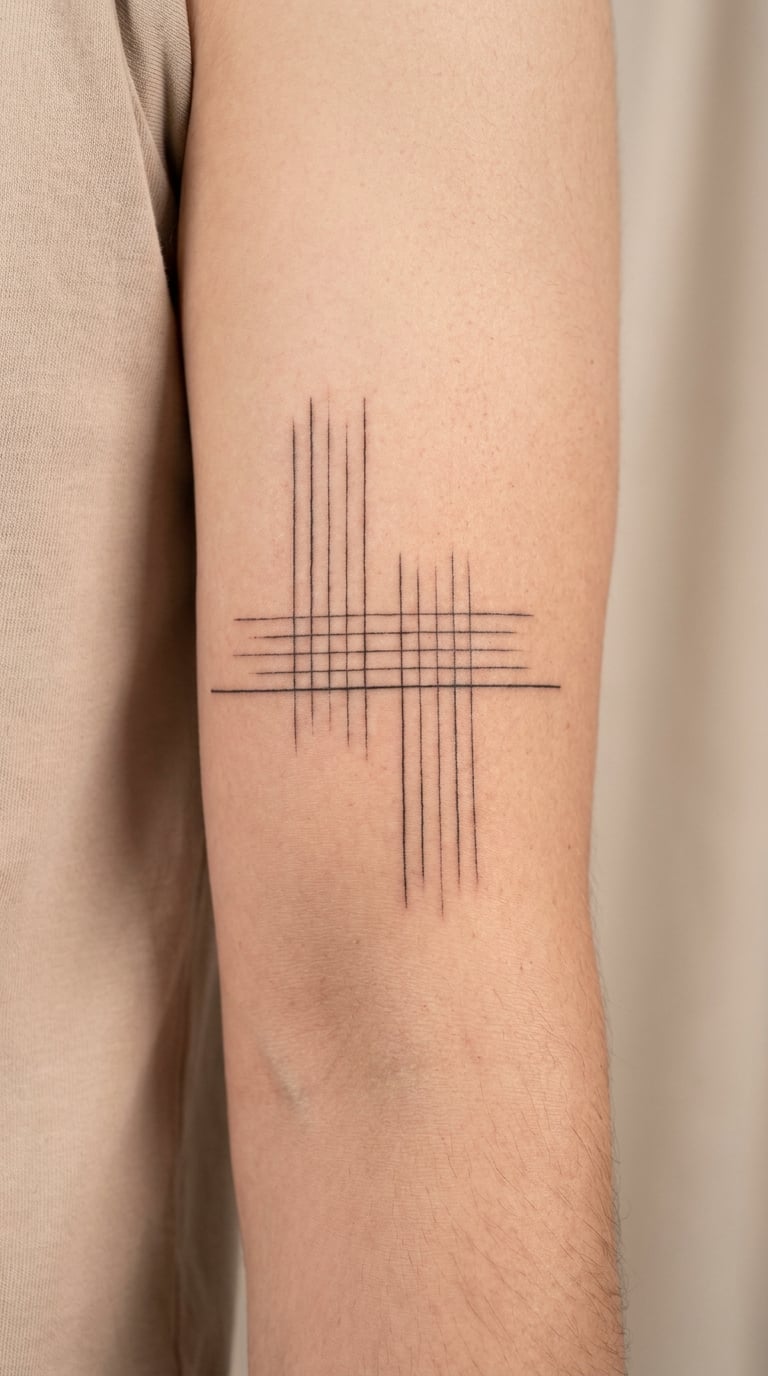
A band of parallel vertical lines set at even intervals, crossed by one clean horizontal horizon, with a small coordinate tucked underneath. No subject, no shading, no colour. It is the most abstract option in the list and the one that ages best.
Read one way it is a formation flying in line, read another it is a rank of names or a horizon with a departure point. Ambiguity is the appeal for anyone who finds literal military imagery too loud.
Placement: inner upper arm, ribs, or a band around the forearm. The rib version takes the most courage and hurts the most.
Size: 5 to 8 inches (13 to 20 cm) wide.
Style: minimalist or geometric line work.
Pain: medium on the upper arm, high on the ribs. Line spacing has to be exact, and a rushed session shows immediately in uneven gaps.
Make it yours: count the lines. A number that means something to you turns an abstract band into a private record.
How to Choose the Right Military Tattoo Design
Most regret I have seen in this genre comes down to one of five checks, and none of them involve the drawing itself.
- Start with the meaning, not the image. If you cannot say in one sentence what a design means to you, the picture is doing all the work and the meaning is borrowed. Borrowed meaning ages badly.
- Pick a size that suits the detail you actually want. Contour lines, morse code, a grille of small keys and a row of ribbon stripes all need more room than instinct suggests. Below about 2 inches, almost all of these simplify into grey.
- Match style to placement. Traditional colour with heavy outlines wants a flat, wide area. Fine line wants a curved surface it can follow. Fine line on fingers and hands fades fastest, usually within a few years.
- Be careful with copied insignia. Unit crests, branch emblems and rank devices are official designs. Using one without a connection to that organisation reads as costume, and generic artists frequently misrender them anyway.
- Think about distortion before the first line. Anything crossing a bicep, knee or rib stretches permanently when the arm or leg moves. A design that reads well on a flat screen can look pushed sideways in five years.
- Check the rules if you are still serving. Size and placement limits differ by branch and change more often than people expect. Confirm current policy with your own service rather than relying on anything written down, including this page.
Cost and Session Time
Rates vary more by city and by artist than by design. The useful way to think about it is by hourly rate plus shop minimum, because that is how studios actually charge.
Micro work under an inch or so, such as a single star or a small field radio, often starts at the shop minimum rather than an hour. Most US shops set that minimum in the low hundreds, and a one-hour session for a small piece usually lands in the same range. Simple blackwork at 3 to 4 inches typically runs one to two hours. Detailed black and grey or a full colour piece at 5 to 7 inches is a three-to-five-hour job, and a large scenic panel like the aircraft-and-mountains design is most often split across two sessions of five hours or more.
Two things move the number more than the size does. Colour adds time because each block is a separate pass, and a custom crest or a portrait likeness has to be drawn and approved before the first line, which is billed as design time. Ask for that fee up front. It is fair, and it is cheaper than a revision after the outline is already on your skin.
Aftercare Basics
Follow your artist’s aftercare instructions first, because they know what they did to your skin. On top of that, the standard list is short.
- Wash the area with clean lukewarm water and a fragrance-free cleanser, then pat it dry. Do not soak it.
- Apply a thin layer of whatever ointment or balm your artist recommends, and only for as long as they say. Too much cream traps heat.
- Expect the piece to look raised, red and slightly dull for the first few days. That is normal, and it settles.
- Keep it out of direct sun, and skip swimming pools, hot tubs and saunas until the surface has fully healed.
- Do not pick scabs. Ink flaking off in the first week is part of healing, not a mistake.
- Once healed, use a daily sunscreen on the area. That single habit does more for a tattoo than anything else, and it matters most on the colour designs in this list.
Frequently Asked Questions
What is the meaning of a military tattoo?
A military tattoo usually points at one of four things: service completed, a unit or branch belonged to, a specific place, or a person who did not come home. The meaning sits in the details as much as the image, which is why coordinates, dates and callsigns are the parts friends read. A design without one of those anchors usually reads as decoration rather than record.
Are military tattoos suitable for people who never served?
They are, but the approach changes. If you have no service connection, motifs taken from official unit crests or branch emblems tend to land badly with people who do have one. Personal experience in the same world, such as a family member’s service, gives you something honest to anchor the design. Plenty of wearers in this genre are relatives, and it is respected when the piece is about the person rather than the uniform.
What size should a military tattoo be?
Large enough for the detail to survive healing, and no larger. A contour map, morse band or ribbon bar needs 3 to 4 inches to stay readable. A single star works at under 2 inches. Big scenic compositions need 6 inches or more, usually on an upper arm or back. If your chosen spot cannot hold the size the design needs, change the design rather than shrinking it.
Can I use real ranks, units or dates in a military tattoo?
Yes, provided the details are accurate and the wearer has a real connection to what is being represented. Get ribbon colours, stripe counts, rank devices and names checked by someone who served with you before the outline is finished, since none of it can be changed once it is inked. Wrong details on a memorial piece are the kind of thing people notice for the rest of your life.
What is the least painful military tattoo placement?
The outer upper arm and the fleshy part of the forearm are the easiest going, mostly because there is muscle underneath. Wrist, inner forearm, ribs, collarbone and knee are the rough ones, and the collarbone is the spot most first-timers underestimate. A small design on the outer bicep is the version people regret least, since it heals quickly and stays easy to cover for work.
How much does a military tattoo cost in the US?
Most studios charge an hourly rate with a shop minimum, and the minimum often applies even to a small piece. Simple blackwork at 3 to 4 inches is commonly one to two hours, detailed black and grey or colour work at 5 to 7 inches runs three to five hours, and large scenic panels are usually split across two sessions. City and artist move the number more than design does, so ask for both the rate and the minimum before booking.
Conclusion
If this is your first military design, stay small and stay specific. A single battle star or a pair of dog tags with one coordinate is a piece you will still like in twenty years, and it gives you somewhere to build from.
If you are adding to an existing set, the quieter options in this list, the topographic map and the formation lines, sit quietly under the big pieces and give a collection structure instead of clutter. Bring two or three reference images and a written version of anything you want spelled out, and the session goes faster than you expect.