
22 Magpie Tattoo Ideas: Best Small and Bold Designs (October 2026)
A magpie tattoo is a bird tattoo built around high contrast — glossy black wings, a white shoulder, a long wedge tail and a pale eye — which makes it read clearly at almost any size. People choose it for its cleverness and its habit of turning up wherever something interesting is happening, and because a lone bird can quietly nod to the old One for Sorrow rhyme without anyone having to explain it. These 22 magpie tattoo ideas cover everything from a 1.5 inch mark behind the ear to a 6 inch piece built for a sleeve.
What makes a magpie design work on skin is the contrast between the heavy black and the empty white, not the detail. Fine-line versions survive because the bird’s shape is doing the work, and bold versions survive because the black block stays solid after healing. Most of these read well for beginners, though a few want a steady hand. Autumn is the busiest booking season for bird work, so if you are planning ahead, book well before the end of 2026 rather than in the last few weeks.
22 Magpie Tattoo Ideas: Quick Guide
| Idea | Style | Best placement | Size | Pain |
|---|---|---|---|---|
| 1. Fine-line in flight | Fine line | Inner forearm | 2.5-3.5 in | Low to medium |
| 2. Blackwork spread wings | Blackwork | Outer upper arm | 4-6 in | Medium |
| 3. Perched on a branch | Traditional | Forearm | 3.5-5 in | Low |
| 4. Neo-traditional portrait | Neo-traditional | Upper arm | 3.5-5 in | Medium |
| 5. Eye and beak | Micro-realism | Knuckle or wrist | 1-1.5 in | Medium |
| 6. Minimal silhouette | Minimal black | Inner wrist | 1.5-2.5 in | Low |
| 7. Magpie and moon | Dotwork | Outer calf | 2.5-3.5 in | Medium |
| 8. Watercolour with splashes | Watercolour | Shoulder | 4-5.5 in | Medium to high |
| 9. Two facing each other | Fine line or blackwork | Upper chest | 3.5-4.5 in | Medium to high |
| 10. Nest with three eggs | Fine line | Inner upper arm | 2.5-3.5 in | Low |
| 11. Across the collarbone | Fine line | Collarbone | 3.5-4.5 in | High |
| 12. Geometric from shapes | Geometric | Forearm | 2.5-3.5 in | Low to medium |
| 13. Australian floral frame | Colour realism | Outer thigh | 4.5-6 in | Medium |
| 14. Checkerboard feathers | Blackwork | Upper arm | 3.5-5 in | Medium |
| 15. Behind the ear | Fine line | Behind the ear | 1-1.5 in | Medium |
| 16. Head in a circular moon | Black and grey | Forearm | 2-2.5 in | Low to medium |
| 17. Art Nouveau with vines | Ornate line | Outer arm | 4.5-5.5 in | Medium |
| 18. Old-school fence post | Old school | Calf | 3.5-4.5 in | Medium |
| 19. Monoline on the rib | Monoline | Rib | 3-3.5 in | High |
| 20. Realistic holding a feather | Semi-realism | Inner forearm | 3.5-4.5 in | Low to medium |
| 21. Street-style panel | Illustrative blackwork | Calf or forearm | 3.5-4.5 in | Medium |
| 22. Colourful wildflowers | Colour realism | Outer upper arm | 5-6 in | Medium |
1. Fine-Line Magpie in Flight
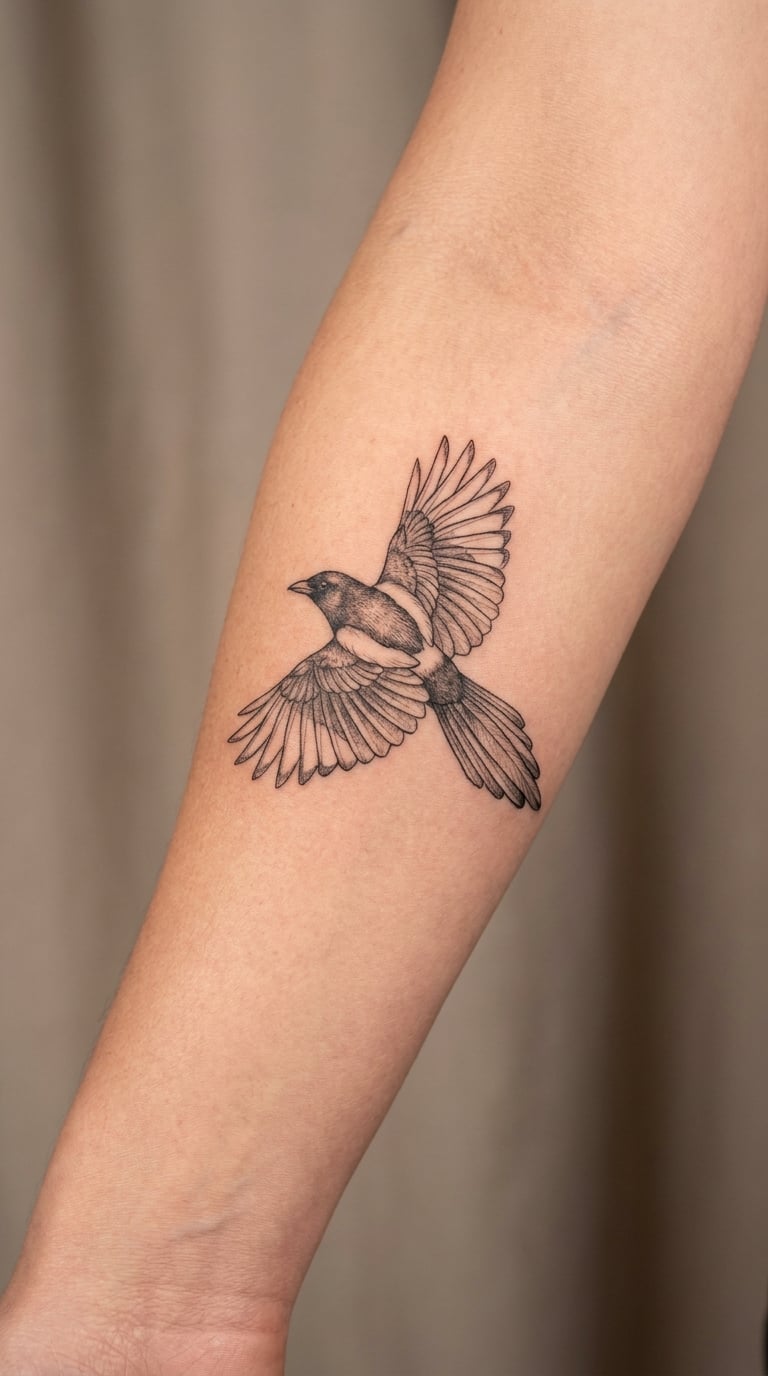
The bird is drawn in side profile mid-flight, wings stretched back and forward in a long diagonal, with the tail trailing as a single tapered line. Feather detail stays minimal — a couple of inner lines on the primary feathers and one soft line for the wing edge — so the whole thing reads as movement rather than a diagram.
This is the version most people ask for as a first bird tattoo. People choose it because a magpie in flight feels restless and clever rather than heavy, and because the design sits comfortably on curved skin without needing to follow a flat plane.
Placement: inner forearm, inner bicep, or along the outside of the ankle. Size: 2.5 to 3.5 inches (6 to 9 cm). Style: fine line, single-needle, no shading.
Pain: low to medium on the inner forearm. Fine lines in one pass are quick, so the session is usually short. One honest note: hairlines fade faster than solid black, so ask your artist to run the outline a touch heavier than feels right now.
Make it yours: have the flight path follow a real line, like a wire or a fence, or angle it to sit alongside existing arrow or branch work.
2. Blackwork Magpie With Spread Wings
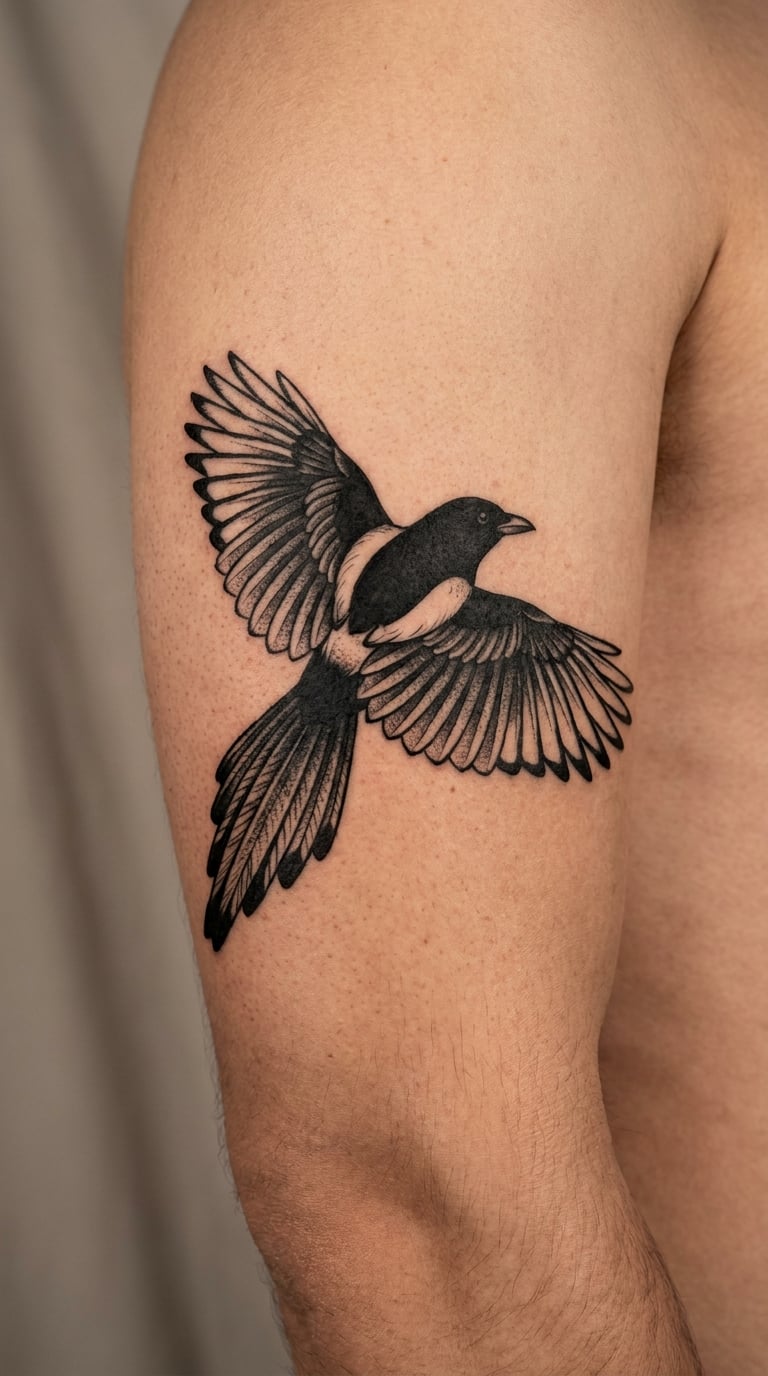
A front-facing bird with both wings opened wide, built from large solid black shapes with thin white gaps left as highlights. The tail is a long block of ink with a few tapered splits, and the eye is a small white dot inside a black head. Nothing decorative surrounds it — the silhouette carries the whole piece.
It reads as bold and confident, and it fills a flat area like the outer upper arm without looking like filler. If your other tattoos are delicate line work, this is the one that makes the collection read as intentional rather than a series of small additions.
Placement: outer upper arm, upper back, chest. Size: 4 to 6 inches (10 to 15 cm). Style: bold blackwork with negative-space highlights.
Pain: medium. The upper arm is fleshy and forgiving, and the large black areas go in faster than you expect. Solid black is the most durable finish in this list — it sharpens rather than fades over the years.
Make it yours: have the white highlight shaped into a crescent or a wing-shaped cut, or add a thin ring of white space so it can sit inside an existing black-and-grey piece.
3. Traditional Magpie Perched on a Branch
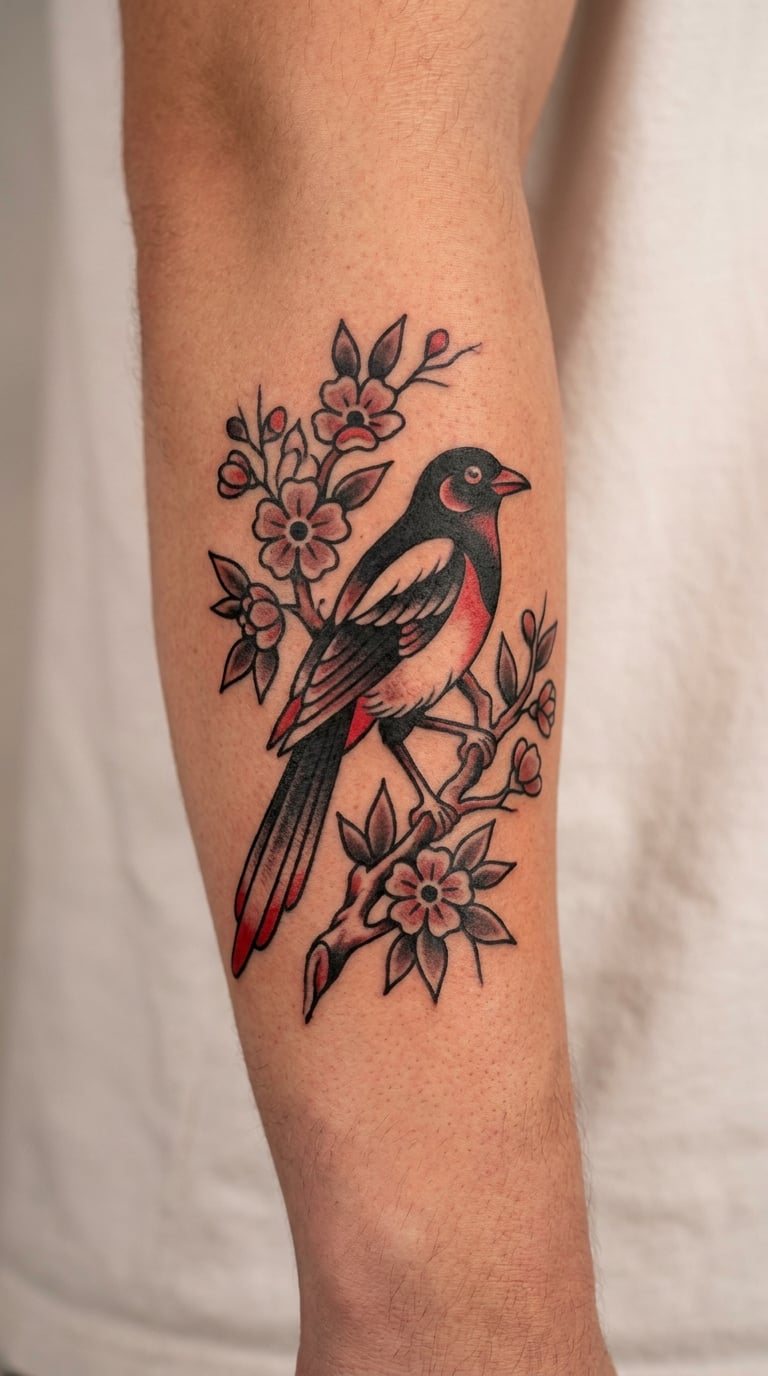
Side view, sitting low on a forked branch with blossoms at either end. The outlines are bold and even, the black is a warm dense black, and the blossoms carry a small amount of red and soft pink. Shading is limited to a few hard shadow blocks under the wing and along the belly.
This is the friendliest of the traditional options, and the one that ages best. Traditional birds are built to be read from across a room, so the shape stays clear even when the ink softens.
Placement: forearm, calf, upper arm. Size: 3.5 to 5 inches (9 to 13 cm). Style: American traditional, bold outline with limited colour.
Pain: low on the forearm and calf. Most of the time is spent on the branch and blossom detail rather than the bird. Colours on the outer forearm fade faster than they do on the upper arm, so ask for a deeper blush pink.
Make it yours: swap the cherry blossom for a native bloom or a thorny branch, or add a small date tucked into the fork of the branch.
4. Neo-Traditional Magpie Portrait
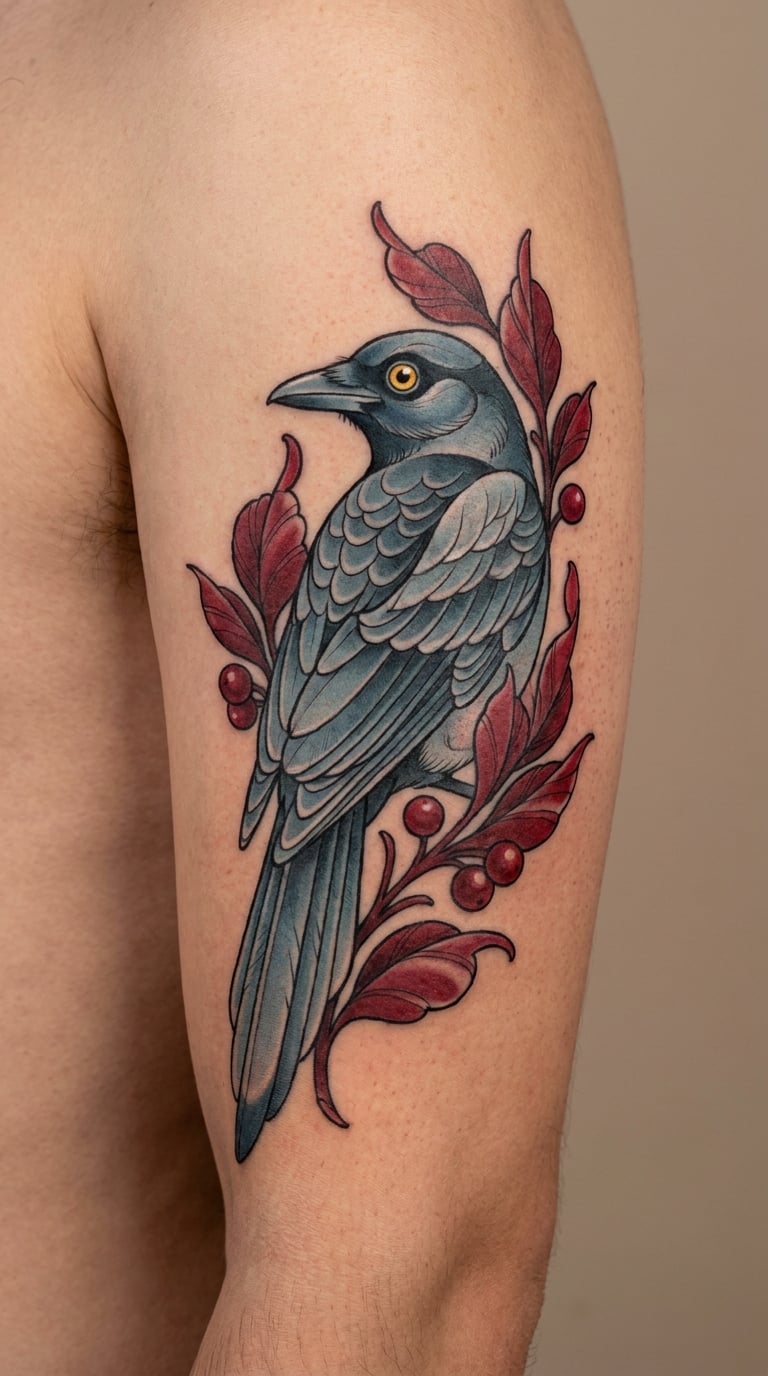
A three-quarter profile with the head turned toward the viewer, so you get a glossy eye, a defined beak and layered feather rows running down the neck. The plumage is built in blue-grey tones over black, and the leaves behind it are a deep red with a dark outline. It has more depth than a straight traditional bird without going semi-realistic.
People pick this one for the colour. Magpies have that iridescent blue-green sheen in real life, and colour is the only way to show it, so the design leans into the part of the bird that black-and-grey work always leaves out.
Placement: upper arm, outer thigh, shoulder. Size: 3.5 to 5 inches (9 to 13 cm). Style: neo-traditional with saturated colour and heavy black line.
Pain: medium. Colour layering means going over the same areas repeatedly, which lengthens the session. The blue-greys can look greyer over time, so a good artist will build saturation in from the start rather than chasing it lighter.
Make it yours: keep the eye the same pale yellow every magpie has, and change only the foliage — thistle, olive, wattle, whatever belongs to your story.
5. Micro-Realism Magpie Eye and Beak
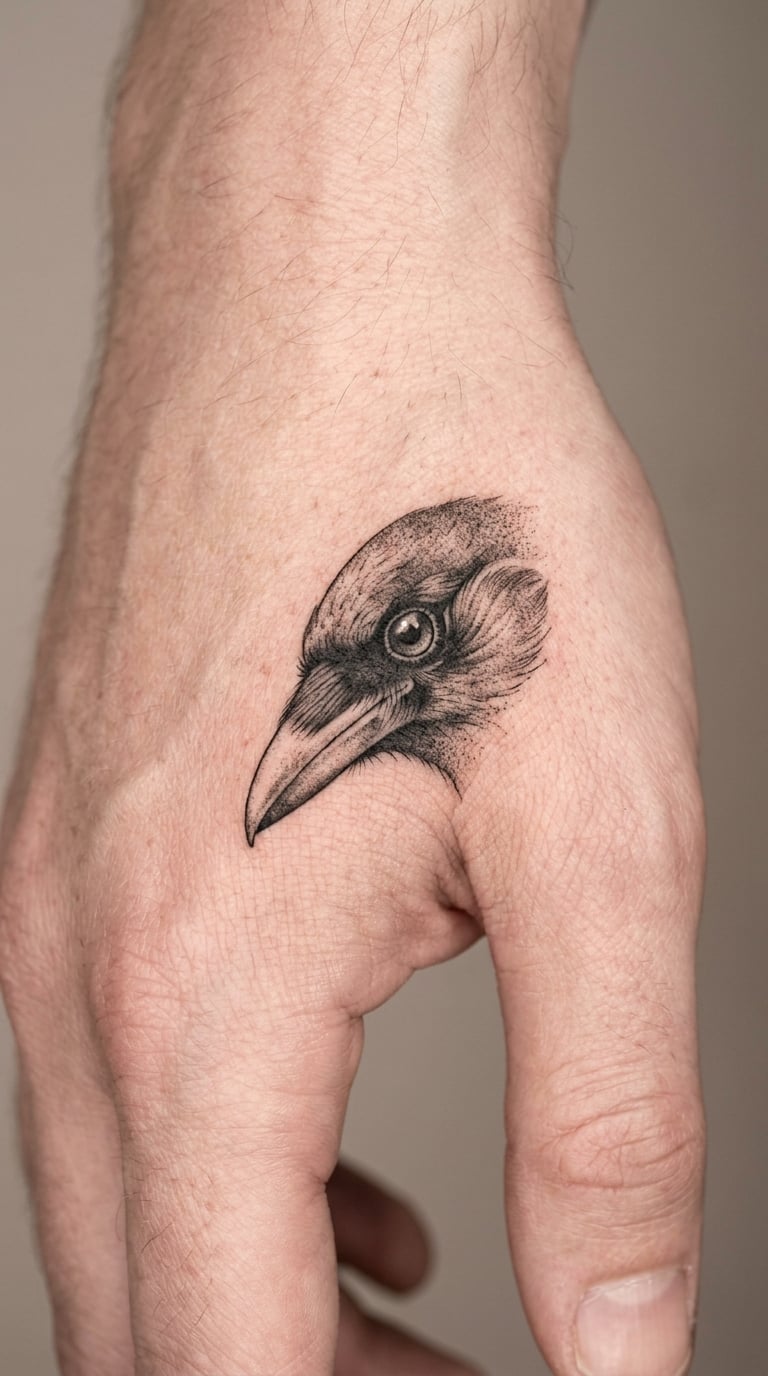
The design crops in hard on the head: one pale eye with a fine dark ring, the hard black mask around it, and the long pointed beak in profile with a soft grey gradient along the lower mandible. Two or three short feather strokes give scale without turning it into a full bird.
It is the most personal of the small designs, because there is so little of it and all of it is face. A magpie’s eye carries most of its expression, so cropping there feels like a portrait of the bird rather than a symbol of it.
Placement: beside the index finger knuckle, inner wrist, behind the ear. Size: 1 to 1.5 inches (2.5 to 4 cm). Style: micro-realism in black and grey.
Pain: medium. Hands and wrists sting more than forearms because the skin is thin and the nerves are close. Micro work takes patience rather than endurance — the artist will be slow, and you will be sitting a while.
Make it yours: ask for the beak to be slightly open, which shifts the whole expression, or have the design fade out at the back of the head instead of ending on a hard line.
6. Minimal Magpie Silhouette
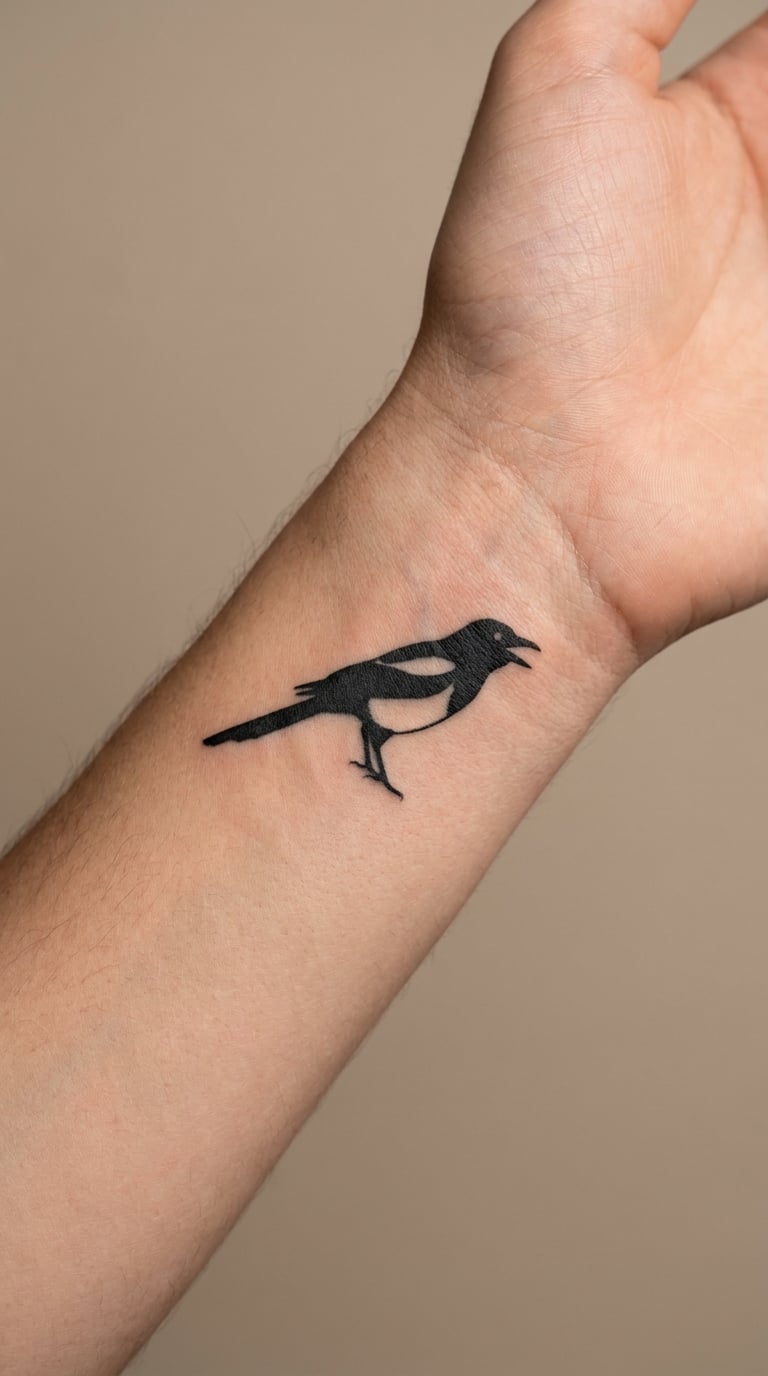
One flat black shape: open beak, rounded chest, folded wing suggested by a single notch, and a short wedge tail. No line work inside, no background, no shading. Everything is carried by the outline, and the edges are clean enough that the bird still reads at a glance from across a room.
This is the easiest magpie design to get right and the one I would put on a first forearm. It is also the most flexible, because a plain silhouette slots into an existing composition without fighting whatever is already there.
Placement: inner wrist, ankle, behind the ear, or the small of the back. Size: 1.5 to 2.5 inches (4 to 6 cm). Style: minimal solid black silhouette.
Pain: low, though the inner wrist is twitchy and the skin moves a lot. Solid black is very durable, so this is the design that still looks crisp a decade from now. The only risk is the silhouette reading as a generic small bird if the tail is too short — insist on a long wedge tail.
Make it yours: have the tail extend into a thin line that runs along your wrist, or place it so it lines up with a watch strap or bracelet.
7. Magpie and Moon in Dotwork
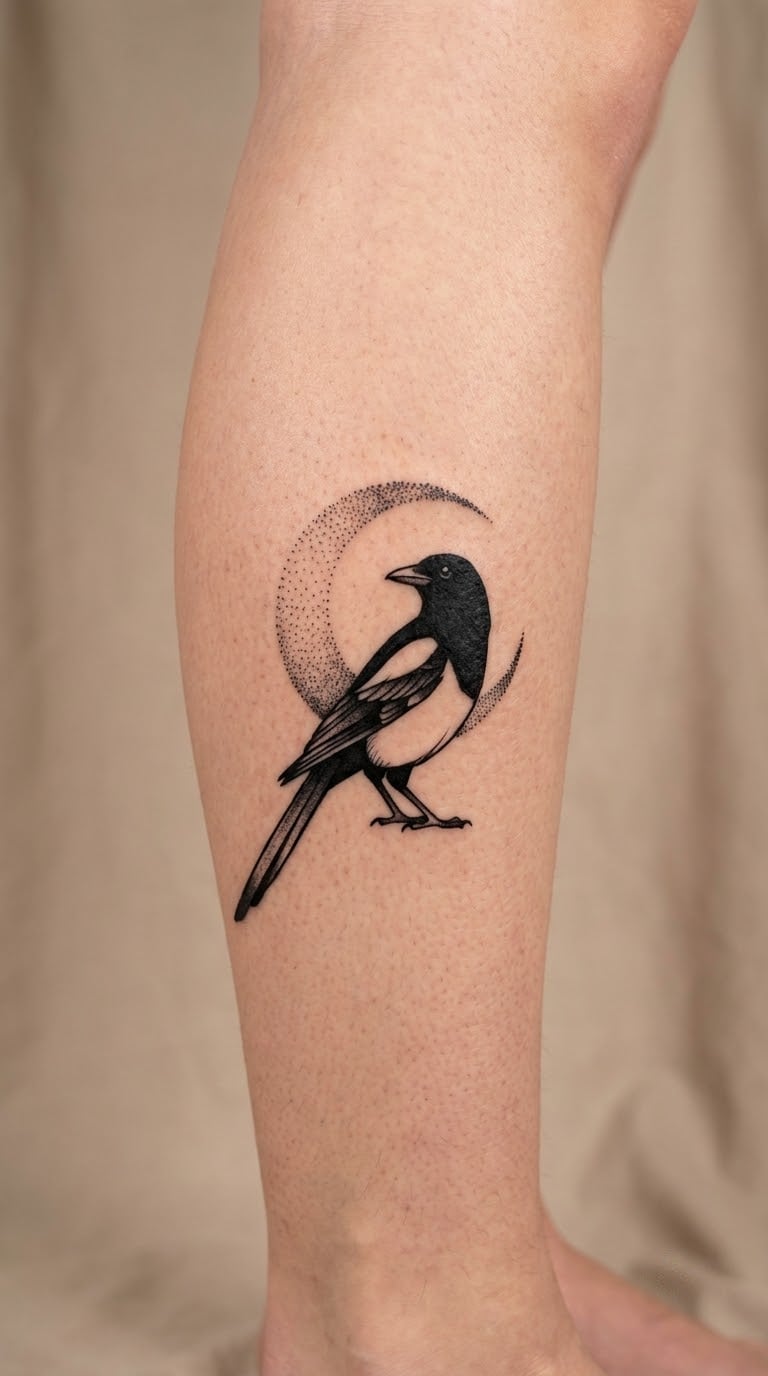
A magpie in profile on one side, a crescent on the other, with the crescent formed entirely from carefully graduated dots rather than solid fill. The bird is rendered in a lighter line work with a few solid accents in the wing, so the dot texture and the line texture read as two different materials.
Dotwork ages well because there is nothing thin to lose, and a magpie and moon pairing is a quiet way to signal the bird’s nocturnal, watchful side. It is a design that rewards a closer look.
Placement: outer calf, shoulder, forearm, or the back of the upper arm. Size: 2.5 to 3.5 inches (6 to 9 cm). Style: dotwork with fine line accents.
Pain: medium. Dotwork is slow, so the needle makes a lot of passes over a small area. On the outer calf most people settle after the first ten minutes. Fading is minimal because the dots hold pigment well, but ask the artist to leave a little breathing room between each one.
Make it yours: reverse the dots inside the crescent to make a solid black moon, or add a scatter of tiny stars at different densities around it.
8. Watercolour Magpie With Ink Splashes
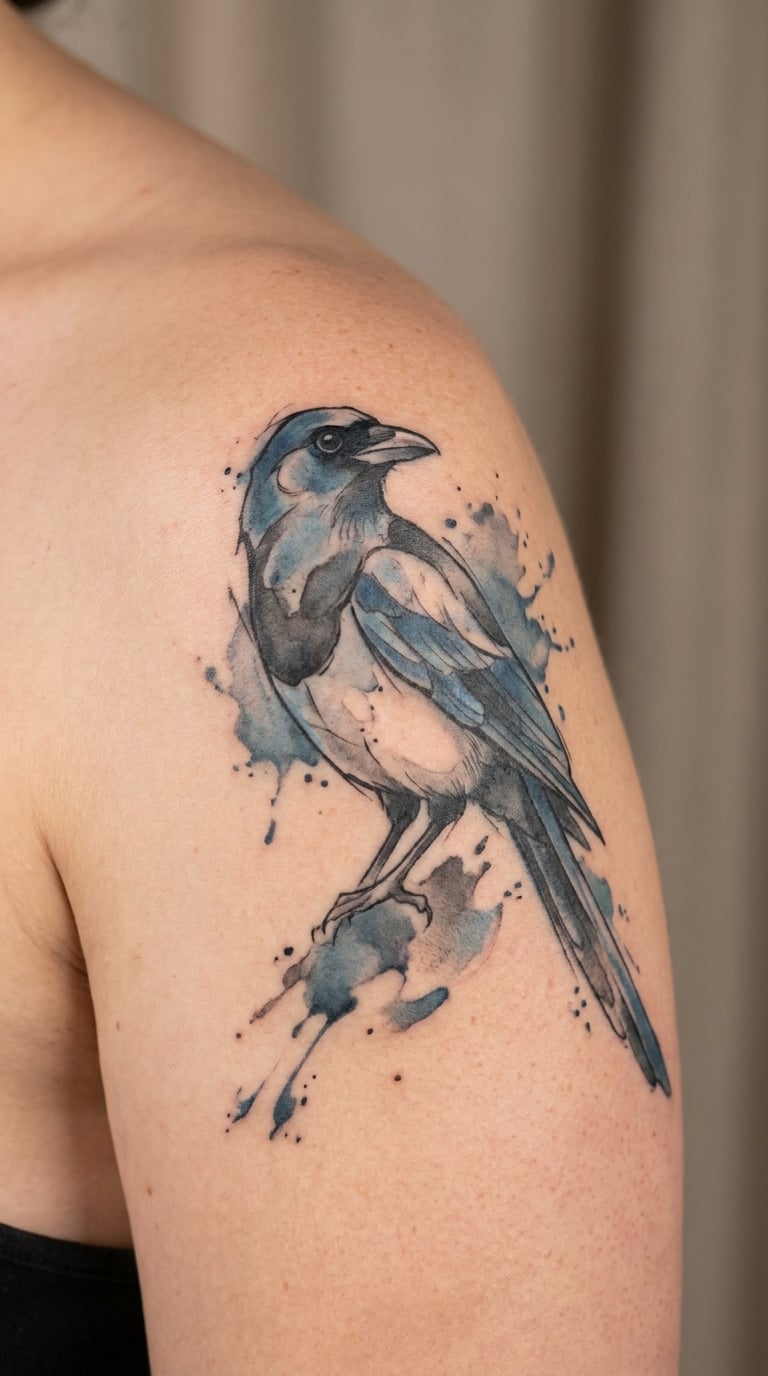
A sharper, darker bird in the centre with loose blue, charcoal and white wash bleeding outward from the wing and tail edges. Some pigment is left to pool and dry unevenly, and a few hard splatter dots sit outside the wash so the design has a hard edge and a soft edge at the same time.
Watercolour is the opposite approach to traditional work — the bird is part-real and part-bleed, and that mix is what makes it feel contemporary. It suits people whose other ink is already colourful and who want something that does not look like a copy of a flash sheet.
Placement: shoulder, outer upper arm, upper back. Size: 4 to 5.5 inches (10 to 14 cm). Style: watercolour with a semi-realistic core.
Pain: medium to high. The shoulder is a bony, sensitive spot, and colour work means several passes. The lighter washes sit higher in the skin, so pale blue and grey will soften more than the black core. Ask for the darkest values placed deeper.
Make it yours: use two colours that mean something to you rather than the usual blue and grey, and keep the bird’s body solid black so it stays legible as the wash fades.
9. Two Magpies Facing Each Other
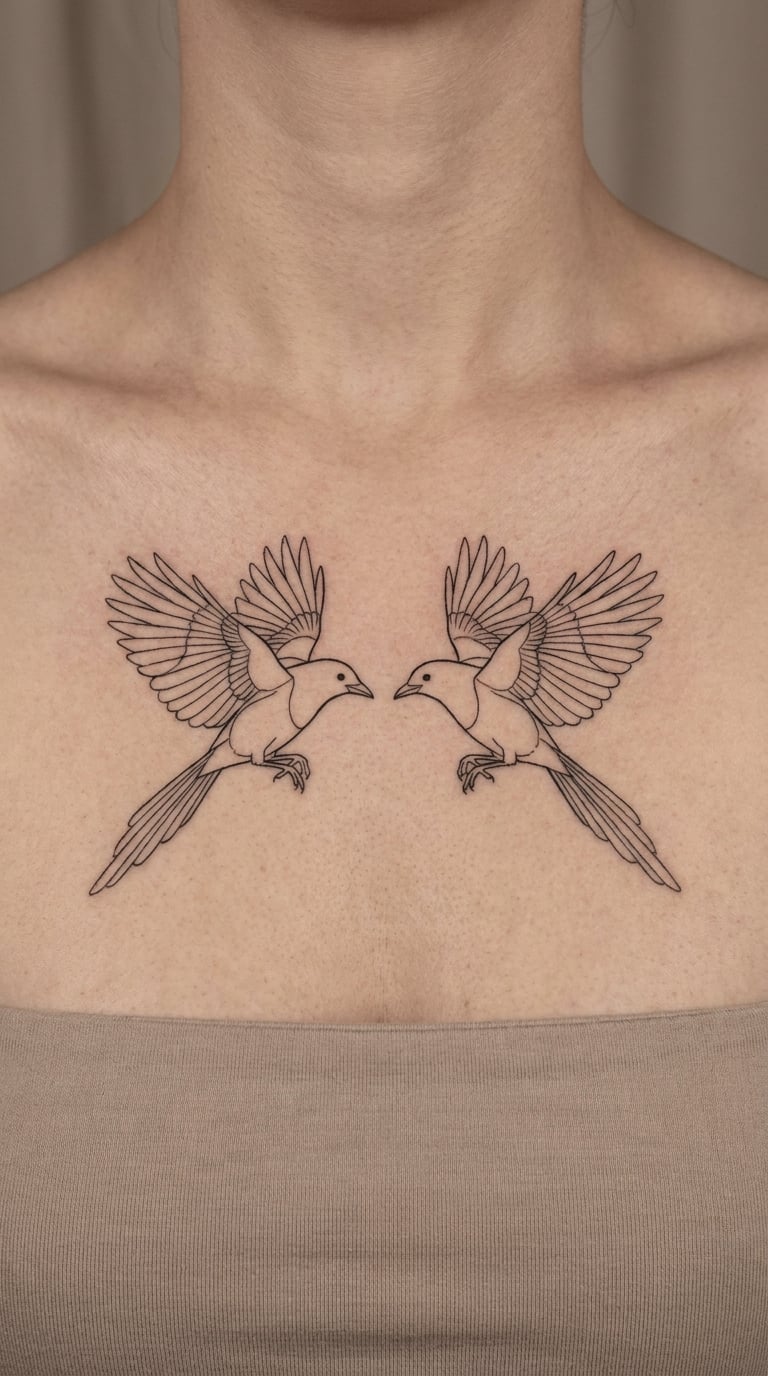
Two birds in profile, mirrored around a central gap, with wings raised in the same gesture on each side. They are close to symmetrical without being identical — one head tilts a degree further, one tail sits a fraction lower — which stops the pair looking stamped.
The number matters more here than in any other design on this list. A pair reads as Two for Joy, and plenty of people get it for a partner, a sibling or a close friend. It also works as a straight answer to anyone who raises the One for Sorrow worry: there is a second bird, and you planned it that way.
Placement: upper chest, collarbone, inner forearms as matching halves, or split across both calves. Size: 3.5 to 4.5 inches (9 to 11 cm) across. Style: fine line or light blackwork.
Pain: medium to high, since the upper chest and collarbone are both sensitive. Drawing both birds in one sitting keeps the line weight consistent. A healed fine-line pair on the chest can look slightly lighter than the same pair on an arm, because sun exposure fades it faster.
Make it yours: have the two birds face each other with a small gap between the beaks rather than touching, or have them fly in the same direction instead of mirroring.
10. Magpie Nest With Three Eggs
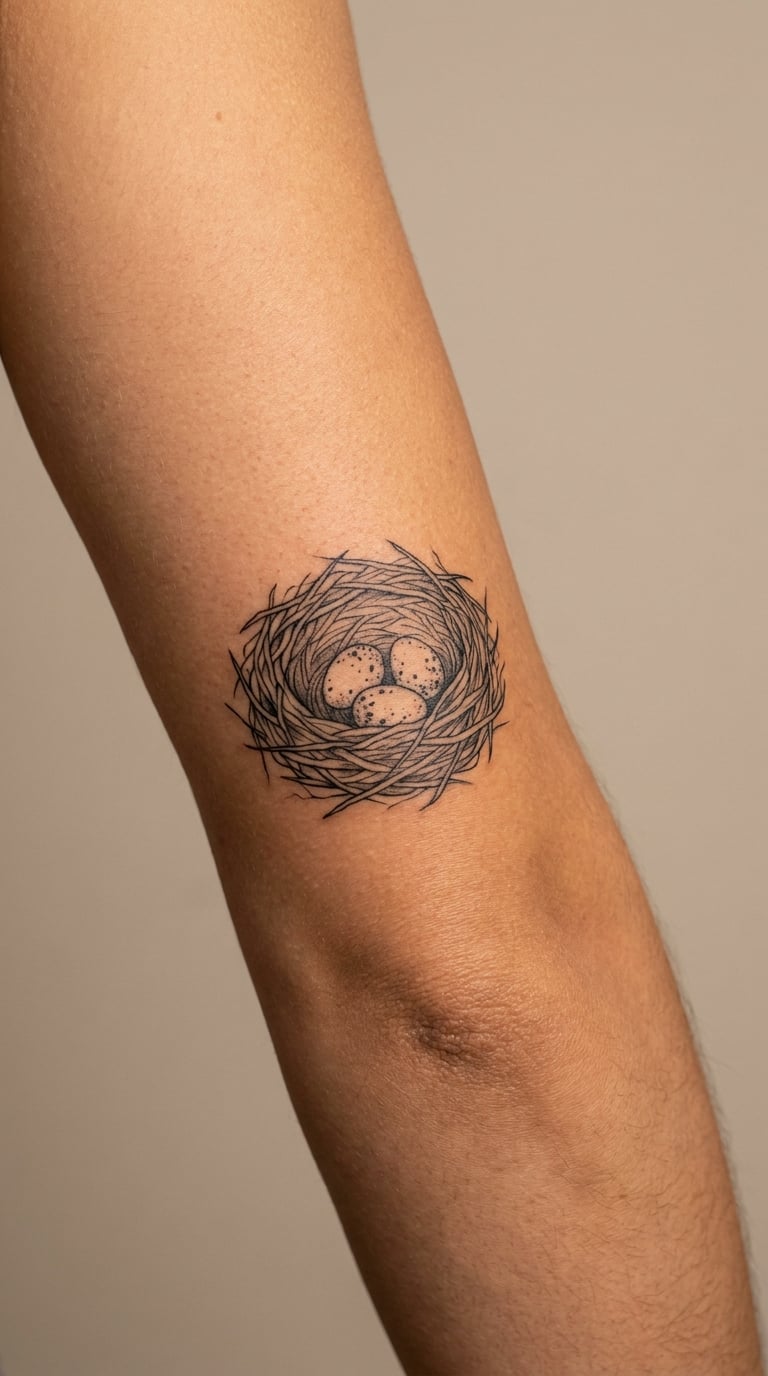
A woven nest built from overlapping curved lines, with three eggs sitting low inside it and one loose feather drifting just above. Everything is line work — the nest texture comes from how many arcs cross each other, not from shading. A few short grass blades under the nest ground it.
A nest is the quieter version of the same symbolism. Where a bird in flight suggests movement and intelligence, a nest points at home, family and the fact that you were there for the beginning of something.
Placement: inner upper arm above the elbow, inner forearm, or the hip crease. Size: 2.5 to 3.5 inches (6 to 9 cm). Style: fine line, woven-texture nesting.
Pain: low to medium on the inner arm. The crossing lines take time rather than hurt, so expect a slowish session. It is also a good design for a memorial — a bird you lost, or a bird that sat in the same tree outside your window for years.
Make it yours: change the number of eggs to match your household, or have one egg already hatched with a small empty shell beside it.
11. Flying Magpie Across the Collarbone
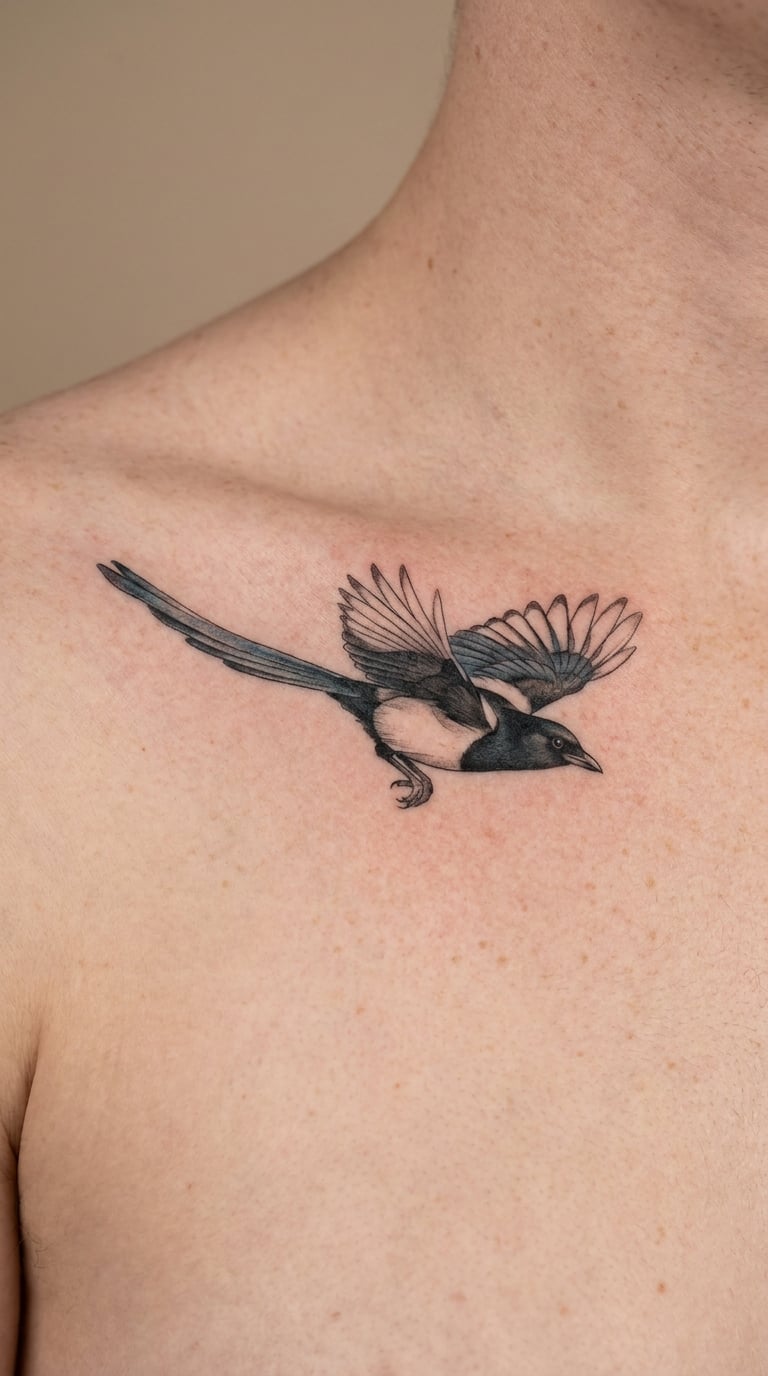
A long, narrow composition stretched along the line of the collarbone, with the bird’s wings extended horizontally so the body is the same width as the bone. Negative space does the work: the tail fades into two or three short strokes rather than a solid block, and the wing is described with a handful of clean lines.
Collarbone work sits high and reads from the front, which is why this placement feels more exposed than a forearm piece. It suits people who want a bird tattoo that looks designed for the body rather than parked on it.
Placement: just above or just below the collarbone, running from the shoulder toward the sternum. Size: 3.5 to 4.5 inches (9 to 11 cm) wide. Style: fine line with light shading on the wing only.
Pain: high. Bone sits right under the skin here and the area stays uncomfortable for a long stretch. Break the work into two sessions of about an hour each, and expect to fidget. Placement on a moving area means the outline needs to be bold enough to survive the movement.
Make it yours: run the tail toward the shoulder so it disappears under a collar, or mirror a second bird on the opposite collarbone so the two face outwards.
12. Geometric Magpie Built from Shapes
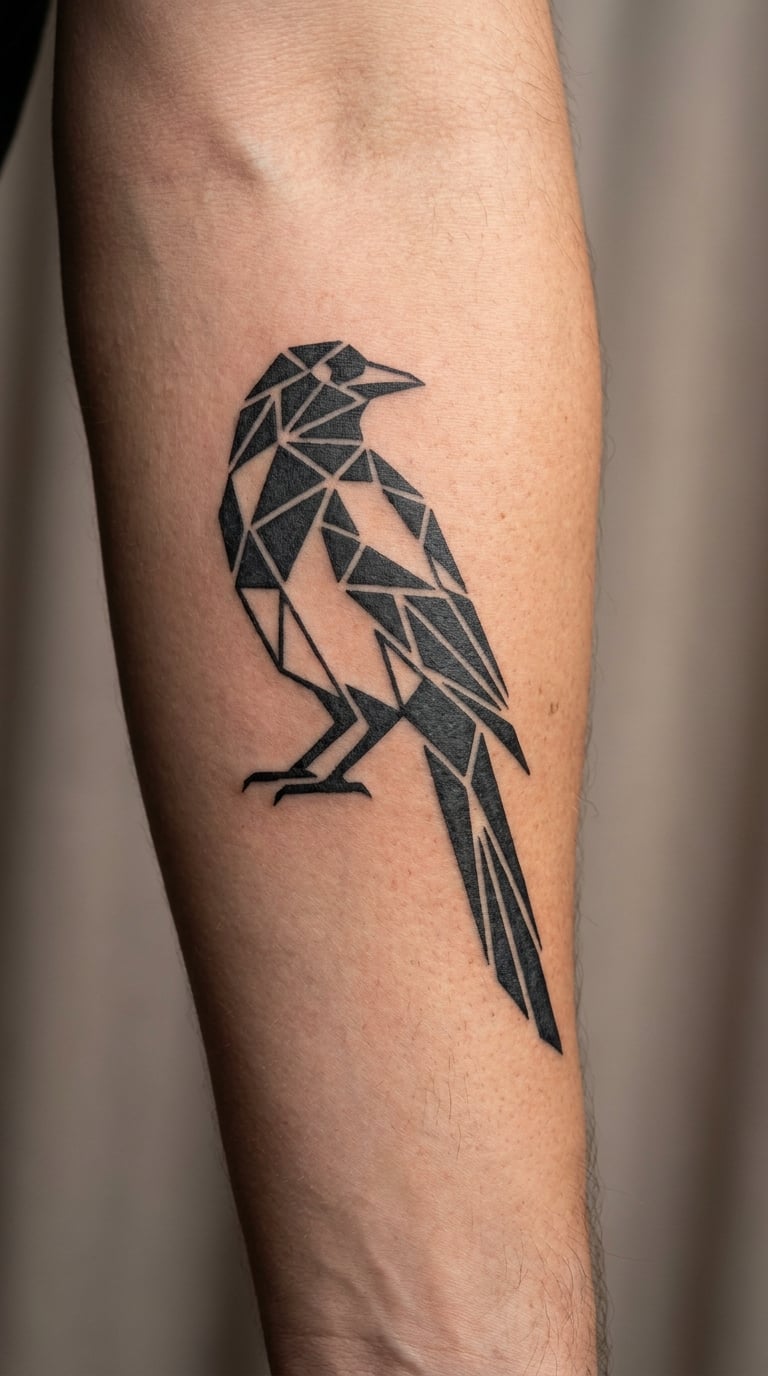
The bird is broken into flat geometric sections — triangles for the wing, an arc for the back, a long narrow shape for the tail — with a small circle for the eye and a sharp triangle for the beak. The sections alternate solid black and open skin, so the bird is legible without ever being drawn.
Geometric work is a good match for someone who likes the magpie as an idea rather than as a photograph of a bird. It also plays well with an existing geometric sleeve, because the shapes line up with the rest of the pattern.
Placement: forearm, upper arm, lower leg, or a finger if you scale it right down. Size: 2.5 to 3.5 inches (6 to 9 cm). Style: geometric abstraction, black and negative space.
Pain: low to medium. Filled geometric shapes are surprisingly quick because the machine lays down large blocks of colour. The hard edges stay sharp for years, though the fine line that defines each shape can soften — ask the artist to separate shapes with open skin rather than a thin outline.
Make it yours: build the tail out of a row of triangles that continue down the arm as a repeating pattern, or let the beak break the outer edge of the design.
13. Magpie in an Australian Floral Frame
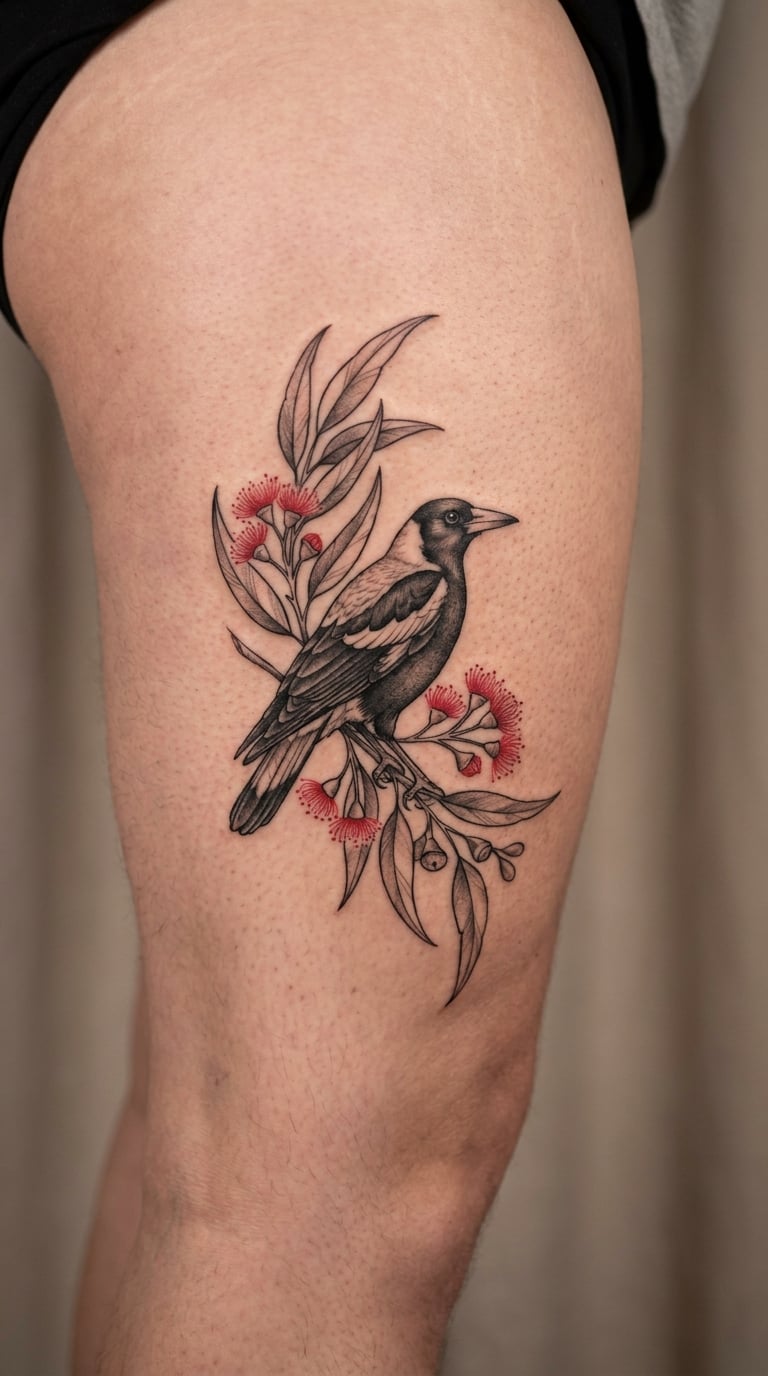
A detailed magpie in full colour surrounded by eucalyptus leaves, round wattle blossoms and a few native grasses that curve around the bird. The frame is loose rather than a closed border, so the composition breathes. The plumage uses the blue-grey and green sheen that the Australian black magpie actually shows.
This is the design for anyone who wants the bird in its own habitat instead of floating on its own. It carries a different weight from the European magpie tradition too, and the Australian species is worth knowing about before you commit — it is a different bird with a different background.
Placement: outer thigh, hip, rib, or shoulder. Size: 4.5 to 6 inches (11 to 15 cm). Style: colour realism with botanical framing.
Pain: medium. The thigh is a large flat area, which makes it an easier place to take your time on detail than a forearm would be. Colour realism needs a long session, often two, and the greens and blues will soften more than the black outlines. You can see how the same approach shifts with a different bird in our guide to tattoo ideas that symbolize freedom.
Make it yours: use a plant that actually grows near where you grew up, even if it is not native to Australia — the personal meaning beats the accuracy.
14. Checkerboard Magpie Design
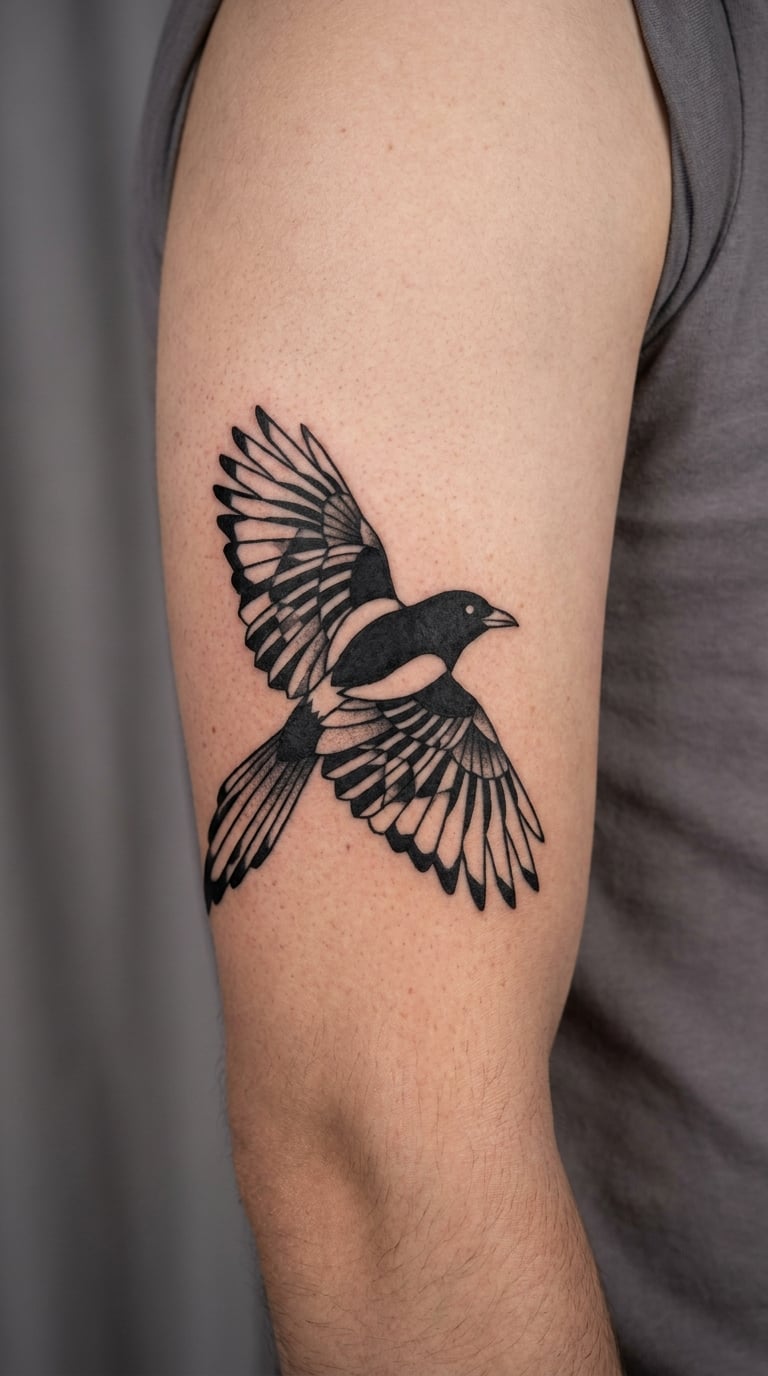
Parts of the body and one extended wing are broken into bold black and white checks, while the head, beak and tail stay solid. The checks follow the direction of the feathers, so the pattern still reads as plumage rather than as a chessboard laid on top of a bird.
It is a graphic design with a bit of mischief in it, which suits the bird’s reputation for watching you from a fence and deciding what to do about it. The checks are the reason it stands out from a normal blackwork piece.
Placement: upper arm, calf, shoulder. Size: 3.5 to 5 inches (9 to 13 cm). Style: blackwork with checkerboard pattern.
Pain: medium. Filled areas on the upper arm go in quickly; the fine lines separating the checks take longer. Solid black holds its shape better than any other finish here, but small checks can fill in slightly over a decade, so the artist should leave each square larger than looks necessary now.
Make it yours: use a single check in a colour instead of black, which turns the whole design into a blackwork piece with one accent point.
15. Tiny Magpie Behind the Ear
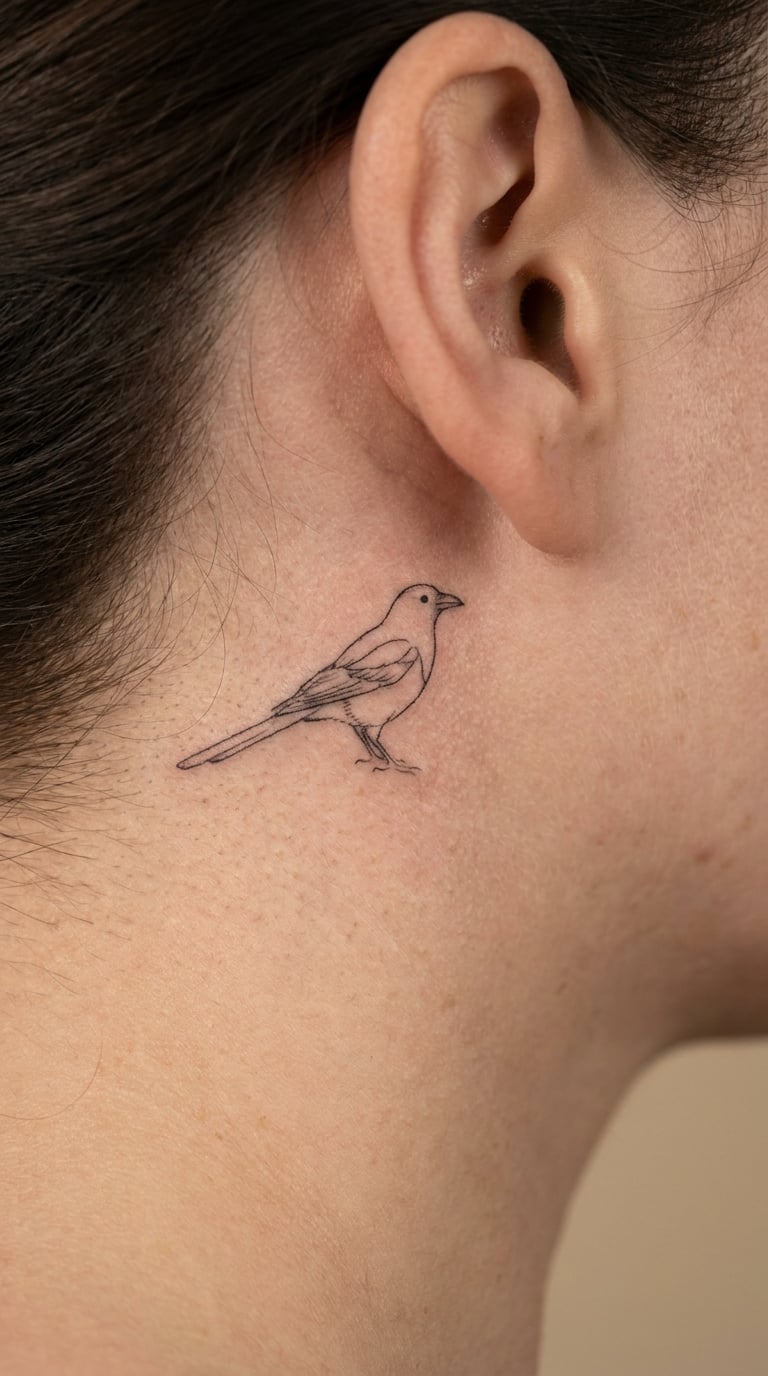
A small side-profile bird with the wing folded, the tail short and the beak pointing forward, drawn in a light continuous line with almost no interior detail. The body sits at the angle of the jaw so it follows the neck rather than sticking out at a right angle.
Behind the ear works because the area is small and mostly hidden, so the design does not have to compete with anything. It is the right first choice if you work in an office where a visible forearm piece would be awkward.
Placement: just behind the ear, above the jaw, or at the base of the skull. Size: 1 to 1.5 inches (2.5 to 4 cm). Style: fine line, minimal detail.
Pain: medium. The skin behind the ear is thin and the session is brief, so it is a short sharp sit rather than a long burn. Ageing is the real issue: fine line on the neck fades noticeably in sun, and hair regrowth can partly bury it. Ask for slightly heavier lines and expect to touch it up in a few years if you want it crisp.
Make it yours: have the bird peek forward toward the ear rather than outward, or place it so the tail line continues into a small earring or piercing.
16. Magpie Head in a Circular Moon
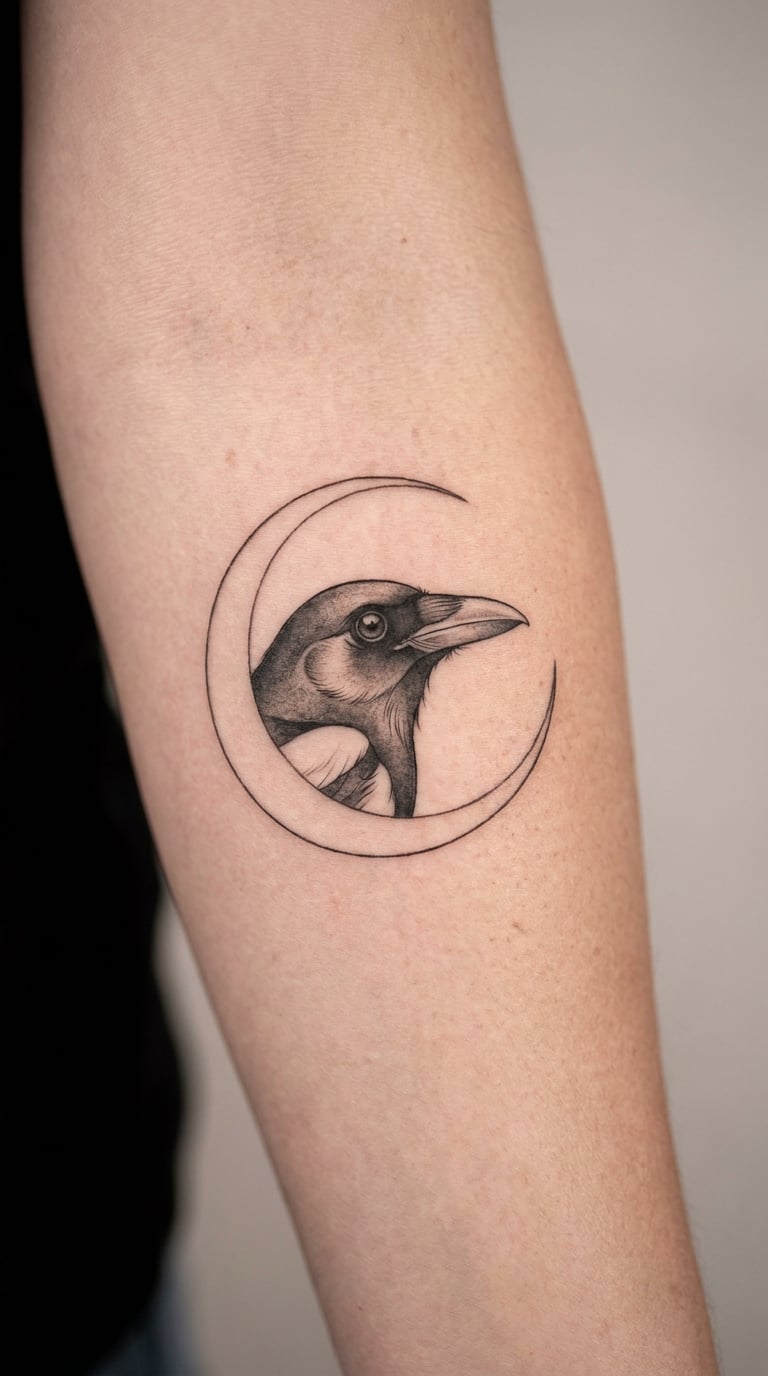
The composition is cropped to the head and beak, sitting inside a thin circle like a full moon. The bird is drawn in black and grey with a pale eye, and the circle is left mostly open so the eye and the beak are the only two strong points in the whole design.
Circular framing is an old trick and it still works, because the shape reads as a finished object at a distance. Here it also keeps the piece small without making it feel cropped, since the circle closes the composition on its own.
Placement: forearm, upper arm, chest, or the back of the hand. Size: 2 to 2.5 inches (5 to 6 cm) across. Style: black and grey with a thin circular border.
Pain: low to medium. The forearm is one of the easier spots, and a 2 inch circle is a short session. Grey shading in the ring can look patchy if it is applied too light, so ask for the mid-tones to be built up rather than started light. On the back of the hand it will fade faster than on the forearm.
Make it yours: fill the circle with a different background pattern — stipple, a grid, or a few branches running behind the bird’s head.
17. Art Nouveau Magpie and Vine
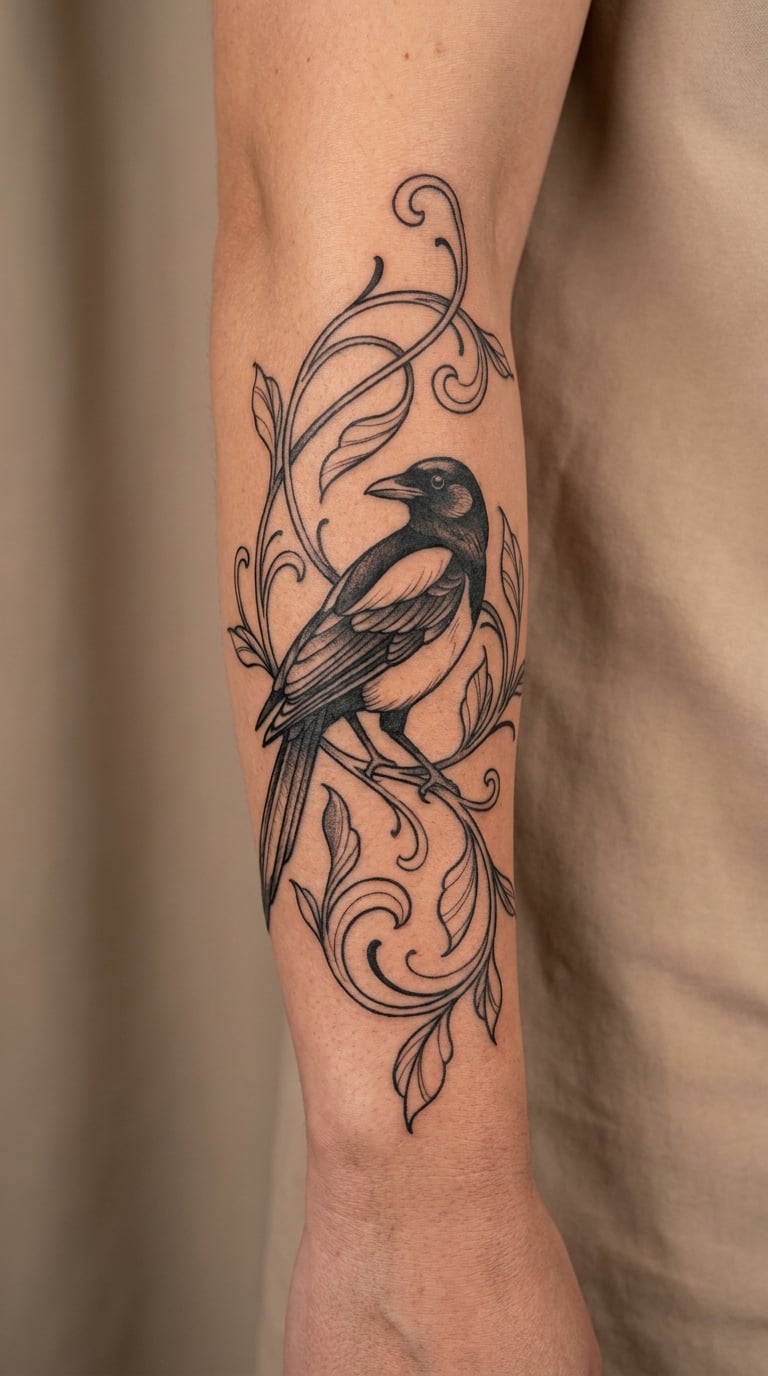
The bird is softened into an elegant shape and wrapped in thin curling vines that loop around the body and tail. Feather lines become long parallel curves, and the composition stretches out horizontally with a lot of open space between the lines. Everything is line work, almost no fill.
Art Nouveau is a good fit for people who find bold traditional birds too heavy. The style is decorative rather than graphic, and the magpie becomes a shape inside a pattern instead of a portrait of a bird.
Placement: outer arm, outer thigh, back of the shoulder, or along the ribs. Size: 4.5 to 5.5 inches (11 to 14 cm). Style: ornate line work, Art Nouveau influence.
Pain: medium. The session is long because the whole piece is thin line, but the pain stays low since there is almost no shading to press through. Long thin lines on the outer arm can drift as the design stretches, so the artist should place the vines along the muscle rather than across the joint. Expect the fine curls to soften most.
Make it yours: grow the vines into whatever is already on the arm, or add a second bird hidden in the pattern so the composition rewards a second look.
18. Old-School Magpie on a Fence Post
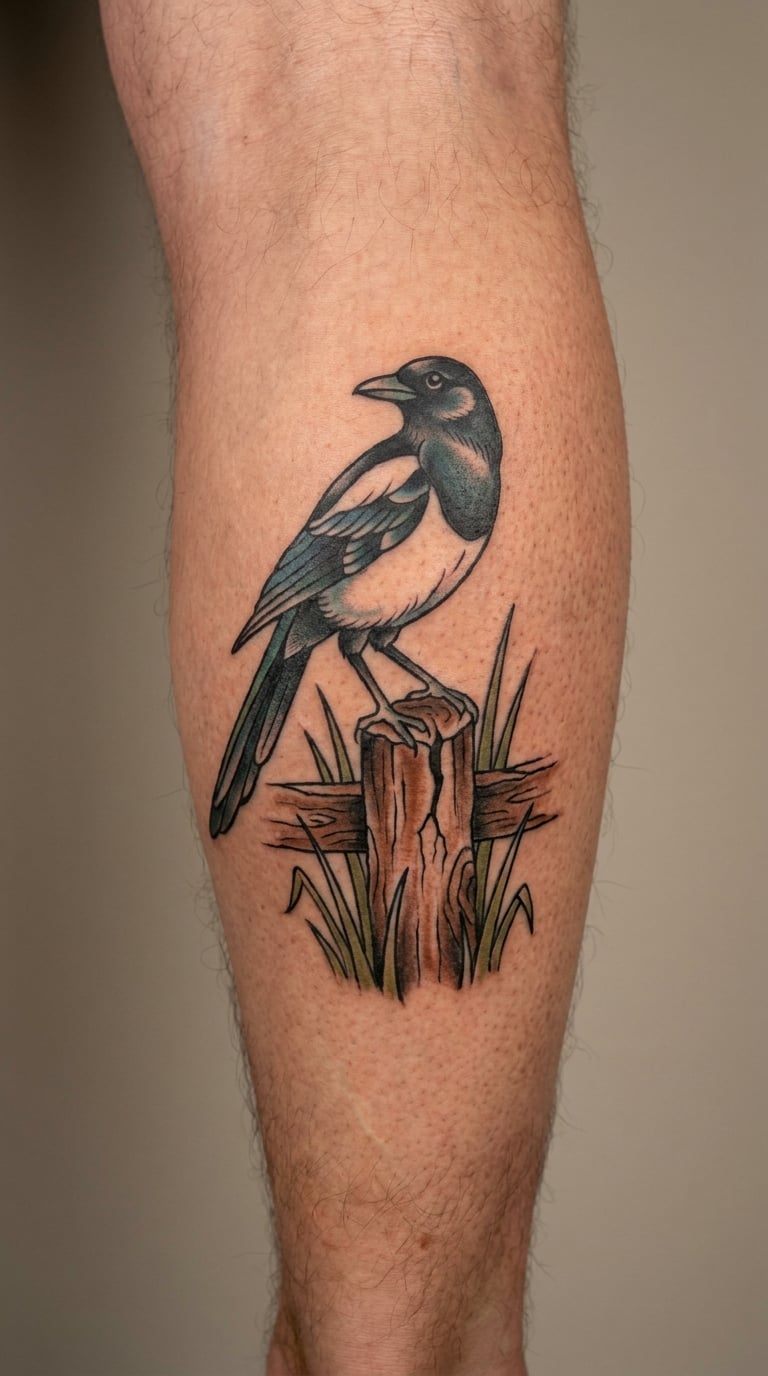
A small scene rather than a portrait: a magpie on a weathered post, a few lines of grass at the base, and two or three solid black clouds above. The post has a crack running down it and a rough grain suggested with short straight lines. The bird is the only detailed element, which pushes the eye straight to it.
Old-school work is built on thick lines and simple shapes, so it holds together at small sizes and covers a lot of skin without looking busy. The scene gives you room to add a fence line later if you want to extend it.
Placement: calf, outer forearm, upper arm. Size: 3.5 to 4.5 inches (9 to 11 cm). Style: old school, thick line, simple background.
Pain: medium. The calf is a big flat area and the outline work is broad, so it is steady rather than sharp. Thick line and solid clouds fade the least of anything in this list, which makes it a good pick if you want a design that still looks correct at forty.
Make it yours: put the post at a slight angle so the composition follows the line of the calf, or leave a gap in the fence on one side so you can add a second bird later.
19. Monoline Magpie on the Rib
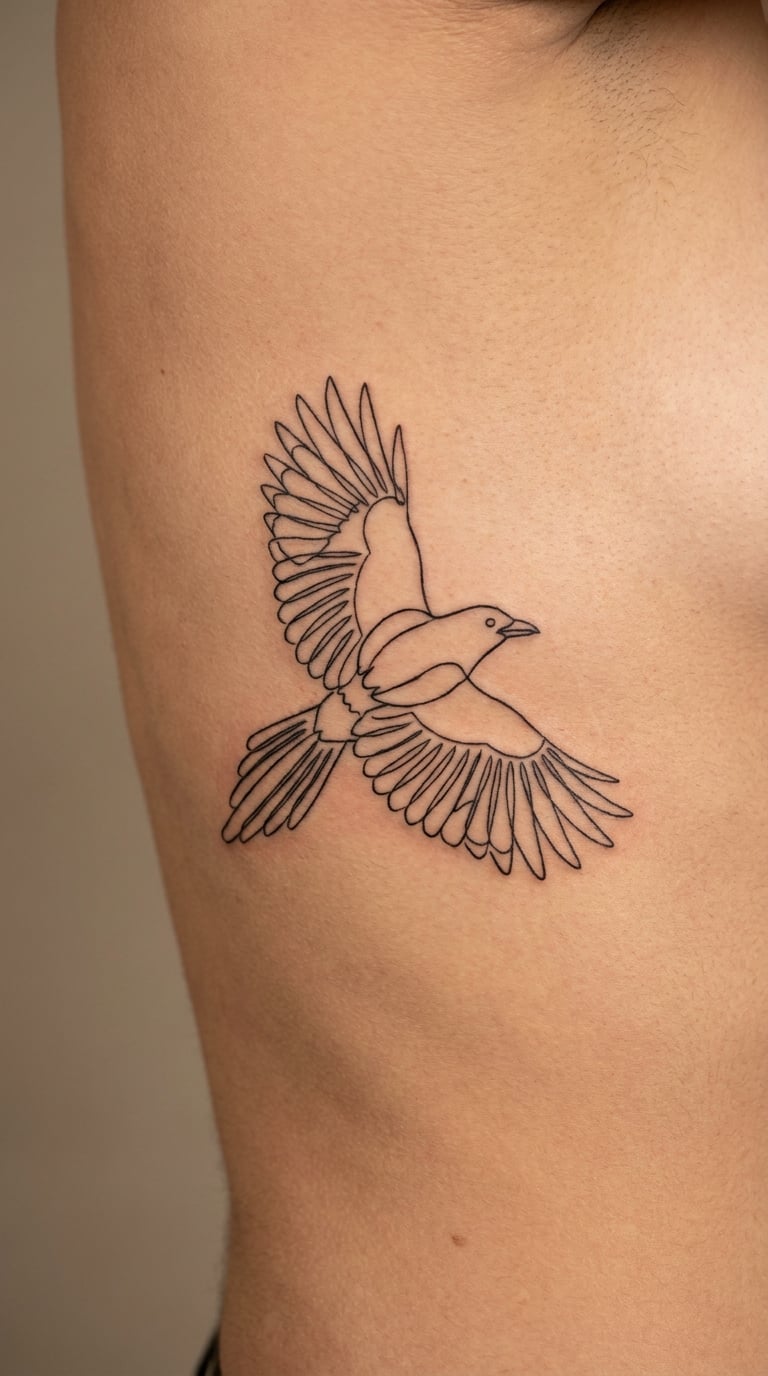
A single-weight line describes the whole bird in one continuous-feeling contour: wings lifted, body streamlined, tail tapering back. There is no interior detail at all — no eye, no feather lines — so the shape alone carries it. The line never changes thickness from the beak to the tail.
Monoline is the cleanest way to put a bird on the ribs, because the area is narrow and curved and heavy shading there would close up. The restraint is also the point. You get a design that looks considered rather than busy.
Placement: side rib, along the floating ribs, or in the gap between the ribs on the back. Size: 3 to 3.5 inches (7.5 to 9 cm) long. Style: monoline, single weight.
Pain: high. The ribs are near the top of the list for a reason, and a single continuous line means the needle stays in one spot for a long time. Most people break this into two sessions. Monoline is also the most unforgiving style when healing goes slightly off, because a wavering line is the whole design — ask the artist to keep it tight and consider a second pass a fortnight later.
Make it yours: curve the line to follow a single rib rather than sitting across several, or scale it down and repeat it three times as a small vertical column.
20. Realistic Magpie Holding a Feather
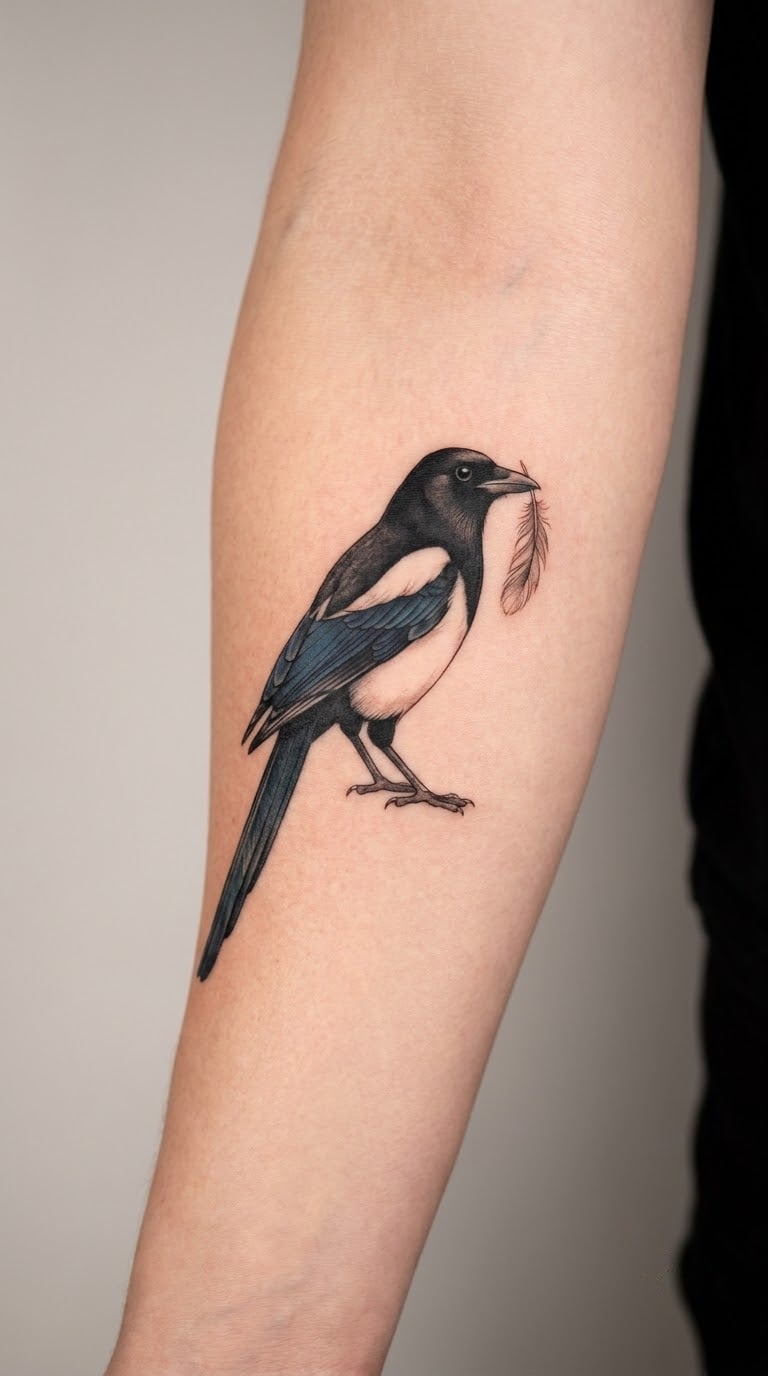
A side-view bird with layered plumage built from many short feather strokes, a pale eye, and one small feather held in the beak. The feather is the focal point: it is lighter than the beak, slightly curved, and placed so it sits against the dark head where it reads immediately.
The feather gives the design a story without telling you what the story is. A person can hold it as something found, something given, or something carried, and none of those readings is wrong.
Placement: inner forearm, inner bicep, back of the upper arm. Size: 3.5 to 4.5 inches (9 to 11 cm). Style: semi-realistic, black and grey.
Pain: low to medium. The inner forearm is a comfortable spot and the detail work is not aggressive, though many short strokes in one area does get warm. Grey plumage in black and grey softens noticeably in sun, so keep it covered on the arm most exposed.
Make it yours: use a feather that means something specific — a bird you watched, a place you have been — and have it angled so it points at a small piece of ink you already have.
21. Blackwork Magpie in a Street-Style Panel
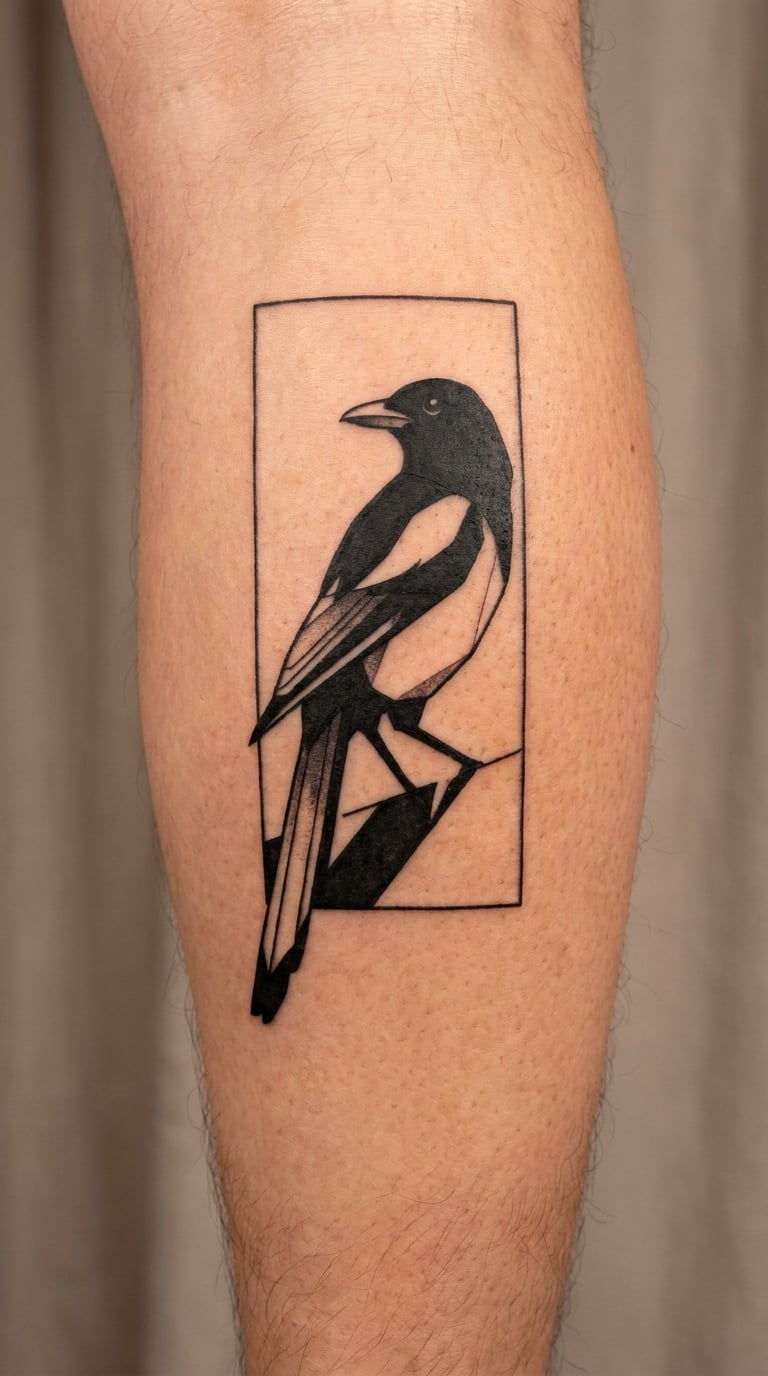
The bird is drawn with bold black feathers and hard-edged shadow shapes, sitting inside a plain rectangular frame with no text, no letters and no characters. The frame has a slightly rough, hand-drawn edge rather than a ruler-straight one, and the interior has a single drop of light on the shoulder and the eye.
Panel work borrows the language of printed illustration, which gives the magpie an urban, graphic feel without tipping into anything copyrighted. The rectangle also makes it easy to place — you know exactly how much space you are taking up before the session.
Placement: outer calf, forearm, outer upper arm, or the back of the lower leg. Size: 3.5 to 4.5 inches (9 to 11 cm) tall. Style: illustrative blackwork, panel composition.
Pain: medium. The frame lines and the shadow blocks are broad, so the session is efficient. Hard black shading is durable, and the panel edge stays crisp because the artist will outline it first. Keep the design off the ankle bone if you want it to stay clean as the bone becomes more prominent with age.
Make it yours: tilt the panel so it follows the muscle, or stack two panels of different heights and add the second bird later as a filler.
22. Colorful Magpie and Wildflowers Sleeve Element
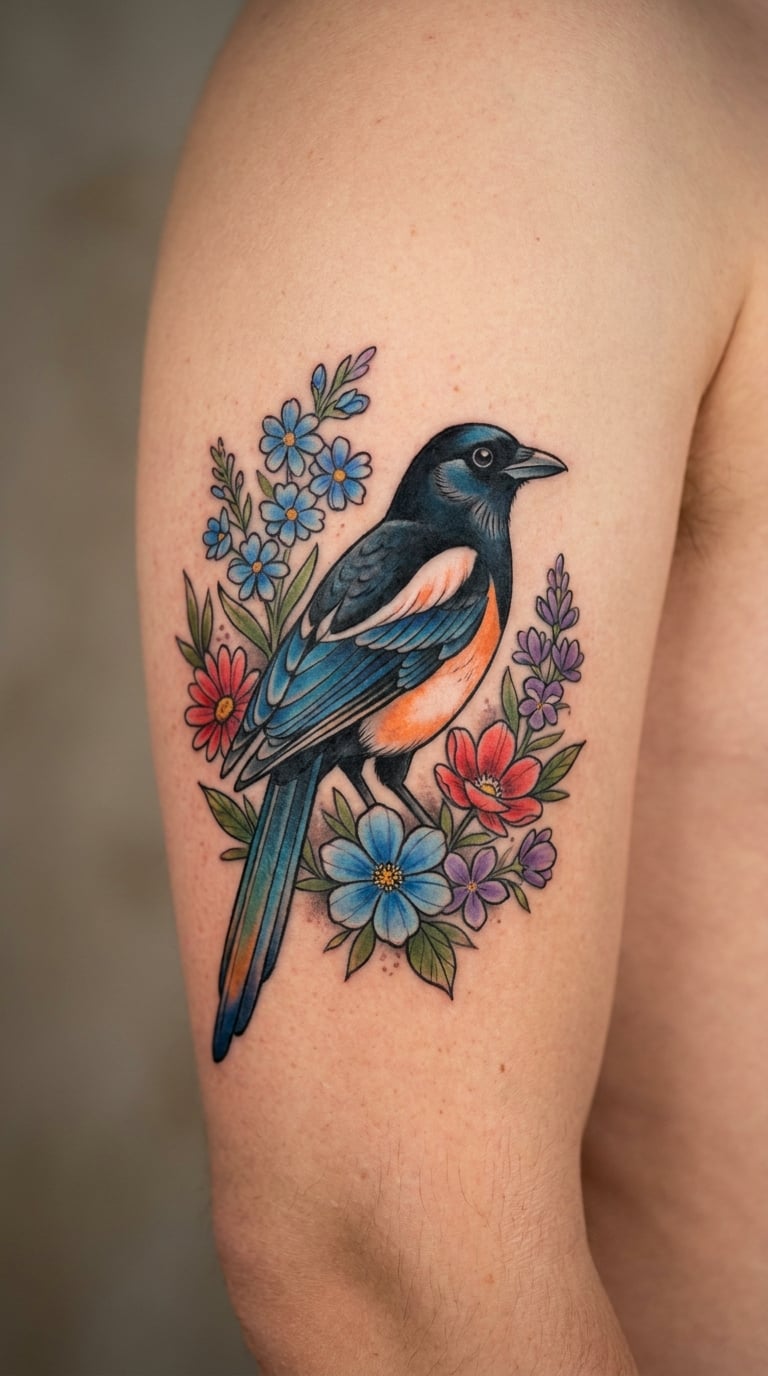
A larger magpie in full colour with layered wildflowers, grasses and a few curved movement lines wrapping around it. Blue, red and purple are the main colours, with the bird’s black plumage holding the composition together and its iridescent sheen picked out in blue and green over the wing.
This is the one to pick if you are starting a sleeve rather than finishing one. It is designed to leave room around the edges — there is space in the composition where a second element can sit later without the design feeling complete and closed off.
Placement: outer upper arm, shoulder, or as the front piece of a sleeve. Size: 5 to 6 inches (13 to 15 cm) tall. Style: colour realism, illustrative sleeve work.
Pain: medium. The upper arm is forgiving and the work is spread out, so it is a long session rather than a painful one. Light purples and blues in a large piece will soften the fastest, so ask for them to be mixed a little deeper than the reference photo. Two sessions is normal at this size.
Make it yours: pick flowers from a place that matters rather than whatever looks best on screen — the whole point of a sleeve element is that it has somewhere to go.
How to Choose the Right Magpie Design
Choosing from these 22 magpie tattoo ideas
Start from your existing ink, not from the reference images. Look at what is already on your skin and match its line weight and level of detail. A 6 inch colour piece next to a set of 1 inch hairlines will always look like two different people, no matter how good each one is.
Match the line style to the size
Fine line and micro work lose definition as they age, and the loss is faster on hands, fingers and anywhere that gets a lot of sun. If you want something that still reads clearly in fifteen years, go solid black, thick line, or checks and blocks. If you want delicacy and you will keep it covered, fine line is a fair choice.
Think about what is already on your skin
A magpie fits into almost any collection, which is both its strength and its risk. It is a strong silhouette, so it holds its own next to other blackwork pieces. For a new wearer, the minimal silhouette or the fine-line bird in flight is the easiest thing to add to a body that already has ink. If you are drawn to symbolic work more broadly, our sunrise tattoo ideas with meaning cover the same instinct from a different direction.
Decide colour and size together
Colour needs more room than you think. A magpie with blue-green plumage and botanical framing needs at least 4 inches to look like a finished piece rather than a sketch with colour added. Black and grey compresses well, so a solid black design can carry real detail in 2 inches.
Let the artist redraw the reference
Bring references, but expect them to be a starting point. Artists working in the magpie tradition usually adjust proportions so the bird reads at your chosen size and on your chosen body part, because a design that works on a flat sheet often collapses on a curved arm. Show the artist your placement in a photo or on your own body before the session starts.
Cost and Session Time
Rates vary a lot by city, shop minimum and artist, so treat the ranges below as a rough shape rather than a quote. Most shops charge either a flat price per piece or an hourly rate, with a minimum that covers the first hour, so small designs often cost close to that minimum.
- Micro designs (1 to 1.5 inches): usually a single short session of well under an hour, priced at or near the shop minimum.
- Small designs (2 to 3.5 inches): one session of around an hour to an hour and a half, with simple fine-line work at the lower end and dotwork or semi-realism at the higher end.
- Medium designs (4 to 5.5 inches): one long session or two shorter ones, and the hourly rate matters more here because detail work takes time rather than size alone.
- Large designs (5 to 6 inches and up, including full colour pieces): two to three sessions is normal, and colour realism is priced on time rather than size.
What moves the final number is detail, not area. A 5 inch solid black silhouette is quick and predictable. The same 5 inches packed with feather strokes, dot gradients and colour layering can triple the time. Cover-up work, new placements and anything on scar tissue also tend to cost more, and a colour design usually needs a touch-up session, which most shops build in or charge for separately.
Aftercare Basics
- Follow your artist’s aftercare instructions first. They know what they did in your skin, and their advice outranks anything general on a list like this one.
- Wash the area gently with clean lukewarm water and unscented soap, twice a day for the first few days, then pat dry with something clean rather than rubbing it.
- Protect the fresh tattoo from sun for the whole of the first summer. This is the single biggest thing that decides how light and crisp your magpie looks in a decade.
- Wear loose, soft clothing over the area while it heals, and change out of anything that gets damp or sticks to the skin.
- Keep it moisturised with a thin layer of a product your artist recommends. Too much ointment traps heat and lifts the ink.
- Leave it alone. No swimming pools or hot tubs while the skin is still healing, and no picking at flaking skin, however tempting it looks in week two.
Frequently Asked Questions
What does a magpie tattoo symbolize?
Most people choose a magpie for its intelligence and curiosity, the way it gathers up interesting things others walk past, and the way it shows up wherever something is happening. Some connect it to good fortune and new beginnings, and some to a memory of a specific bird. Meanings are personal rather than universal, and they shift between countries: the same bird reads as an omen in Britain and a clever thief in France and Italy.
Should I choose a color or black-and-grey magpie tattoo?
Black and grey suits people who want a design that ages predictably and coordinates easily with existing tattoos, and it compresses well at small sizes. Colour shows the magpie’s blue-green iridescence, pale eye and the red of a flower or berry, but light blues and purples soften fastest, especially in sun. If you are undecided, a black core with one colour accent gives you most of the effect with far less to fade.
What is the least painful placement for a small magpie tattoo?
The upper arm, outer thigh and forearm are usually more comfortable than the ribs, collarbone, inner arm, sternum, hands or fingers. That said, pain varies with your own sensitivity, how long the session runs and the technique being used. A micro design on the inner wrist might sting for twenty minutes and then be done, which is very different from a two-hour session on the ribs.
Will a tiny magpie tattoo on my hand or finger stay sharp?
Probably not indefinitely. Fine line softens on areas that are washed often, exposed to sun or constantly moving, and tiny finger tattoos change noticeably as the hand ages. Ask the artist to simplify the eye, beak and feather detail into bolder shapes, keep the black solid where you can, and cover the area when you are in strong sun. Many people accept a slight softening as part of the look.
How do I personalise a magpie tattoo without ruining the design?
Change one thing rather than five. A different native plant or flower, a specific feather, a date tucked into a branch, a colour pulled from something that matters to you, or a pose the bird is not usually drawn in. Keep the head, eye and beak recognisable, because that is what makes it read as a magpie, and let your artist redraw the proportions for your placement before the stencil is cut.
Conclusion
If this is your first bird and you want something low-risk, go with the minimal silhouette or the fine-line magpie in flight. Both are compact, both survive a first-tattoo mistake, and both sit easily next to whatever you add later. If you already collect ink, the blackwork spread-wing, the traditional perched bird or the colourful wildflower piece give you enough range to make the magpie the centrepiece rather than an addition.
Whichever one you pick from these 22 magpie tattoo ideas, choose the artist first and the placement second. A magpie drawn by someone who works in birds every week will look like a magpie, and a reference photo handed to the wrong hands usually does not. Bring your references, know the size you want in inches, and check the placement in a photo before anything is cut.