
22 Anime Tattoo Ideas for Men: Small and Bold (October 2026)
Twenty-two anime tattoo ideas for men, arranged from quiet symbols you can hide under a shirt cuff to full-arm manga action panels. Every design below is original inkwork that borrows the visual language of Japanese animation rather than reproducing a copyrighted character, and each one comes with a real placement, a real size in inches, a style, a pain note and one way to make it personal.
If you have landed here searching 22 anime tattoo ideas for men, you already know the style appeals to you. What decides whether a piece works is line weight matched honestly to the space it has to live in.
Anime ink transfers to skin badly when you copy a screen frame. It works when an artist redraws the idea with clean contours, deliberate line weight and shading that suits the body part. The planning rule is simple: fewer elements, bigger shapes, longer lines. If you are new to being tattooed, start near the bottom of this list and work up.
Budget a few weeks of scrolling before you book anything. Tattoos are permanent, and the difference between a piece you still like at forty and one you regret is usually detail level matched honestly to the size of the space.
22 Anime Tattoo Ideas for Men: Quick Guide
Here is every idea in this list at a glance, in order, with the style, placement, realistic size and expected pain for the suggested spot. Sizes are finished-healed dimensions, not stencil size.
| Idea | Style | Best placement | Size | Pain |
|---|---|---|---|---|
| 1. Fine-line hero profile | Fine line, single weight | Inner forearm | 3-4 in tall | Low to medium |
| 2. Energy burst | Bold blackwork, one red accent | Outer upper arm | 4-5 in | Medium |
| 3. Mini warrior in a summoning circle | Black and grey, one gold accent | Calf | 3-4 in | Medium |
| 4. Split-screen battle | Black ink panels | Forearm | 5-7 in long | Medium |
| 5. Spiked hair silhouette | Blackwork with grey shading | Shoulder deltoid | 4-6 in | Medium to high |
| 6. Determined eye | Black and grey portrait | Inner forearm | 2-2.5 in wide | Low to medium |
| 7. Crossed swords in a circle | Traditional line emblem | Upper arm | 3-4 in | Medium |
| 8. Dragon-wrapped sword guard | Blackwork with muted red | Outer forearm | 3 in | Medium |
| 9. Samurai helmet with blossoms | Blackwork, pale pink accent | Upper arm | 4-5 in | Medium |
| 10. Lone ronin with a talisman | Loose manga ink lines | Calf | 5-6 in | Medium |
| 11. Windmill and cloud scene | Soft watercolour | Forearm | 4 in | Low to medium |
| 12. Mecha pilot silhouette | Solid black silhouette | Side of torso | 5-6 in | Medium to high |
| 13. Mecha shoulder blueprint | Technical line, one blue tone | Upper arm | 4-5 in | Medium |
| 14. Cyberpunk alley sign | Black with neon cyan and magenta | Outer forearm | 3-5 in tall | Medium |
| 15. Retro-futurist red dune scene | Black and red graphic | Upper arm | 5-7 in | Medium to high |
| 16. Magical wand and ribbon | Bold outline, one violet accent | Calf | 4-5 in | Medium |
| 17. Witch familiar and crescent moon | Fine line | Forearm | 3 in | Low to medium |
| 18. Celestial dragon and moon | Blackwork with grey moon | Upper arm | 5-7 in | Medium |
| 19. Tiny forest familiar | Micro line and solid fill | Inner bicep | 1-1.5 in | Low |
| 20. Sports victory leap | Black line, team colour accent | Upper arm | 4-5 in | Medium |
| 21. Traditional manga portrait | Line portrait, one red accent | Chest | 5-6 in | High |
| 22. Full manga action sleeve | Black and red multi-panel | Full arm | Shoulder to wrist | High, over sessions |
1. Fine-Line Manga Hero Profile
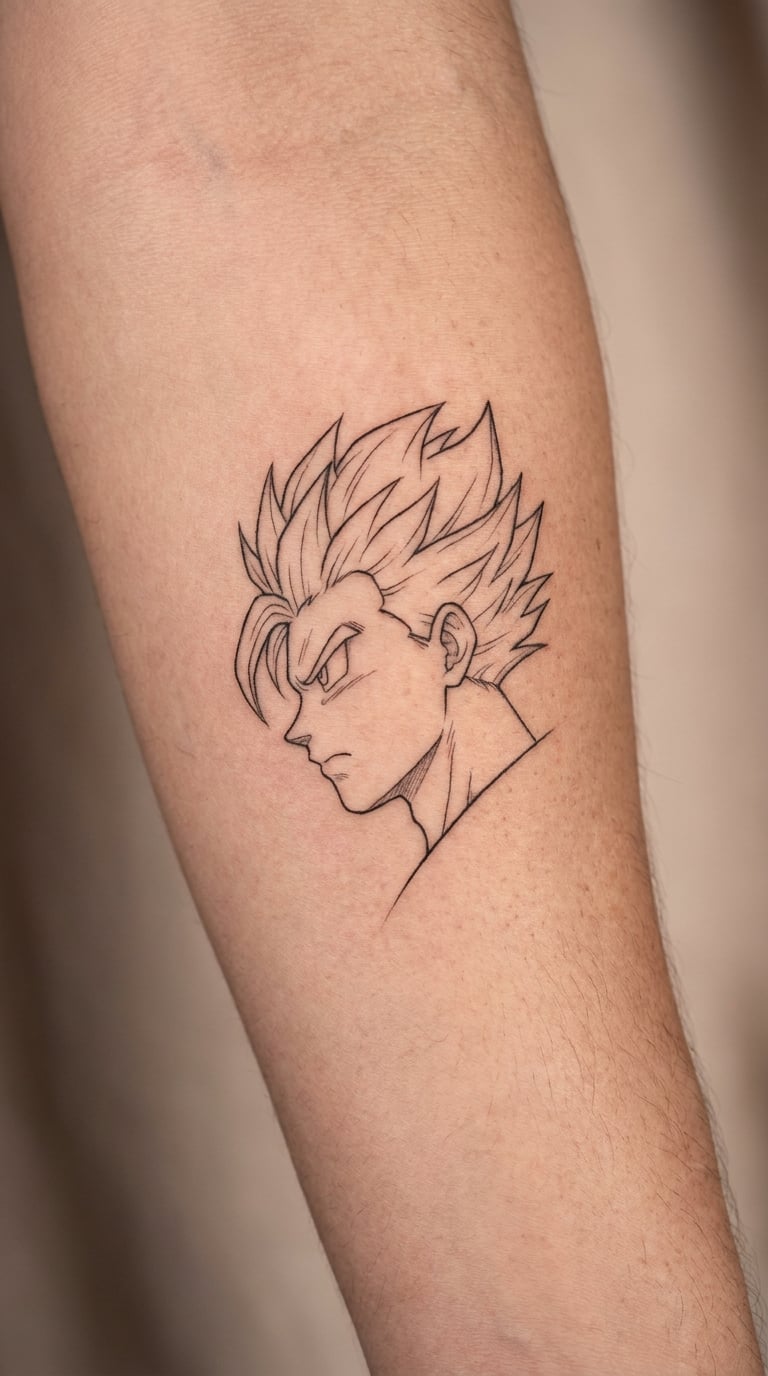
A single contour line traces the profile of an original hero: brow, nose, lips, chin, one sharp jaw. No eye detail, no background, and three or four manga speed lines trailing behind the head to give it movement.
This is the quietest statement on the list. People choose a profile when they want the drawing style more than the specific character.
Placement: inner forearm, or the flat of the upper arm. Size: 3 to 4 inches tall, 1.5 to 2 inches wide. Style: fine line at a single consistent weight.
Pain: low to medium on the inner forearm, mostly a scratchy constant sting. Ageing note: single-needle lines soften noticeably after ten years, so ask for slightly heavier line than feels right at the consult.
Make it yours: add a thin band of small kana or a date running along the bottom edge of the jaw.
2. Exploding Shonen Energy Burst
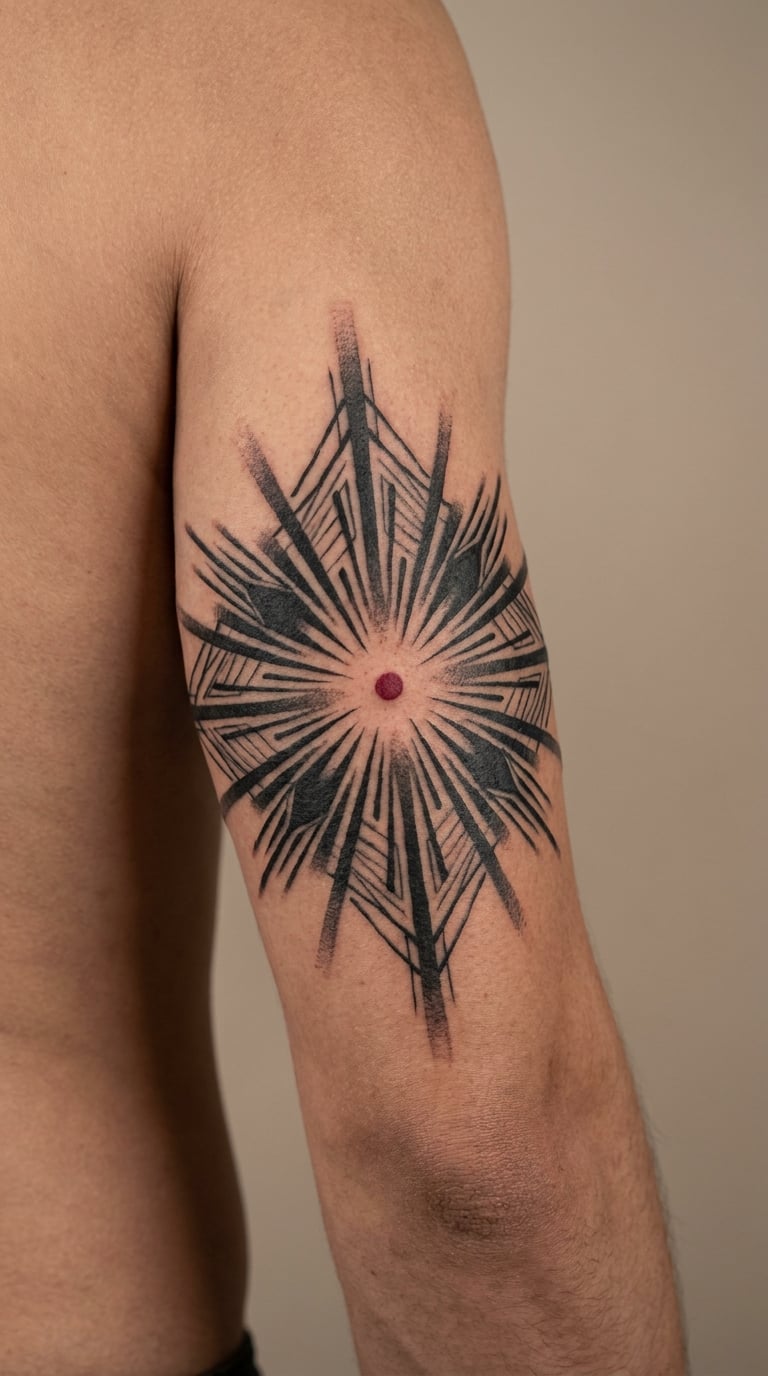
A jagged starburst of solid black wedges radiating from a small hollow centre, with one red dot of colour in the middle and a few tapered speed lines breaking away from the edges. Abstract, aggressive, and it never points at a specific series.
It reads as a power-up moment frozen mid-impact. Plenty of men pick this one because it carries the feeling of a fight scene without the face.
Placement: outer upper arm or the deltoid cap, where a round shape has room to breathe. Size: 4 to 5 inches across. Style: bold blackwork with a single colour accent.
Pain: medium. Solid black packing is a longer, duller burn than line work. Ageing note: the outer arm gets sun, so the red centre will fade to orange faster than the black.
Make it yours: swap the red for your team colour, a national flag, or a birth month number hidden in the centre.
3. Mini Shonen Warrior in a Summoning Circle
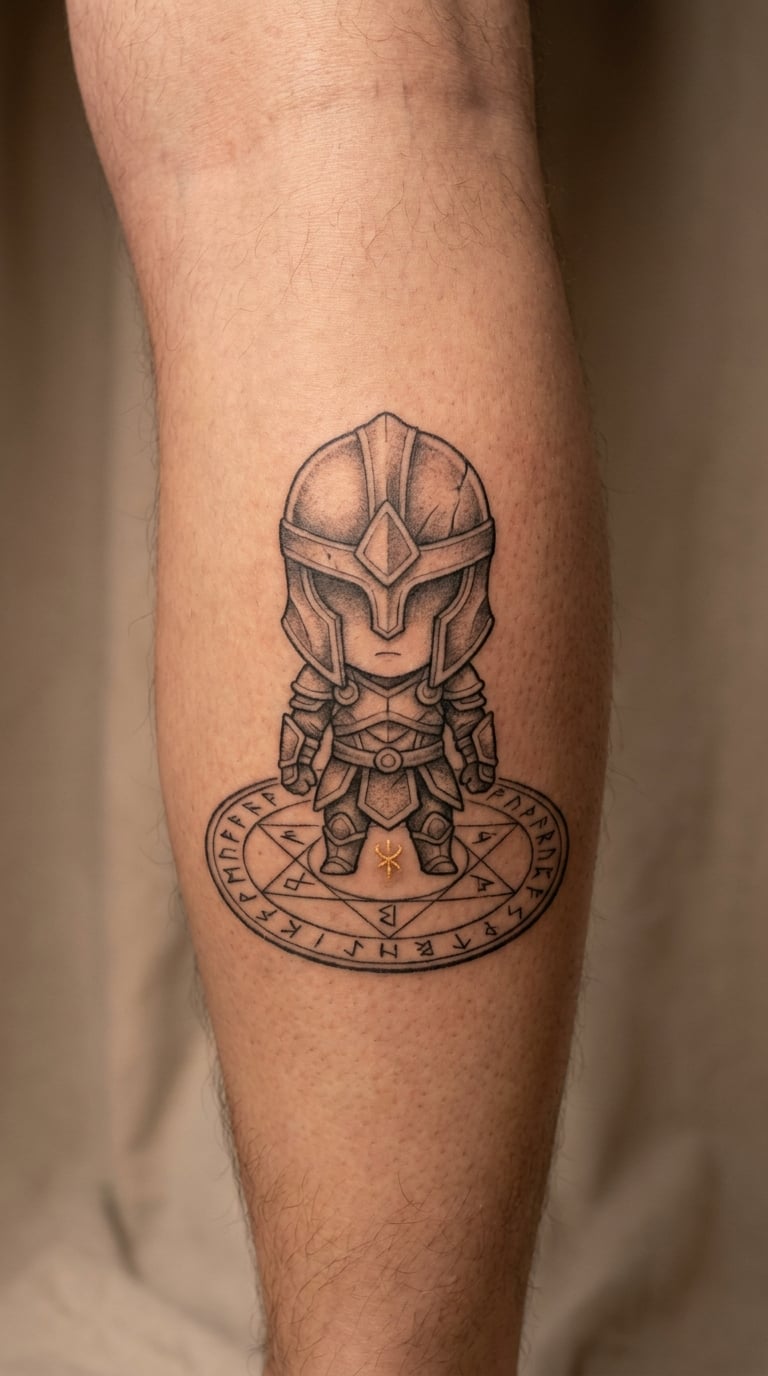
A small original character with an oversized head, a short cloak and a sword held down at one side, standing inside two overlapping geometric rings filled with tick marks and small glyph shapes. One gold arc picks out the outer ring.
Big-head stylised figures are the mascot end of anime design, and this version is drawn original rather than traced from a franchise mascot. It suits someone who likes the visual language but not the lore.
Placement: side of the calf, the inner bicep, or the outer forearm. Size: 3 to 4 inches tall including the circle. Style: black and grey with one metallic accent.
Pain: medium. Ageing note: the tiny tick marks inside the ring are the first thing to blur, so ask the artist to space them wider or cut them entirely.
Make it yours: replace the ring’s glyph shapes with a real mathematical formula or a chess notation you play.
4. Split-Screen Battle Silhouette
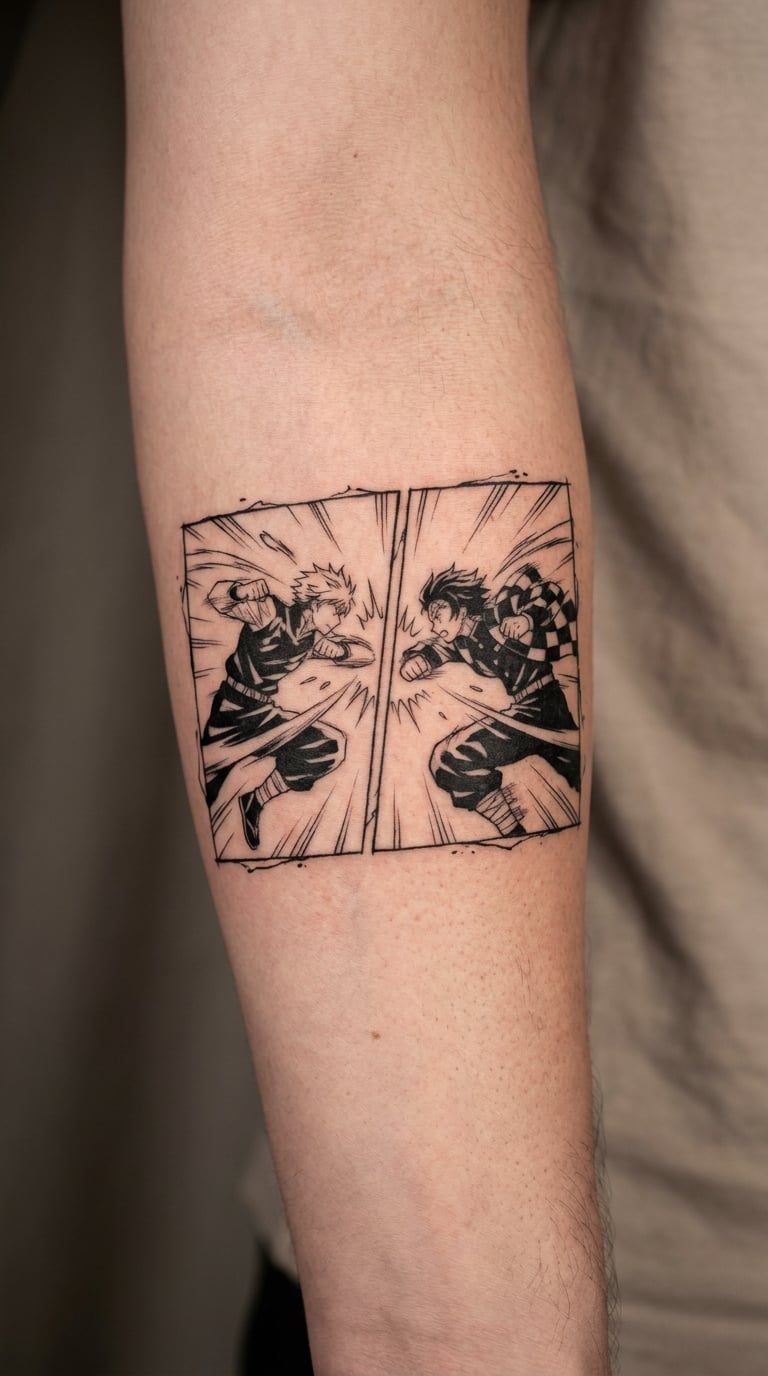
A tall rectangle divided by a single ragged vertical line. On one side, a fighter in a mid-lunge silhouette with a trailing coat; on the other, a second figure bracing with a raised arm. Both are solid black shapes with a few cut-out highlights.
Rival-versus-rival is one of the most common threads in shonen stories, and the panel layout lets you hold both poses in one small space. It also reads as a comic page, which is the point.
Placement: outer forearm running lengthwise, or the inner arm. Size: 5 to 7 inches long, 2 to 2.5 inches wide. Style: black ink panel work.
Pain: medium, with a stingier patch over the inner elbow edge. Ageing note: the cut-out highlights inside a solid black shape are where the black starts creeping in, so keep them generous.
Make it yours: mirror the design on the other forearm as a matched pair with a different colour in each half.
5. Spiked Anime Hair Without a Character
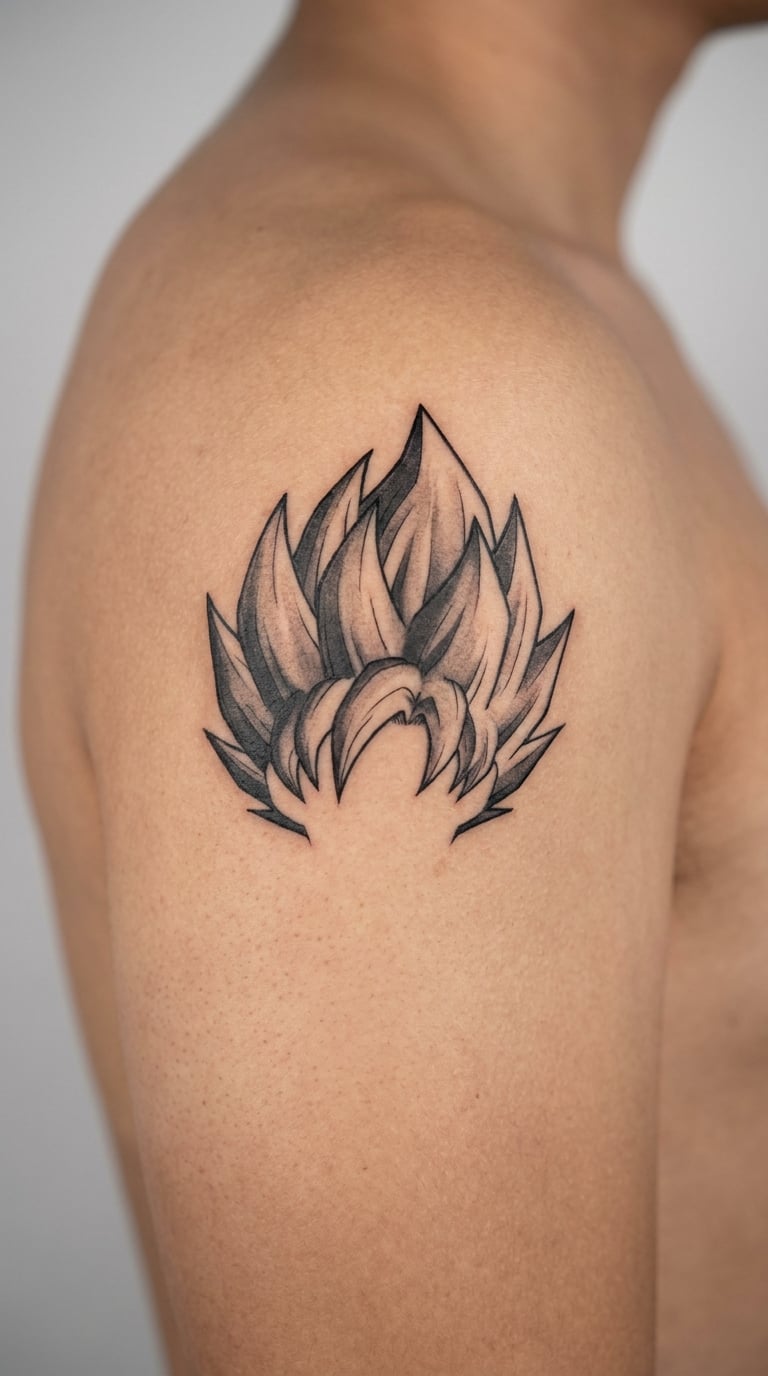
A standalone wedge of upswept spikes, six to nine points tall, with grey shading packed into the shadowed roots. No face, no shoulders, just the hairstyle floating on its own.
Hair silhouettes are the most recognisable thing about the genre and the least identifiable to anyone who is not a fan, which makes this the sweet spot for people who want a nod rather than a label. It is also the design fans keep circling back to for low-key placements.
Placement: deltoid or upper shoulder, following the curve of the muscle. Size: 4 to 6 inches wide, 2 to 3 inches tall. Style: blackwork with grey shading.
Pain: medium to high. The deltoid curves hard, so the needle angle changes constantly. Ageing note: pointy tips are the first part of the design to round off; ask for wider points than look right now.
Make it yours: count the spikes and make that number meaningful, or add a thin circular halo behind the shape.
6. Anime Hero’s Determined Eye
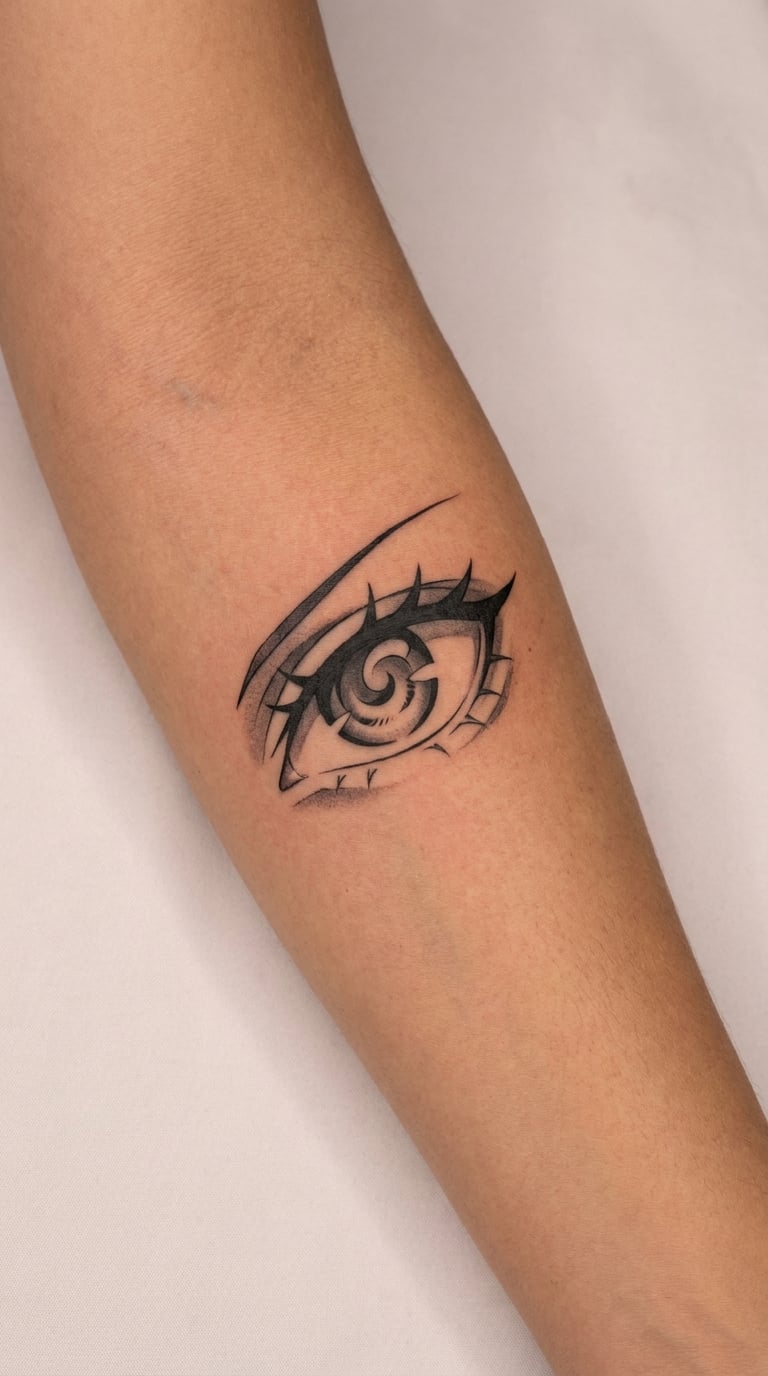
One eye in three-quarter view: a heavy upper lash line, a sharp iris with a highlight left as bare skin, a lower lid in soft grey wash, and a few short hatching strokes under the brow. Cropped tight so no face is implied.
The eye is the classic manga focal point and it carries focus, vigilance and stubbornness. A single eye also works as a memorial piece, which is how a lot of people end up choosing it.
Placement: inner forearm, sternum, or the flat of the bicep. Size: 2 to 2.5 inches wide. Style: black and grey portrait shading.
Pain: low to medium in a small area, and it finishes fast. Ageing note: the iris hatching greys out noticeably by year five. Ask for a bolder iris line and fewer, wider highlight shapes.
Make it yours: have the iris shaped as a hexagon or a teardrop, or add a single line of text beneath it in a script you can read.
7. Crossed Swords in a Circle
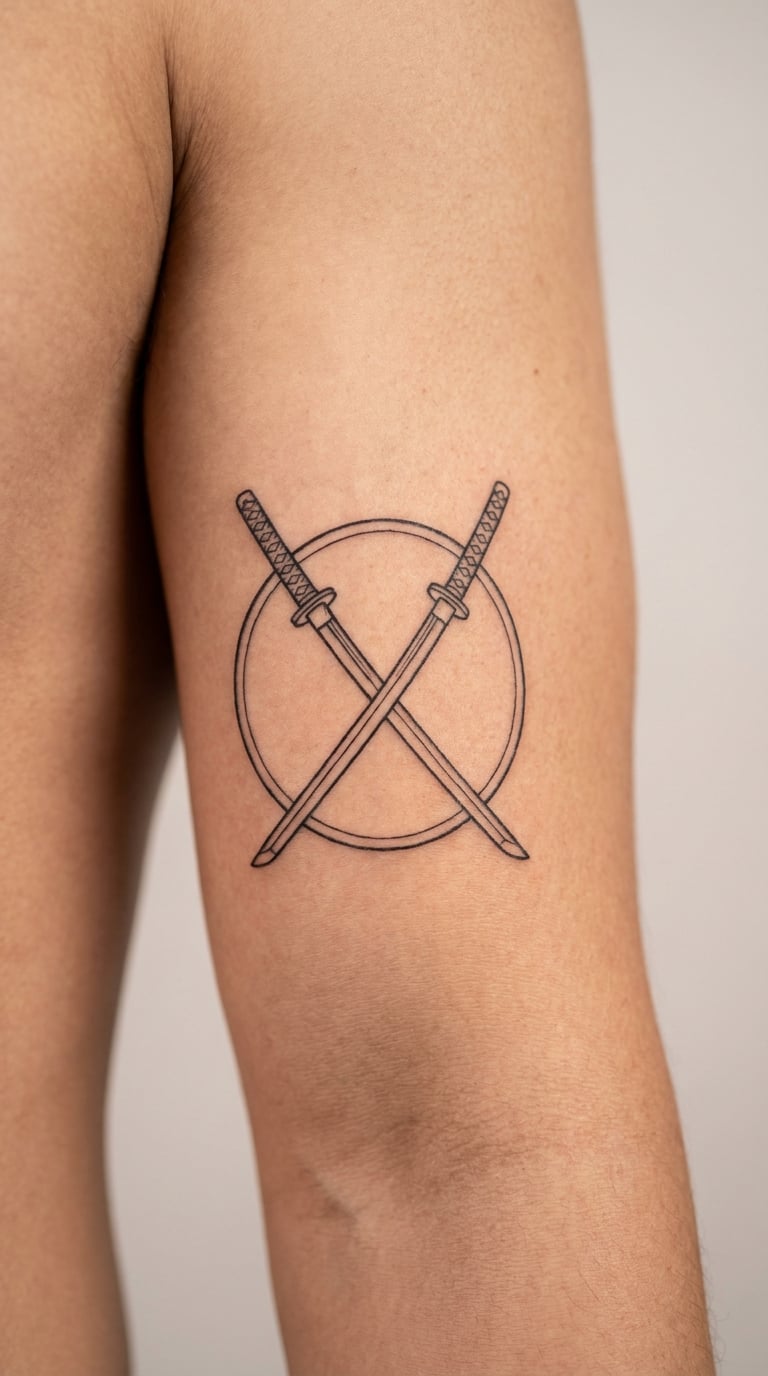
Two slender swords crossed in an X inside a thin double-ring frame, each blade drawn with a single highlight gap running its length, small wrapped handles at the bottom, and a short tassel line from one grip. Balanced, symmetrical, emblem-like.
Swords are the most borrowed visual prop in the genre and almost nobody can trace a specific one. A circular frame gives you an instant medallion shape that suits a shoulder or a chest plate.
Placement: outer upper arm, deltoid, or centred on the chest. Size: 3 to 4 inches across. Style: traditional line emblem with a single grey wash.
Pain: medium, mostly the ring outline and the cross point where the needles overlap. Ageing note: thin outer rings fade first; a doubled ring holds its shape far better.
Make it yours: have the tassel length encode a date, or engrave a family initial inside the circle at the crossing point.
8. Dragon-Wrapped Sword Guard
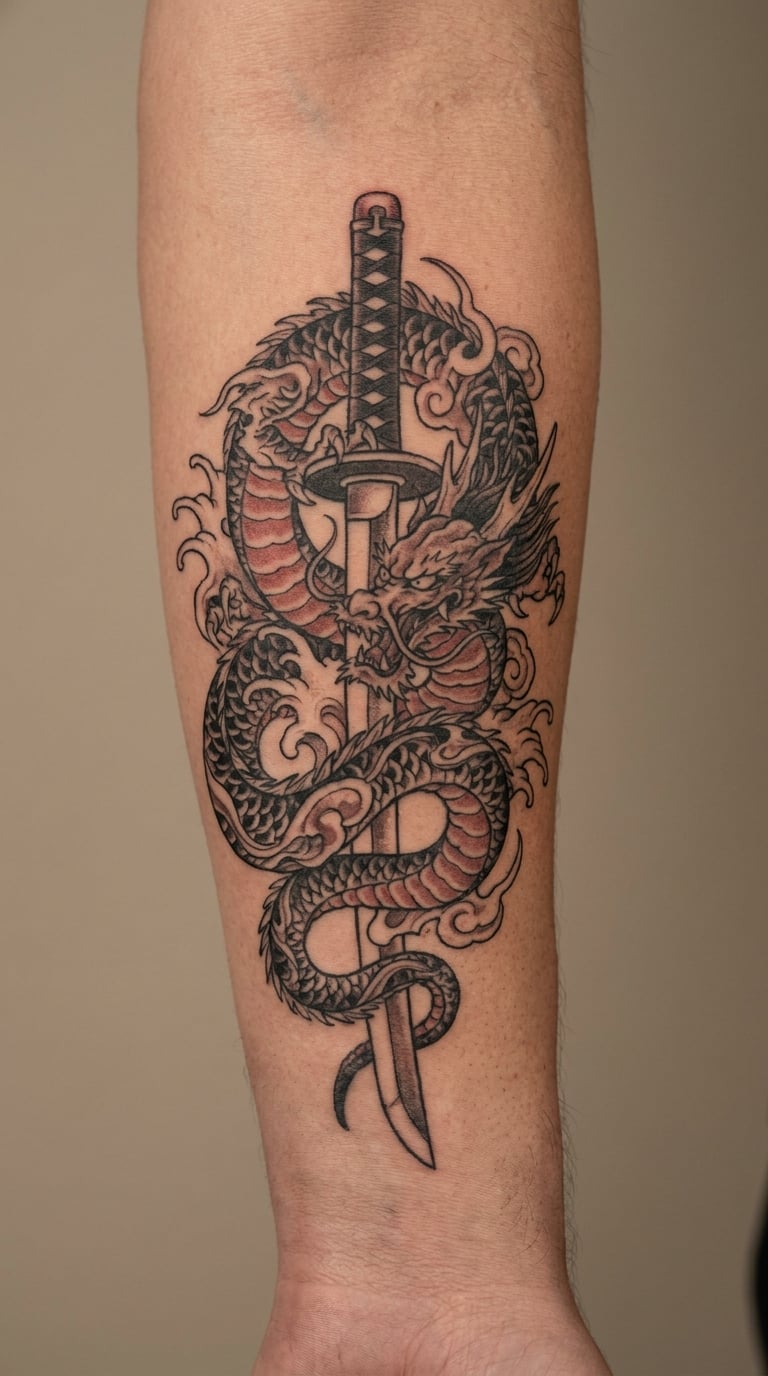
A close-up of a sword guard: an oval plate with cut-out spokes, a small original dragon coiled around the handle, scales indicated by a dozen small arcs, and a muted red wash in the negative space behind the dragon’s body.
Object portraits are unusual in a fandom full of faces, so this one stands out. The dragon is drawn original rather than adapted, which keeps the piece clean and lets the artist work in a tight, controlled blackwork style.
Placement: outer forearm, laid across the muscle. Size: about 3 inches. Style: controlled blackwork with one warm accent.
Pain: medium. Ageing note: the scale arcs blur together quickly at this size. Fewer, larger scales is the fix, and the artist should tell you if your reference has too many.
Make it yours: put a real maker’s stamp or your own initials inside the spokes of the guard.
9. Samurai Helmet With Cherry Blossoms
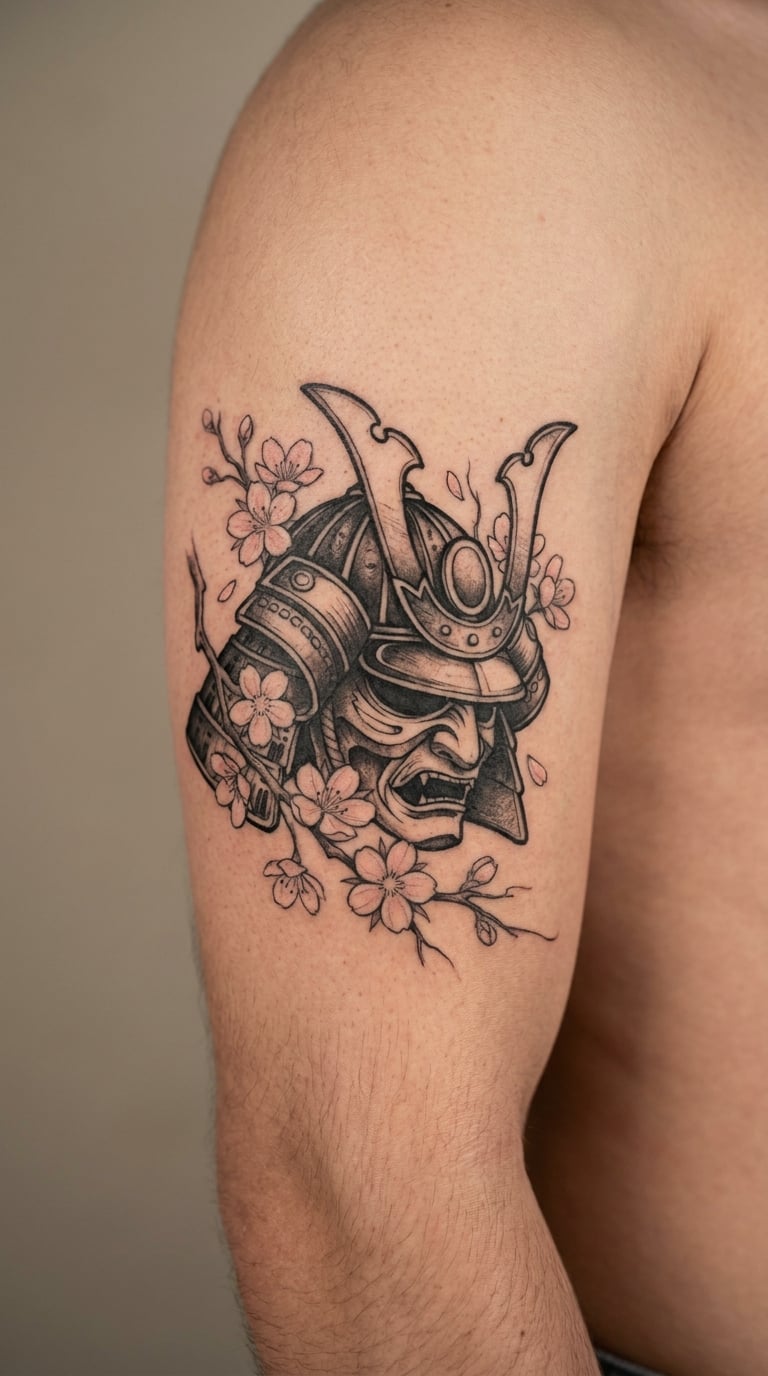
A historically inspired helmet with flared neck guards and a small crest on top, drawn in solid black and mid-grey, with two branches of five-petal blossoms crossing behind it in pale pink. Historical armour, no anime character anywhere near it.
Japanese armour is one of the few genuinely traditional motifs in this genre, and it reads as heritage rather than fandom once the face is gone. Good for anyone who wants the visual world without the series reference.
Placement: upper arm, chest plate, or across the shoulder blade. Size: 4 to 5 inches tall. Style: blackwork with one soft colour.
Pain: medium. Ageing note: the pale pink will fade to a dull cream fastest of anything here. A deeper rose holds noticeably longer.
Make it yours: have the crest replaced with a small original emblem from a story you invented, or a clan mark of your own family.
10. Lone Ronin With a Paper Talisman
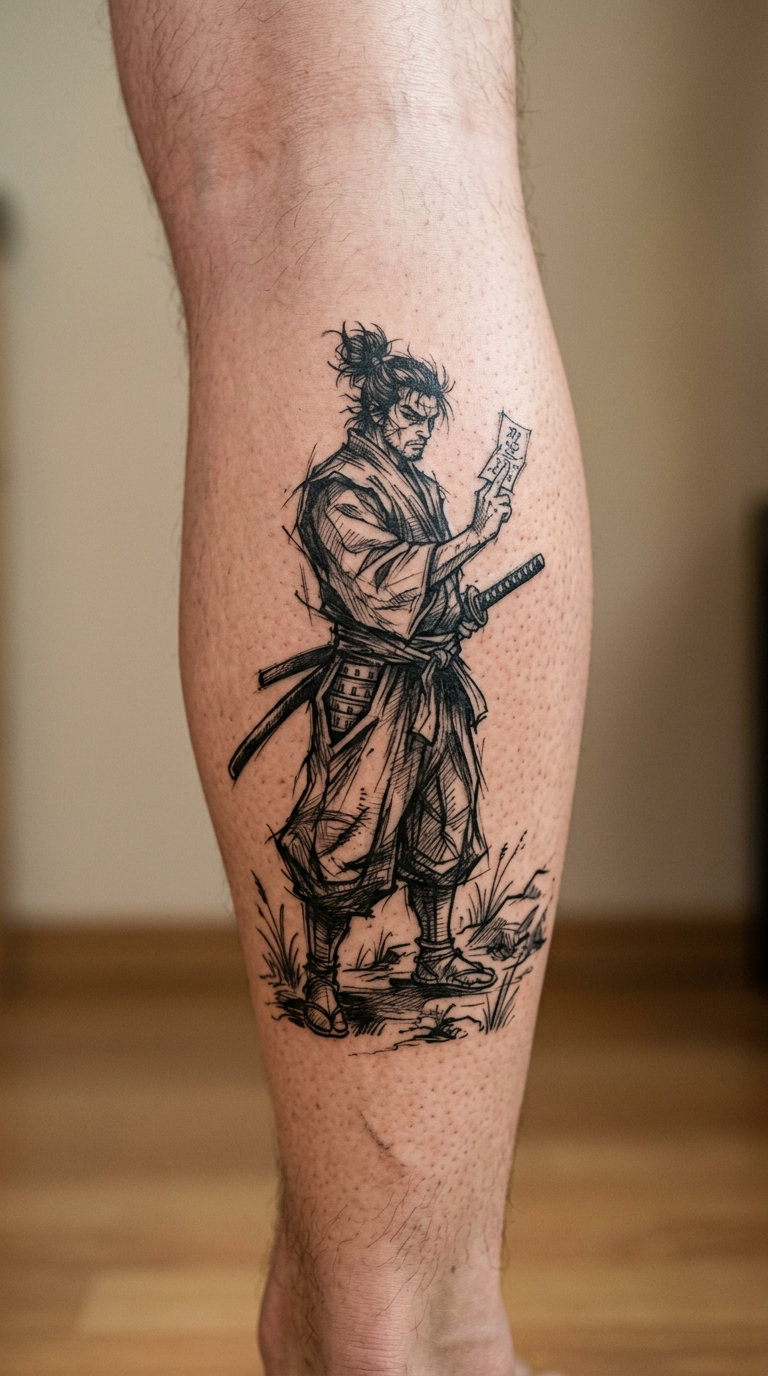
A single standing figure in profile with a long windblown coat, one hand out holding a small folded paper strip with a few abstract brush marks on it. Loose brush linework, almost no shading except under the coat hem, and a few horizontal wind strokes behind the head.
It is the contemplative half of the genre: a wanderer between places rather than a fighter mid-clash. People choose it when they like the mood of older series more than the modern battle look.
Placement: calf, outer thigh, or the back of the upper arm. Size: 5 to 6 inches tall. Style: loose manga ink line with minimal wash.
Pain: medium. The calf bruises more than most spots and stays tender longer. Ageing note: the paper strip is the smallest element; give it enough width to survive.
Make it yours: put an actual folded note’s silhouette, or a short line of brush-style Japanese you can read yourself.
11. Windmill and Cloud Scene
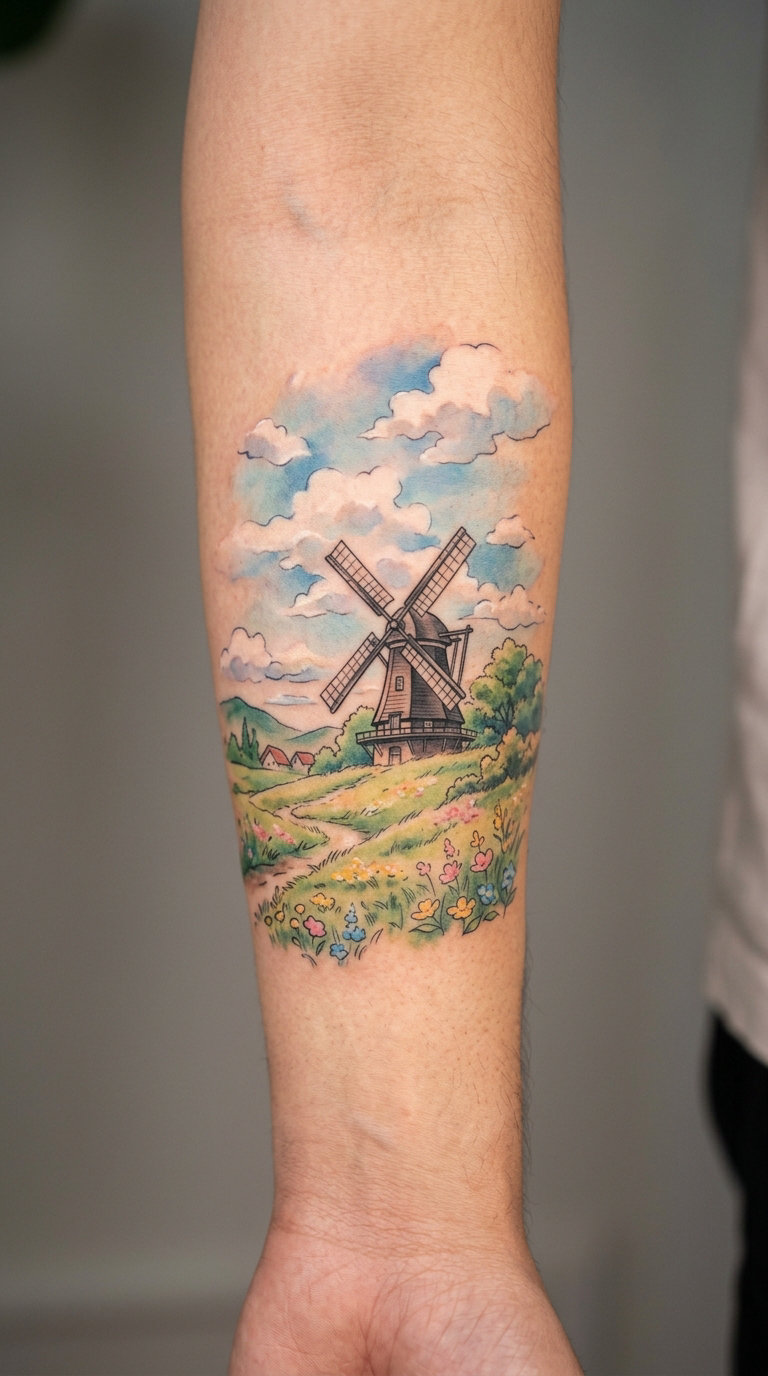
A hand-painted feeling scene: a small round windmill on a low hill, three drifting clouds, a band of grass suggested by three quick strokes, and a soft gradient sky in pale blue bleeding into warm yellow. Loose edges, no hard outlines.
This is the pastoral end of Japanese animation, and it is a genuine change of pace from every other entry on the list. The soft gradient work is closer to watercolour than to cel-shaded anime ink.
Placement: inner forearm, or wrapped slightly around the upper arm. Size: 4 inches tall, 3 inches wide. Style: watercolour with soft shading.
Pain: low to medium, and pale washes feel gentler than heavy black. Ageing note: light watercolour tones fade within a few summers, and the yellow goes first. Going deeper on the blue buys you years.
Make it yours: have the windmill turned to face a real direction, or add a small lamp in the window that glows in a warmer tone.
12. Original Mecha Pilot Silhouette
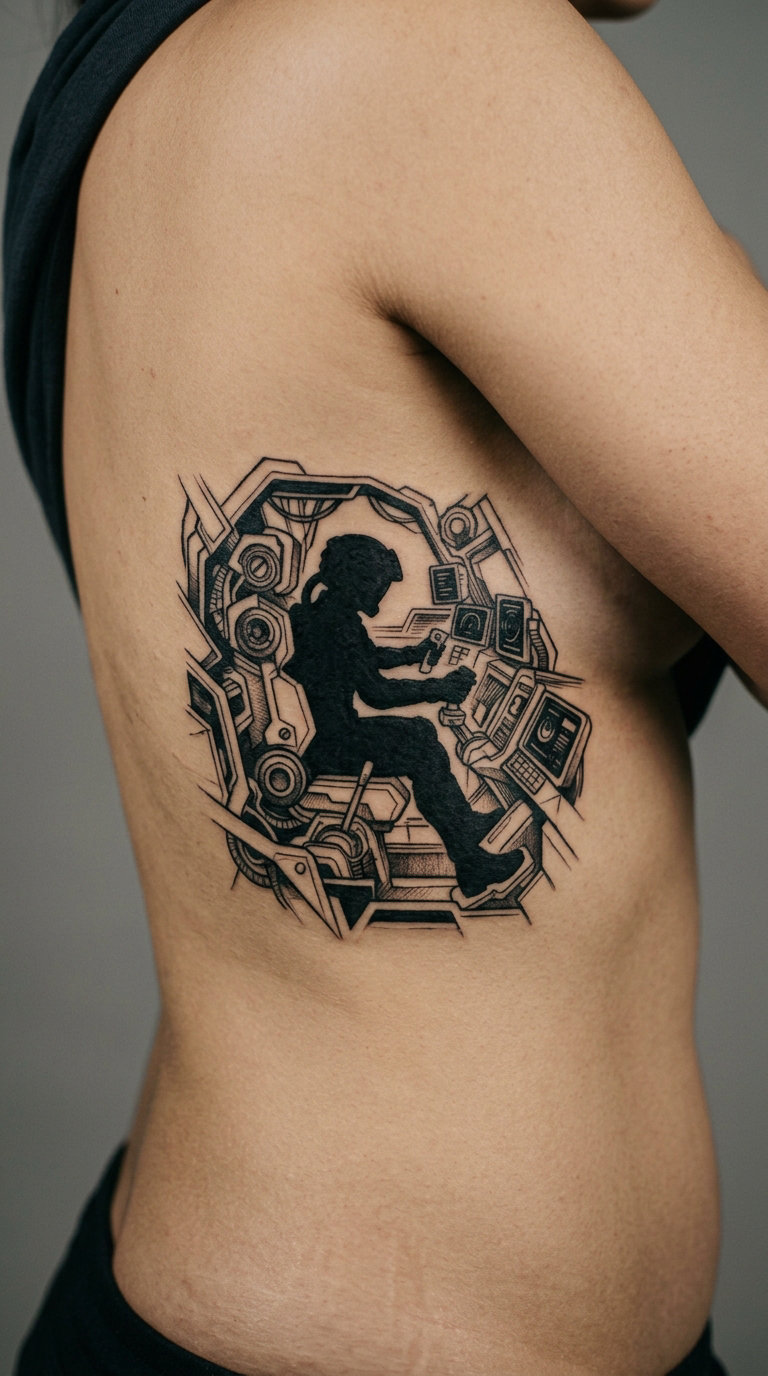
A helmeted pilot in profile, rendered as one solid black shape with a bright visor gap. Around the figure, angular cockpit framing: three hard-edged lever shapes, a strut, and a bank of small square instrument panels, all in line work.
Machine-pilot designs say the reader likes the engineering half of the genre rather than the fight choreography. Framing the silhouette with cockpit geometry keeps it mechanical instead of character-poster plain.
Placement: side of the torso, upper back, or the outer arm. Size: 5 to 6 inches tall. Style: solid black silhouette with technical line work.
Pain: medium to high. Ribs and the side of the torso are among the more sensitive placements for anyone not used to long sessions. Ageing note: the small instrument squares lose definition; make each one at least an eighth of an inch.
Make it yours: engrave a real aircraft tail code or a callsign in the instrument panel strip.
13. Mecha Shoulder Blueprint
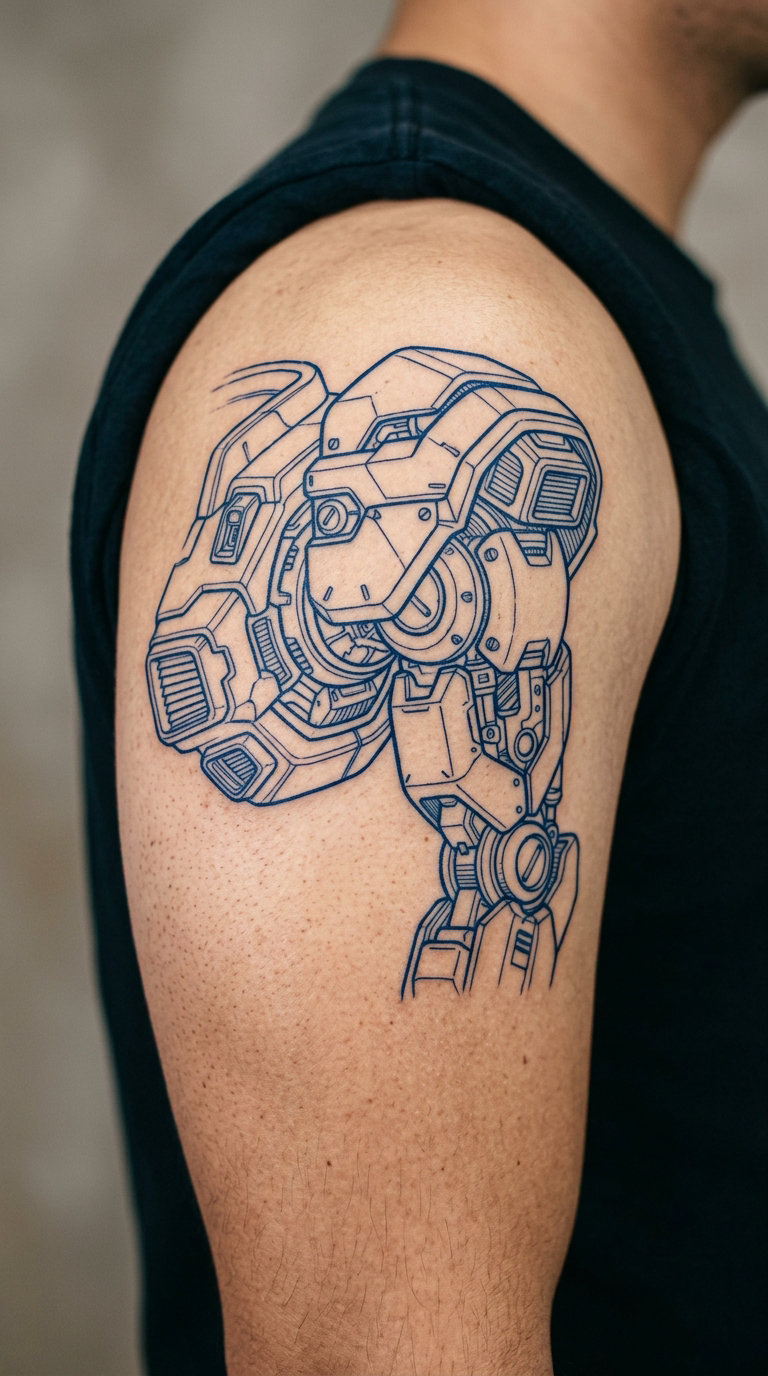
A fictional armoured shoulder unit drawn as a technical drawing: an exploded outline, bolt circles, hatched section marks, a dimension arrow with a small number, and a scale bar along the bottom. All in thin blue line work, maybe a grey wash on one plate.
Blueprint style is a favourite in the current anime tattoo scene because it looks engineered rather than decorative. It also travels well to other fandoms later, which matters if your interests shift.
Placement: upper arm or the outer forearm, oriented along the limb. Size: 4 to 5 inches. Style: technical line work, single blue tone.
Pain: medium. Ageing note: this is one of the designs that greys out fastest, because every line carries the whole image. Ask the artist for one heavier key line and keep the rest light.
Make it yours: have the dimension numbers swapped for a date in the same format, or invent a model designation for the unit.
14. Cyberpunk Tokyo Alley Sign
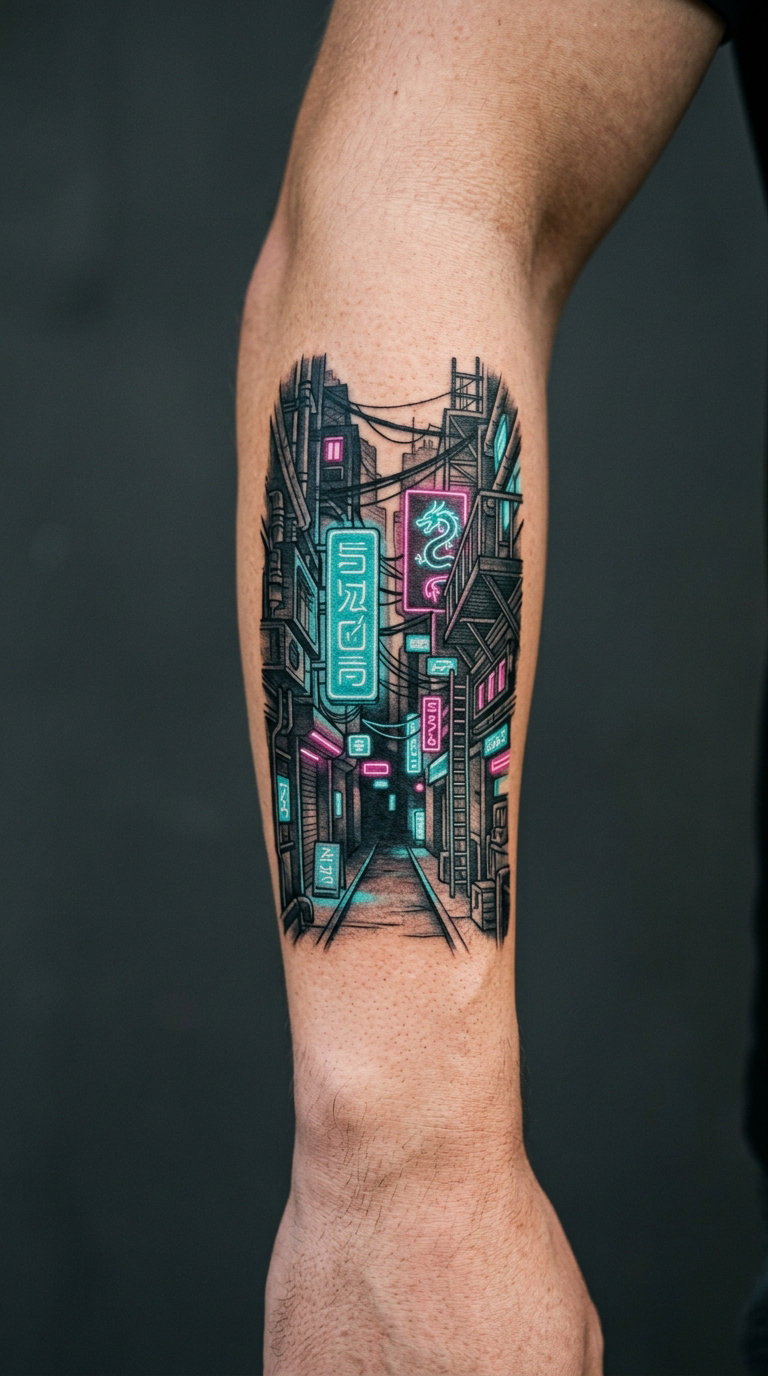
A narrow vertical alley: fire escapes, a bundle of overhead cables, two vertical sign shapes filled with abstract glyph marks, a puddle at the bottom reflecting the signs, and a few rain streaks. Black base with cyan and magenta on the signs only. No readable brand names anywhere.
Rainy neon alleys are the visual shorthand for the near-future corner of the genre, and building it as a scene rather than a face keeps it graphic. It works as a standalone piece or as the back half of a half sleeve.
Placement: outer forearm, vertical, or the calf. Size: 3 to 5 inches tall, 1.5 to 2 inches wide. Style: black ink with two neon colours.
Pain: medium. Ageing note: thin cyan on skin yellows over time, so lean toward a bluer cyan than looks right now, and keep the magenta away from direct sun.
Make it yours: have the sign glyphs become a real phrase in katakana that you chose, or hide a small constellation in the cable bundle.
15. Retro-Futurist Red Dune Scene
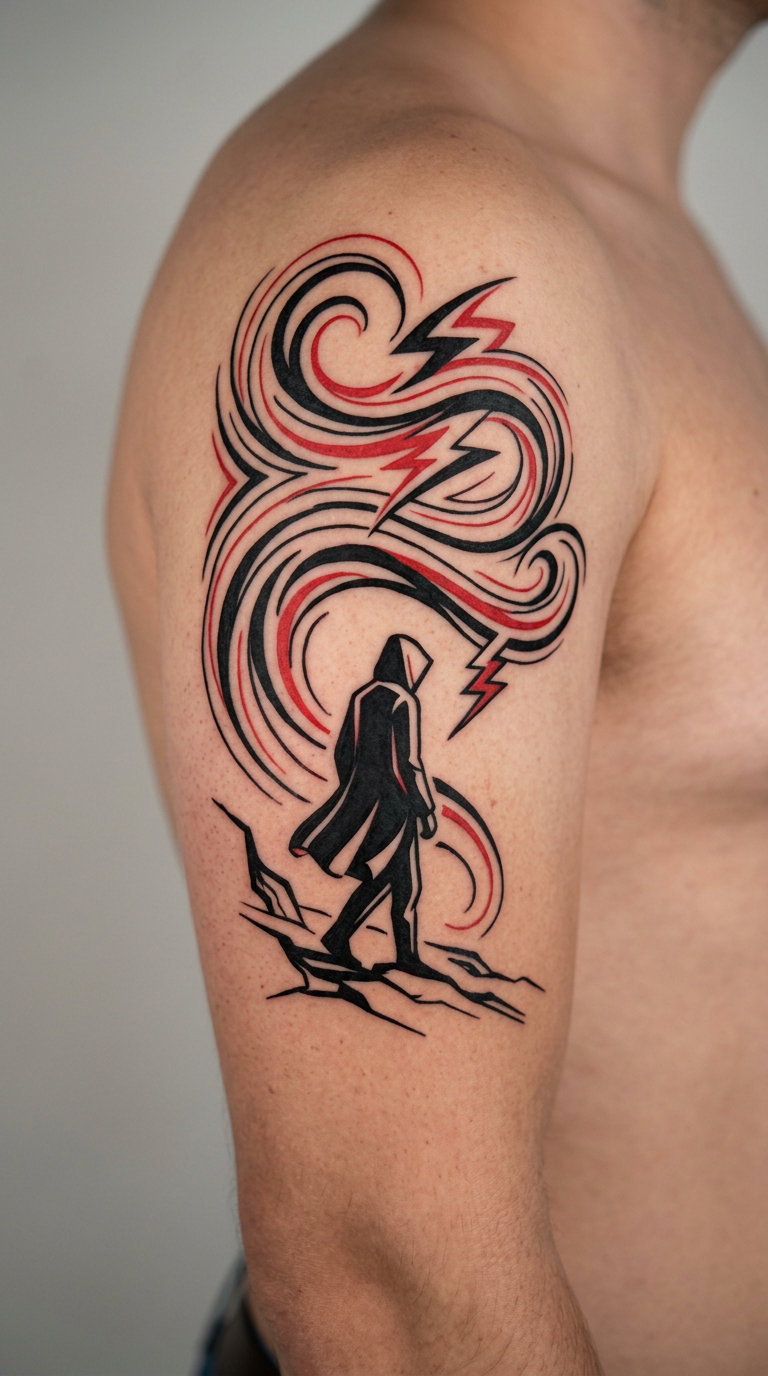
A small lone figure in a coat standing on a ridge line, with three enormous curved red forms sweeping overhead like wind made visible. Black ink for the figure and the ground, saturated red for the sky shapes, nothing else.
Sweeping energy shapes over a small human figure is a direct visual quote from 1980s science-fiction animation, and it is one of the boldest colour moves available without a face. The scale contrast is what makes it read.
Placement: upper arm, calf, or across the shoulder blade. Size: 5 to 7 inches wide. Style: two-colour graphic black and red.
Pain: medium to high over the shoulder blade; the arm version is easier. Ageing note: large red areas hold colour better than thin red lines, so ask for the sweeps to be filled shapes rather than outlined.
Make it yours: set the figure facing a real horizon you have stood on, and add a small vehicle silhouette in the distance.
16. Magical Girl Wand and Ribbon
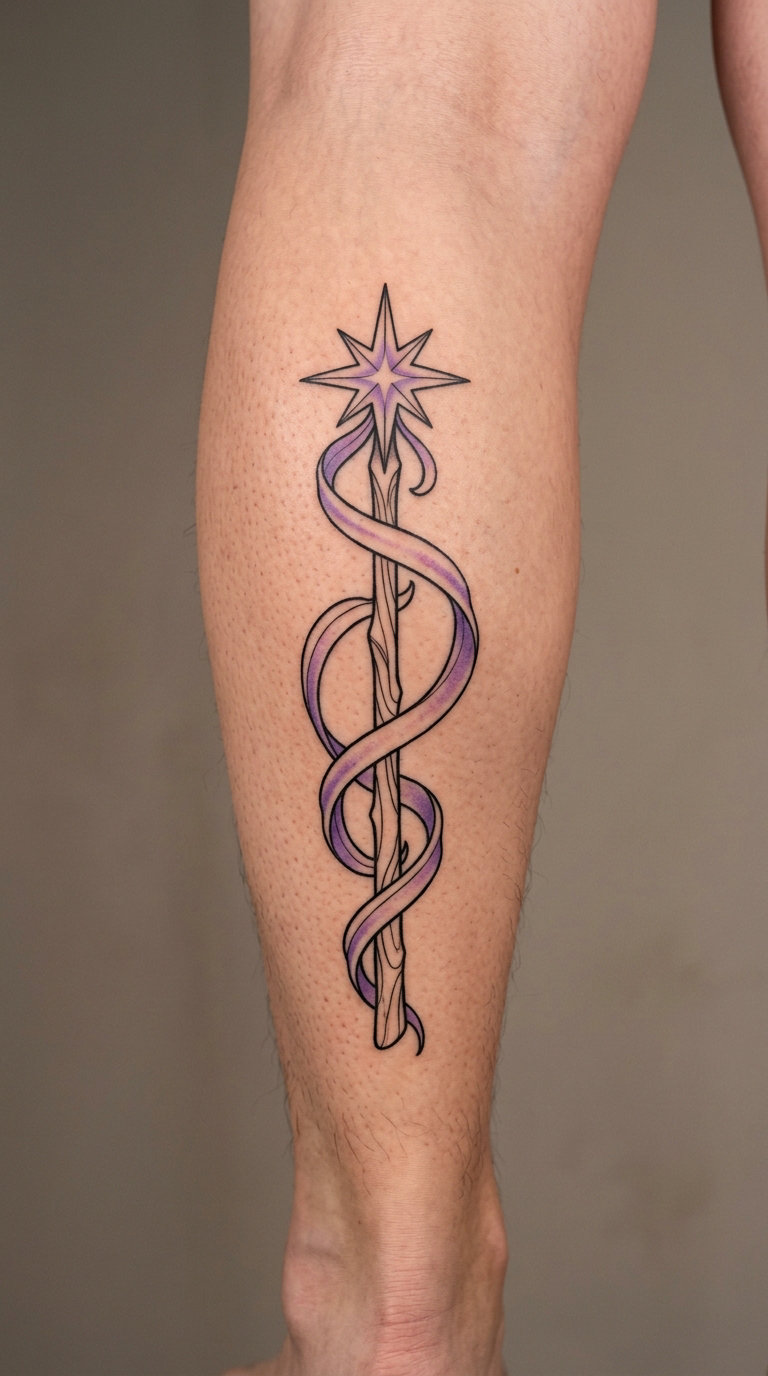
A slim wand tipped with a four-point star, a ribbon spiralling around the shaft and trailing off in two long ends, outlined in bold black with a violet wash inside the ribbon folds. It is graphic rather than cute, which is the whole reason it works on an arm.
The magical-girl object is usually paired with a specific character, so taking the wand alone frees it from that and gives you a shape that reads as a symbol. It also sits well next to a sword piece later on.
Placement: calf, inner forearm, or the back of the hand. Size: 4 to 5 inches. Style: bold outline with one accent colour.
Pain: medium on the calf, low on the back of the hand but slow because of the bone. Ageing note: the ribbon’s inner folds are the detail that softens; keep the violet as a solid block, not a gradient.
Make it yours: have the star at the tip replaced with a small emblem from another series you love, turning it into a mashup.
17. Celestial Witch Familiar
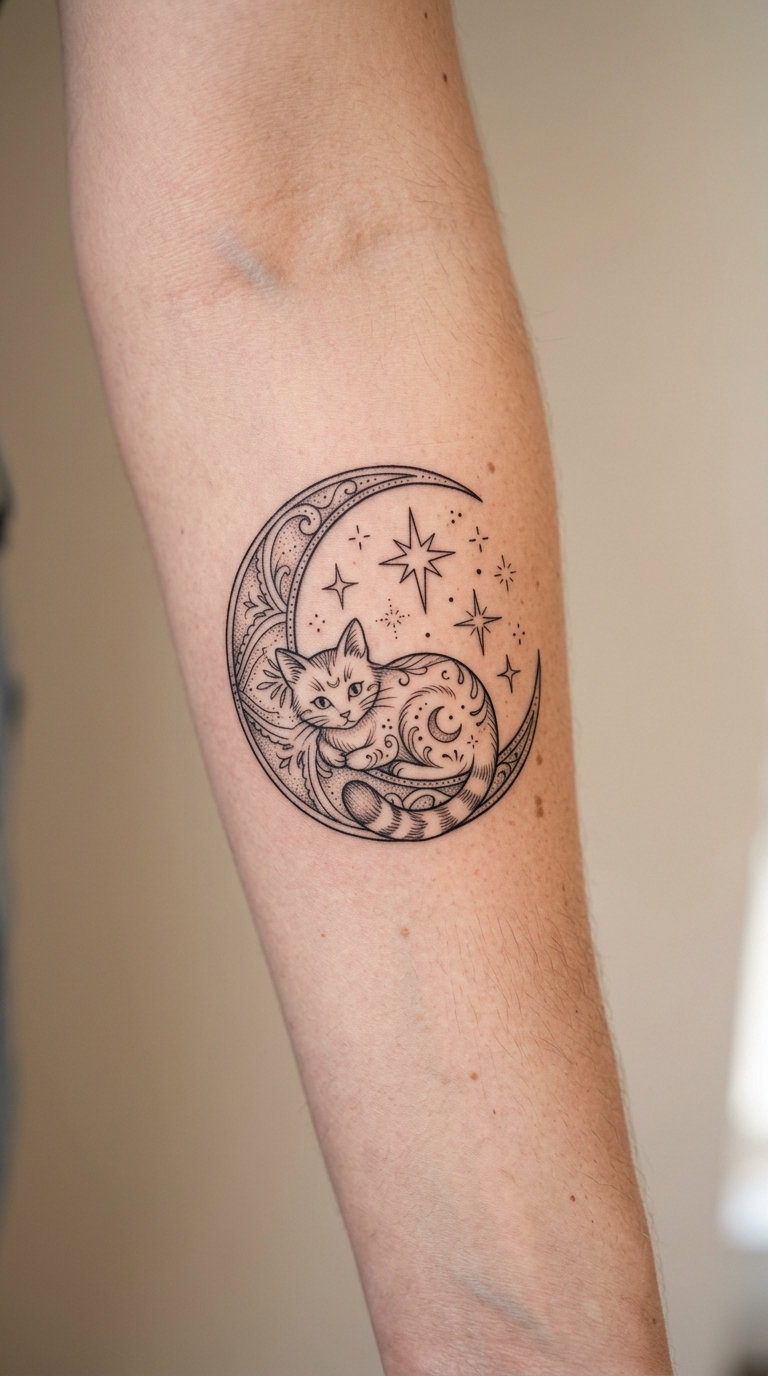
A crescent moon curving around an original cat-like creature curled in the hollow of it, three four-point stars scattered outside the curve, and a scatter of tiny dots for sky. Fine line throughout, with the creature’s back built from a few clean contour strokes.
Pet-and-moon designs read as gentle and a bit secretive, which is a different register from the battle imagery most of this list sits in. It is the one I would suggest to someone who likes anime but not the fights.
Placement: inner forearm, behind the ear, or the ankle. Size: 3 inches. Style: fine line with a small amount of dot shading.
Pain: low to medium. Behind the ear is more sensitive and more visible than most people expect. Ageing note: tiny stars and dots are the first to disappear; three stars at a quarter inch each read for a decade.
Make it yours: name the creature after a real cat, or put the date a cat joined your family along the moon’s outer curve.
18. Celestial Dragon and Moon
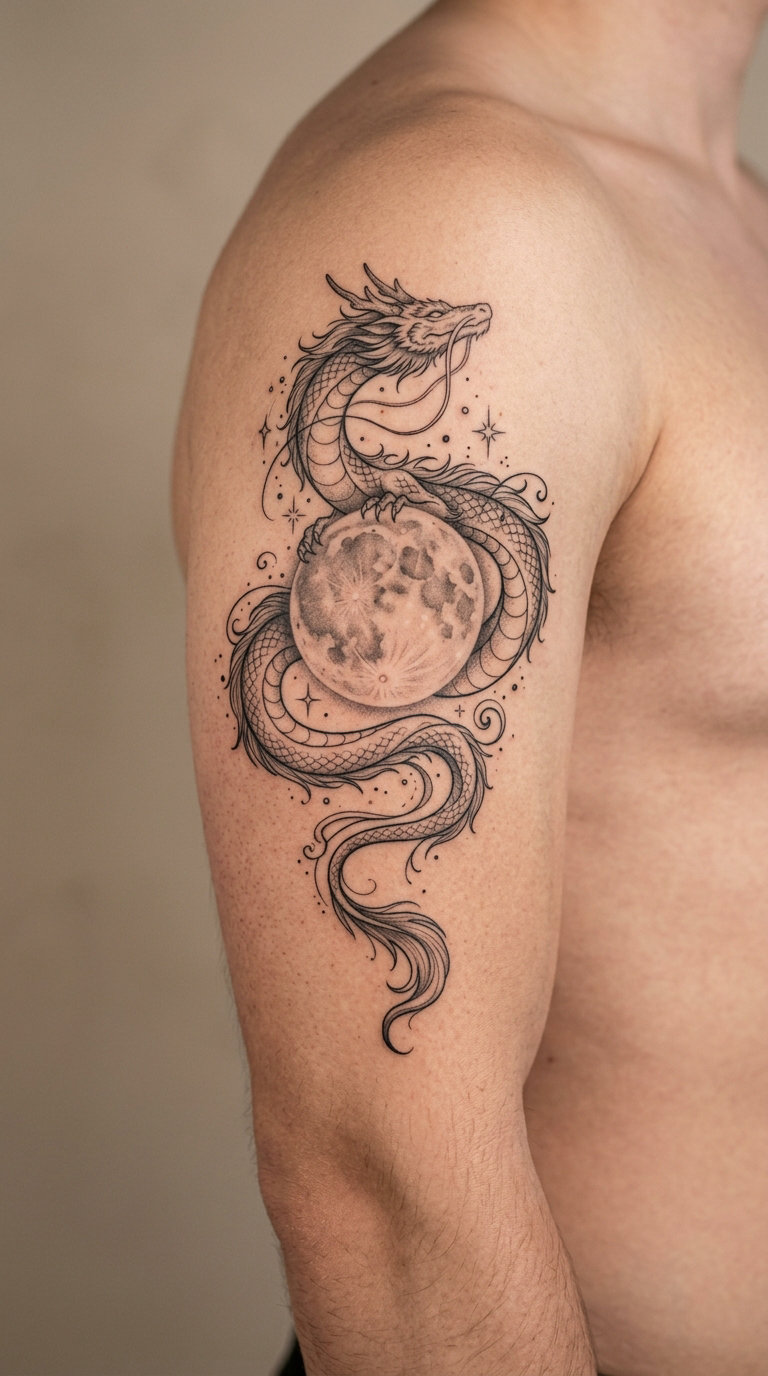
A long serpentine dragon drawn as a single unbroken ribbon of body wrapping three quarters of the way around a full moon, whiskers trailing, claws resting on the moon’s surface, and the moon shaded in smooth grey gradient with a hard black outline. No clouds, no background.
Dragons wrapped around a moon are a classic pairing across Japanese and Chinese visual traditions, and this composition fills an upper arm without needing a background. The unbroken body line is the whole design, so it rewards a smooth surface.
Placement: upper arm or the back. Size: 5 to 7 inches. Style: blackwork with grey gradient shading.
Pain: medium. Ageing note: the grey gradient on the moon is a big flat area that can look patchy as it heals; a black outline around its edge helps hide that.
Make it yours: have the dragon’s whisker curl into a single letter, or ask for a faint constellation drawn inside the moon’s grey.
19. Tiny Forest Familiar on the Inner Arm
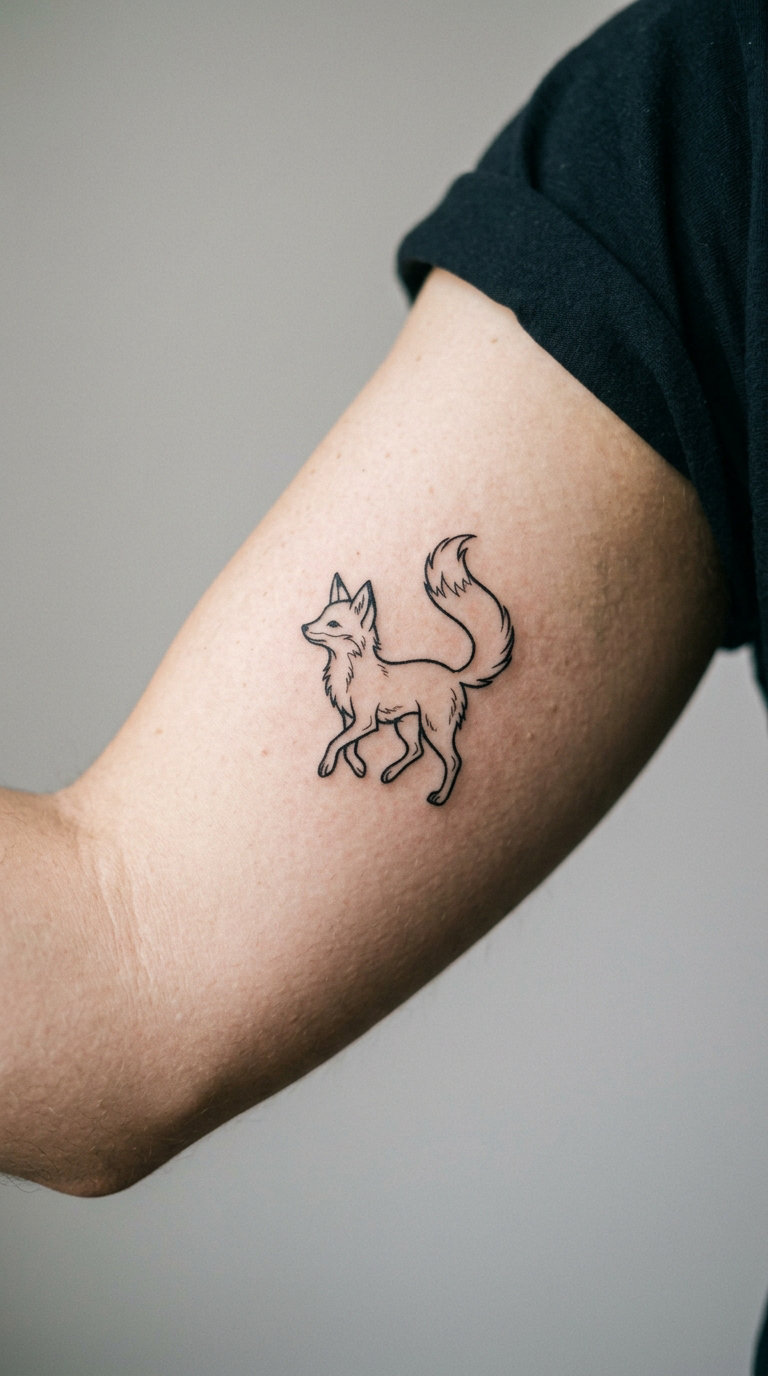
A micro piece: a fox-like creature sitting in profile, built from a handful of strokes with one solid black tail and a single leaf shape above it. Nothing else in the frame, no background, no frame line.
This is the smallest useful size for an anime-adjacent design. At an inch and a half, the point is that the silhouette still reads as an animal and not as a smudge, which is exactly the problem people hit with tiny detailed pieces.
Placement: inner bicep, inner wrist, or behind the ear. Size: 1 to 1.5 inches tall. Style: micro line with one solid fill.
Pain: low, and it is over before you have settled in. Ageing note: micro work is the first thing to blur. A solid tail and one clean contour survive far better than a shaded face would at the same size.
Make it yours: have the leaf above it become a specific real plant from where you grew up.
20. Sports Anime Victory Leap
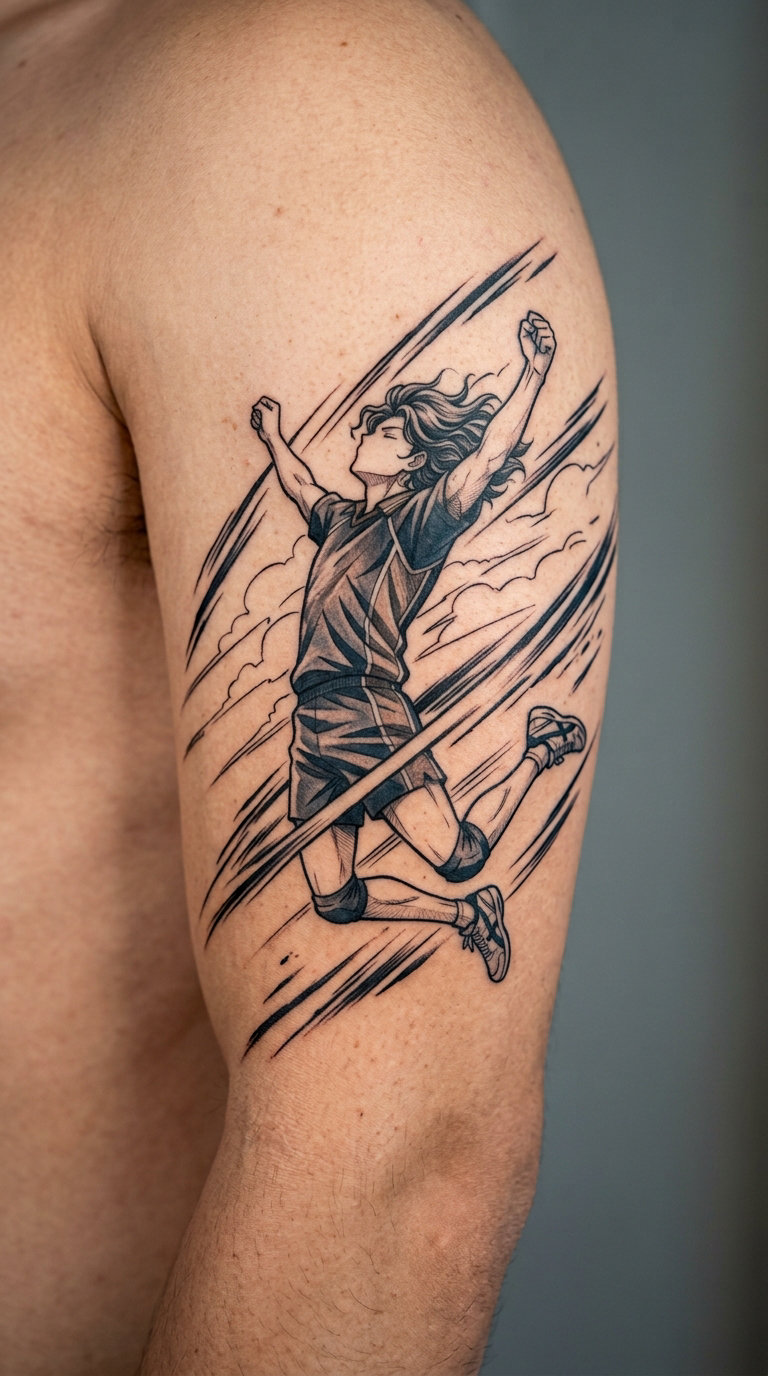
A figure at the top of a leap, knees tucked, one fist raised, drawn in strong black contour with a simple jersey shape. Around the body, a fan of diagonal speed lines and one curved ground line underneath, with a single accent colour in the jersey.
Sports anime is one of the most-watched corners of the medium and the least represented in tattoo galleries. The upward diagonal composition suits the deltoid better than any other placement on this list.
Placement: outer upper arm and shoulder, following the deltoid curve. Size: 4 to 5 inches. Style: bold black line with one colour accent.
Pain: medium to high over the shoulder cap. Ageing note: jersey numbers and small chest text are the elements that go to mush, so skip them or make them large.
Make it yours: put your actual team colours or a real club badge shape in the jersey, and angle the leap toward your dominant arm.
21. Traditional Manga Portrait in Three-Quarter View
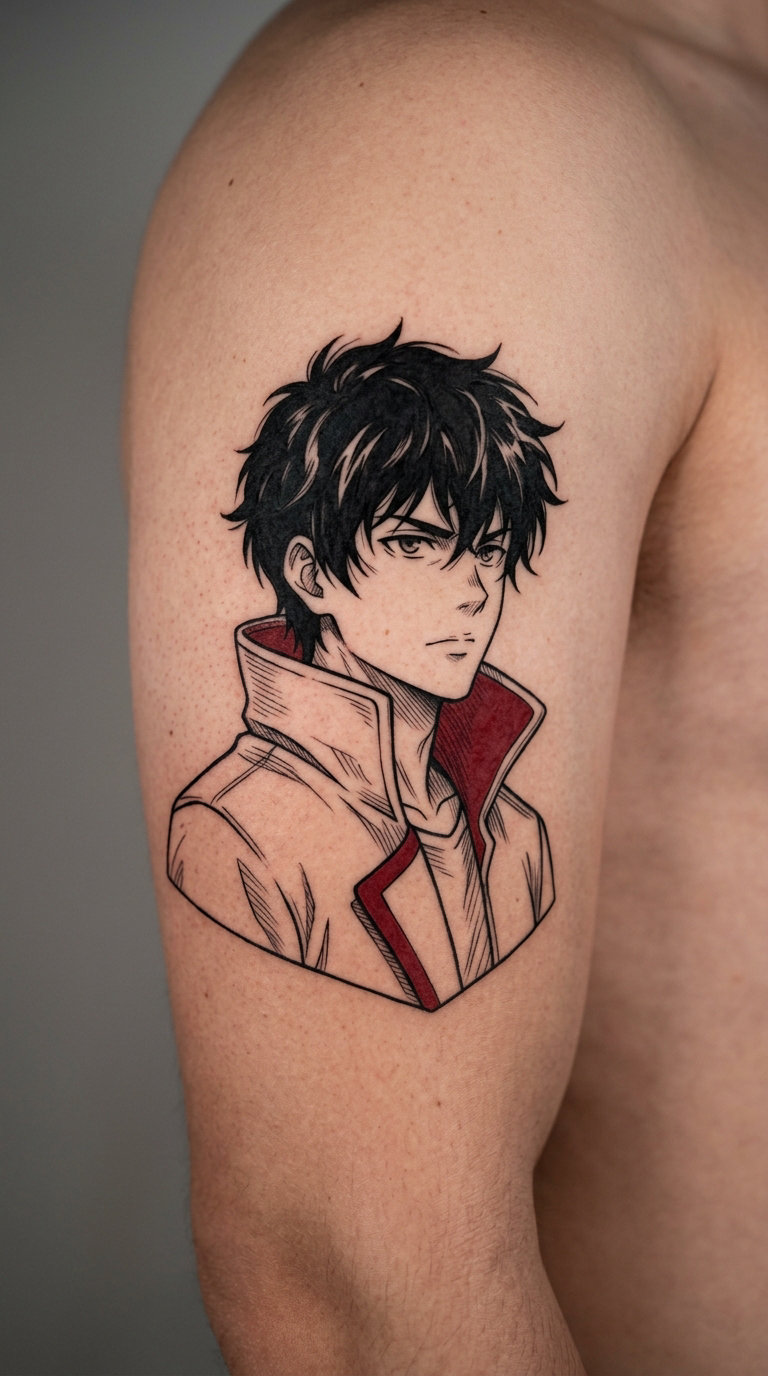
A head and shoulders of an original male character turned three-quarters to the side, with expressive upswept hair built from grouped solid shapes, large eyes with a single highlight, a strong jaw, and a red accent running along the collar. Background stays as bare skin.
Full faces are the boldest choice here, and the three-quarter view is the most forgiving because it hides the hardest part of drawing, which is a straight-on symmetrical face. It is the piece people tend to want after a year of symbols.
Placement: chest, upper back, or the outer arm. Size: 5 to 6 inches. Style: traditional manga line portrait with one accent colour.
Pain: high. The chest is sensitive and the neck of the arm, if you include it, is worse. Ageing note: solid hair shapes hold up far better than individually drawn strands, which is why the hair here is built in groups.
Make it yours: design the character as a version of yourself with the eyes and hair you actually wanted, and keep the face recognisable only to you.
22. Full Manga Action Sleeve
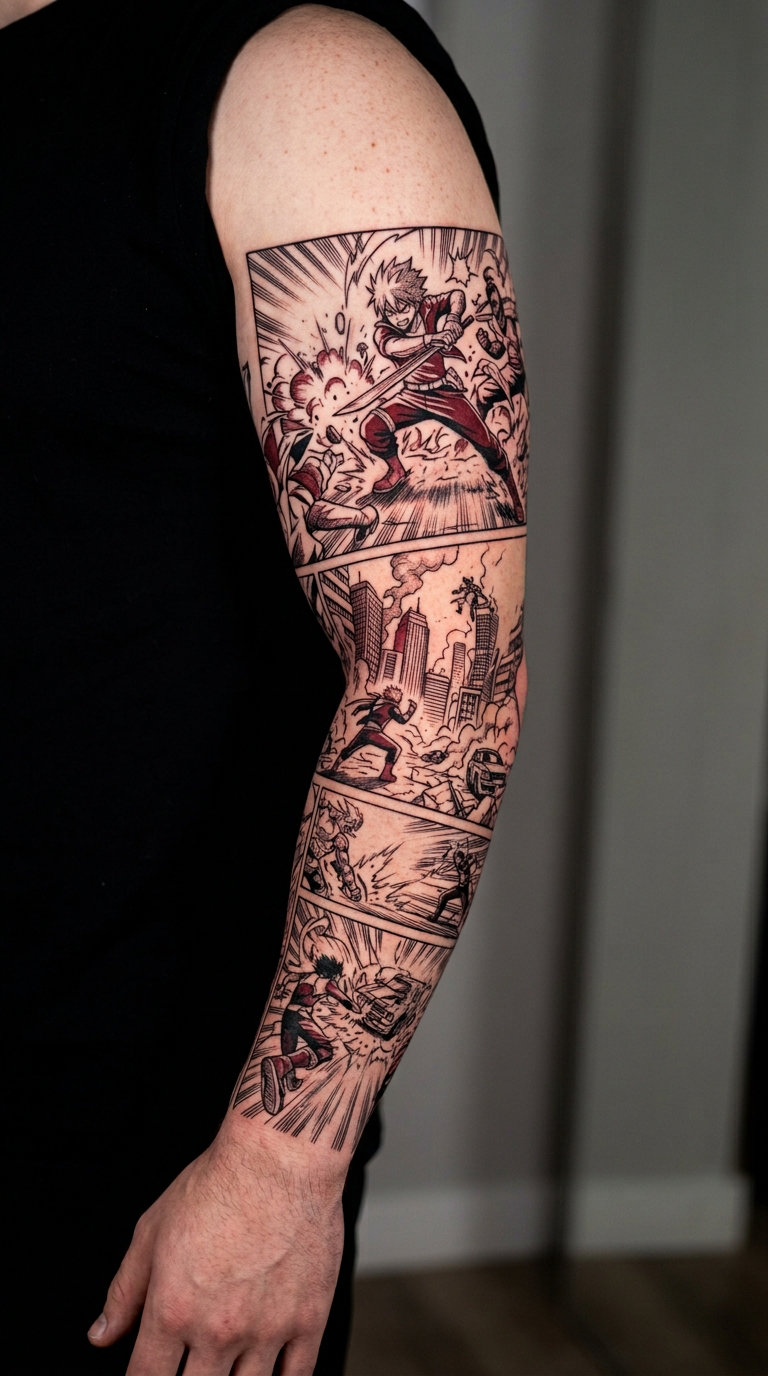
A full-arm composition divided into three bands: an original hero rising through a speed-line field at the top, a city rooftop panel with a distant rival in the middle, and a transformation burst with radiating black wedges at the wrist. Black line work with one deep red running through all three bands.
A sleeve is the version of this for someone who wants the fandom visible rather than hidden. Repeating the red across all three bands is what keeps a large piece from turning into three separate tattoos.
Placement: shoulder to wrist on one arm, with the flow designed for the arm’s curve rather than flattened onto paper. Size: full arm coverage. Style: multi-panel black and red manga.
Pain: high, and almost always split across three to five sessions with healing breaks in between. The elbow, inner biceps and inner elbow crease take the longest to heal and are the areas to plan last. Ageing note: large pieces need a colour refresh on the red sooner than the black.
Make it yours: decide the running order of the three panels before the first session, because sleeve flow is very hard to change once the top band is healed in.
How to Choose the Right Design
Six checks will get you closer to a design you still like in twenty years than another week of scrolling will.
- Match detail to the space. Count the elements in the design and the square inches you have. A face, a hand and a background do not fit inside two inches. If the reference art has that much in it, the artist has to simplify it, and you should agree on which parts go before the stencil goes on.
- Pick the placement first, honestly. Think about work, family and swimming, then choose the spot. Designing for a spot you are willing to show constantly gives you far more freedom than designing for one you will hide.
- Set a minimum size before you book. Three inches is the floor for a recognisable anime-adjacent figure. Below that, choose a symbol or a silhouette instead of shrinking a scene.
- Decide your line tolerance now. If you want something that will still read crisply in fifteen years, take the solid-shape version over the fine-line version of the same idea. Fine line is a look you commit to early and refresh often.
- Choose the colour question deliberately. Full colour costs more per session, needs more sessions for the same size, and shows every fade. Black and grey holds its shape better and is far easier to extend into a sleeve later. Plenty of people start in grey and add colour to one element years afterwards.
- Check it against your existing tattoos. If you already have a lot of black line work, a fine-line profile will disappear into it. Scale contrast between pieces is what keeps a collection readable, and the same rule applies to an unfilled gap left for later.
If you want a wider set of designs in the same visual family, these 10+ manga tattoo ideas cover more of the panel and character-reference side of things.
Cost and Session Time
What you pay is driven by size, detail, number of colours, and how long the artist needs to get through it. Those four things move together, so a rough way to plan is to decide how big the piece is and how many sessions it takes before you worry about the number.
- Micro and small pieces under about two inches are usually booked as a short single session, though some shops set a minimum that a tiny piece may not clear.
- Small pieces around three to four inches are normally one session of an hour or two, depending on how much line work and shading is in the design.
- Medium pieces at five to seven inches often need two sessions, particularly with a full grey wash or two colours.
- Large pieces and half sleeves are usually three to five sessions with a healing break between each, because a full area of black packing will not hold up if you push it in one sitting.
- Full sleeves are quoted per session or as a package, and the per-session figure is the honest number to plan around.
Most artists work hourly, so a design with a lot of fine detail takes longer to execute than its size suggests, and you are paying for all of it. A consultation is often free or credited against the final session, and deposits are normal on larger projects. Shop minimums vary widely by city, and travel can change the rate entirely, so it is worth asking two or three studios for a quote on the same design before you commit.
One more thing worth doing: ask the artist to tell you which parts of the design they would simplify. A good answer at the consult saves you from a piece that looks like a photocopy of a screenshot when it heals.
Aftercare Basics
Start with your artist’s aftercare instructions, because they know how deep the ink went and how much area is covered.
- Follow the washing and moisturising routine they give you, usually a gentle wash and a thin layer of ointment a few times a day for the first several days, then unscented moisturiser as the skin dries out.
- Protect it for the first couple of weeks. Loose dark clothing over the area, no tight straps or sleeves rubbing across it, and nothing that snags the surface.
- Keep sun, pools and hot tubs off it while it heals, and be thoughtful about sun afterwards, since the fades on this list are mostly sun-driven rather than age-driven.
- Do not soak it, and do not pick at it. If a scab forms, leave it alone. Ink that comes out during the first weeks is ink that was never deep enough to hold.
- Watch it, and ask if something looks wrong. A photo sent to the artist is normal and useful, especially with large flat colour areas and heavy black packing. A shop would rather see a message than deal with a piece that healed patchy.
Healing is not linear. Expect a few days of looking brighter and glossier, then a stretch where the skin flakes and looks dull, then a few weeks of the linework appearing to sink in before it settles back out. Judging the design before the four-week mark is a mistake nearly everyone makes once.
Frequently Asked Questions
Can I get an anime-inspired tattoo without copying a character?
Yes, and most good anime tattoos work that way. An artist takes the visual language of the genre, meaning clean contours, deliberate line weight, speed lines, panel framing and flat shading, and applies it to an original figure, symbol or scene. A screen frame sent straight to a needle is the version that ends up blurry and legally awkward. Every design in this list is original for exactly that reason.
What is the best small anime tattoo for a first piece?
A small symbol or silhouette beats a miniature character. Anything under two inches has to lose most of its detail, and what survives at that size is usually a smudge. A crossed-sword emblem, a crescent moon with a familiar, or a single eye at two inches wide all read clearly, heal predictably, and finish in one short session, which is a much better first experience than a rushed portrait.
Do anime tattoos only work in bright colour?
No. Black and grey is arguably the stronger look for this style, and it is what most experienced anime tattooers default to. It holds contrast better as it ages, costs less per session because each pass is quicker, and it extends into a sleeve later without looking mismatched. Full colour gives you the punch of the source, but it needs more sessions for the same size and every colour fades on its own schedule.
Where should a detailed anime tattoo be placed?
Put detailed work where the body is flat and the skin has room, and where you are willing to show it. The outer and inner forearm, the deltoid and the upper back give an artist the most usable surface. The chest, ribs, inner elbow and collarbone carry more sensitivity and more movement, so they suit bolder, simpler designs better than fine detail. A composition designed for a flat calf will fight you on a rounded upper arm.
How do I choose an anime tattoo artist?
Look for a portfolio that contains anime or manga-style healed work specifically, not just one popular piece in a generalist book. Ask to see healed photos taken months later, since fresh work hides how a design settled. Bring clean, high-resolution reference images rather than screenshots, and ask the artist which parts they would simplify at your size. If they cannot tell you how many sessions the piece needs, keep looking.
Conclusion: Choose Your First Anime-Inspired Tattoo
Start with a sword emblem, a crescent moon familiar or a single determined eye. Each of these anime tattoo ideas for men is small enough to heal predictably, cheap enough to be a mistake you can live with, and simple enough that the linework will still look sharp a decade from now.
Move up to an energy burst or a split-screen battle once you know how you handle a long session and how you feel about colour. Save the manga portrait and the full action sleeve for the point where the rest of your collection already tells people you are in this world.
Whatever you pick, take the sizing notes from this list to the consult and let the artist argue with you about detail. That conversation is where a good anime tattoo actually gets made.