
20 Telescope Tattoo Ideas for Stargazers (October 2026)
A telescope tattoo is one of those subjects that works because of its shape. The long tapered tube lies flat along a forearm, a calf, or the upper back, and the wide end gives an artist somewhere to put stars, a moon, or a horizon line. The 20 telescope tattoo ideas below cover that range end to end, from a one-line crescent moon pairing to a full observatory scene across the upper arm.
Astrology people, physics graduates, night-shift nurses, and parents who camp with their kids all end up here for the same reason: the instrument points away from the body, toward whatever is out there. If you are planning around autumn, the clearest skies run from late summer into early winter, and good artists book four to six weeks out. Book the consultation first, then pick from the shortlist below.
20 Telescope Tattoo Ideas: Quick Guide
Here is the whole list at a glance. Rows match the numbered sections below, so you can jump straight to the design that fits your canvas.
| Idea | Style | Best placement | Size | Pain |
|---|---|---|---|---|
| Fine-line telescope with crescent moon | Fine line | Inner forearm | 2 to 3 in (5 to 8 cm) | Low to medium |
| Vintage refractor telescope | Etching-style black and grey | Outer upper arm | 4 to 5 in (10 to 13 cm) | Medium |
| Telescope in a star field | Blackwork linework | Upper back | 5 to 7 in (13 to 18 cm) | Medium |
| Nebula through the lens | Watercolor | Shoulder, deltoid | 3 to 4 in (8 to 10 cm) | Medium |
| Minimalist geometric telescope | Minimalist geometry | Inner wrist | 1.5 to 2 in (4 to 5 cm) | Low to medium |
| Telescope with a shooting star | Playful fine line | Behind the ear | 1.5 to 2.5 in (4 to 6 cm) | Low |
| Botanical night-sky telescope | Botanical fine line | Outer forearm | 3 to 4 in (8 to 10 cm) | Medium |
| Astronaut holding a telescope | Blackwork silhouette | Calf | 3 to 4 in (8 to 10 cm) | Medium |
| Antique telescope with compass rose | Vintage black and grey | Forearm | 4 to 6 in (10 to 15 cm) | Medium |
| Dotwork Milky Way telescope | Dotwork | Upper back, sleeve | 6 to 9 in (15 to 23 cm) | Medium |
| Retro mid-century telescope | Retro linework with colour | Upper arm | 3 to 4 in (8 to 10 cm) | Medium |
| Realistic wooden telescope | Micro-realism | Outer forearm | 2.5 to 3.5 in (6 to 9 cm) | Medium |
| Crescent moon linework pair | Fine line with accents | Rib area | 2.5 to 3.5 in (6 to 9 cm) | High |
| Celestial map telescope | Technical illustration | Thigh | 5 to 7 in (13 to 18 cm) | Medium |
| Blackwork portal telescope | Bold blackwork | Shoulder blade | 5 to 6 in (13 to 15 cm) | Medium |
| Tiny telescope with heart constellation | Fine line | Wrist, hand | 1 to 1.5 in (3 to 4 cm) | Medium to high |
| Constellation map sleeve detail | Fine line constellation | Inner forearm, sleeve | 4 to 6 in (10 to 15 cm) | Medium |
| Retro space patch telescope | Emblem with flat colour | Upper arm | 3 to 3.5 in (8 to 9 cm) | Medium |
| Hand-held antique spyglass | Vintage black and grey | Side of index finger | 1.5 to 2 in (4 to 5 cm) | High |
| Large realistic observatory scene | Realism with colour | Upper arm, back panel | 8 to 12 in (20 to 30 cm) | Medium to high |
1. Fine-Line Telescope and Crescent Moon
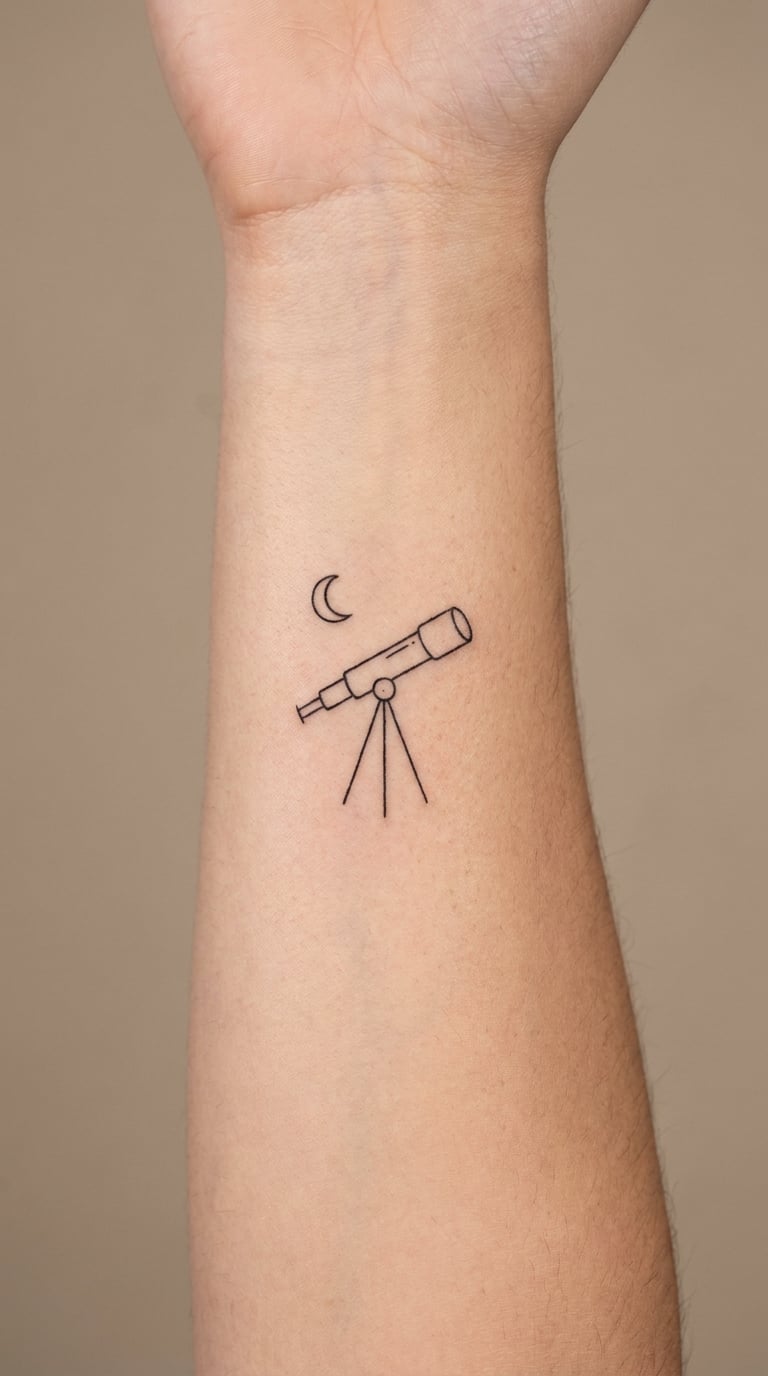
This is the one most first-time clients ask about. The drawing is a single unbroken line for the tube, two short tripod legs, and a thin crescent moon sitting just above the eyepiece, drawn in the same weight. Nothing is filled in, nothing is shaded, so the whole thing reads as quiet rather than loud.
People choose it because the pairing is a well-known astronomy visual rather than a fixed symbol with assigned meaning. The moon gives the composition a focal point at the wide end, which is where the eye goes first.
Placement: inner forearm, ribs, or the soft area just above the ankle. Size: 2 to 3 inches (5 to 8 cm) across. Style: fine line, single weight.
Pain: low to medium on the inner arm, more of a scratchy burn than a deep ache. Fine line on the inner forearm and ribs is one of the first things to soften, so expect the hairlines to look lighter after five or six years, and touch-ups are normal. Make it yours: add a small coordinate number or a single star beside the moon.
2. Vintage Refractor Telescope
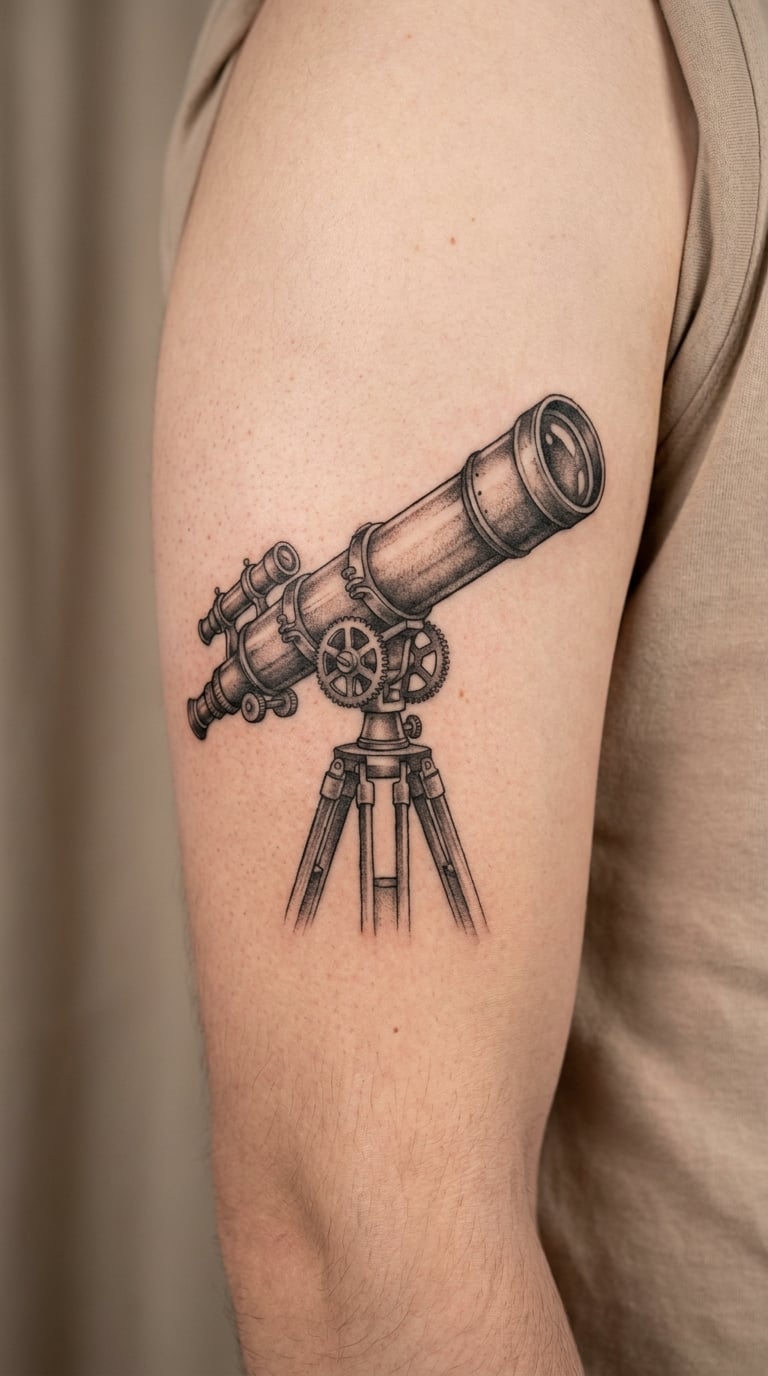
A long refractor on a wooden tripod, rendered the way an old encyclopaedia drew instruments: thin contour lines, cross-hatched shadow, a faint sepia wash that can be left out entirely. The barrel gets more attention than anything else, with the lens rings and a small focusing knob near the base.
This one reads as nostalgia more than anything else. People with a grandparent who owned one, or who spent a childhood in the car on the way to a dark site, tend to land here.
Placement: outer upper arm or the flat of the forearm. Size: 4 to 5 inches (10 to 13 cm). Style: etching-style linework, black and grey, optional sepia.
Pain: medium, and the line work means a longer session, so fidgeting hurts more than pain does. Cross-hatched shading holds its shape far better than hairlines, which makes this a good choice if you want a tattoo that still reads clearly in fifteen years. Make it yours: have the artist engrave a founding year on the tripod leg.
3. Celestial Telescope in a Star Field
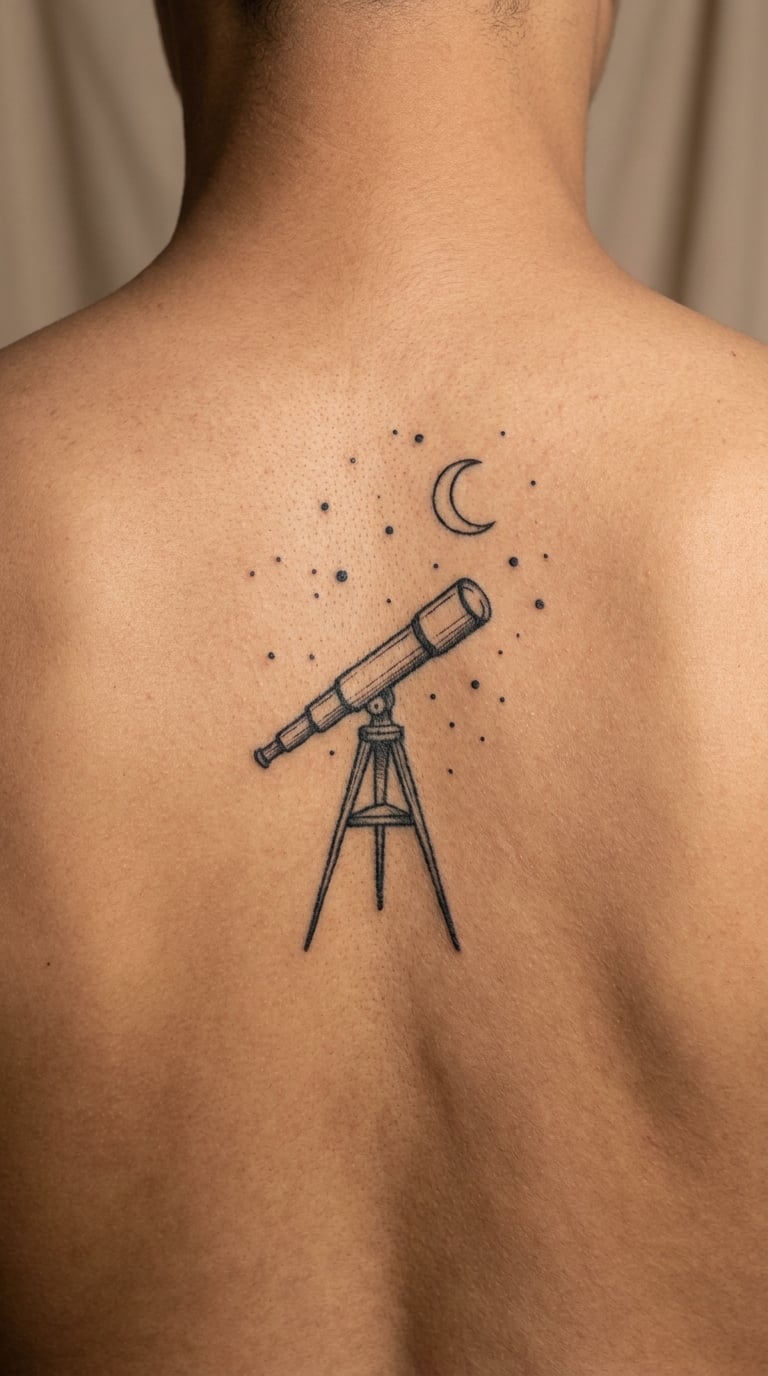
The telescope is angled upward, and the space it points at fills with dots of varying size, a few four-pointed stars, and one short constellation line. The star field is deliberately sparse. When the density climbs, the instrument gets lost.
It is the most flexible design in the list because the stars can be anything you want them to be, which means it works for people who like space and would never call themselves a scientist.
Placement: upper back between the shoulder blades, where there is a broad flat area. Size: 5 to 7 inches (13 to 18 cm). Style: blackwork linework with stippled stars.
Pain: medium across the back, and the upper back sits on bony muscle so you will feel every pass. A star field built from solid dots holds its edges for decades, which is why it ages better than a fine-line version. Make it yours: use the sky above a place that matters to you as the reference.
4. Watercolor Nebula Through the Lens
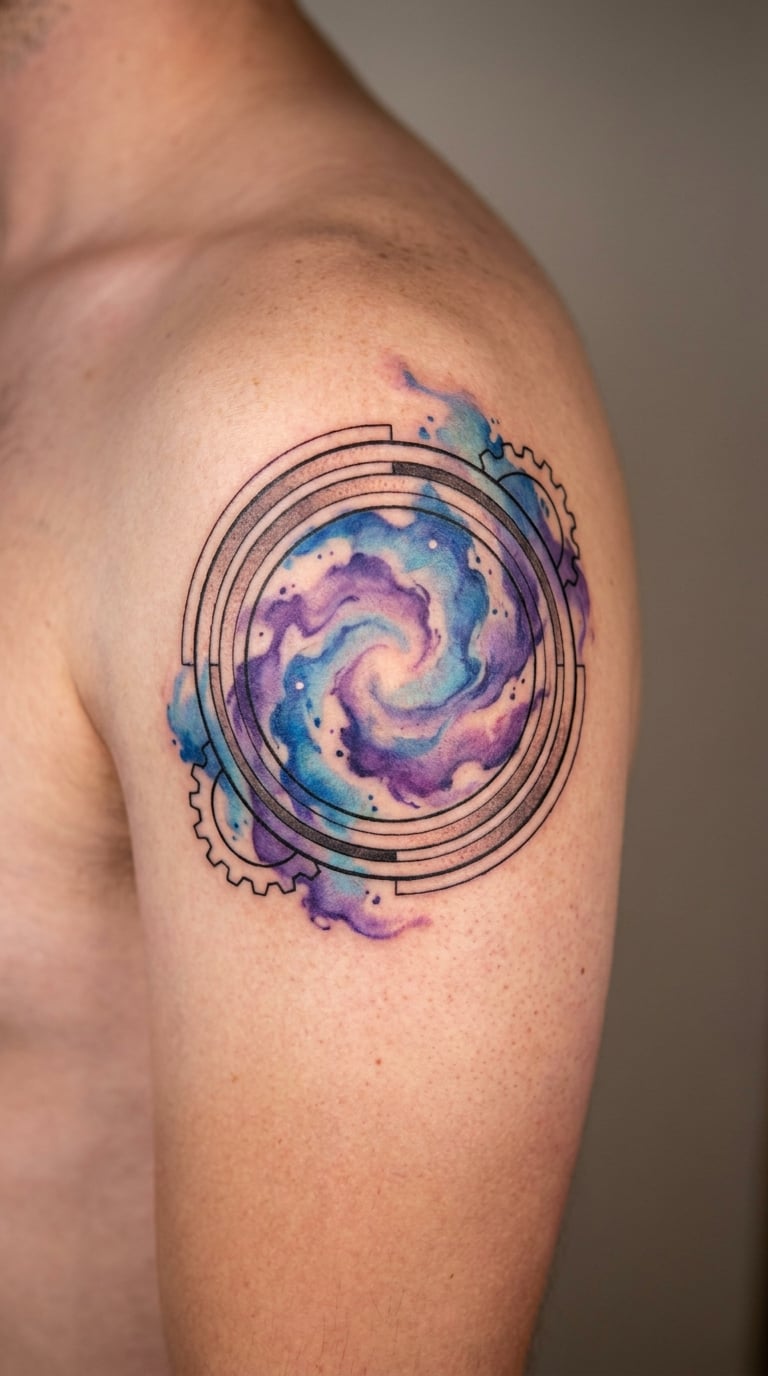
Here the barrel is drawn in clean black line work, and the wide end is open, with a wash of violet, blue, and a little coral bleeding outward past the lens rim. The colour should sit partly outside the instrument. That slight overflow is what makes it look like the telescope is projecting rather than containing.
It is the boldest colour option in this list and the one people notice first from across a room. If you have never had colour ink, expect a longer sitting and a longer heal.
Placement: deltoid or shoulder, where a wash has room to spread. Size: 3 to 4 inches (8 to 10 cm) for the lens, wider if you want a bigger cloud. Style: watercolor with a blackwork outline.
Pain: medium, and the stippled work in the wash is deeper than a single pass. Watercolor sits lighter in the skin than solid black, so it fades noticeably faster, usually noticeable by around year four or five, and a colour refresh is easier than a black outline touch-up. Make it yours: choose two colours pulled from a nebula photograph you like.
5. Minimalist Geometric Telescope
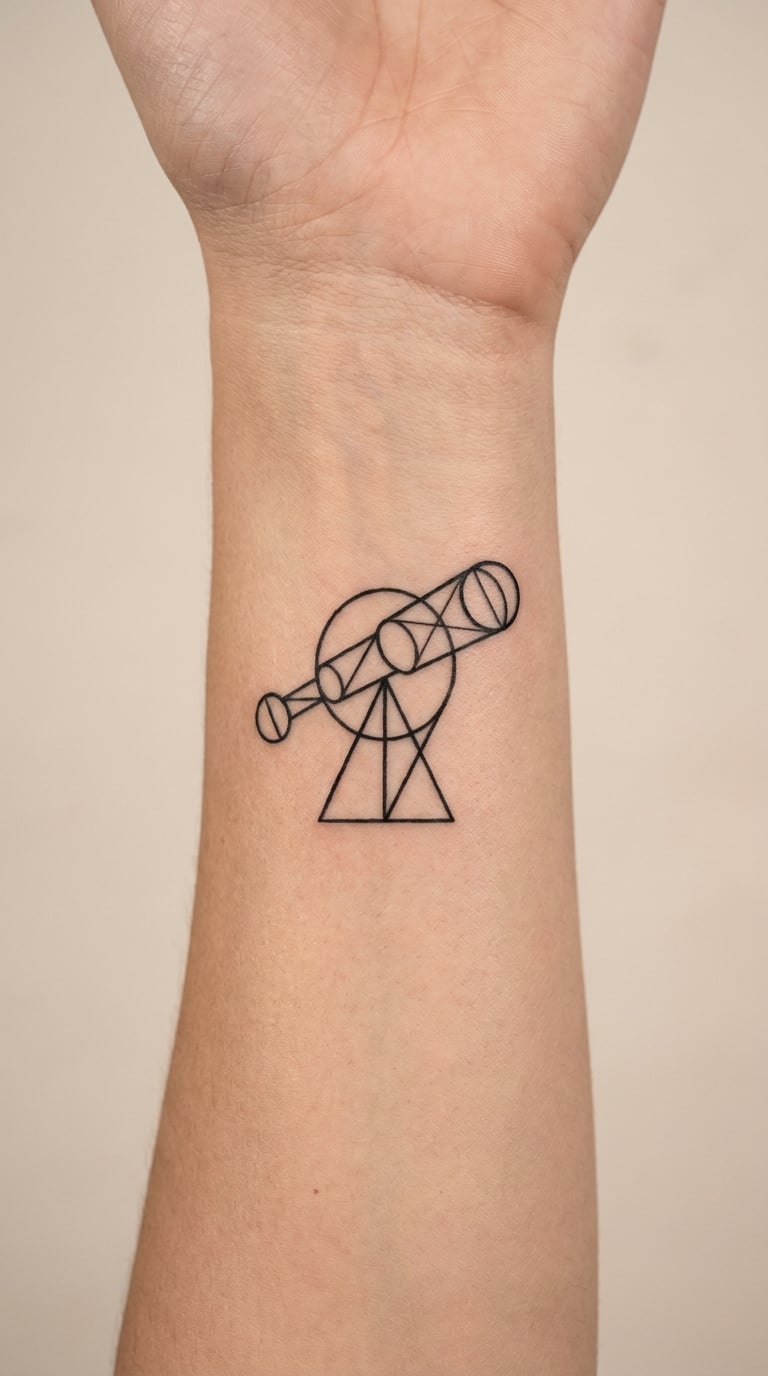
The telescope reduced to three circles and four straight lines. The lens end is a half circle, the tube is a rectangle, the tripod collapses into a triangle, and that is the whole design. It fits inside a circle or a square if you want the artist to frame it.
This is the most approachable design here. It has almost no interior detail, so it works at sizes where a realistic version would turn to mud, and it is a genuinely comfortable first tattoo.
Placement: inner wrist, ankle, or behind the ear. Size: 1.5 to 2 inches (4 to 5 cm). Style: minimalist geometry.
Pain: low to medium. Solid black outlines last far longer than hairlines, though anything inside a wrist crease will soften a little with age. Make it yours: set the instrument at an angle that points along the vein or across it, depending on how bold you want it to look.
6. Telescope with a Shooting Star
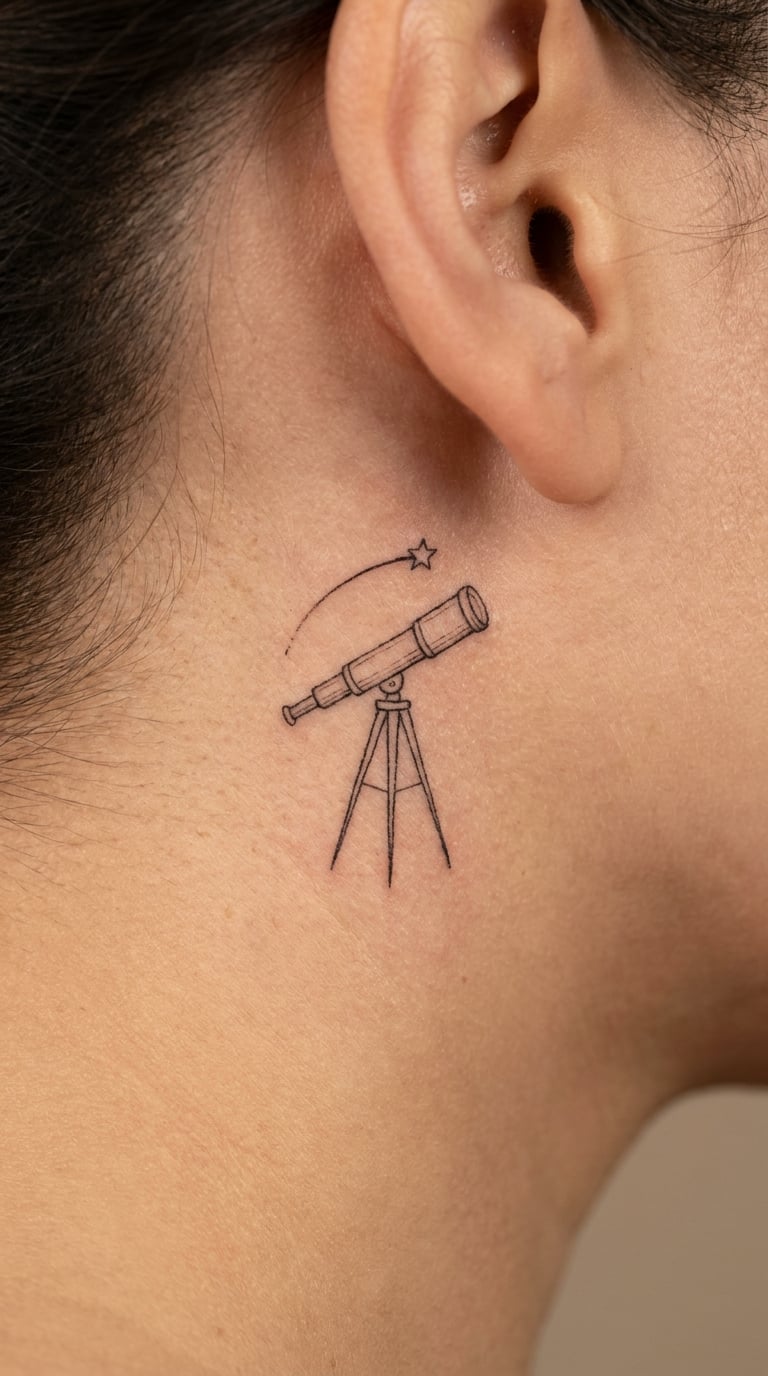
A playful line work telescope with the tripod left off, and one shooting star with a long tapering tail cutting across the top of the composition at an angle. The motion in the tail is what gives it energy, so the star is never drawn as a plain dot.
The pairing usually gets described as curiosity, discovery, or a wish made, but it does not carry one fixed meaning. Most people are choosing a composition they like rather than a symbol to explain later.
Placement: behind the ear above the jawline, or the upper inner arm. Size: 1.5 to 2.5 inches (4 to 6 cm). Style: playful fine line.
Pain: low, the bony spot behind the ear is mostly nerve endings and thin skin, so it is quick. That is also why fine line fades fastest there, often within three or four years, so plan on a touch-up. Make it yours: have the star tail cross a specific constellation.
7. Botanical Night-Sky Telescope
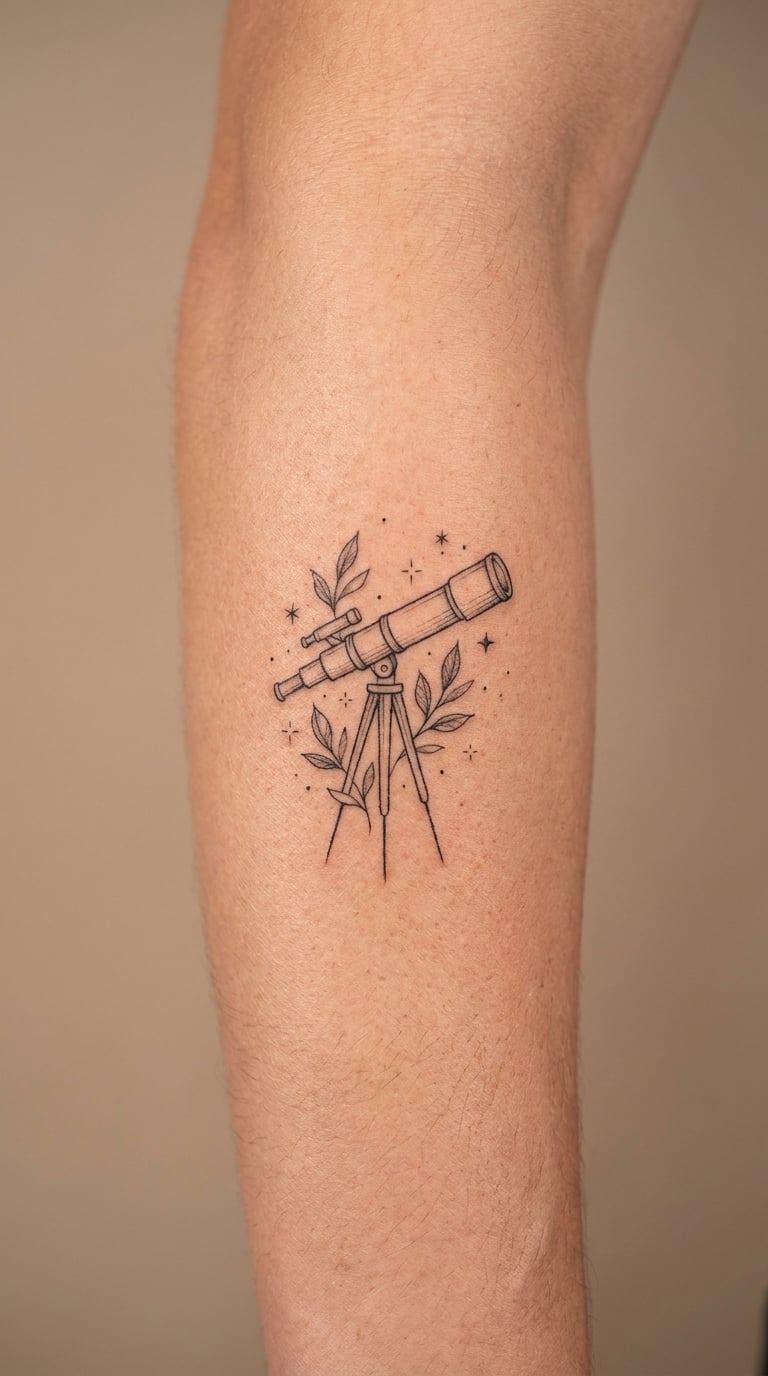
A technical object sitting inside an organic scene. Small lunar flowers and rounded leaves curl around the tripod legs, a few stars fill the gaps, and the whole thing is one consistent line weight so nothing looks pasted on.
This version softens the instrument, which is why a lot of people pick it when a technical object on skin feels too much like a diagram. It reads as a night garden rather than a telescope catalogue.
Placement: outer forearm or the hip. Size: 3 to 4 inches (8 to 10 cm). Style: botanical fine line.
Pain: medium, and mixed line work takes time, so the sitting is longer than a single object of the same size. Organic fine line on the forearm holds up reasonably well as long as you keep it out of strong sun, though the smallest petals go first. Make it yours: use a plant from where you learned to stargaze.
8. Astronaut Holding a Telescope
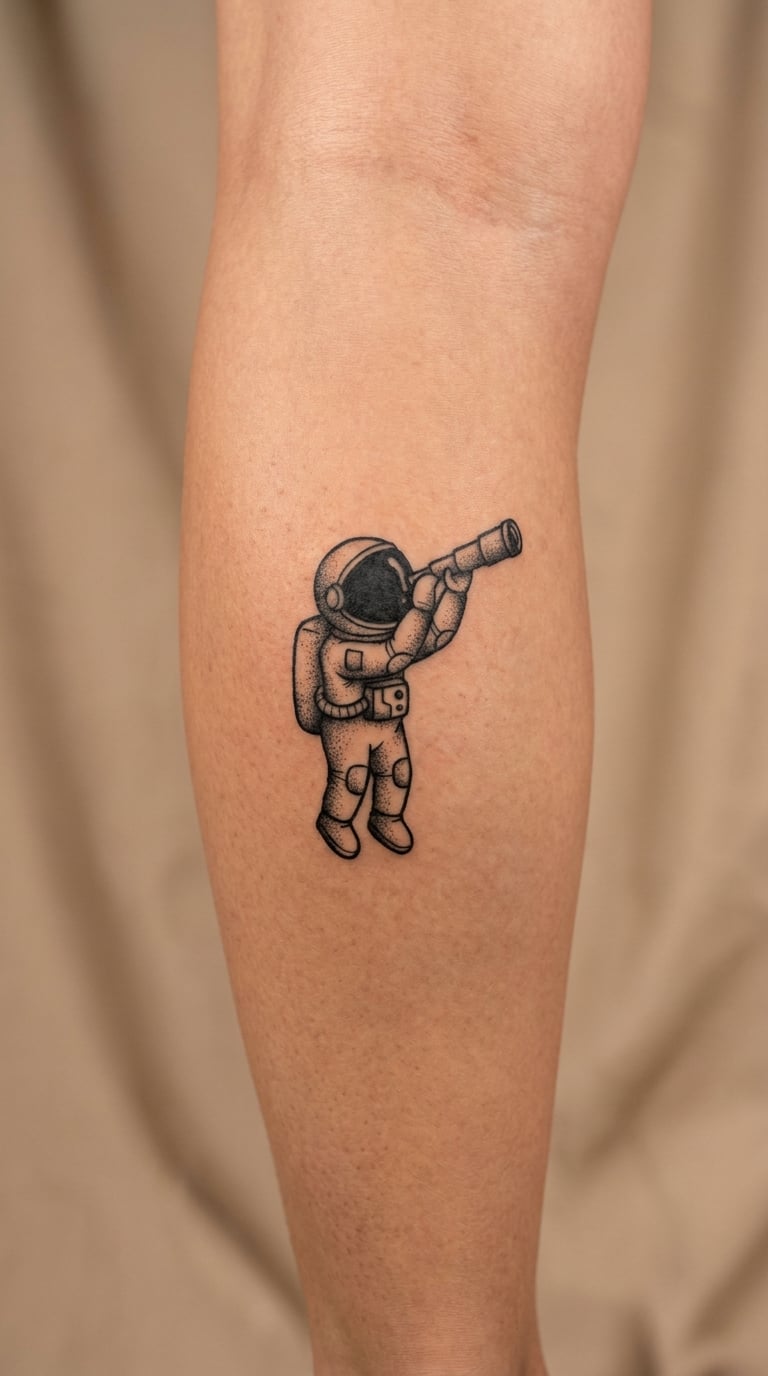
A small astronaut in solid black, helmet visor left empty, holding a telescope rather than a flag. Keeping the figure to one shape with a few cut-out highlights is what makes it work at a size most people underestimate.
It is the friendliest take on the subject. An astronaut reads as wonder and play rather than as a technical instrument, and a lot of clients use it to mark a trip or a childhood dream they have not given up on.
Placement: calf, shoulder, or the back of the upper arm. Size: 3 to 4 inches (8 to 10 cm) tall. Style: blackwork silhouette.
Pain: medium on the calf, more on the inner calf near the shin. Solid black shapes are the most durable ink there is, but the visor cut-out and the thin antenna details are the parts that blur after a decade. Make it yours: put a real launch window date on the suit patch.
9. Antique Telescope with Compass Rose
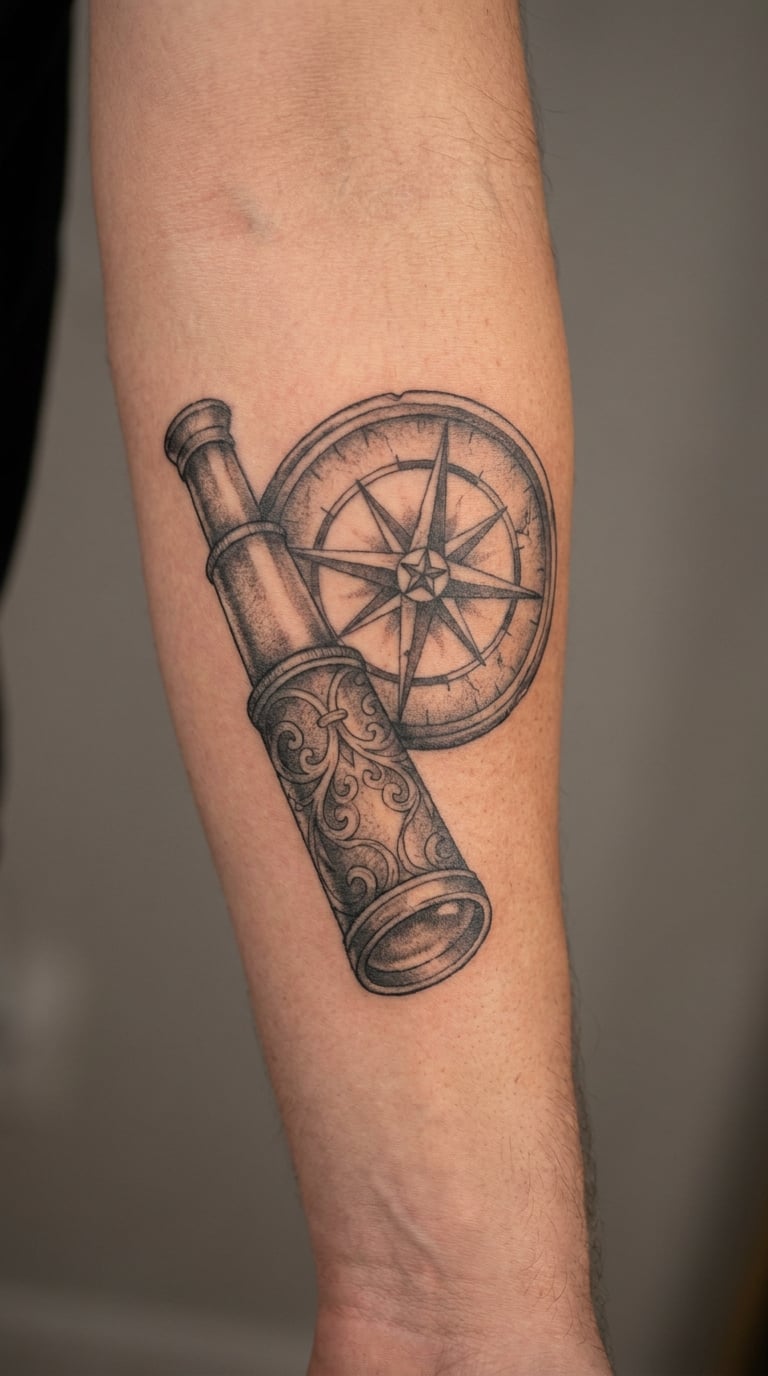
An antique long tube on a stand, with a compass rose behind it at maybe forty degrees off centre. The rose has eight points, alternating filled and hatched, and a small ring around the outside with tick marks like an old instrument dial.
Navigational instruments sit naturally next to each other, and together they point at exploration rather than at a single hobby. That combination is why this one shows up as a gift as often as it does a personal commission.
Placement: forearm, running lengthwise. Size: 4 to 6 inches (10 to 15 cm). Style: vintage black and grey with light stipple shading.
Pain: medium, with the tick marks and stipple making it a longer session. The heavy black outlines age well, and the tiny radial ticks are the first detail to soften. Make it yours: set the needle to a real bearing between two places that matter to you.
10. Dotwork Milky Way Telescope
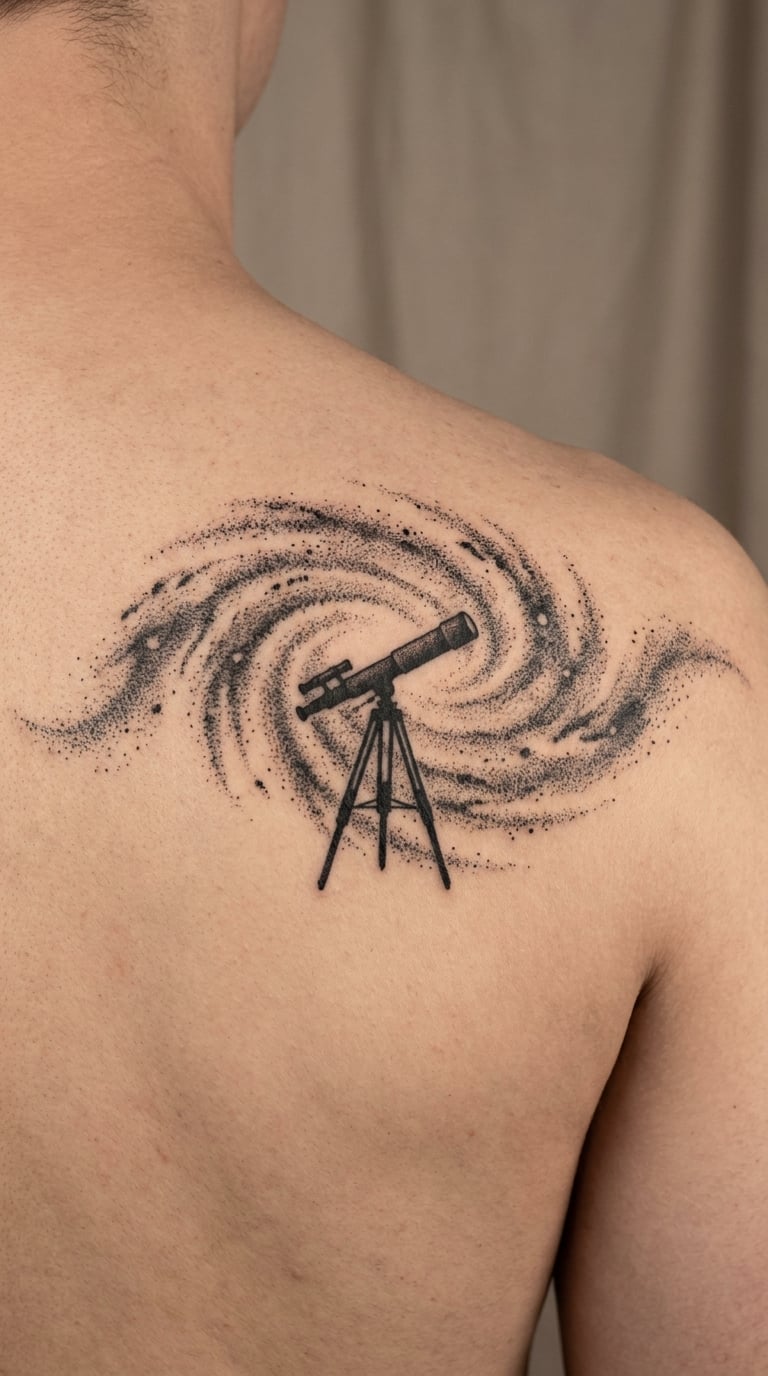
A field of graduated black dots, denser at the middle and thinning at the edges, sweeping behind a small solid telescope silhouette. Graduated dots are the trick here. They build a sense of depth and galaxy structure without anyone having to draw a realistic nebula.
It suits people who want a big, atmospheric piece but do not want photorealism. The dots also mean the design reads well from across the room, and up close it holds a texture of its own. If you are planning a bigger black work commitment, our 20 best black sleeve tattoo ideas for men covers how dense line work holds over a whole arm.
Placement: upper back, or as the middle of a sleeve. Size: 6 to 9 inches (15 to 23 cm) and it can run much wider. Style: dotwork with a black silhouette.
Pain: medium, though a field this size takes two to four sessions. Dotwork ages well because the dots are solid, and the only ageing issue is the silhouette losing a crisp edge where the black is thinnest. Make it yours: bring a reference image of a real star field and ask the artist to translate it into dot density.
11. Retro Mid-Century Telescope
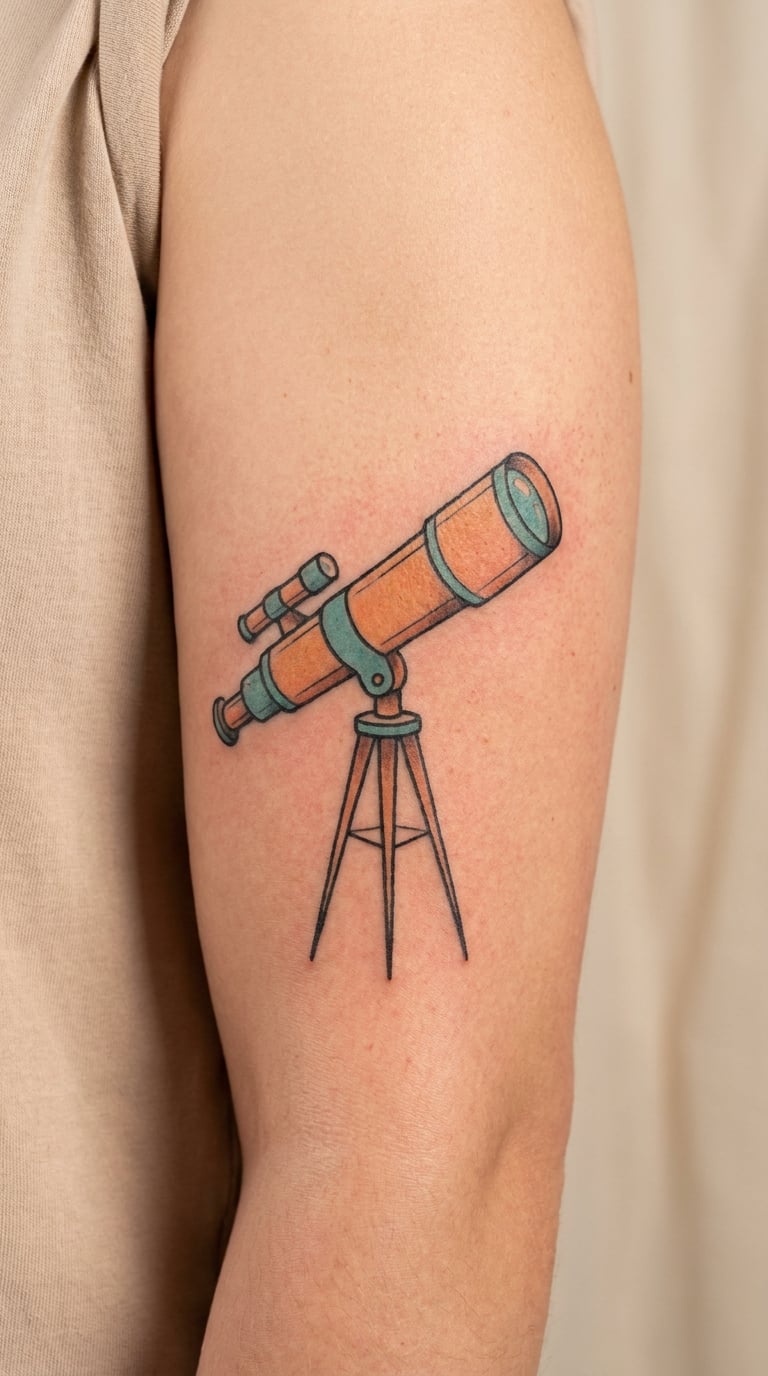
A streamlined telescope with a tapered body, rounded lens hood, and a single thick black outline, filled with muted orange and teal. No shading inside the shapes, and no gradients. The flatness is the whole point, since mid-century design depended on bold blocks rather than modelling.
It is a warm, graphic design that sits well with existing colour pieces. People who grew up with 1950s and 1960s posters tend to recognise the style immediately.
Placement: upper arm, chest, or the outer calf. Size: 3 to 4 inches (8 to 10 cm). Style: retro linework with flat colour.
Pain: medium, and the two colours mean a longer visit than black work of the same size. Orange fades faster than navy or black, so the colour balance shifts slightly over the years, though a bold black outline keeps the drawing sharp. Make it yours: have the name of the observatory that inspired the design set in a simple sans-serif band.
12. Realistic Wooden Telescope
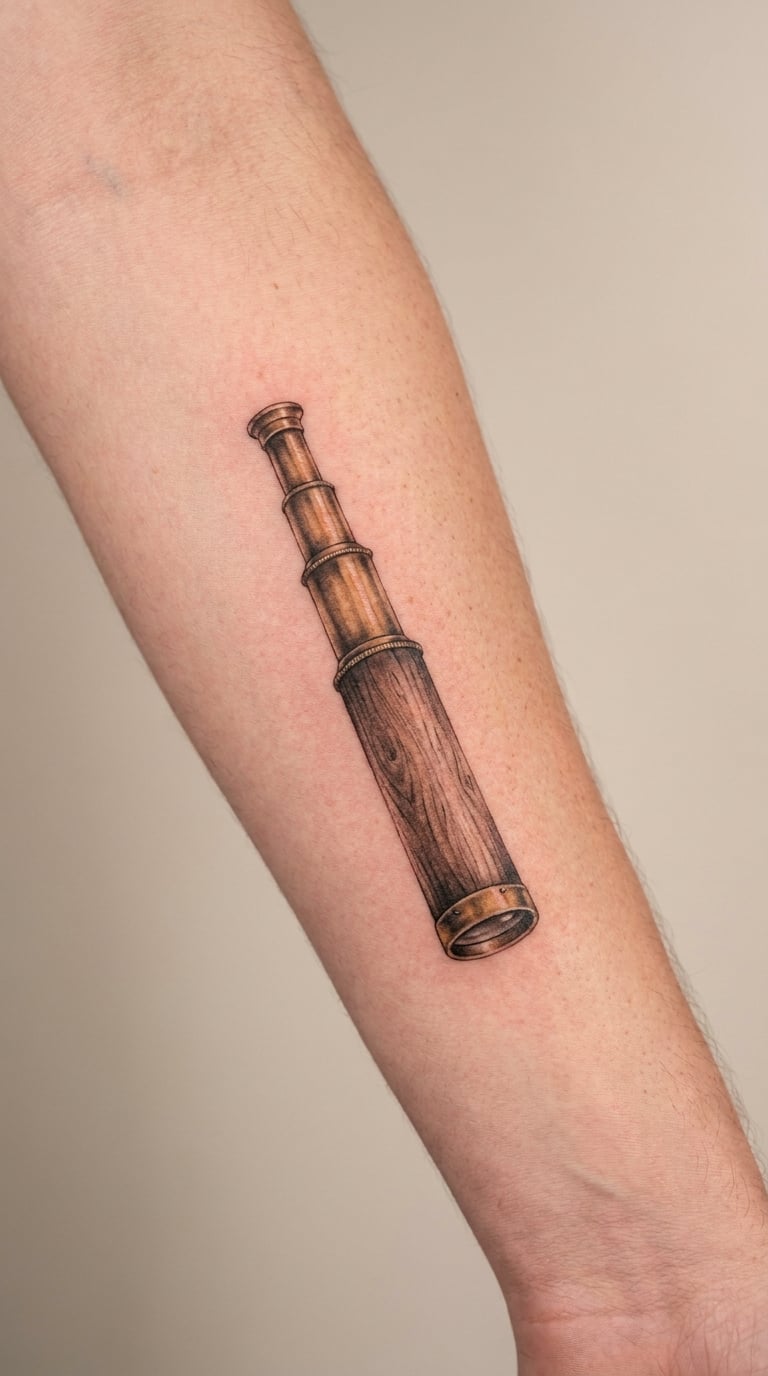
A small wooden telescope in three-quarter view, with visible grain running along the barrel, brass fittings at the joints and the eyepiece, and a soft highlight down the top edge. The grain is the part that sells it, so ask the artist to vary the line weight rather than repeat one pattern.
A realistic instrument is a commitment to a hobby, and most clients who go this way describe it as a portrait of something they actually use. That is the difference from the geometric and emoji-adjacent versions.
Placement: outer forearm, thigh, or calf. Size: 2.5 to 3.5 inches (6 to 9 cm). Style: micro-realism, black and grey.
Pain: medium, and micro-realism needs patience, so expect two to three hours for a piece this size. Fine grain lines soften within five to eight years, while the brass and the darker wood tones hold up considerably better. Make it yours: have the barrel engraved with a first star you ever found.
13. Crescent Moon and Telescope Linework Pair
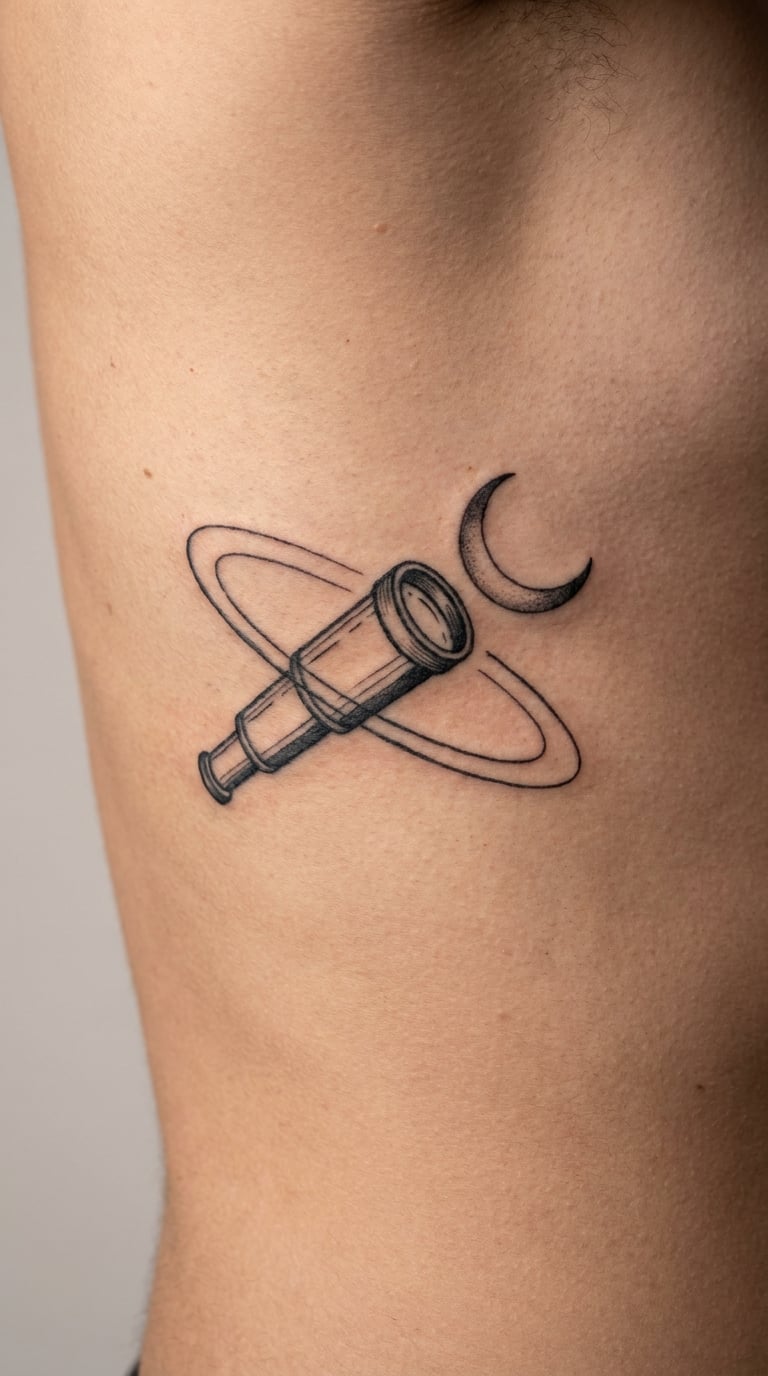
This one is distinct from the first design in the list because the instrument is drawn from a low angle, looking up at the moon. The lens is open and shaded dark inside, the crescent is heavier and more solid than the telescope line work, and two thin orbital arcs curve around both.
Two weights of line give the composition a focal point without needing colour. It works as a standalone piece or as the start of a small set that builds outward.
Placement: rib area, side of the torso, or the inner arm. Size: 2.5 to 3.5 inches (6 to 9 cm). Style: fine line with a solid accent.
Pain: high on the ribs, and the ribs are where most people decide for themselves they are done after the first pass. Curved line work stretches and relaxes constantly with breathing, so the arcs will soften noticeably faster than the straight sections. Make it yours: angle the orbital arcs to follow the curve of your own ribs.
14. Celestial Map Telescope
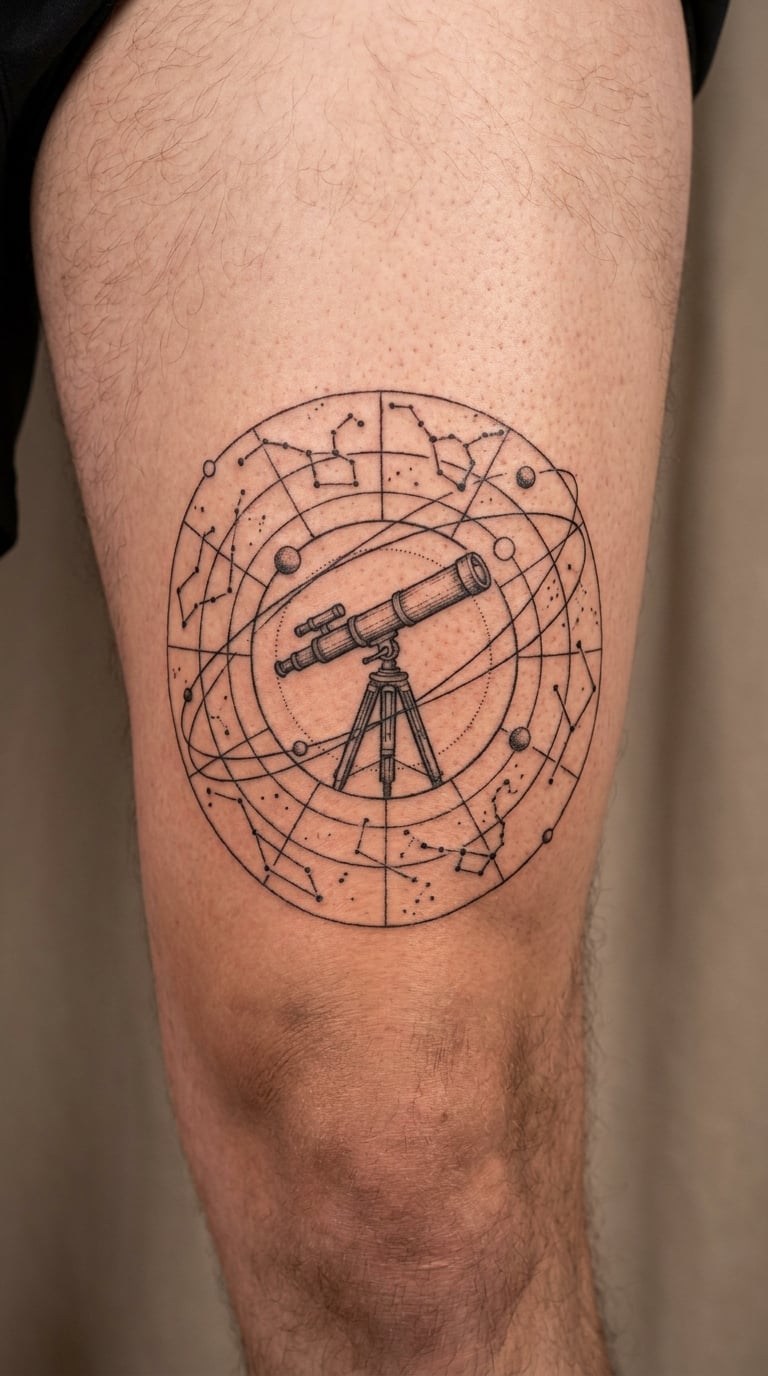
A technical chart composition. A telescope sits in the middle, laid over partial constellation lines, a faint grid of right-ascension marks, and a few small coordinate notations. The grid is drawn in a lighter weight than the instrument so the hierarchy stays clear.
This is the choice for someone who reads star charts. Astronomers tend to spot the little things immediately, the kind of detail that would not mean much to anyone else.
Placement: thigh, upper back, or the flat of a calf. Size: 5 to 7 inches (13 to 18 cm). Style: technical illustration, fine black line.
Pain: medium, and the chart work makes it one of the longer sittings in this list. The grid and the smallest coordinate numbers are the weak points here, and they will blur first. Ask for the grid to be slightly heavier than you think you need. Make it yours: use a chart of the sky on a specific date, and let the artist include one real star name.
15. Blackwork Portal Telescope
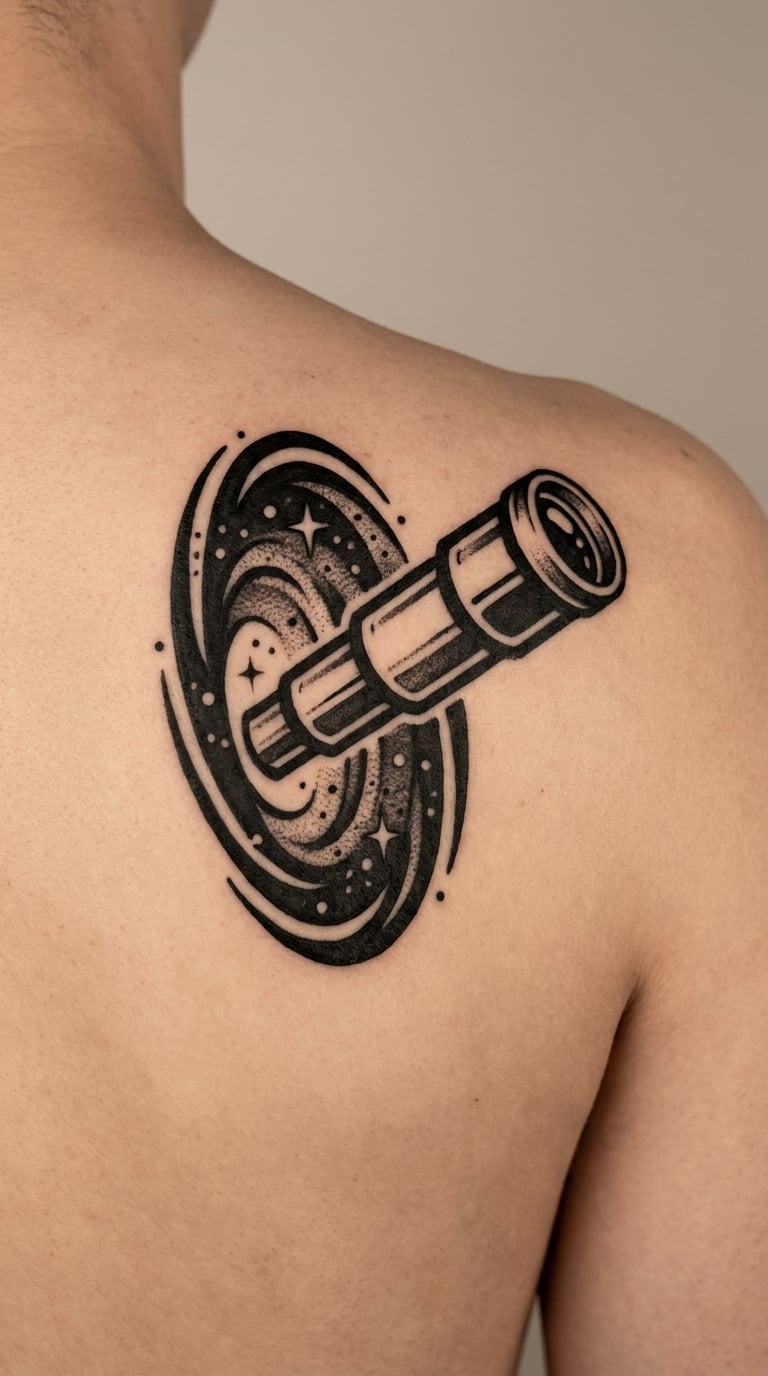
The telescope is solid black, and it points into a dark filled circle with a handful of stars cut out of it as white negative space. The portal is completely filled, so the contrast between the black disc and the surrounding skin does all the work.
It is the highest contrast design here, and it reads well at a distance, which matters if you want something that shows across a room rather than only up close.
Placement: shoulder blade, outer arm, or the upper chest. Size: 5 to 6 inches (13 to 15 cm) across. Style: bold blackwork.
Pain: medium, and long solid black areas take more passes than they look like they should, so the sitting runs long. Blackwork ages best of any style, and the one thing to watch is the edge of the disc, which softens into a gradient over time. Make it yours: put the date you started something new inside the portal.
16. Tiny Telescope with a Heart Constellation
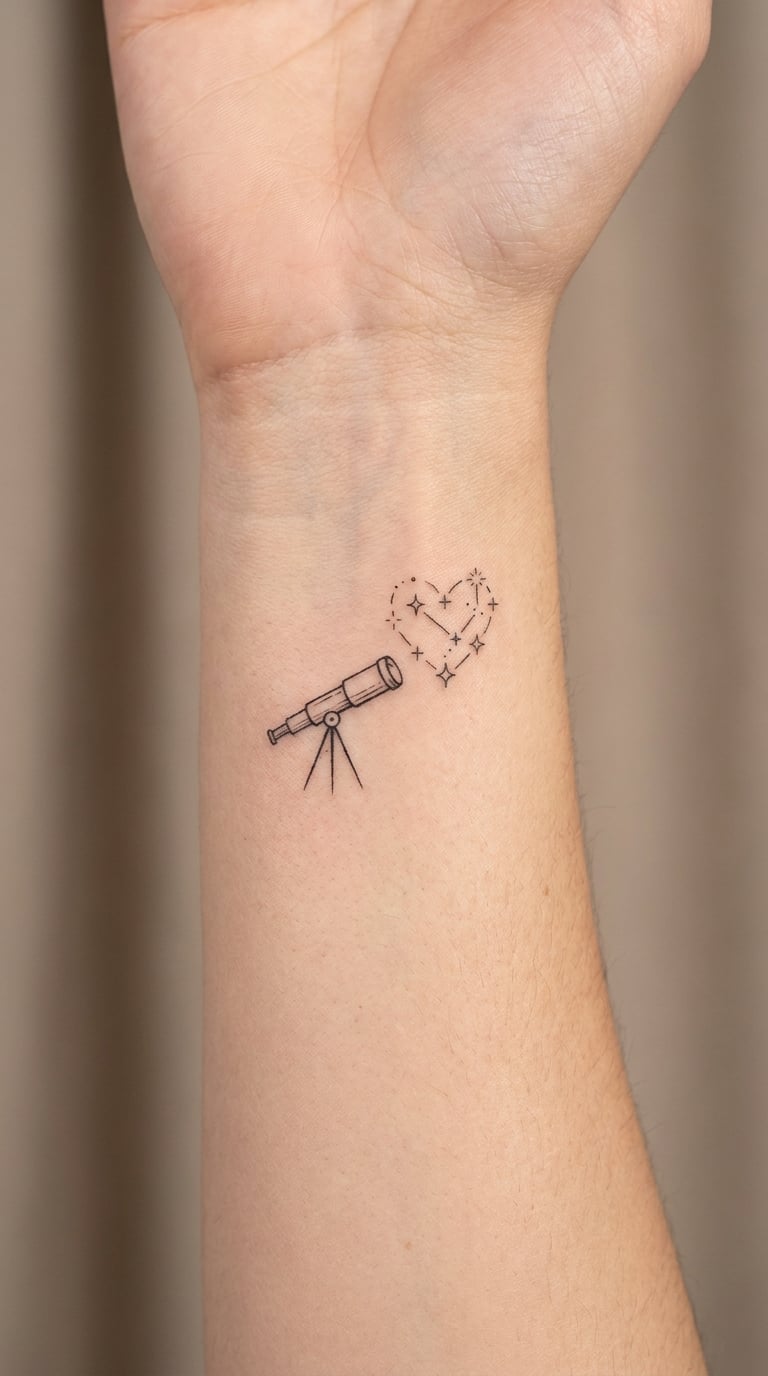
A small telescope, about an inch across, with a handful of stars arranged in a loose heart shape above it. It is the smallest serious design in the list and the one most often used to fill a gap between existing pieces.
It connects to affection, but just as often it marks a shared interest. Either reading works, which is part of why it gets picked.
Placement: wrist, back of the hand, or the inside of a forearm near an existing piece. Size: 1 to 1.5 inches (3 to 4 cm). Style: fine line.
Pain: medium to high on the wrist and hand, because the wrist has both thin skin and a lot of nerve endings, and the hand bleeds more than anywhere else on the body. At this size there is no recovery from a slightly wobbly line, so ask for the line weight to be a touch heavier than the reference. Make it yours: use a real constellation and bend the lines into a heart without changing the star positions.
17. Constellation Map Sleeve Detail
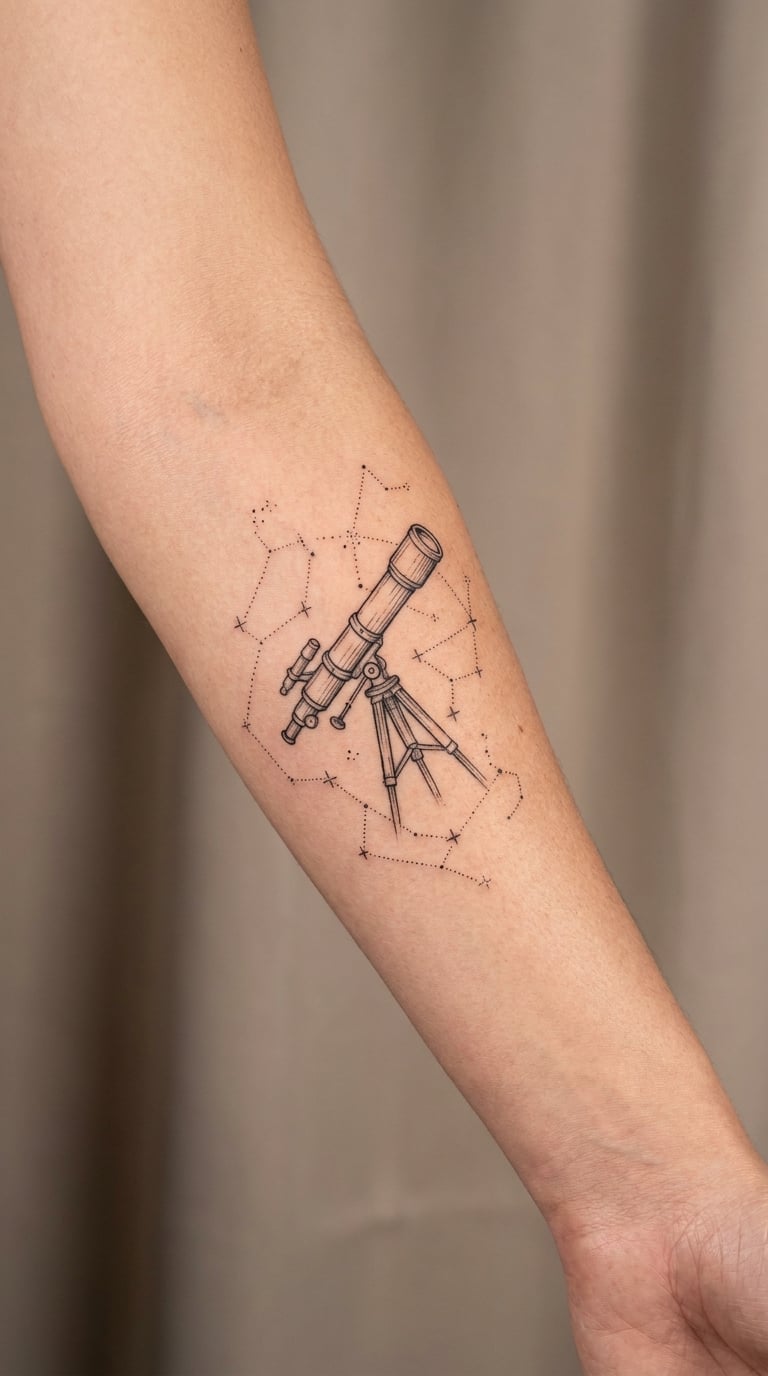
A single telescope as the focal point, with a limited constellation composition around it. The trick to sleeve work is restraint: a handful of lines and plenty of empty skin, rather than a crowded star field that closes up over five years.
Designed for an arm that will keep growing, this one is built to be joined later. Leave space around it and you can add another instrument or a planet without having to rework anything.
Placement: inner forearm, upper arm, or as one panel of a sleeve. Size: 4 to 6 inches (10 to 15 cm) with breathing room around it. Style: fine line constellation work.
Pain: medium over a forearm, and the inner arm is more sensitive than the outer. Fine line constellation work is the first thing to need a refresh on a five to ten year sleeve, so budget for a lighter line rather than counting on a single pass. Make it yours: map your own birth sky and use one region for this panel.
18. Retro Space Patch Telescope
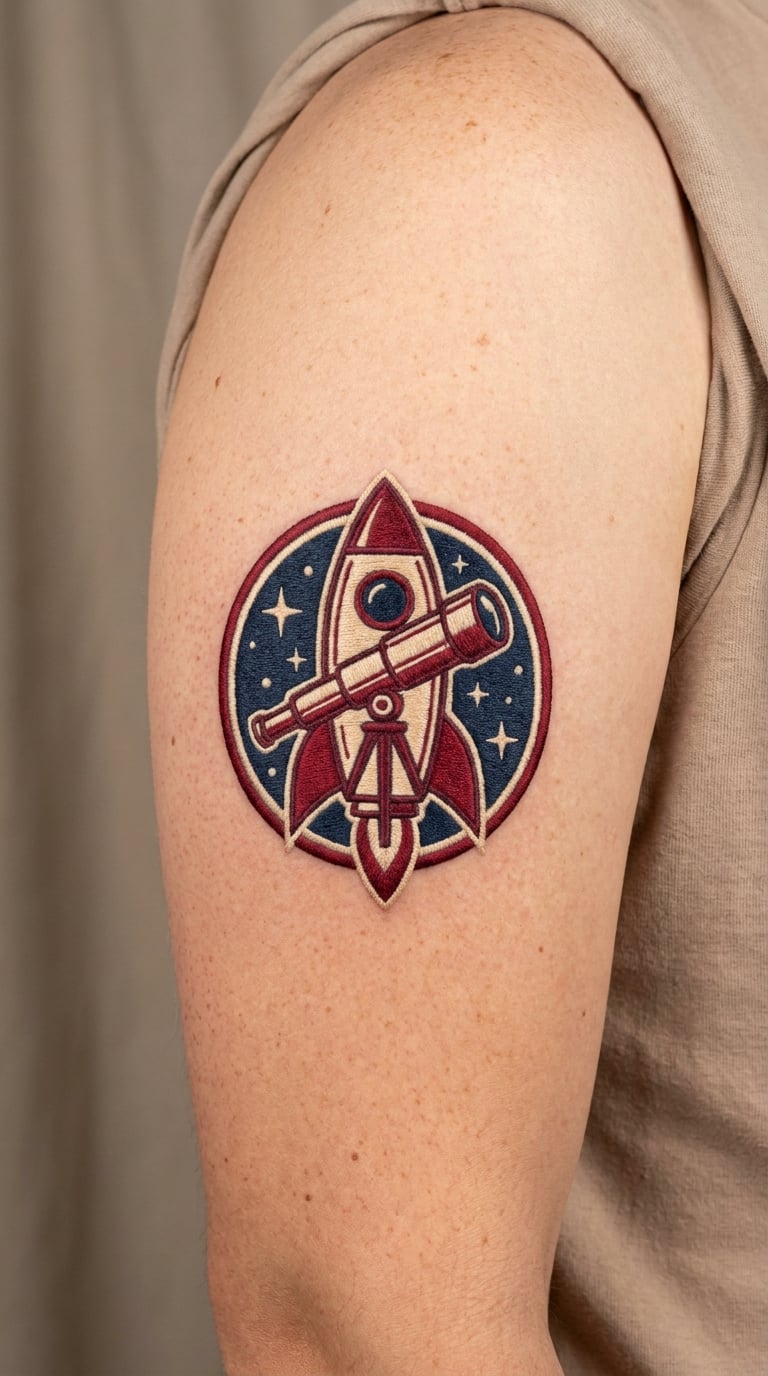
A mission patch layout rather than a scene: a telescope inside a rounded shield or circle, with a limited palette of cream, brick red, and navy, and a simple band of text space along the bottom edge. Nothing more than three colours, and each one filled flat.
It is the most collectable option in the list because patches are what programmes and observatories wear on a uniform. Many people take the name and year as a design and leave the band blank, which avoids text-heavy fine work.
Placement: upper arm, chest, or the outer calf. Size: 3 to 3.5 inches (8 to 9 cm) as a round badge. Style: emblem with flat colour, like a traditional patch.
Pain: medium, with the flat colour fills making it a longer sitting. Cream is the colour that ages worst here, it takes a warm yellow cast within a few years, so a designer picking the palette will usually push it toward a warmer off-white from the start. Make it yours: have the band along the bottom carry a word instead of a phrase.
19. Hand-Held Antique Spyglass
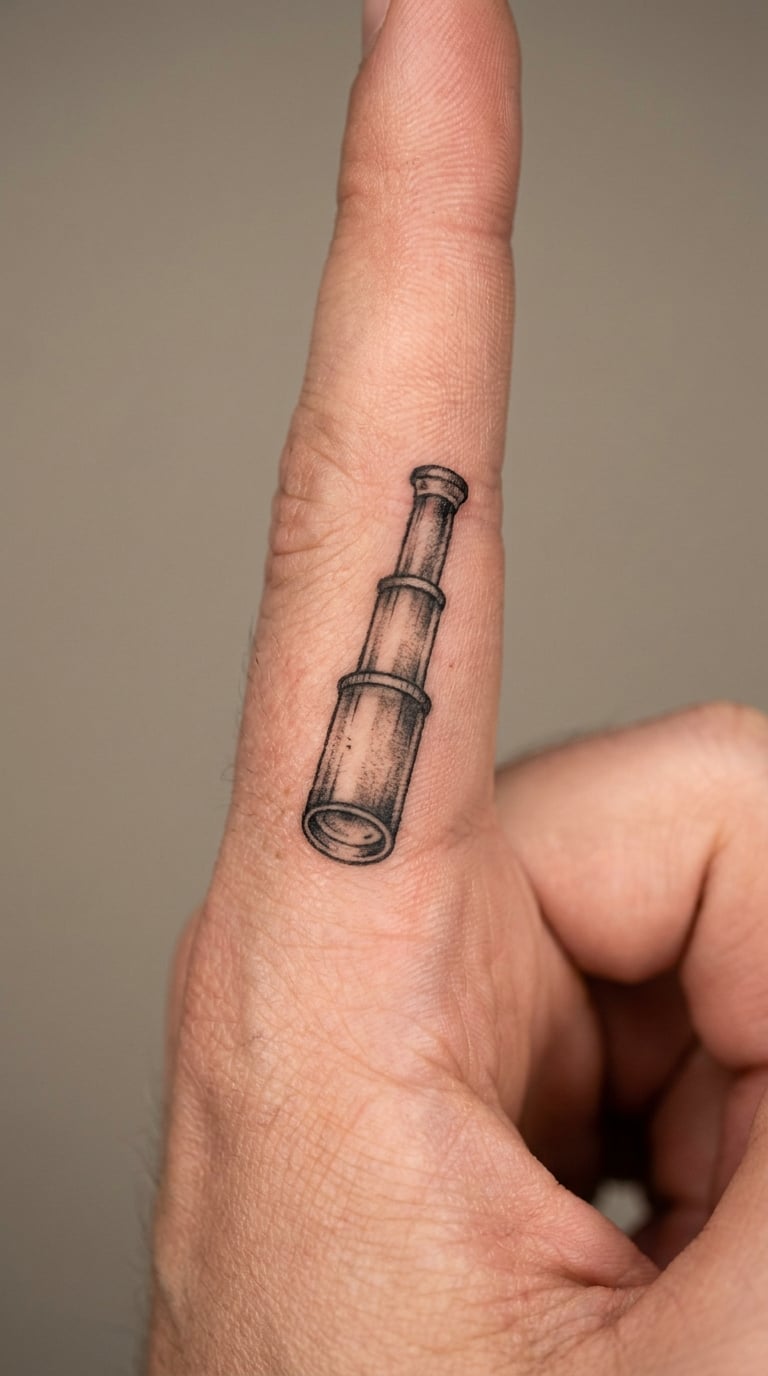
A compact brass spyglass, closed, held vertically in a hand or simply drawn on its own with the two barrels and a small hinge. At this scale the artist has to simplify hard, which means the silhouette does all the work rather than the detail.
Finger placement suits people who already have larger arm work and want something in a spot that stays visible, and it reads clearly from a distance in a way an inner wrist piece does not.
Placement: the side of the index finger or the thumb. Size: 1.5 to 2 inches (4 to 5 cm) long, running along the finger. Style: vintage black and grey.
Pain: high. Fingers have almost no fat, the skin moves constantly as you work, and the nerve density is high, so this is a short, sharp session. Fine line on fingers fades in a few years and the skin on the sides of fingers is thinner than most, so expect to add a little ink. Make it yours: add a ring or a thin band at the base of the design, or mirror it on the other hand.
20. Large Realistic Observatory Scene
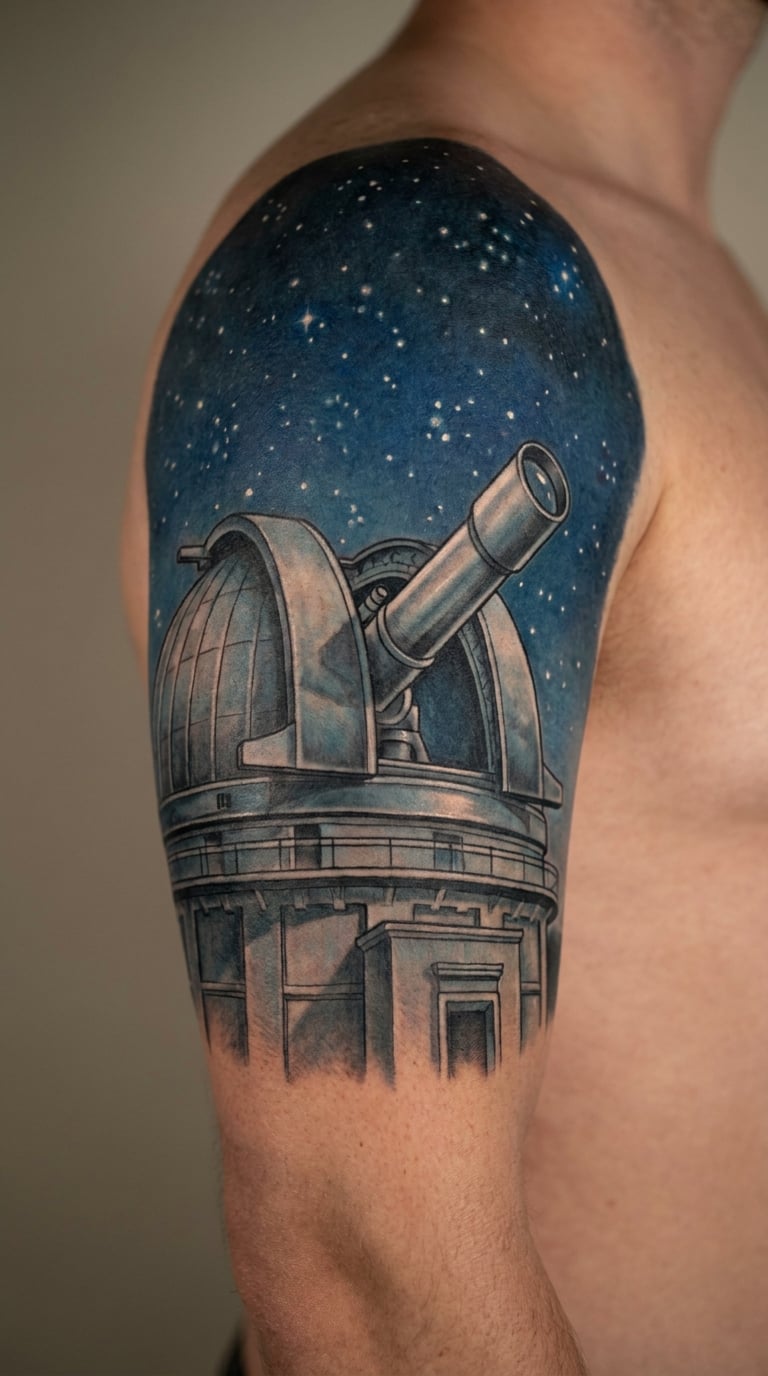
The statement piece. A detailed telescope on a mount in the foreground, an observatory dome with an open slit behind it, a horizon line low in the composition, and a deep blue night sky above with a scatter of stars and a faint band of galaxy. It is a scene rather than an object, and it needs a canvas to match.
People who already have a few tattoos and are adding to a collection usually land here. It takes planning, money, and a series of sittings, so start the conversation months out rather than weeks. If the protective, watchful side of symbolism is what draws you to the subject, our guide to 20 best tattoo ideas that symbolize protection covers designs built around that idea.
Placement: outer upper arm, back panel, or thigh. Size: 8 to 12 inches (20 to 30 cm) across, or larger. Style: realism with colour shading and a night sky.
Pain: medium to high, since the session runs three to five hours and the shading means many overlapping passes. The fine star field and the soft sky gradient fade first, and the dome and telescope hold their shape best, so build the composition with that in mind. Make it yours: model the dome on an observatory you have actually visited, and put the date of that visit in the sky.
How to Choose the Right Design
Six questions settle almost everything, and it is much easier to answer them before a consultation than while sitting in one.
How much detail fits the spot you have in mind?
A telescope is a detailed object by nature, and detail needs size. Below about 1 inch (2.5 cm) tall, a realistic instrument turns into a smudge. At 1.5 to 2 inches, only a simplified version reads. Above 3 inches, you can safely ask for grain, joints, and cross-hatching.
Which style matches the rest of your ink?
If you already have soft blackwork and grey shading, ideas 2, 9, and 12 sit naturally beside it. If your existing pieces are thin and light, start with a fine-line design such as 1 or 6. Placing a bold blackwork piece next to a fine-line forearm looks like an accident, and artists will tell you so.
What do you want it to mean?
Curiosity and discovery, foresight and ambition, or the courage to look at something uncomfortable. Which one you pick determines the supporting elements. More people get this wrong than any other decision. If you are working through a hard period and want the design to carry that, our list of 20 tattoo ideas that represent overcoming hard times has versions of these themes that suit it.
Is this a first tattoo or part of a collection?
For a first tattoo, idea 5 or 16 is a sensible start, small enough to finish in one short sitting and simple enough that you are not disappointed by the first result. For a collection, ideas 10 and 20 are built to grow into.
How visible do you want it to be?
Wrist, finger, and behind the ear are the seen places, and they are also the places where fine line fades fastest. The upper arm and back are easier to keep looking good, and easier to photograph.
Should you go with colour?
Colour gives you atmosphere in ideas 4, 11, and 18, and it costs you an extra session and more fading to manage. Solid black line ages more predictably than any colour, including the yellow in cream patches.
Cost and Session Time
Tattoo pricing is usually hourly rather than per design, so size and detail drive both the number of hours and the total. Every shop sets a minimum, and that minimum often becomes the real cost of a small piece.
- Tiny designs (up to 1 inch, such as idea 16) take 30 minutes to an hour, and you will often pay the shop minimum regardless.
- Small designs (1.5 to 2.5 inches, like ideas 5, 6, and 19) run one to two hours. Fingers and wrists cost more per hour because they take longer than the line count suggests.
- Medium designs (3 to 4 inches, such as ideas 1, 4, 7, 11, and 12) take two to three hours, and colour work pushes toward the top of that.
- Detailed designs (5 to 7 inches, like ideas 2, 3, 9, 14, 15, and 17) take three to five hours, often split across two sittings.
- Large designs (8 inches and up, like ideas 10 and 20) run three to six hours per sitting across two to four appointments.
Rates vary with geography, the artist’s experience, and whether the shop is a private studio or a walk-in shop. Colour and custom composition cost more than a flash design. Book a consultation and get a real estimate before you commit, since most good artists will tell you honestly if your idea needs to be simplified to work at the size you asked for.
Aftercare Basics
- Follow your artist’s aftercare guidance first. It is specific to your skin, your ink, and what they did in the session, and it overrides anything general written here.
- Keep it clean and gently washed as directed, then pat dry with a clean towel or paper. Do not soak the fresh tattoo.
- Wear loose clothing over the area for a few days. Fitted cotton against a healing tattoo is a fast route to irritation.
- Keep it out of direct sun while it heals, and treat sun exposure as the main long-term cause of fading in these delicate space designs.
- Hold off on swimming, hot tubs, and saunas until the artist says it has healed. Pool water and chlorine are the two things most likely to ruin a fresh piece.
- Let scabs do their job. If a scab comes off early, pigment leaves with it, which is the start of a touch-up you did not plan on.
Frequently Asked Questions
Where can a small telescope tattoo be placed?
The wrist, the inner forearm, behind the ear, the ankle, and the side of a finger all work for a small telescope design. Inner wrist and finger placements stay visible but fade faster, because fine line softens on thinner skin. The upper arm and back give a larger flat canvas if you want more detail or a star field. Tell your artist the exact spot and the size you have in mind before the session, since the same drawing needs simplifying on a rib or a wrist.
Should I choose a fine-line or realistic telescope tattoo?
Choose fine line if you want a small, quiet piece, if you already have light thin-line tattoos, or if you are getting your first one. Choose realism if you already have solid black work and want the instrument to hold up as a portrait of a real object. A realistic telescope needs at least 2.5 inches of height to hold its detail, and smaller than that it turns grey within a couple of years.
Are telescope tattoos painful on the wrist or ribs?
The wrist stings more than it aches, because the skin is thin and the nerve endings are dense, and the hand bleeds more than most other areas. The ribs are usually the more unpleasant of the two, a deeper bone-level feeling that many people describe as the worst spot on the torso. If you are nervous, choose the outer forearm or the outer upper arm, which are among the more forgiving common placements.
How do watercolor and fine-line telescope tattoos age?
Watercolor sits lighter in the skin than black, so it fades faster, usually noticeably within four or five years, and a colour refresh is simple. Fine line also softens, sooner on the inner forearm, behind the ear, and on fingers. Solid black outlines and dotwork last the longest of everything in these 20 telescope tattoo ideas. If longevity matters most to you, ask the artist to build the design around black shapes.
What is the best telescope tattoo for a first-time client?
The minimalist geometric telescope is the safest starting point, since it needs very little detail, finishes in a short sitting, and is hard to disappoint with. A small fine-line telescope with a crescent moon is the second option, provided you are comfortable with the line fading over time. Whatever you pick, book a licensed artist, bring reference images, and tell them honestly this is your first one so they can simplify if needed.
Conclusion: Find the Design That Fits Your Sky
If this is your first telescope piece, start with the minimalist geometric design. It is quick, forgiving, and it reads clearly even at wrist size, which is exactly what a first tattoo needs. If you already have arm work and want something that draws attention, the large realistic observatory scene is the one worth committing to, with the sessions and the planning that go with it.
Whichever way you go, save your two or three favourites from these 20 telescope tattoo ideas and bring them to a consultation. A licensed artist can tell you in ten minutes which version will hold up at the size and placement you actually have in mind.