
20 Best National Park Tattoo Ideas for Minimalists October 2026
National park tattoo ideas work best when a design carries one clear idea: a ridgeline, a bison, a single arch, a coordinate line. Strip out the pine trees, the campfire, the compass rose, the whole souvenir-shop scene, and what is left is a shape someone can read at a glance and you can explain in one sentence.
That restraint is why minimalist national park tattoos age well. Thin scenic linework on a forearm goes soft and vague after a decade, but a solid silhouette or a two-line ridgeline keeps its shape. I have watched a friend get a four-inch alpine panorama that now reads as grey smudges, and the small black ridge above his wrist that still looks sharp ten years on.
Below are 20 designs built for people who like clean skin, quiet colour and a park they can actually name. Every entry covers what the tattoo looks like, where it sits best, roughly how big it should be, how it feels to get, and one way to make it yours. Sizes are given in inches with centimetres in brackets, and placement notes assume a healed piece sitting flat on a normal forearm or shoulder, not a stretched arm.
One note on terminology before we start. People use national park loosely, and so does this list. Most designs below reference US National Park Service sites, national monuments or national forests, with a few Canadian park references mixed in where the design is genuinely better for it. If you are commemorating a specific place, check that your reference photos come from that place, since a generic mountain with the wrong ridgeline is the single most common version of this tattoo.
National Park Tattoo Ideas: Quick Guide
Here is every design in this list at a glance, in the same order as the sections below. Scan the Style and Pain columns first, since they narrow twenty options down to about four in a minute.
| Idea | Style | Best placement | Size | Pain |
|---|---|---|---|---|
| 1. Minimalist Mountain Range Linework | Fine line | Inner forearm | 2.5-4 in (6-10 cm) | Low |
| 2. Yellowstone Bison Silhouette | Solid black silhouette | Outer upper arm | 2-3 in (5-8 cm) | Low |
| 3. Joshua Tree Line-Art Pair | Fine line, minimal detail | Forearm | 2-3.5 in (5-9 cm) | Low |
| 4. Grand Canyon Layered Strata | Black and grey, geometric | Calf or outer thigh | 3-5 in (8-13 cm) | Medium |
| 5. Acadia Coastal Mountain Scene | Neo-traditional, muted colour | Upper arm | 3-4 in (8-10 cm) | Medium |
| 6. Yosemite Half Dome Miniature | Micro-realism | Wrist | 1.5-2 in (4-5 cm) | Medium |
| 7. Yellowstone Black Bear Outline | Bold outline | Shoulder or upper back | 3-4.5 in (8-11 cm) | Low |
| 8. Zion Red Rock Abstract | Watercolour abstract | Shoulder | 3-4 in (8-10 cm) | Low |
| 9. Olympic Rainforest Ferns | Blackwork botanical | Forearm | 3-5 in (8-13 cm) | Low |
| 10. Denali Snow-Capped Peak | Black and grey, single peak | Chest or upper arm | 3-4.5 in (8-11 cm) | Medium |
| 11. Arches National Park Arch Symbol | Minimal fine line | Inner bicep | 1.5-2.5 in (4-6 cm) | Low |
| 12. Great Smoky Mountains Pine Forest | Solid black, negative space | Forearm | 2-3 in (5-8 cm) | Low |
| 13. Everglades Alligator Outline | Minimal line outline | Lower leg or rib | 3-4 in (8-10 cm) | Medium |
| 14. Badlands Geological Curves | Neo-traditional, ochre | Upper arm | 3-4 in (8-10 cm) | Medium |
| 15. Glacier Lake Reflection | Fine line, symmetrical | Forearm | 2.5-4 in (6-10 cm) | Low |
| 16. Sequoia Giant Tree | Blackwork, vertical | Inner forearm | 2.5-4 in (6-10 cm) | Low |
| 17. North Cascades Waterfall Line Tattoo | Fine line, vertical flow | Inner arm | 2.5-4 in (6-10 cm) | Low |
| 18. Death Valley Desert Sun and Mountains | Muted colour landscape | Forearm | 2.5-3.5 in (6-9 cm) | Low |
| 19. Rocky Mountain Elk in Dotwork | Dotwork portrait | Calf or upper arm | 2.5-3.5 in (6-9 cm) | Medium |
| 20. Compass With Coordinates | Blackwork, geometric | Inner forearm | 1.5-2.5 in (4-6 cm) | Low |
1. Minimalist Mountain Range Linework
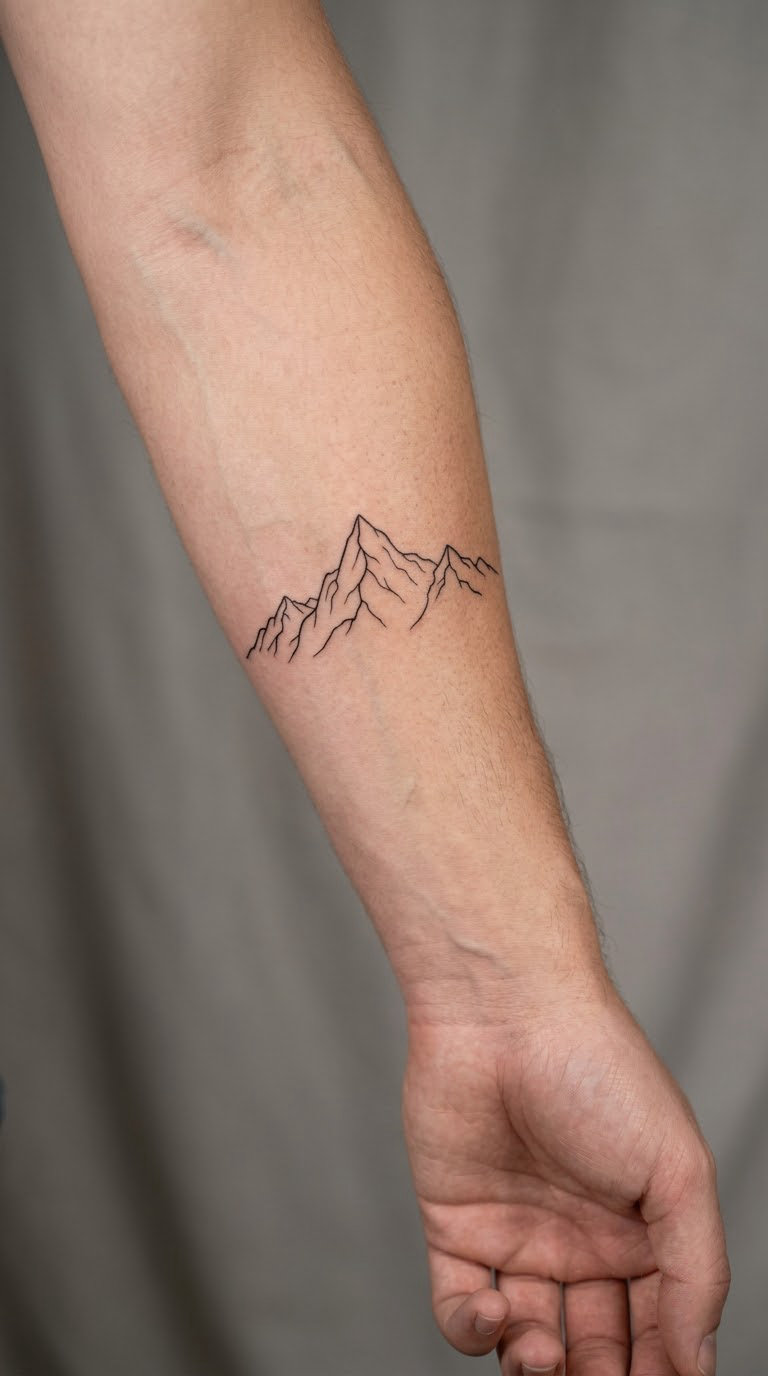
A minimalist mountain range tattoo is the most searched design in this whole category, and the reason is simple: a ridgeline is the cheapest honest way to record a place. The artist draws one main peak with a couple of smaller shoulders falling away from it, adds a single snow line or nothing at all, and leaves the rest as skin. The line weight stays even from end to end so it does not look thin at one end and clumped at the other.
People choose it because the specific ridgeline is theirs. A Glacier view and a Mount Rainier view are not the same outline, and if you want yours to be recognisable to you, send the artist the exact photograph rather than describing the mountains.
Placement: Inner forearm, sitting between wrist and elbow. Size: 2.5 to 4 in (6-10 cm) across. Style: fine line. Pain: low to medium, and honestly the forearm feels more like persistent scratching than anything sharper. Fine line fades fastest in sun, so if this goes on an arm you leave rolled up, plan on a colour touch-up or a bolder line weight from the start. Make it yours: have the artist reduce the range to a single peak from your photo rather than drawing the whole vista.
2. Yellowstone Bison Silhouette
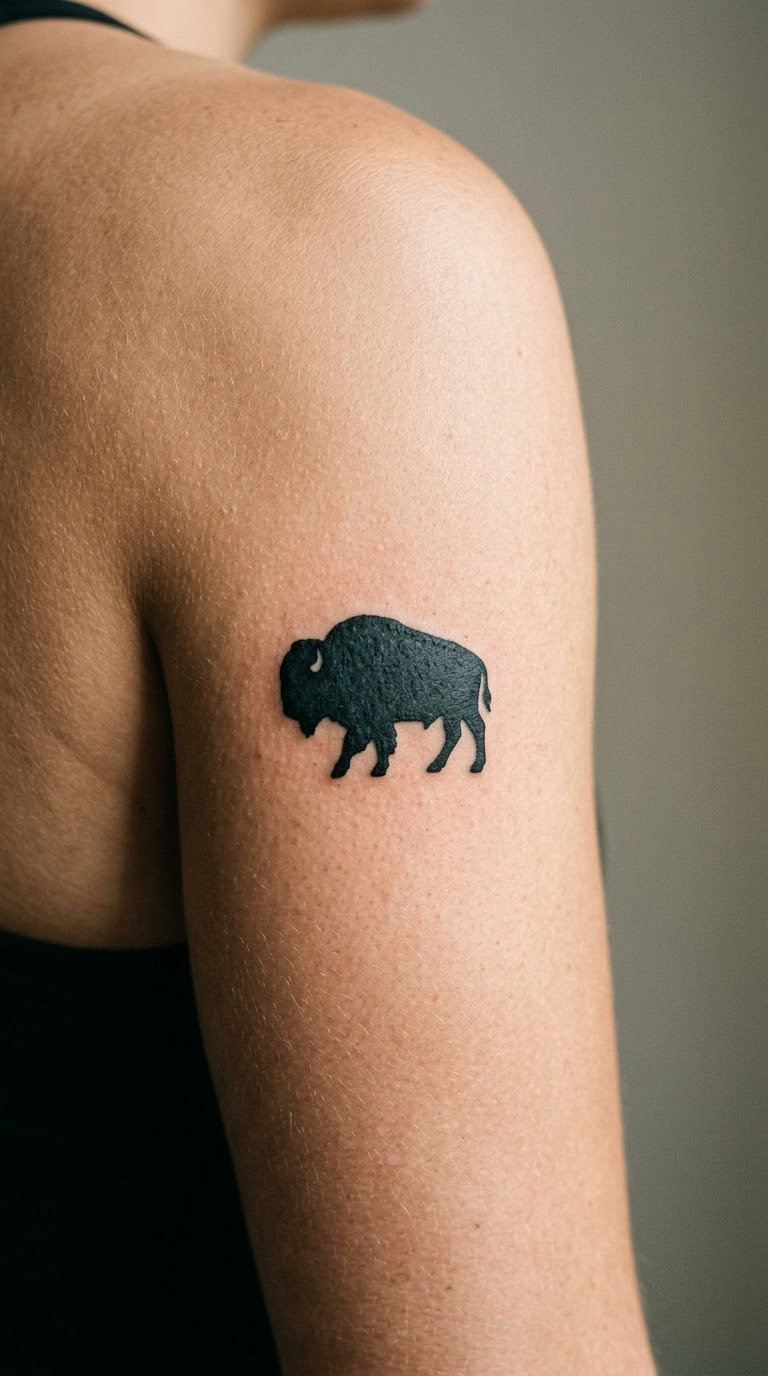
The Yellowstone bison silhouette is built from one heavy shape: a hump, a low head, four legs that do not need to be anatomically perfect. Solid black fill does the work that detail would otherwise do, and because there is no interior linework, there is very little to fade. This is the most durable design in the list if you want ink that still looks intentional in fifteen years.
Bison show up in Yellowstone tattoos as shorthand for the American West, open grassland, and wildlife that outnumbers visitors. Most people who get one were on a trip where the animals were the memory, not the geysers.
Placement: Outer upper arm or outer shoulder. Size: 2 to 3 in (5-8 cm) long. Style: solid black silhouette. Pain: low, unless the artist fills a large solid area, which drags a little. A bison on the forearm will soften and blur in the outline over time; on the upper arm it holds. Make it yours: add a small foreground grass line along the belly so it reads as a specific meadow rather than an animal floating on skin.
3. Joshua Tree Line-Art Pair
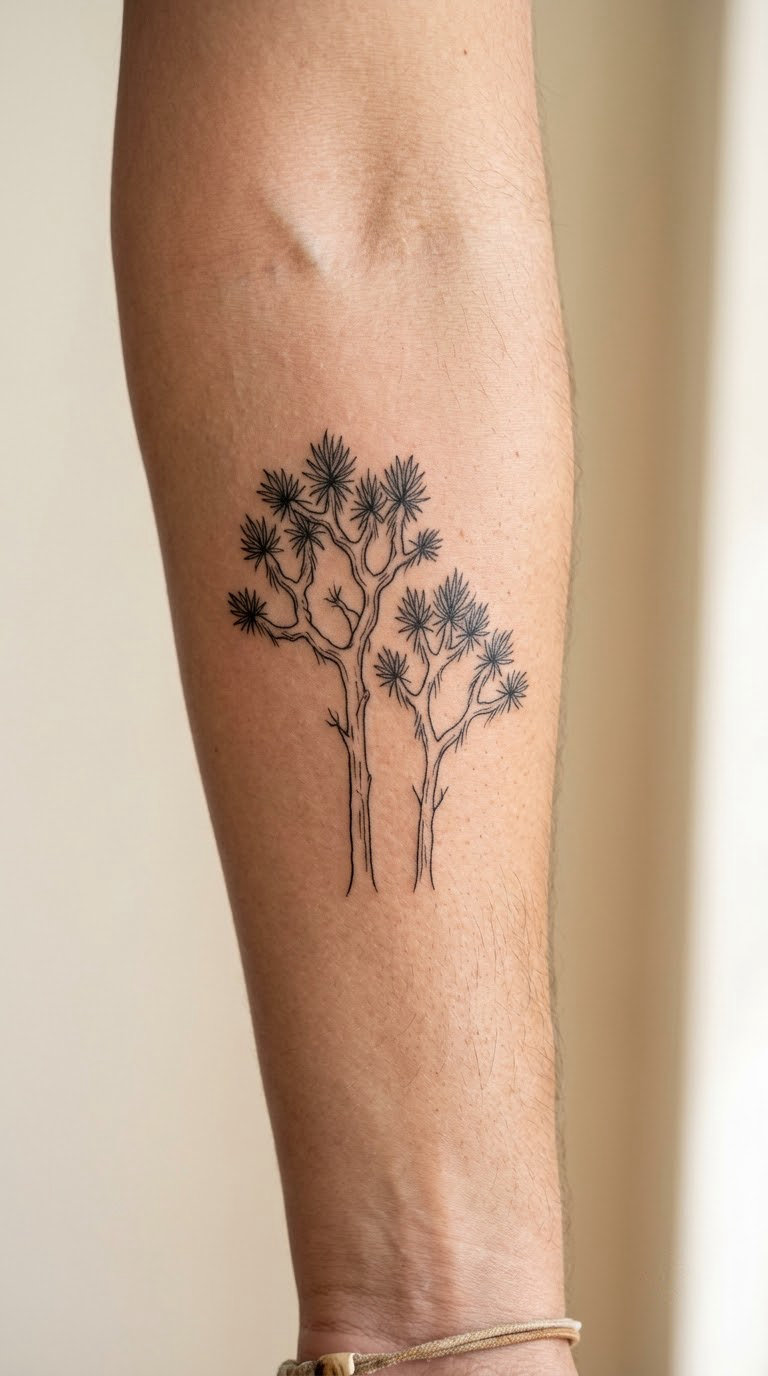
Two Joshua Trees in fine line is a design that gets better the less the artist adds. Each tree is a trunk that splits into upward forks, and the branches taper to points. Black ink, no shading, no ground line, and a gap between the two trees so they do not merge into a thicket.
It is a good pick for someone whose park is the desert one, and it carries the same quiet weight as a bonsai or an olive branch without turning into a plant portrait. The branching is the whole point, so pick a version where the forks read clearly at arm’s length.
Placement: Forearm, lengthwise, or the back of the hand for a smaller pair. Size: 2 to 3.5 in (5-9 cm) tall. Style: fine line. Pain: low. The fine hairlines on fingers and hands blur fastest of anywhere, so keep the trees on the forearm if you want them intact. Make it yours: ask for the taller tree to lean slightly away from the smaller one, which is how they actually stand in the park.
4. Grand Canyon Layered Strata
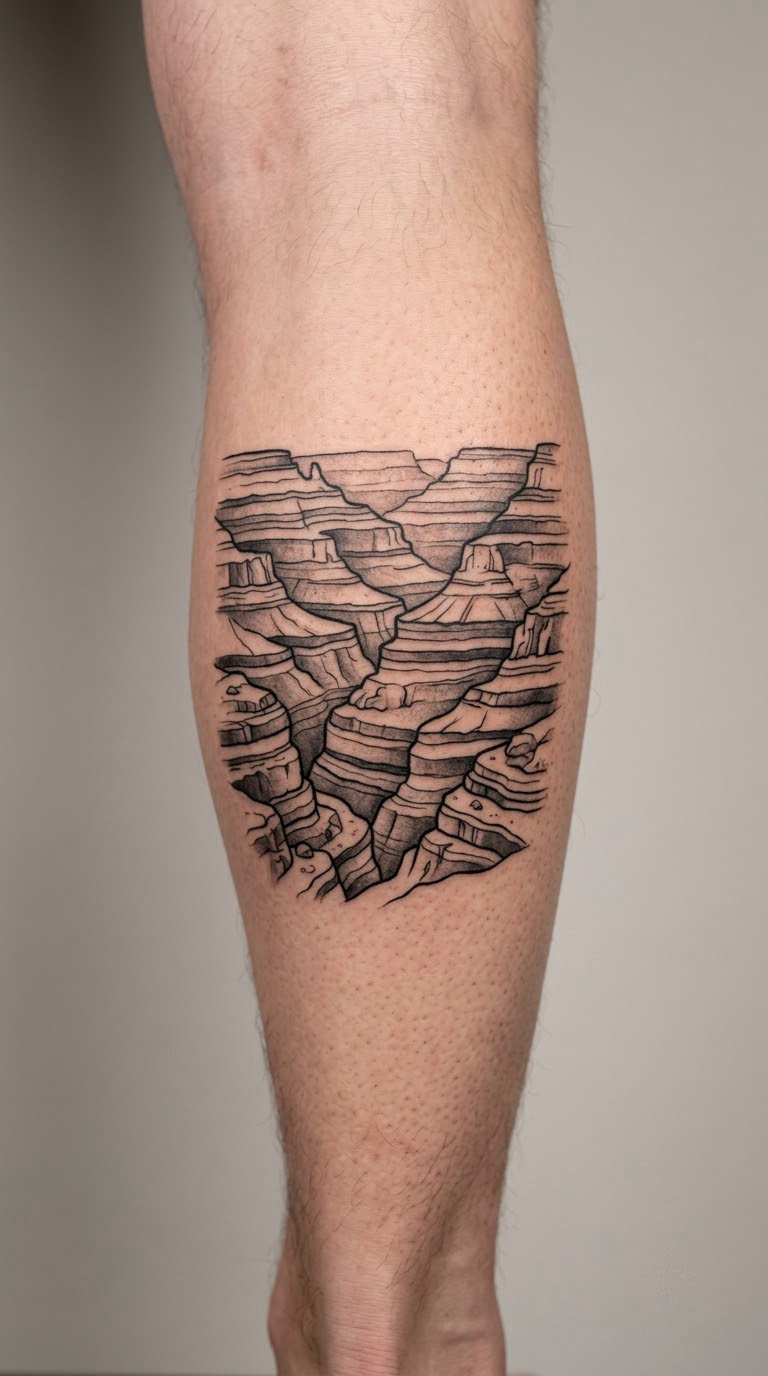
Grand Canyon strata tattoos treat rock layers as bands of colour rather than as a picture of a viewpoint. The design stacks a handful of horizontal or slightly curved shapes, darkest at the bottom, with soft grey between them. Nothing in it claims to be a specific overlook, which is exactly why it works: it is the canyon as a material, not a postcard.
People gravitate to it when the trip mattered more than the view. A family tradition, a proposal at the rim, a first time seeing something enormous. The banding gives an artist room to layer in a warm tone without the piece turning into a scenic illustration.
Placement: Outer calf, outer thigh, or ribs. Size: 3 to 5 in (8-13 cm). Style: black and grey, geometric. Pain: medium, and the calf and ribs are both more sensitive than an arm. Shading layered over a healed black base takes real time. Make it yours: name the formations you actually stood between and ask the artist to vary band thickness to match them.
5. Acadia Coastal Mountain Scene
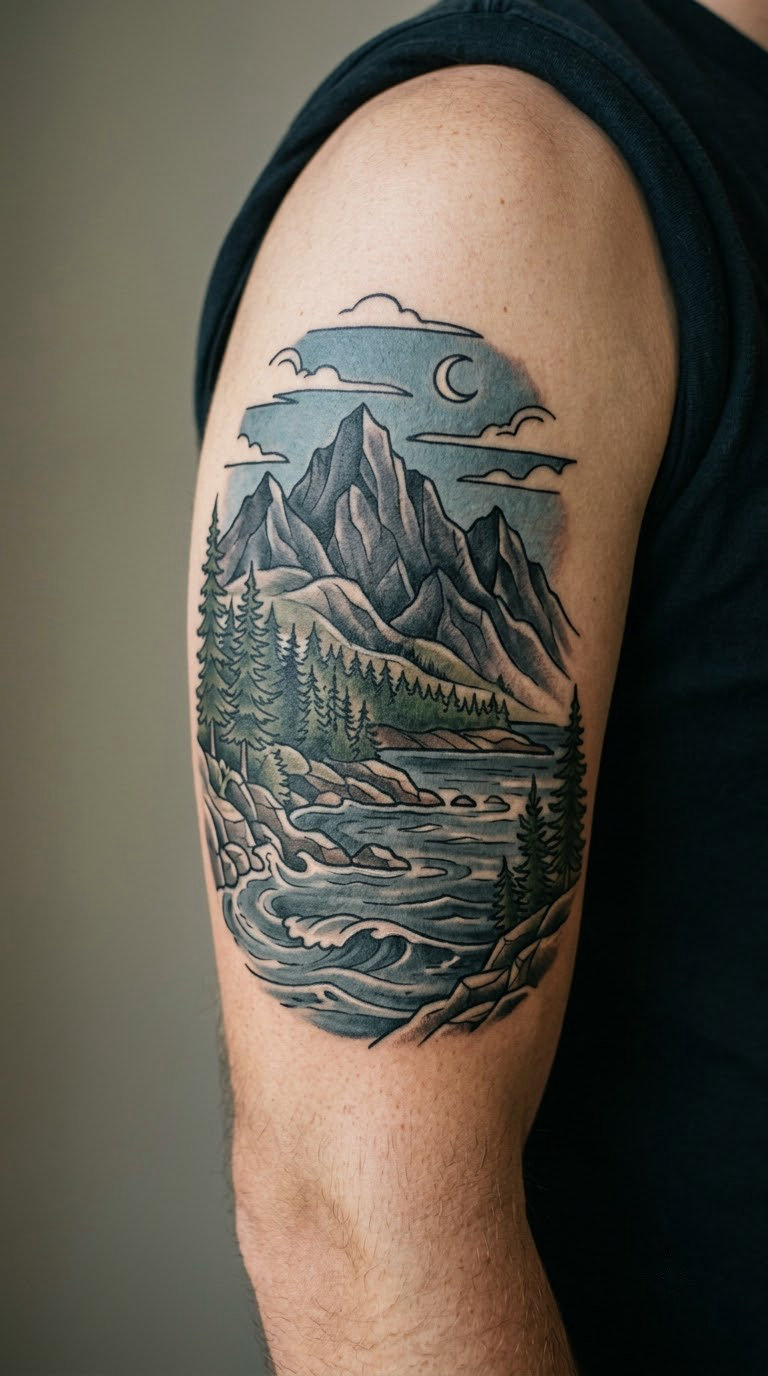
An Acadia scene is one of the few national park tattoo ideas that earns its colour. The composition is simple: a dark peak mass at the top, a band of water underneath, and a hard horizontal line where the two meet. In neo-traditional work the water gets a muted blue and the rock stays black and grey, so the piece still reads as restrained.
The mountain above the ocean is the reason people pick it. Cadillac Mountain and the Gulf of Maine in the same frame is a specific feeling, and it is not a motif you can get from a generic mountain range.
Placement: Upper arm or shoulder blade. Size: 3 to 4 in (8-10 cm) wide. Style: neo-traditional. Pain: medium, since coloured work takes longer in one sitting. Blue in a tattoo is the first colour to fade, so ask for a deeper tone than the reference photo. Make it yours: add a tiny white lighthouse or a single buoy below the waterline, which dates the piece to a specific stretch of coast.
6. Yosemite Half Dome Miniature
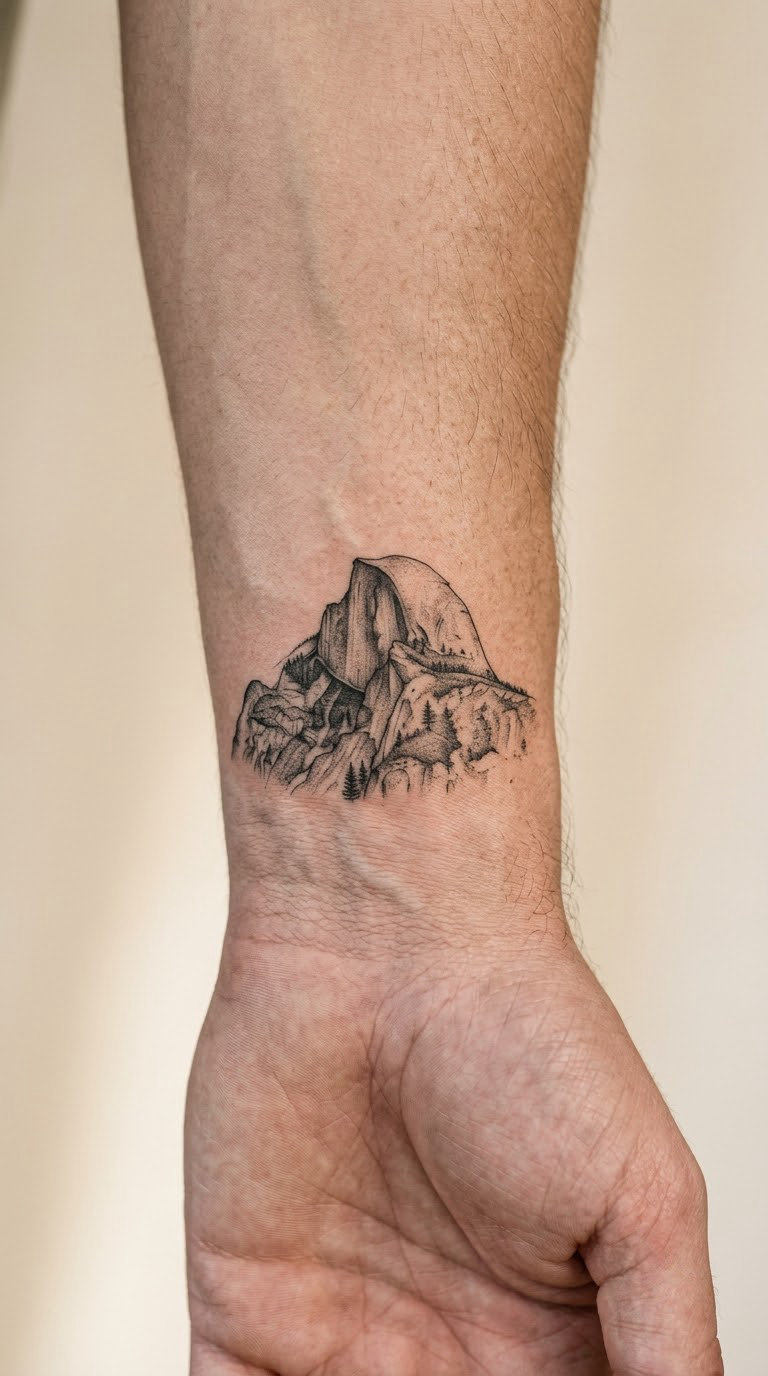
Half Dome is the landmark most people picture when they say Yosemite, and at small scale it is a design problem worth solving carefully. The shape has a straight vertical face on one side and a curved, striated fall on the other. Micro-realism means the artist renders that face in fine grey lines rather than a flat black block, which is what keeps it readable at wrist size.
Ask for the viewpoint you remember. Half Dome from Glacier Point and Half Dome from the Valley floor are different shapes, and picking the wrong one is how a landmark ends up unrecognisable to anyone but the person wearing it.
Placement: Wrist, inner forearm, or behind the ear. Size: 1.5 to 2 in (4-5 cm). Style: micro-realism. Pain: medium; the wrist has lots of nerve and bone close to skin. Wrist fine line fades faster than forearm work, so expect to want a touch-up. Make it yours: put a small date or mile marker beneath it, tucked into the remaining skin so it does not crowd the dome.
7. Yellowstone Black Bear Outline
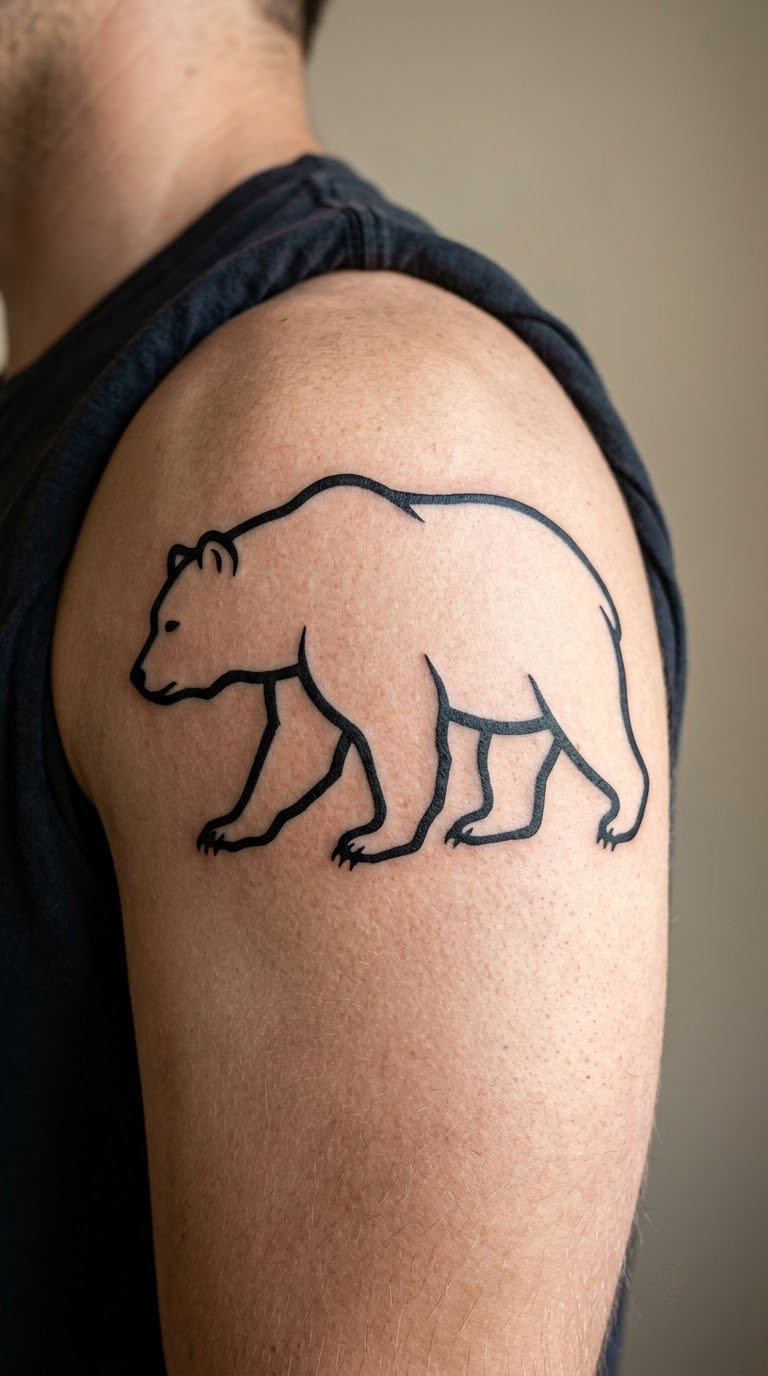
A bear outline is not a detailed animal portrait. It is one continuous line around a heavy shape: a shoulder hump, a long snout, a low head, and a suggestion of fur at the jaw. The interior stays empty. That is what makes it bold rather than busy, and it holds its shape at a distance in a way no shaded wildlife piece does.
Yellowstone black bears turn up in tattoos for people who had a close encounter, worked in wildlife, or simply grew up in bear country. It is a strong, uncomplicated shape and a good second piece for someone who already has a small scenic line tattoo.
Placement: Shoulder cap, upper back, or outer upper arm. Size: 3 to 4.5 in (8-11 cm). Style: bold outline. Pain: low. Shoulders hurt far less than people expect because there is less bone under the skin. A heavy line is more uncomfortable to sit through than a light one. Make it yours: have the artist set the head slightly lower than neutral so the bear reads as walking rather than looming.
8. Zion Red Rock Abstract
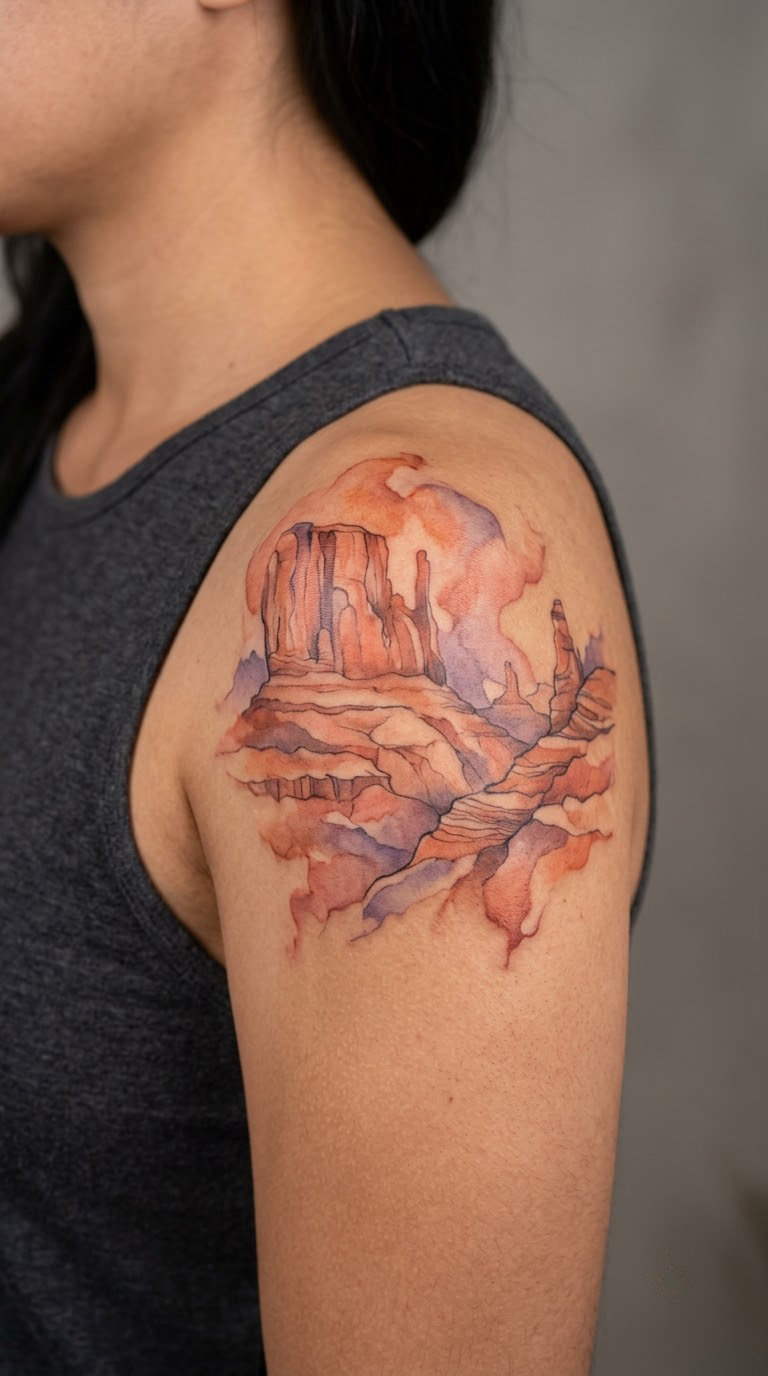
The Zion red rock abstract is the one design here that leans on colour without looking busy. The artist blocks in angled planes of rust, coral and a dusty violet, letting the edges bleed slightly instead of outlining them. A single dark line along one edge gives the composition a spine so it does not dissolve into a stain.
It suits people who like big colour tattoos but not the whole-sleeve commitment. Zion’s sandstone is one of the few park colour palettes that is genuinely its own, and the washes keep the piece small and contemporary.
Placement: Shoulder, upper back, or outer thigh. Size: 3 to 4 in (8-10 cm). Style: watercolour abstract. Pain: low, since it is mostly broad shading. Watercolour work feels warm and scratchy and needs a longer session. Make it yours: keep one section of true black for the shadow side; it makes the pale washes look intentional after a year of sun.
9. Olympic National Park Rainforest Ferns
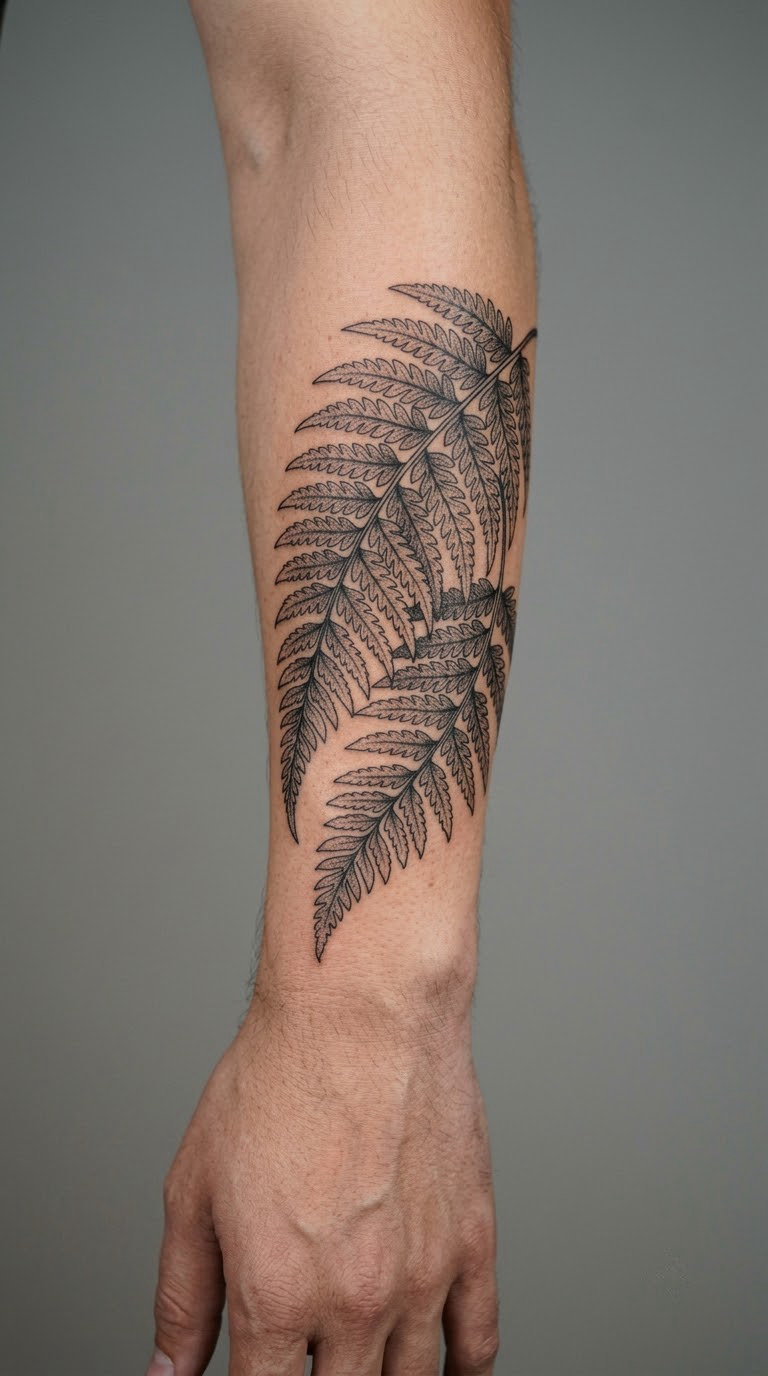
Olympic rainforest ferns are the most botanically busy design on this list, and it earns that by being the only one with a full vein structure. Two fronds overlap along a central stem, each leaflet drawn separately, with the shade between the stems left as black fill. It is closer to a botanical study than a souvenir.
Hoh River Valley gets a lot of rain, and people who go there tend to come back talking about the green rather than the peaks. The fern is how that reads on skin without writing a paragraph.
Placement: Forearm, lengthwise. Size: 3 to 5 in (8-13 cm) long. Style: blackwork botanical. Pain: low, but it is time-consuming; expect it to run over a session. The fine leaflets are the first part to soften, so the piece wants a bolder minimum line than it looks like it does. Make it yours: use the sword fern from a photo you took rather than a stock illustration, and add only one frond if you want it smaller.
10. Denali Snow-Capped Peak
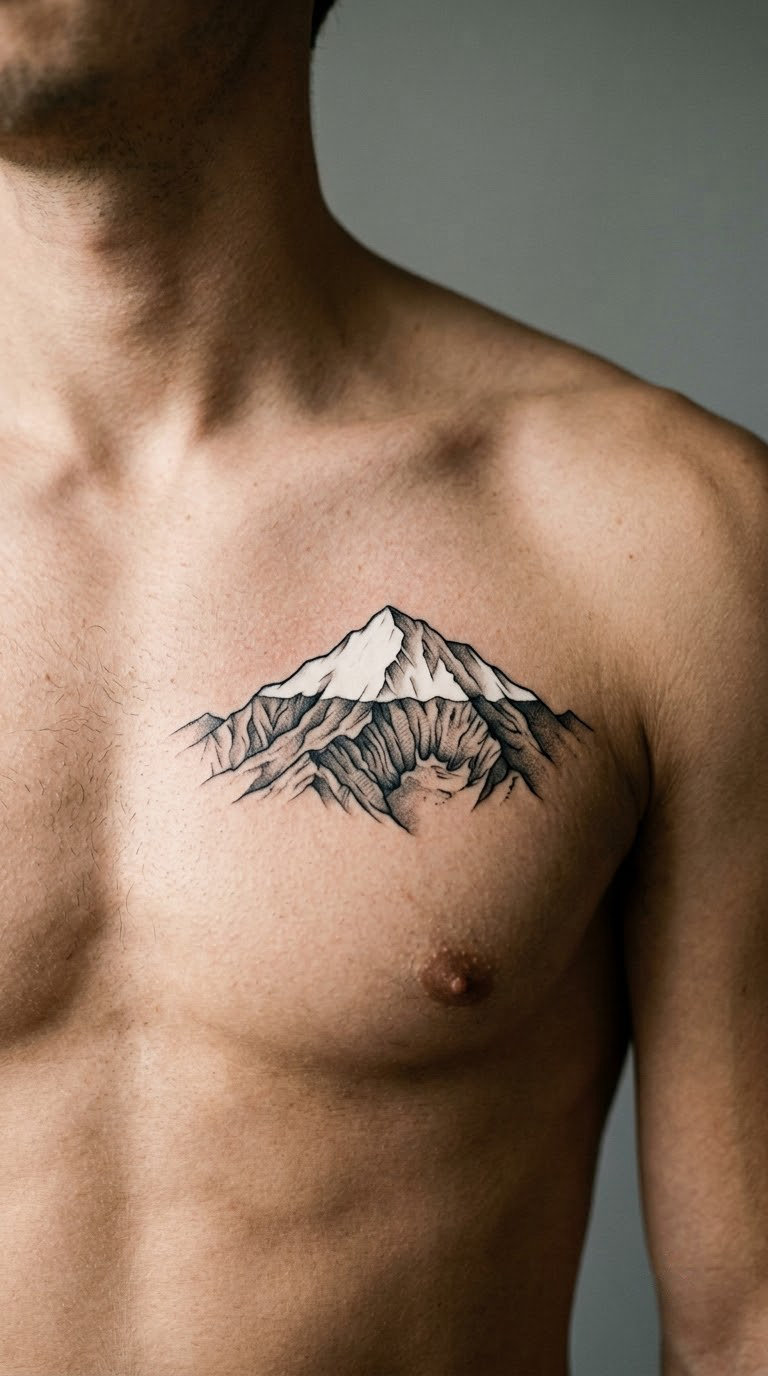
Denali reads as a single dominant summit, which makes it a very good design for one central silhouette. The peak is a broad triangular mass, often drawn wider at the base than expected, with a hard snow line cutting across the upper third and grey shading only on one flank. The mass is what makes it read as Denali rather than any sharp alpine peak.
Alaskan park trips are often tied to a single moment, a climb or a flight, and this is the design people reach for when that is the story. The broad shape scales cleanly, so it can be three inches or eight.
Placement: Chest, upper arm, or back of the shoulder. Size: 3 to 4.5 in (8-11 cm). Style: black and grey. Pain: medium on the sternum, lower on the upper arm. Chest skin moves a lot with breathing, which affects how a fresh design sits. Make it yours: add the elevation in small numerals under the base, which nobody else will read but you.
11. Arches National Park Arch Symbol
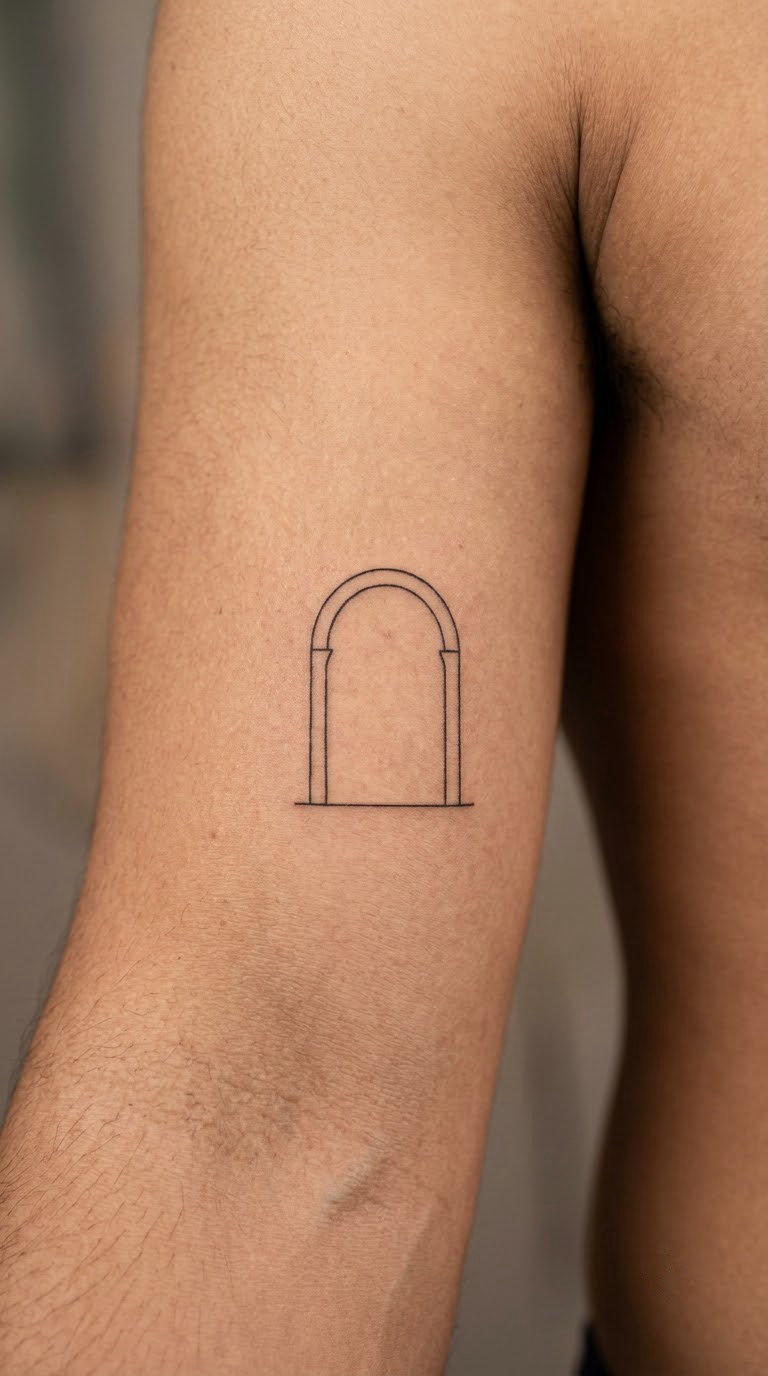
Delicate Arch reduces beautifully to one shape: a slender sandstone span with a thick leg on one side, a thin tapering one on the other, and open sky in the middle. Drawn in fine black line, it is a clean little symbol that works at an inch and a half, and the negative space in the middle is doing most of the recognition work.
It is the smallest true landmark design here, which makes it a good choice for a first tattoo or a place that is mostly about a memory rather than a destination. A lot of people get it because the arch is genuinely a symbol of the park, not just a feature of it.
Placement: Inner bicep, inner forearm, or the small of the back. Size: 1.5 to 2.5 in (4-6 cm). Style: minimal fine line. Pain: low, and it is over in an hour. Fine line at that size blurs noticeably over a decade, so many people convert it to a medium-weight line after the first touch-up. Make it yours: put the year of the visit in tiny numerals under the opening, small enough to read as texture.
12. Great Smoky Mountains Pine Forest
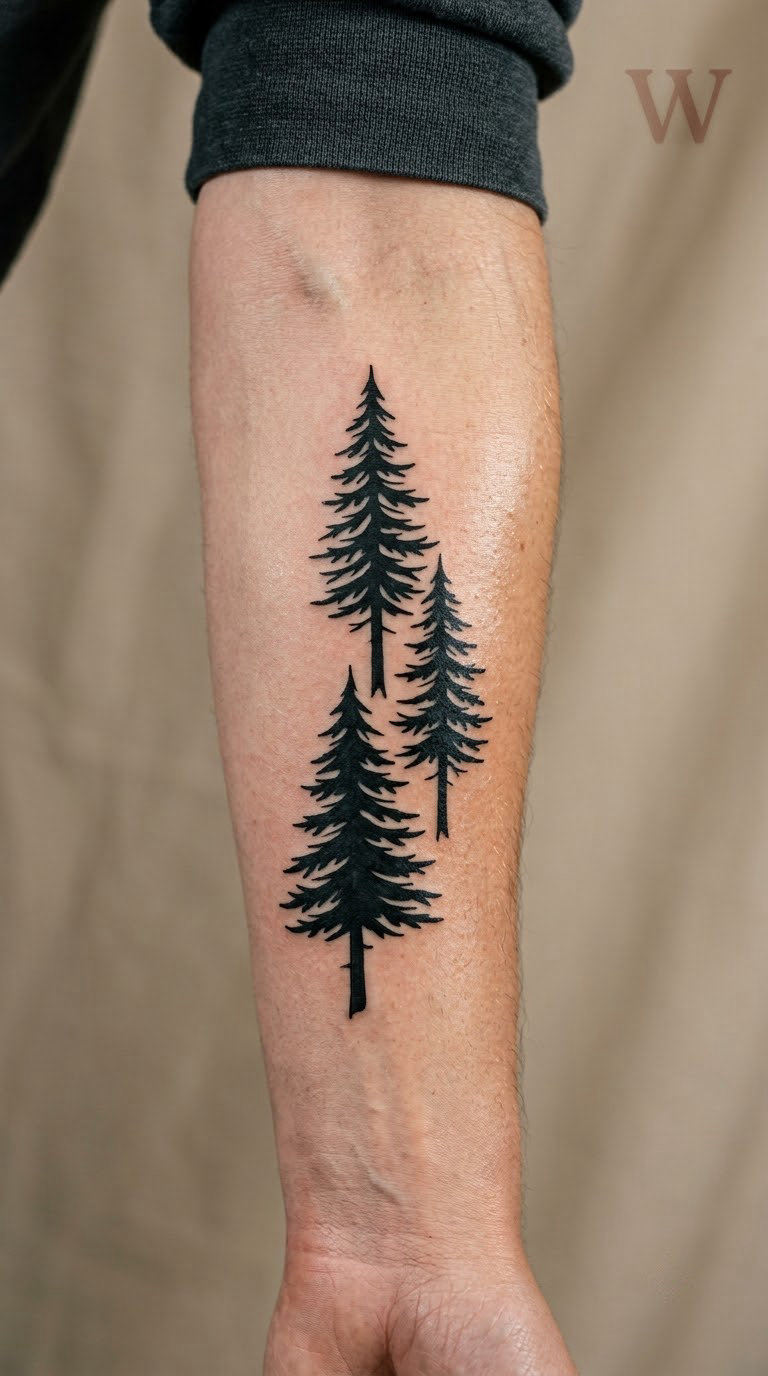
Three pines is the whole composition: one tall, one mid, one small, each with a few clean triangular tiers, staggered so no two peaks line up. The trees are solid black and the space between them is untouched skin. Repeated evergreens are usually a sleeve idea, so this is the piece that works when you want the symbol without the project.
Smokies tattoos tend to come from repeat trips, often family ones where the same overlook was visited over years. The trees carry that repetition, which is why three of them says more than one.
Placement: Forearm or the back of the hand. Size: 2 to 3 in (5-8 cm) wide. Style: solid black with negative space. Pain: low. Solid black is faster than line work for the same area, and it barely fades. Make it yours: stagger the trees unevenly and drop one to about half height, so it reads as a treeline rather than a graphic pattern.
13. Everglades Alligator Minimal Outline
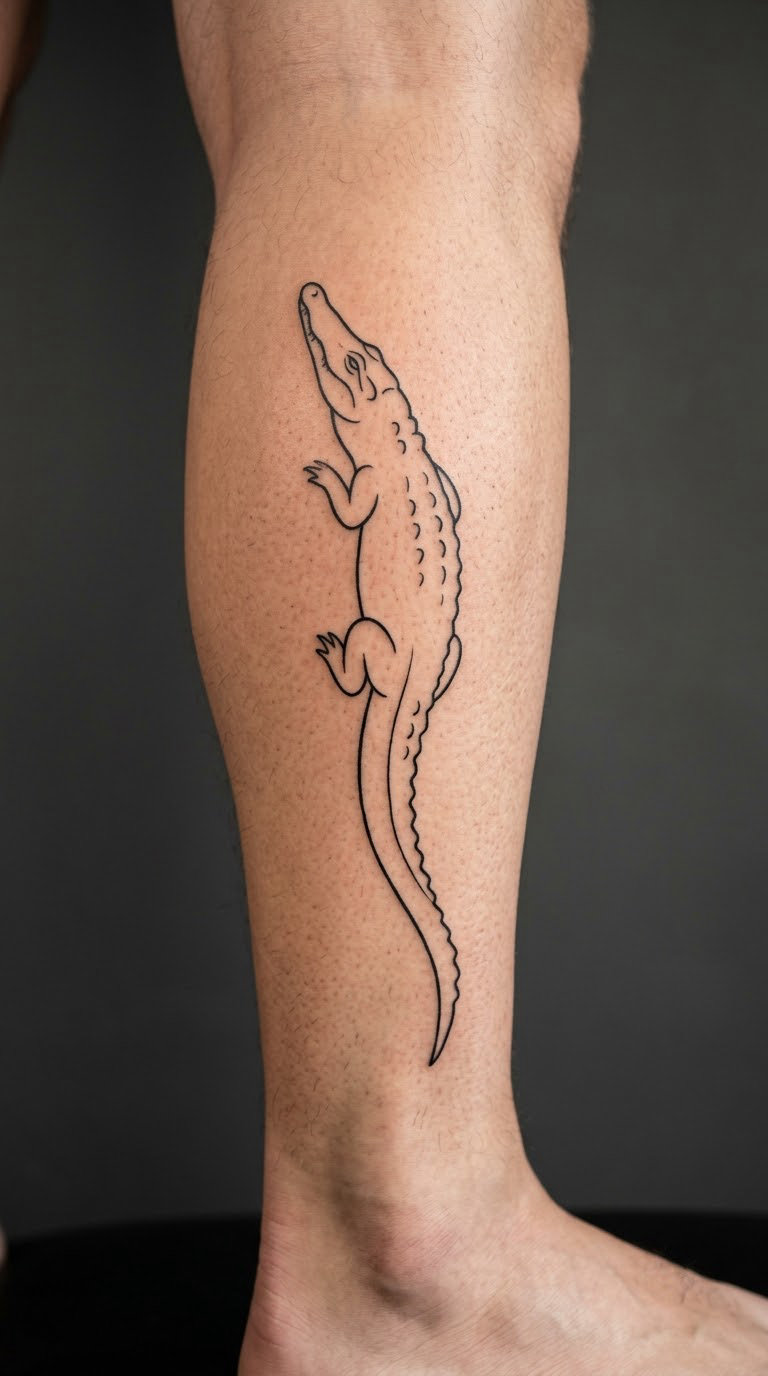
An Everglades alligator outline is drawn as a long, low shape: a heavy head, a straight back, a tail that tapers to a point, and a small number of leg stubs. Four or five scale marks along the back give it texture without filling the interior. Drawn lengthwise on a lower leg it follows the line of the limb and looks settled rather than placed.
The alligator is the park symbol, and it usually appears on tattoos for people who have spent real time in the water there. It is a more unusual choice than a bear or a bison, and people notice it.
Placement: Lower leg, or along the rib area for a shorter version. Size: 3 to 4 in (8-10 cm) long. Style: minimal line outline. Pain: medium on the shin, and the lower leg bruises visibly for a few days. A long thin outline takes time because the line has to stay consistent. Make it yours: angle the head slightly upward rather than straight ahead, which makes it read as alert instead of flat.
14. Badlands Geological Curves
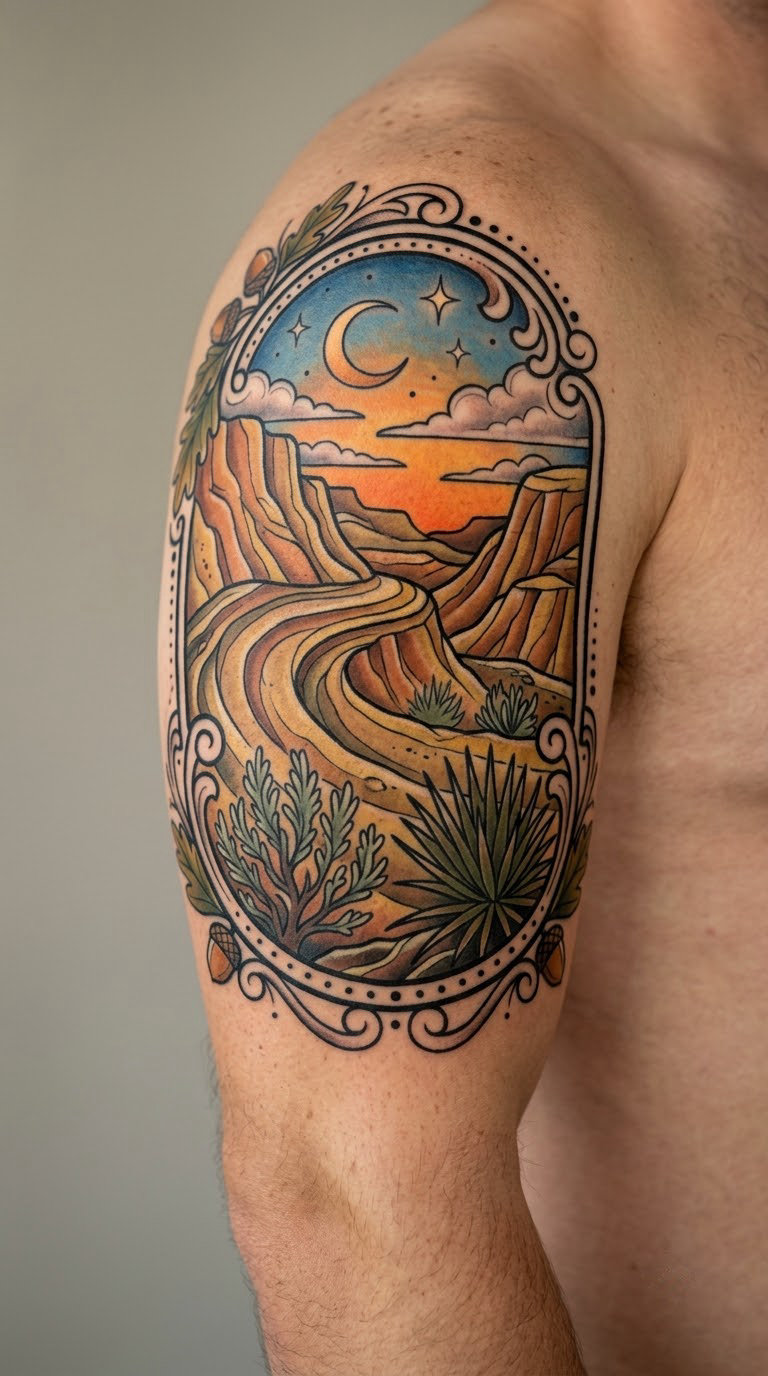
The Badlands design takes the park’s banded, eroded hills and turns them into a set of curved shapes stacked in a row. Ochre, dusty yellow and a muted red get a thin black outline so each band holds its edge, and the curves get tighter toward one end to suggest the way the formations actually stack.
Badlands visits are often road trips, part of a longer drive rather than a destination, and the layered design mirrors that: several shapes moving in one direction. It is also the best choice here if you want warm colour but not a scene.
Placement: Upper arm, forearm, or outer calf. Size: 3 to 4 in (8-10 cm). Style: neo-traditional. Pain: medium, mostly from the coloured shading sessions. Warm inks hold their tone better than blues, so this ages better than most colour work. Make it yours: end the stack with a flat horizon line rather than a curved one; the contrast is what makes the shape read as landform.
15. Glacier National Park Lake Reflection
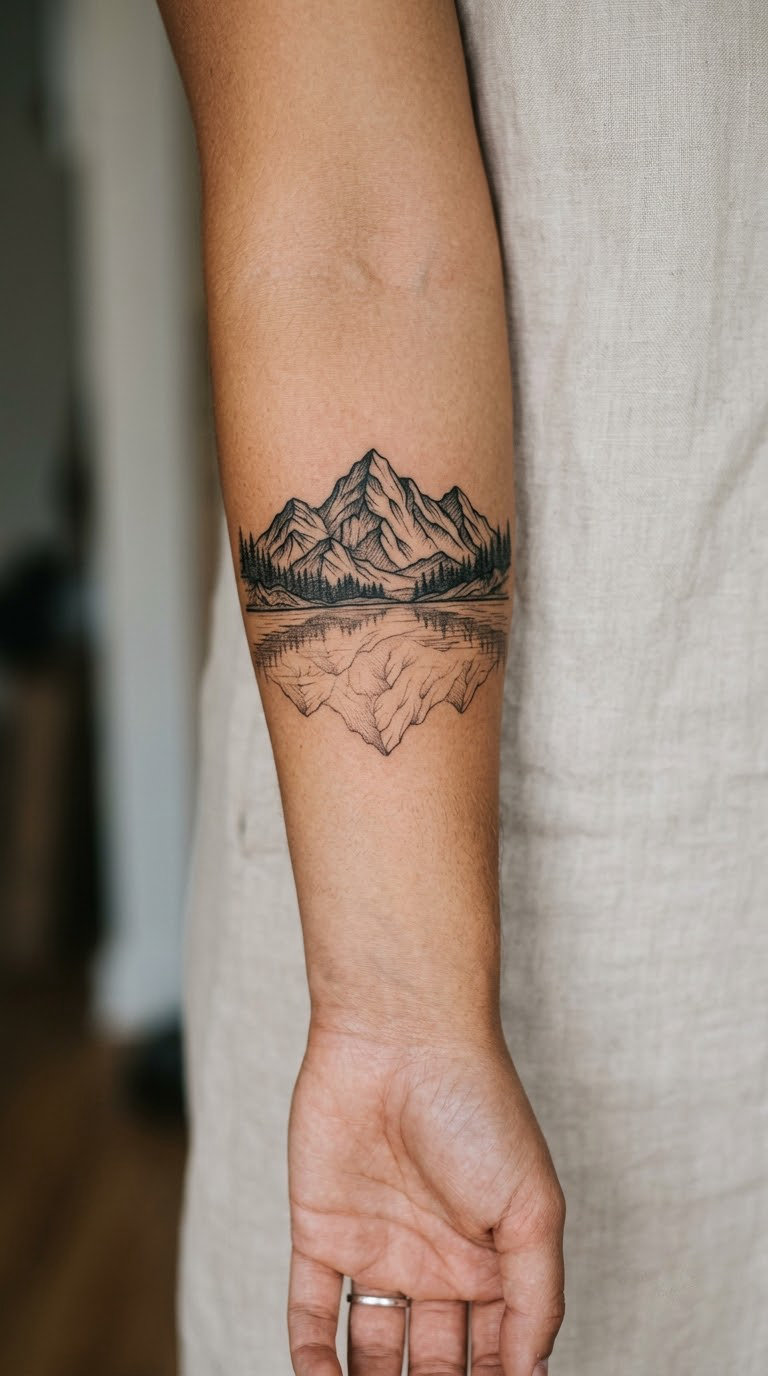
A reflection design is split horizontally: the mountain sits above the line, the lake sits below it, and the two halves mirror each other with the lower one drawn lighter and slightly broken up. The horizontal line is the waterline and it must be dead straight, otherwise the whole thing looks like a mistake.
Glacier, Lake Louise and Banff all give people the same view, and the mirrored format is what separates one from the others. Send a photo taken at the same angle you want, and tell the artist which side the reflection falls on.
Placement: Forearm, lengthwise, or centred on a calf. Size: 2.5 to 4 in (6-10 cm) long. Style: fine line, symmetrical. Pain: low. Symmetry takes longer to tattoo than it looks, and the artist will be checking both halves constantly. Make it yours: keep the reflection slightly incomplete, fading out before the mountain’s base, which is how it actually looks on still water.
16. Sequoia National Park Giant Tree
A sequoia tattoo is mostly trunk. The artist draws a tall vertical column that flares at the base, then adds short angular bark marks down the length and a small crown of branches at the top. The proportion is the point: very tall, very narrow, with a wide foot. A sequoia drawn with a normal tree canopy looks like any other conifer.
People get these for grove walks, for the scale of standing under one, and sometimes as a marker of a family road trip. The vertical shape suits a forearm better than any other design in this list.
Placement: Inner forearm, running from wrist toward elbow. Size: 2.5 to 4 in (6-10 cm) tall. Style: blackwork. Pain: low. Bark texture is repetitive work, so budget time rather than expecting a quick sitting. Make it yours: add a person-sized silhouette at the base, which instantly communicates the scale without a single extra tree.
17. North Cascades Waterfall Line Tattoo
A waterfall falls straight down, and the design follows: two or three thin vertical lines dropping between soft rock contours, with a small mist shape at the bottom. There is no landscape around it and no sky. The whole piece is vertical, which is why it reads well along an arm or behind the leg.
Cascades, falls and geysers are the water half of national park tattoo ideas, and waterfalls are the version that stays minimalist. Ask the artist to vary the stream widths so it reads as falling water rather than as parallel rules.
Placement: Inner arm, outer calf, or the back of the calf. Size: 2.5 to 4 in (6-10 cm) tall. Style: fine line. Pain: low. Long vertical runs of thin line are steady work and take longer than the size suggests. Make it yours: name the actual falls and use the shape of the rock lip at the top, which is the part that makes a waterfall recognisable.
18. Death Valley Desert Sun and Mountains
A sun disc above low black mountains is a two-element design that works at almost any size. The mountains are simple black contour shapes, low and wide rather than pointed, and the sun is a soft muted gold disc sitting just clear of the ridge line with a small gap between the two. Warm, graphic, and it never needs a background.
Death Valley trips are about extremes, heat and distance, and this is the design that says warm and open rather than green and alpine. It also layers easily with a personal mark, which is a common request in this category.
Placement: Forearm, ankle, or behind the ear. Size: 2.5 to 3.5 in (6-9 cm) wide. Style: muted colour. Pain: low, though the sun disc needs a shaded fill and that adds time. Pale gold inks fade toward skin tone faster than most colours, so expect a touch-up. Make it yours: drop a personal emblem into the gap between the sun and the ridge, the way people add a small second symbol to this design.
19. Rocky Mountain Elk in Dotwork
Dotwork builds tone out of graduated dots rather than lines, so the shading changes gradually and the edges stay soft. An elk works well in it because the antlers give a hard black silhouette against a light neck and shoulders. The head is the focus; the body is implied by a few strokes and a lot of open skin.
Elk rut in Rocky Mountain and Glacier country is a specific seasonal memory, and this is the design for someone who remembers a particular autumn rather than a general trip. It carries more atmosphere than a flat silhouette at the same size.
Placement: Calf, outer arm, or the back of the shoulder. Size: 2.5 to 3.5 in (6-9 cm). Style: dotwork. Pain: medium and slow. Dots are repeated small punctures, so this one is a long sitting and a patience test, especially over the neck shading. Make it yours: ask for the antlers to have an extra tine, which changes the whole shape and reads as a different animal.
20. National Park Compass With Coordinates
The compass-and-coordinate design is the smallest and most personal option here. A simple compass rose, four points, done in thin black geometric marks, with a short coordinate line set underneath it. The coordinates are the whole meaning: a latitude and longitude that point at a specific spot rather than a general sense of being outdoors.
It is the one design in this list that says something nobody else can read, and it works for parks, trailheads, and campgrounds rather than only for named landmarks. The lowercase coordinate format sets it apart from the usual Roman-numeral compass.
Placement: Inner forearm or the wrist. Size: 1.5 to 2.5 in (4-6 cm). Style: blackwork, geometric. Pain: low, and it fits comfortably in one sitting. Small text and small line weight are the two things to watch; both need a heavier touch than looks necessary. Make it yours: use the coordinates of the trailhead rather than the park itself, which is a far more specific record.
How to Choose the Right Design
Match line weight to the body part, not to the picture
Forearms, wrists and hands take fine line but lose it fastest. Shoulders, upper arms, backs and chests hold a heavier line without looking wrong, and solid black shapes hold up almost indefinitely. If the design you like is a thin scenic line, put it somewhere covered before you commit to it.
Decide what the design is for
A landmark, a coordinate, a piece of wildlife and a park name are four different statements. A landmark is a record of a place. A coordinate is a private record. Wildlife is an identity. Park name text is a souvenir, and it is the version that ages worst because the clothing industry pushes the same one constantly.
Check the size against the detail
A rough rule: if the design is under two inches, it needs one element. Between two and four inches, two or three. Past four, a scene starts to work. National park tattoo ideas with a mountain, a treeline, a lake and a compass do not fit in two inches, and the detail turns to grey mush within a few years.
Pick a viewpoint and stick to it
Half Dome from the valley floor, Half Dome from Glacier Point and Delicate Arch from the road are three different drawings. When you bring references, bring three angles of the same spot and mark which one you want. This is the step that separates a design someone else recognises from one only you can read.
Look for healed work, not fresh work
Ask to see healed photographs of the same design, not just portfolio pieces photographed in the shop. Healed line weight is the honest test, and a good artist will have examples even if they are on their own skin or on staff.
Cost and Session Time
Almost every national park tattoo is priced by the hour, and the total depends far more on size and detail than on which park you are depicting. A small design under two inches, like the arch or the compass, is often a short single appointment. A mid-size piece in the three to four inch range, such as the Grand Canyon strata or the elk, commonly takes a full sitting and sometimes a second. Anything past five inches, or any piece with layered colour and grey shading, is a multi-session project with a sketch stage and a touch-up built into the plan.
Shop minimums are the thing that surprises people most. Plenty of studios set a floor for the smallest booking, so a two-inch design can end up costing what a three-inch one costs. Hourly rates vary widely by city, by artist experience, and by whether you are booking a guest slot or a regular. Ask for the total estimate in writing before you start, and ask whether the touch-up is included.
Two practical ways to keep the budget and the time down. Get the design right on paper before you get it on skin, since the sketch stage is cheap and a re-draw in ink is not. And settle on a final size before the first line, because growing a small piece into a large one means paying twice.
Aftercare Basics
Start with your artist’s aftercare instructions, since they will account for how your particular piece was done.
- Keep the fresh tattoo clean, and wash it with whatever your artist specified rather than substituting a stronger product.
- Leave the skin alone while it heals. That means no picking at flakes, no scratching, and no worrying about it every day.
- Keep it out of direct sun while it heals, and think about sunscreen on it for the life of the tattoo, especially on forearms, arms and lower legs.
- Skip swimming, hot tubs and saunas until your artist says the piece is done healing, not just until it stops looking shiny.
- Loose clothing over the area for the first stretch of healing beats anything tight against fresh ink.
- Book the touch-up. Fine line and lighter colour work almost always needs one, and most studios would rather do it free than have you go elsewhere.
If anything about your tattoo looks wrong while it heals, call the studio. That is a normal question and they have heard it before.
Frequently Asked Questions
What is the meaning behind a minimalist mountain tattoo?
A minimalist mountain tattoo usually stands for a real place and a real period of your life rather than a general idea of adventure. Wearers tend to describe a specific ridgeline, a first trip, a family tradition or a stretch of time spent outside. The minimalism is practical: fewer lines stay readable longer, and the shape of one peak from your own reference photo means more than a detailed scene from anywhere.
What are some tattoos that symbolize nature?
The most common nature symbols in this category are ridgelines, pine and fir trees, wildflowers, water such as a lake reflection or a waterfall, wild animals like bears, bison and elk, and a compass with coordinates. Each one signals something slightly different: trees for growth and place, water for calm, wildlife for wildness, coordinates for a specific memory.
How big should a national park tattoo be?
Match the size to how many elements you want in it. One element such as a tree, an arch or a compass works at 1.5 to 2.5 inches. Two or three elements, like a ridgeline with a treeline, need 2.5 to 4 inches. A layered scene with water, rock and shading usually needs 5 inches or more, and detail below two inches turns grey within a few years.
Do fine line nature tattoos fade in the sun?
Yes, and location matters more than most people expect. Fine line and pale colour work on frequently exposed skin, such as forearms, lower legs, hands and the back of the neck, loses definition faster than the same design on a shoulder or upper arm. Sunscreen on the area, and a heavier line weight from the start, both slow the process down.
What are some tattoos to avoid in this style?
The most common disappointments are a generic three-peak mountain that could be any range, a landmark drawn from the wrong viewpoint, a detailed scenic line piece done too small to read, and a large scene on a forearm that ages into blur. Pick a photo from your own park, fix the viewpoint, and choose a size the detail can live in.
Can I combine a park tattoo with a personal symbol?
Yes, and it is a common request. The pattern is usually one park element plus one other mark, such as a ridgeline with a small compass, a park scene with an animal, or a landscape with a coordinate line underneath. The one rule worth keeping is that the park element stays readable, so place the second symbol beside or under it rather than across it.
Conclusion
If this is your first tattoo, start with the compass and coordinates or the small Arches arch. Both are quick, both hold their shape, and both mean something specific rather than decorative.
If you are already building a travel and nature collection, the piece to plan is the one that leaves room, like the Grand Canyon strata or the Denali peak, and a thinner element beside it. Book a consultation, bring three reference angles, and settle the final size before the first line goes in.