
20 Best Pine Forest Tattoo Ideas for the Forearm (September 2026)
Pine forest tattoo ideas for the forearm work because the arm is long, flat and curved in exactly the places a forest scene needs to bend. A line of evergreens can run from wrist to elbow like a view through trees, and the forest theme survives skin that stretches, bends and gets sun all day. This guide breaks twenty distinct woodland concepts into sizes, styles, placements and pain levels you can take straight to a consultation.
Twenty designs are below, from a two-inch branch to a wraparound scene, and each one lists where it sits, how big it realistically is, how much it hurts and how it ages. If you are planning a first tattoo, start with something small; if you are adding to a collection, look at the larger scenes. Bring your measurements to the appointment, not just screenshots.
Pine Forest Tattoo Ideas for the Forearm: Quick Guide
The table below lists all twenty concepts in order, with the style, the forearm zone that suits it best, a realistic size range and the pain level most people report for that placement.
| Idea | Style | Best placement | Size | Pain |
|---|---|---|---|---|
| 1. Fine-line inner forest | Fine line | Inner forearm, vertical | 2-4 in (5-10 cm) | Medium |
| 2. Mountain lake reflection | Black and grey realism | Outer forearm | 4-7 in (10-18 cm) | Medium |
| 3. Crescent moon in pines | Illustrative realism | Inner forearm, centred | 3-5 in (8-13 cm) | Medium |
| 4. Blackwork forest band | Blackwork | Middle or outer forearm | 2.5-4 in (6-10 cm) tall | Medium-high |
| 5. Lone pine and mountains | Geometric nature | Outer forearm, any length | 3-5 in (8-13 cm) | Low-medium |
| 6. Misty watercolour forest | Watercolour | Inner or outer forearm | 4-6 in (10-15 cm) | Low-medium |
| 7. Minimal pine branch | Minimal fine line | Inner wrist, diagonal | 2-3 in (5-8 cm) | Low-medium |
| 8. Cabin beneath tall pines | Illustrative realism | Outer forearm panel | 4-6 in (10-15 cm) | Medium |
| 9. Pine silhouette landscape | Silhouette blackwork | Inner or outer forearm | 3-5 in (8-13 cm) | Low-medium |
| 10. Japanese-inspired pine and river | Neo-traditional | Broad inner forearm | 5-8 in (13-20 cm) | Medium |
| 11. Stippled forest at dusk | Stippling | Outer forearm | 3-5 in (8-13 cm) | Medium |
| 12. Pine camouflage patch | Illustrative blackwork | Outer forearm | 3-5 in (8-13 cm) | Medium-high |
| 13. Woodland path in perspective | Black and grey realism | Inner forearm, lengthwise | 4-7 in (10-18 cm) | Medium |
| 14. Pine tree constellation | Fine-line celestial | Inner forearm | 2.5-4 in (6-10 cm) | Low-medium |
| 15. Campfire and fox | Illustrative realism | Outer forearm | 4-6 in (10-15 cm) | Medium |
| 16. Vintage botanical pine study | Vintage botanical | Inner or outer forearm | 3-5 in (8-13 cm) | Low-medium |
| 17. Monoline forest panel | Monoline | Inner forearm, vertical | 3-5 in (8-13 cm) | Low-medium |
| 18. Storm over a pine ridge | Black and grey realism | Outer forearm | 5-8 in (13-20 cm) | Medium-high |
| 19. Folk-art pine forest | Contemporary folk | Inner or outer forearm | 3-5 in (8-13 cm) | Low-medium |
| 20. Full forearm forest scene | Black and grey realism | Most or all of the forearm | 7-12 in (18-30 cm) | Medium-high |
1. Fine-Line Pine Forest Along the Inner Forearm
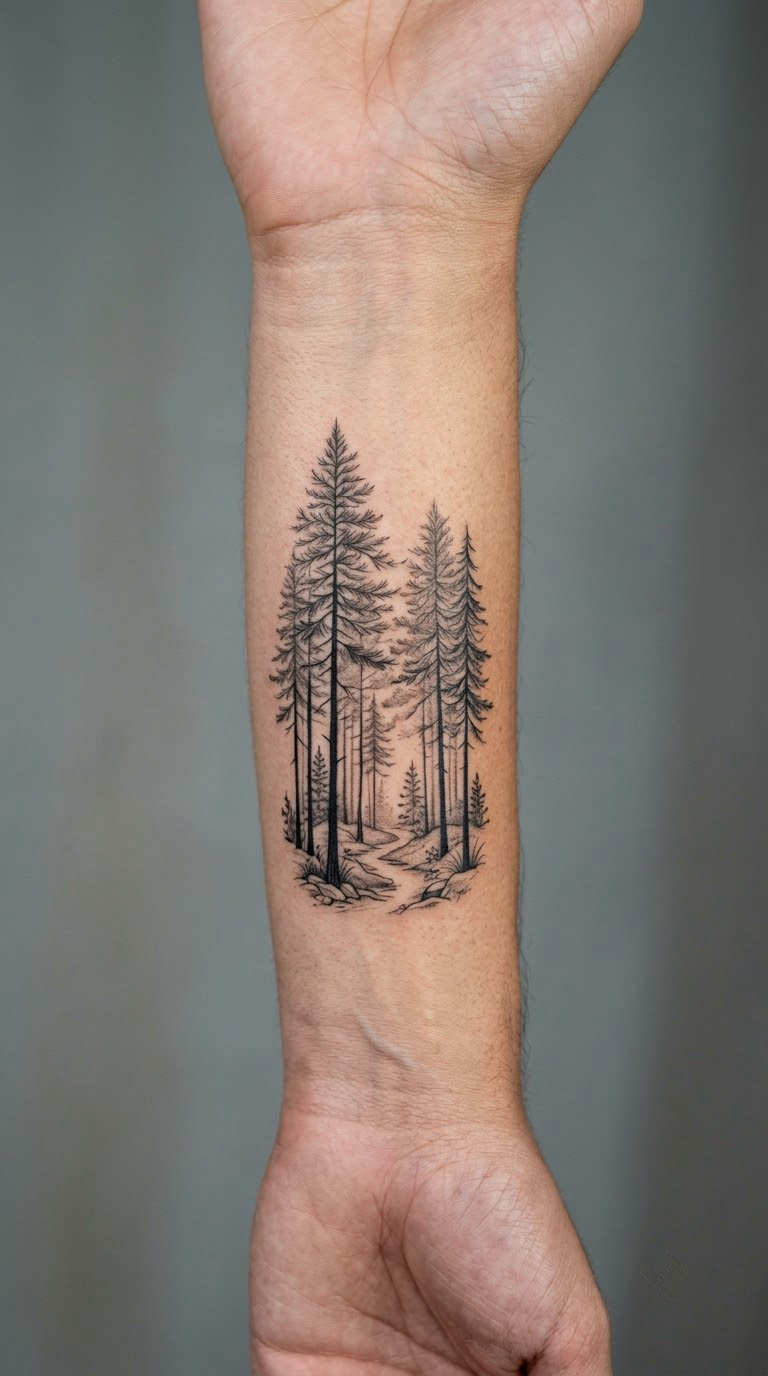
A fine-line pine forest for the forearm is a single quiet scene: five or six slender trunks, light needle clusters and almost no shading. The line work tapers from a heavier trunk base to a hairline canopy, and most of the space between trees stays as bare skin. That negative space is what keeps it readable.
People choose this one because it is personal without being loud, and it works well alongside other small pieces. The inner forearm shows it clearly when the arm rests on a table or holds a coffee cup.
Placement: Inner forearm, running vertically from just above the wrist crease toward the elbow. Size: 2-4 inches (5-10 cm). Style: Fine line, single-needle work. Pain: Medium, because inner forearm skin is thin and sensitive. Fine lines soften noticeably within a few years, so plan for a touch-up rather than expecting razor edges forever. Make it yours: add a small date beneath the treeline in matching single-needle script.
How This Pine Forest Forearm Tattoo Works
Tapered line weight does the heavy lifting. Heavy lines sit at the trunk base where the arm is least visible over time, and thin lines sit in the canopy, so the fading is less obvious. Directional trees angled slightly toward the wrist follow the taper of the forearm rather than fighting it.
2. Realistic Mountain Lake Reflection
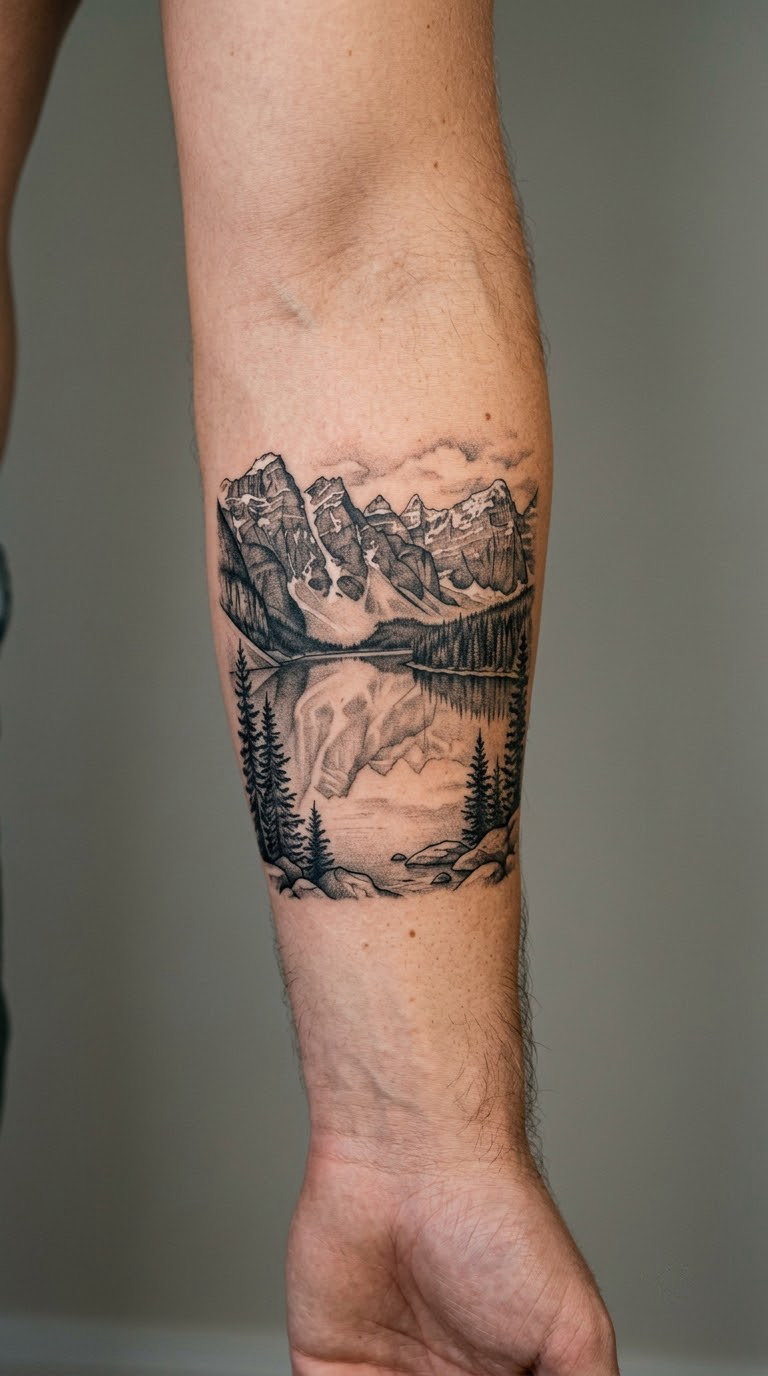
A mountain lake scene builds depth in four bands: a pale sky, a dark ridge, a stand of pines, then still water holding a mirrored, slightly broken version of everything above it. The waterline is the only clean horizontal, and it usually crosses the middle of the forearm.
It suits people who pick their designs from a real place, whether that is a trip, a childhood lake or a view they think about often. It also photographs well once healed.
Placement: Outer forearm, lengthwise, or inner forearm if you want it visible while your arm is at your side. Size: 4-7 inches (10-18 cm). Style: Micro-realism or black and grey realism. Pain: Medium over a longer stretch. The tiny reflected trees and ripple lines are the first details to soften, so ask your artist to keep the reflection slightly bolder than the source. Make it yours: have the ridge line drawn from a photo of the view you actually mean.
3. Pine Trees Framing a Crescent Moon
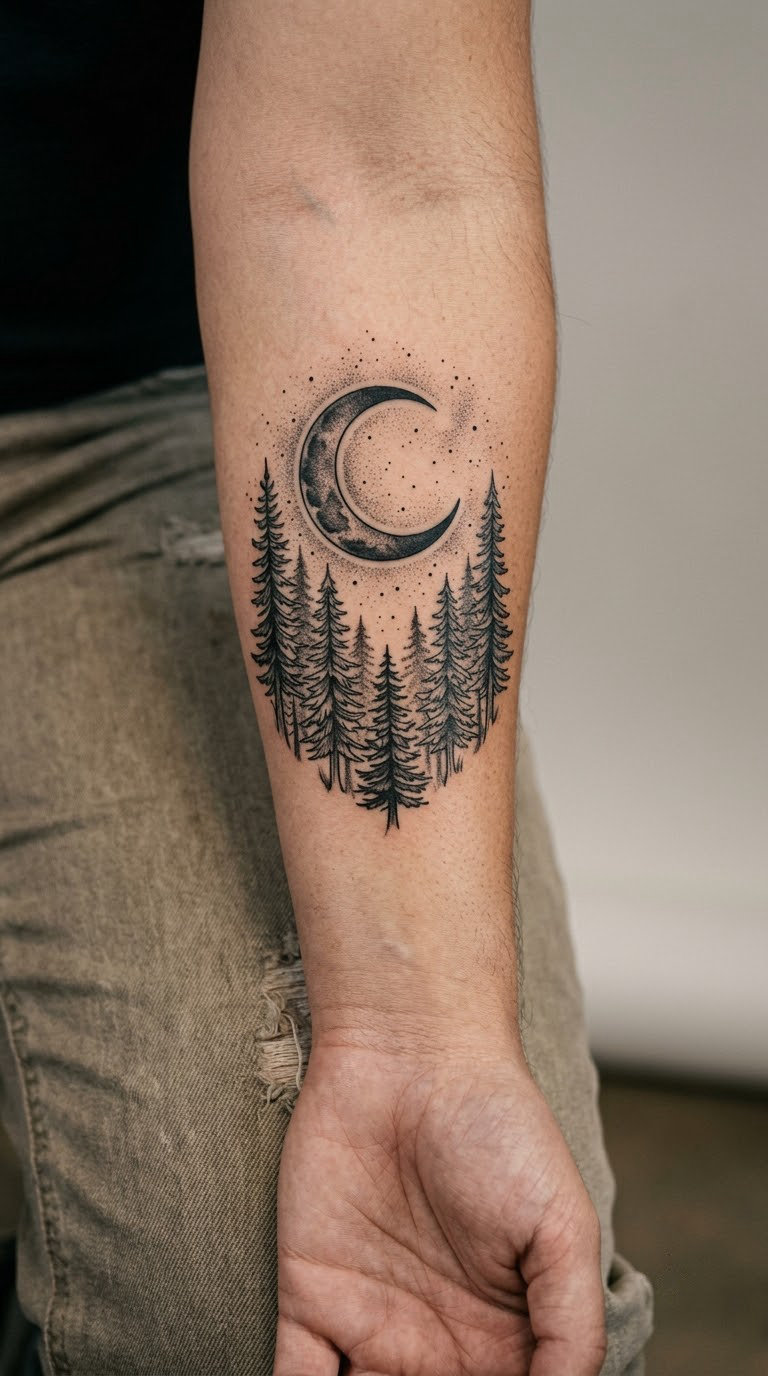
Layered pines stand on a low rise on each side of a narrow crescent, with a lightly stippled sky behind and open space around the moon. The composition is balanced rather than symmetric, which is what stops it feeling like clip art.
There is no fixed meaning attached to this design, so treat it as a nature composition you like the look of. Plenty of people connect it to a night they remember, but that is personal, not traditional.
Placement: Inner forearm, centred between wrist and elbow, or outer forearm for more flat surface. Size: 3-5 inches (8-13 cm). Style: Illustrative realism. Pain: Medium on the inner arm, low-medium on the outer. Pale stippling in the sky is the weak point; it fades first and can leave the trees looking heavier than intended. Make it yours: use a muted green or deep blue ink only in the crescent, leaving the pines black.
4. Dense Blackwork Pine Forest Band
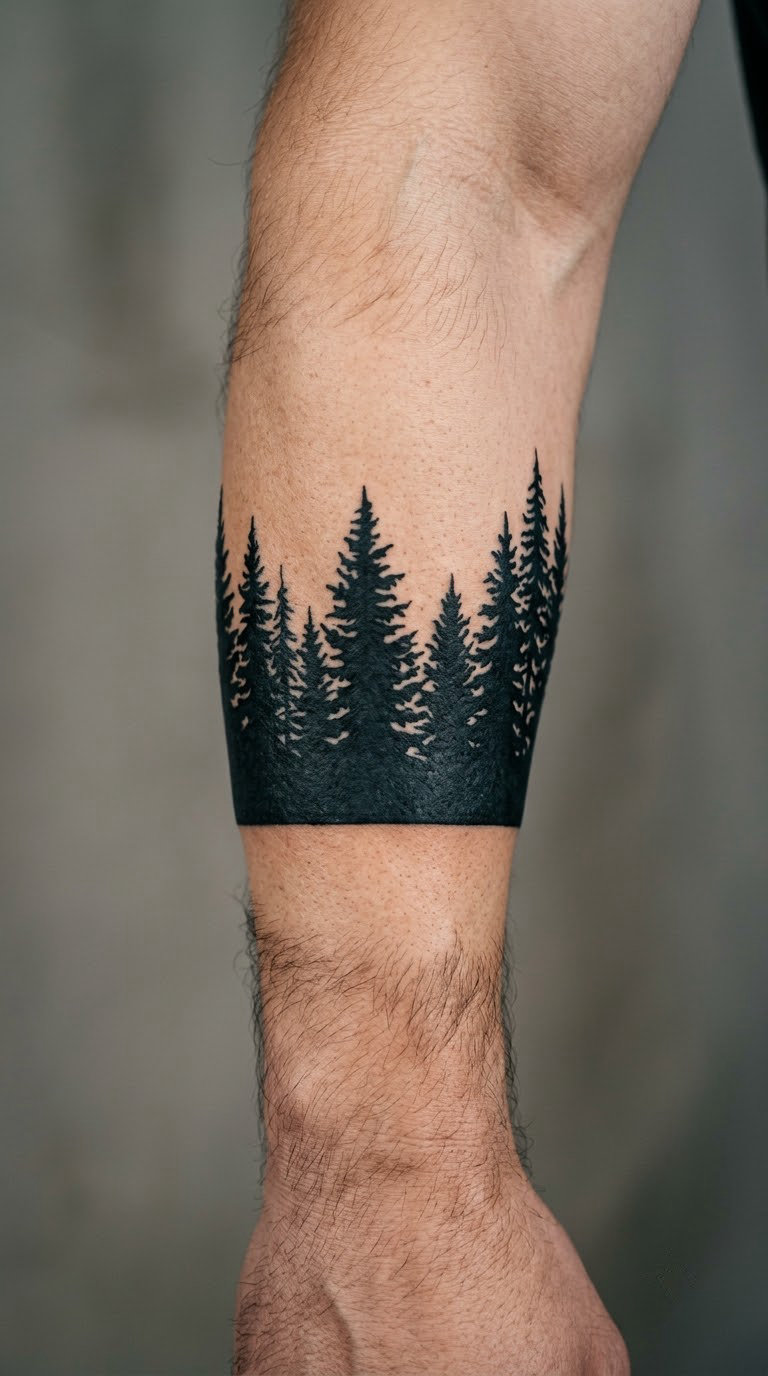
A blackwork band is a belt of solid black pines interlocking across the arm, with trunks running diagonally and slivers of bare skin cut between them. The black areas are saturated, not grey, and the negative spaces are narrow and deliberate rather than accidental gaps.
It reads as a bold nature piece rather than a full scene, which makes it a good match for someone who wants weight on the arm without going large. It also hides older marks well when the band is dense enough.
Placement: Middle or outer forearm, wrapping slightly around the arm. Size: 2.5-4 inches (6-10 cm) tall, any width that suits your arm. Style: Blackwork. Pain: Medium-high; saturated black takes more passes and more time in one sitting. Dense black holds its shape better than fine detail, so this style ages more predictably than most. Make it yours: ask for a few trunks to stop short of the band edge so the wrap looks deliberate rather than cut off.
5. Lone Pine With a Geometric Mountain Backdrop
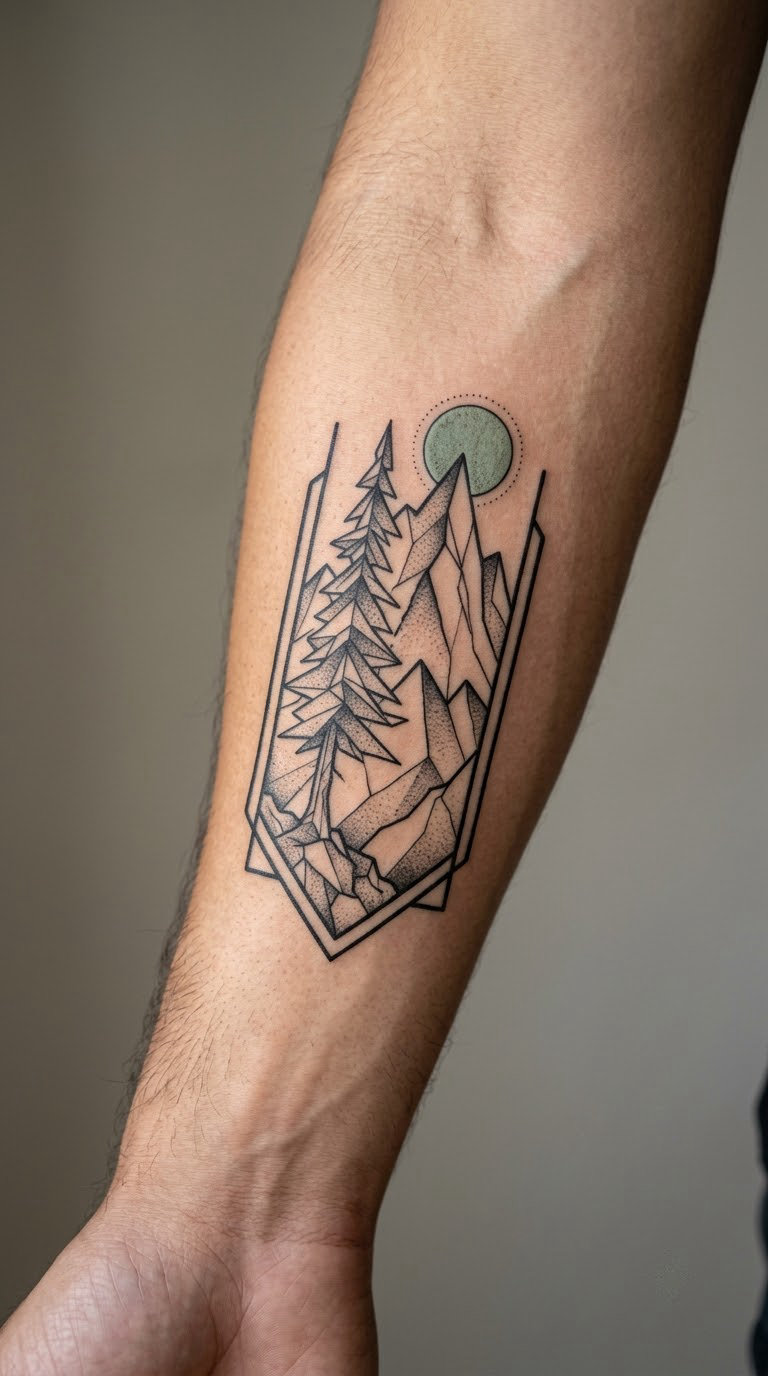
One pine tree stands in the foreground against simplified angular peaks, with a flat circle behind them as sun or moon. Straight lines and hard corners do the background work; the tree is the only organic shape in the piece.
This is the version I would suggest to a first-time client who still wants something with real presence. The shapes are simple enough to heal cleanly and sharp enough to look deliberate.
Placement: Outer forearm, anywhere from elbow to wrist. Size: 3-5 inches (8-13 cm). Style: Geometric nature. Pain: Low-medium, since there is little shading and no large black fill. Hairline geometric lines can thin out with age, so ask for the peak lines at single-needle weight but no thinner. Make it yours: pick the accent colour that matches something you already own, and keep it to one small shape.
6. Misty Pine Forest in Watercolor
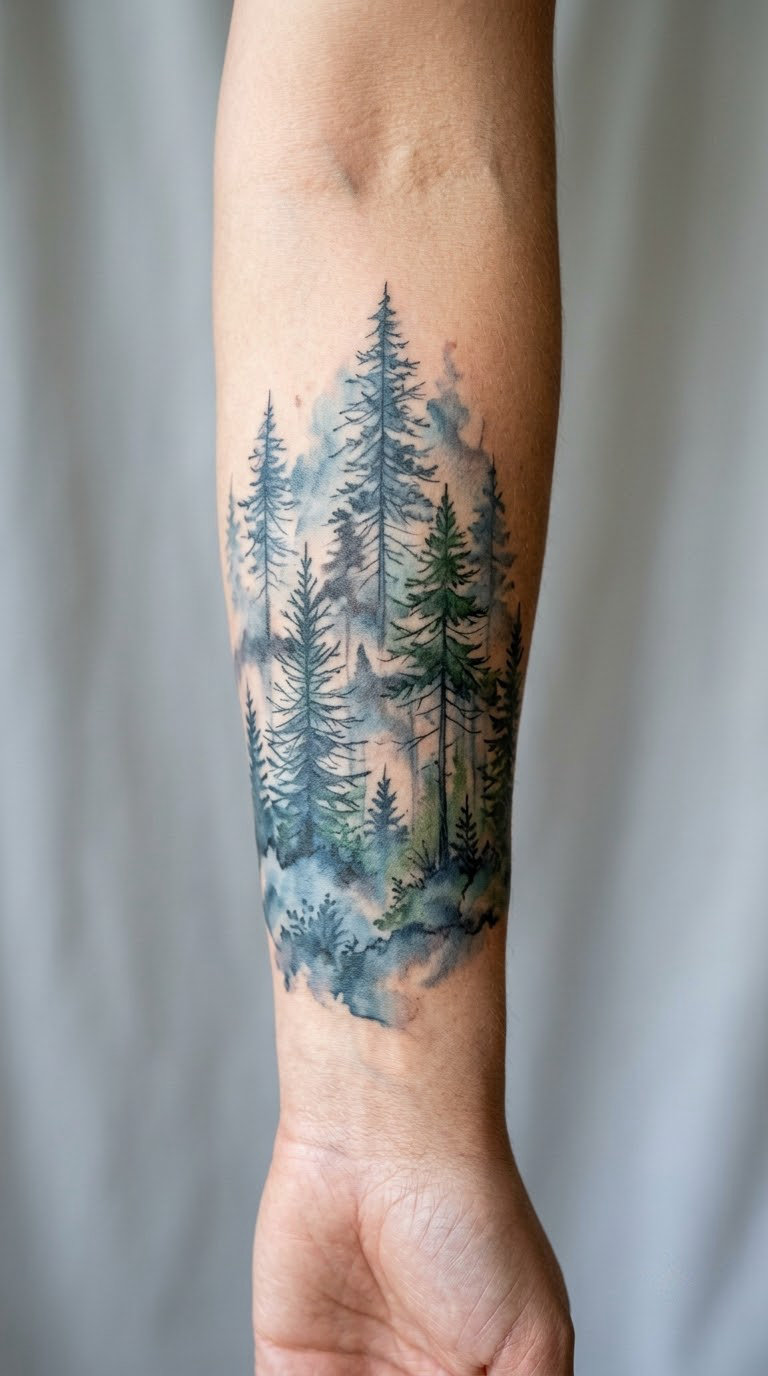
Overlapping translucent pine silhouettes sit in bands of blue-grey wash, with a few loose splashes at the edges and the darkest greens reserved for the nearest trees. Nothing has a hard outline except the closest trunk.
Atmospheric scenes like this are chosen for mood, usually by people who like quiet places. The forearm is one of the harder placements for pale washes, so this is a design with a real trade-off.
Placement: Inner or outer forearm, running lengthwise. Size: 4-6 inches (10-15 cm). Style: Watercolour. Pain: Low-medium. Here is the honest part: light washes fade unevenly on the forearm because the arm is one of the most sun-exposed places a tattoo sits, and the pale bands go first. Make it yours: anchor the design with a solid black trunk or a darker foreground band so something stays readable when the mist fades.
7. Minimal Pine Branch With Needle Clusters
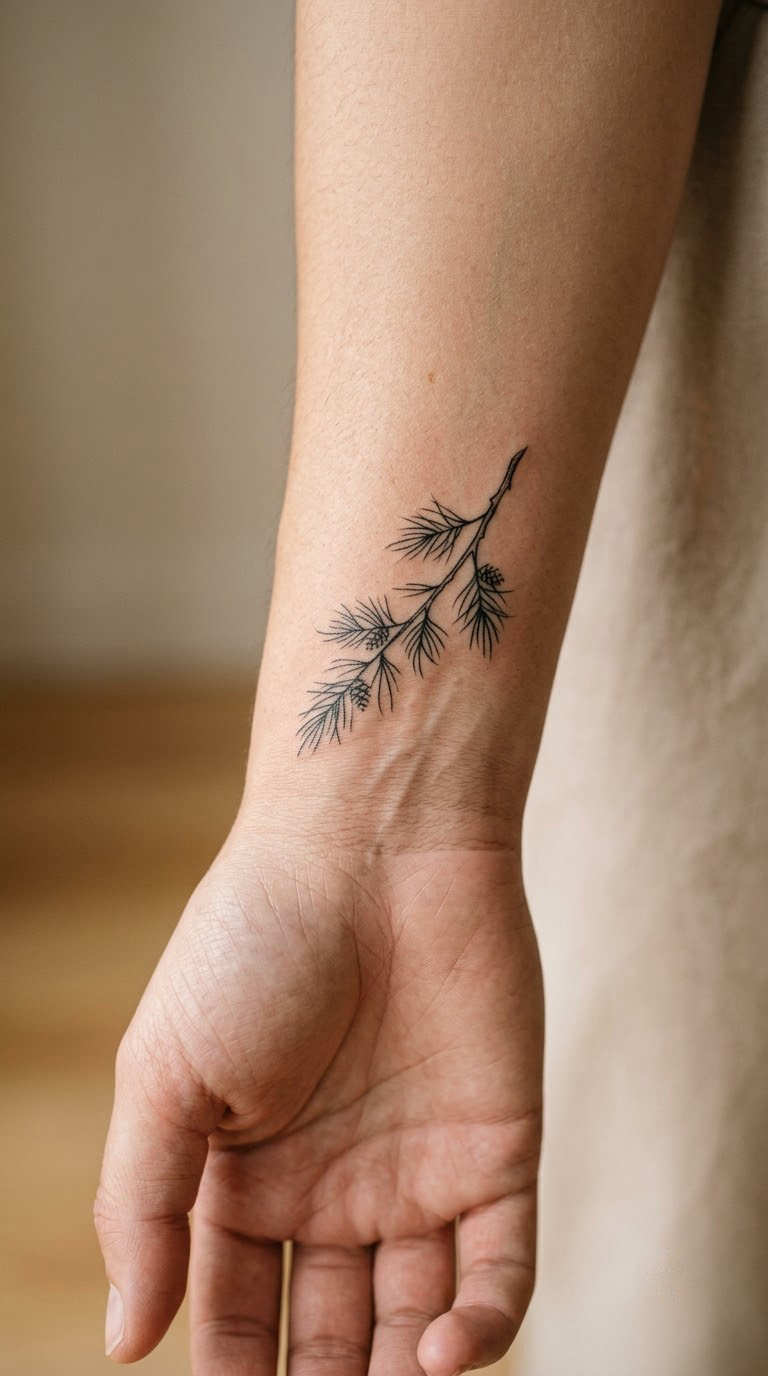
A single curved branch crosses diagonally with three or four balanced needle clusters and a scatter of small dots for texture. There is no trunk, no ground line and no background at all. Restraint is the whole design.
It suits narrow forearm space, small forearms and people who want a nature piece without committing to a scene. It is also the easiest of the twenty to get done in one short sitting.
Placement: Inner wrist or the inside edge of the elbow crease, set on the diagonal. Size: 2-3 inches (5-8 cm). Style: Minimal fine line. Pain: Low-medium, mostly a scratchy feeling. Wrist and elbow crease areas move constantly, so tiny needles can blur and soften faster than they would on the upper arm. Make it yours: add a second matching branch on the other forearm, mirrored rather than identical.
8. Old Cabin Beneath Tall Pines
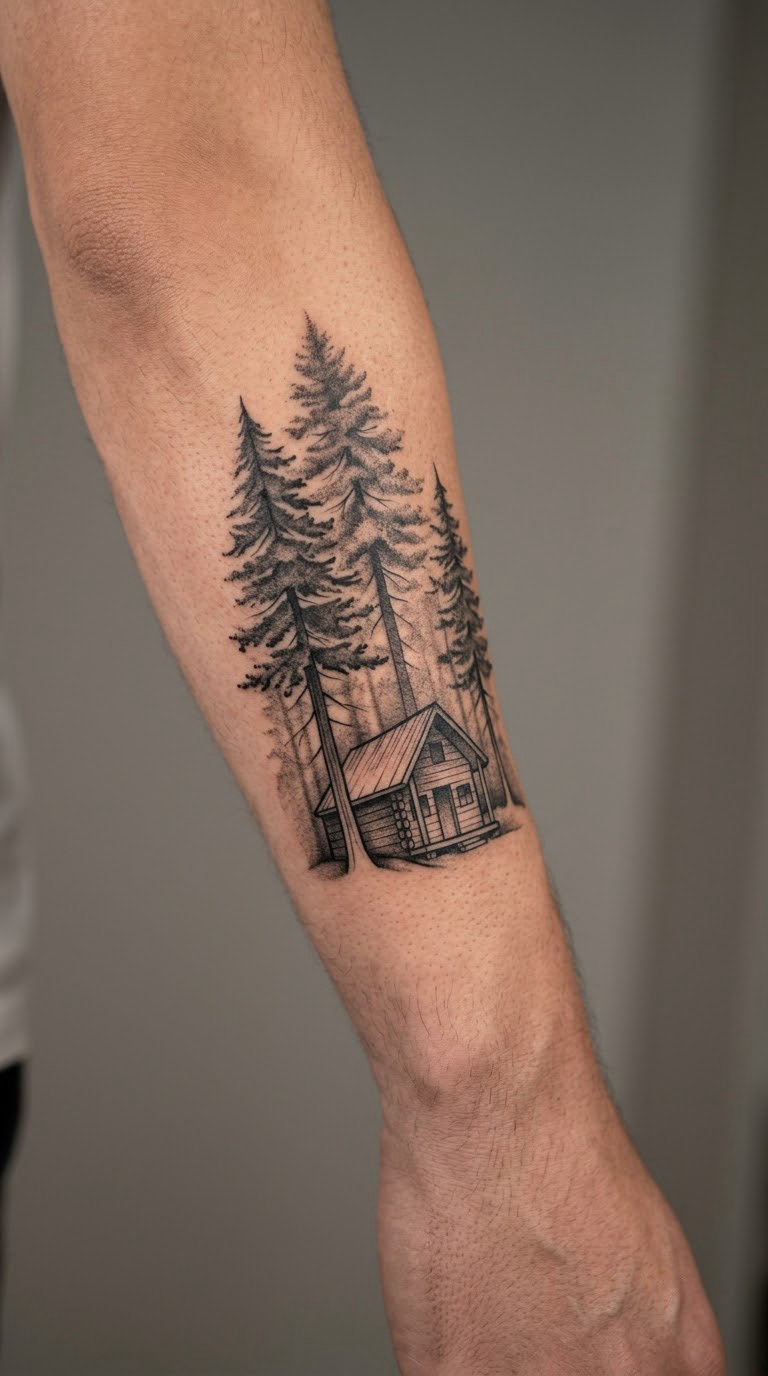
A small cabin with a pitched roof, porch posts and two lit windows sits at the base of tall trunks that rise past the top of the composition. A thread of chimney smoke curves upward through the trees and the background is soft grey wash rather than detail.
People usually pick this one because of a place, a retreat or a hobby rather than a symbol. It reads as somewhere you would rather be.
Placement: Outer forearm panel, which gives the cabin a flat wall of skin to sit on. Size: 4-6 inches (10-15 cm). Style: Illustrative realism. Pain: Medium. Architectural elements are the fragile part here: window panes, porch rails and shingle lines blur faster than the trees behind them. Make it yours: have the artist match the cabin to a real building you know, including the window layout.
9. White Pine Silhouette Tree Line
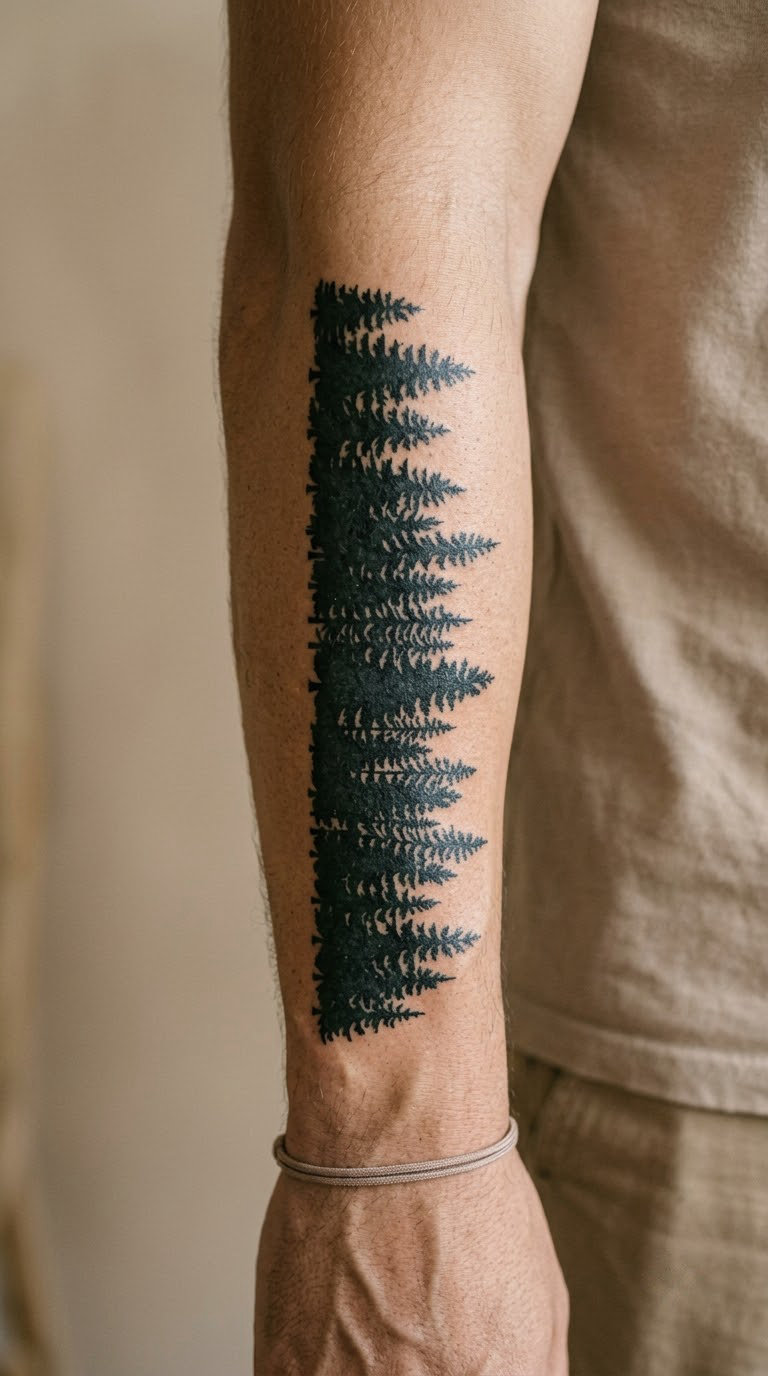
Layered pine silhouettes in flat black sit against completely untouched skin, arranged so the trees step down in size and create a sense of distance. No sky is inked, no ground line is drawn, and the background stays open.
High contrast makes this one legible from across a room, which is why it works so well as part of a growing collection. It also fills an awkward gap between two existing pieces without looking busy.
Placement: Inner or outer forearm, lengthwise from wrist toward elbow. Size: 3-5 inches (8-13 cm). Style: Silhouette blackwork. Pain: Low-medium, because it is mostly silhouette filling. Solid black shapes hold their edges well, so this is one of the better options if you care about how the piece looks in ten years. Make it yours: vary the tree heights to match the shape of your own forearm rather than spacing them evenly.
10. Japanese-Inspired Pine and River Scene
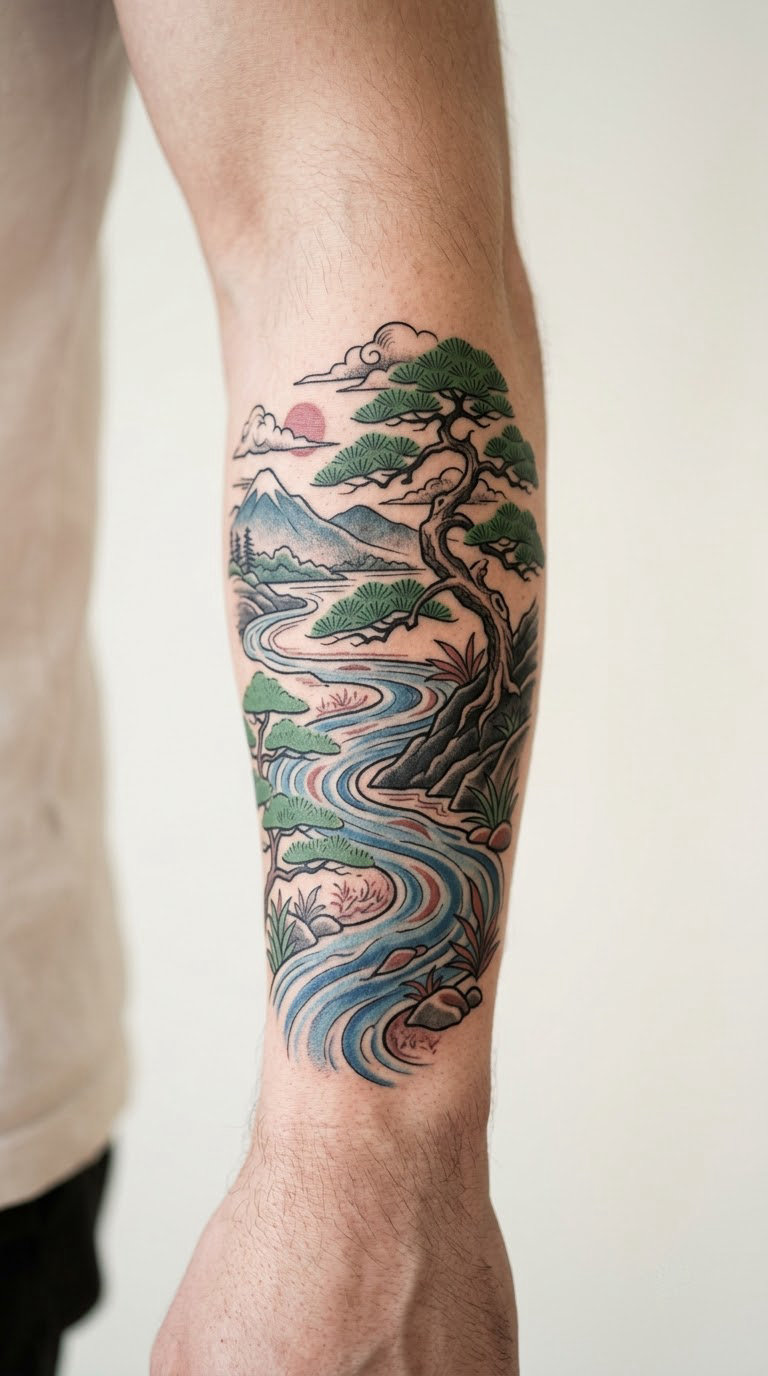
Stylised pine canopies with flattened needle clusters sit above a winding river, with small wave marks and a restrained seasonal palette of green, blue and one muted red accent. Trees are drawn as shapes, not as individual needles.
To be clear, this is a Japanese-inspired approach, not a traditional piece. Ask any artist working this style what their training actually is before booking, and never let anyone tell you a design is authentically traditional unless they can show you the lineage.
Placement: Broad inner-forearm composition, which suits the long horizontal river. Size: 5-8 inches (13-20 cm). Style: Neo-traditional. Pain: Medium, and expect two sessions at this size. Fine internal lines in the needles need a steady hand and they are the first thing to blur. Make it yours: ask for one seasonal accent colour only, so the piece stays quiet rather than busy.
11. Stippled Pine Forest at Dusk
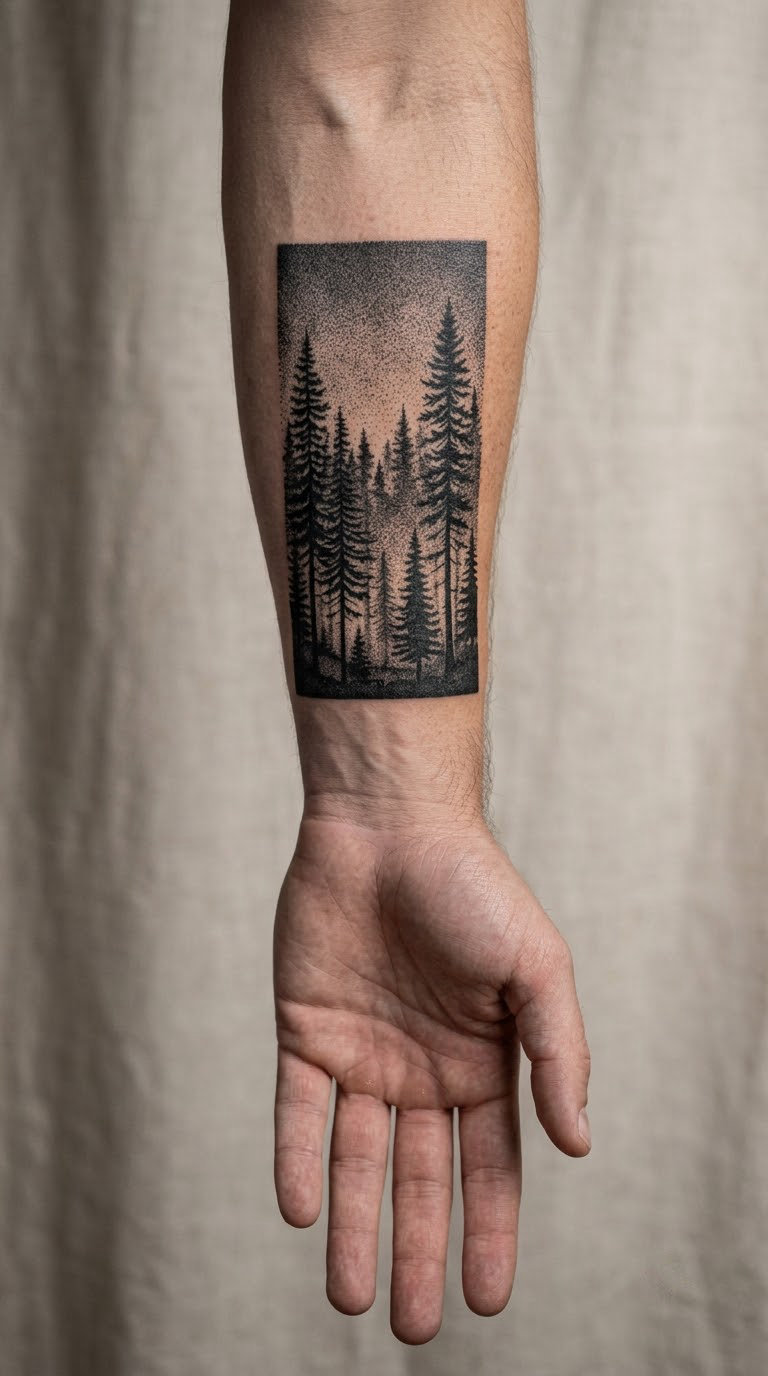
Irregular pine outlines sit in front of a sky built from graduated dot density, densest near the horizon and thinning overhead. The trees themselves are line drawings; the tone comes entirely from the dots behind them.
This is the tonal alternative to a shaded scene. It suits people who want depth and atmosphere but no grey wash at all.
Placement: Outer forearm, where the flatter skin keeps the dot gradient even. Size: 3-5 inches (8-13 cm). Style: Stippling. Pain: Medium, and dot work takes time. Individual dots merge with each other or fade to a grey haze over the years, so ask for slightly bolder dots than look necessary on day one. Make it yours: have the dot density darkest at the wrist end and fading toward the elbow to suggest low evening light.
12. Pine Forest Camouflage Patch
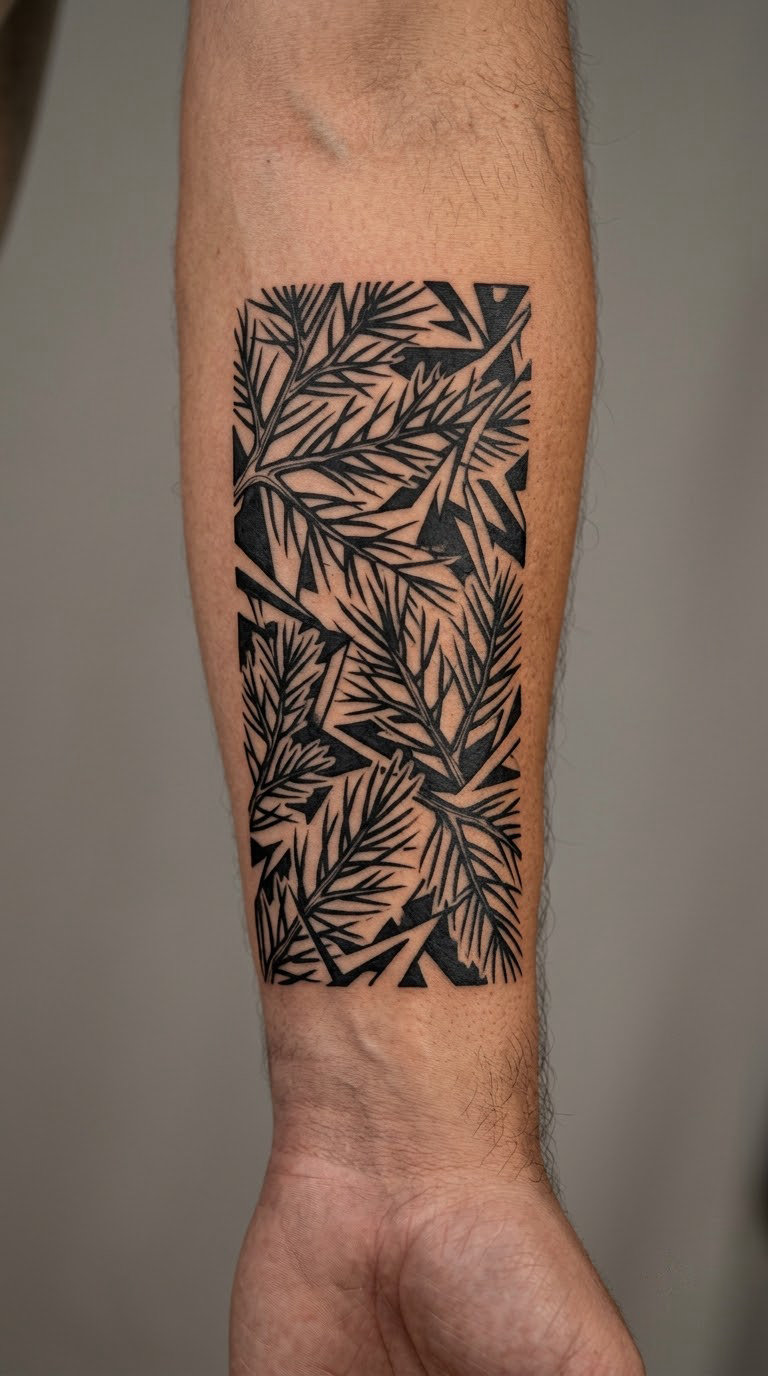
Black pine branches, needle clusters and trunk fragments interlock into a dense field, with angular gaps of bare skin cut through it. The eye should not settle on one tree; it should move across the patch.
People use this as texture rather than as a picture, which makes it a flexible gap filler in a sleeve or an addition to a quiet arm. It carries no fixed symbolism of its own.
Placement: Outer forearm, in a compact block. Size: 3-5 inches (8-13 cm) across. Style: Illustrative blackwork. Pain: Medium-high, since the field has almost no rest areas. The risk is at the joins where two black areas meet; those can blur into one indistinct shape as the piece ages. Make it yours: ask for one deliberate open gap per section, so the negative space keeps the pattern readable.
13. Woodland Path Through the Pines
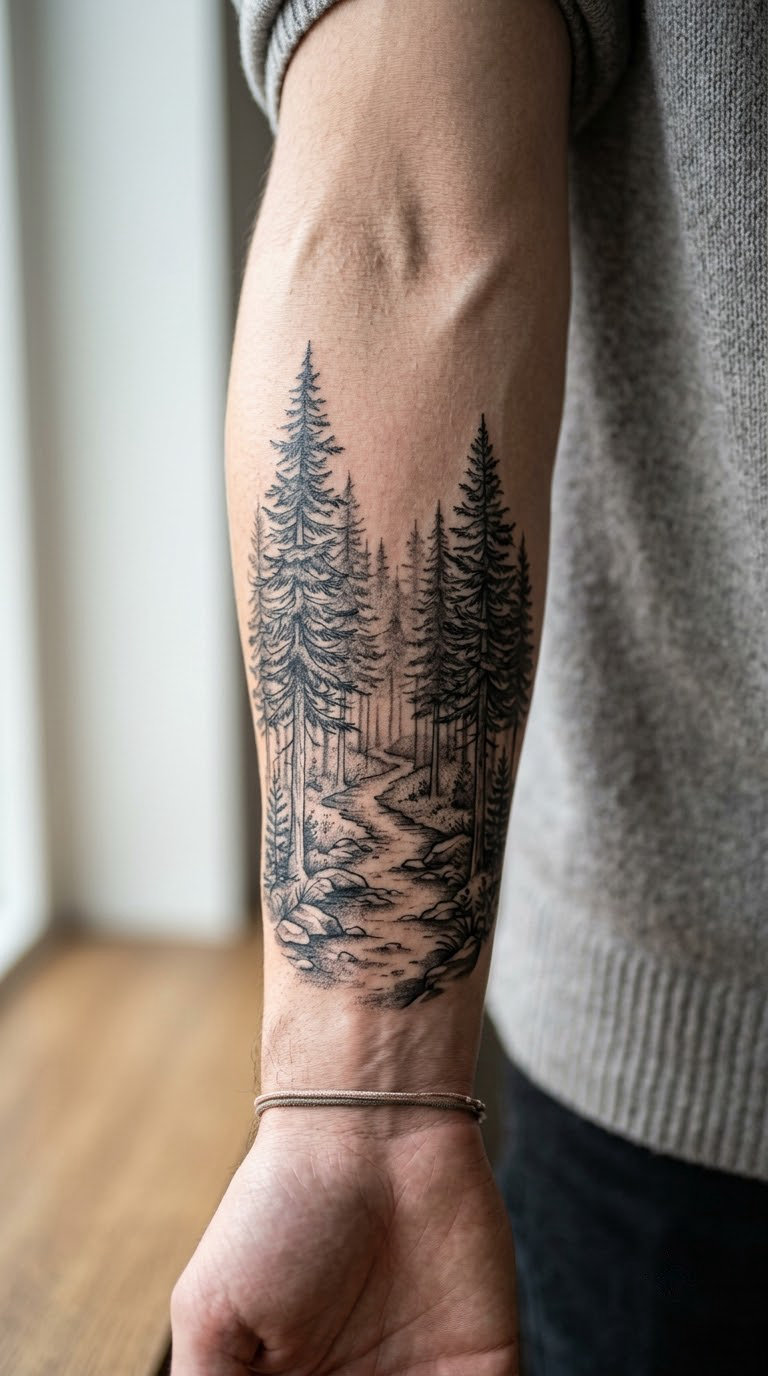
One-point perspective leads from the wrist end toward the elbow along a narrowing path, with pine trees staggered on both sides and shrinking steadily into the distance. A soft mist band sits where the furthest trees meet the sky.
It is the strongest sense of travel in this list, and people often connect it to a specific trip they took. Foreshortening is the whole trick, so check the design on your own arm, not on a flat photo.
Placement: Inner forearm, lengthwise, with the widest part near the wrist. Size: 4-7 inches (10-18 cm). Style: Black and grey realism. Pain: Medium. The distant trees compress into the smallest marks on the arm, and those tiny elements blur first, which can flatten the depth the composition depends on. Make it yours: have the path curve slightly to follow your own arm rather than running dead straight.
14. Pine Tree Constellation
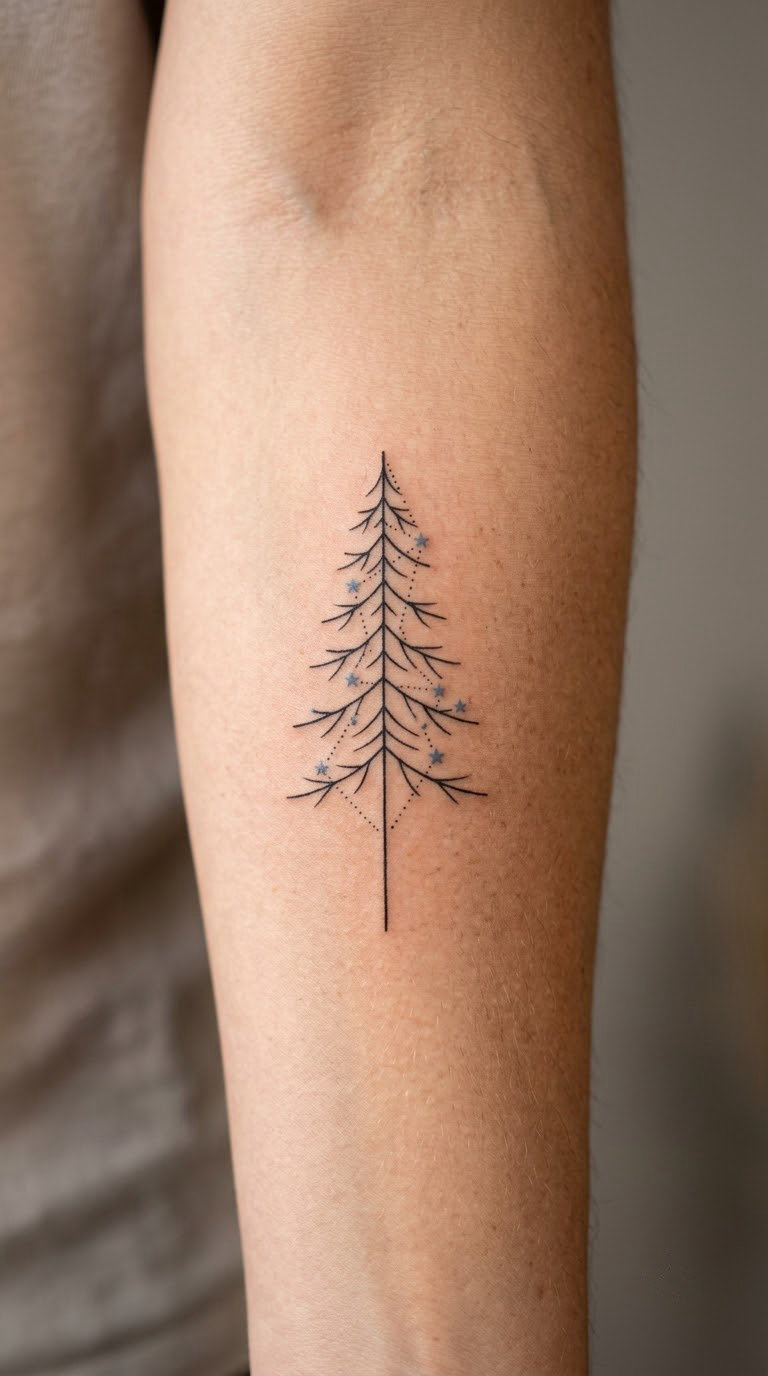
A central fine-line pine connects to a scatter of small stars with delicate dotted lines, and a few stars carry a muted blue or green ink while the tree stays black. The connections are dotted rather than solid so the piece stays airy.
It is a nature and night-sky design at once, and it works well as a companion piece. It suits anyone who wants something quiet that still needs a second look.
Placement: Inner forearm, where a soft curve of stars follows the arm nicely. Size: 2.5-4 inches (6-10 cm). Style: Fine-line celestial. Pain: Low-medium. Pinpoint stars are the fastest-fading element in tattooing, and after a few years they often need reworking or leaving alone. Make it yours: use the star pattern from the night sky on a date that matters to you, with the pine standing in for the ground beneath it.
15. Campfire, Fox and Pine Silhouettes
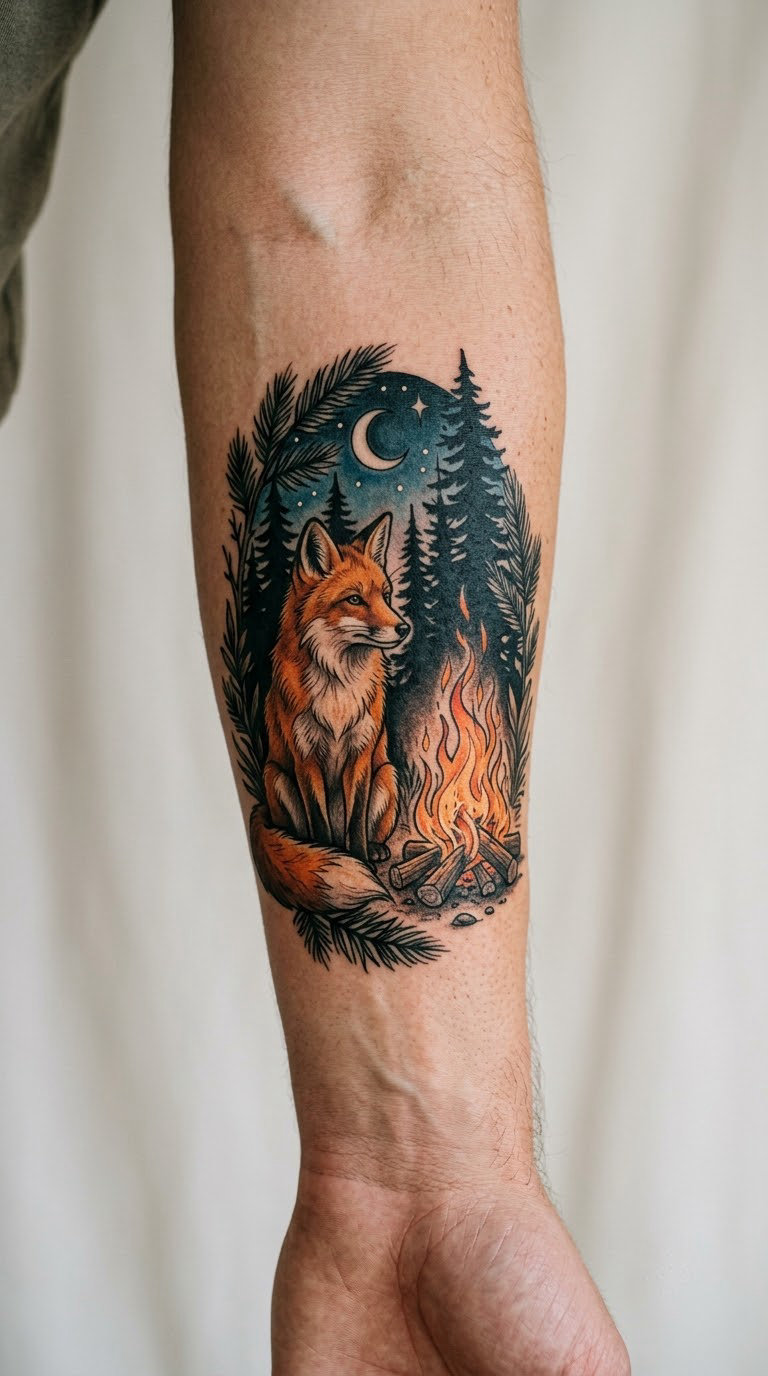
A fox lies curled near a small campfire, with a dark line of pine silhouettes behind and a few embers lifting into the space above. The tree line is flat black; the fox and fire carry all the colour in the piece.
It is a small story rather than a full scene, and people tend to tie it to a place, a person or a stretch of outdoor life. Keep the story personal and it stays yours.
Placement: Outer forearm, with the fire low and the trees rising above it. Size: 4-6 inches (10-15 cm). Style: Illustrative realism. Pain: Medium. Fur texture, whiskers and the thin flame shapes are delicate marks that soften noticeably with sun exposure, so the piece will simplify over time rather than collapse. Make it yours: place the fox curled toward your wrist so it reads differently as your arm moves.
16. Vintage Botanical Pine Study
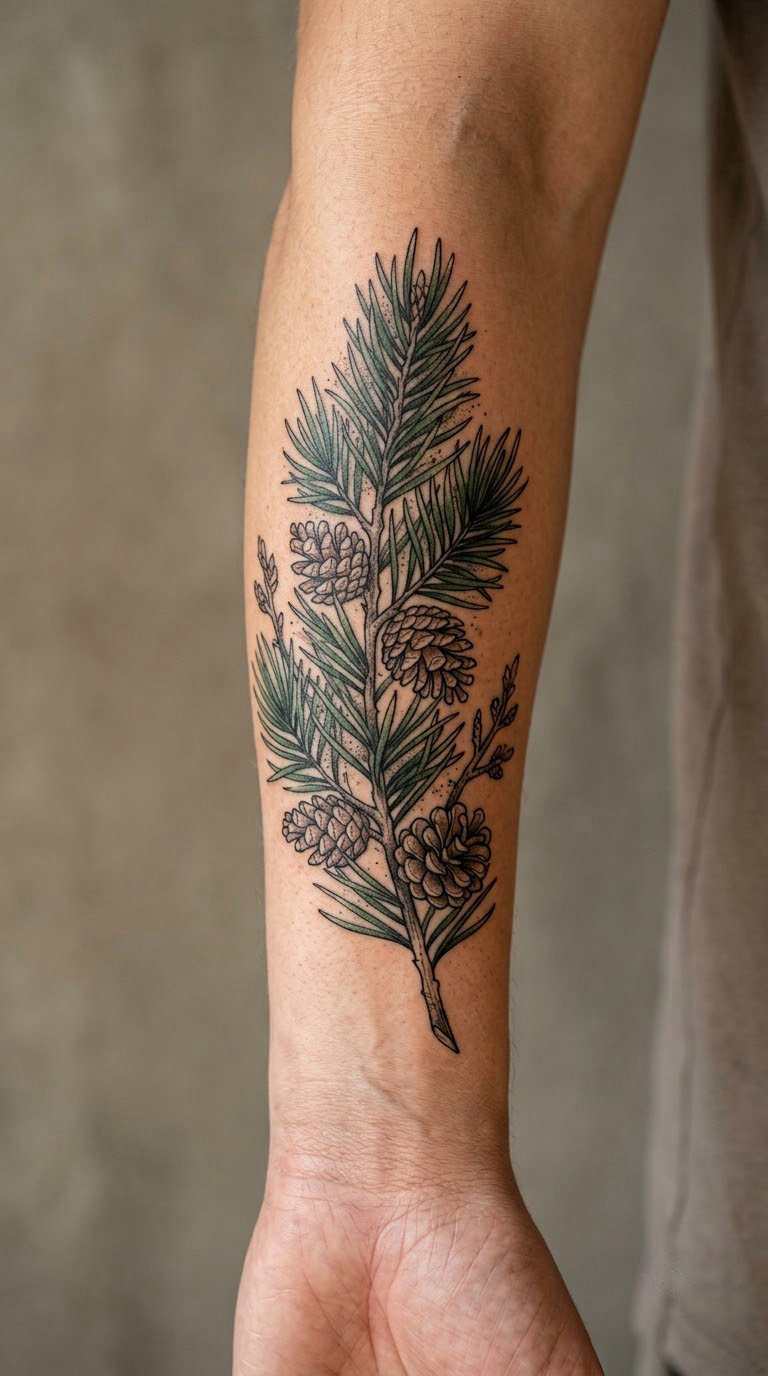
An open botanical plate arrangement shows labelled pine branches, a cross-section of a cone and a scattering of needles, with muted green wash and fine ink outlines in the style of an old field guide.
This is the one for people who draw, read field guides or collect old books. It looks studied and specific in a way the other nineteen do not.
Placement: Inner or outer forearm, arranged vertically like a plate. Size: 3-5 inches (8-13 cm). Style: Vintage botanical. Pain: Low-medium. Tiny lettering is the piece’s weak point; handwritten labels lose their edges within a few years and can end up looking like smudges. Make it yours: have the labels use a Latin name you actually care about, or leave the text out entirely and keep the arrangement clean.
17. Monoline Pine Forest Panel
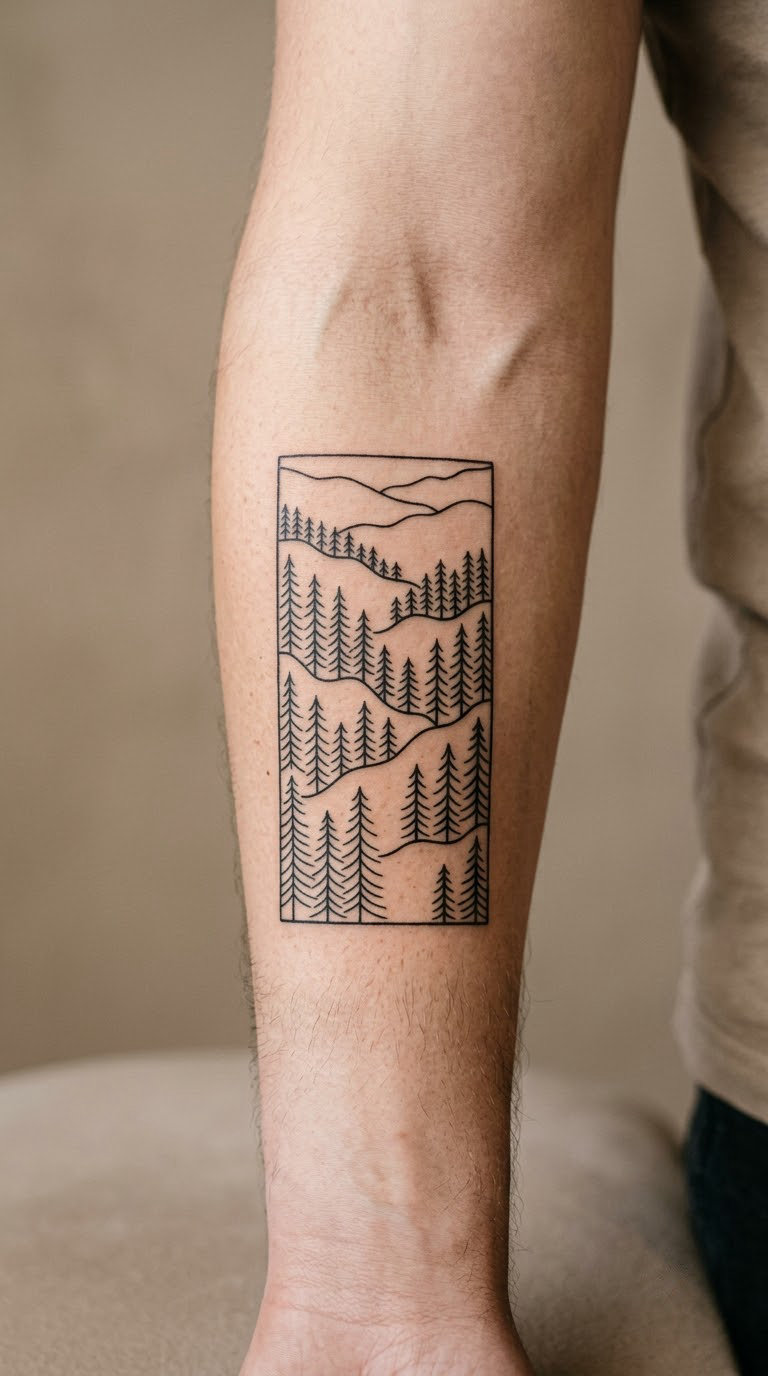
A single unbroken line travels through pines, rolling ground and a low horizon, looping back on itself so the whole forest is one continuous path. There is no shading anywhere, only the outline.
This is the modern alternative to dense blackwork: the same subject, far less ink, and a piece that suits someone who likes clean and graphic work. It also heals quickly because there is so little saturation.
Placement: Inner forearm, placed vertically. Size: 3-5 inches (8-13 cm). Style: Monoline. Pain: Low-medium, and usually the shortest session of the realistic styles. Be honest about retention: ultra-thin monoline lines spread and blur faster than any other style in this list, so this is a piece that changes visibly over five to ten years. Make it yours: plan the line’s route on paper first, then let the artist mirror it to fit the curve of your arm.
18. Black and Grey Storm Over a Pine Ridge
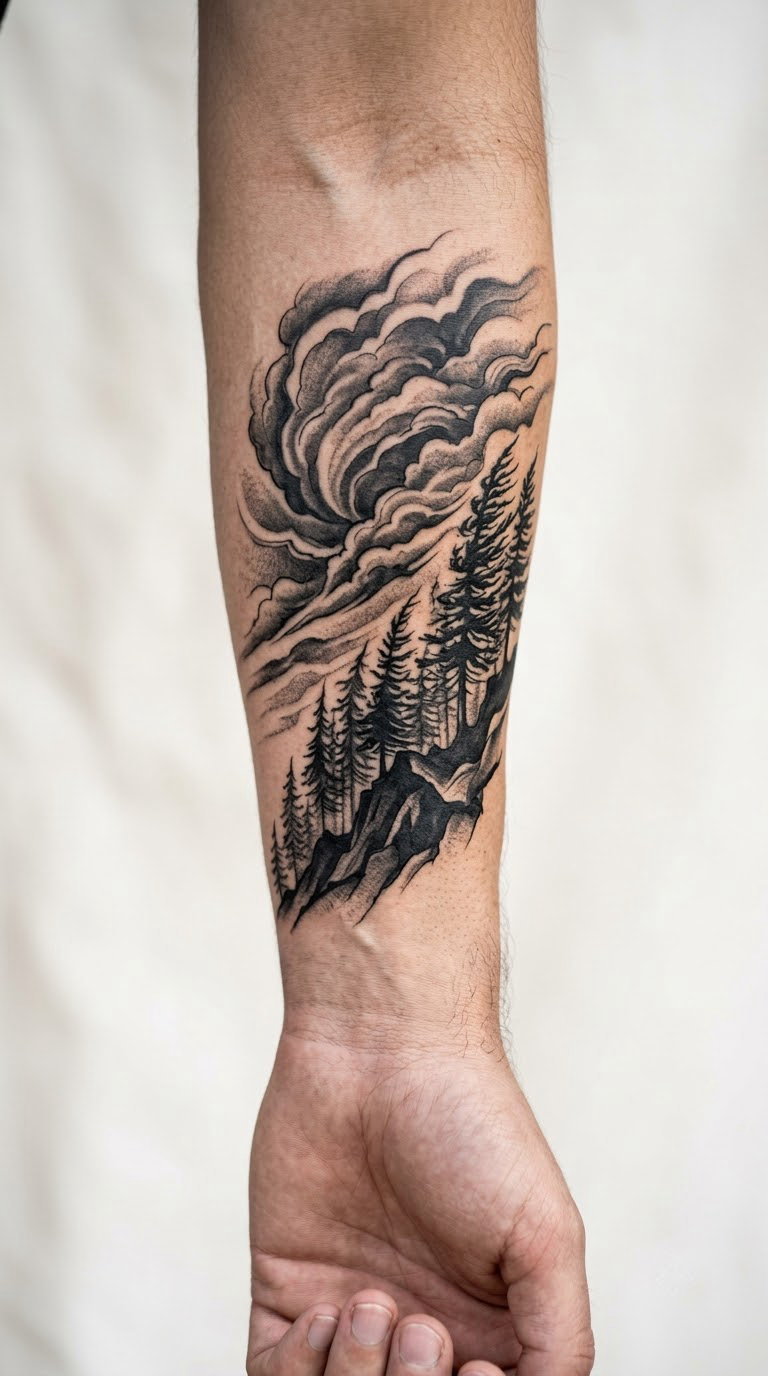
Dark cloud masses stack across the top of the composition while wind-shaped pines lean along a ridge line, with one lighter band at the horizon to stop the whole thing going flat. The contrast between the light gap and the heavy sky is the point of the design.
It suits people who are drawn to moody scenery rather than calm scenery. Nothing about it is symbolic; the appeal is tonal.
Placement: Outer forearm, wide enough to hold the cloud layers. Size: 5-8 inches (13-20 cm). Style: Black and grey realism. Pain: Medium-high; large shaded areas take the most time of any style here and usually need a second session. Soft cloud gradients are the first thing to flatten out, so expect the horizon band to become the defining feature. Make it yours: angle the ridge line to match the natural curve from your elbow to your wrist.
19. Folk-Art Pine Forest With Bold Colour
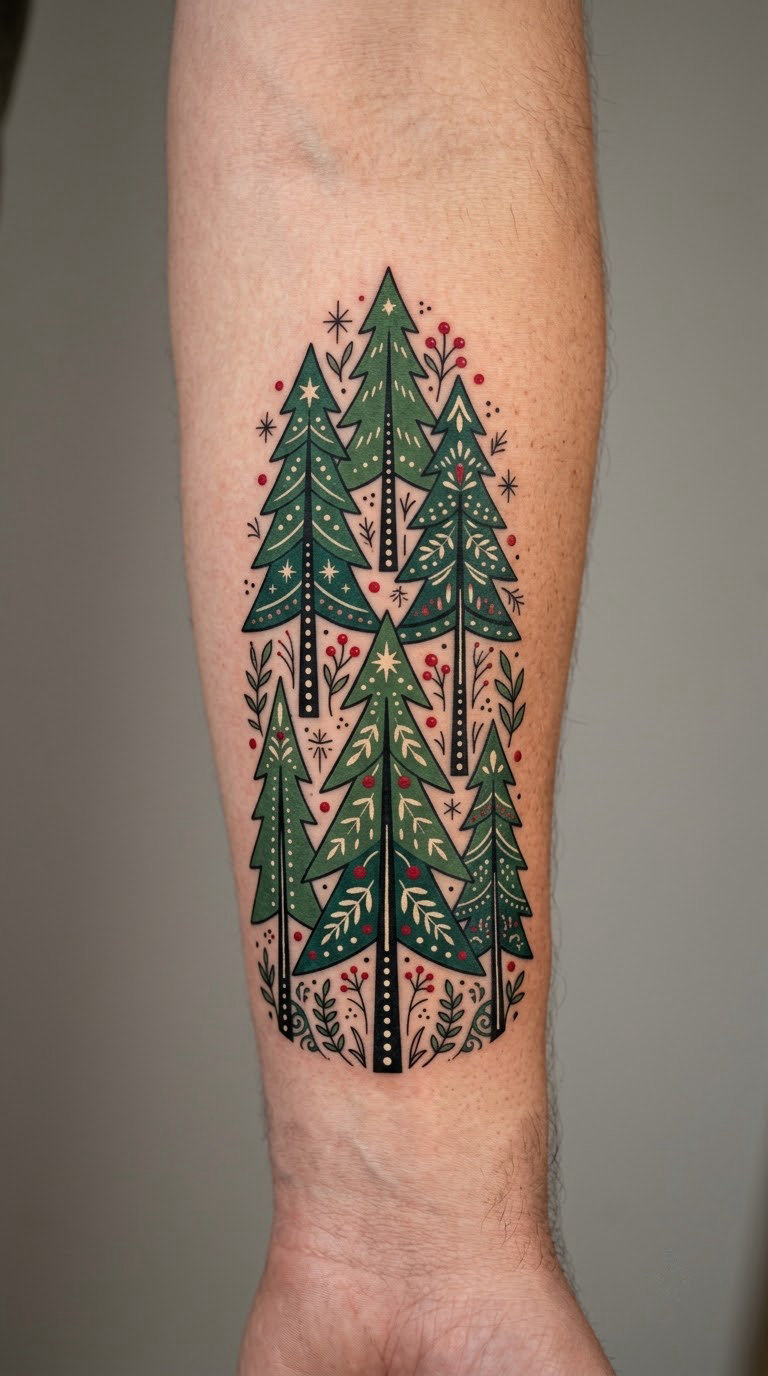
Flat evergreen shapes stack in simple tiers with red and cream accents, decorative dots and a symmetrical frame that echoes traditional folk ornament. The colour is confident and opaque, not blended.
This is the expressive option in the list. It gives you a design that does not look like every other forest piece out there, and it is a good conversation piece at a family gathering.
Placement: Inner or outer forearm. Size: 3-5 inches (8-13 cm). Style: Contemporary folk. Pain: Low-medium; flat colour and bold outlines are quicker than shading. Small decorative dots and thin cream details lose definition first on the sun-exposed forearm, so keep those marks as large as you can. Make it yours: pick two colours and stick to them, then let the artist handle the ornament spacing.
20. Full Forearm Pine Forest Scene
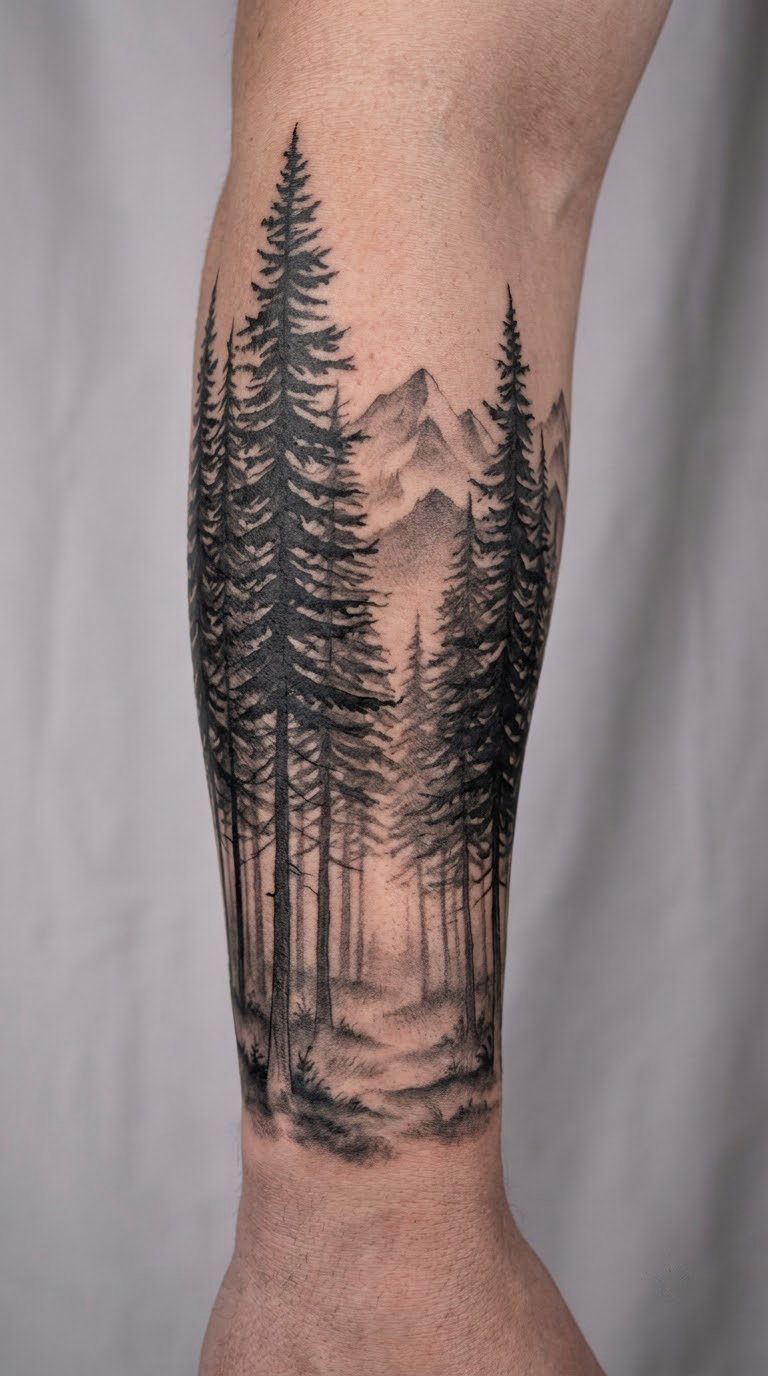
A large scene layers foreground trunks, a midground stand of trees, distant peaks and either a shaft of light or a bank of fog across the forest floor. Open skin between the layers keeps the depth readable at arm’s length.
This is a dedicated project, not a quick piece. It suits someone with a forearm that can carry the scale and an artist relationship worth committing to over several sessions.
Placement: Most or all of the forearm, from wrist to elbow and around the upper forearm if you want a full wrap. Size: 7-12 inches (18-30 cm). Style: Black and grey realism. Pain: Medium-high, spread over several sessions with breaks. At this scale, ask the artist to simplify detail now rather than have it blur later; what is removed at the drawing stage is what you keep legible. Make it yours: agree the fog and light pattern before session one, because that is the decision that shapes the whole composition.
How to Choose the Right Design
Most people choose a forest scene because they like it, then discover the forearm shape was never considered. Sorting out a few practical points before the consultation saves both time and money.
- Pick the style first, then the picture. A fine-line forest and a blackwork forest are different commitments. Fine line suits small, personal pieces; blackwork suits bold, permanent-looking shapes.
- Measure the real space available. Measure from your wrist crease to the inside of your elbow, then plan a design roughly two-thirds of that length so it does not crowd the joints.
- Match the shape to the anatomy. Vertical designs follow the taper of the arm. Horizontal scenes like a river or a wide band need the flat outer forearm or they will bow when you bend your arm.
- Check what is already there. An existing forearm tattoo, or a scar, changes the design. Show your artist the whole arm, including older work, before the stencil is placed.
- Think about sun, honestly. The forearm is the most exposed tattoo placement there is. Solids and silhouettes fade more slowly than stippling, needle work and pale washes.
- Prioritise the consultation. A fifteen-minute conversation about scale, orientation and ageing will do more for the result than another twenty screenshots.
Cost and Session Time
Ranges below are typical US pricing for a custom forearm piece, and they vary widely by city, artist and shop minimum. Expect a small piece in the low hundreds, a mid-size detailed scene in the mid to high hundreds, and a large wraparound project running into the low thousands or beyond. Most studios charge by the hour, with a minimum that covers the first sitting.
In time terms, a two or three inch piece usually takes one short session. A four to seven inch realistic scene runs two to three hours, and anything past that is almost always split across sessions with a break between each one. A full forearm scene typically needs three or more.
When you compare quotes, check what is included: stencil placement, the design fee, the hourly rate, and whether touch-ups within the first year are on the house. A high hourly rate with no minimum can cost less than a cheap shop that bills three hours for a design that needed two.
Aftercare Basics
Whatever your artist tells you at the end of the appointment takes priority over anything on this page. Most of this is standard, but follow their instructions first.
- Follow your artist’s aftercare instructions before anything else on this list, including what they tell you to wash with and how long to keep the area covered.
- Wash gently with lukewarm water and unscented soap, then pat dry with clean hands rather than a rough towel.
- Protect the area from sun for the whole healing period and after it, because the forearm gets exposed constantly. Sleeves rolled past the elbow are the main reason forearm ink fades early.
- Wear loose, soft clothing over the healing area, especially at night when sleepwear presses against fresh work.
- Moisturise with whatever your artist recommends, in thin layers, and change the covering daily if you were told to keep it wrapped.
- Contact your artist if the redness, swelling or itching lasts much longer than the healing timeline they gave you, and speak to a qualified clinician if the area becomes hot, painful or shows spreading marks.
Frequently Asked Questions
Are pine forest tattoos better on the inner or outer forearm?
The inner forearm shows fine detail and reads well when your arm rests on a table, but it bends, rubs against clothing and takes more sun damage than most placements. The outer forearm gives you a broader, flatter canvas, which suits wide scenes and wrapping bands, and it usually ages better. Choose the inner forearm for a small fine-line piece and the outer forearm for anything detailed or landscape-scale.
How big should a pine forest tattoo be on the forearm?
A single pine or branch fits comfortably within 2 to 4 inches, and most detailed scenes work best between 4 and 7 inches. A wraparound forest needs roughly 7 to 12 inches of design span. Measure from your wrist crease to the inside of your elbow first, then plan a design at about two-thirds of that length so it does not crowd the joints.
Does a detailed pine forest tattoo hurt a lot?
Pain depends far more on placement, skin sensitivity and session length than on the subject itself. The fleshy inner forearm usually feels like a moderate, sustained ache, while the outer forearm near the elbow bone can feel sharper and more sensitive. Long sessions on one area get worse toward the end, so a larger scene split across two sittings is genuinely more comfortable.
Will fine pine needles and small forest details fade?
Fine needles, tiny stars, lettering and pale stippling soften sooner than broad black shapes, because the ink sits in very small areas of skin. Inner-forearm tattoos also face more rubbing and more sunlight. If crisp detail matters to you, choose a design with strong silhouettes and solid black areas, and ask your artist about touch-ups before you book.
Is a forest scene a good choice for a first tattoo?
A forest scene can be an excellent first tattoo, but only at a smaller scale. Options one, five, seven and fourteen in this list are all compact, clear and heal quickly. Start there, and let a large wraparound landscape wait until you already know how your skin handles ink and how you feel about a permanent piece at that scale.
Conclusion: Choose Your First Pine Forest Piece
If this is your first tattoo, the fine-line pine forest along the inner forearm is the safest bet: small, quiet, quick to heal and easy to place. If you already have work on the arm and want a statement piece, the full forearm scene rewards patience and a good artist relationship.
Before booking, settle three things: the composition, the real measured size, and whether the artist actually draws in the style you want. Take your measurements, bring the two or three references you like most, and let the consultation settle the rest.