
20 Best Upper Back Tattoo Ideas for Men (September 2026)
The best upper back tattoo ideas for men come down to three things: a design that matches the flat, generous canvas between your neck and your lower shoulder blades, a placement that works with how your shoulders move, and an artist whose healed work looks like the style you want. Pick any one of the twenty below and you can walk into a consultation with a real reference in hand.
That last point matters more than people expect. The back is the one large area you will never see properly, so a photograph on a screen is doing all the work. This guide gives you twenty distinct concepts, each with a size range, a placement, an honest pain note, and the question to ask your artist before you commit. Plan your appointment a few weeks out, not the night before, so the stencil can be checked in daylight and a mirror.
Quick Guide: Every Idea at a Glance
| Idea | Style | Best placement | Size (inches / cm) | Pain |
|---|---|---|---|---|
| Fine-line spine line | Minimalist | Centered on the spine, nape to scapulae | 8-12 in / 20-30 cm long | Medium |
| Koi pair | Japanese | Upper back, one each scapula | 10-14 in each / 25-35 cm | Medium |
| Mandala | Geometric | Centered between the shoulder blades | 8-12 in wide / 20-30 cm | Medium |
| Spread-wing eagle | Traditional American | High upper back, wings across the shoulders | 16-20 in wingspan / 40-50 cm | Medium-high |
| Panther head | Neo-traditional | One shoulder blade, angled | 8-10 in / 20-25 cm | Medium-high |
| Mountain range | Fine line | Across the shoulder blades, horizontal | 10-16 in wide / 25-40 cm | Medium |
| Rose and snake | Black and grey realism | Diagonal from scapula to flank | 10-14 in / 25-35 cm | Medium-high |
| Compass rose | Traditional | Centered low on the upper back | 5-7 in / 13-18 cm | Medium |
| Celtic knot panel | Blackwork | Centered, spine through the middle | 9-13 in / 23-33 cm | Medium-high |
| Phoenix rising | Illustrative | Lower shoulder blade, feathers up | 12-16 in tall / 30-40 cm | Medium-high |
| Sun and moon mirror pair | Fine line | One on each scapula | 4-5 in each / 10-13 cm | Medium |
| Vine wrap | Botanical | Shoulder to spine on one side | 8-12 in long / 20-30 cm | Medium |
| Hourglass with birds | Neo-traditional | Centered, slightly left of the spine | 7-9 in / 18-23 cm | Medium-high |
| Roman numerals | Script | Spine, running downward | 6-9 in / 15-23 cm | Medium |
| Howling wolf | Dotwork | One shoulder blade, facing outward | 6-8 in / 15-20 cm | Medium |
| Stained glass cross | Geometric color | Between the scapulae | 9-12 in / 23-30 cm | Medium |
| Chess pair | Blackwork | Split down the spine, king and queen | 7-10 in each / 18-25 cm | Medium-high |
| Pine forest gradient | Blackwork | Full upper back panel | 16-20 in wide / 40-50 cm | Medium-high |
| Single koi | Japanese | Diagonal across the upper back | 14-18 in / 35-45 cm | Medium-high |
| Gladiator helmet | Micro-realism | Centered, upper thoracic spine | 8-11 in / 20-28 cm | Medium-high |
1. Fine-Line Spine Line From Neck to Shoulder Blades
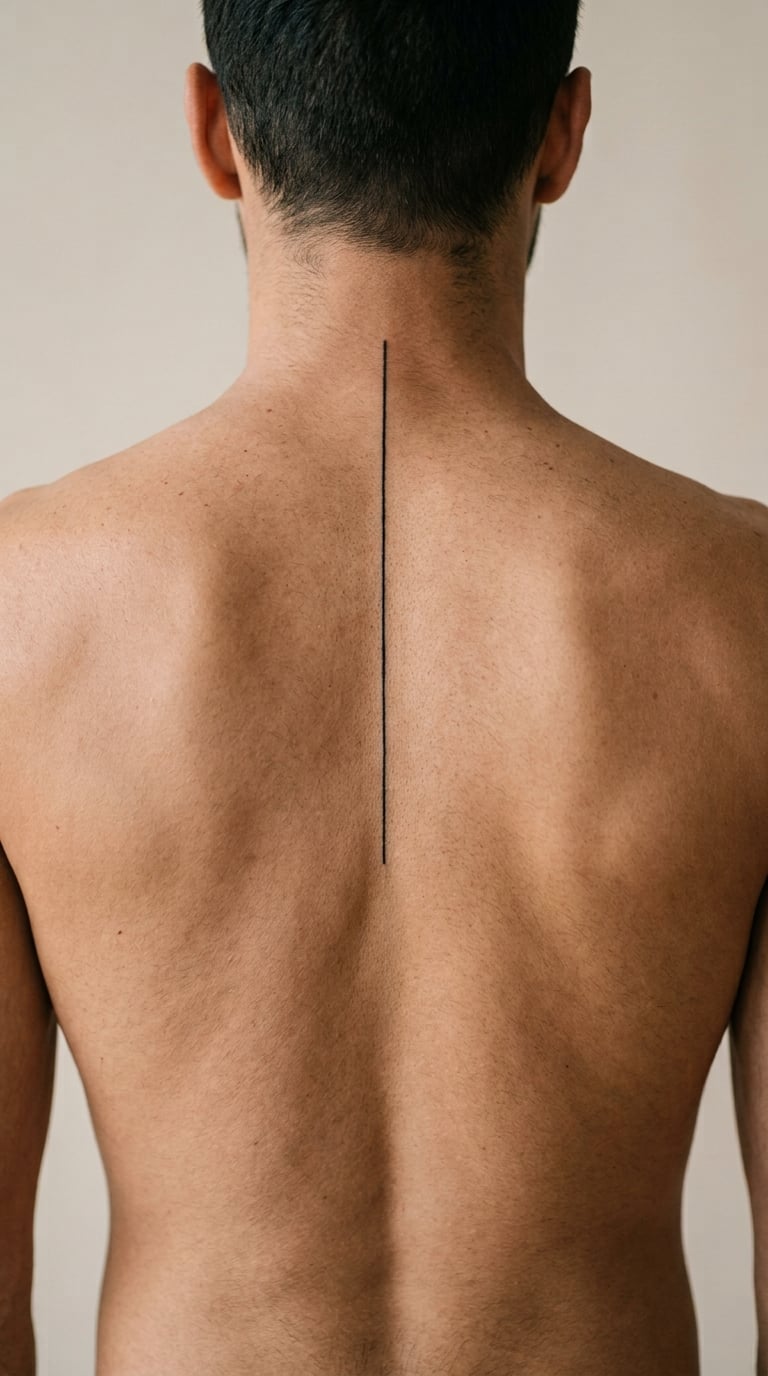
The drawing is almost anticlimactic in a good way: a single unbroken line, one weight throughout, no shading and no fill. A few artists taper the very top near the nape or add a hairline arrow detail at one end, which gives the eye somewhere to land without crowding the line.
People choose it because it is the one large-looking back tattoo that does not announce itself. It often marks something specific, a stretch of years or a place, and stays legible under a collared shirt.
Placement: Centered on the spine, roughly from the base of the neck down to the level of the lower scapulae. Size: 8-12 inches (20-30 cm) long, a line thin enough to disappear at more than arm’s length. Style: Fine line, single-needle. Pain: Medium. The upper spine near the nape is the sharpest part, and you feel every pass. Honest ageing note: line weight thins noticeably over five to eight years, and any fine work on the hands or fingers blurs fastest, so ask about a slightly heavier pass than you think you need.
Make it yours: Set the length to a distance you can picture, like the drive between your house and somewhere that matters, and ask for the date underneath in the same line weight.
2. Koi Pair, One Fish Over Each Shoulder Blade
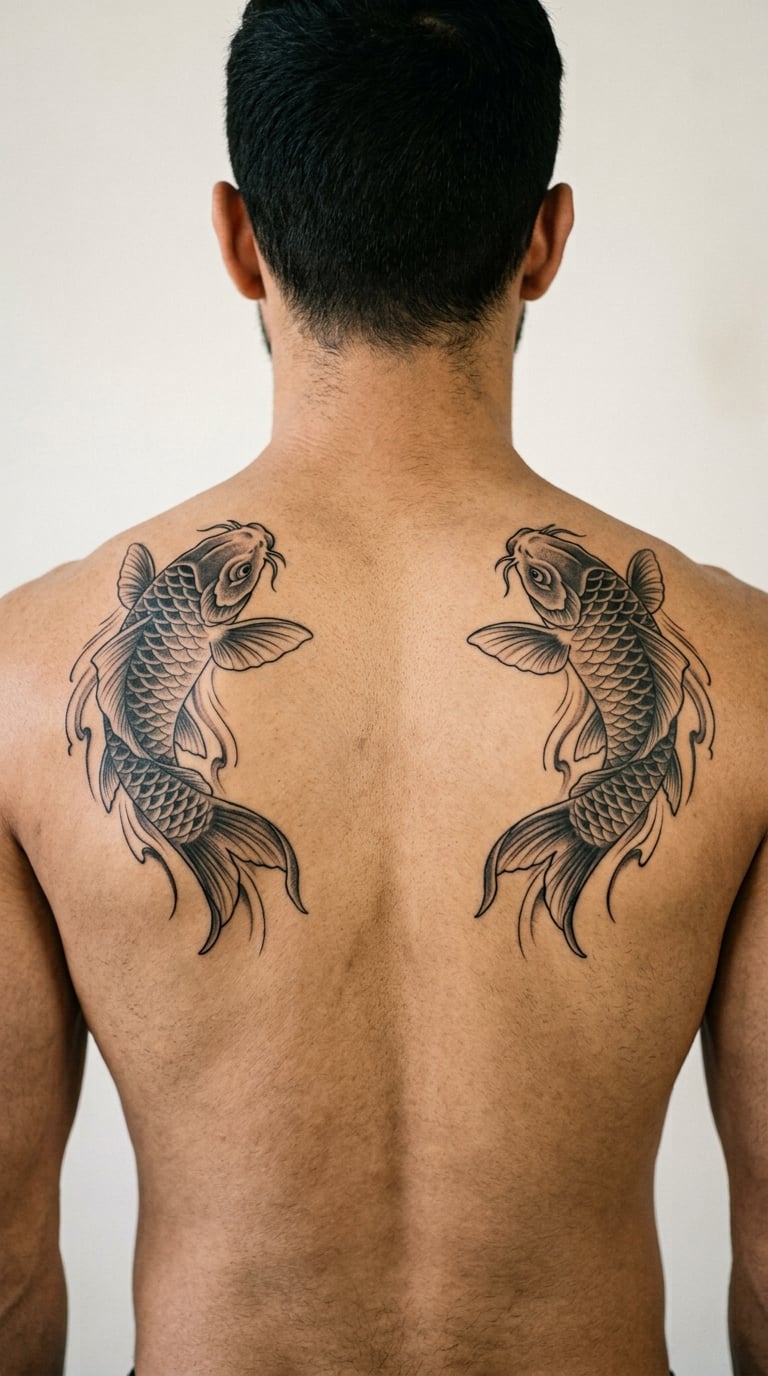
Two koi, nose to tail, curving away from each other so the bodies frame the spine. The classic version is black and grey with scale work and soft petal shading on the fins; a bolder take adds one spot of orange or red behind the gill as the only color.
Koi are usually about persistence and the fact that they keep moving upstream. A pair reads as a partnership or matched set, which is why this lands often for a partner piece.
Placement: One fish per scapula, heads angled toward the neck. Size: 10-14 inches (25-35 cm) each, so the pair spans most of the upper back. Style: Japanese or traditional realism. Pain: Medium to medium-high. The inner edges near the spine are sensitive, and the fins that reach toward the shoulder feel the movement of the shoulder blade under the skin.
Make it yours: Put a small kanji or single character on the inner flank of each fish, one character per fish, and let the artist size the characters to the belly of the fish.
3. Geometric Mandala Centered Between the Shoulder Blades
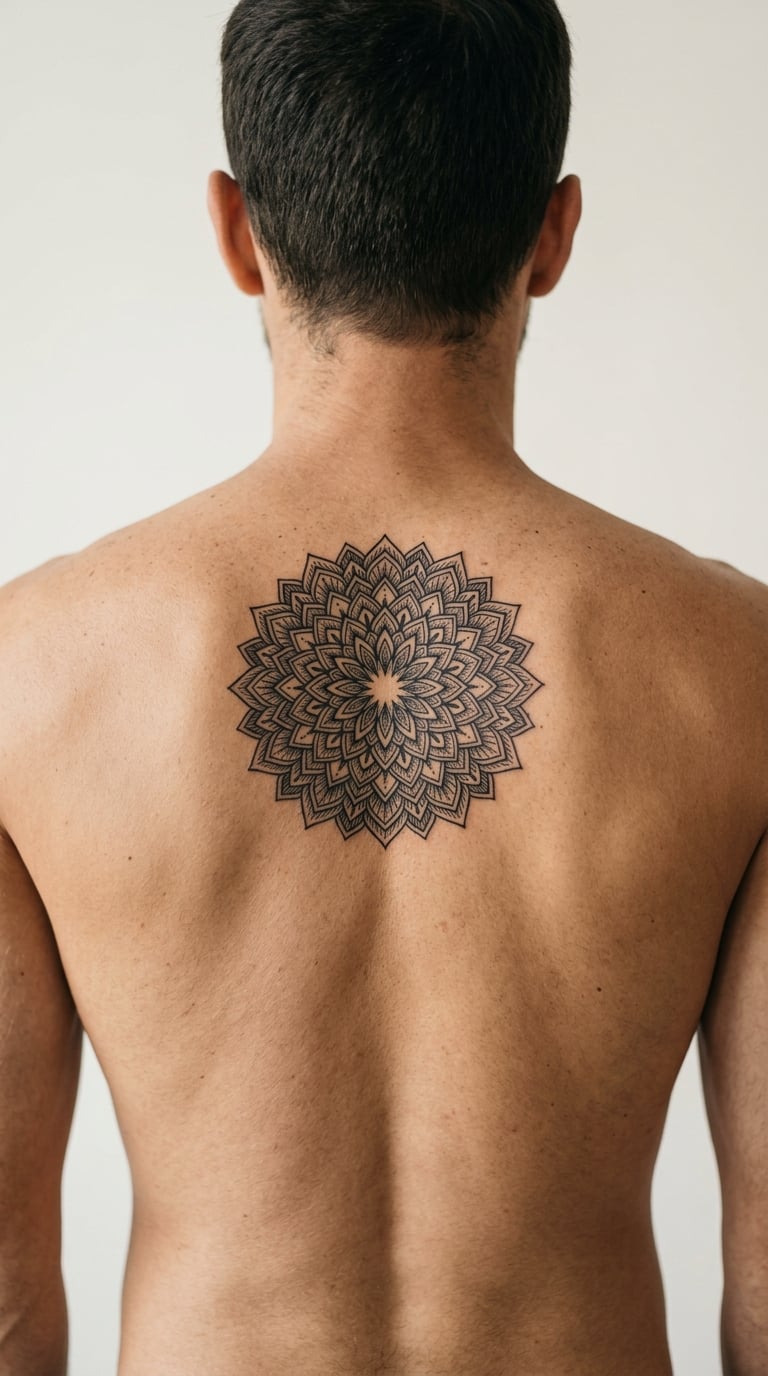
A mandala here means a radial pattern built from repeated geometry: petal shapes, interlocking triangles, dotted rings, or thin rays, all built outward from one center point. Fine line and dotwork versions stay light and airy; heavier blackwork versions fill the negative space and read as one solid shape from across a room.
It is a popular first large piece because symmetry hides small imperfections, and the geometry is forgiving. You are choosing a shape language, not a specific subject, so there is very little for a tattooer to get wrong.
Placement: Dead center between the shoulder blades, with the true center a finger’s width above the spine’s midpoint. Size: 8-12 inches (20-30 cm) wide. Style: Geometric, dotwork or blackwork mandala. Pain: Medium. Steady and even, because there is no heavy packing. Dense blackwork versions run hotter because the artist is layering solid ink in one spot.
Make it yours: Build the outer ring from a date broken into digits, or keep the center empty as negative space and let your existing lower back piece show through later.
4. Traditional American Eagle With Banner
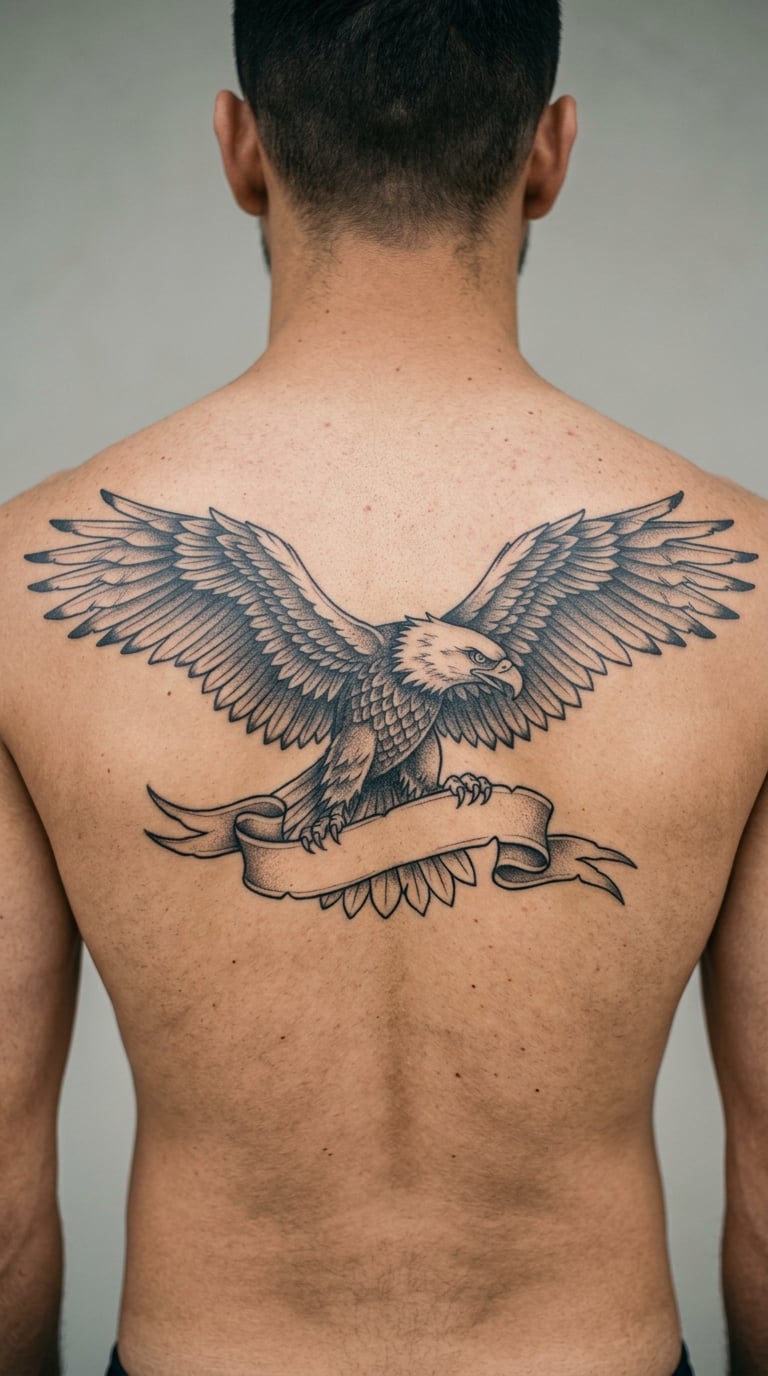
Eagle designs come down from flash sheets: a head in three-quarter profile, wings spread and layered, talons forward, often with a banner hanging beneath and a halo of clouds or rays behind. Bold black line with a single accent color, red or gold, keeps it readable at a distance.
The eagle is one of the most requested back subjects in American traditional work. People usually mean freedom, focus, or a reference to family, military service, or a hometown.
Placement: High on the upper back so the wingtips run along the shoulder line. Size: 16-20 inches (40-50 cm) wingspan. Style: Traditional American. Pain: Medium-high. The shoulder blades shift constantly, so the artist works in short passes and the session gets broken up more than you would expect.
Make it yours: Leave the banner blank and have the date hand-lettered later, or swap the eagle’s standard banner for a shape that matches a second piece on your arm.
5. Neo-Traditional Panther Head on One Shoulder Blade
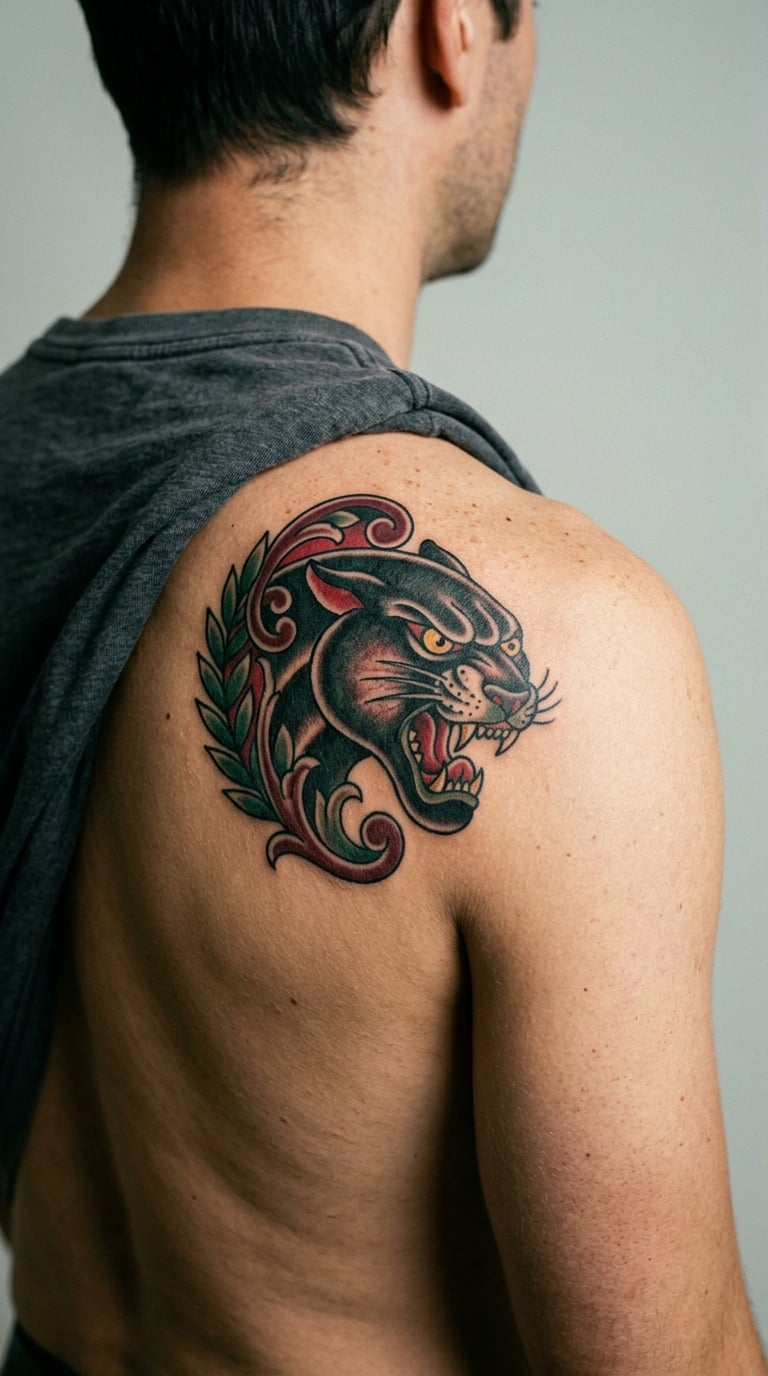
A panther head with a heavy black outline, deep saturated color, and a single white highlight cutting through the dark fur. Neo-traditional work keeps the flash-sheet structure and pushes the color harder, so the reds and greens land dense and stay that way for years.
It reads as composure and control, and it works well for someone who wants the visual weight of a large piece without the commitment of a full back.
Placement: One scapula, tilted so the jaw points toward the spine and the top of the head rides onto the trapezius. Size: 8-10 inches (20-25 cm). Style: Neo-traditional. Pain: Medium-high. Solid color packing is the sore part, and the area right over the shoulder blade is bony with very little meat to absorb it.
Make it yours: Swap the red for a single color that matches a sleeve you already have, and ask for the highlight placed so it still reads in a dim bar.
6. Mountain Range Across the Shoulder Blades
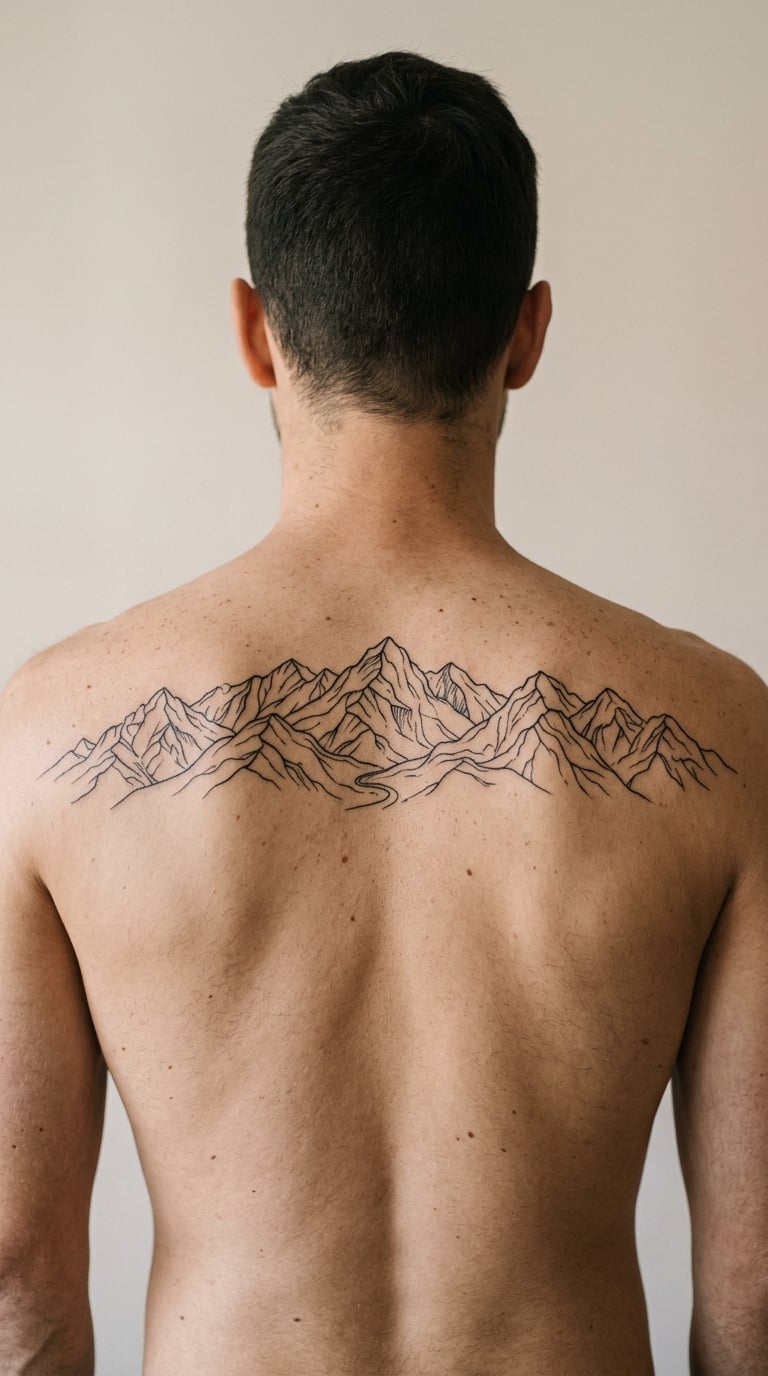
Overlapping peaks drawn in one continuous line weight, with a few hatch lines down the shadow sides and nothing else. Some artists add a low sun or a single bird for scale, but the restraint is the whole point: this is scenery rendered as line, not as a picture.
Men usually pick a range that means somewhere, the mountains they grew up under or the trip that reset them. It reads as steady rather than sentimental, which is why it works on a straight spine.
Placement: Horizontal band across the shoulder blades, following the curve of the trapezius. Size: 10-16 inches (25-40 cm) wide, 3-5 inches tall. Style: Fine line, single-needle. Pain: Medium. The hatch shading over the scapula edges is where you notice it most, since the bone shifts under every pass.
Make it yours: Make the center peak the tallest by a deliberate inch, and add your home latitude as a tiny label tucked into the negative space at one end.
7. Rose and Snake Diagonal From Scapula to Flank
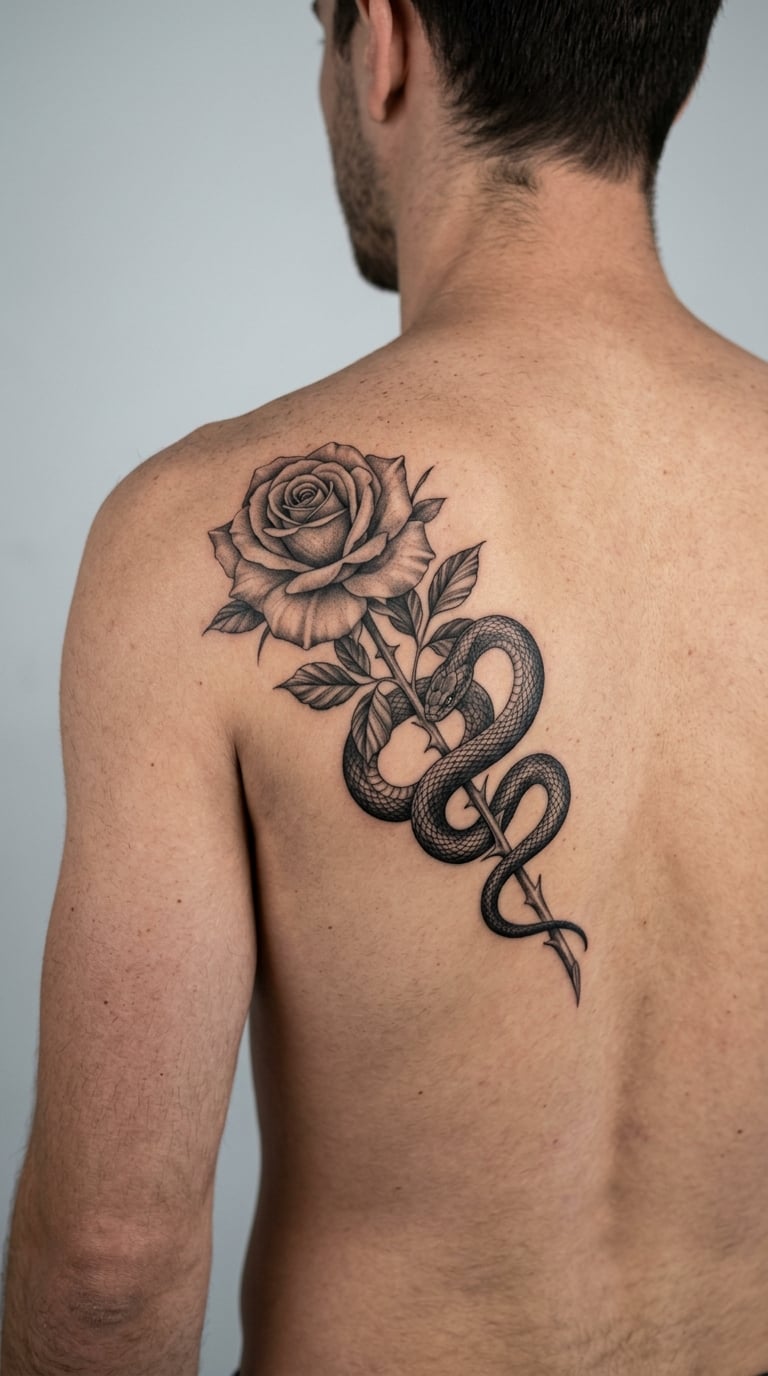
A large rose in black and grey, petals shaded dark at the edges and open and pale in the center, with a snake whose body curves around the stem and whose head rests near the shoulder. The diagonal line of the stem is what makes the placement, so the design is drawn to the body’s slope rather than set straight.
Flowers on a back piece are usually about someone specific, and the snake is most often about change or protection. Plenty of men choose this one because the composition hides a lot of square footage in something that reads delicate.
Placement: Diagonal from the inside of one scapula toward the flank, following the line of the lat. Size: 10-14 inches (25-35 cm) long. Style: Black and grey realism with a traditional bloom. Pain: Medium-high. Grey wash means repeated passes over the same skin, and the flank is where the ribs take over.
Make it yours: Have the snake’s body wrap the stem once and only once, and tuck a small birth flower into the leaves where only you will ever see it.
8. Compass Rose at the Base of the Shoulder Blades
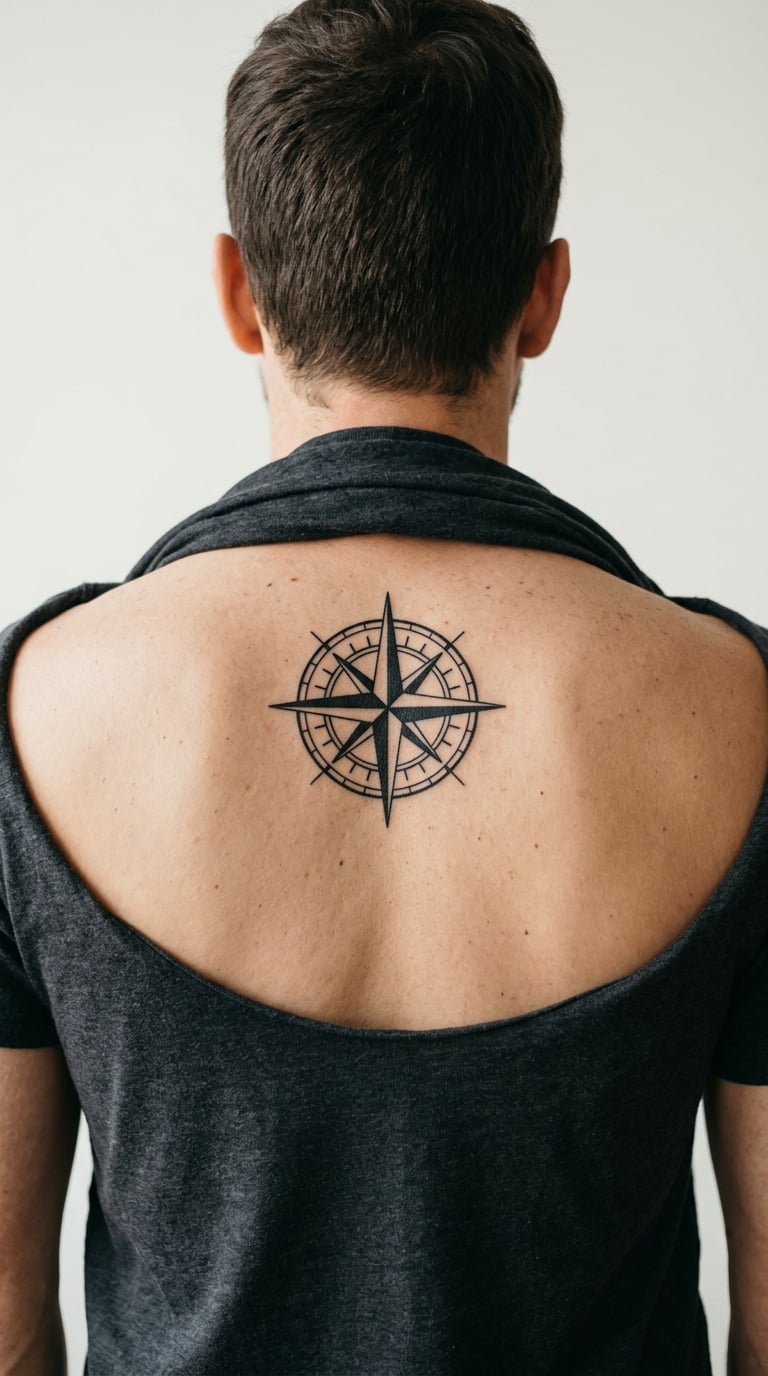
A traditional compass rose: a pointed star with four main points, small secondary points between them, a circle or ring at the center, and lettered or marked points around the edge. Bold black line with one red detail is plenty.
It is a direction piece, chosen for people who have just changed direction, finished a chapter, or moved somewhere new. It is also the easiest of the twenty to keep symmetric.
Placement: Centered and low on the upper back, around the level of the lower scapulae. Size: 5-7 inches (13-18 cm) across. Style: Traditional or fine line. Pain: Medium. Short, contained and usually finished in one sitting, though the center of the back is closer to the nerve-rich spine than the shoulder area.
Make it yours: Put the coordinates of a place that reset you where the ring sits, in a size your artist can keep legible at that scale.
9. Blackwork Celtic Knot Panel Down the Spine
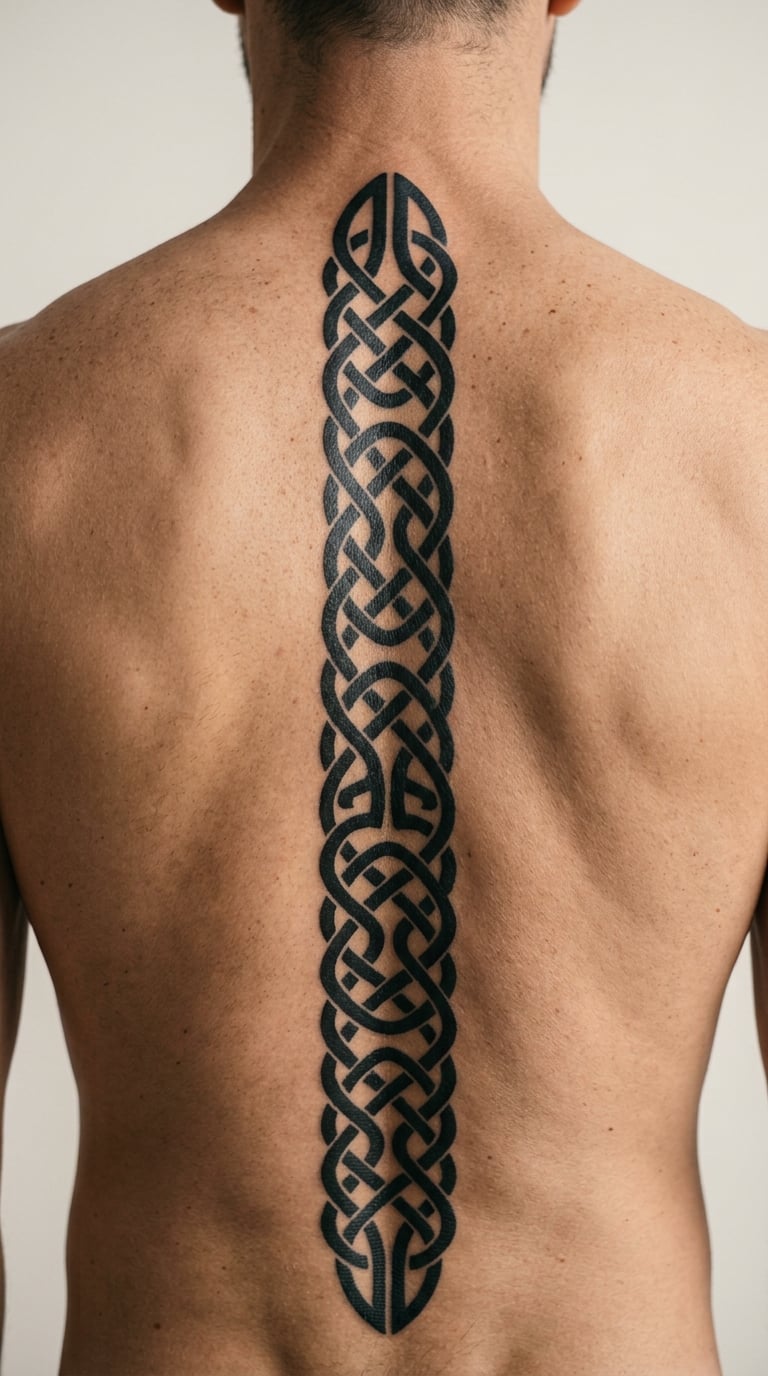
Interlacing ribbon that loops over and under itself, packed solid in the negative spaces so the piece reads as one dark block with bright woven lines running through it. The panel shape can be a straight column, a shield, or a rounded arch, and the arch usually flatters the body best.
Celtic knotwork is chosen as heritage, faith, or simply a pattern with no meaning attached, which is a perfectly good reason. Solid black areas hold their edges better than grey, so this one ages well if the black is truly black.
Placement: Centered, the long axis following the spine, with the panel’s widest point across the scapulae. Size: 9-13 inches (23-33 cm) tall. Style: Blackwork. Pain: Medium-high. Packing solid black means multiple layers in the same skin, and the center of the back is the most sensitive strip on this whole list.
Make it yours: Have the panel top arch instead of square, and place the narrowest point of the arch exactly over the base of your neck so a collar sits below it.
10. Phoenix Rising From the Lower Shoulder Blade
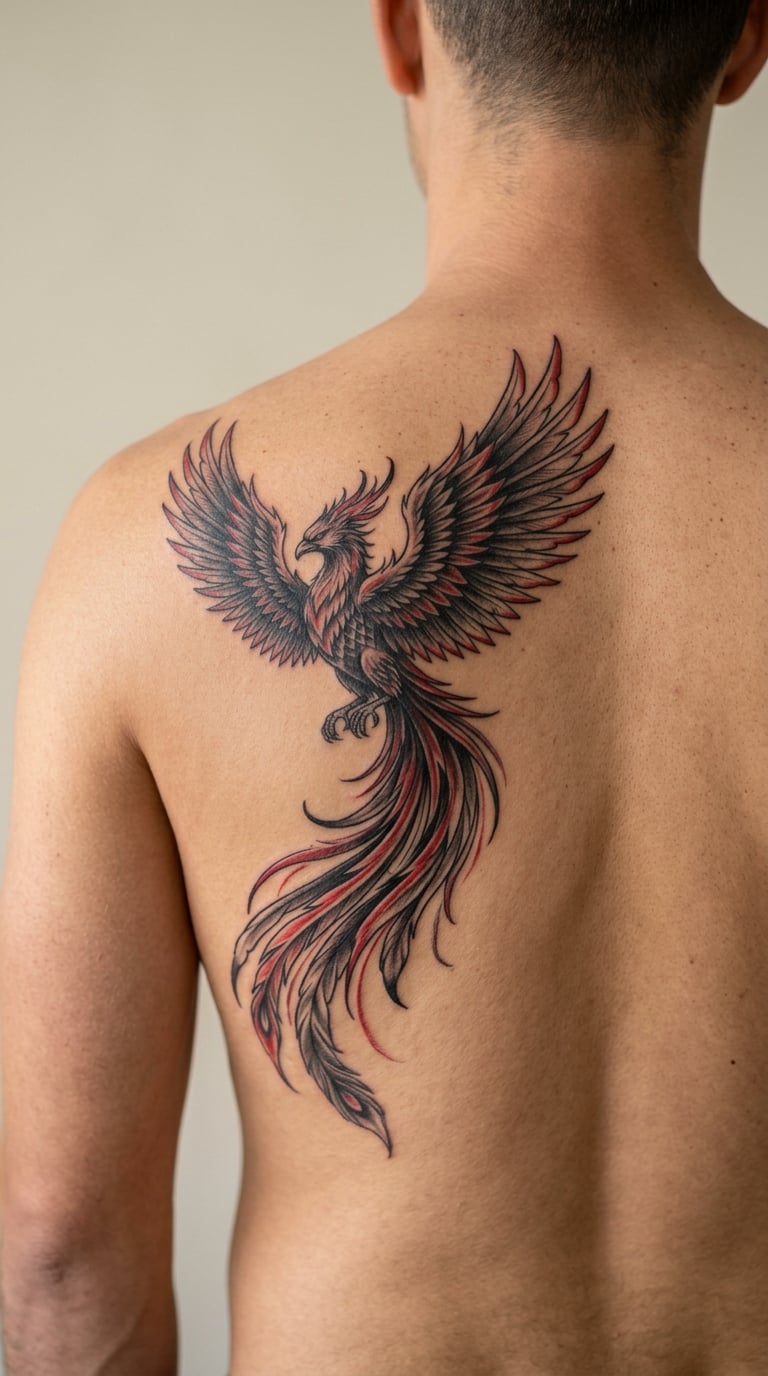
A bird with a small head and a huge tail, the tail made of long tapering feathers that sweep upward and across the spine. Black and grey with one red or orange accent in the chest, or done as pure linework with no fill at all.
The phoenix is the one mythic bird people pick on purpose, for the idea of ending and starting again. It suits a design that is meant to point upward, which is unusual on a back.
Placement: Starting low near the lower scapula and rising toward the neck, tail crossing the spine. Size: 12-16 inches (30-40 cm) tall. Style: Illustrative, black and grey with a color accent. Pain: Medium-high. Feathers need many small strokes, so this is a long session in an awkward position, and the neck end is the worst of it.
Make it yours: Ask for the tail feathers to break apart near the top and fade into unfinished line ends rather than closing the shape, which makes the piece look larger.
11. Sun and Moon Mirror Pair on the Shoulder Blades
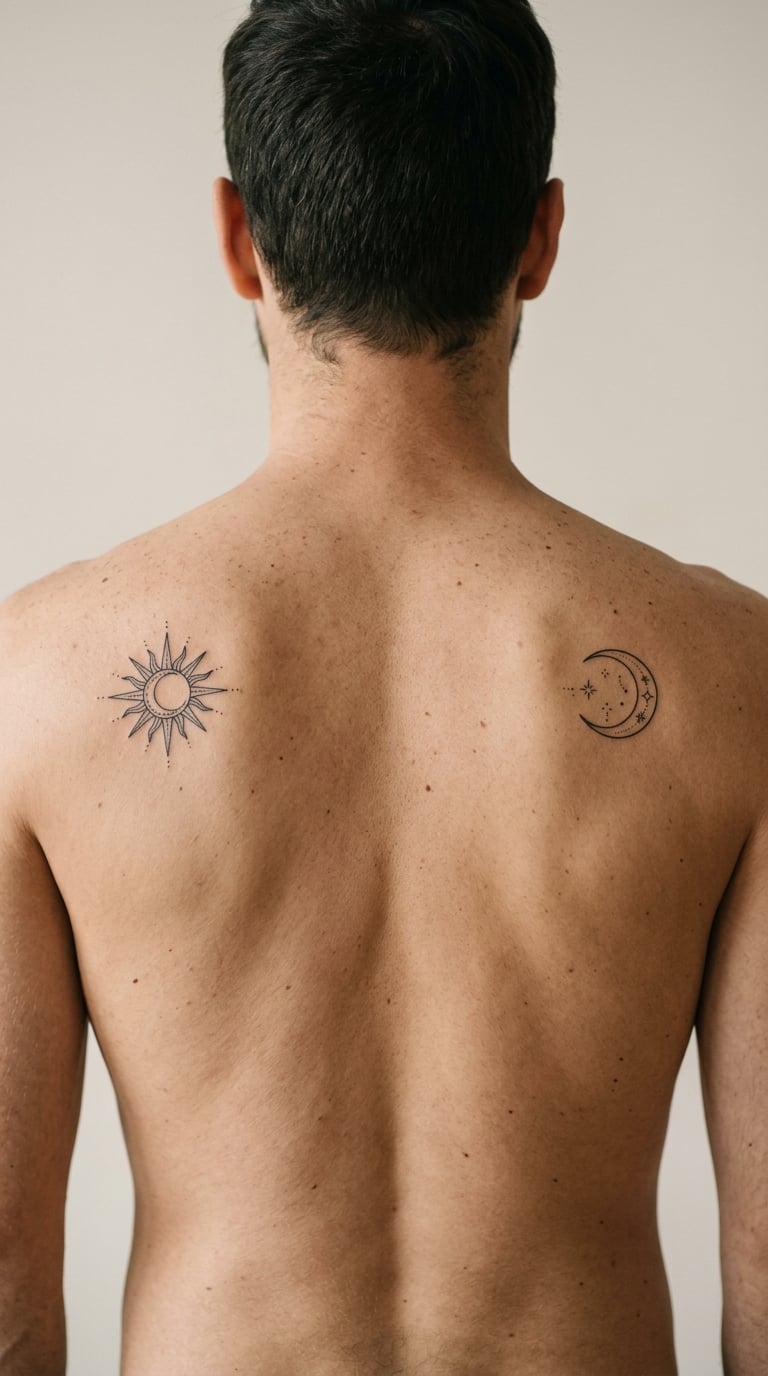
Two pieces about three inches apart from center, mirrored so the pair reads as one design when you see it in a mirror. The sun gets a circle with rays; the moon gets a crescent with a few crater dots and a small star. Both in the same line weight so neither side dominates.
Solar and lunar pairs are usually relationships, siblings, or a parent and child, and the mirror placement makes that explicit. It is a first large tattoo that still looks like two small tattoos.
Placement: One on each scapula, at the same height, mirrored. Size: 4-5 inches (10-13 cm) each. Style: Fine line. Pain: Medium. Short sessions, and the two placements mean the artist can work one side, let you rest, then start the other.
Make it yours: Give each side a different number of rays or craters, matching the ages or the count of something you both agree on.
12. Vine Wrapping From Shoulder to Spine
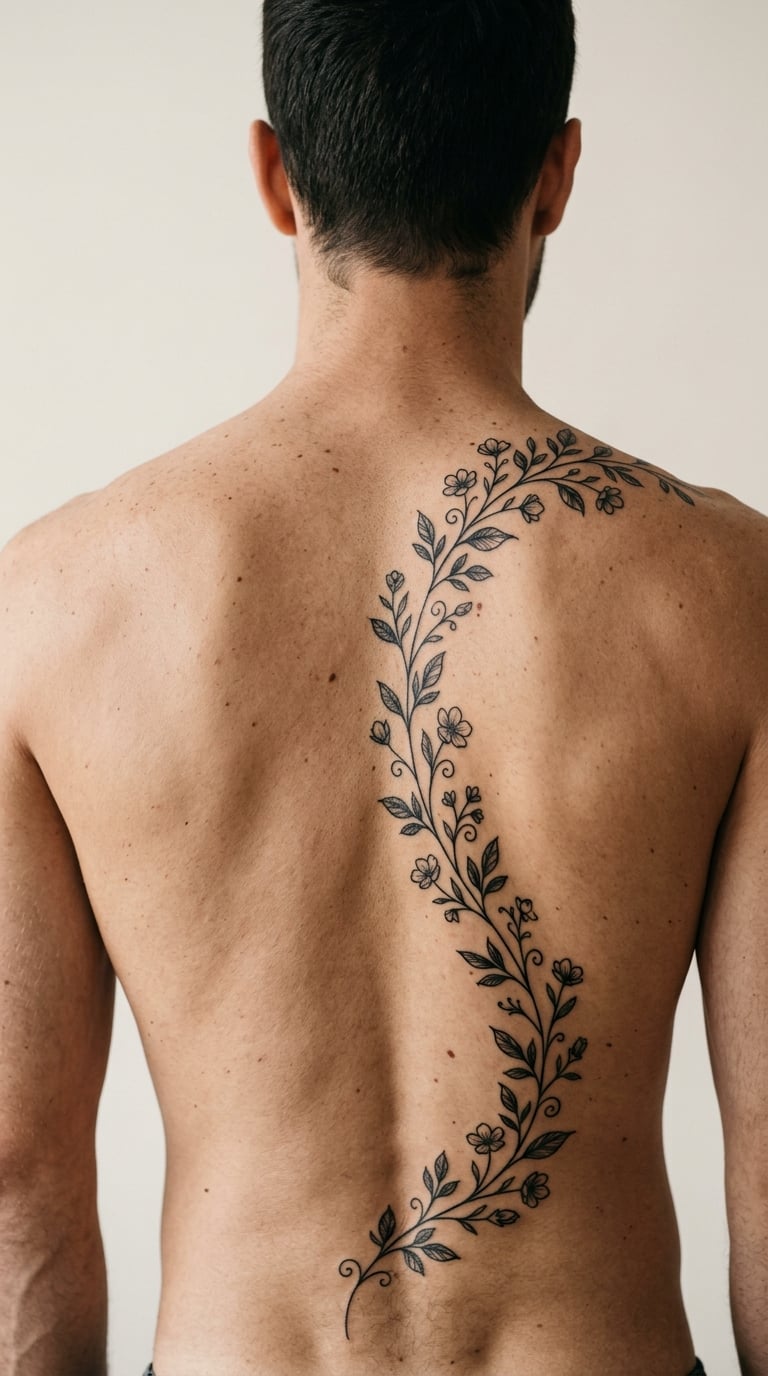
A single stem that starts on the shoulder, curves down and inward, and ends at the spine, with leaves alternating along its length and a few small blooms for contrast. Botanical work lives or dies on leaf veining, and the vein detail is where you should look when you are checking a portfolio.
Most people choose this for a specific plant, a species tied to a place or a family, rather than for a generic vine. It also works as a bridge piece that eventually connects to a shoulder or arm tattoo.
Placement: One side of the upper back, shoulder to spine, arcing along the trapezius. Size: 8-12 inches (20-30 cm) long. Style: Botanical, black and grey. Pain: Medium. The upper curve over the shoulder is tender because the trapezius works hard all day.
Make it yours: Sketch your plant’s actual leaf shape and hand it over; artists agree that a real reference beats a generic leaf every time.
13. Hourglass With Birds Escaping
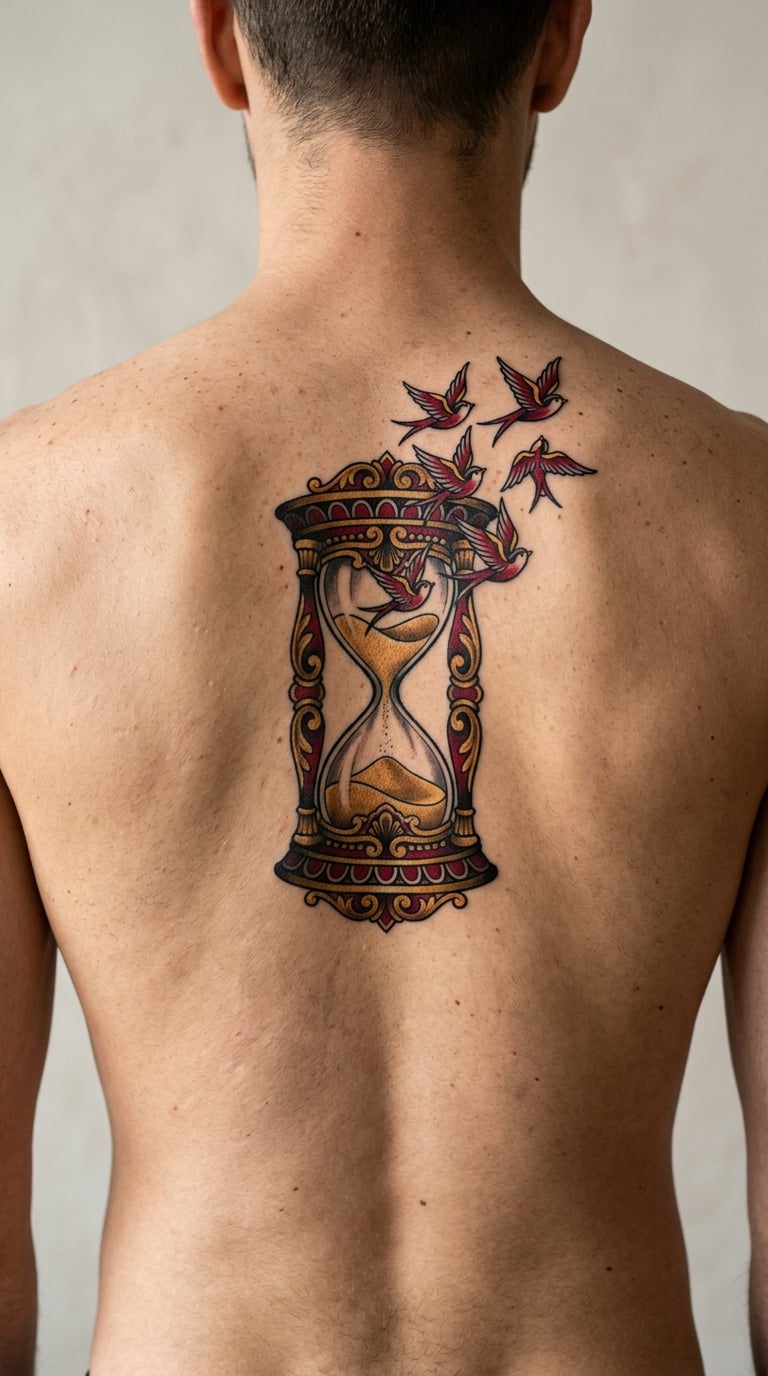
A neo-traditional hourglass: heavy black outline, sand rendered in a warm accent, ornate frame shapes at the top and bottom, and usually small birds breaking out of the frame. It is a compact composition that occupies a lot of visual space without a lot of ink.
Time is the obvious reading, and depending on the version people take it as urgency or as patience. The birds decide which way it lands for you.
Placement: Centered on the upper back, offset slightly to one side of the spine so the shape does not look squared to the body. Size: 7-9 inches (18-23 cm) tall. Style: Neo-traditional. Pain: Medium-high. The frame work is tight line packing, and the stretches of small detail over the scapula edge are the hard part.
Make it yours: Change what is inside the frame, a handful of ashes rendered as dots, a child’s handwriting reduced to a shape, and the symbolism shifts entirely.
14. Roman Numerals Down the Spine
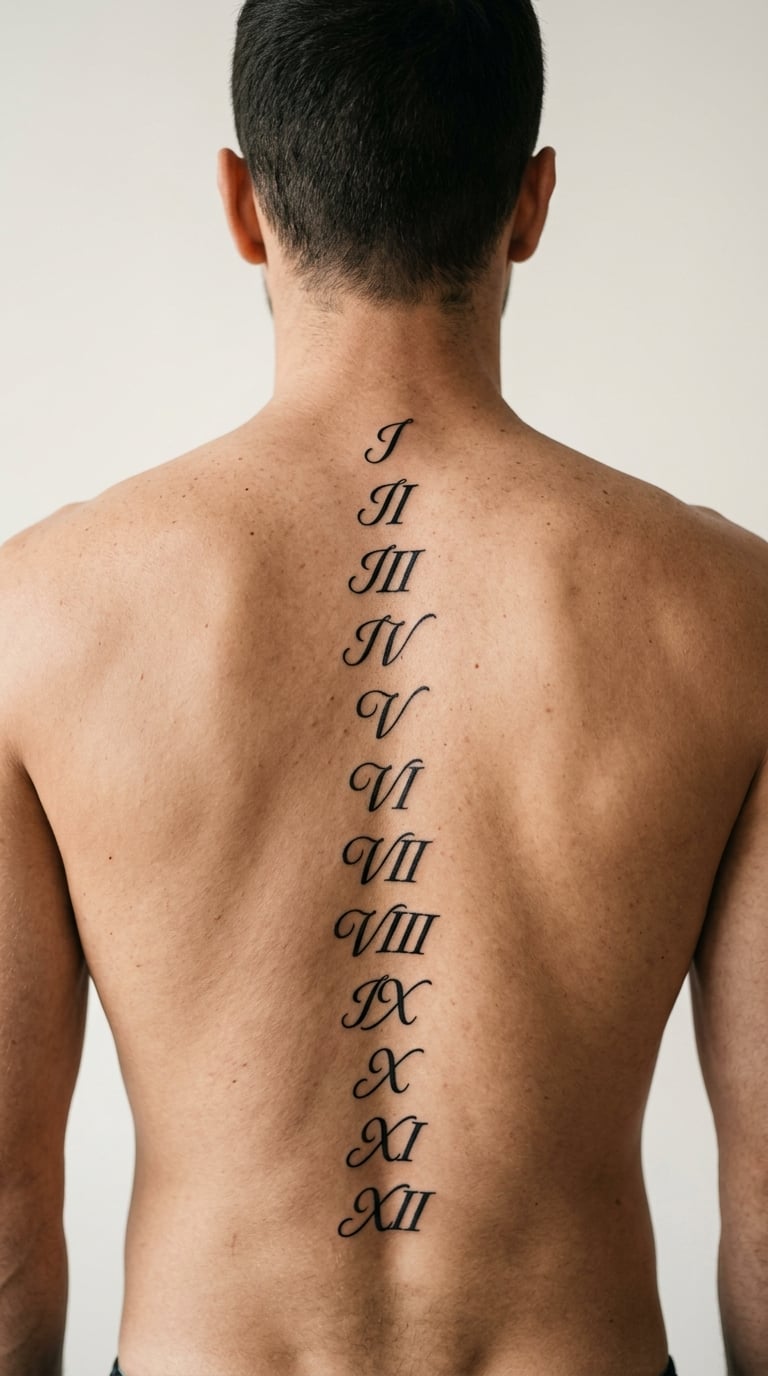
Letters in a calligraphic script, large at the top and tapering smaller as they descend, with a thin line or a small ornament closing the bottom. Some artists run the numerals straight down the spine; others set them in a gentle arc so the design follows the body’s curve.
Dates are the usual reason, and a pair of numerals often means two people or two years. The scale of the type matters more than anything else here, since numerals that are too small turn to mud from a step away.
Placement: Spine, running downward from between the scapulae. Size: 6-9 inches (15-23 cm) long. Style: Script or calligraphic blackwork. Pain: Medium. The script sits over the most sensitive strip, and lettering means the artist is doing slow single-needle passes the whole way.
Make it yours: Use a font that matches something you own, then ask the artist to set the final numeral smaller so the piece has a natural finish rather than an abrupt stop.
15. Dotwork Wolf Howling on One Shoulder Blade
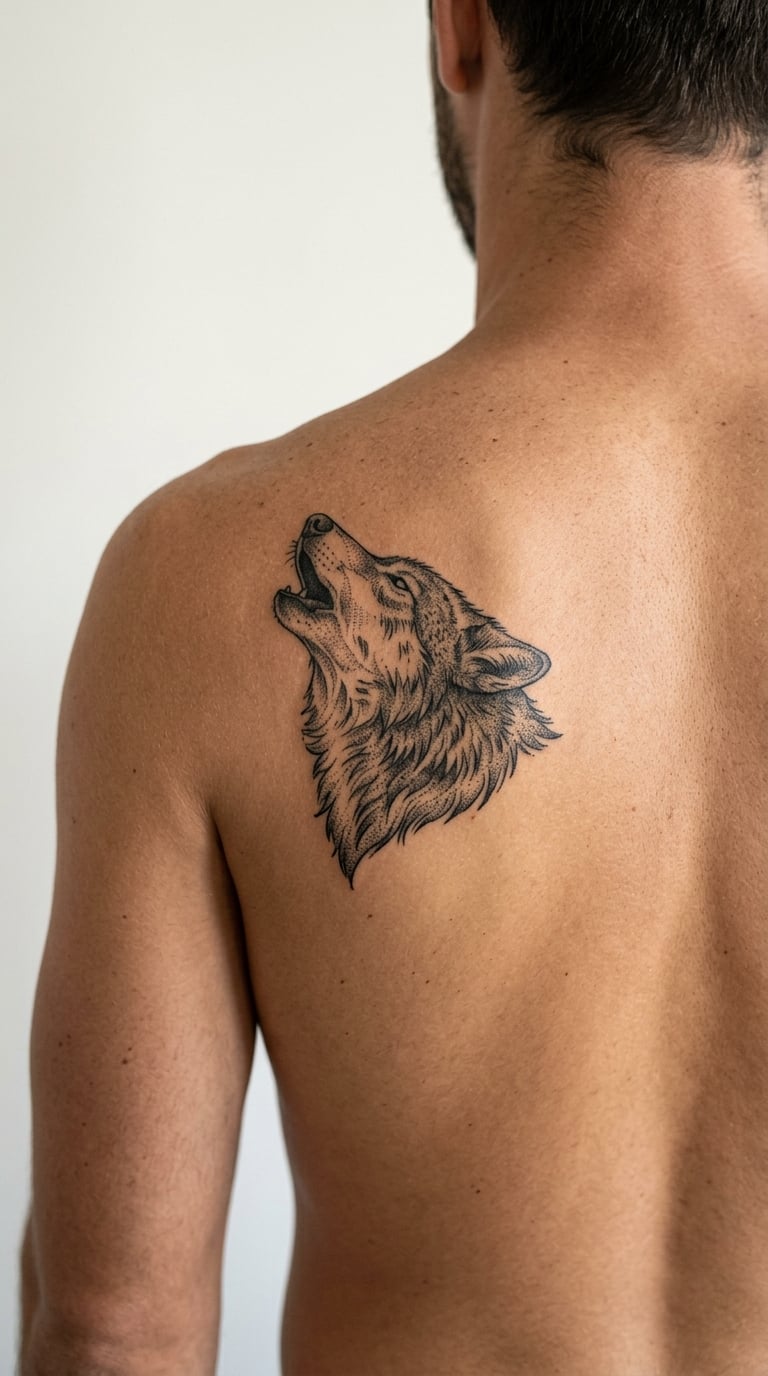
A wolf head built entirely from dots, with the density of the stippling doing the shading: dense under the jaw and around the eye, sparse across the cheek. The muzzle points up and away from the spine so the profile reads clearly in a mirror.
Dotwork rewards an artist who is deliberate rather than fast, so this is a good design to match to a specific person rather than to whoever has an opening. Wolves tend to mean loyalty, family or the wild side of things.
Placement: One scapula, muzzle angled up and outward. Size: 6-8 inches (15-20 cm) tall. Style: Dotwork, black ink. Pain: Medium. Dotting is repeated light passes rather than one hard hit, which many people find easier to sit through than a solid fill.
Make it yours: Ask for the eye to be a single empty ring with no pupil, which reads as wild and keeps the piece from looking like a sticker.
16. Stained Glass Cross Between the Scapulae
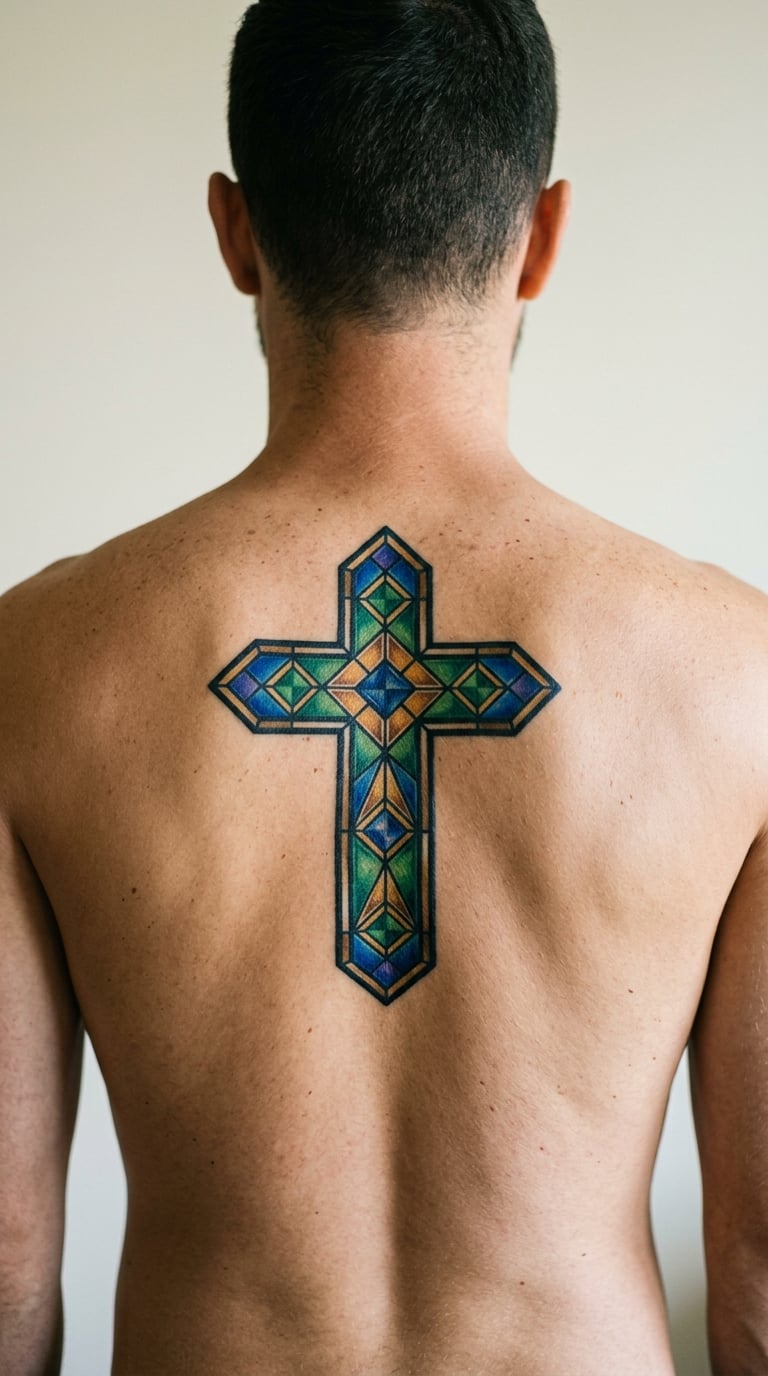
A cross built from geometric panels, each one filled with a different color and separated by heavy black leading, the way a church window is assembled. The cross itself stays simple so the color does the work.
Faith is the usual reason, but a lot of men choose this one for the color. It is a rare upper back piece that reads clearly in color and still holds its shape as a pattern once the shading softens.
Placement: Centered between the shoulder blades, tall rather than wide. Size: 9-12 inches (23-30 cm) tall. Style: Geometric color with black leading. Pain: Medium. Color packing is lighter than solid black, though saturated color means more passes and a longer healing window.
Make it yours: Choose your panel colors from something you own, a flag, a football kit, a mural, and keep the leading line heavy so the design survives if the colors soften.
17. King and Queen Chess Pair Split by the Spine
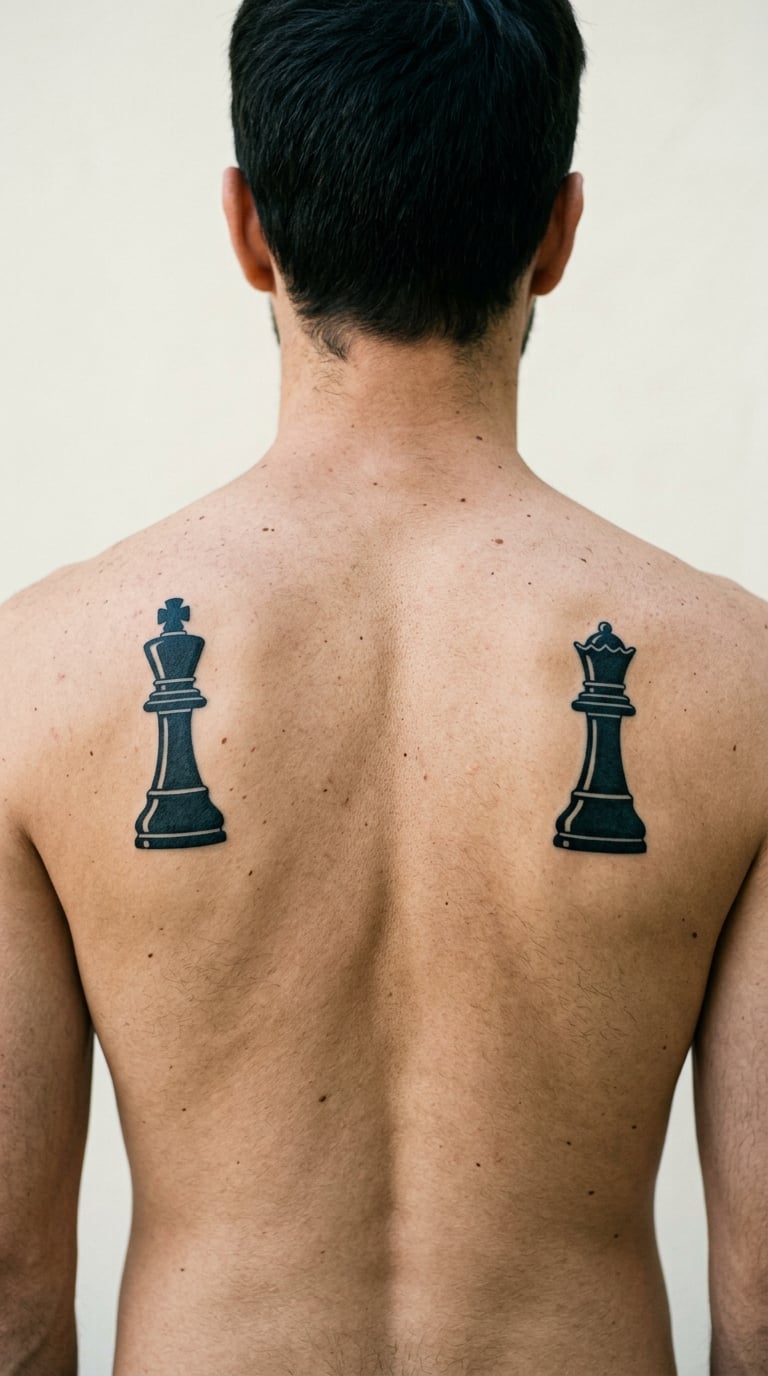
Two chess pieces in solid black with no interior detail, mirrored across the spine so the king’s crenellations face the queen’s crown. Blackwork here means true black fill, which is what gives the pieces their weight.
Chess usually stands for strategy, patience, or being outnumbered on purpose. A matching pair is also the most practical design here for someone who wants a partner piece, since the two halves are already designed to work apart.
Placement: One piece per side, split down the center line, bases level. Size: 7-10 inches (18-25 cm) each. Style: Blackwork with minimal line work. Pain: Medium-high. Solid fill plus a lot of curved edges on the crowns, and the inner half sits right over the spine.
Make it yours: Give each piece one small detail, a ring on a finger, a chip in the crown, and let the rest stay solid black.
18. Pine Forest Gradient Panel Across the Upper Back
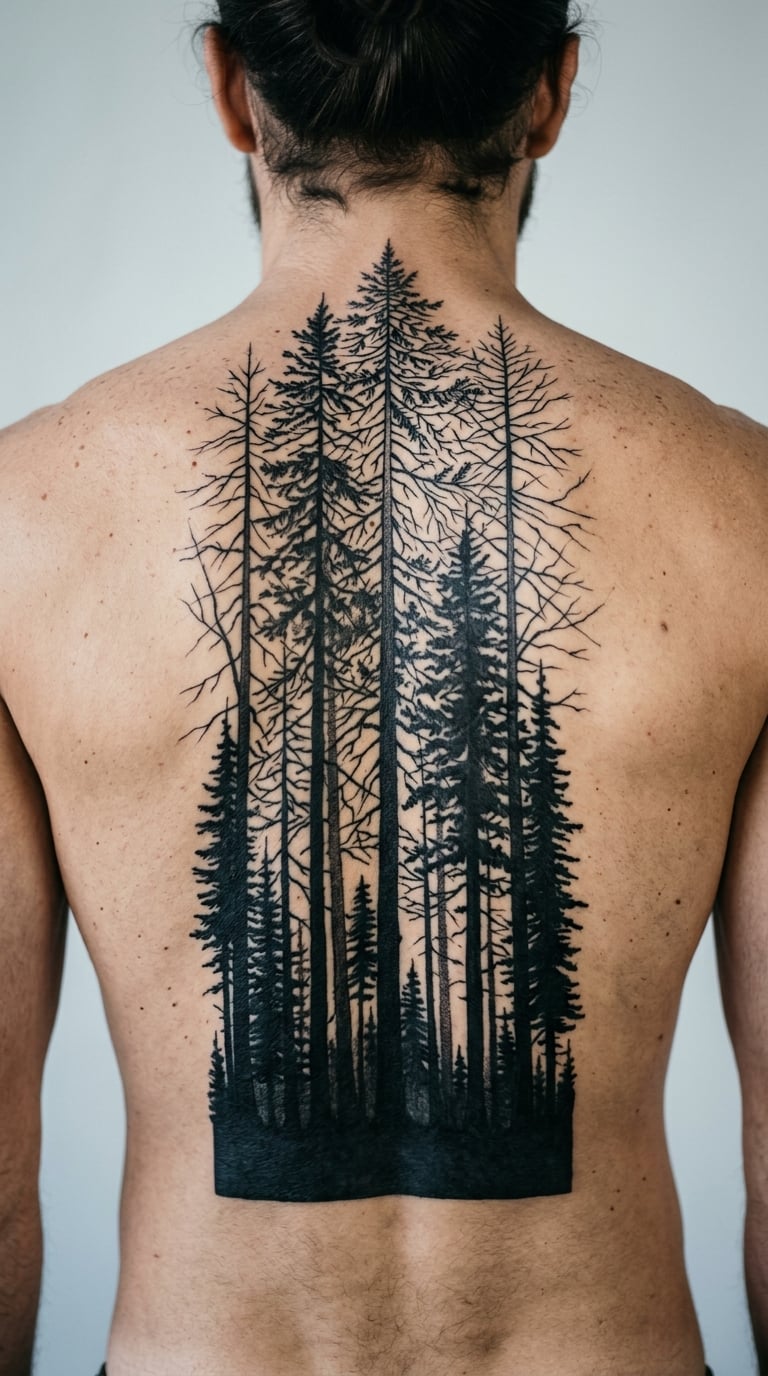
A row of pine trees packed black at the bottom of the panel and thinning into thin outline and bare branches toward the top, so the piece fades out instead of stopping. Mist bands of untouched skin between the tree lines are what keep it readable.
This is a good choice for someone who wants a full-width upper back piece that stays quiet in a dark shirt. Forests get chosen for where they are, usually a place with a lot of trees that mattered.
Placement: A horizontal panel across the upper back, its base line running parallel to the shoulder blades. Size: 16-20 inches (40-50 cm) wide. Style: Blackwork with a gradient fade. Pain: Medium-high. The solid base is a lot of packed black in one session, and wide work means a long stretch of awkward posture.
Make it yours: Set the fade to end at the exact height of a collar line so the top of the piece stays hidden under a shirt and the trees show when it comes off.
19. Single Koi Diagonal Across the Upper Back
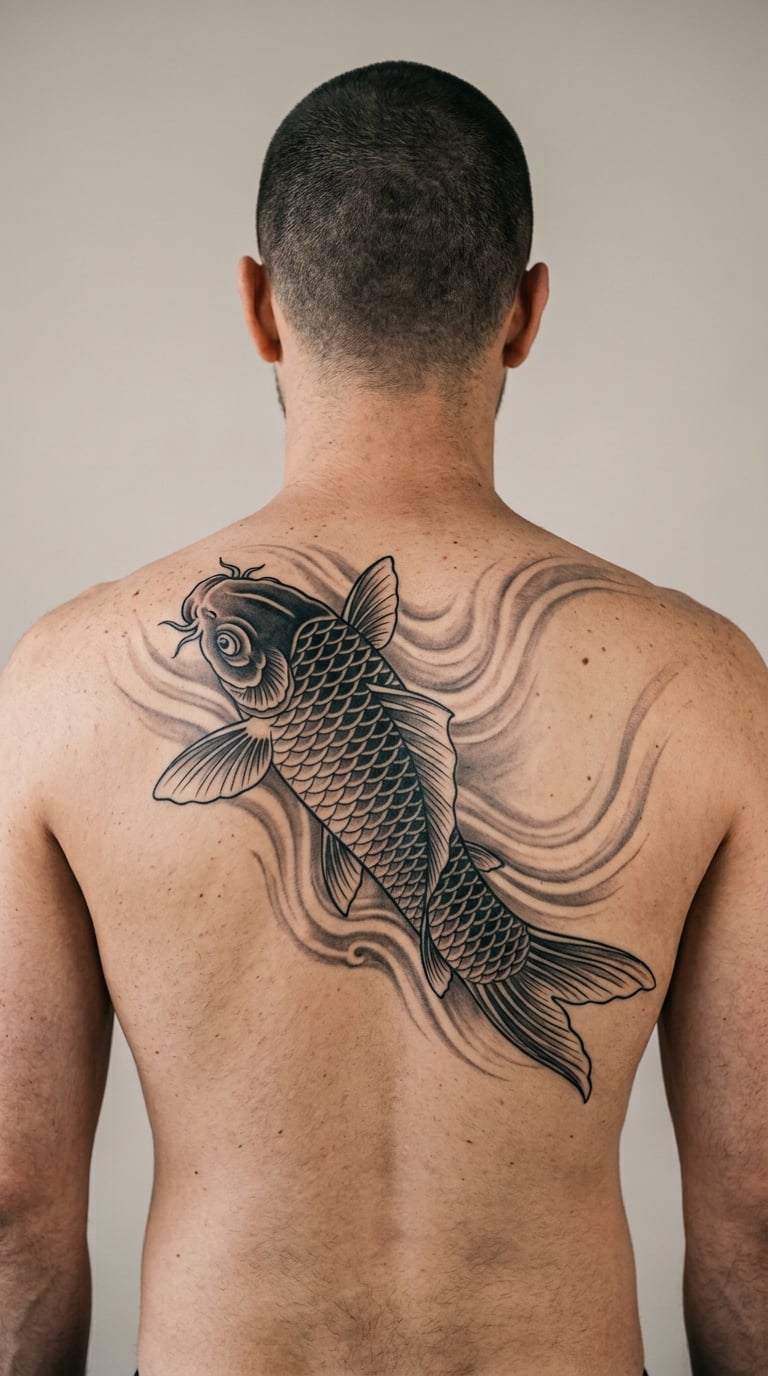
One koi, much larger than in the paired version, body arcing from the lower left of the back up toward the opposite shoulder, with grey water ripples and a few bubbles behind it. Scale work is the detail that takes the time here, and it is the detail that makes the fish read as Japanese rather than as clip-art carp.
A single koi is about one person’s own persistence, and the diagonal composition uses far more of the back than a straight upright fish would.
Placement: Diagonal across the upper back, head toward one shoulder and tail toward the opposite hip. Size: 14-18 inches (35-45 cm) long. Style: Japanese, black and grey. Pain: Medium-high. Scales are hundreds of small individual passes, and the tail end reaches down over the lat where you feel every stroke in your ribs.
Make it yours: Have the tail dissolve into unfinished grey ripples rather than a closed outline, and reserve one orange scale near the gill as the only color.
20. Micro-Realism Gladiator Helmet on the Upper Spine
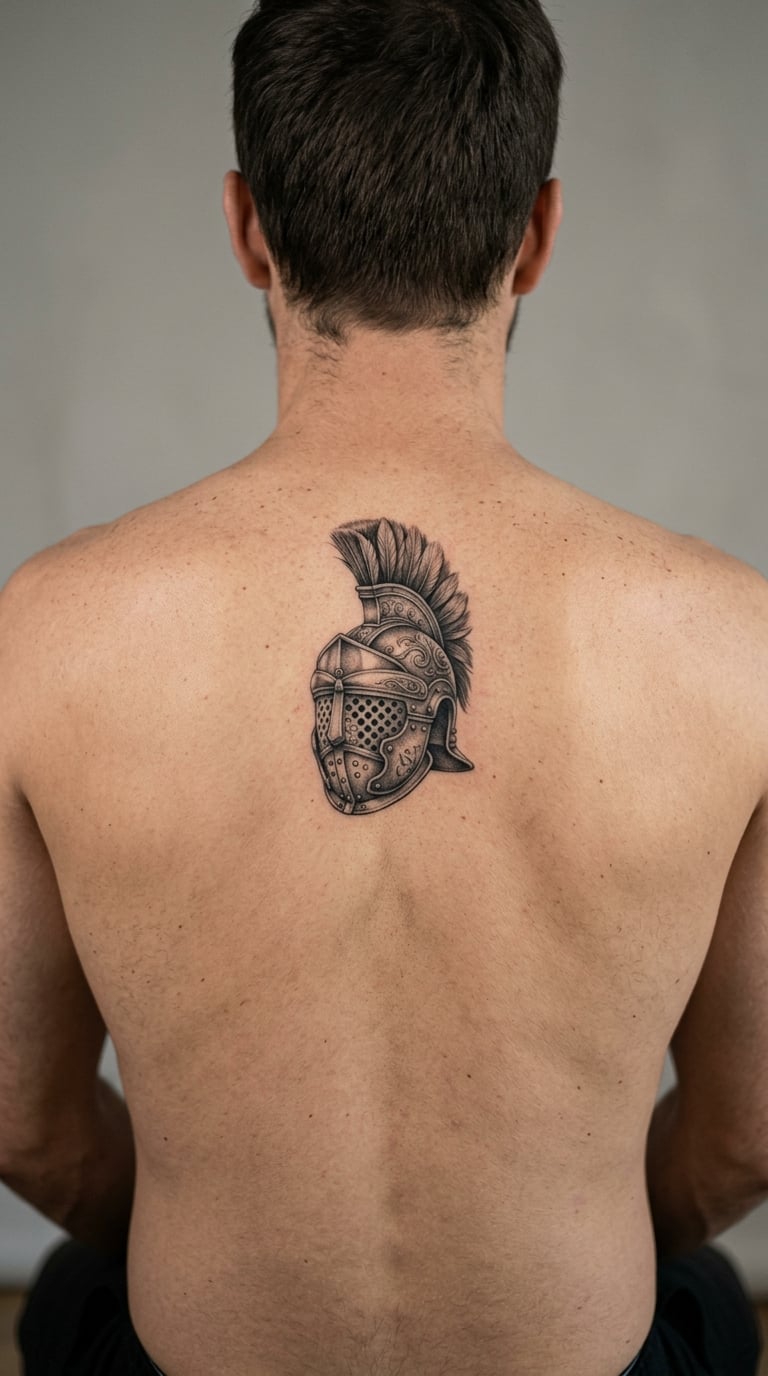
A roman gladiator helmet rendered at near-photographic scale: a brushed metal dome with a worn surface, a crest running front to back, cheek guards, and eye openings that read as dark voids. The realism comes from the texture work, the scratches and the soft shadow under the brim.
Helmets come down to discipline, to something worn for protection, or just to a shape people like. Micro-realism is demanding work, and it is the one style here where matching the artist matters more than the placement.
Placement: Centered on the upper thoracic spine, the crest running toward the neck. Size: 8-11 inches (20-28 cm) tall. Style: Micro-realism, black and grey. Pain: Medium-high. Grey wash texture means building tone in layers, and the helmet sits close to the neck where the skin is thin and sensitive.
Make it yours: Have the artist copy scratches and wear from a real photograph of a museum piece, and leave the interior dark enough that the shape holds at any distance.
How to Choose the Right Upper Back Design
Start with the space you actually have. Measure the distance from the base of your neck to your waist with a tape, then look at photos of the design at that scale. A concept that reads beautifully at eight inches across can look thin and lost at fourteen.
- Pick the style first, the subject second. Fine line rewards simplicity, blackwork rewards solid shapes, and Japanese work needs real estate for scales and petals. If your subject does not suit your style, change the subject, not the style.
- Decide whether it is a standalone piece or a start. If you might extend later, leave breathing room at the edges and keep the palette simple enough to add to.
- Test the placement while you move. Sit, shrug, reach forward, and lie down. If the design bites or pinches when you shrug, it is too low or too low-slung on the scapula.
- Ask what happens as it ages. Fine line thins, grey softens, and tight detail blurs. If you want it sharp in fifteen years, ask for heavier line weight or fewer details now.
- Look for negative space to work with. Open skin around a design is what keeps a large back piece from looking crowded, and it is the part most people forget to ask about.
Cost and Session Time
Most shops bill by the hour with a minimum that covers your first sitting, and that floor is where a small upper back piece usually lands. What moves the number is size, detail density, and how many times the artist has to come back.
A fine-line spine line or a compass rose is often a single session. A mandala, a rose and snake, or a koi pair is more commonly two. Full-width work like a forest panel or a single large koi runs three to five, and a full back project is a long commitment that most people plan across a year or more.
Shop rates vary by city, by artist reputation, and by how specialized the style is. A Japanese or micro-realism specialist is usually booking months ahead and charges accordingly, while a generalist shop is cheaper and often a poor fit for the styles on this list. Ask for the full session plan and the total figure at the consultation, not just the hourly rate, so there is no surprise at the final sitting.
Aftercare Basics for Upper Back Ink
Follow your artist’s aftercare instructions above everything else, since they match the exact products and technique they used. These are the general points that come up most often for back pieces specifically.
- Wash the area as directed with clean water and unscented soap, then pat it dry and leave it alone. No scrubbing, no picking at flakes, no scabbing over the top of it.
- Keep it loose. A shirt or robe that buttons at the front beats anything pulled over the head, and it stops fabric grinding against the fresh lines while they set.
- Plan how you sleep. Two or three nights on your stomach is rough on a fresh back piece, and the pressure stretches new lines. Side sleeping with a pillow either side, or back sleeping for the first week, is the usual workaround.
- Skip baths, pools, hot tubs and saunas until the skin has closed over, and keep sun off the healing area even through a shirt, since fresh ink and UV do not get along.
- Expect a worse itch than most body parts. Moisturizer applied in thin layers as directed helps; scratching does not.
- Photograph the piece at one week, one month, and three months. Those healed photos are how you compare it to the artist’s portfolio later, and they are what a cover-up conversation starts from.
Frequently Asked Questions
What are good upper back tattoo ideas for men?
The strongest options are designs that use the flat canvas between the shoulder blades: a fine-line spine line, a pair of koi or a single large koi, a geometric mandala, a traditional eagle across the shoulders, a compass rose, script numerals, or a single subject like a rose and snake. Match the subject to the style and to how much space you actually have.
Are upper back tattoos extremely painful?
The upper back sits around a four or five out of ten, which is uncomfortable rather than severe. Two areas are noticeably worse: the strip directly over the spine, where the bone is close to the skin, and the edges of the shoulder blades, which move under every pass. Numbing cream helps on the spine, and most artists work in short sessions with breaks.
Should I get a full back or upper back tattoo first?
Start with the upper back if you want one strong piece and want to live with it for a few years before adding more. Start with the lower back if you already know you will want a full back project, because a lower piece is usually easier to extend upward from. Whichever you pick, leave margin at the edges and keep the palette simple.
How do I check a tattoo stencil on your own back?
Ask for the stencil, stand in front of a full-length mirror, then take a phone photo of the reflection and zoom in on it. Look for even spacing, level edges and correct center, and have someone at home check the shoulder line against your actual spine. Do it in daylight, and ask for the stencil to be adjusted rather than started on.
What should you wear to a spine tattoo appointment?
Wear something that buttons or zips at the front, loose enough to slide over the finished work without dragging it across fresh skin. Bring a second shirt for the trip home. Skip tight collars and anything that has to be pulled over the head, and plan how you will keep fabric off the area while the ink settles.
What does a 777 tattoo mean for guys?
It usually reads as an angel number in some circles, tied to luck and protection, and it is also a plain lucky number in others. On a man’s back it is often done large and centered as a design rather than a digit piece. There is no fixed meaning, so ask yourself what you want it to stand for and go with that.
Start Small or Start Big: What to Book First
If this is your first large piece, the fine-line spine line or the compass rose is the lowest-risk way to find out how you handle a long session on the back. If you already know you want a back project and you have a style in mind, go straight to the koi pair or the mandala, pick an artist who works in that style daily, and agree the whole session plan before the first sitting.
Whichever idea you choose, book the consultation, measure the space, and check the stencil in daylight. That is the part you can still change, and it is worth more than any design decision in this list.