
22 Chef Knife Tattoo Ideas: Best Small and Bold (October 2026)
A chef knife tattoo is a design of a professional kitchen knife, usually a Japanese gyuto, a cleaver or a boning knife, drawn to show that the person wearing it cooks. This list of 22 chef knife tattoo ideas covers everything from a thin single-line knife on the wrist to a full realistic blade resting on a cutting board, with placement, size, style and pain notes for each one.
Most people who land on this page are line cooks, culinary students, sous-chefs, bakers or the kind of home cook who plans Sunday meal prep a week ahead. What makes a knife design work on skin is proportion, mostly: a chef’s knife is a long, narrow shape, and it needs either open skin or a clean block of colour to read correctly. Book a consultation for October 2026 and work through the list in order.
22 Chef Knife Tattoo Ideas: Quick Guide
| Idea | Style | Best placement | Size | Pain |
|---|---|---|---|---|
| 1. Fine-line chef knife | Fine line | Inner forearm | 3 in (7.5 cm) | Medium |
| 2. Traditional knife with rolling pin | Traditional American | Outer forearm | 5 in (12.5 cm) | Medium |
| 3. Minimal line art knife | Minimal line art | Wrist | 2 in (5 cm) | Medium |
| 4. Watercolor knife with herbs | Watercolour | Inner upper arm | 4 in (10 cm) | Low |
| 5. Blackwork knife across wrist | Blackwork | Inner wrist | 4 in (10 cm) wide | Medium |
| 6. Knife wrapped in laurel | Black and grey | Upper arm | 5 in (12.5 cm) | Medium |
| 7. Micro-reality knife on finger | Micro-realism | Side of index finger | Under 1 in (2.5 cm) | High |
| 8. Knife with flame details | Black and red | Outer forearm | 4.5 in (11 cm) | Medium |
| 9. Japanese-inspired knife | Japanese influenced | Calf | 6 in (15 cm) | Low |
| 10. Knife and egg | Fine line | Inner forearm | 3 in (7.5 cm) | Medium |
| 11. Knife with wheat stalks | Blackwork with fine detail | Upper arm | 5 in (12.5 cm) | Medium |
| 12. Dotwork knife and lemon | Dotwork | Forearm | 3 in (7.5 cm) | Medium |
| 13. Neo-traditional knife with banner | Neo-traditional | Shoulder | 6 in (15 cm) | High |
| 14. Knife and garlic bulb | Black and grey | Outer forearm | 4.5 in (11 cm) | Medium |
| 15. Minimal cleaver icon | Minimal icon | Inner bicep | 2 in (5 cm) | Low |
| 16. Knife with coffee cup | Fine line | Inner forearm | 3.5 in (9 cm) | Medium |
| 17. Knife in a kitchen scene | Illustrative colour | Upper arm | 5 in (12.5 cm) | Medium |
| 18. Blackwork knife, bone handle | Blackwork | Forearm, vertical | 5 in (12.5 cm) | Medium |
| 19. Knife with small compass | Black and grey | Wrist | 3 in (7.5 cm) | Medium |
| 20. Sketch-style knife | Illustrative sketch | Outer forearm | 4 in (10 cm) | Low |
| 21. Knife and small tomato | Bold line with one colour | Lower forearm | 3 in (7.5 cm) | Medium |
| 22. Realistic knife on board | Realism, black and brown | Upper arm | 7 in (18 cm) | Low |
1. Fine-Line Chef Knife on the Forearm
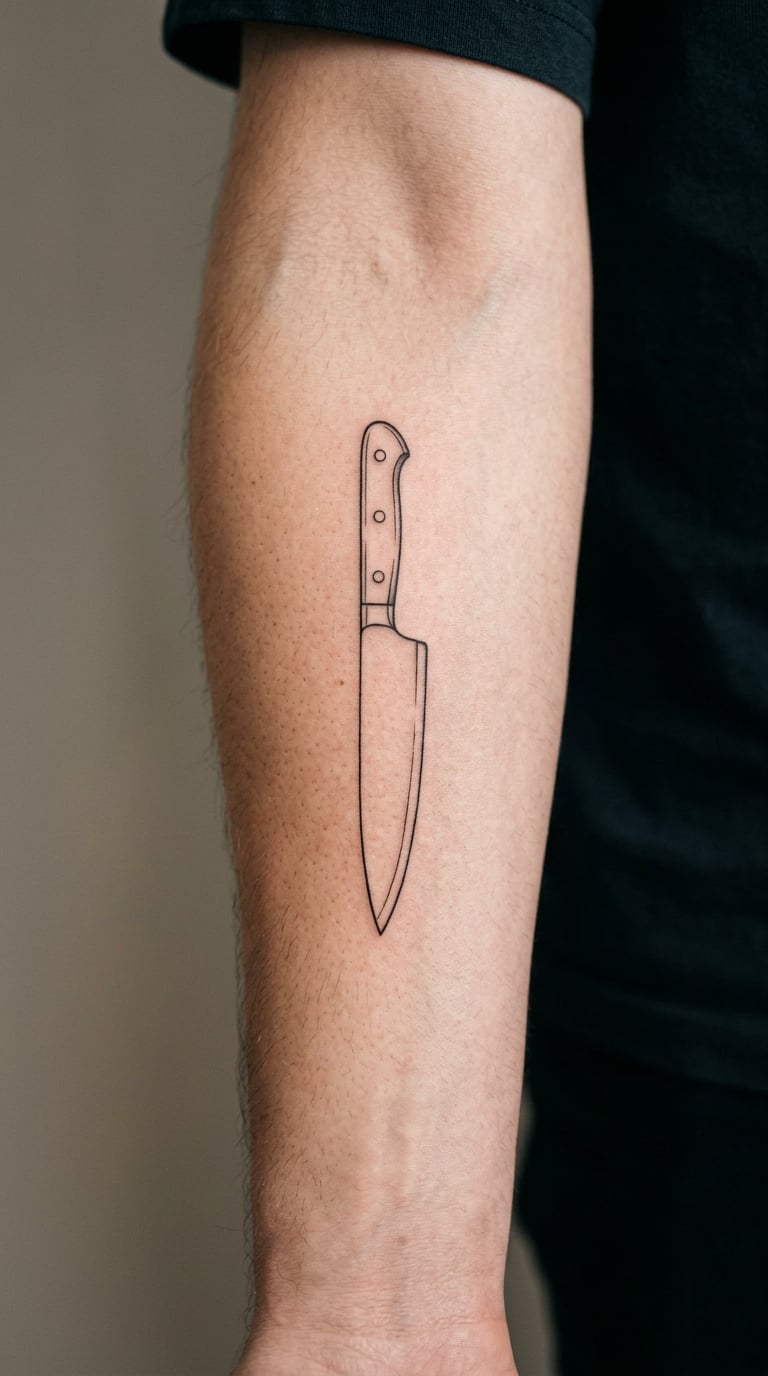
This chef knife tattoo idea is drawn with a single hairline outline and no fill at all: blade edge, spine, bolster, rivets and handle rendered in one continuous weight of line. It is the version most people ask a first-timer to copy, and the one that looks the most expensive when it is done well.
People choose it because it sits under a shirt sleeve and still means something to the person wearing it. There is no set meaning attached to it beyond craft and pride in the work, and that is exactly why so many cooks pick it.
Placement: inner forearm, running lengthwise from just above the wrist toward the elbow. Size: 3 to 3.5 inches (7.5 to 9 cm) long. Style: fine line, single-needle outline. Pain: medium, and the inner forearm stings more than most spots.
Ageing note: single-needle work on the inner forearm fades faster than anywhere else on the arm because that skin rubs against itself and sees constant movement. Expect to need a touch-up every few years.
Make it yours: trace the actual profile of your own knife, tip to heel, instead of a stock image. If your knife is a gyuto with a curved edge, that curve is what tells onlookers it is a kitchen knife and not a dagger.
2. Traditional Chef’s Knife with Rolling Pin
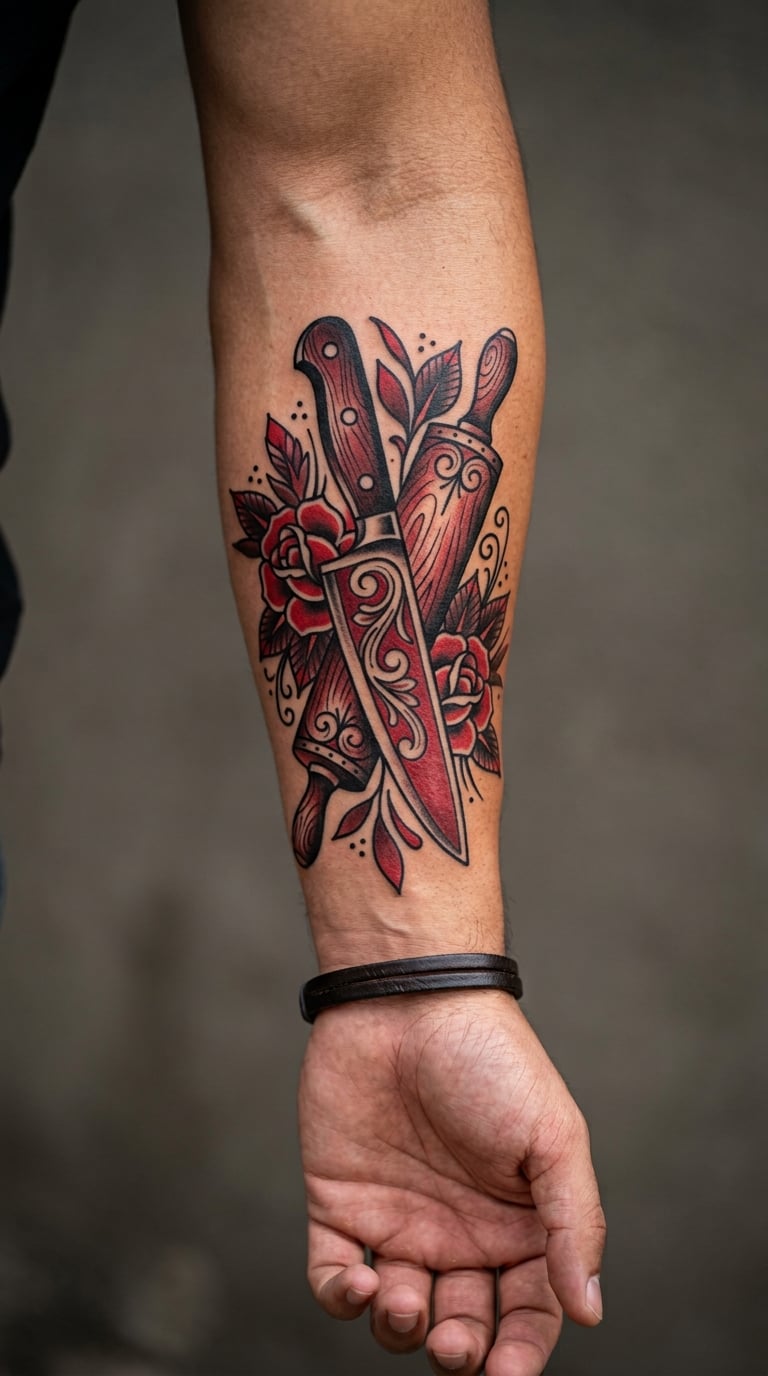
A traditional American chef knife tattoo puts a wide-bladed knife in bold black outline with heavy black shading, then adds a rolling pin crossing behind it, ends wrapped. Red is the one colour that shows up most often, usually in the pin or a shadow pass under the blade.
Rolling pins are baker’s shorthand. If you came up through a pastry kitchen rather than a line, this is the version that gets you recognised by other bakers before anyone reads the knife.
Placement: outer forearm or upper arm, both flat and well exposed to view. Size: 5 to 6 inches (12.5 to 15 cm) across the pair. Style: traditional American, bold outlines, shaded. Pain: medium, though the outer forearm is a little easier than the inner side.
Ageing note: the red is the part that fades first. Red and yellow pigment at that scale usually needs refreshing sooner than the black line work.
Make it yours: engrave the pin with the year you finished culinary school, or the name of the bakery you trained in. A short curved banner under the blade is the classic spot for it.
3. Minimal Chef Knife Line Art
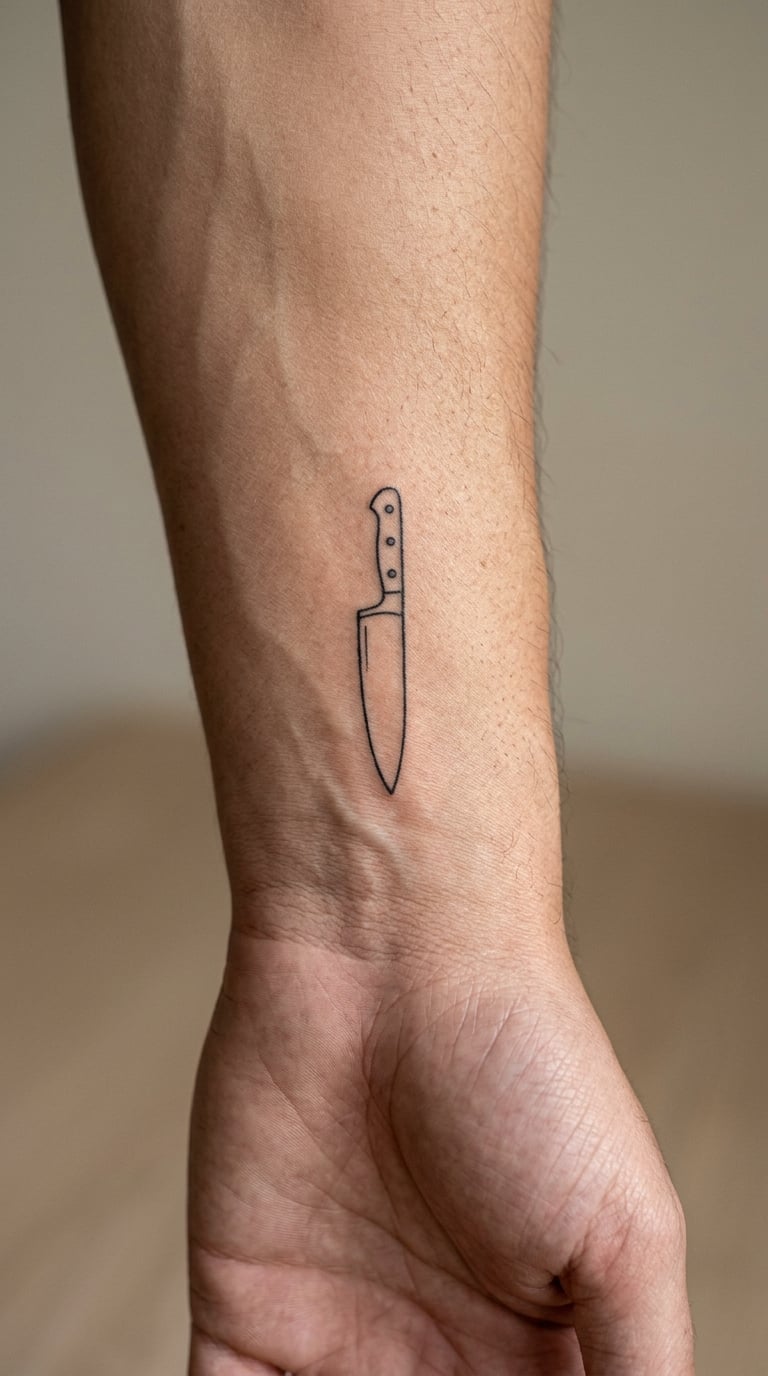
Minimal chef knife tattoo ideas reduce the whole thing to a blade silhouette: a single closed shape, one or two interior lines to mark the handle, nothing else. No rivets, no bolster detail, no shading. At 2 inches the whole thing is about the length of your thumb.
This is the one people pick when they want a cooking symbol that is not the first thing anyone notices across a room. It also suits anyone adding to an existing tattoo who does not want a second piece to fight the first.
Placement: inner wrist, or the soft spot just below the thumb on the palm side. Size: 1.5 to 2.5 inches (4 to 6 cm). Style: minimal line art, solid black contour. Pain: medium on the wrist, and the wrist moves constantly so you feel every line.
Ageing note: a design this simple holds its shape well, but interior handle lines can soften and blur over about five years. Ask the artist for a line weight slightly heavier than feels necessary.
Make it yours: pair it with a matching tiny knife on the opposite wrist, or add a single line of text on the inside of the forearm in the same weight.
4. Watercolor Chef Knife with Herb Accent
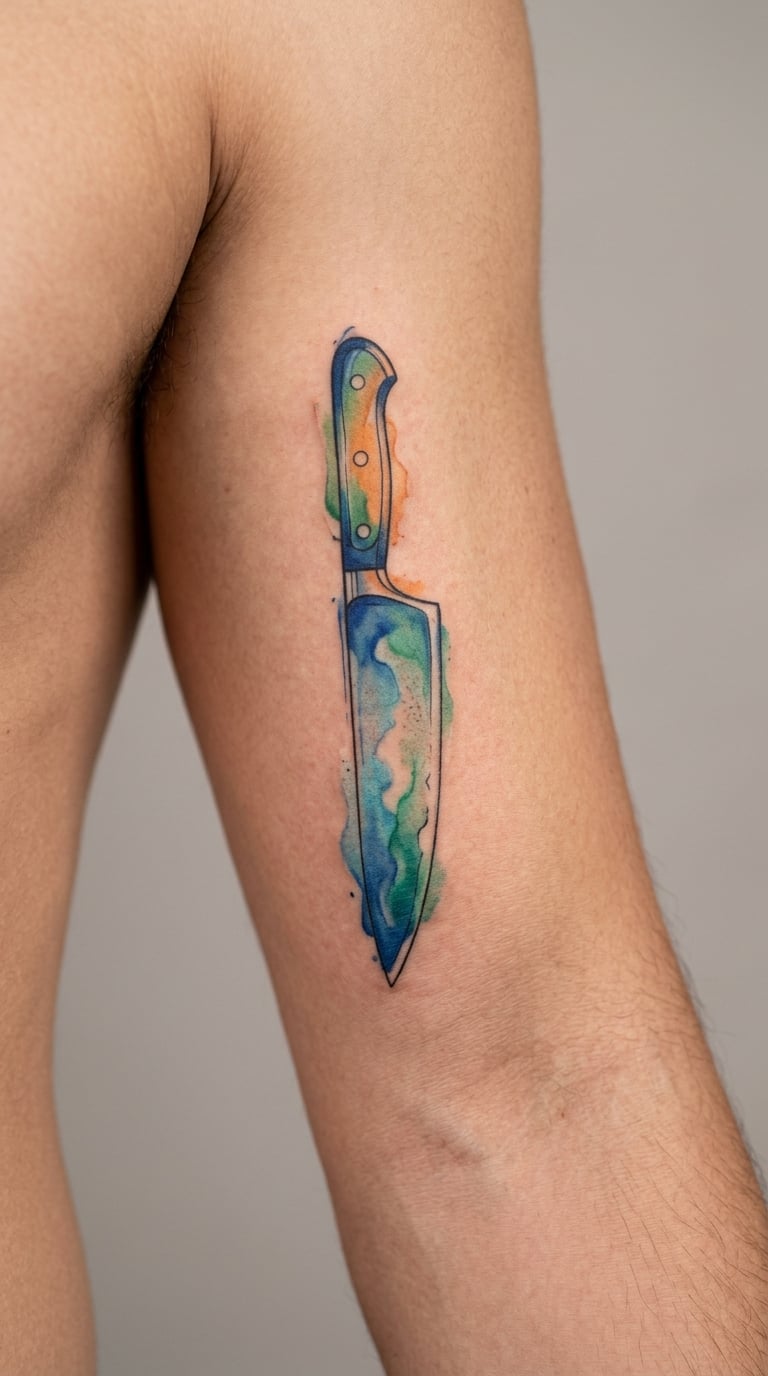
A watercolour chef knife tattoo keeps the knife itself in thin grey line work and lets the colour happen around it: loose blue and green washes bleeding past the blade, with a warm orange accent and a few herb sprigs drawn in the same pigment. The colour is supposed to look like it ran, not like it was filled in.
Watercolour reads as softer and more personal than a solid black piece, and it hides small errors in knife anatomy better than any other style, because the eye reads colour before shape.
Placement: inner upper arm or the soft part below the shoulder. Size: 4 to 5 inches (10 to 12.5 cm) including the colour bleed. Style: watercolour with line work. Pain: low, since the upper arm is a forgiving area.
Ageing note: pale washes are the first thing to fade. Plan on a colour refresh within three to four years, which is normal and easy to book.
Make it yours: use the colour of a herb you actually cook with, or the colour of a kitchen you worked in. Nobody will know the reference, and you will.
5. Blackwork Chef Knife Across the Wrist
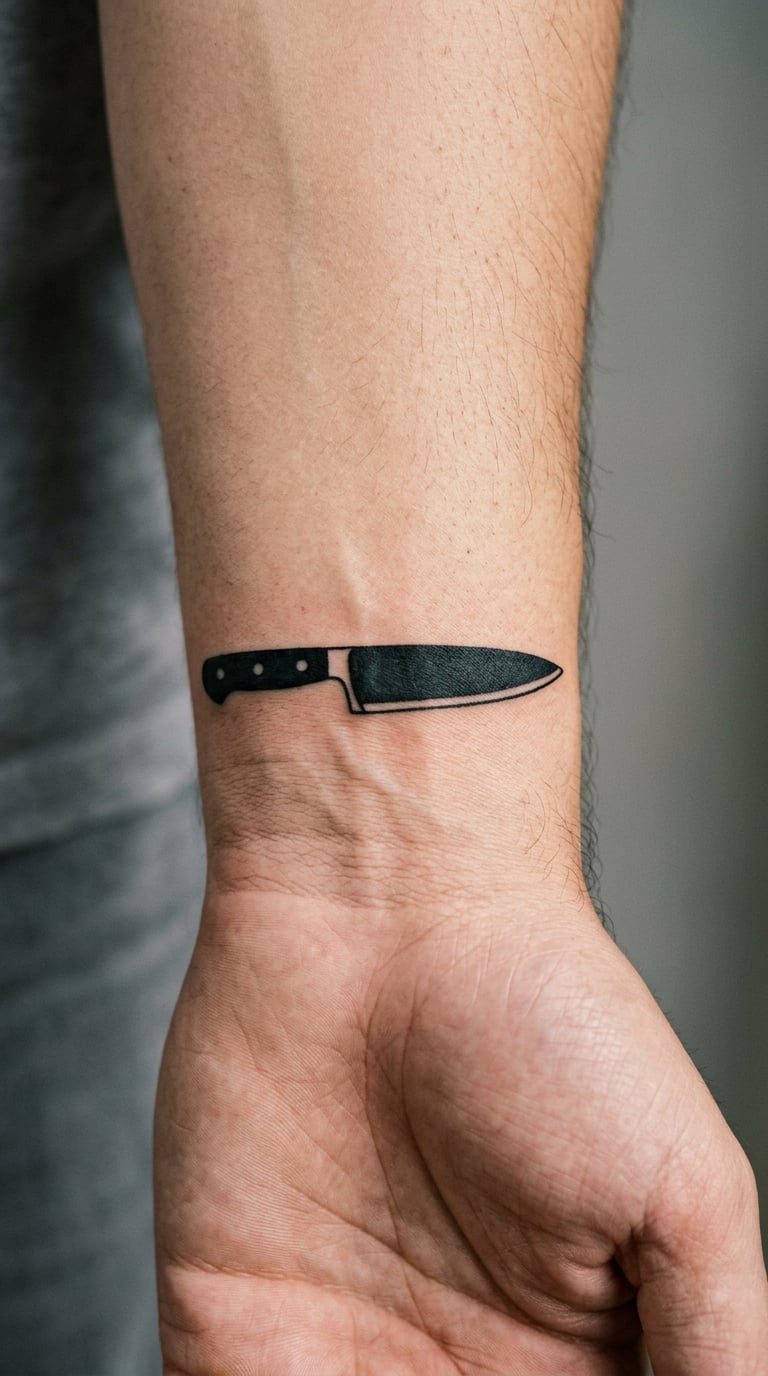
This blackwork chef knife tattoo fills the entire knife shape in solid black with no interior line work at all, the blade and handle reading as one dense graphic shape. Placed horizontally across the inner wrist, the edge runs parallel to the wrist crease and looks deliberate from both sides.
Blackwork is the boldest option in this list. It reads as a knife from across a room, and it is the version people choose when they want the tattoo to be noticed rather than discovered.
Placement: inner wrist, horizontal. Size: 3.5 to 4.5 inches (9 to 11 cm) wide. Style: blackwork, solid fill. Pain: medium, the wrist is bony and every nerve runs close to the surface.
Ageing note: solid black fills stay sharp for years because there is nothing to blur. The edges of the shape do soften and need tidying up over time.
Make it yours: have the handle end in a small wrap of a line of script, or keep it completely closed and let the shape stand alone. Both work.
6. Chef Knife Wrapped in Laurel
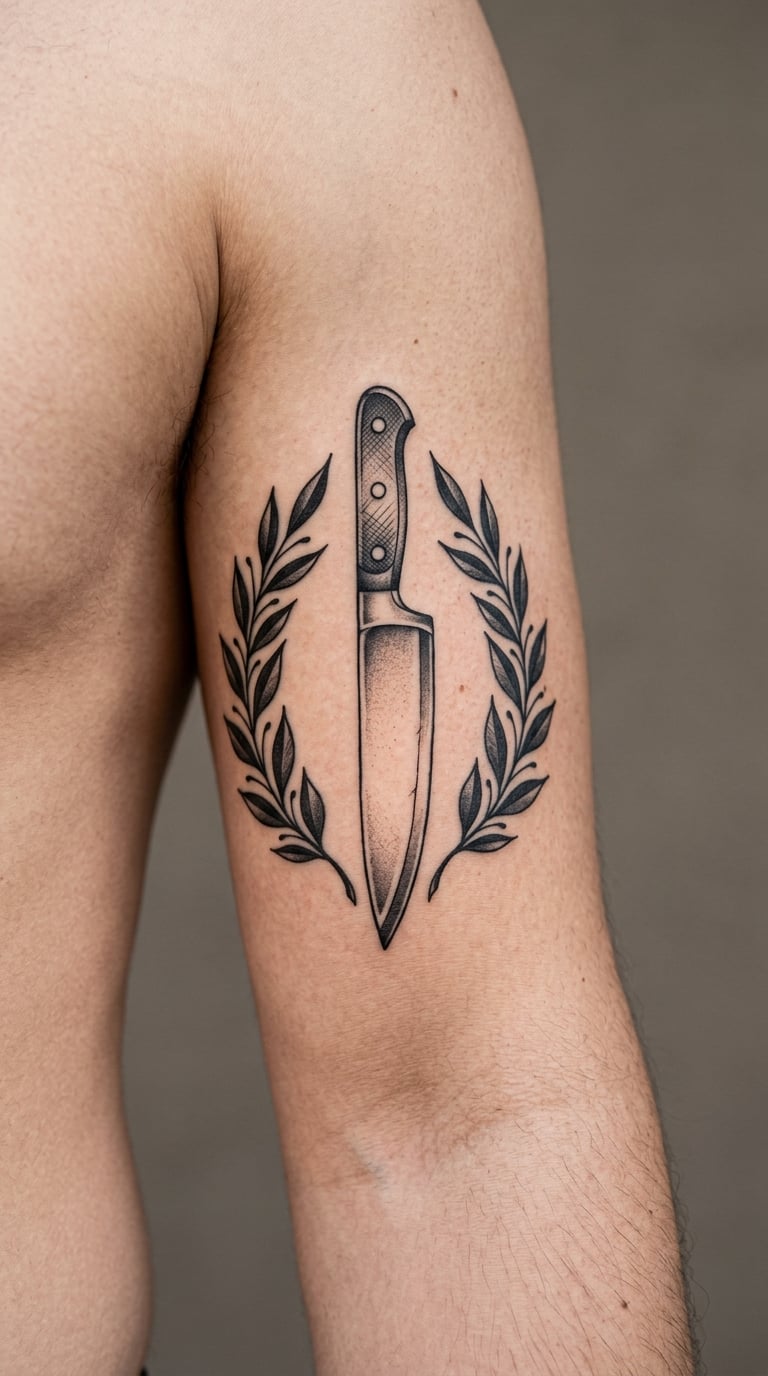
Laurel framing puts a black and grey chef knife in the centre with two symmetrical branches curving up around the blade, leaves filled in with smooth grey shading. Keep the leaves generous and the shading simple, or the piece turns into a mush in a small size.
Laurel is borrowed from classical imagery of achievement, so people read it as recognition for finishing something hard, whether that is a certification, a stage, a decade in kitchens or a restaurant opening.
Placement: upper arm or the back of the shoulder. Size: 5 to 6 inches (12.5 to 15 cm) tall including the branches. Style: black and grey, shaded. Pain: medium.
Ageing note: grey wash shading in leaf shapes is a common target for a touch-up, because light grey areas lose density first.
Make it yours: have the leaves wrap slightly around the arm so the composition follows the muscle rather than sitting flat on it.
7. Micro-Reality Chef’s Knife on the Finger
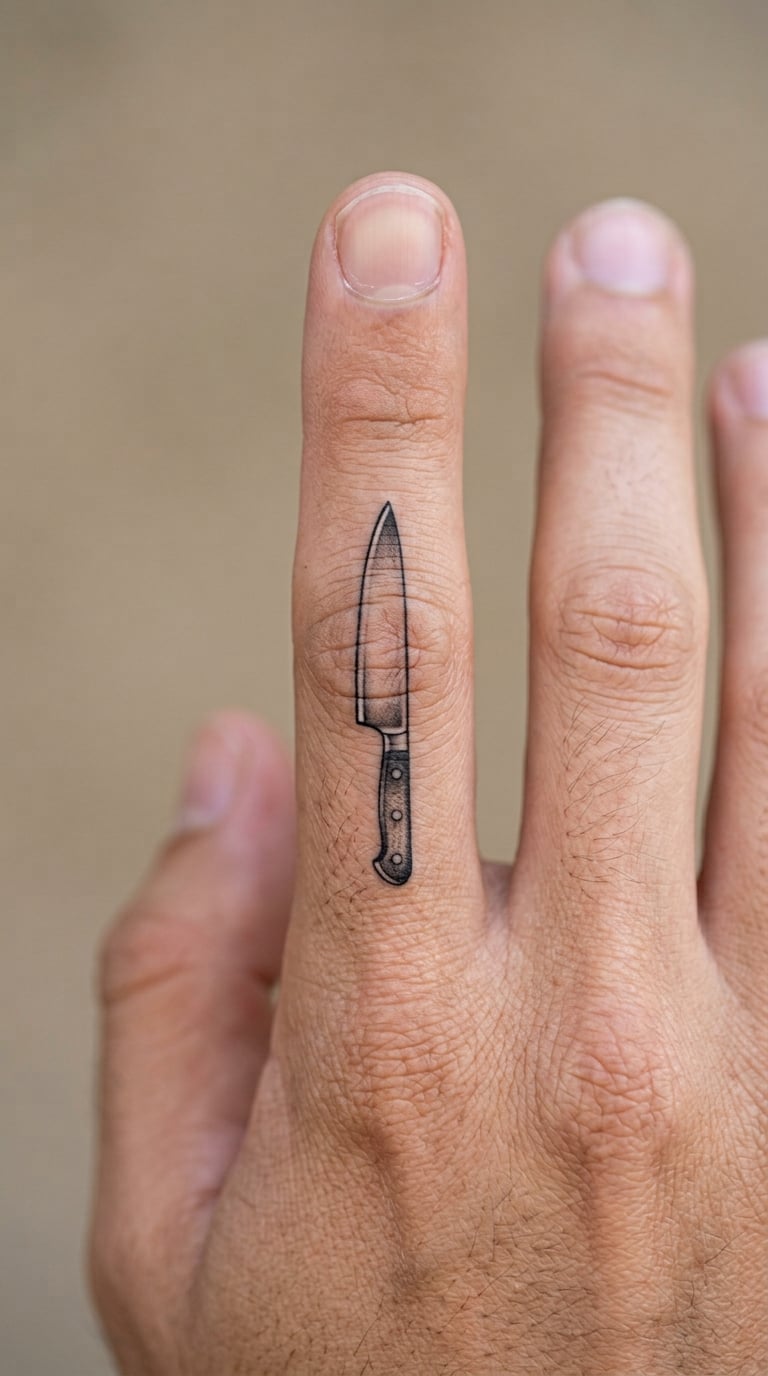
Micro-reality means the tattoo is rendered the way it would appear in a photograph: steel drawn with soft grey gradients, a hint of reflection along the spine, rivets picked out in white. The whole knife fits on the side of a finger, which is the entire point.
Finger tattoos are the most personal placement on this list. They are also the one most likely to blur, so plan on it being a small, slightly softened mark in ten years rather than a crisp knife.
Placement: side of the index finger, aligned with the bone. Size: under 1 inch (2.5 cm). Style: micro-realism. Pain: high, the sides of the fingers are thin skin over bone with very little cushion.
Ageing note: fine detail on fingers fades fastest of any placement. Many people accept the softness as part of the look, or re-touched it every few years.
Make it yours: tattoo the knife you actually reach for most. At this scale the silhouette is everything, so a recognisable profile matters more than detail.
8. Chef Knife with Flame Details
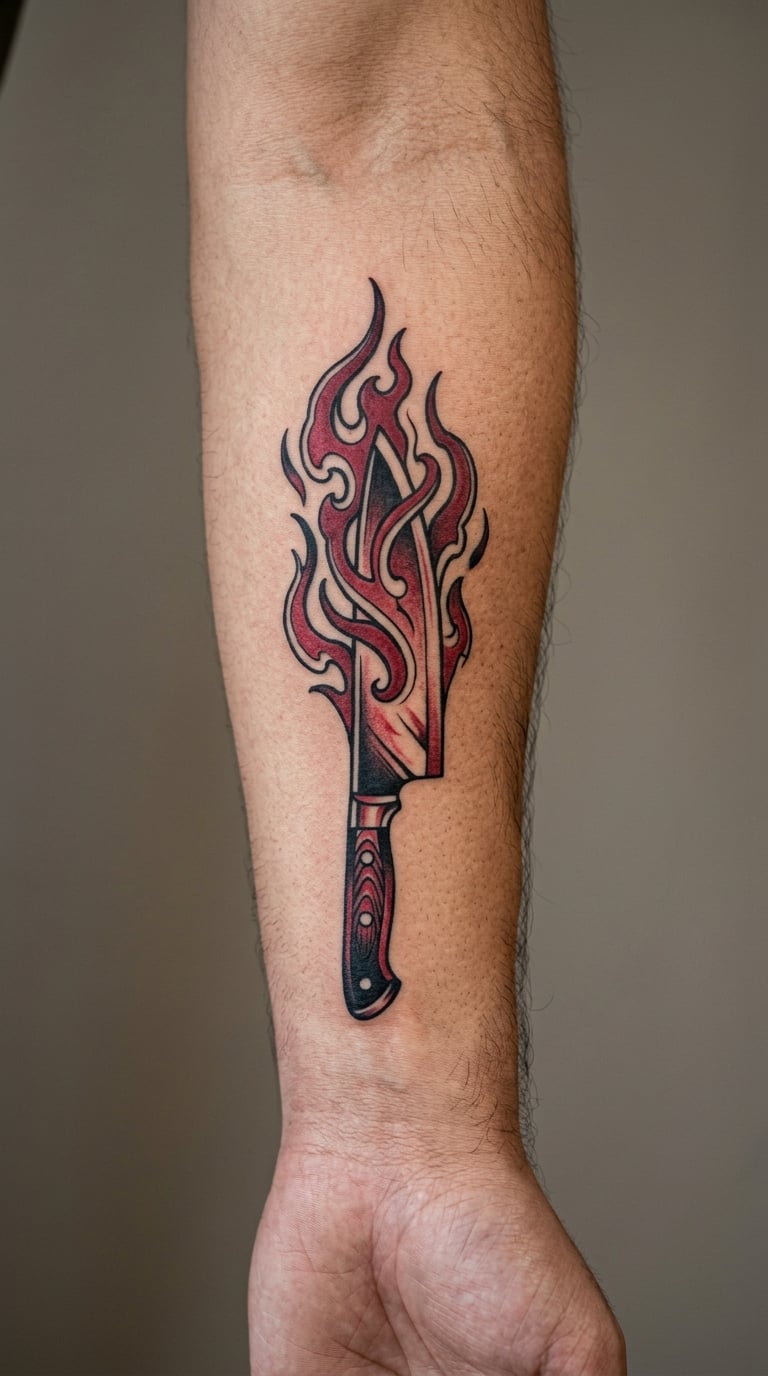
Flames are the traditional way of saying a knife is working. Here the blade is drawn in black with a red core, and stylised flames rise from the cutting edge in loose black and red shapes rather than realistic fire.
It suits cooks who want heat and movement in the design, and it works especially well if the flame shapes follow the curve of the blade instead of floating above it.
Placement: outer forearm, blade pointing down or up along the arm. Size: 4 to 5 inches (10 to 12.5 cm). Style: black and red illustrative. Pain: medium.
Ageing note: red pigment fades noticeably faster than black, so the flames will lose their colour before the knife loses its outline.
Make it yours: have the flames fade into nothing at one end of the blade rather than stopping abruptly, which makes the composition look deliberate rather than crowded.
9. Japanese-Inspired Chef Knife Design
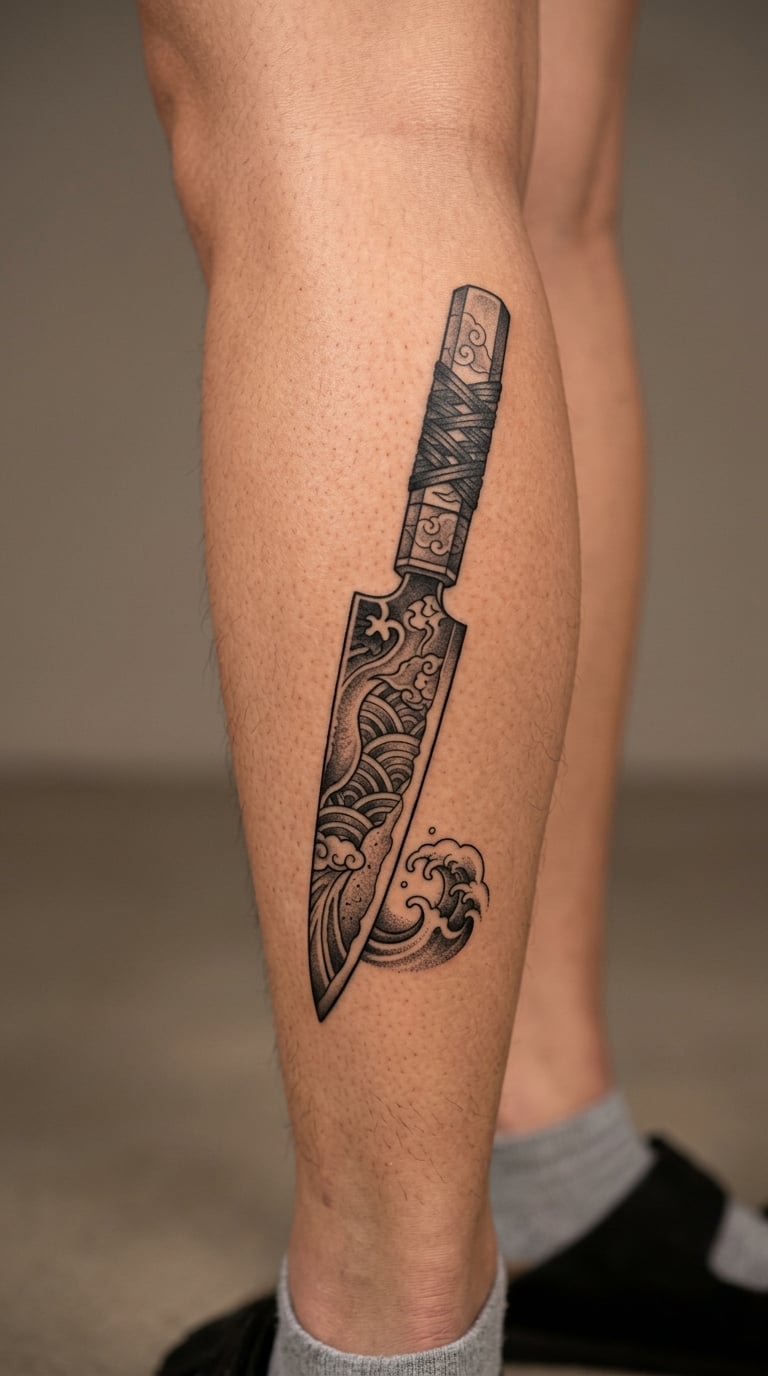
A Japanese chef knife tattoo draws a gyuto with the details that make it a gyuto: a long straight spine, a gently curved edge, a wooden octagonal handle and a visible tang running into it. Shading stays smooth and even, with one small wave or cloud form as the only decorative element.
The vocabulary matters here. On r/chefknives, people talk about hamon, Sakai work, full tangs and nickel pins, and that vocabulary is the difference between a tattoo that reads as a real kitchen knife and one that reads as a sword.
Placement: calf, inner arm or back of the upper arm. Size: 5 to 7 inches (12.5 to 18 cm) long. Style: Japanese influenced, smooth black and grey. Pain: low to medium depending on the spot, the calf is one of the easier places to sit through.
Ageing note: hairlines such as the hamon or the tang pins are the first to disappear at small sizes. Ask for them to be cut heavier than the drawing looks.
Make it yours: have your own knife’s handle shape reproduced, including the wood grain direction. It is the detail that gets the reaction from other cooks.
10. Chef Knife and Egg Tattoo
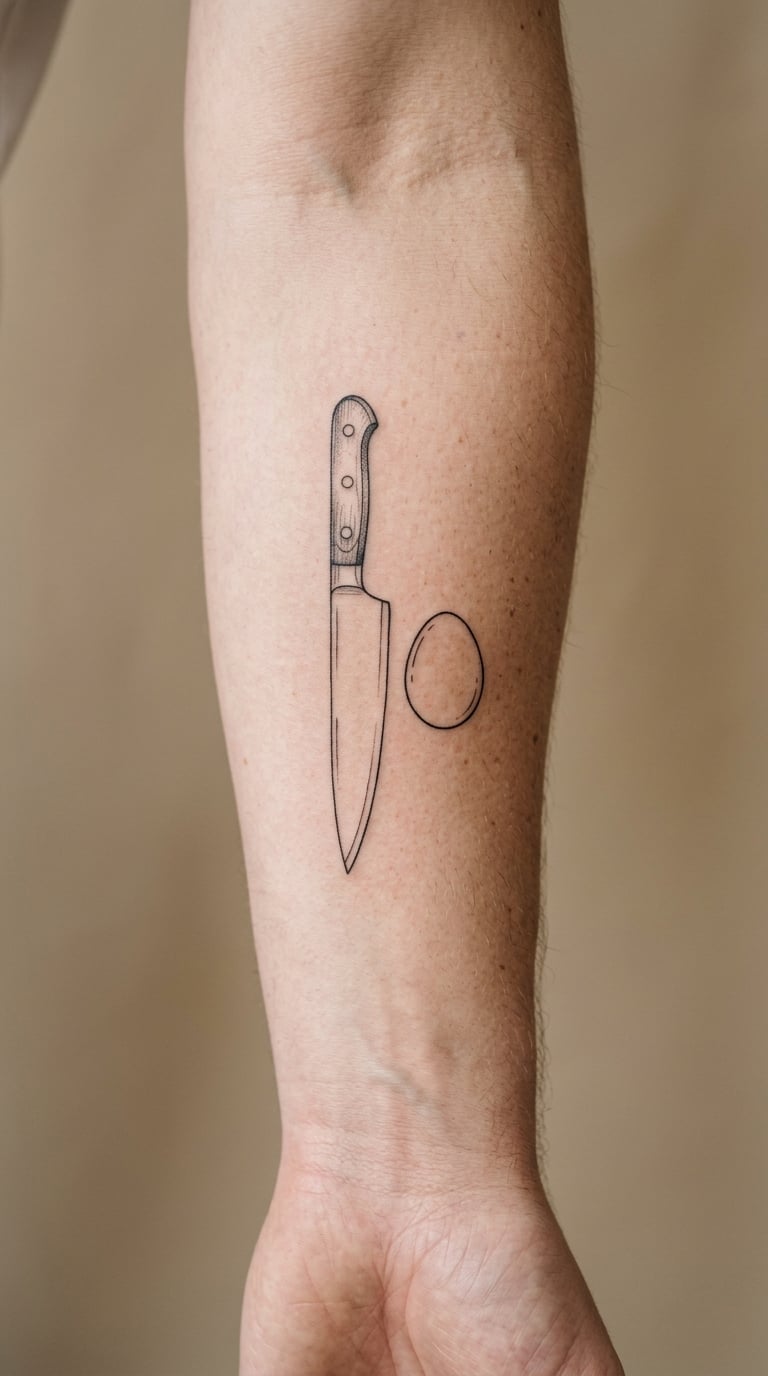
One chef knife tattoo idea adds a single outlined egg next to a fine-line knife, nothing else, no plate, no pan. The two shapes sit at the same height, spaced about half an inch apart, and the composition stays deliberately empty around them.
An egg is a breakfast and baking symbol rather than a line-cook one, so this tends to suit pastry chefs, people who cook at home, or anyone who would rather wear a softer design than a bold blade.
Placement: inner forearm. Size: 3 inches (7.5 cm) tall for the pair. Style: fine line outline, no fill. Pain: medium.
Ageing note: two small thin shapes side by side on moving skin will need a top-up sooner than one solid shape would.
Make it yours: swap the egg for a single ingredient you actually use every week, a lemon, an onion, a sprig of thyme, whatever it is.
11. Chef Knife with Wheat Stalks
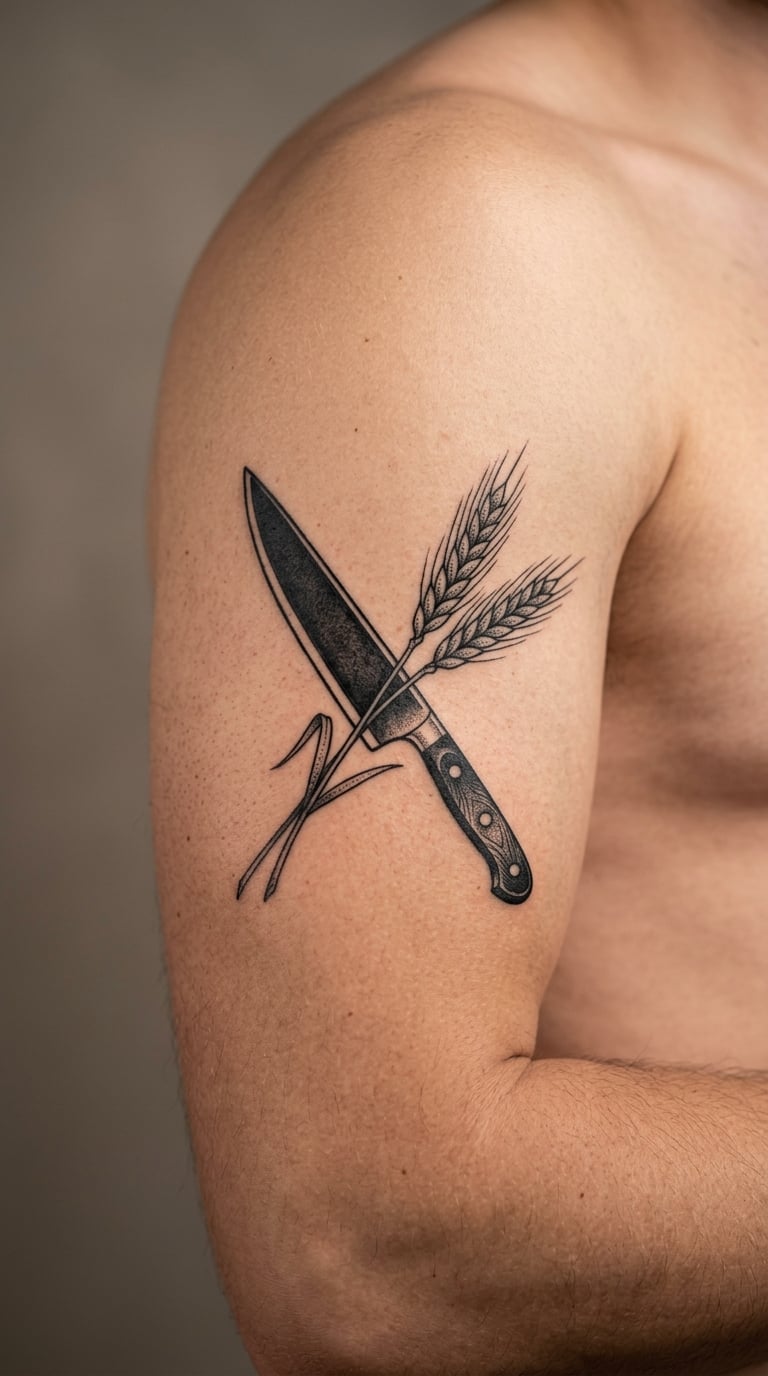
Wheat gives a chef knife tattoo an agricultural frame. A solid black knife sits behind two thinner wheat stalks that cross over the blade diagonally, kernels drawn as small teardrop shapes stepping up each stem.
It covers both halves of the food chain in one image, the ingredient and the tool, and that is the reason people choose it over a plain knife. It reads as farming, baking, or just working with food at a basic level.
Placement: upper arm or the back of the shoulder. Size: 5 inches (12.5 cm) tall including the stalk tips. Style: blackwork with fine line detail. Pain: medium.
Ageing note: the wheat kernels are small repeated shapes, and repeated small shapes blur together faster than a single outline does.
Make it yours: have the wheat drawn with a full head and a few loose grains, which keeps it recognisable at smaller sizes than a bare stalk would be.
12. Dotwork Chef Knife and Lemon Slice
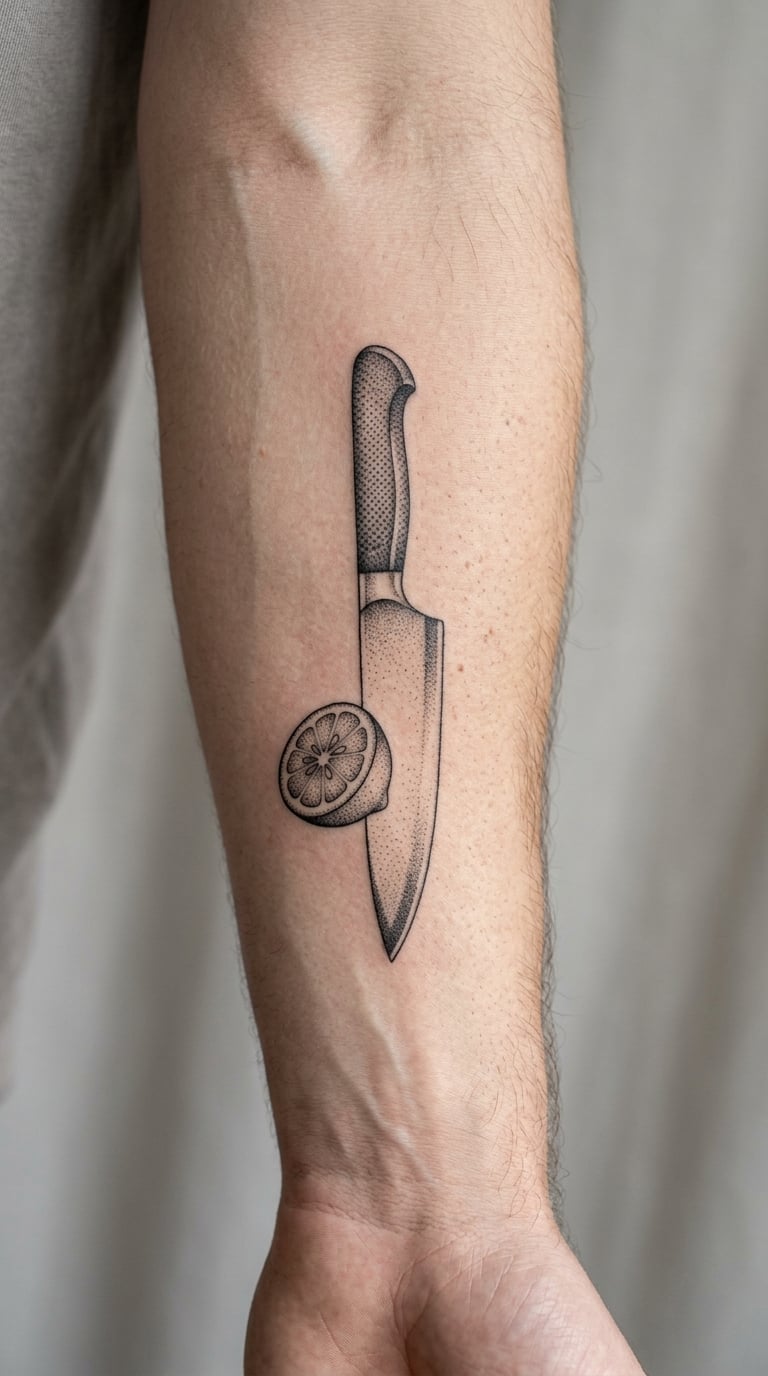
Dotwork builds tone out of nothing but dots, graded from dense black to open spacing. A dotwork chef knife tattoo uses that gradient along the blade for a soft metallic effect, with a small lemon slice behind the handle filled in the same way.
Dotwork looks graphic and a little vintage without needing any colour, and it suits people who find solid blackwork too heavy for the size they want.
Placement: outer forearm, or anywhere with a flat area large enough for the whole composition. Size: 3 to 3.5 inches (7.5 to 9 cm) tall. Style: dotwork. Pain: medium, dotwork takes longer than a line piece so expect a longer sitting.
Ageing note: dots spread slightly as they heal and the gaps between them close up over the years, so the tone lightens. Density can be topped back in later.
Make it yours: have the dot gradient run along the blade edge like a highlight, which is the detail that makes dotwork look like steel rather than a pattern.
13. Neo-Traditional Chef Knife with Banner
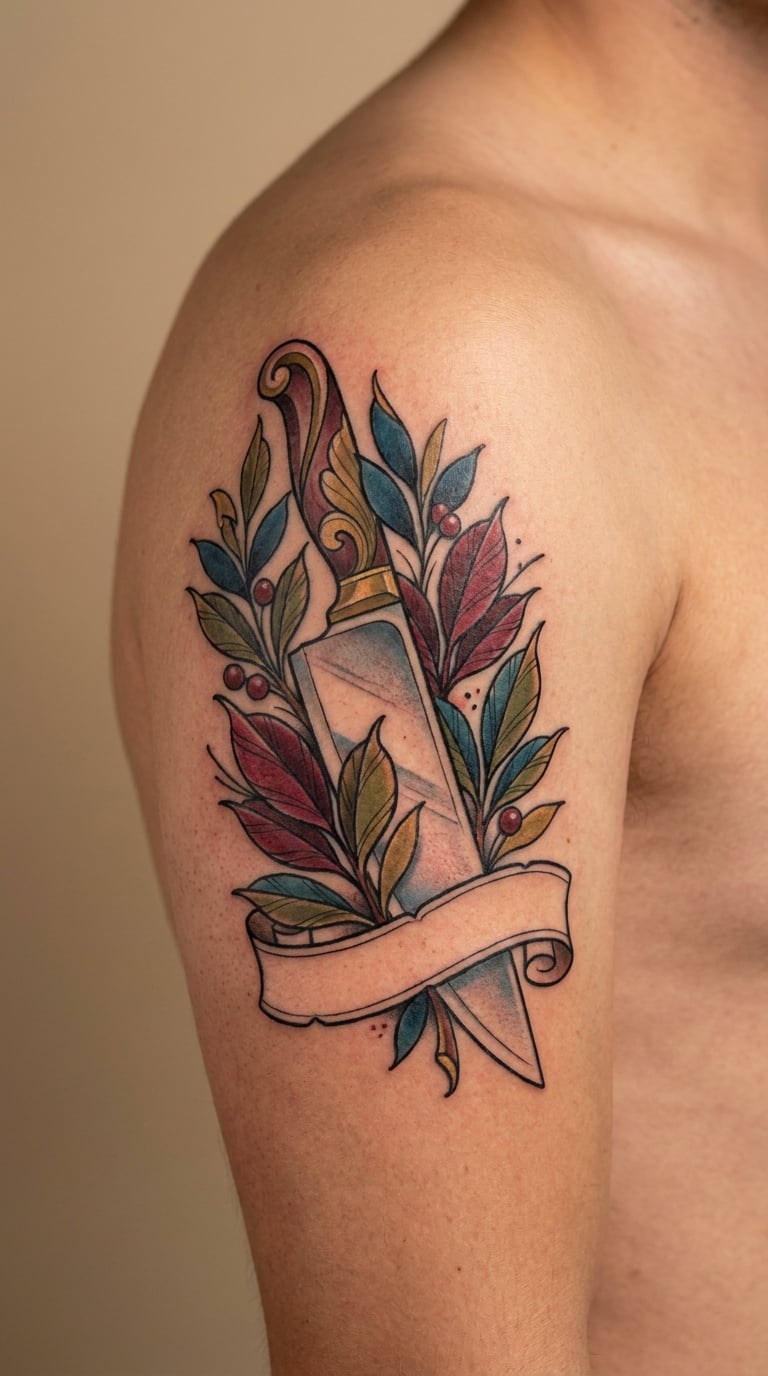
Neo-traditional is a colour style with heavy black outlines, deep saturated shading and a wider range of hues than traditional American. A neo-traditional chef knife tattoo usually runs the blade at an angle with a curved banner underneath, and the banner is where the text goes.
Very few motifs carry text this well, because a knife is a long horizontal shape and a banner wants exactly that. It is the most personal design in this list.
Placement: shoulder, upper arm or across the chest. Size: 6 to 7 inches (15 to 18 cm) with the banner. Style: neo-traditional. Pain: high, the shoulder and upper arm are bony and the session is long.
Ageing note: banner lettering in a thin script is the weak point. Have the artist run the letters a little heavier than feels bold, or plan on a lettering touch-up.
Make it yours: put the kitchen you trained in, a date, or a short family motto on the banner. Keep it under five words, it will read better.
14. Chef Knife and Garlic Bulb
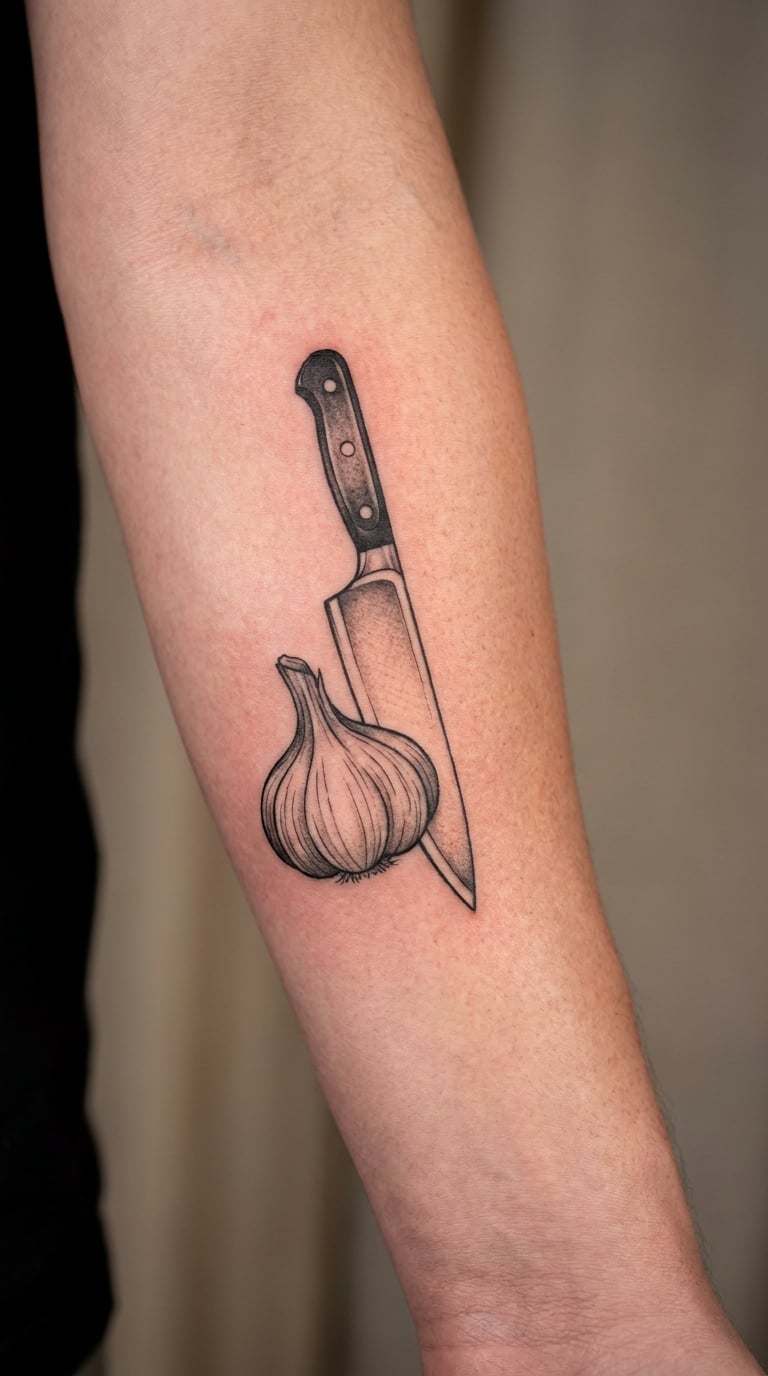
Garlic is the classic savoury ingredient pairing for a knife. In this chef knife tattoo the bulb is drawn in black and grey with papery skin lines and individual cloves showing at the base, standing upright beside a heavier knife drawn at the same scale.
Getting the two objects at matching scale is what makes this one work. A knife next to a tiny garlic clove just looks like two unrelated stickers, and that mismatch is the most common version I see come back from a first session.
Placement: outer forearm, both shapes vertical. Size: 4 to 5 inches (10 to 12.5 cm) tall. Style: black and grey realism. Pain: medium.
Ageing note: the fine papery lines on the bulb disappear first. Worth a touch-up at around the four year mark.
Make it yours: swap the garlic for an onion, which suits a line cook better than a pastry kitchen, or add a small sprig of thyme across the base of both.
15. Minimal Cleaver Icon
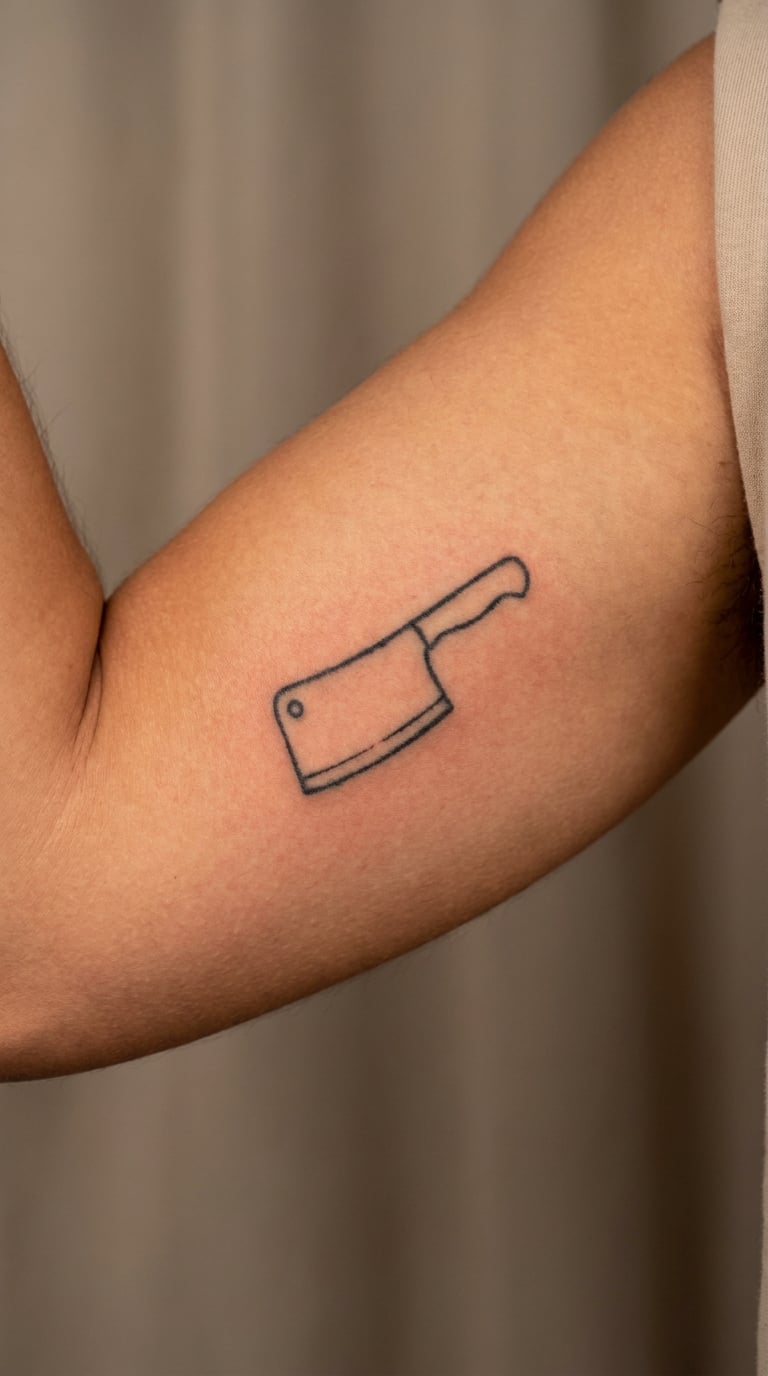
A cleaver is a far more compact shape than a chef’s knife, which makes it the easiest kitchen tool to tattoo small. This minimal cleaver tattoo is a filled black rectangle with a rounded cutting edge, a narrow handle and nothing else, no cutting board, no motion lines.
It also comes with a different tone. A cleaver reads as prep work, as volume cooking, as feeding people, which is a different statement from the precision of a chef’s knife.
Placement: inner bicep, inner forearm or the side of the calf. Size: 2 inches (5 cm) wide. Style: minimal icon, solid fill. Pain: low to medium, the bicep is a comfortable place to work.
Ageing note: solid shapes hold up extremely well, so this is a good choice for someone who wants a cooking tattoo that still looks sharp in fifteen years.
Make it yours: a matching pair, one cleaver on each forearm, is a common way to wear this without it looking like a brand logo.
16. Chef Knife with Coffee Cup
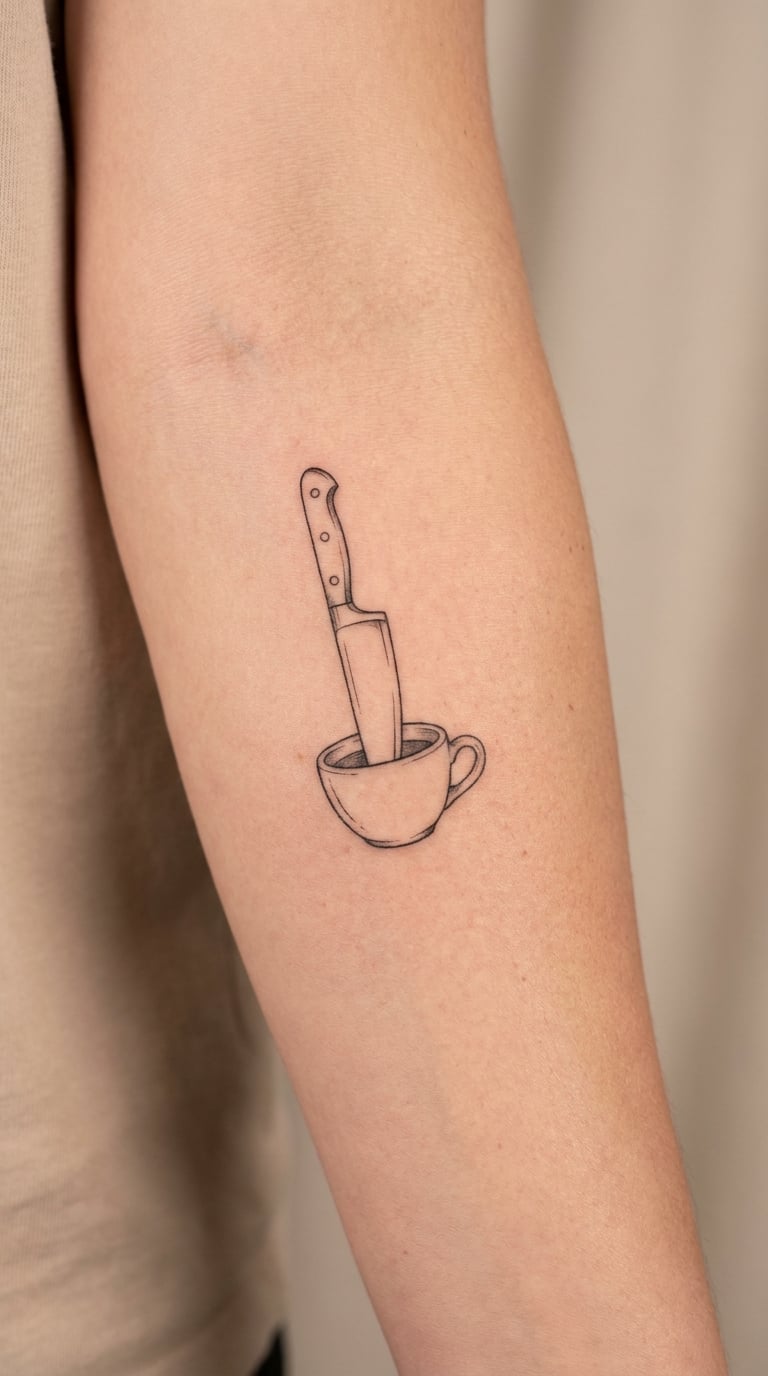
The coffee cup in this chef knife tattoo idea is drawn in fine line, small, with two curved steam lines, and the knife handle sits inside it with the blade rising straight out of the top. It is a compact composition that reads as a kitchen moment rather than a tool.
It suits café workers, caterers and cooks who know the fifteen-minute coffee break in the middle of service better than anyone. It also softens the blade enough to feel less martial.
Placement: inner forearm. Size: 3 to 3.5 inches (9 cm) tall for the whole thing. Style: fine line. Pain: medium.
Ageing note: the steam lines are hairlines. Expect them to be the first part you cannot read at arm’s length after a few years.
Make it yours: use a real mug shape rather than a generic cup, or put the number of years you have worked in kitchens in place of the steam lines.
17. Colorful Chef Knife in a Kitchen Scene
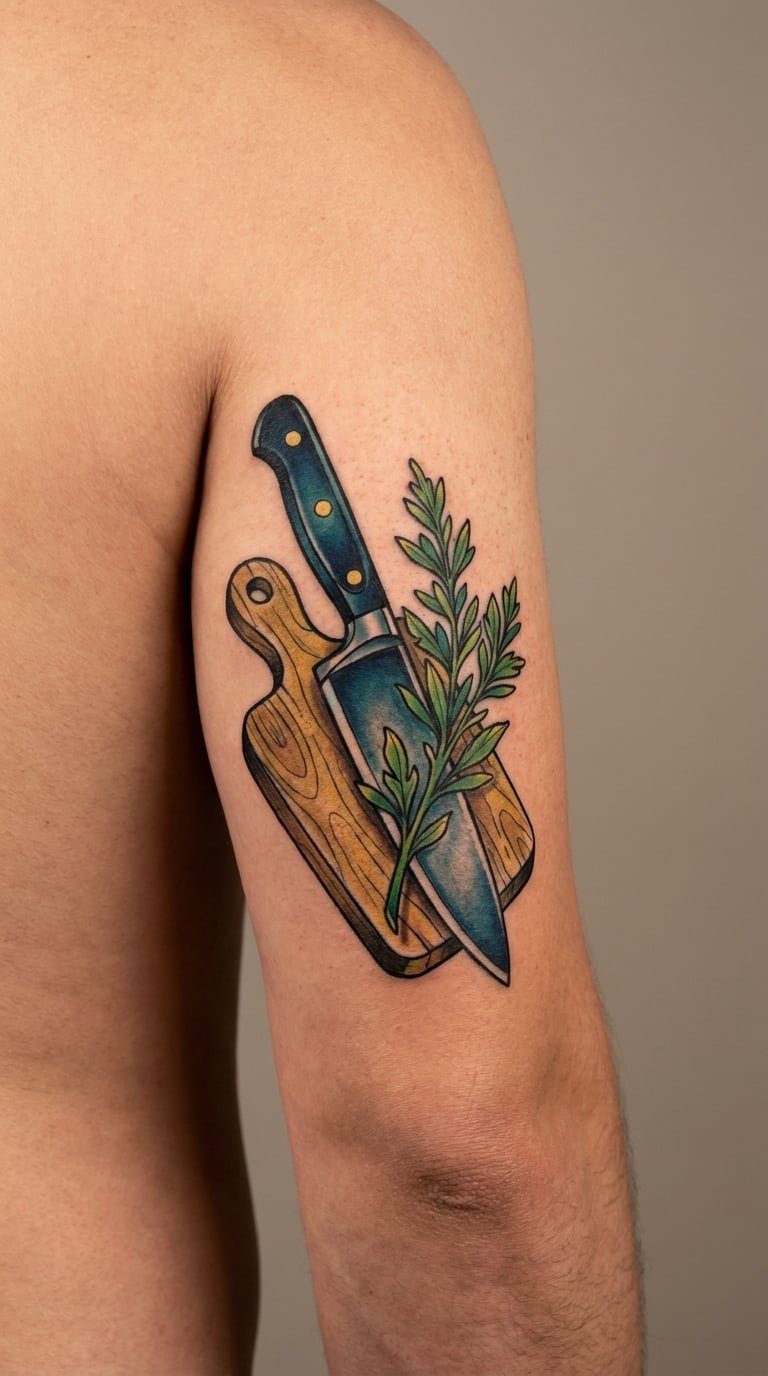
Instead of one motif, this chef knife tattoo idea builds a small vignette: a knife angled across a cutting board, a herb sprig and a couple of scattered pieces, all outlined in a consistent illustrative line with flat colour fills. Two or three colours is the right amount, more turns muddy fast.
It works for people whose tattoo is really about the kitchen as a whole rather than one tool, and the scene gives you room to add a detail later without a new tattoo.
Placement: upper arm, outer forearm or the back of the calf. Size: 5 to 6 inches (12.5 to 15 cm) square. Style: illustrative with colour. Pain: medium, and it is a long sitting.
Ageing note: flat colour blocks in the smallest elements, herb leaves, small pieces, will fade unevenly. Keep those areas larger than feels necessary.
Make it yours: include something specific to your station, a particular board, a burn on the counter wall, the herb you reach for first.
18. Blackwork Chef Knife with Bone Handle
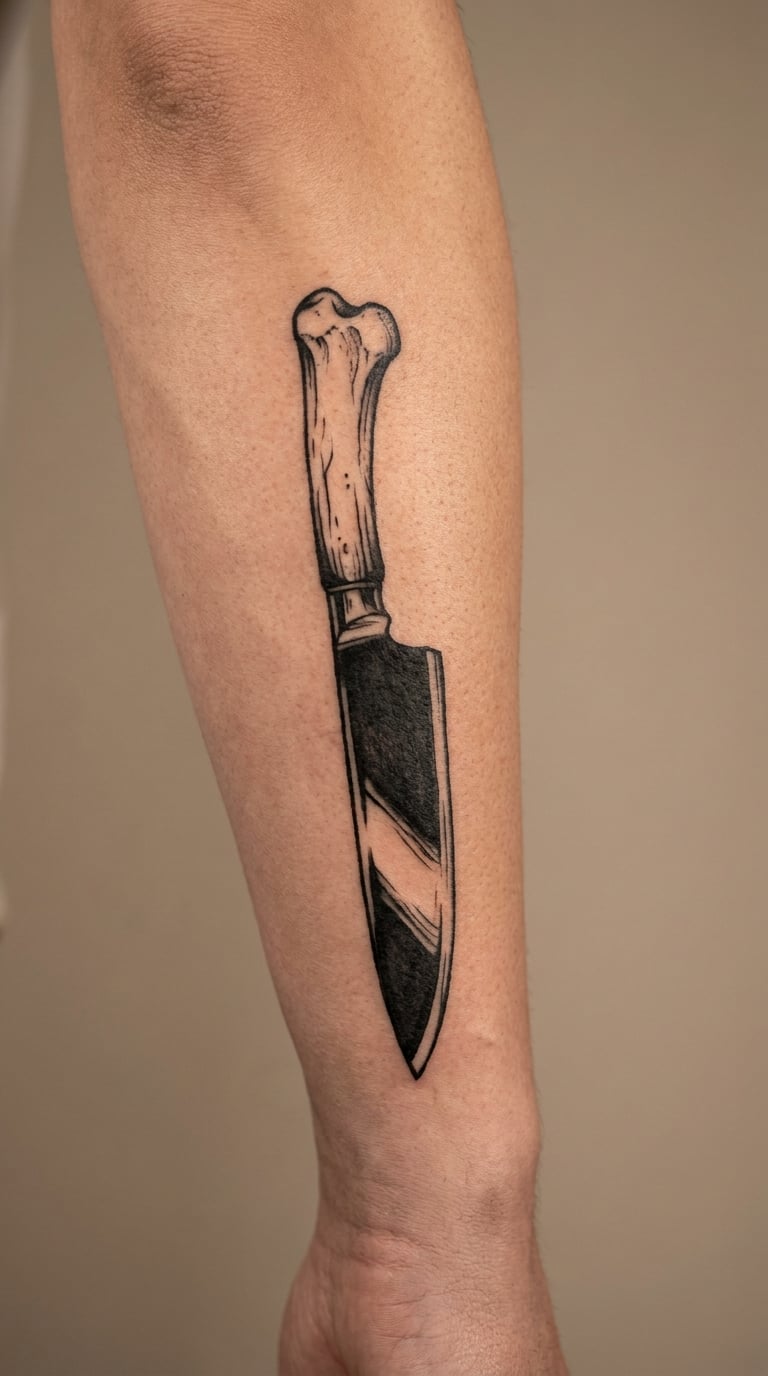
High contrast is the whole idea here. The blade and spine are solid black, the outline is sharp, and the handle is left as pale skin or light grey with a few black marks for the rivets, so the bone handle reads as the lightest part of an otherwise dark shape.
Placed vertically along the forearm, running with the arm rather than across it, it looks bigger than its actual size. The vertical axis is the trick to making a 5-inch piece feel substantial.
Placement: forearm, vertical, from wrist toward elbow. Size: 5 to 6 inches (12.5 to 15 cm) long. Style: blackwork with negative space. Pain: medium.
Ageing note: the pale handle will pick up a slight tan difference between sun-exposed and covered skin over the first summer. Worth mentioning to your artist if you plan to keep it covered.
Make it yours: have the handle left in your own skin tone with a thin black outline only, no fill. It looks best on skin that is even in tone.
19. Chef Knife with Small Compass
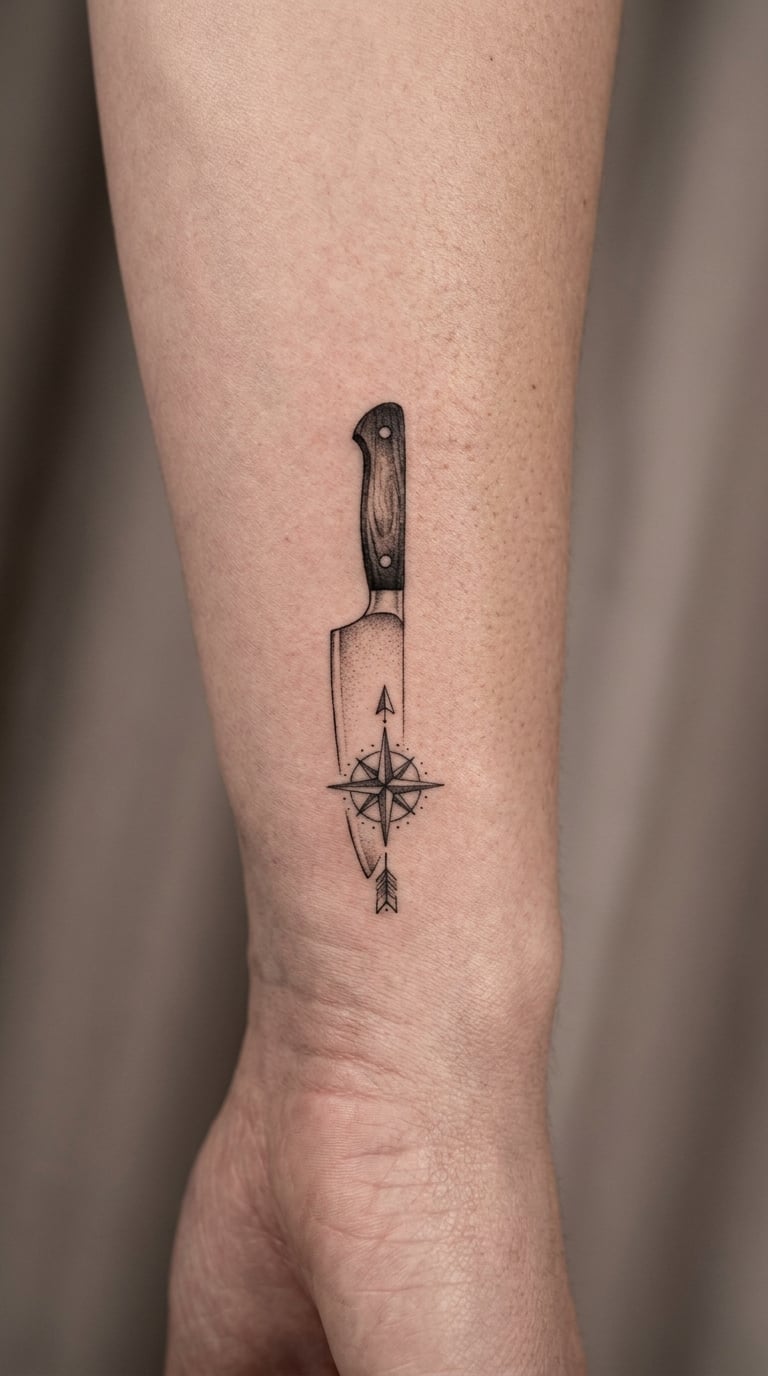
A small compass sits directly beneath the handle of a black and grey chef knife, about half the height of the handle itself, with a simple four-point rose and a fine circle around it. The scale difference keeps the compass subordinate to the knife.
Compasses get chosen for travel, for working in different kitchens or countries, or for a general sense of direction. It is the design people ask for when their cooking took them somewhere rather than when it is about a single place.
Placement: wrist or the inner forearm just above it. Size: 3 inches (7.5 cm) for the knife, with the compass under it. Style: black and grey line work. Pain: medium.
Ageing note: the compass rose points are the fragile part. Small radiating details blur faster than a closed outline.
Make it yours: have the needle point in a real direction, or have the circle replaced by a date and place you cooked in.
20. Sketch-Style Chef Knife Tattoo
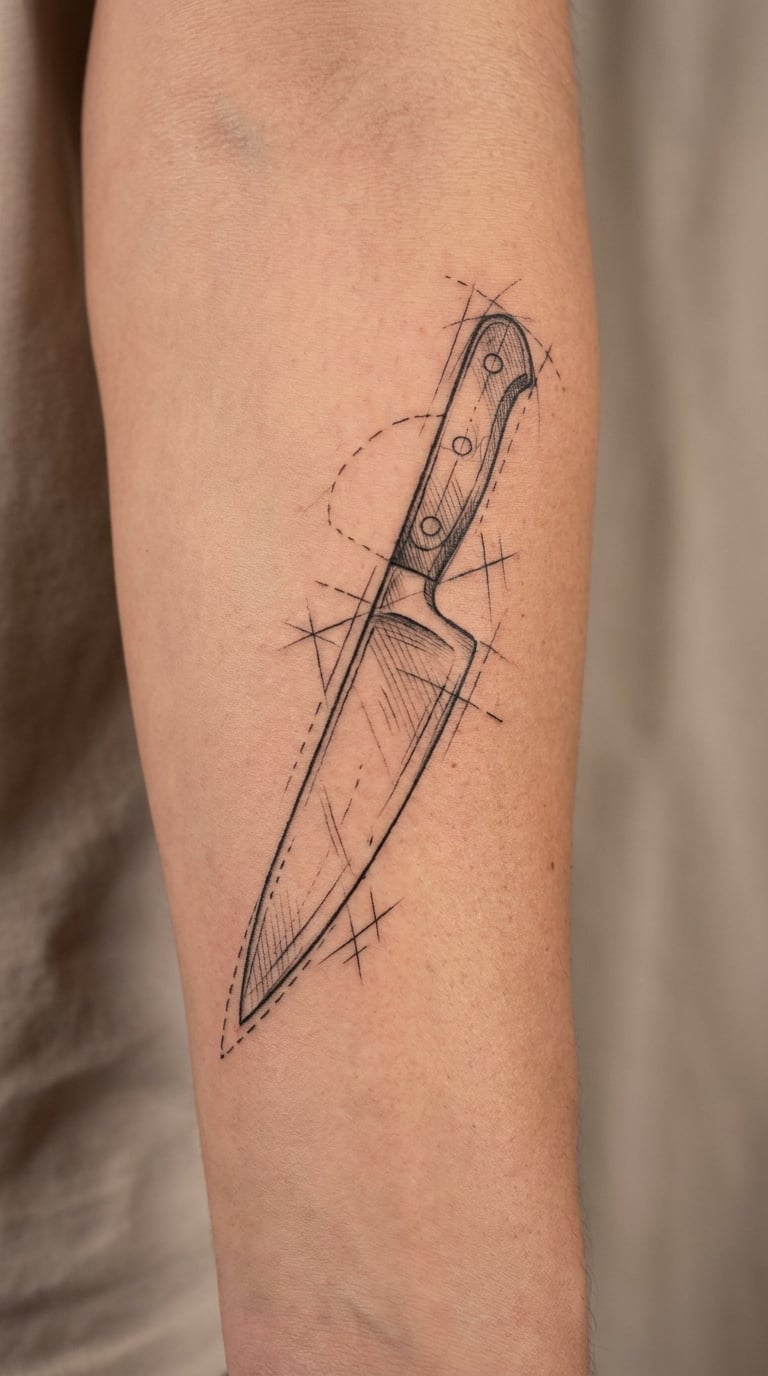
A sketch-style chef knife tattoo is drawn the way a design is drawn on paper: light construction lines, the blade outline built from simple straight segments, a few heavier lines finished off, and some of the guide marks left visible. The handle is where the finished lines go darkest.
This one appeals to people who like the process of a tattoo as much as the result. The leftover construction lines are the point, and an artist who normally does solid blackwork will enjoy drawing it.
Placement: outer forearm, chest or anywhere flat with room for the loose lines. Size: 4 inches (10 cm) long. Style: illustrative sketch. Pain: low to medium, there is very little solid area to work through.
Ageing note: the lightest guide lines are barely there by the time it is fully healed, so ask the artist to make them darker than the sketch looks on paper.
Make it yours: have your own knife sketched first and the tattoo transferred from that, so the construction lines are genuinely your knife’s rather than decoration.
21. Chef Knife with Small Tomato
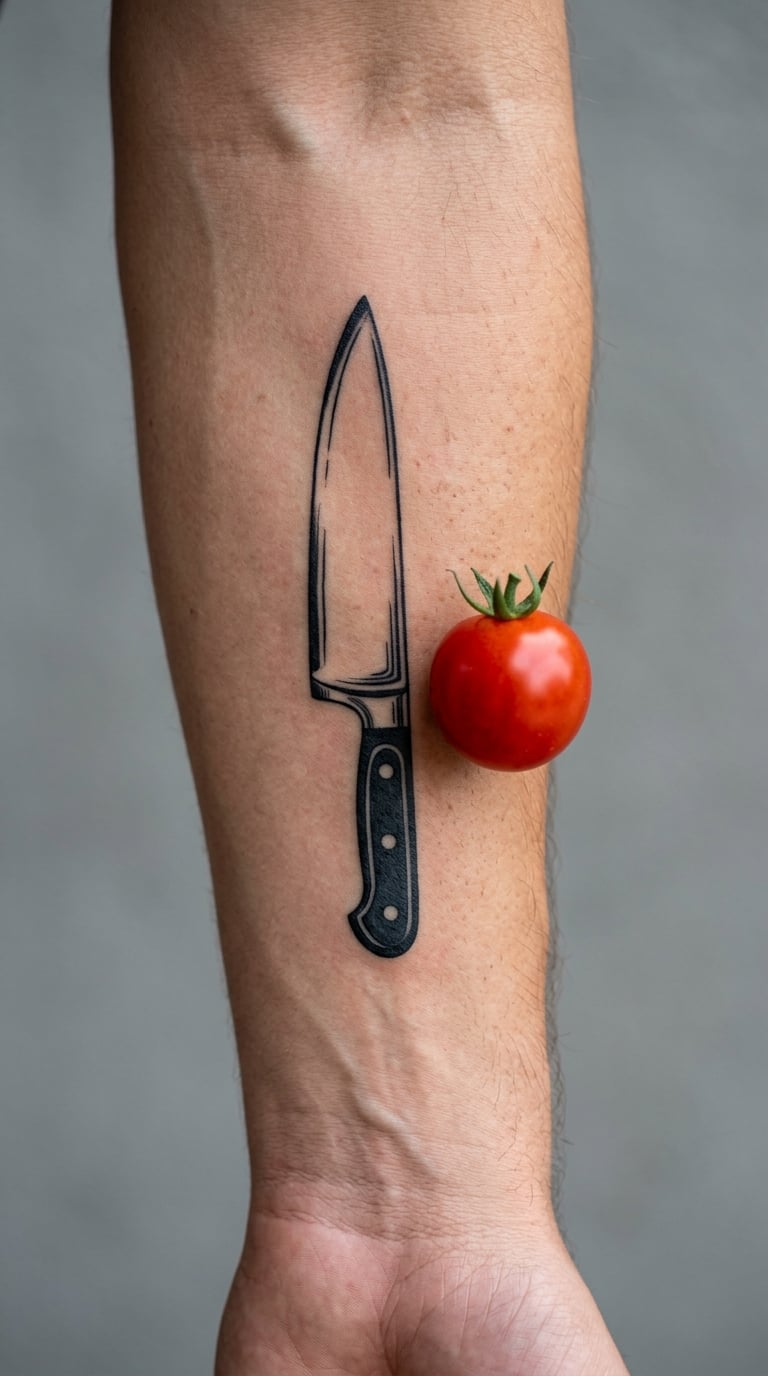
One chef knife tattoo idea keeps the knife in clean black line work and adds a single tomato filled in flat red, with a green calyx on top. One colour only, no gradient, and the two shapes aligned along the same baseline.
A red accent is the cheapest way to stop a black design from looking severe, and it is the one people notice from across a room. The tomato also keeps the piece firmly on the side of cooking rather than the side of a weapon.
Placement: lower forearm, both shapes side by side. Size: 3 inches (7.5 cm) tall. Style: bold line with a single colour accent. Pain: medium.
Ageing note: the red will fade first and go slightly orange before it goes dull. A single colour top-up is a quick appointment.
Make it yours: swap the tomato for a chilli, a lemon, or a small red onion, depending on the kind of cooking you actually do.
22. Realistic Chef Knife with Wooden Board
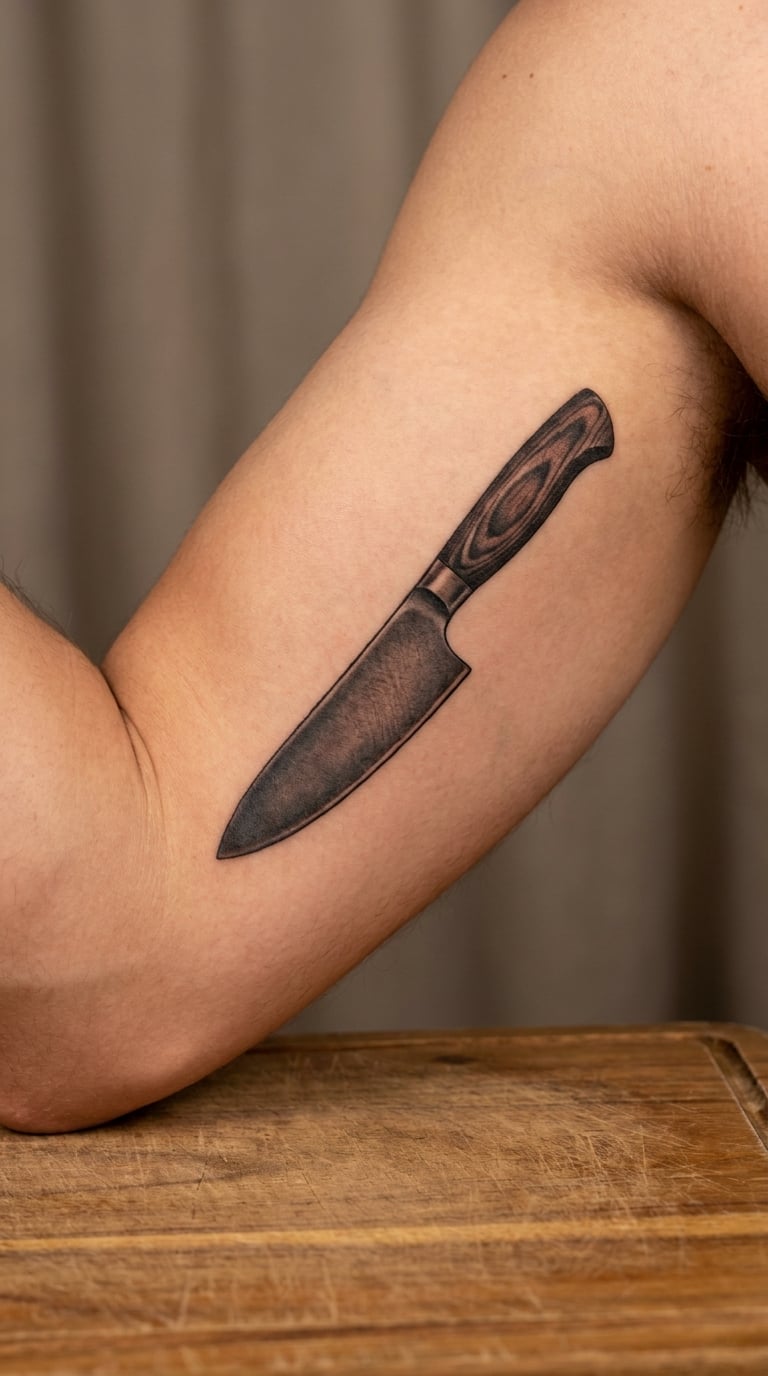
The last chef knife tattoo idea is the biggest one. A realistic knife in black and brown rests diagonally on a wooden board with visible grain, rendered with soft grey gradients along the spine and a dark shadow where the blade meets the wood. This is a statement piece, not a small symbol.
It suits someone who cooks seriously, collects knives, or has a specific blade they want recorded. The honest version of this design takes a whole session or two, and it is worth booking a consultation rather than walking in with a reference folder and a free afternoon.
Placement: upper arm, across the chest, or the back of the calf. Size: 7 to 9 inches (18 to 23 cm) across. Style: realism, black and brown. Pain: low on the upper arm and calf, medium on the ribs.
Ageing note: wood grain is a large area of mid-tone shading, and mid-tones are the first thing to wash out. A refresh at around the five year mark keeps the board looking like wood rather than grey.
Make it yours: this is the design to use if the knife is a real one. Photograph your own knife in flat light, or take it to the consultation, because the grain of the handle and the curve of the edge are what make it yours rather than a stock rendering.
How to Choose the Right Design
Most disappointing knife tattoos are not bad drawings. They are a good drawing in the wrong style, at the wrong size, in the wrong spot, and that is entirely fixable before you sit down.
Match a chef knife tattoo style to the placement
Fine line and watercolour need open, flat skin with room around the design, which means the inner upper arm or the inner forearm. Blackwork and traditional work can hold their own almost anywhere, including the wrist and the upper arm, because the solid shape reads clearly against a curved surface.
Dotwork needs the largest uninterrupted area on the body, since the density of the dots depends on skin that stays flat. If you are planning dotwork, the outer forearm or the calf gives you more room than the wrist ever will.
Make the knife read as a kitchen knife
This is the single most common complaint from people who have had one done, and it also comes up constantly on r/chefknives, where people ask for inspiration and frequently worry the result will come out as a generic dagger. Three details fix it almost every time: the bolster, the rivets in the handle, and the curve of the cutting edge. A real chef’s knife has a straight spine, a gently curved edge and a handle with visible hardware. A dagger has none of those.
Bring photographs of the actual knife you have in mind. If it is a Japanese gyuto, bring a gyuto reference, not a butcher knife or a paring knife, because those are different shapes and your artist will only render what you show them.
Size it for where it will live
A knife under 2 inches (5 cm) has room for a silhouette and nothing else. Rivets, tang pins and hamon lines all disappear at that scale, so pick a design with fewer parts or plan for a top-up in a few years.
Anywhere above 4 inches (10 cm) and you can afford shading, texture and a second element like a lemon, a compass or a coffee cup. Between 2 and 4 inches is the sweet spot for a single object with a little detail, and it is the most common size people end up choosing.
Placement summary
- Inner forearm — visible when you roll a sleeve, the most popular spot for fine line work. Medium pain, and it is the side you hold a knife on, so plan around a fresh tattoo during service.
- Outer forearm — flatter, slightly easier, and takes bold styles such as traditional or blackwork well.
- Wrist — small designs only. Medium to high pain, because the wrist is thin and constantly moving.
- Fingers and hand — discreet and personal, highest pain, and the fastest placement to fade. Plan on a touch-up.
- Upper arm and shoulder — the most space and the least pain, and the only place large compositions with text fit comfortably.
- Calf and ribs — good for vertical knife designs, low to medium pain, and easier to keep covered from sun.
One practical note for anyone working in a kitchen: most cooks hold their knife in the hand of their working hand, and the inner forearm of that same side is where the handle presses and where sweat sits. A new tattoo there will be uncomfortable to brace against for a few weeks, and it will be under a sleeve in a hot kitchen. That is a scheduling problem, not a reason to avoid the placement, but book around it.
Cost and Session Time
Artist rates and shop minimums vary a lot by city, and the numbers below are the usual US ranges rather than a quote from any particular shop. A shop minimum means the smallest tattoo they will do still carries a floor price, so a tiny design can cost the same as a small one.
- Small designs, under 2 inches (5 cm) — usually charged at the shop minimum, which commonly falls somewhere between 80 and 200 dollars for a simple single-object piece.
- Medium designs, 2 to 4 inches (5 to 10 cm) — typically 200 to 500 dollars, depending on detail level and how much colour is involved.
- Larger designs, 4 to 7 inches (10 to 18 cm) — commonly 500 to 1500 dollars, and detailed realism at the top of that range can go higher.
- Very large or full piece — priced by the session, often 150 to 300 dollars an hour, and several sessions at that rate.
Time follows size and detail rather than a fixed rule of thumb. A small fine line knife is often a 20 to 40 minute sitting. A medium composition with colour is 2 to 3 hours. The realistic knife on a wooden board is a long project, usually 4 to 6 hours spread over two sessions, because holding one spot of the board still for that long is a lot to ask of anyone.
Ask your artist about a second session rather than rushing the first. Tattooing a fresh piece over unfinished work is the fastest way to end up with a patchy result, and most artists would rather split the work than compromise it.
Aftercare Basics
Always start with your artist’s aftercare instructions, since they know exactly what they did in your skin that day. The general guidance below is a baseline, not a replacement.
- Follow your artist’s aftercare instructions first. They come before anything general, especially if you have a specific ointment or film recommendation.
- Wash gently, twice a day. Clean water and a mild unscented soap, then pat dry with something clean. Do not scrub or soak.
- Keep it moisturised but not wet. A thin layer of whatever your artist recommends, reapplied a few times a day. Heavy creams trap heat and soften fresh line work.
- Leave loose clothing alone for a few hours. Tight cuffs and watch straps rub a fresh tattoo and lift the ink. Cotton is the best fabric against the healing area.
- Keep it out of the sun. Direct sun on a healing tattoo fades the pigment permanently, and indoor tanning is no better. Cover it up for the first couple of weeks.
- Know the normal signs and the warning signs. Mild redness, swelling and itching in the first few days are normal. Increasing pain, spreading redness, or yellow or green discharge mean you should contact your artist and see a doctor.
- Plan the kitchen around it. Expect the area to be tender for two to three weeks, longer on the inner forearm or the fingers. Double gloves over a healing hand tattoo are a real adjustment for anyone working in food service.
Frequently Asked Questions
What does a chef knife tattoo symbolize?
It usually stands for the work itself: craft, precision, discipline and pride in feeding people. Because the chef’s knife is the one tool a cook touches on every single item they produce, inking it is a public declaration of the profession. People also use it as a marker of a stage, a certification or a kitchen they trained in. There is no fixed universal meaning, so the significance is entirely personal.
What does a knife tattoo mean in general?
Outside a kitchen context, knife tattoos tend to be read as strength, precision, discipline, sacrifice or protection, and some people read them as aggression or gang affiliation. In a professional kitchen it usually reads the other way, since everyone in the room recognises a kitchen knife. If you want it to read as craft rather than as a weapon, keep the blade profile recognisable and add a culinary element such as wheat, herbs or a rolling pin.
What tattoos do chefs get?
Chef’s knife is the most common by a wide margin, along with cleaver designs for prep cooks and bakers. Pastry chefs lean toward rolling pins, whisk, eggs and wheat, while butchers and pitmasters often choose cleavers or butcher knives. A lot of cooks tattoo the silhouette of their own knife, especially an inherited or hand-forged one. A few also get a small dot or line for each station they worked through.
Where should I put a chef knife tattoo?
The inner forearm is the most popular spot because a rolled sleeve shows it and the skin is flat enough for clean line work. The outer forearm is flatter and takes bold styles better. The wrist works for small designs only, fingers are discreet but fade fastest, and the upper arm or calf gives you the most space and the least pain for a large piece. Avoid the inside of the elbow if you can, since movement and sweat there give the worst healing.
Do chef knife tattoos hurt?
Expect the wrist, fingers and inner forearm to be the most painful, since the skin is thin and the nerve endings are close to the surface there. The upper arm, calf and shoulder are noticeably easier. A medium knife design usually takes 20 minutes to an hour and a half, so the discomfort is brief and uneven rather than constant. Deep blackwork and neo-traditional colour work in a large area are the hardest sessions of the set.
How long does a forearm knife tattoo take to heal?
A small forearm design is usually surface-healed in two to three weeks and fully settled at four to six weeks. Colour and fine line work can look slightly faded for a couple of months while the skin finishes returning to normal, so do not judge the result too early. Plan on at least one touch-up on fine line work within a few years, particularly on the inner forearm, and more often on the fingers and hand.
Conclusion
For a first tattoo, the fine-line chef knife on the inner forearm or the minimal line art on the wrist is the safest place to start. Both are small, both are quick, and both give you a real kitchen knife rather than a shape that could belong to anything. Of the 22 chef knife tattoo ideas above, those two are the least likely to need a redo.
If you are adding to a collection and want something with weight, go for the realistic knife on the wooden board or the blackwork piece with the bone handle. Give an artist a photo of your own blade, book a consultation before October 2026 fills up, and decide which detail is the one that makes it yours before you sit down.