
20 Best Self Harm Scar Cover Up Tattoo Ideas (September 2026)
Self harm scar cover up tattoo ideas are easier to browse than they are to choose, and that gap is where most people get stuck. A tattoo will not erase a scar, but it can change how the area reads: a mark that used to pull the eye now sits inside a design you picked on purpose. That shift is the whole point for a lot of people, and it works best when the design has enough ink, movement and scale to sit over the mark instead of politely around it.
Below are 20 designs built for scar tissue, each with honest notes on size, placement and pain. Every one of them is a starting sketch, not a prescription. Bring the list to a consultation, show the artist the mark in person, and expect to adjust the plan once they see it healed. If you have never been tattooed before, start with something small and quiet rather than a full arm piece.
Self Harm Scar Cover Up Tattoo Ideas: Quick Guide
Each row below matches the numbered ideas that follow, in the same order. Sizes are realistic finished dimensions, not the size of the original mark. Pain is rated for the suggested placement, on a low to high scale.
| Idea | Style | Best placement | Size | Pain |
|---|---|---|---|---|
| 1. Laurel branch | Fine line, black and grey | Inner or outer forearm | 4-7 in (10-18 cm) | Medium |
| 2. Mountain range | Blackwork | Outer upper arm | 5-8 in (13-20 cm) | Medium |
| 3. Watercolor floral | Watercolor | Forearm, calf | 4-6 in (10-15 cm) | Medium |
| 4. Geometric bands | Geometric, minimal | Inner wrist | 1.5-2.5 in (4-6 cm) | High |
| 5. Small bird | Micro-realism | Collarbone, upper chest | 2-3 in (5-8 cm) | Medium |
| 6. Traditional rose | Traditional | Back of hand, wrist | 2-3 in (5-8 cm) | High |
| 7. Celestial dotwork | Dotwork | Shoulder, upper back | 4-6 in (10-15 cm) | Medium |
| 8. Butterfly | Fine line, black | Outer thigh, calf | 4-7 in (10-18 cm) | Low to medium |
| 9. Wave pattern | Japanese-style black and grey | Outer calf | 6-9 in (15-23 cm) | Medium |
| 10. Heartbeat line | Minimal, red ink | Inner wrist | 2-4 in (5-10 cm) | High |
| 11. Sunburst | Blackwork | Inner elbow | 3-4 in (8-10 cm) | Medium |
| 12. Koi fish | Colour plus blackwork | Forearm, calf | 4-6 in (10-15 cm) | Medium |
| 13. Word or initial | Minimal lettering | Inner arm, wrist | 1.5-3 in (4-8 cm) | Medium |
| 14. Botanical vine | Fine line, green | Calf, forearm | 6-8 in (15-20 cm) | Medium |
| 15. Snake | Neo-traditional | Outer thigh, arm | 5-7 in (13-18 cm) | Medium to high |
| 16. Abstract shapes | Abstract blackwork | Anywhere, custom | Custom, 3-6 in | Medium |
| 17. Moon and clouds | Black and grey realism | Ribcage, flank | 4-6 in (10-15 cm) | Medium to high |
| 18. Painted peony | Colour realism | Shoulder, upper arm | 6-8 in (15-20 cm) | Medium |
| 19. Map or route | Fine line | Forearm, calf | 5-8 in (13-20 cm) | Medium |
| 20. Cloud fade | Watercolour, soft | Inner arm, wrist | 3-4 in (8-10 cm) | Low |
1. Fine-Line Laurel Branch Over a Forearm Scar
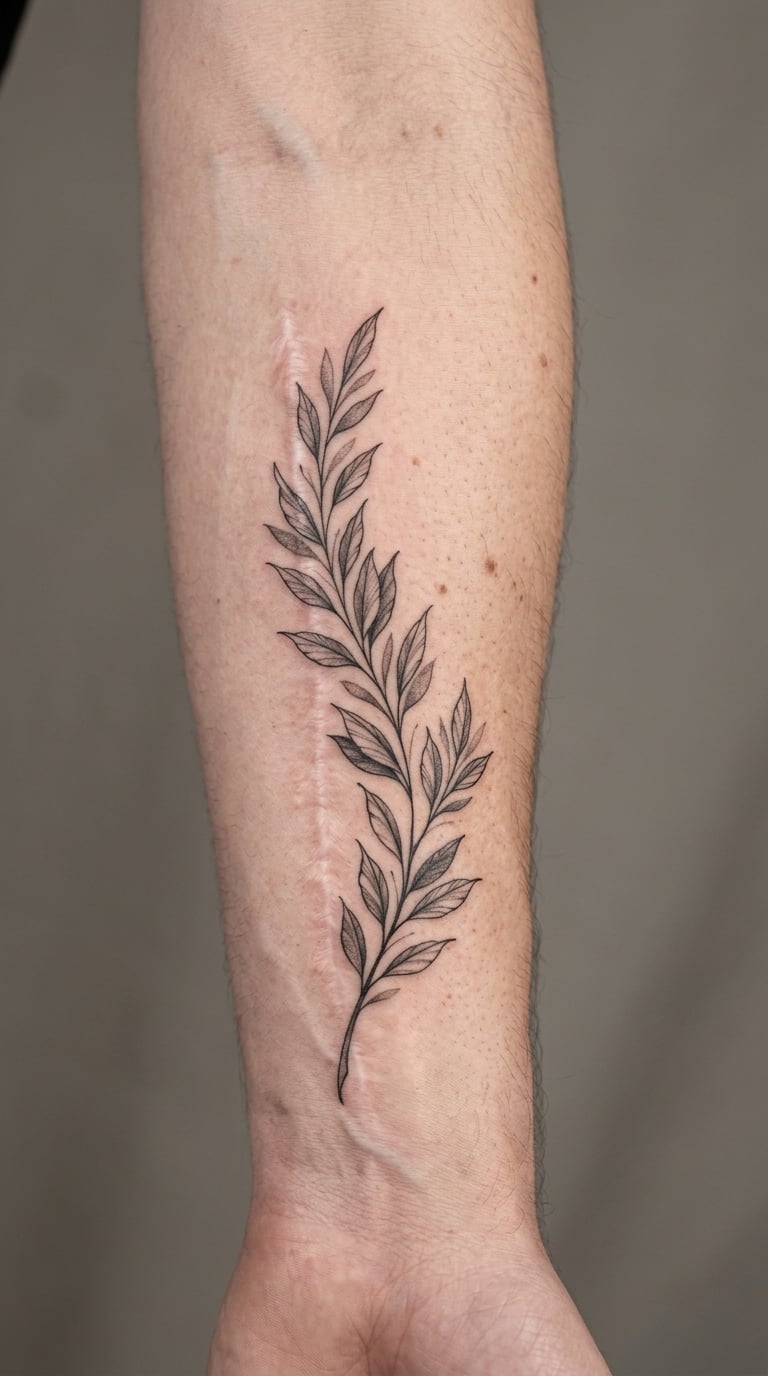
A laurel branch is one of the easiest botanical shapes to adapt to a narrow mark because it grows in one direction. The artist builds it with a thin main stem, alternating leaves at slightly different sizes, and a soft grey wash underneath the lower half to add depth without going solid black.
Laurel traditionally reads as victory and endurance, though plenty of people just like how it follows the line of the arm. It suits anyone who wants the tattoo to look considered rather than loud.
Placement: Inner or outer forearm, running lengthwise alongside the mark · Size: 4-7 in (10-18 cm) long, 1-2 in wide · Style: Fine line with light black and grey shading
Pain: Medium on the forearm. Ageing note: fine lines on the inner arm soften and blur over the years, so a slightly heavier line now pays off later.
Make it yours: Add a second, smaller branch so the pair reads as a growing stem, or work in two thin green leaves as the only colour.
2. Blackwork Mountain Range Across the Upper Arm
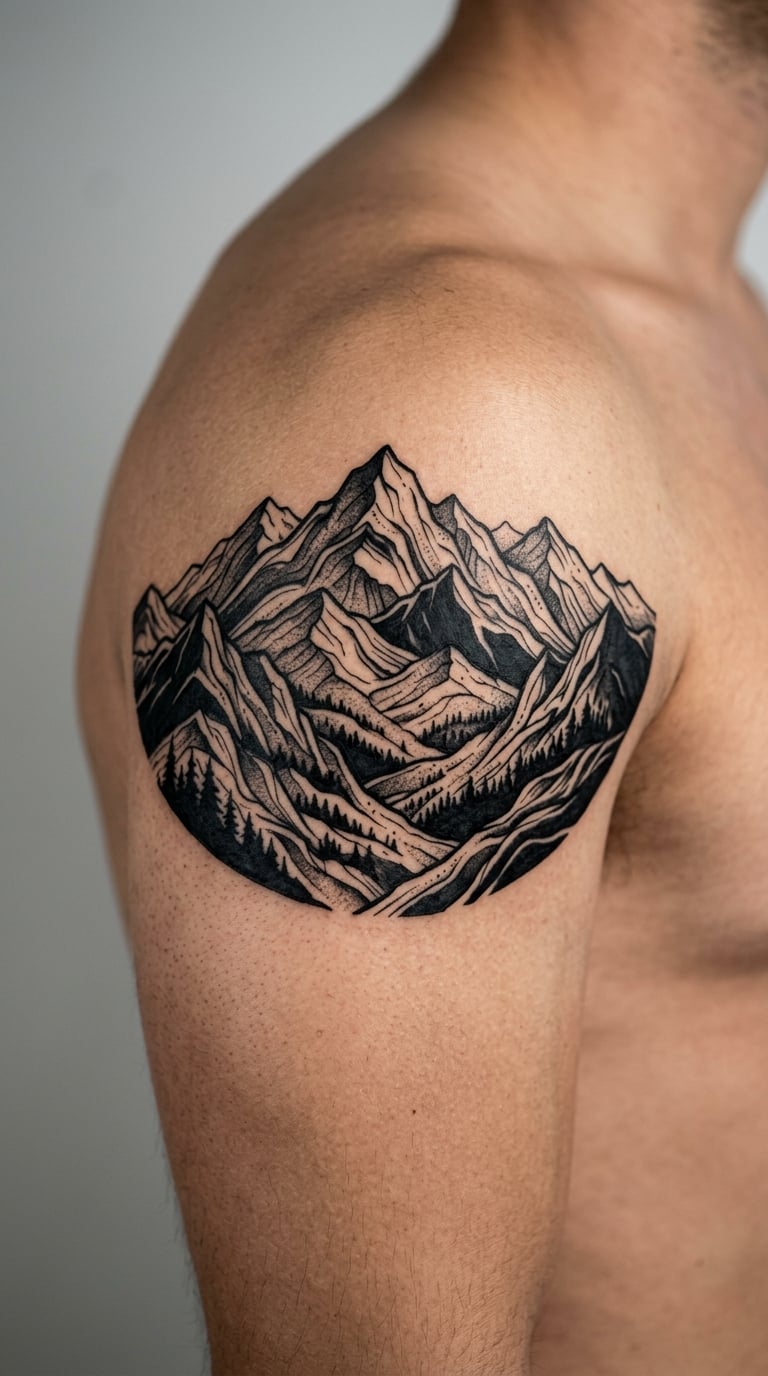
Layered peaks with a solid black sky behind them is the most reliable way to cover a longer mark, because ink that fills space leaves nothing to see through. Most artists stack two or three ridgelines of decreasing weight, then cut the sky out as clean negative space rather than filling it grey.
It is a calm, wide-open image that suits people who would rather not have a design with obvious meaning attached. Nobody asks what a mountain means.
Placement: Outer upper arm, or across a wider forearm · Size: 5-8 in (13-20 cm) across · Style: Blackwork, graphic linework
Pain: Medium. The upper arm has good muscle support, though the bony outer elbow nearby is a different story. Ageing note: solid black stays solid, so this is a good long-term option.
Make it yours: Turn one ridge into a local mountain range you have actually climbed, with a small tree line at the base.
3. Watercolor Floral Sleeve Section
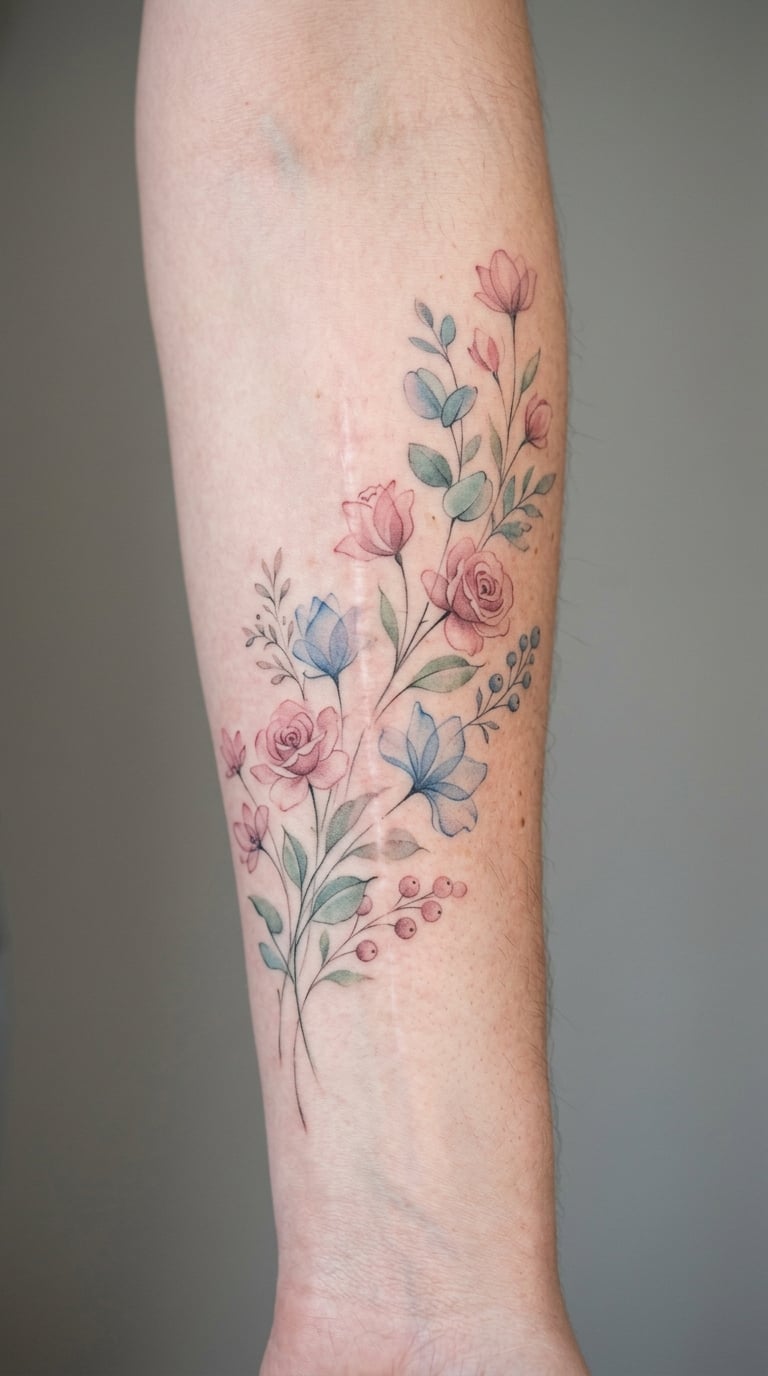
Watercolour tattoos are built from translucent washes rather than solid fill, which makes them trickier over a mark with a different texture. Good artists compensate by adding darker edges along the petals that cross the scar and keeping the palest colour off the centre of the mark.
Flowers are the most requested choice and also the one most likely to be personalised, so expect to be asked what you actually want the piece to say.
Placement: Forearm, calf or shoulder · Size: 4-6 in (10-15 cm) · Style: Watercolour with soft blended edges
Pain: Medium, and longer per session because colour layering takes patience. Ageing note: pale watercolour fades fastest, so expect a refresh every few years on the light areas.
Make it yours: Name the flowers. Peonies, ranunculus and anemones all read very differently, and the species shapes the whole layout.
4. Minimalist Geometric Bands on the Wrist
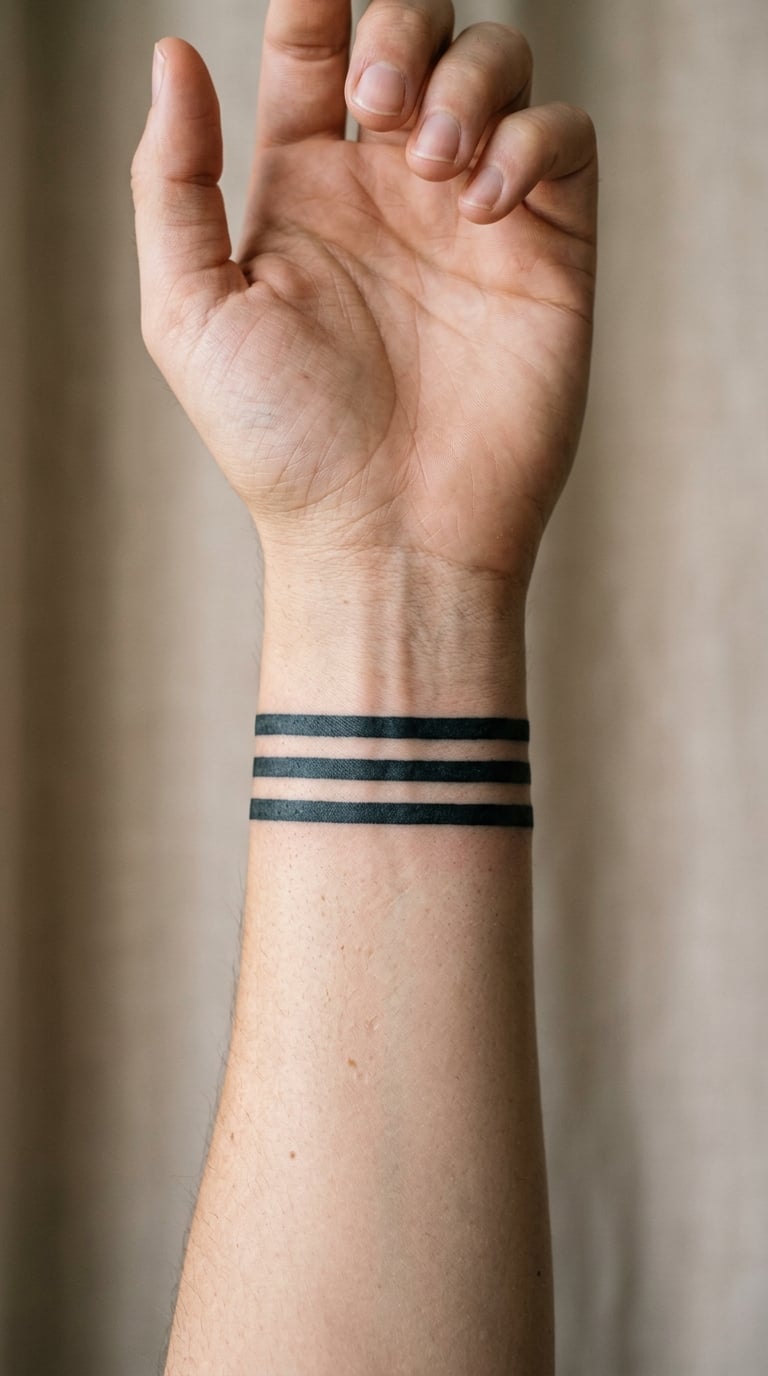
Three or four parallel bands with deliberate gaps is the design most tattooists would call a conversation piece rather than a cover-up. It works on a short narrow mark because the bands can be spaced so that one crosses the mark cleanly and the others frame it, and the crisp geometry gives the eye something to follow instead of the texture underneath.
It is the least demanding idea on this list in terms of ink coverage, so it suits smaller marks or a first session.
Placement: Inner wrist, or circling the forearm · Size: 1.5-2.5 in (4-6 cm) wide · Style: Geometric minimalism, black line
Pain: High. The inner wrist is thin-skinned over bone and most people feel it more here than almost anywhere. Ageing note: hand and wrist lines soften fastest, so keep the bands simple.
Make it yours: Vary the gap width so no two bands are identical, or break one band with a short section of dotwork.
5. Micro-Realism Bird Covering a Collarbone Scar
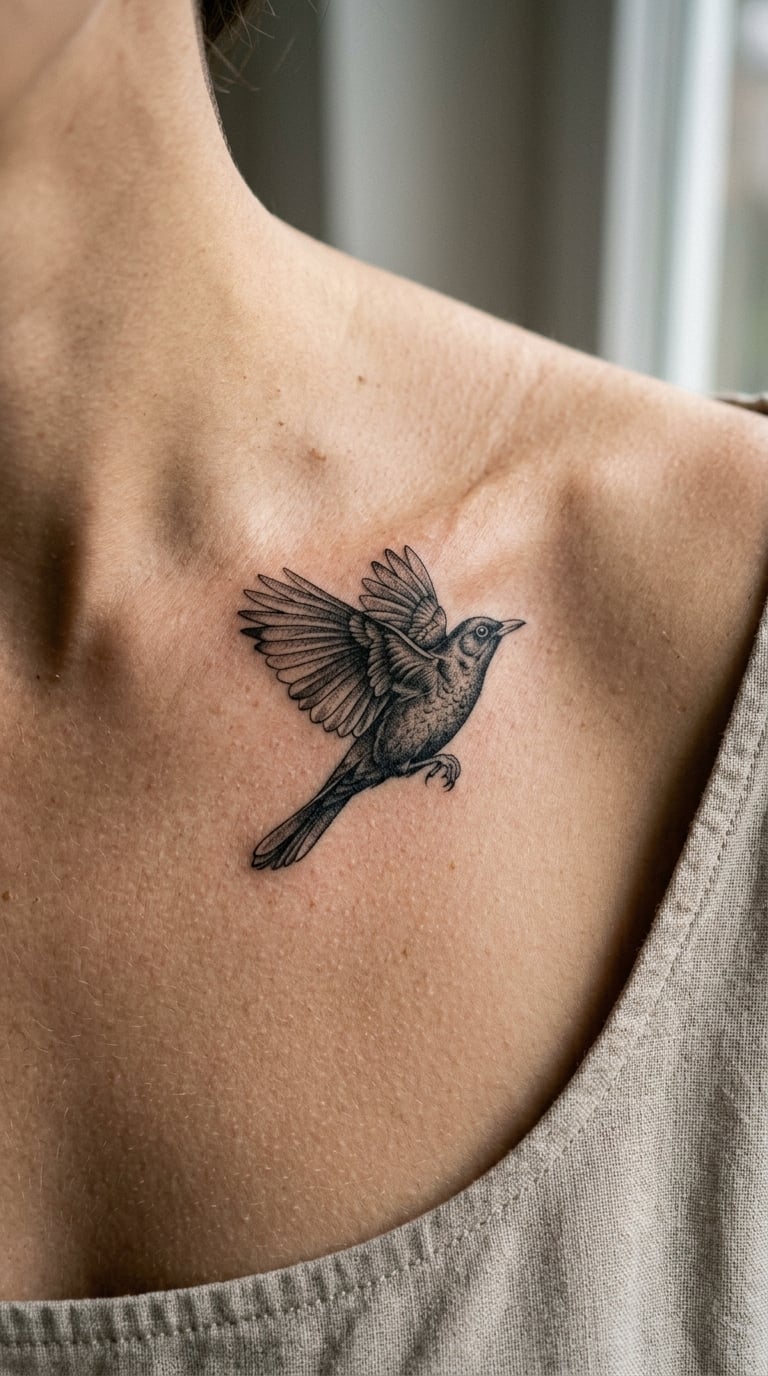
A small bird placed on a diagonal does a lot of quiet work. The angle pushes the eye along the collarbone and away from the centre of the mark, and micro-realism gives the artist enough tonal range in the feathers to sit over uneven texture. A blackbird, a wren or a swallow all suit the shape.
Birds are frequently chosen as symbols of getting free of something, which is why this one keeps coming up in recovery contexts.
Placement: Collarbone, upper chest, or the shoulder just above it · Size: 2-3 in (5-8 cm) · Style: Micro-realism, black and grey with a single colour accent
Pain: Medium. Bony areas like the collarbone sting briefly at the start, then settle. Ageing note: feather detail this small blurs over time, so the silhouette needs to be strong on its own.
Make it yours: Pick a species tied to where you are now rather than where you were, or add a short banner of text beneath it.
6. Traditional Rose Covering a Small Hand Scar
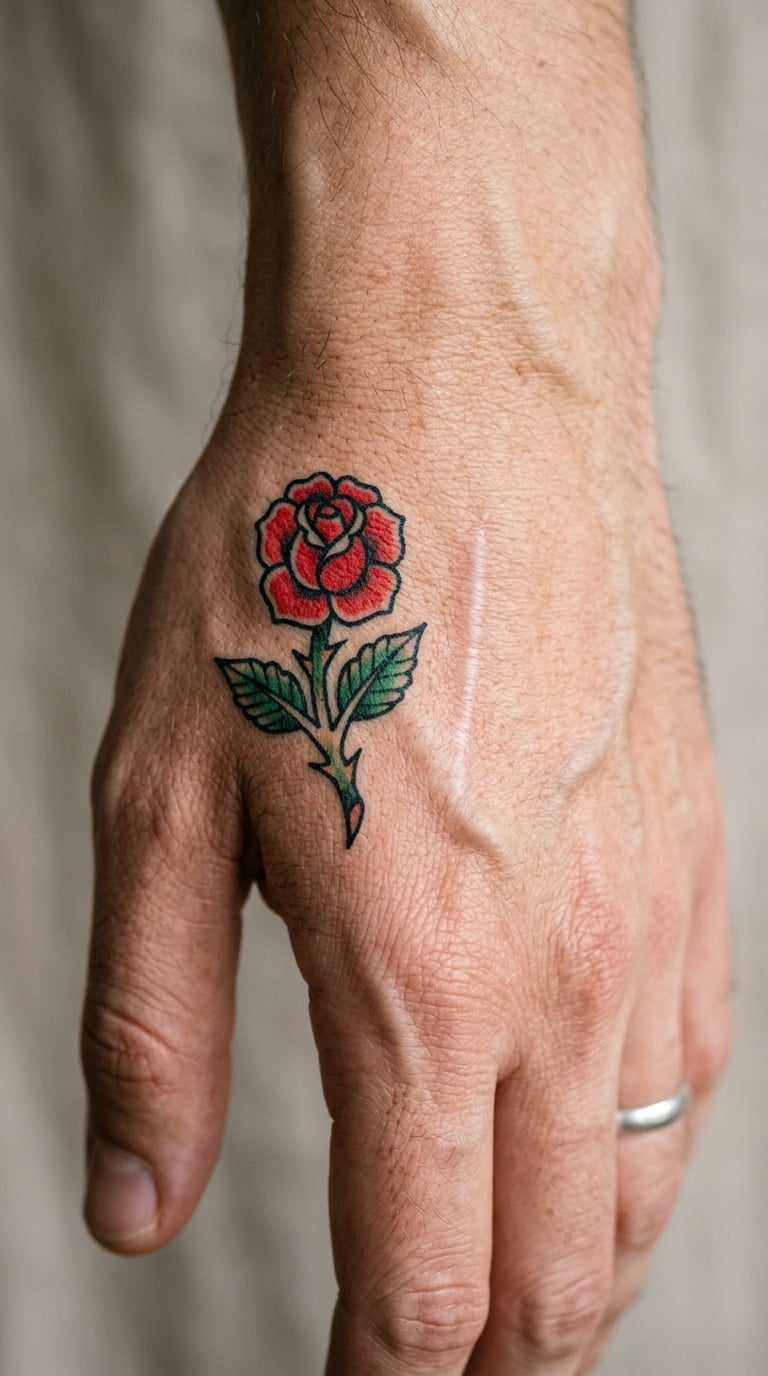
A traditional rose is heavy on everything that helps: strong black outlines, saturated red and green, and shaded petals that give the artist plenty of opportunity to build density where the texture changes. On the back of the hand it also becomes part of the whole hand composition, which makes a small mark feel considered.
The rose is one of the oldest motifs in tattooing, so there is no specific story attached to it. Plenty of people like that.
Placement: Back of the hand, wrist, or the base of the thumb · Size: 2-3 in (5-8 cm) · Style: Traditional, bold outlines with red and green
Pain: High. Hand skin is thin and the nerves are close to the surface. Ageing note: fine colour detail on hands fades and blurs noticeably, so bold outlines are worth insisting on.
Make it yours: Change the stem into something with a bent or thorny line, or add a second smaller bud for balance.
7. Dotwork Celestial Design Over a Shoulder Scar
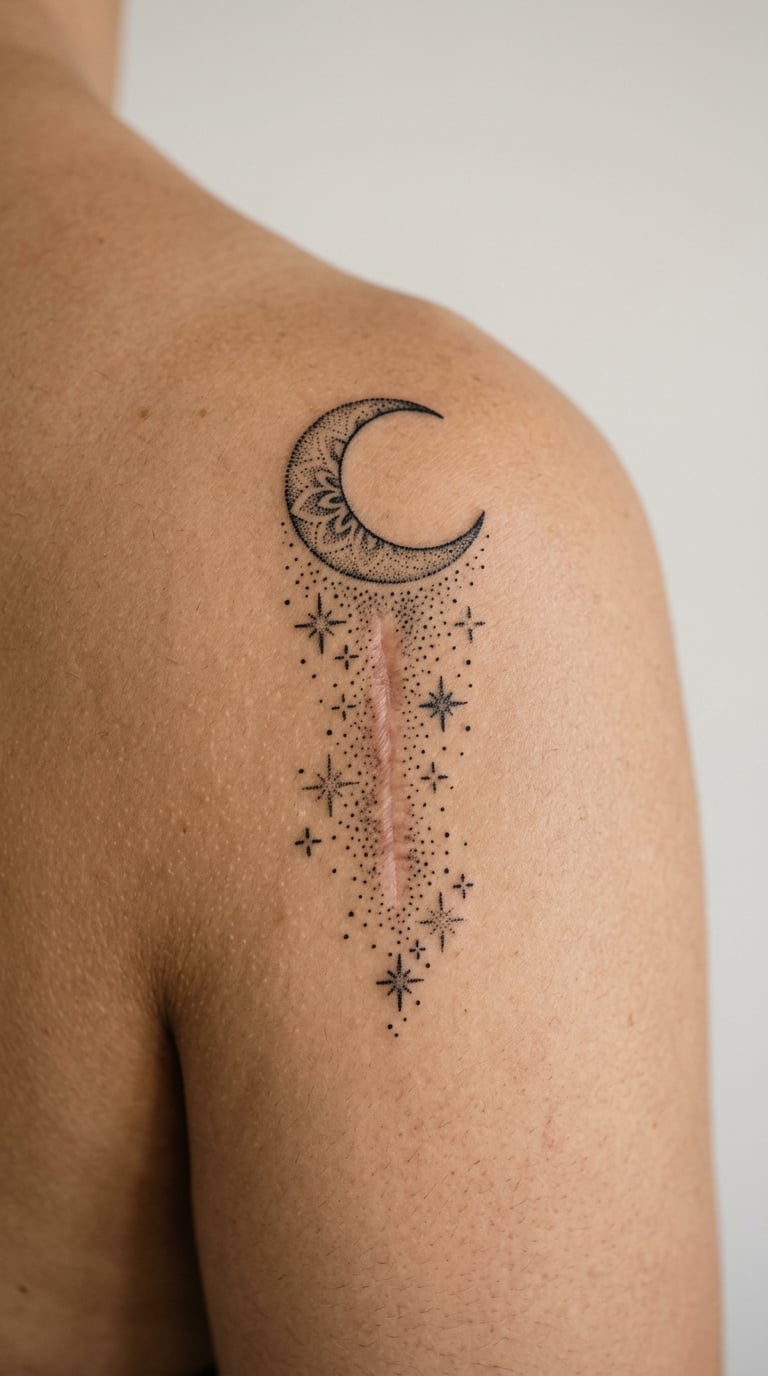
Dotwork is a good match for rounder or more irregular marks because the eye reads the overall gradient first and the individual dots second. A crescent moon anchoring one edge, with stars scattering outward in decreasing density, fills a circular area evenly and gives the artist an easy way to fade the edges out.
Night sky designs are common and pleasantly understated, which makes them an easy choice when you would rather not explain the piece.
Placement: Shoulder, upper back, or the top of the arm · Size: 4-6 in (10-15 cm) · Style: Black dotwork with solid black accents
Pain: Medium, though stippling takes longer than it looks like it should. Ageing note: dots spread slightly as the skin ages, softening the contrast between light and dark areas.
Make it yours: Set the crescent to match a real phase from a date that matters, or scatter the stars along a genuine constellation.
8. Fine-Line Butterfly Stretching Across a Leg Scar
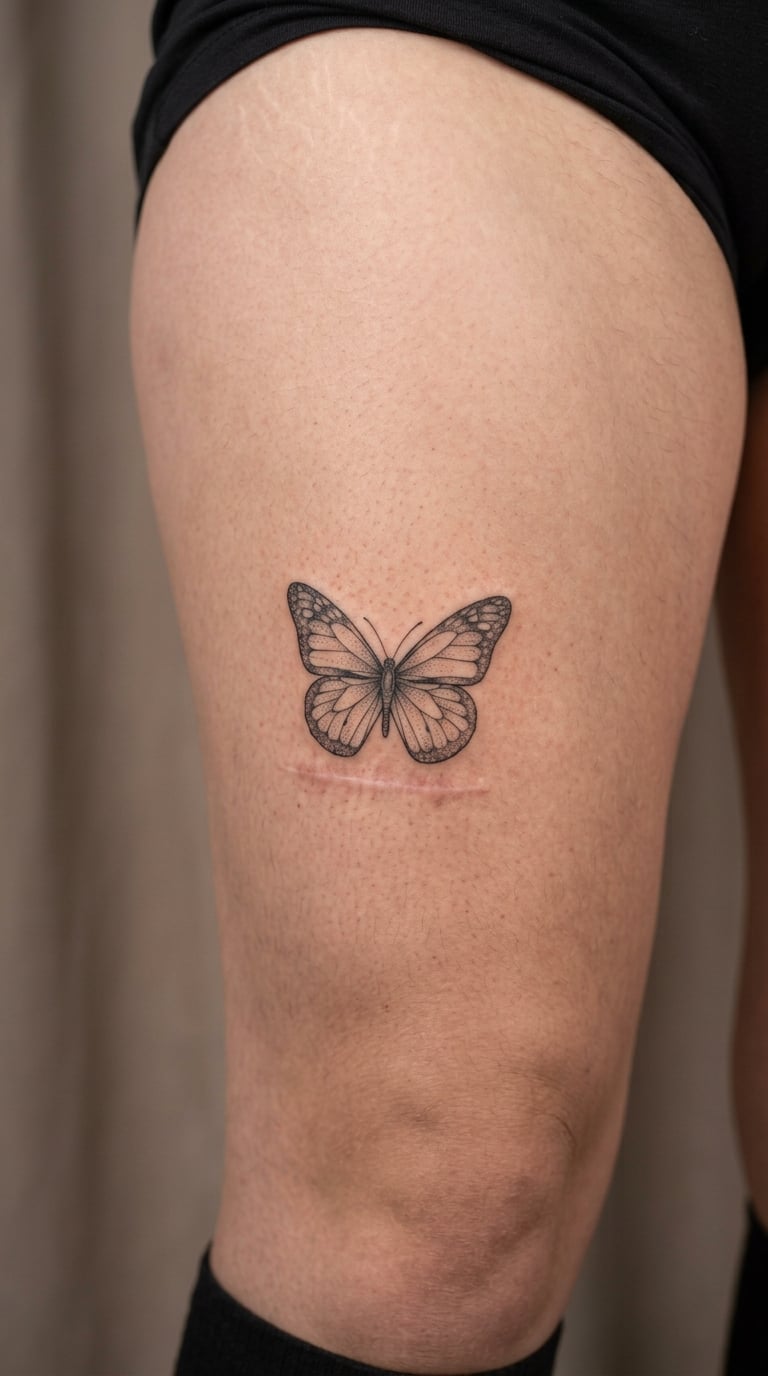
A butterfly is wide and symmetrical, which makes it a natural fit for a scar with separated sections: the wingspan bridges the gap between them and the body sits over the centre. The upper wing pattern carries most of the linework, so the artist can concentrate detail where the texture needs it most.
It is one of the most common symbols for change and new beginnings, and it is hard to find a motif people read less sentimentally than that.
Placement: Outer thigh, calf, or the back of the shoulder · Size: 4-7 in (10-18 cm) wingspan · Style: Fine line, black, symmetrical
Pain: Low to medium on the thigh, higher over the knee. Ageing note: butterfly wingspan is a wide, forgiving canvas, so fine line ages better here than on a wrist.
Make it yours: Add a small date along the lower wing edge, or use a muted colour wash on the upper wing only.
9. Japanese-Style Wave Pattern Along a Calf
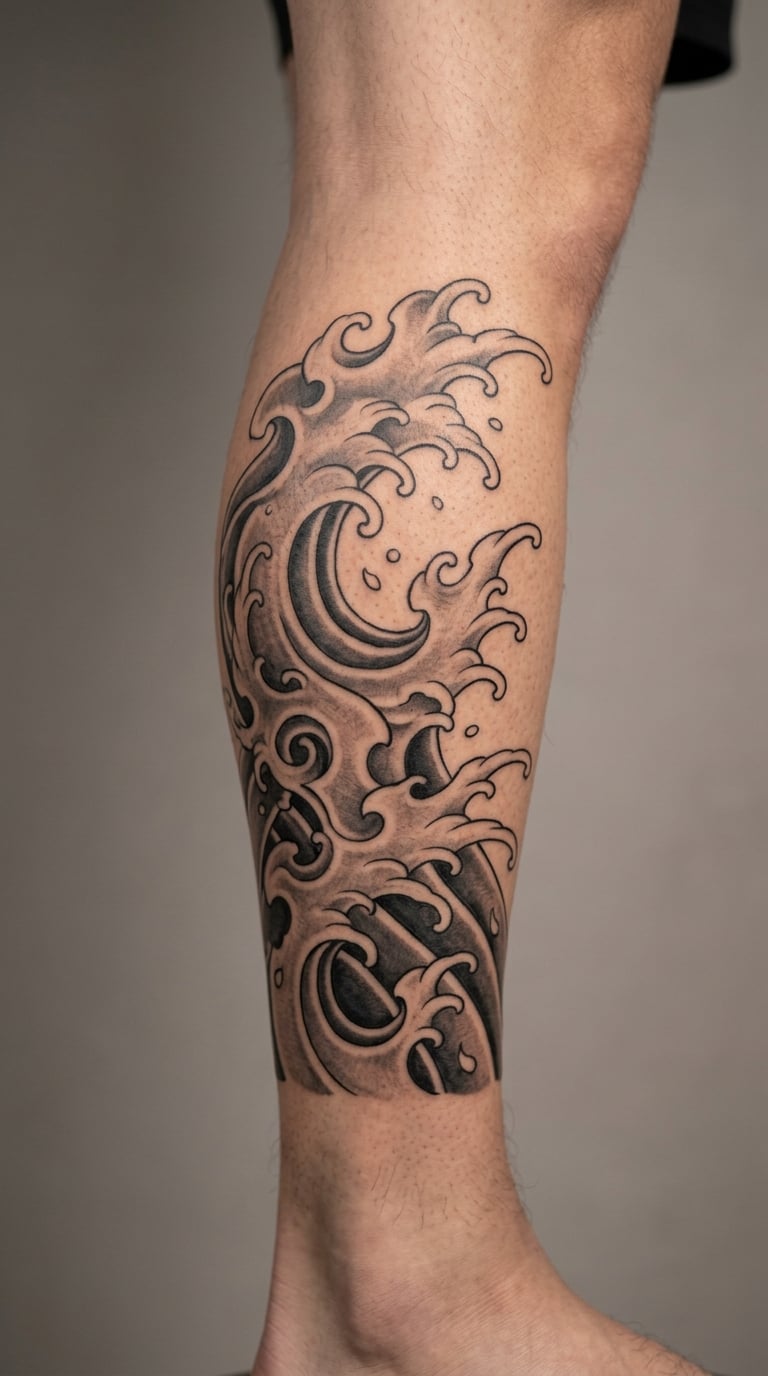
Wave compositions are built from curves, and a scar is rarely straight, so a design that is all movement tends to sit over it well. Artists work with layered black for the deep water, mid greys for the swell, and fine white foam lines on top, which gives them a full tonal range to work with across the length of a lower-leg mark.
These designs are old forms, so the meaning depends on the wearer rather than on the image itself.
Placement: Outer calf, or the lower leg above the ankle · Size: 6-9 in (15-23 cm) tall · Style: Japanese-style black and grey, smooth gradients
Pain: Medium on the calf, and the shin side is noticeably more sensitive. Ageing note: long pieces on the leg need more touch-ups than arm work, mostly in the grey wash.
Make it yours: Add a single circular crest motif in the negative space, or set the waves in a diagonal band instead of a straight column.
10. Red Ink Heartbeat Line Across a Wrist
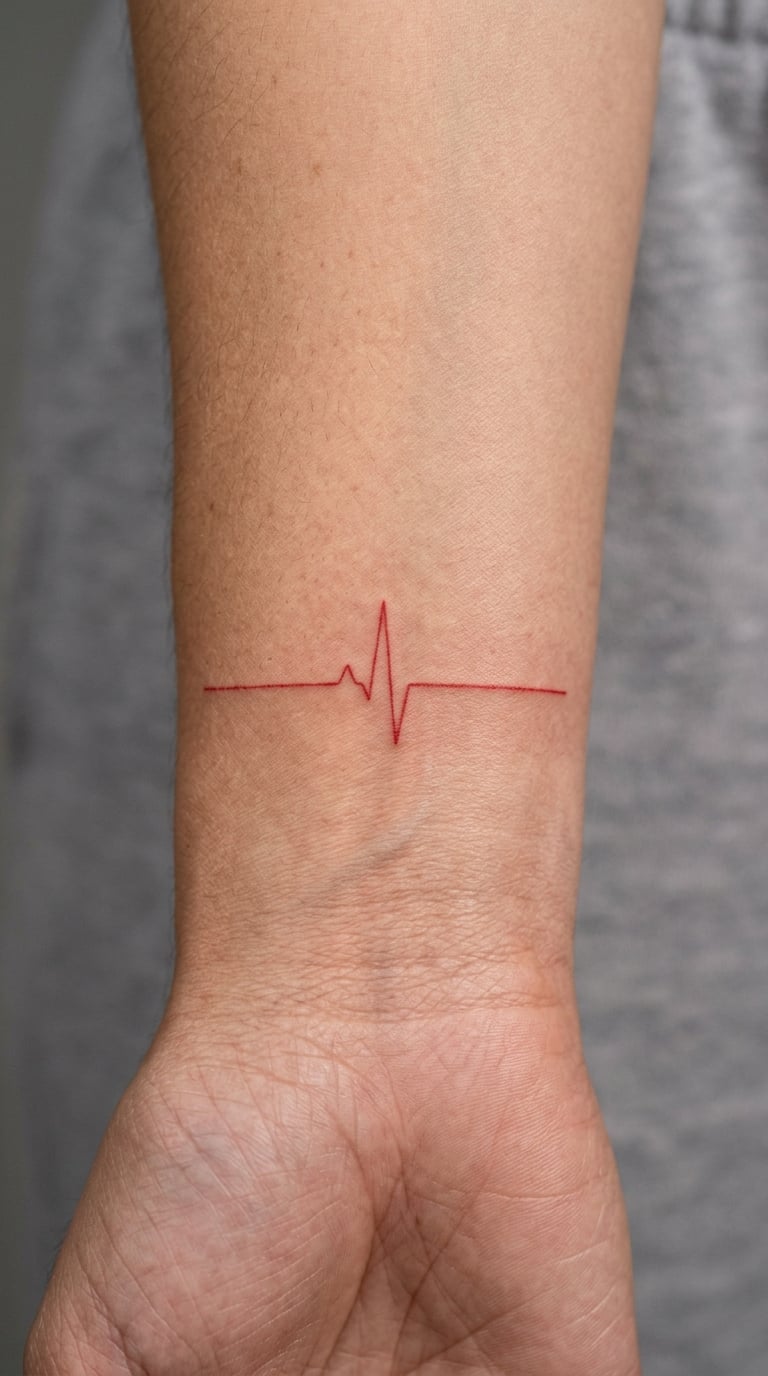
A heartbeat line is a single continuous stroke with one or two sharp peaks, and the whole design lives or dies on the direction of that line. Laid straight across a mark, the peaks interrupt the texture; run parallel to it, the line just follows the scar and gives the eye a clear path.
It reads as ongoing life, a medical reference or a specific date, and people pick it for all three reasons at once.
Placement: Inner wrist, following the line of the mark · Size: 2-4 in (5-10 cm) · Style: Minimal linework, red ink
Pain: High, on the thin inner wrist. Ageing note: red ink fades faster than black and needs a refresh sooner, which is a fair trade for the colour.
Make it yours: Add a word or short date in small matching red type at one end, kept off the peak so the line stays clean.
11. Blackwork Sunburst Around a Small Elbow Scar
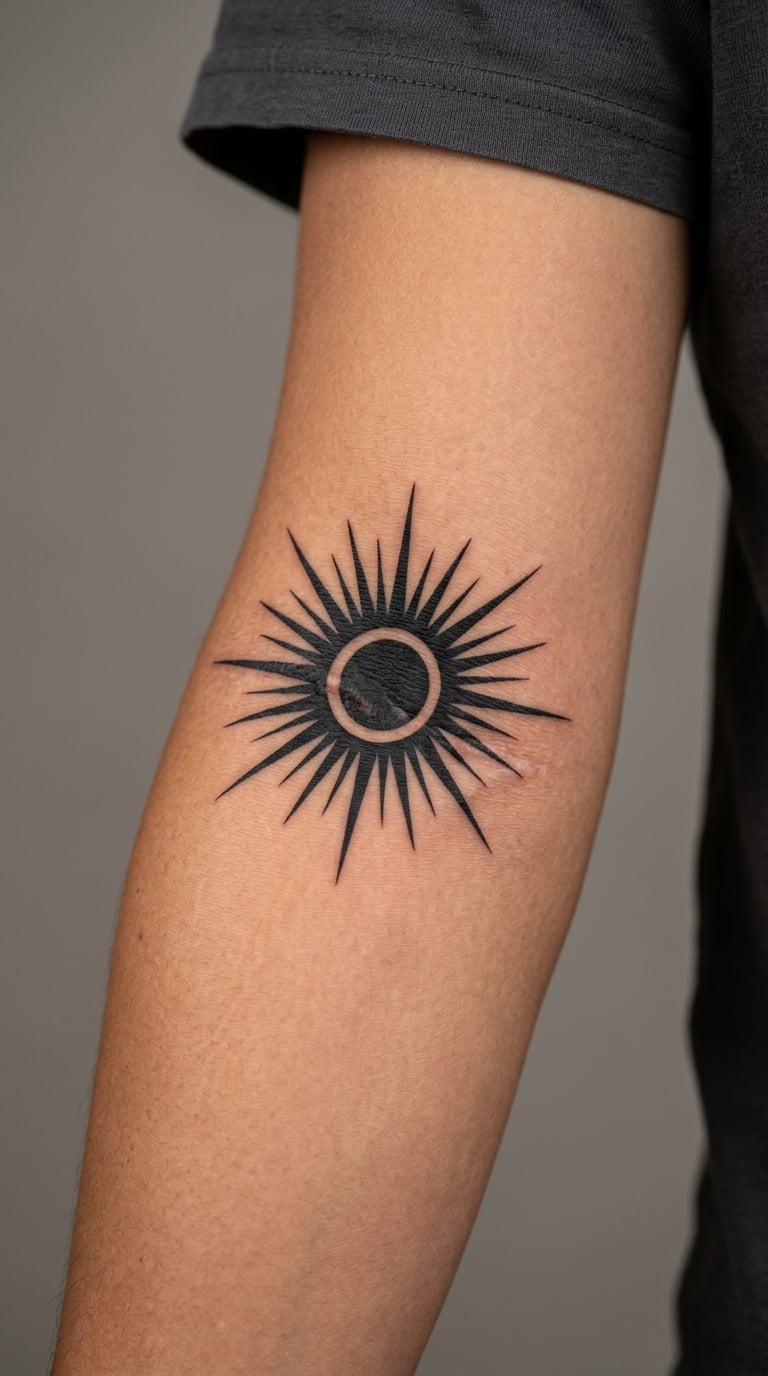
Radiating triangular rays from a solid circular centre create symmetry on purpose, and symmetry is what makes a small irregular mark disappear into a larger composition. The rays vary in length, the inner elbow creases slightly as the arm bends, and that natural asymmetry is the only thing the viewer notices.
Sunbursts carry very little fixed meaning, so it works as a pure design decision.
Placement: Inner elbow or the crease just above it · Size: 3-4 in (8-10 cm) across · Style: Blackwork, solid black with sharp negative-space rays
Pain: Medium, with a sting each time the arm straightens during the session. Ageing note: elbow lines crease constantly, so expect the rays to soften as the skin folds.
Make it yours: Number the rays and let them stand for a set of people, dates or goals rather than a fixed number.
12. Colorful Koi Fish Wrapping Around a Forearm Scar
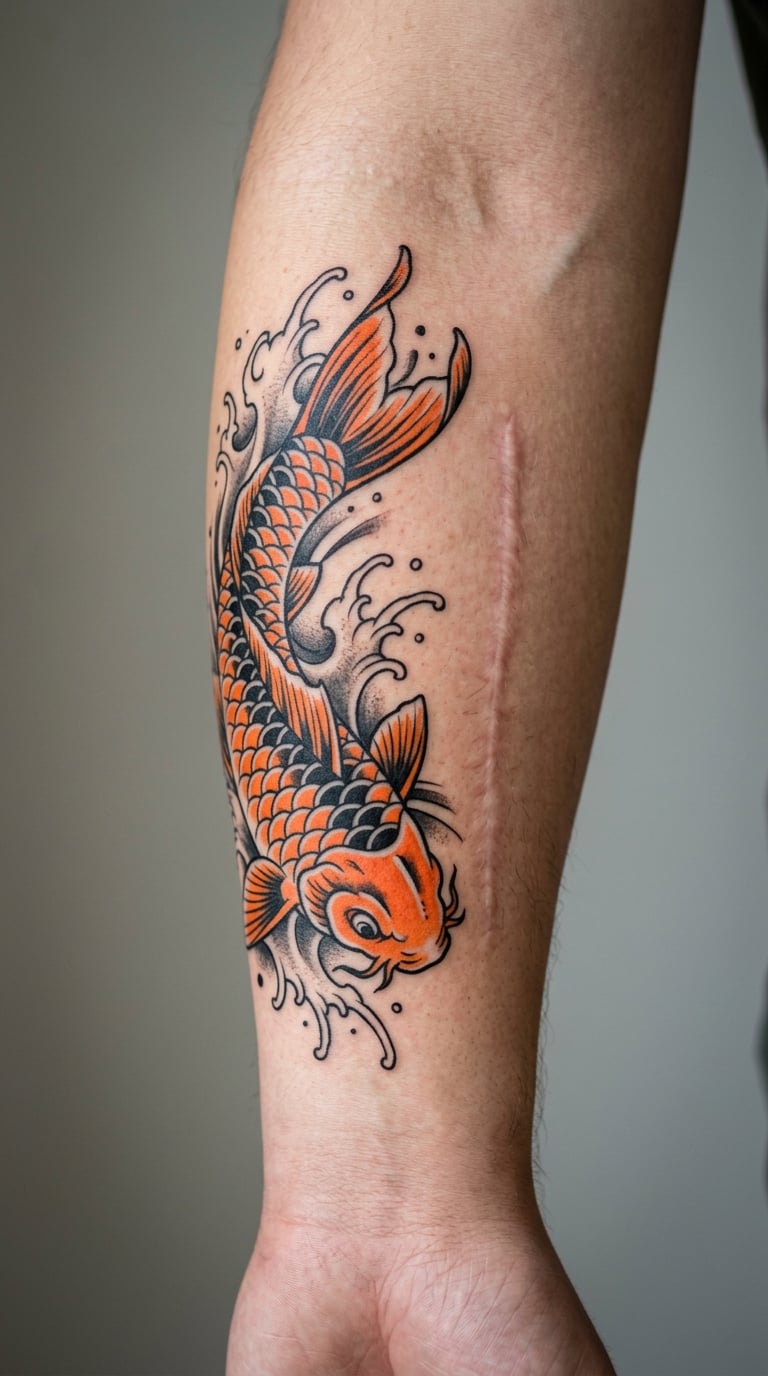
A koi is essentially a shape problem, and it is a good one: the body arcs, the tail sweeps, and the fins sit at angles that give the artist somewhere to put solid ink. The direction the fish travels matters more than anything else. Run it across the mark and the scales break up the texture; run it along it and the fish becomes a quiet stripe.
Koi are usually associated with perseverance and with moving upstream, which is a fairly on-the-nose fit for a recovery piece.
Placement: Forearm, calf or upper arm · Size: 4-6 in (10-15 cm) · Style: Colour realism with blackwork scales and outlines
Pain: Medium on the upper arm, higher on the inner forearm. Ageing note: orange and red tones in a koi fade noticeably within a few years, so a touch-up is normal.
Make it yours: Add a second smaller fish turning the opposite way, or work your own birth month colour into the scales.
13. Minimalist Word or Initial Near a Small Scar
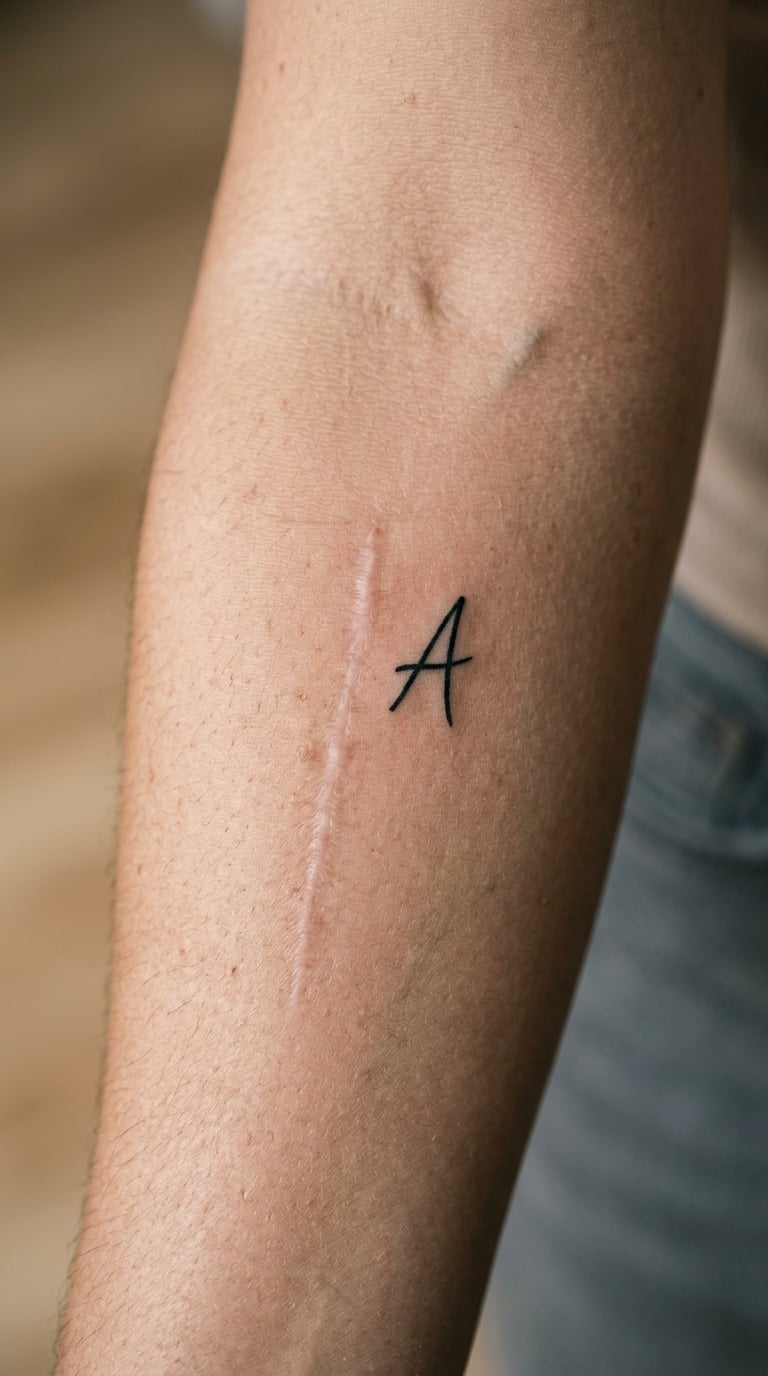
Lettering is the hardest discipline in tattooing, which is why a short word or a single initial done well looks considered and the same text done badly looks like a mistake. The approach that works over a small mark is generous spacing and a font with a plain structure, placed so the letter or word sits next to the mark rather than trying to run across it.
What you choose to have written is entirely personal, and that is the point of this one.
Placement: Inner arm, wrist, or just above the elbow · Size: 1.5-3 in (4-8 cm) · Style: Minimal lettering, black
Pain: Medium. Ageing note: hand-lettered and script styles blur first, so a clean block or simple sans serif ages far better than cursive.
Make it yours: Use a hand-drawn sample of your own handwriting and have the artist transfer that, rather than typing it in a font.
14. Botanical Vine Covering a Vertical Calf Scar
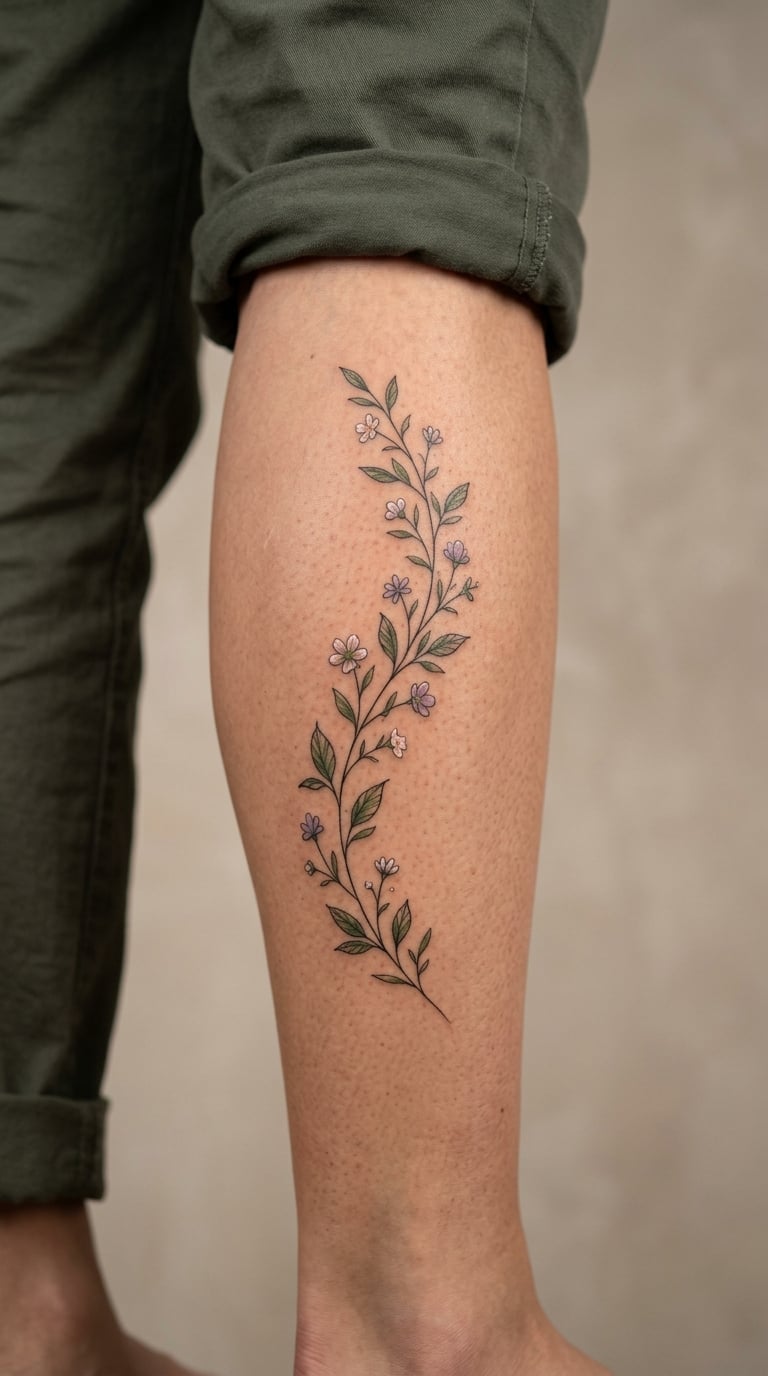
Vines are the most flexible shape on this list, because the stem can bend, thicken, thin out and change direction as it travels. A long vertical scar gives the stem a direction to follow, and small leaves, berries and flowers fill the areas where a single line would be too thin to hide texture.
Botanicals are the oldest subject matter in the trade and still the easiest to make personal, since the species and the leaves can be chosen to mean something to you.
Placement: Calf, forearm, or along the side of the torso · Size: 6-8 in (15-20 cm) tall · Style: Fine line with green wash in the leaves
Pain: Medium. Ageing note: a thin stem line on the lower leg thins and fades faster than the same line on the upper arm, so ask for a slightly heavier weight.
Make it yours: Grow the stem from a specific flower at the base to another at the top, with the mark falling in the middle third.
15. Neo-Traditional Snake Curving Over a Thigh Scar
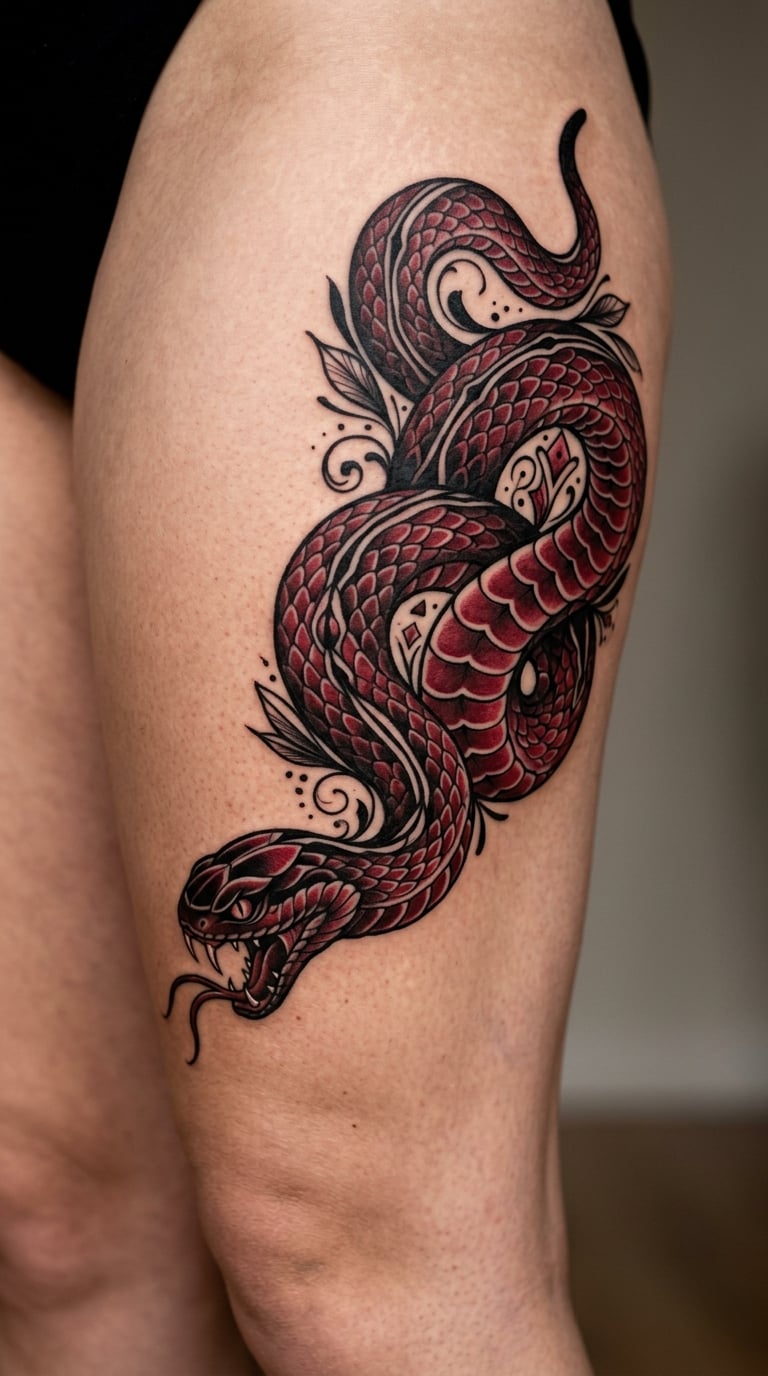
A snake is all S-curve, and an S-curve crosses a straight mark at two points, which means the body interrupts the scar twice while the gaps between the curves do the hiding. Neo-traditional styling gives you clean black outlines, defined scales and limited shading, so the piece reads as illustration rather than as camouflage.
Snakes carry transformation and renewal, and shed their skin, which is why people reach for this one.
Placement: Outer thigh, arm, or the calf · Size: 5-7 in (13-18 cm) · Style: Neo-traditional, bold black line with deep red and gold
Pain: Medium to high, and a long session. The thigh takes it well but the colour packing is demanding. Ageing note: scale detail fills in over time, so expect the shading to soften first.
Make it yours: Have the snake’s head face a direction that means something to you rather than one picked at random at the desk.
16. Abstract Blackwork Shapes for an Irregular Scar
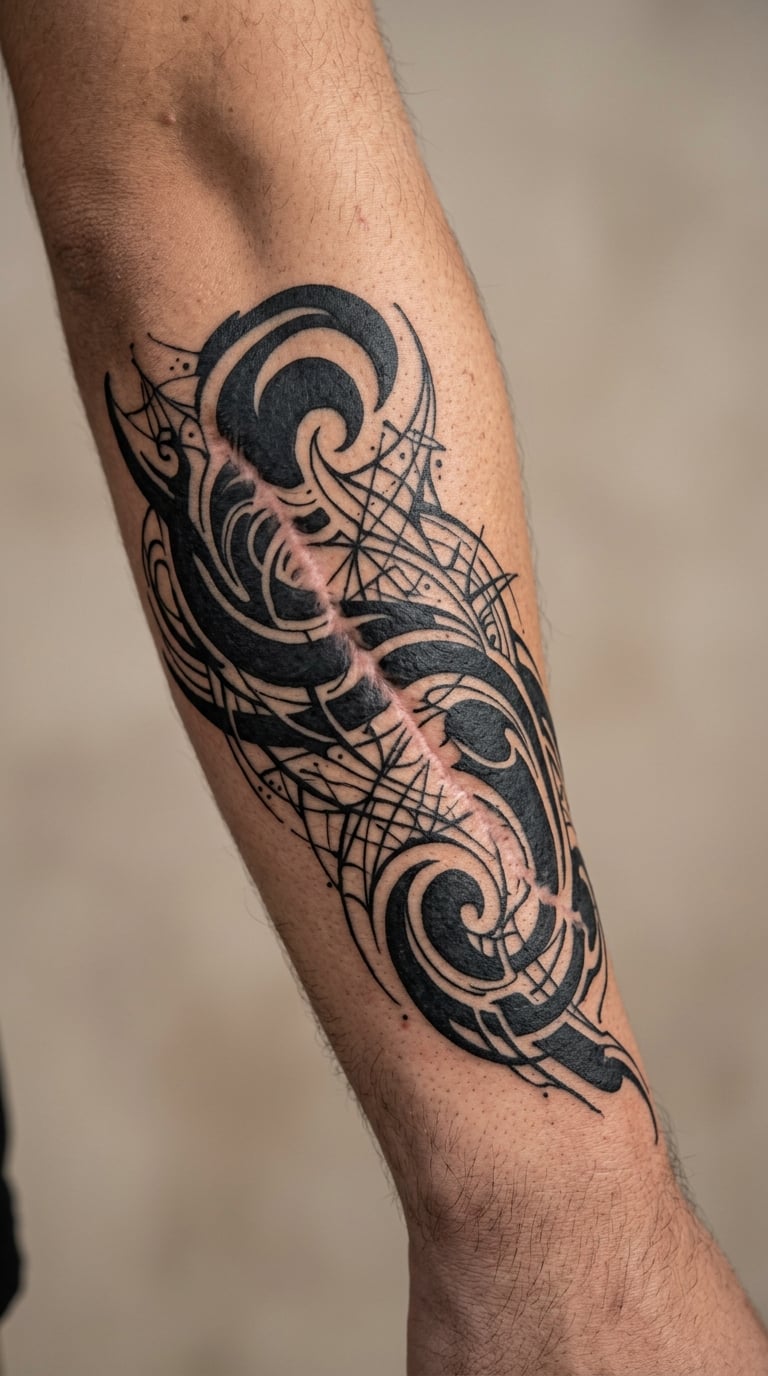
When a mark does not fit a recognisable motif, the most reliable option is an artist-designed arrangement rather than a borrowed design from a gallery. Curved solid blocks, tapering lines and open negative space can follow almost any outline, and because nothing has to look like a specific thing, the eye has nothing to compare the mark against.
It suits anyone who has been browsing inspiration for months and recognises nothing in particular. This is the design made for you specifically.
Placement: Anywhere the mark sits, custom to its outline · Size: Custom, usually 3-6 in (8-15 cm) · Style: Abstract blackwork, graphic
Pain: Medium, unless the design calls for heavy solid packing, which takes more passes. Ageing note: solid black holds its edge well, so this ages in your favour.
Make it yours: Trace the actual shape of your mark onto tracing paper and bring it to the consultation, then let the artist build from that.
17. Realistic Moon and Clouds Along the Rib Area
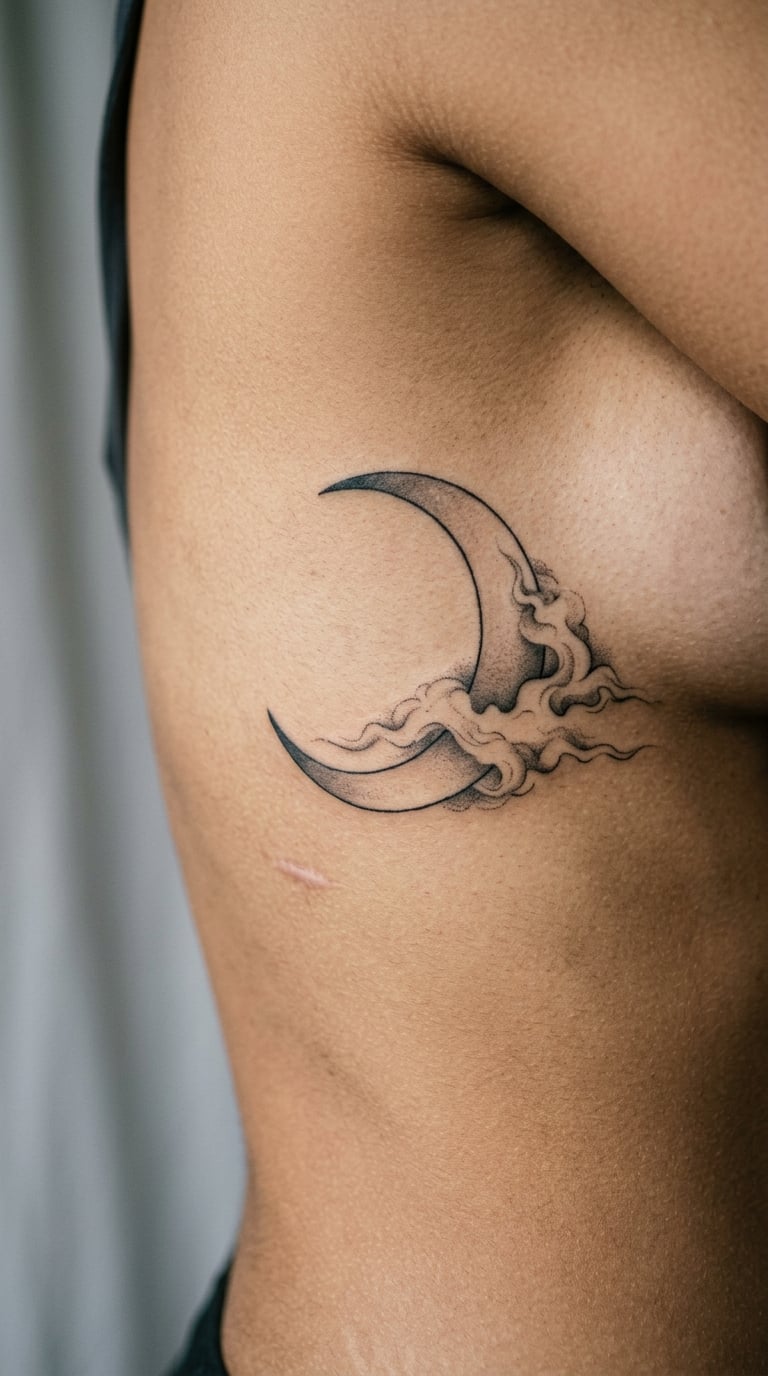
Clouds are made of rounded, overlapping forms with soft edges and open space between them, which is a forgiving structure to work with on a mark that has an uneven outline. A shaded crescent anchors the design, the clouds carry the mid-tones, and a few small stars sit in the gaps to keep the composition balanced.
Night scenes are common, and if you want a little more meaning you can tie the phase of the moon to a real date.
Placement: Side of the ribcage, flank, or the outer upper arm · Size: 4-6 in (10-15 cm) · Style: Black and grey realism, soft shading
Pain: Medium to high. Ribs are bony and sensitive, and the skin there stretches when you breathe and move. Ageing note: soft grey shading on the torso ages gracefully, unlike fine detail.
Make it yours: Match the moon phase to the date of something that changed for you, and put one small star on the opposite side to balance it.
18. Colorful Painted Peony Covering a Shoulder Mark
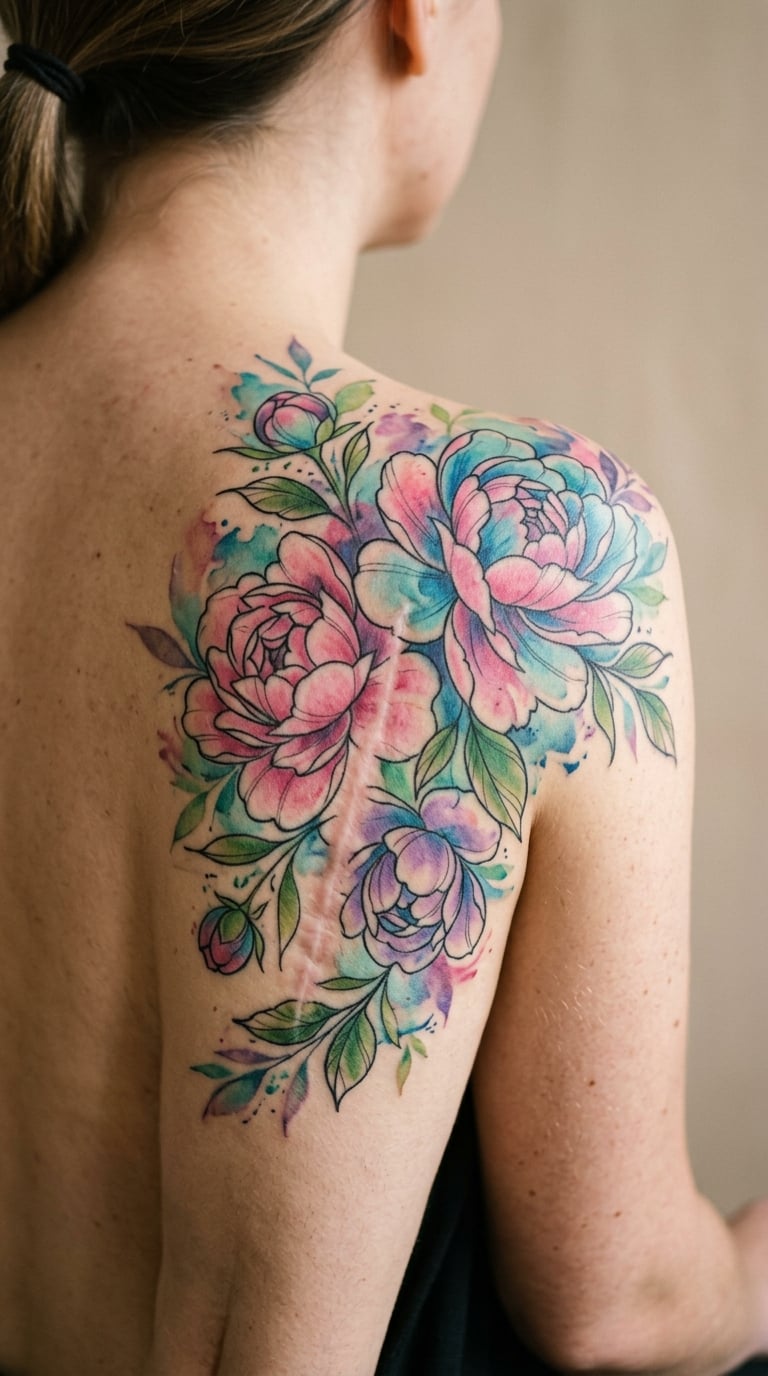
A peony at shoulder scale is not a cover-up patch, it is a composition, and that is the point. Layered petals, deep shadows near the centre and cool blue-grey leaves give the artist more ink than any small botanical, so the density does the work without a single black outline.
Peonies are associated with prosperity and with a life lived fully, and the scale makes it hard to read as a quiet little secret.
Placement: Shoulder cap, upper arm, or across the back of the shoulder · Size: 6-8 in (15-20 cm) · Style: Colour realism, watercolour edges
Pain: Medium on the shoulder, though a piece this size runs long and the sessions get tiring. Ageing note: large colour work on the shoulder fades evenly rather than patchily, which is the friendlier outcome.
Make it yours: Bring a photograph of a peony you have actually seen, so the petal arrangement is one you recognise rather than a stock flower.
19. Fine-Line Map or Route Design on the Forearm
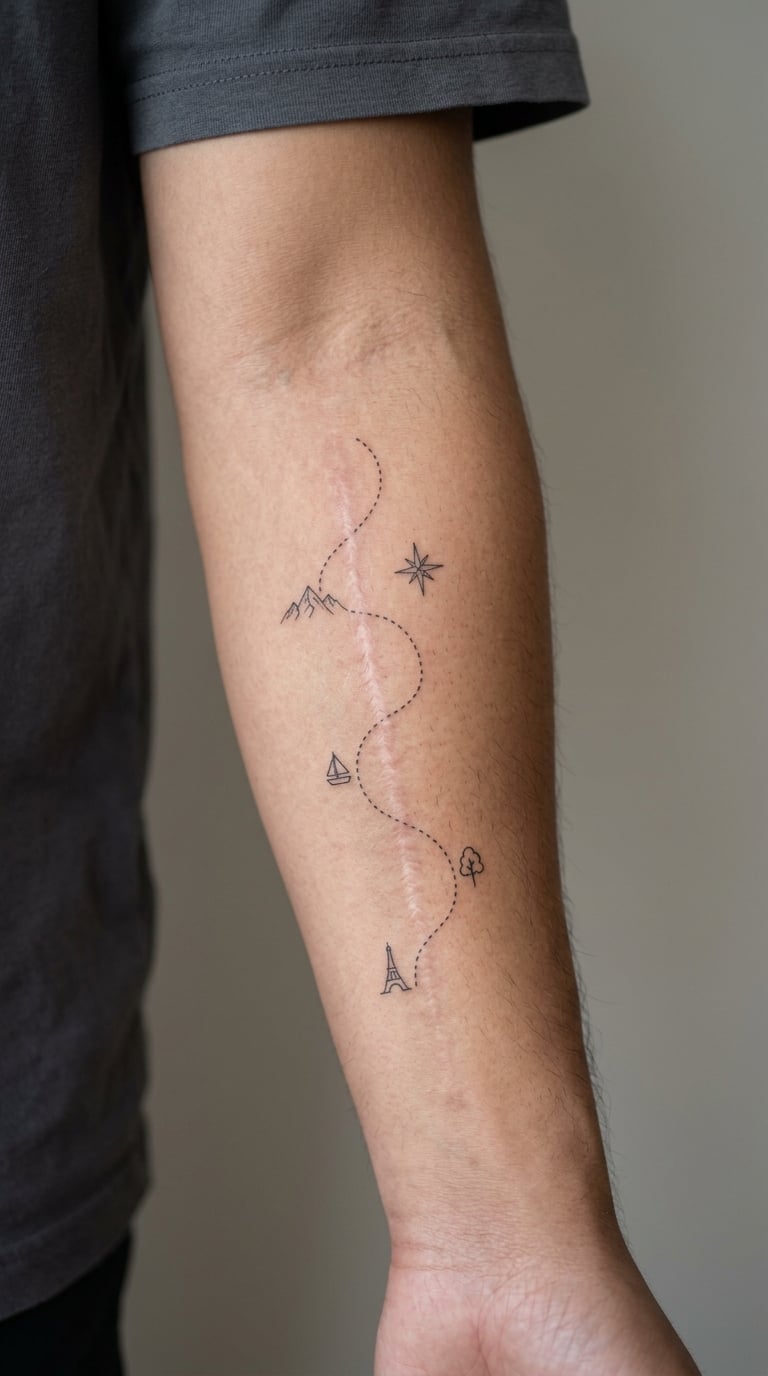
A route drawn along a forearm is naturally long and narrow, which suits a lengthwise mark better than almost anything else on this list. The design is built from a dotted or dashed path, a handful of small landmark icons at intervals, and a light border line to close the composition when the scar sits near the edge.
Maps are personal by default: the route can be a move, a trip, a person or just a place you needed to get to.
Placement: Inner or outer forearm, running lengthwise · Size: 5-8 in (13-20 cm) · Style: Fine line illustration, black
Pain: Medium, with a long session because of the detail. Ageing note: very fine map lines blur first, so ask for a slightly heavier line weight and expect more frequent touch-ups.
Make it yours: Use real coordinates for places that mattered to you, or mark a date by putting a small numbered pin at the right point on the path.
20. Soft Watercolor Cloud Fade for a Small Arm Scar
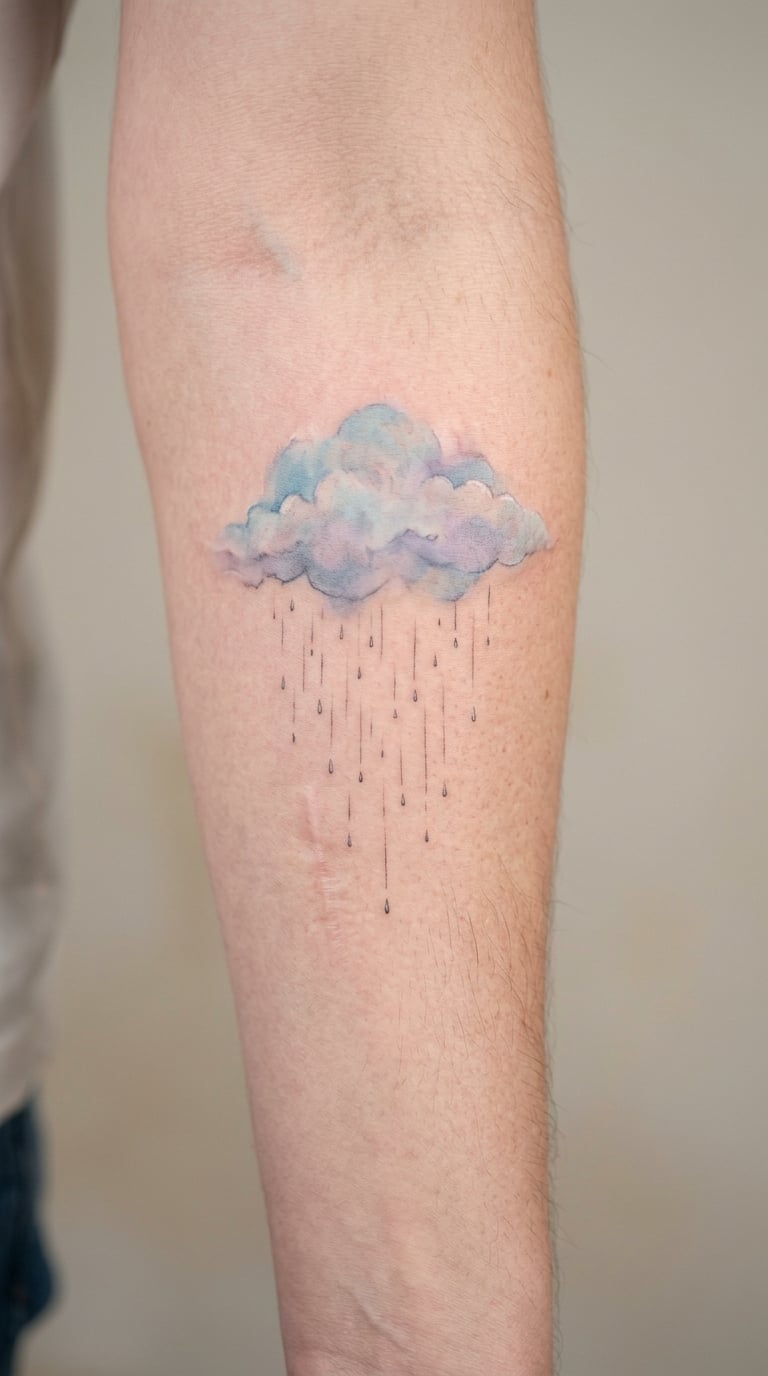
This is the gentlest option here and the one with the most honest limits. A soft cloud in pale blue and grey with a few light raindrops can soften the look of a small mark without pretending to bury it, and the feathered edges blend into surrounding skin more forgivingly than a hard outline.
It suits someone who wants a visual shift rather than total disappearance, and it is the easiest of the 20 to keep adding to later.
Placement: Inner arm, wrist, or the calf · Size: 3-4 in (8-10 cm) · Style: Watercolour, pale blue and grey
Pain: Low to medium. Ageing note: pale watercolour on the inner arm fades first, so a refresh every few years is normal, and the mark may sit slightly visible beneath once the colour softens.
Make it yours: Pick the rain colour deliberately, since a warm tone on cool skin will read differently than a cool one.
How to Choose the Right Design
Choosing well comes down to matching the design to the mark’s direction, contrast and the amount of surface you actually have. These are the points worth working through before you sit down with an artist.
Match the style to how much ink the mark needs
Flat, pale, fully settled scars usually take ink well, while raised or still-pink marks hold pigment less reliably. People who have done this report that heavy blackwork and traditional pieces with bold outlines tend to cover the most ground with the fewest sessions, and that floral work with shading blends into scar texture better than fine line. Fine detail and pale watercolour are the hardest options on scarred skin, not because of skill but because there is less ink to hide behind.
Work with the direction of the mark
A line that runs alongside a scar reinforces it. A line that crosses it repeatedly breaks it up. That single observation rules out a lot of designs and picks a lot of others, and it is the fastest way to shortlist: anything with movement, curves or repeated elements will do more work than a single delicate line.
Check the size against the mark plus a margin
Designs need to be larger than the mark in every direction, not just the same size as it. A tattoo that ends exactly where the scar ends draws attention straight to the edge. Most artists add at least half an inch of design on each side, and much more for a wide piece, so when you are comparing self harm scar cover up tattoo ideas by size, check the finished piece against the mark rather than the sketch on paper.
Ask the artist to see the mark in person
This is not a detail you can handle over a message. Texture, colour, thickness and how the skin sits under stretch are all things an artist assesses by looking, and often by holding the light across it at different angles. Book a consultation in person, and treat it as a real appointment rather than a formality.
Ask the questions that tell you about the artist
Useful questions include: how many scar cover-ups have you done, can I see healed work at a year or more rather than fresh photos, what do you do when ink does not take, and how many sessions do you expect this to need. Artists who have turned away clients because a scar was not ready yet are a good sign. So is an artist who offers a small test patch on the tissue before starting the whole piece.
Decide whether to hide it or use it
Some people want the mark gone from view. Others have found more meaning in letting the design acknowledge it, and a few regret choosing complete concealment later. Neither choice is wrong, but it is a decision worth making deliberately rather than drifting into.
Cost and Session Time
Tattoo pricing in the US is driven by hourly rate, so the real question is how long the job takes. A small design of the size listed here usually runs about 60 to 150 US dollars, which covers a single session in most shops. A medium piece of 4 to 6 inches commonly lands between 150 and 400 US dollars. A larger composition of 6 to 9 inches, the kind that covers a broad stretch of arm or leg, more often sits between 300 and 800 US dollars.
Most shops have a minimum, frequently 50 to 100 US dollars, so a tiny piece and a medium piece can cost close to the same. Artists who specialise in scar tissue often charge a premium, and multi-session pieces are usually quoted per session rather than as a package.
On timing, a small cover-up is often a single session. Larger arm pieces that people report getting done in three to six sessions are common, because scarred skin takes ink unevenly and the artist is working around it. Budget for touch-ups at roughly three months, six months and a year. Scar tissue releases pigment faster than normal skin, so more than one refresh is normal rather than a sign of poor work.
Aftercare Basics
Start with your artist’s aftercare instructions, because they will know exactly what they did and which products work with it. Everything below is general and comes after that conversation, not instead of it.
- Follow your artist’s aftercare instructions first. Ask for them in writing before you leave, including what to do if the tattoo is still weeping on day two.
- Wash gently, twice a day, for the first stretch. Lukewarm water, a fragrance-free wash, patted dry with a clean towel. No scrubbing and no long soaking.
- Keep it covered and leave it alone. Loose clothing over the area, no tight sleeves, no picking, no scratching once the flaking starts.
- Expect scar tissue to itch longer. Moisturiser applied thinly and a clean, non-adhesive dressing both help. If the itching is severe or the redness keeps climbing, contact your artist and a qualified healthcare professional.
- Sun protection matters more here. A healed tattoo over scarred skin shows fading faster, so keep the area covered or use sunscreen once it is closed.
- Book the first touch-up early rather than late. Mention at the aftercare stage that the area is scar tissue, so it goes in the diary for the right window.
If you have a specific concern about healing, a raised scar that is still changing, or skin that reacts badly to ink, raise it with your tattooist and with a qualified healthcare professional before booking. Some scars are not ready, and an honest artist will say so.
Frequently Asked Questions
Can a tattoo completely hide a self harm scar?
It can change how the scar looks and make the area read as part of a deliberate design, but no tattoo can promise complete invisibility. Scar texture, colour, thickness and size all affect how ink settles, and pale watercolour in particular will let a mark show through when it fades. The honest goal is a design that changes the story of the skin, not a hidden secret.
Should I wait before getting a scar covered with a tattoo?
Ask your tattoo artist about the timing and condition of the specific area, because it depends on the location and how the mark settled. Most advice is to wait until a scar is fully matured and no longer changing in colour or thickness, which is often a year or more after the injury. If the scar is still raised, red or shifting, most artists would rather wait, and some would rather you did not tattoo it at all.
What kind of tattoo design works best over a scar?
Designs with strong contrast, enough scale and directional movement integrate more easily with an irregular mark. Heavy blackwork, traditional pieces with bold outlines, botanical work with shading, and balanced colour all tend to cover well because they put more ink into the area. Delicate fine line and pale watercolour are the hardest choices, because there is not enough pigment sitting in the skin to disguise an uneven texture.
Will a cover-up tattoo hurt more than a normal tattoo?
Pain varies by placement, size, style and how you personally feel about it, so a scar area has no fixed level. People who have been tattooed over scars often describe it as deeper or more burning than the same work on unbroken skin nearby, and sore areas, elbows, ribs and wrists already hurt plenty on their own. Your artist should work at a pace you can signal to, and you are always allowed to stop and take a break.
How long does a scar cover-up tattoo take to heal?
Most tattooed skin settles within two to four weeks, with the peeling and flaking stage in the middle, but scar tissue often takes noticeably longer and feels itchier than usual during healing. The colour will not be judged until the surface has fully calmed, which is usually around the six-week mark. Your artist will tell you the window that suits the specific piece, and you should follow that rather than a general timeline.
How do I find a tattoo artist experienced with scar cover ups?
Look for healed work rather than fresh photos, and ask specifically whether they have tattooed scar tissue before, not just surgical scars. A consultation is where the real filtering happens: ask how many sessions they expect, what happens if ink does not take, and whether they would do a small test patch first. Artists who explain their limits clearly, and who have declined clients whose scars were not ready, are the ones worth booking.
Where to Start With Your First Cover-Up
If this would be your first tattoo, the geometric wrist bands, the small bird or the soft cloud fade are the gentlest introductions, because they need one session, very little colour and no commitment to a large piece. Start there, let the artist work on the tissue a little, and see how the ink sits before deciding anything bigger.
Someone building a collection already knows how their skin takes ink, and the peony, the koi and the wave pattern are the natural step up, because they build on placement you already have covered rather than starting a new area cold. Bring the quick guide table to the consultation and mark the rows that appeal. Whichever way you go, the design works hardest when the artist has seen the scar and designed around it, not the other way round.