20 Best Orca Tattoo Ideas (September 2026): Simple, Bold, Small
Vini
September 28, 2026
Table Of Contents
Orca tattoo ideas come down to three decisions: how much detail the design carries, how big it sits, and which part of the body it wraps. The killer whale, or Orcinus orca, is unusual among sea animals because its markings are already graphic. A black back, a white belly, a white eye patch, and a tall dorsal fin read clearly at almost any size.
That is why orcas work as a first tattoo and as a full back piece. Below are twenty designs, each with the placement, realistic size, style, and pain level that suit it best. Bring two or three references to your consultation, because the differences between them matter more than people expect.
Orca Tattoo Ideas: Quick Guide
Idea
Style
Best placement
Size
Pain
1. Minimal black silhouette
Solid black
Inner forearm, wrist, calf
2 to 3 in
Low
2. Fine-line swimming orca
Fine line
Forearm, rib side
3 to 4 in
Low
3. Orca pod with calf
Black and grey
Upper arm, shoulder
4 to 5 in
Low
4. Breaching through a wave
Black and grey realism
Outer upper arm, back
5 to 6 in
Medium
5. Geometric low-poly orca
Geometric
Outer forearm, calf
3 to 4 in
Low
6. Watercolor orca and splash
Watercolor
Shoulder blade, thigh
4 to 5 in
Low
7. Blackwork wraparound
Blackwork
Forearm
7 in and up
Medium
8. Orca and ocean globe
Illustrative
Upper arm, back
5 in across
Low
9. Dotwork bubble orca
Dotwork
Calf, upper arm
3 in tall
Low
10. Crescent moon and orca
Fine line
Inner arm, nape
3 in tall
Low
11. Sunrise rays breach
Black and grey with colour
Outer thigh, back
5 to 6 in
Low
12. Anatomical orca study
Realism
Upper back, thigh
6 to 8 in
Medium
13. Pixelated orca
Pixel, illustrative
Lower leg, forearm
3 in wide
Low
14. Traditional orca and rose
Neo-traditional
Forearm, calf
4 in tall
Medium
15. Orca heart
Minimal black
Inner forearm, chest
3 in wide
Low
16. Orca compass rose
Fine line
Upper arm
3 in wide
Low
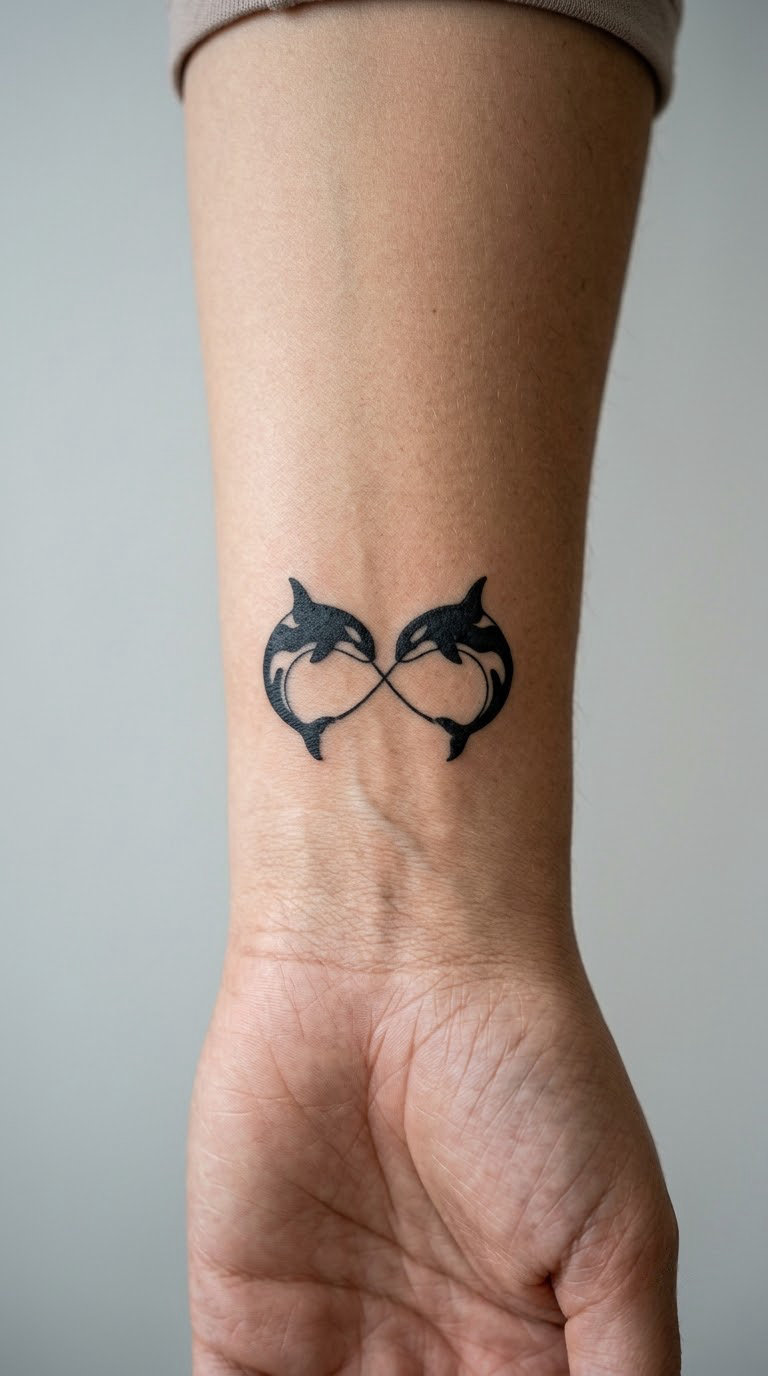
17. Infinity orca connection
Minimal line
Wrist, ankle
2 in wide
Low
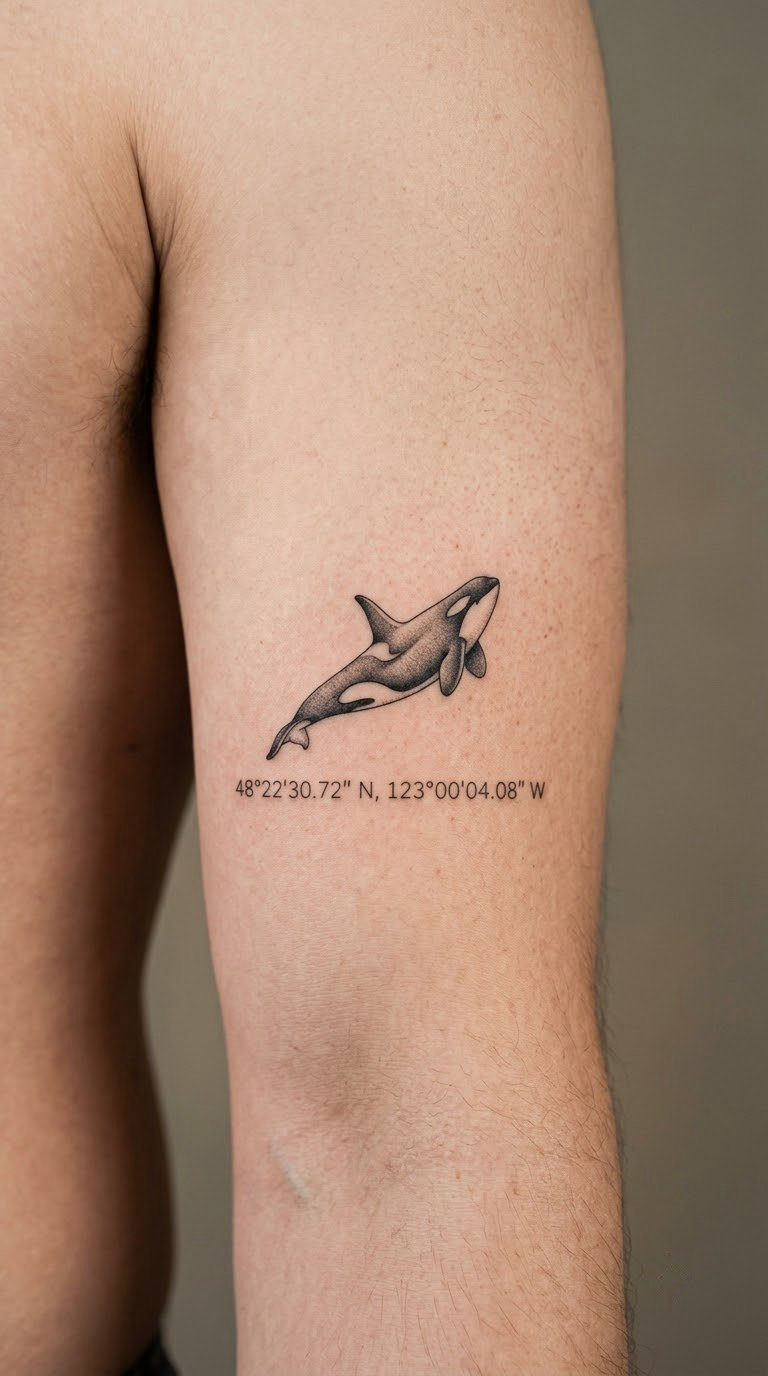
18. Coordinate point markings
Micro-realism
Bicep, rib side
2 in tall
Low
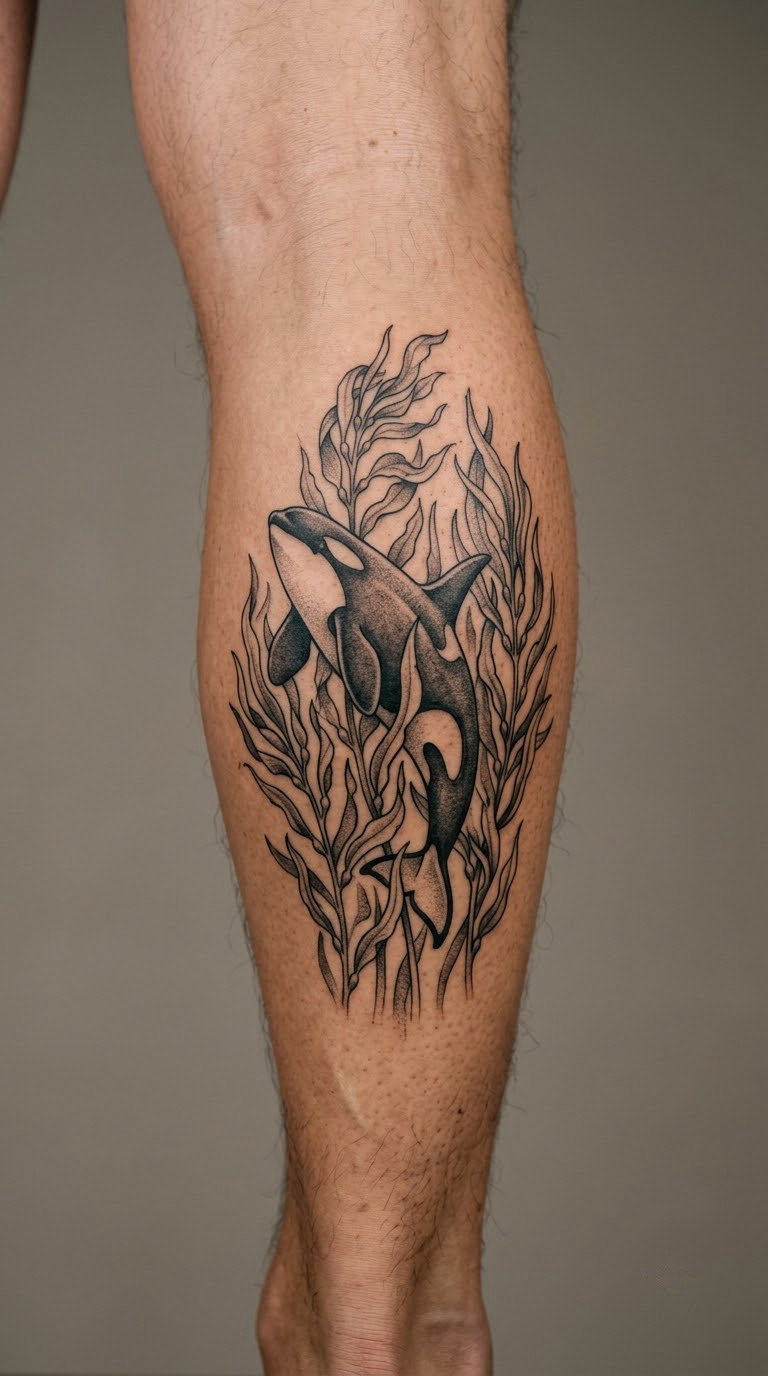
19. Kelp forest orca
Illustrative realism
Outer calf, thigh
6 in tall
Medium
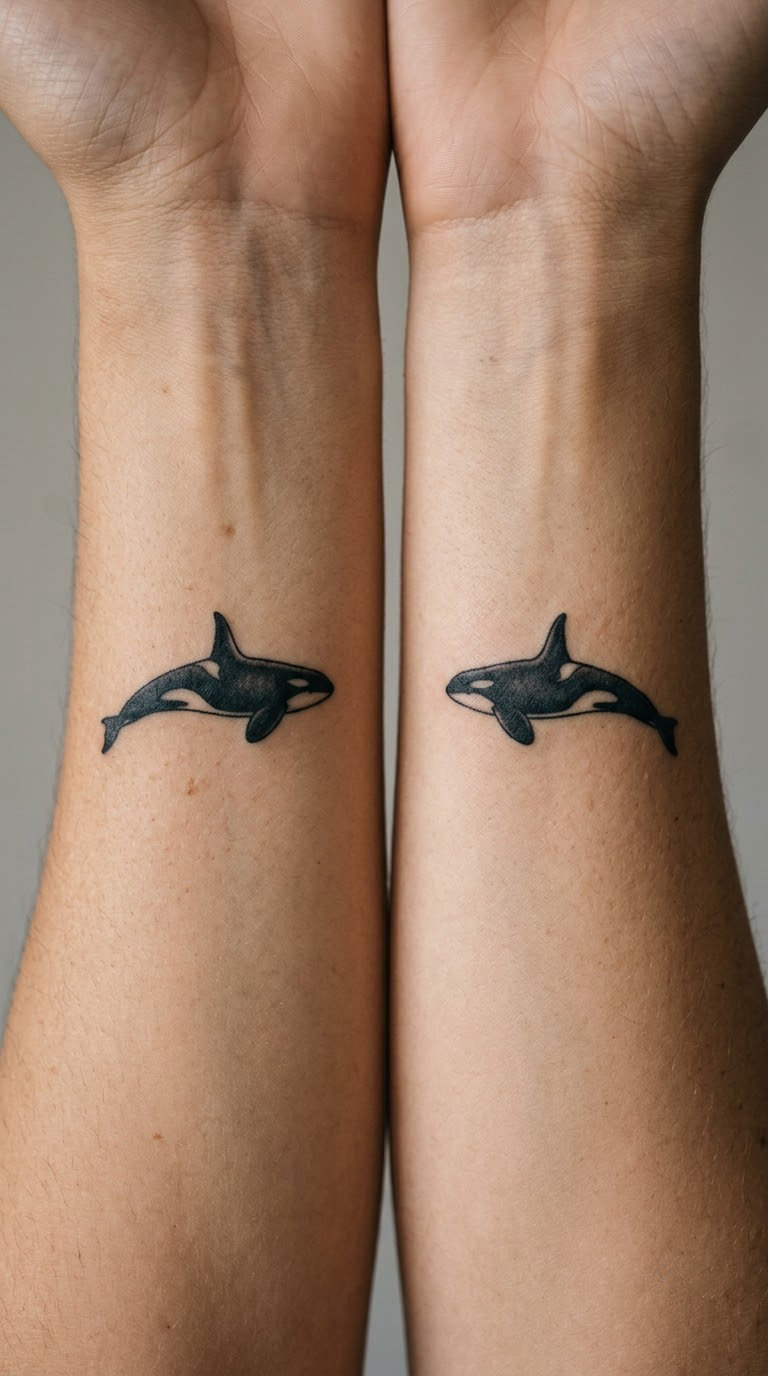
20. Matching orca trail
Minimal black
Forearms, calves
1.5 in each
Low
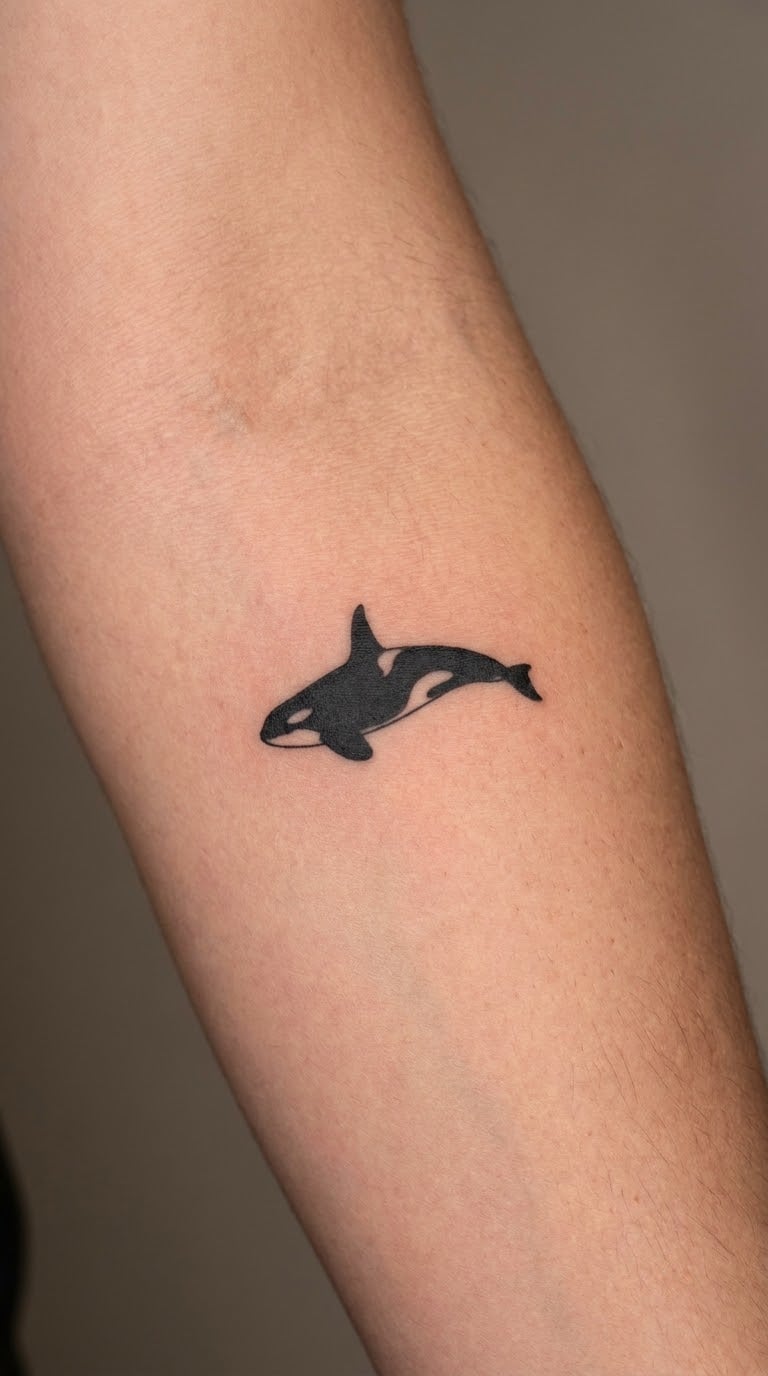
1. Minimal Black Orca Silhouette
This orca tattoo idea is one clean shape: a solid black killer whale with a smooth curved back, a tapered dorsal fin, and a fluke notch cut out of the tail. No background, no shading, no water lines. The whole design depends on the silhouette being right, so the fin height and tail notch carry everything.
People pick it because it survives a long time. A solid black shape has nothing to blur, and it still reads as an orca in fifteen years when a detailed grey piece might not.
Placement: inner forearm, wrist, or the soft inner calf. Size: 2 to 3 inches long. Style: solid black minimalism. Pain: low on the forearm, low to medium on the inner arm near the elbow. The one ageing note is that solid black does slowly lighten along the forearm’s sun-exposed side, so ask about keeping it out of direct sun. Make it yours by adding a single small element behind the tail, like three short water lines, without touching the body of the orca.
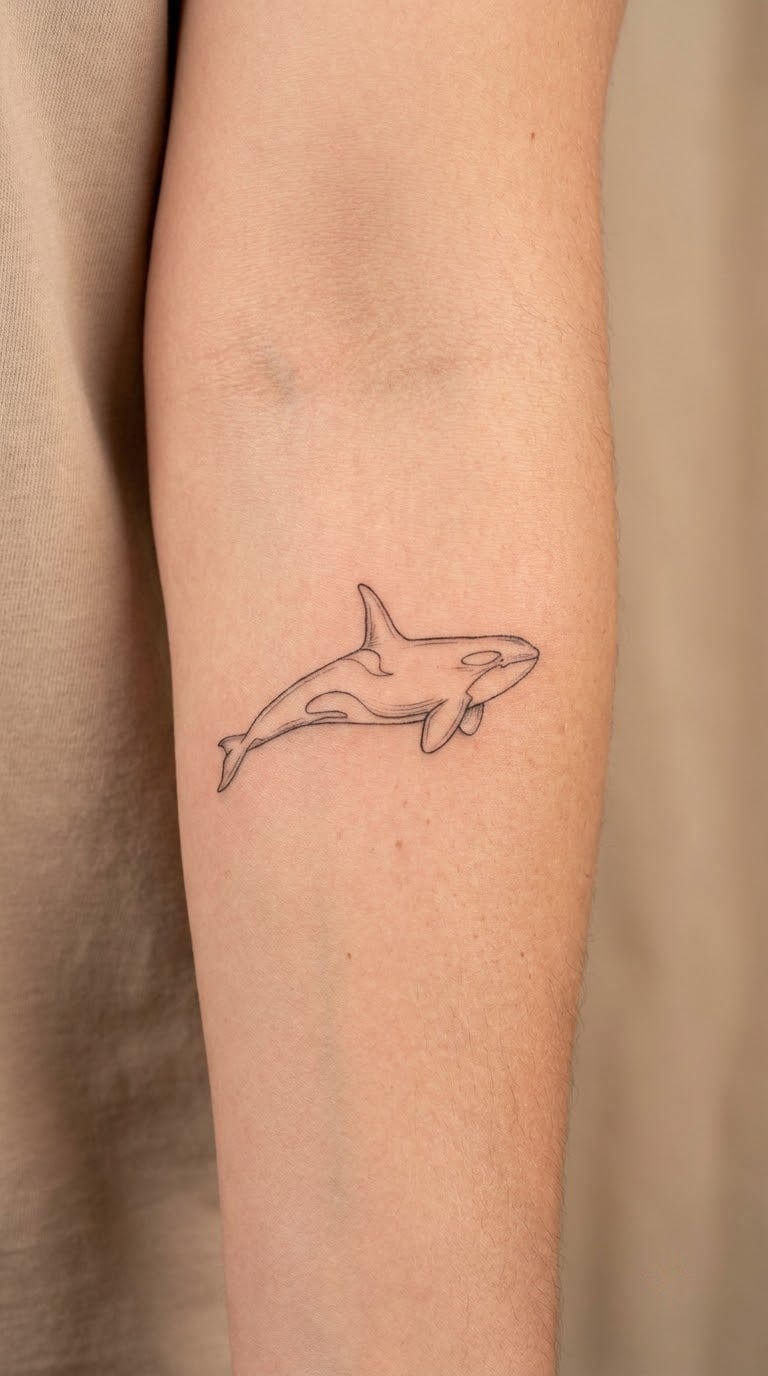
2. Fine-Line Swimming Orca
A single-weight outline, no fill. This fine-line orca tattoo idea is the one most people picture when they imagine their first piece. The artist draws the killer whale in profile with a handful of restrained internal marks: the eye patch, the saddle patch, the crease behind the flipper. The rest is skin.
The appeal is that the design looks lighter than it is. On a forearm it can read as a drawing rather than ink, which is a strange thing to want and a very common request.
Placement: side of the forearm along the radius, or the space between the ribs and the spine on the side of the torso. Size: 3 to 4 inches wide. Style: fine line, single needle weight. Pain: low to medium, and the rib-side placement runs hotter than most people expect. Fine line on the inner arm and hands fades fastest of any style, so plan a refresh in five or six years. Make it yours by adding a small spout of water at the blowhole, three dots at most.
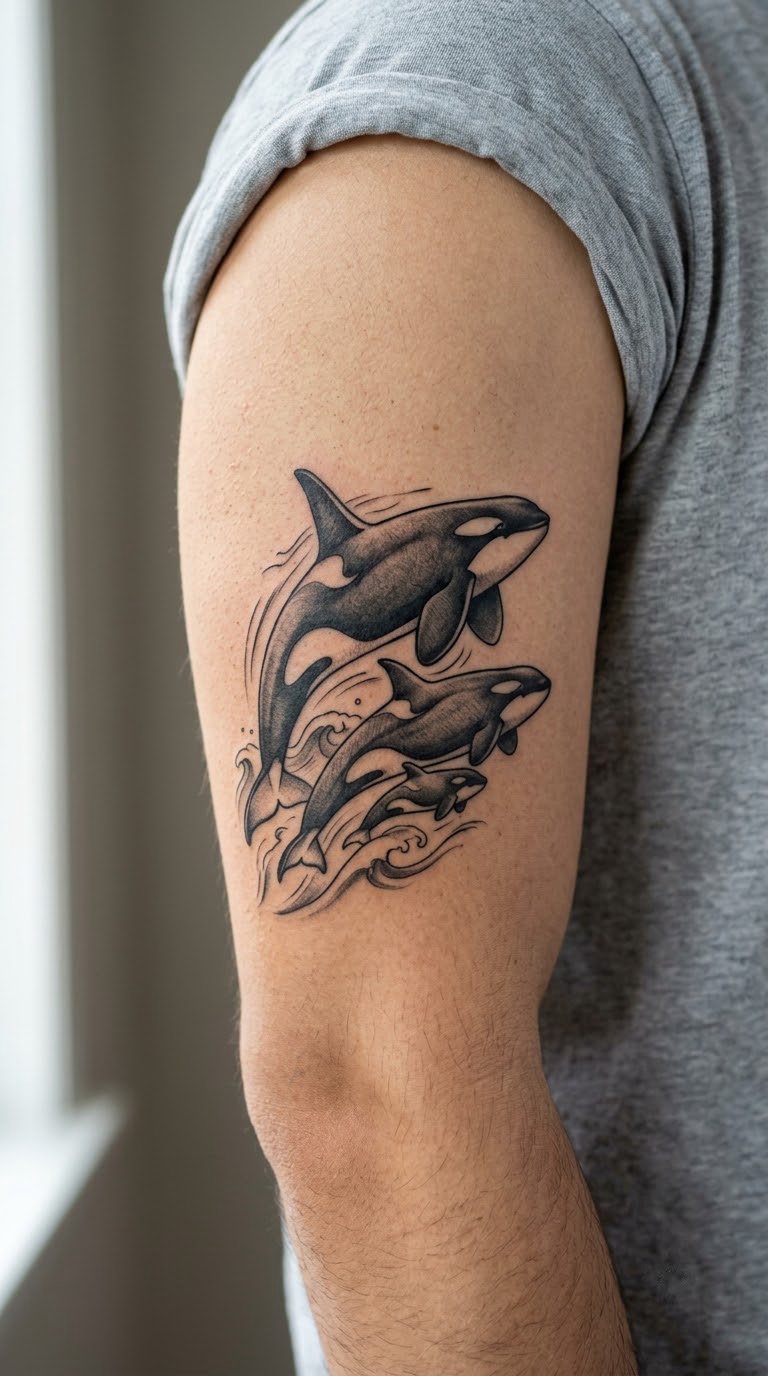
3. Orca Pod With Baby
Two adult orcas flanking a smaller calf, all in simplified flowing shapes rather than a realistic scene. The calf is usually half-size and set slightly behind or below the adults, so the composition reads as a family group without any extra scenery. Black and grey shading does the work, with the white belly left as untouched skin.
Orcas travel in family groups called pods, and that is the reason this composition gets chosen. It works as a family piece, a memorial piece, or a marker for a specific group of people, without needing a name or a date.
Placement: outer upper arm, shoulder, or the upper back. Size: 4 to 5 inches wide. Style: black and grey realism with simplified forms. Pain: low on the upper arm, medium on the upper back. Ageing note: the small calf’s outline needs a slightly heavier line than the adults or it fades first. Make it yours by adding a small dorsal ridge on the calf, so it is recognisably yours and not a stock drawing.
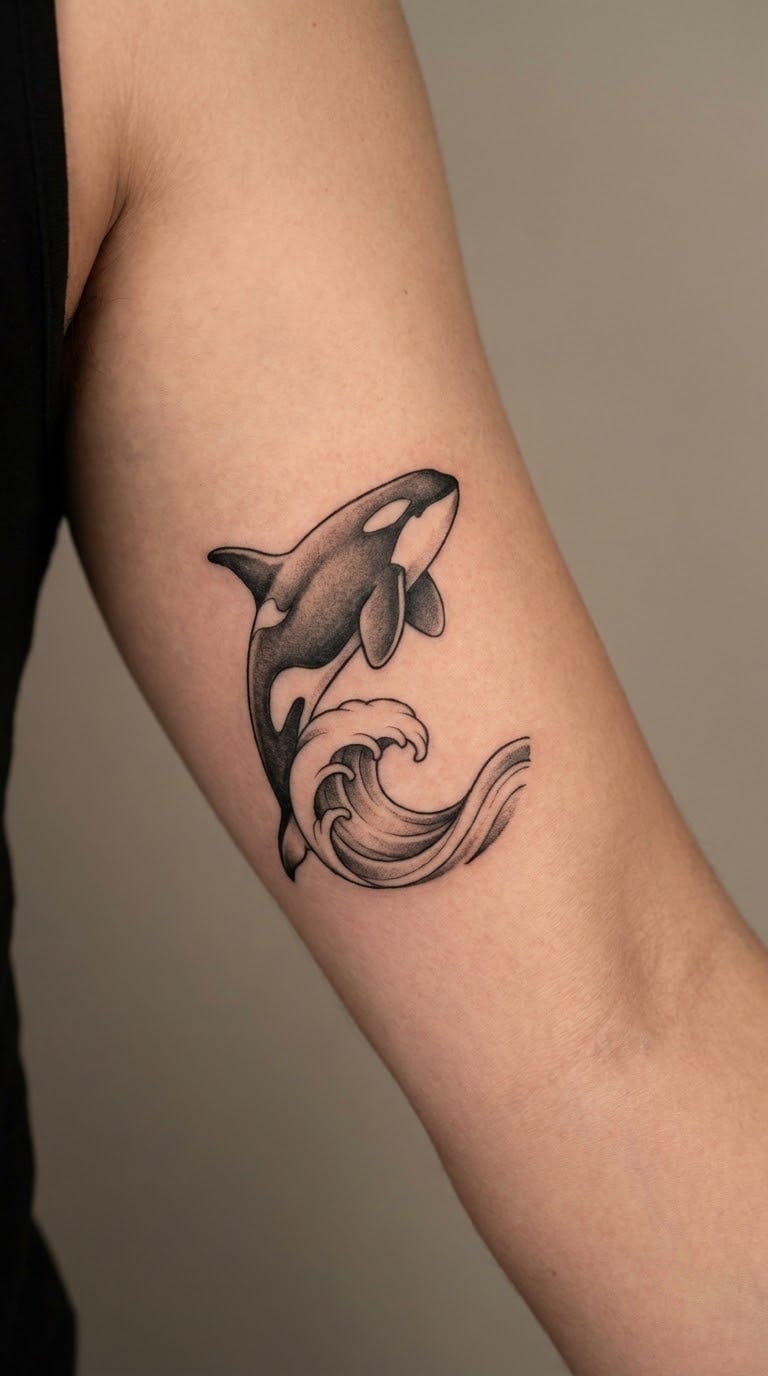
4. Orca Breaching Through a Wave
The orca leaves the water at an angle, forelimbs tucked, dorsal fin forward, with a curling wave beneath it and a few separated droplets above. Black and grey shading builds the wet flank, and the wave is drawn as a single curl rather than a full seascape. Getting the anatomy clear matters more here than anywhere: breaching orcas twist in the air, and a rigid pose looks wrong to anyone who has seen a photograph.
Placement: outer upper arm, or the back between the shoulder blades where the composition has room to be tall. Size: 5 to 6 inches tall. Style: black and grey realism. Pain: medium, mostly from the bony shoulder area. One ageing note: grey shading on the wave tends to soften first, so keep the dark outline of the curl strong. Make it yours by changing the wave into a single ribbon of water, which scales down cleanly.
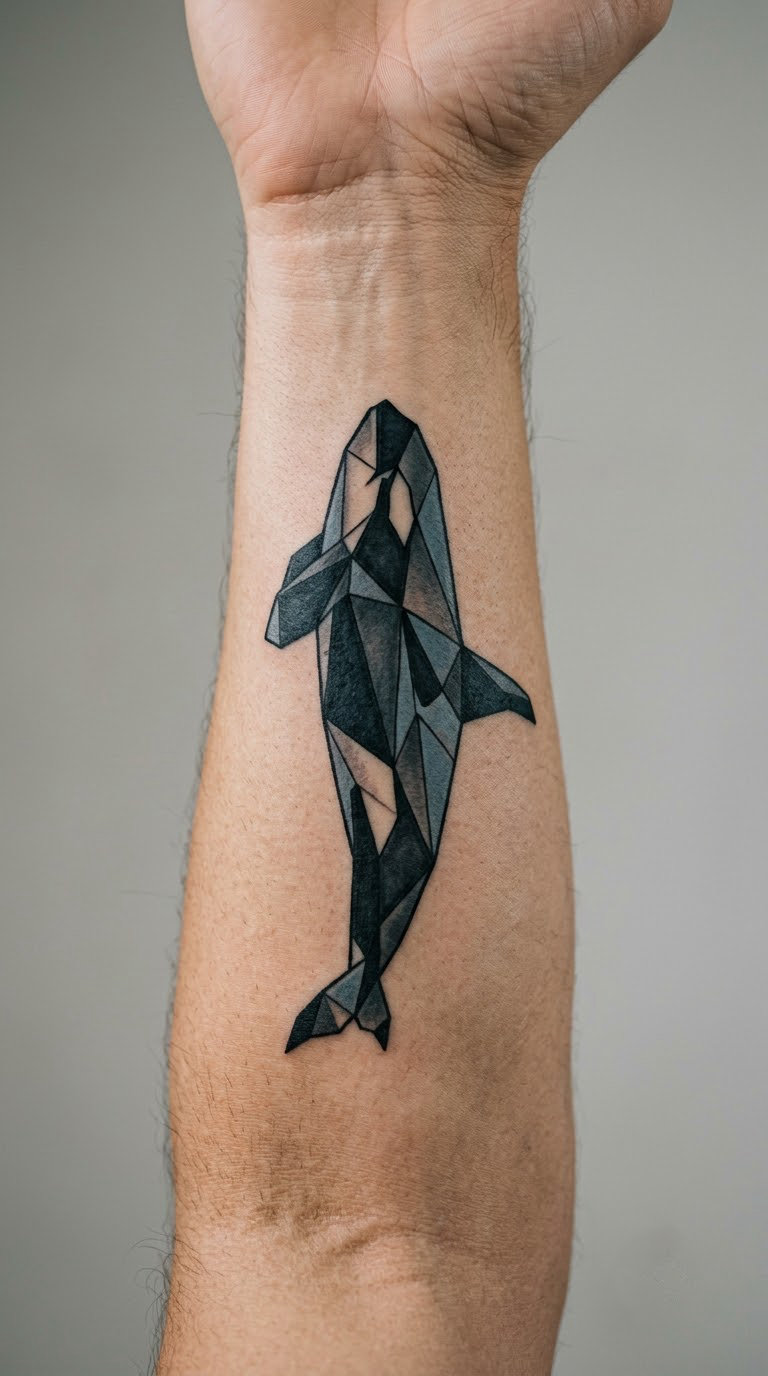
5. Geometric Low-Poly Orca
An orca built from crisp angular facets. Black, grey, and a muted blue are laid in flat triangles, and the negative space between the polygons does as much work as the ink. Because the form is assembled rather than shaded, it holds together on curved surfaces like a shoulder or a calf where soft realism would foreshorten badly.
This is the orca tattoo idea for someone who likes structure. The polygonal treatment also forgives small imperfections, since a slightly off eye patch reads as a facet instead of an error.
Placement: outer forearm, calf, or the inside of the upper arm. Size: 3 to 4 inches wide. Style: geometric, low-poly. Pain: low almost everywhere at this size. Ageing note: thin grey facets and hairline outlines soften over about five years, so thicker grey is worth asking for. Make it yours by picking your own colour set, maybe grey and copper instead of grey and blue.
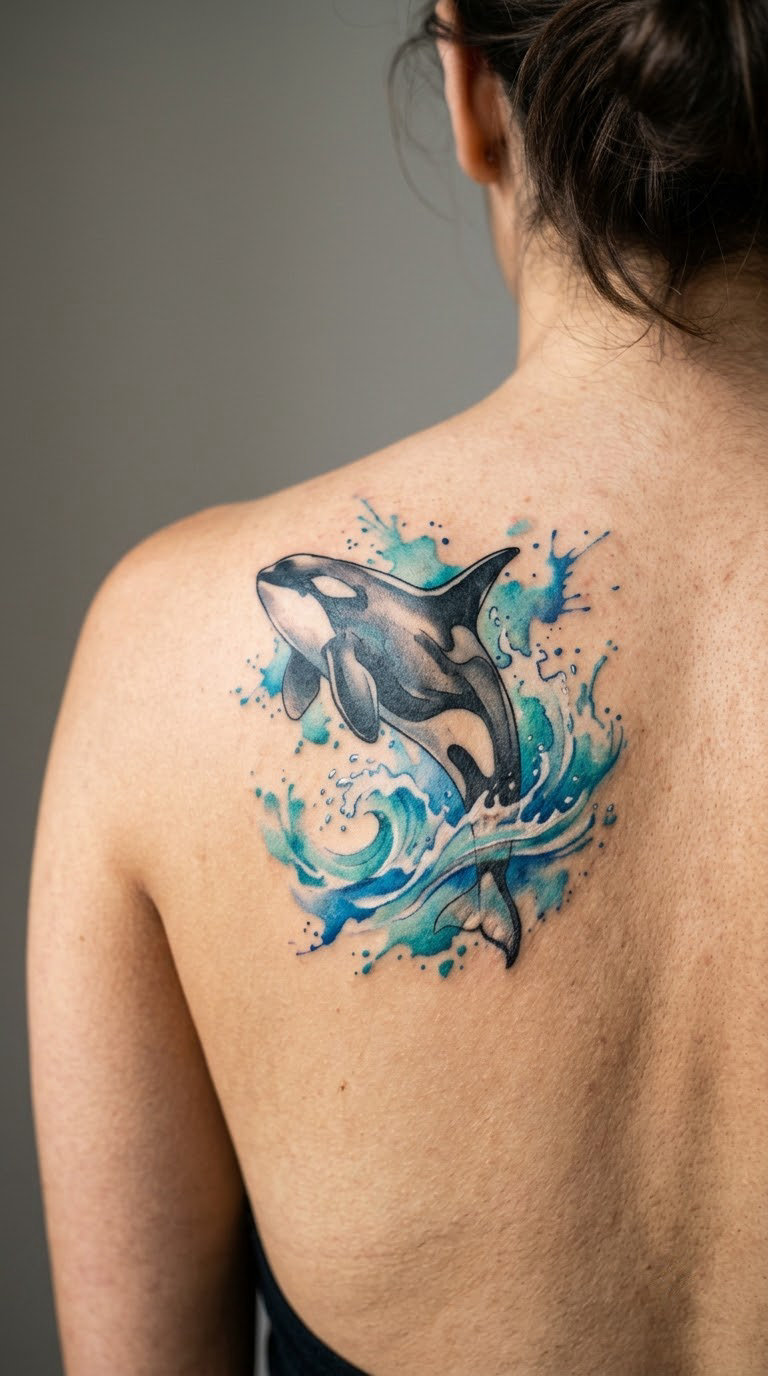
6. Watercolor Orca And Ocean Splash
A realistic black and grey orca in the centre, wrapped in loose washes of blue, teal, and a little violet. The animal stays controlled while the water around it does not. That contrast is the whole design: a precise subject inside an uncontrolled field.
Watercolor suits people who want colour without a full colour piece. The pigment sits lighter in the skin than traditional saturated colour, and it fades in a way that looks like a wash rather than a loss, so the design keeps its character longer.
Placement: shoulder blade, outer thigh, or the back of the calf. Size: 4 to 5 inches wide. Style: watercolor with black and grey subject. Pain: low on all three. Ageing note: the lightest violet washes will soften noticeably within a few years, which is part of the look. Make it yours by giving the splash one colour you already love, so the piece wears a little of your palette.
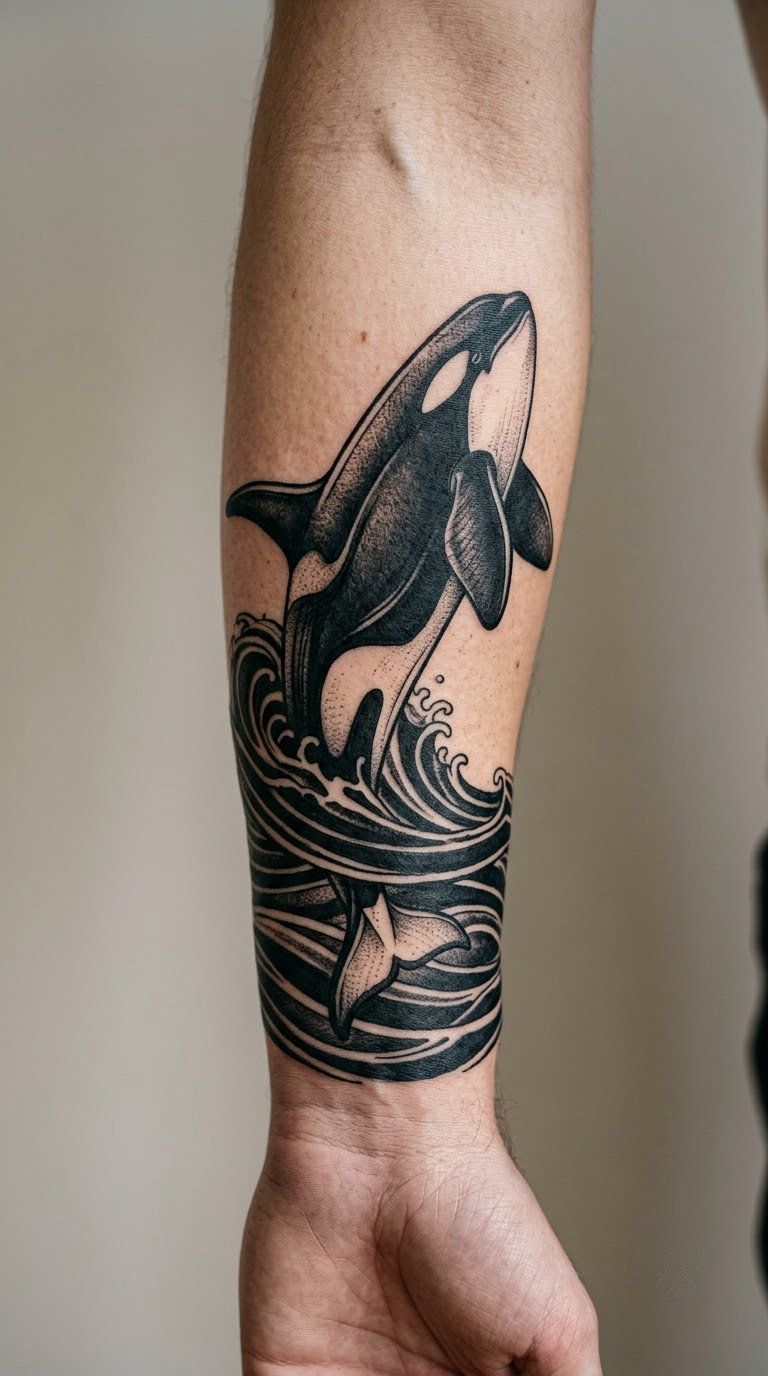
7. Blackwork Orca Wraparound Design
A bold forearm piece where a large orca moves through solid black fields and open skin, with water lines flowing around it. The contrast between dense black and bare skin does the work; there is very little grey. This is the design you pick when you want the tattoo to read from across a room.
It is also the biggest commitment on this list. A wraparound like this usually takes three to five sessions because the artist is filling a large area of near-solid black, and full black takes longer to lay down than shading.
Placement: forearm, wrapping from the inner side around to the outer. Size: 7 inches and up. Style: blackwork. Pain: medium, since the inner forearm near the elbow is sensitive and the sessions get long. Make it yours by adding a second smaller orca in the negative space, something most people wish they had planned.
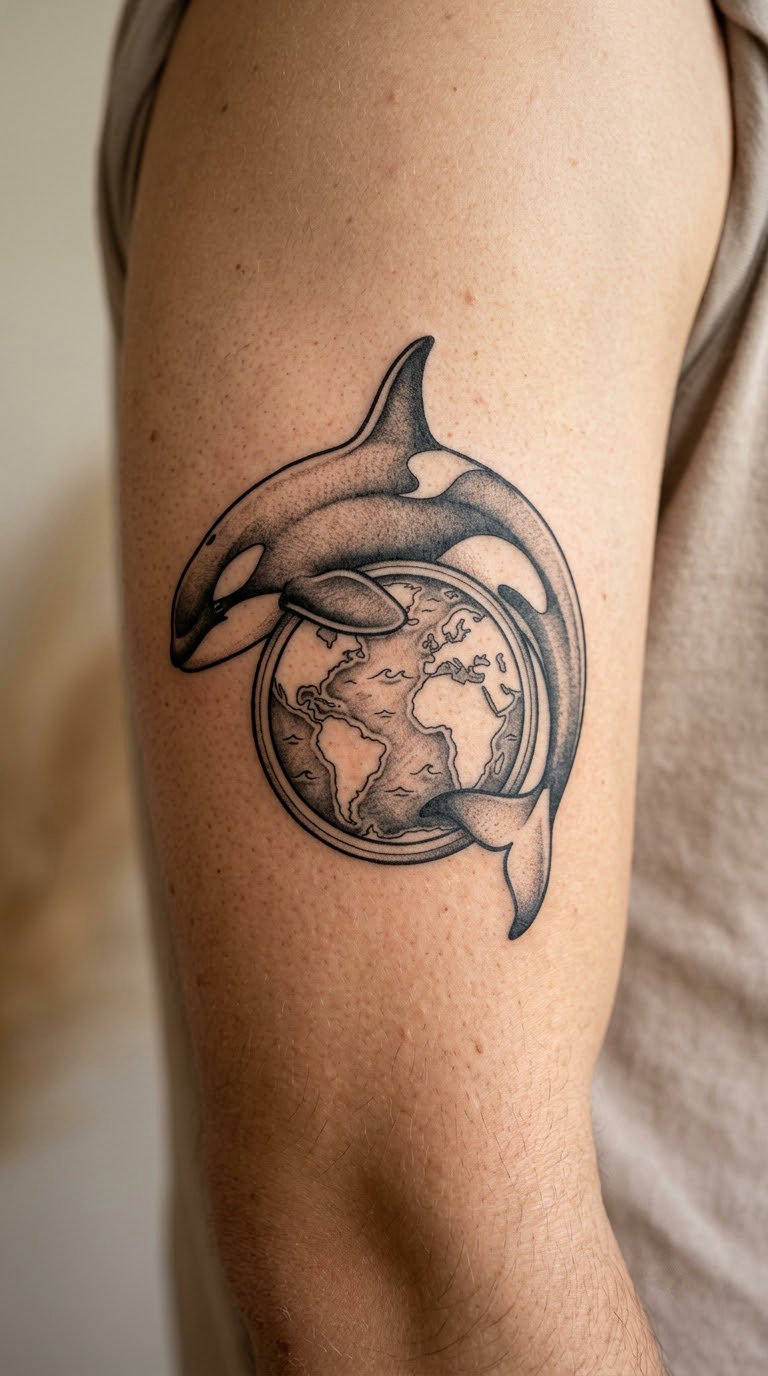
8. Orca And Ocean Globe
A cleanly rendered orca curving around a simple globe with two or three curved latitude lines. The map detail is deliberately sparse. Crowded coastlines turn to noise once the skin moves, and an artist who tries to fit a full world map into five inches will have to simplify it anyway.
The globe adds travel and distance to a design that otherwise says strength and family. It works well for anyone who came to the orca through the water rather than through the animal itself.
Placement: upper arm, back, or the outer thigh. Size: about 5 inches across. Style: illustrative, black and grey. Pain: low on the arm, low to medium on the back. Ageing note: the thin latitude lines are the first thing to blur, so ask for them at a consistent weight. Make it yours by having the artist mark one real coordinate you have been to, drawn as a small cross on the globe’s edge.
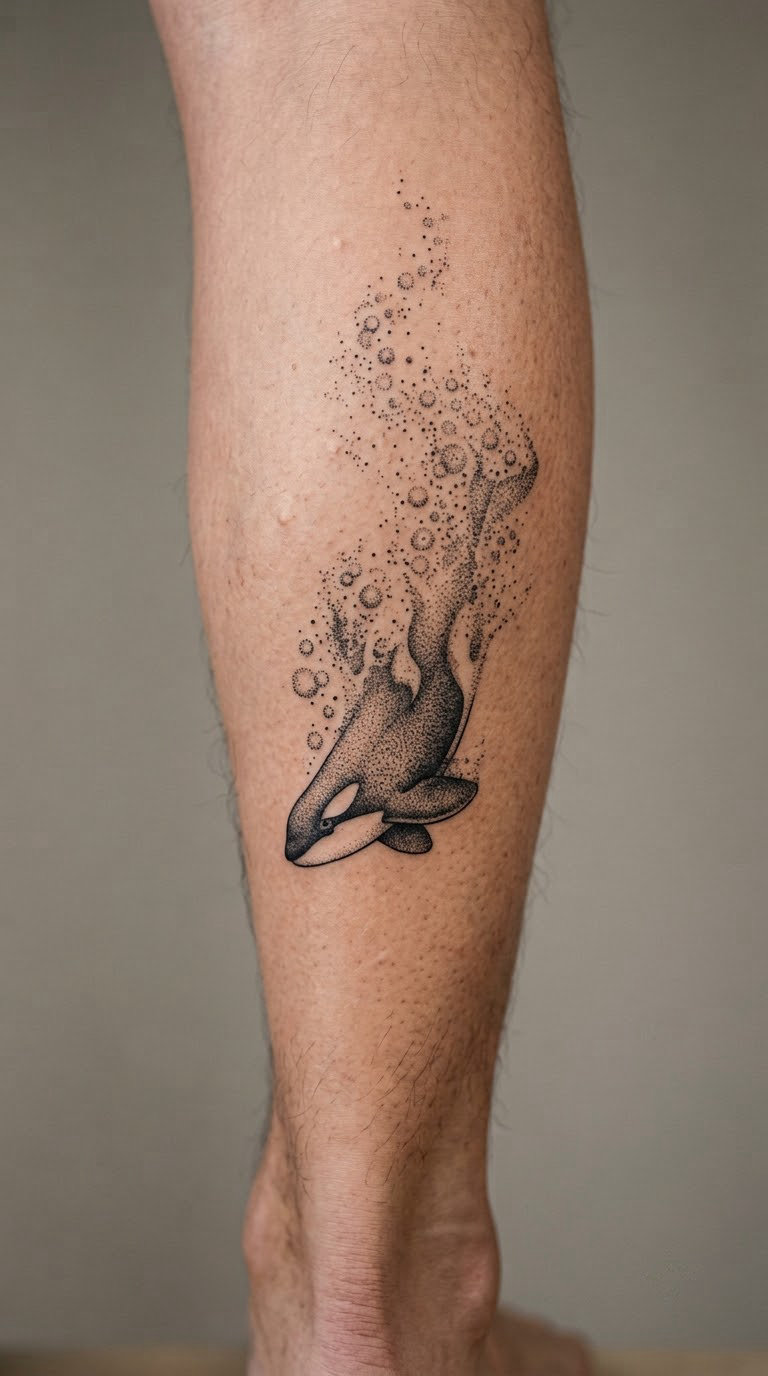
9. Dotwork Orca Made From Bubbles
Graduated dots build the orca’s outline and then break away into a trail of bubbles. The body is the densest area, the head is lighter, and the tail dissolves entirely. It reads as movement rather than as a static shape, and it is far lighter on the eye than a solid piece of the same size.
Dotwork is a slow technique. The dots are placed individually rather than shaded with a machine, so a three-inch orca still takes a couple of hours.
Placement: calf, outer upper arm, or the forearm. Size: about 3 inches tall. Style: dotwork. Pain: low. Ageing note: the smallest dots soften first, which means the bubble trail fades before the body. Make it yours by spacing the bubbles in a pattern that means something, like the number of years in a group, instead of a random scatter.
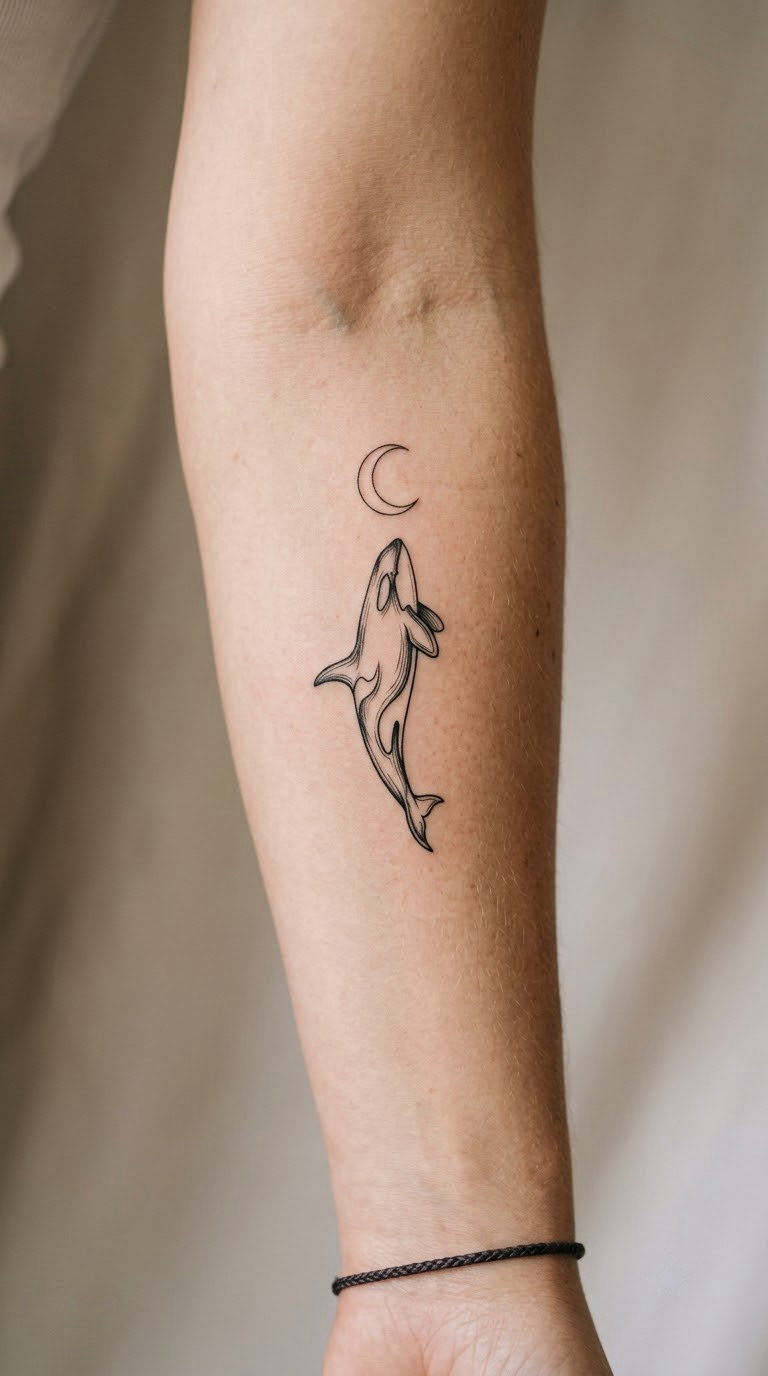
10. Crescent Moon And Orca
A slim crescent frames a small swimming orca from above. Everything is line work in black and grey, with generous empty skin between the two shapes. The moon is thin enough to read as a stroke rather than a solid form, which keeps the whole design from turning heavy.
Celestial and marine imagery sit side by side here without any narrative attached to it. People usually choose it for the composition rather than for a meaning, and that is a perfectly good reason.
Placement: inner arm, nape of the neck, or behind the ear. Size: about 3 inches tall. Style: fine line. Pain: low on the arm, medium on the nape because the skin there is thin and reactive. Ageing note: fine line on the inner arm fades noticeably within four to six years. Make it yours by adding three small stars inside the crescent, kept to a single needle weight.
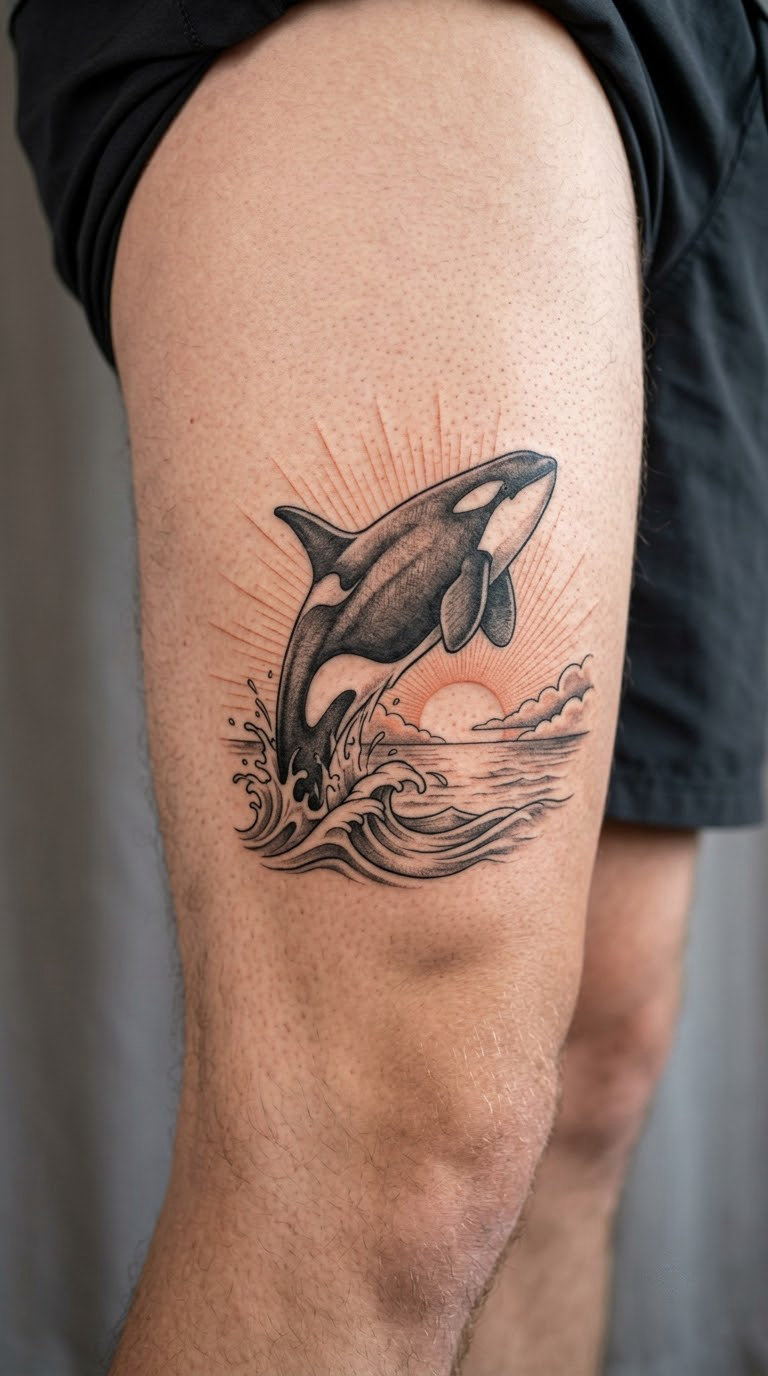
11. Orca Breaking Through Sunrise Rays
A black and grey orca breaching in front of a half-sun with narrow tapered rays behind it. The sun is the only colour: a muted orange, nothing brighter, so the animal stays the subject. Rays are drawn as separate clean wedges rather than a blur, and the wave under the orca is reduced to two or three strokes.
This is where colour appears in a mostly monochrome piece without pulling focus. It suits someone who wants black and grey but finds flat greyscale a little lifeless.
Placement: outer thigh, upper back, or the back of the shoulder. Size: 5 to 6 inches wide. Style: black and grey with a colour accent. Pain: low on the thigh, low to medium on the back. Ageing note: pale orange shifts a little over time but never turns muddy. Make it yours by choosing the sunrise colour to match an existing tattoo in the same area.
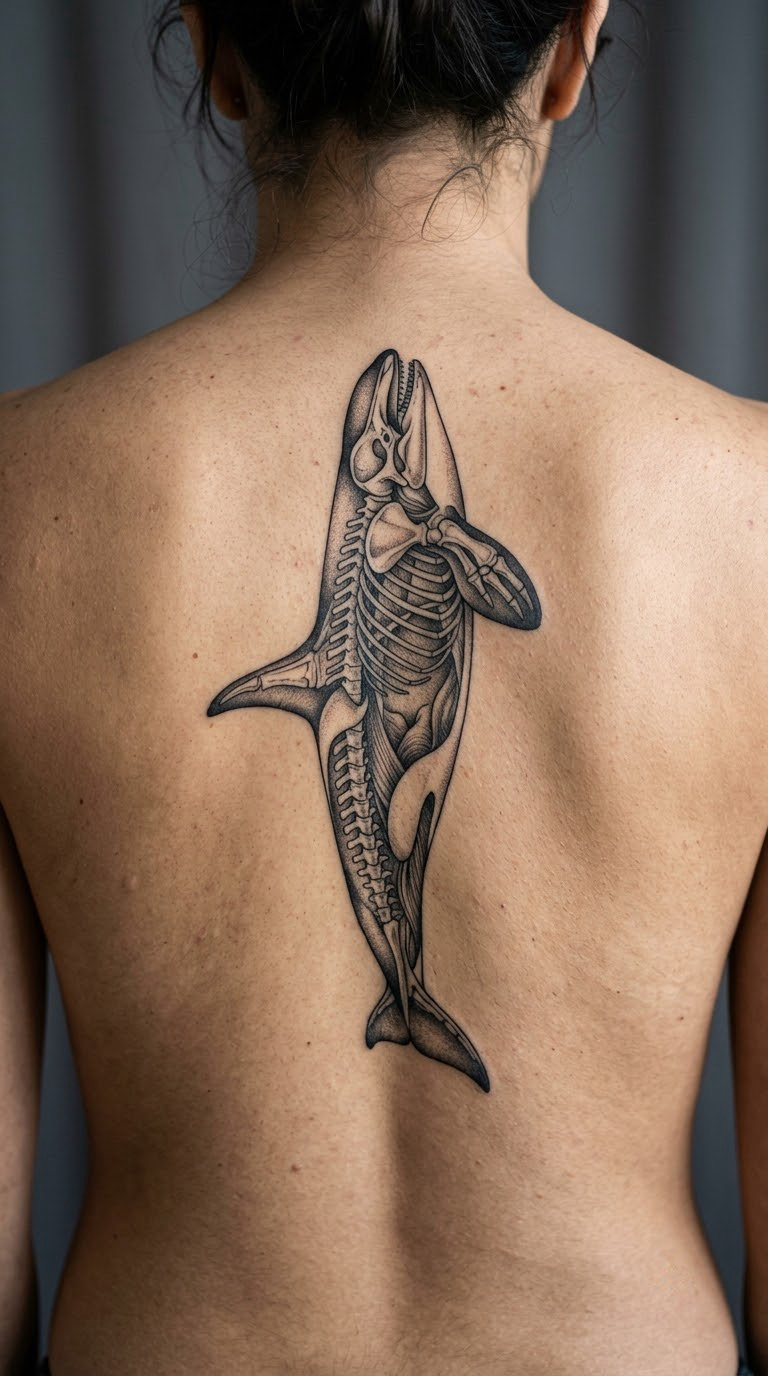
12. Anatomical Orca Study
A restrained study with accurate eye patch, dorsal fin, flipper shape, and light skin texture along the flank, and no scenery at all. The focus is the animal’s actual form rather than a scene around it. At this size the artist can work the contrast between the black dorsal surface and the white belly with real modelling.
Orca anatomy is where tattoos most often go wrong. A muddy or misshapen eye patch is the complaint that comes up most, because that white shape is the first thing your eye looks for.
Placement: upper back, outer thigh, or the back of the calf. Size: 6 to 8 inches long. Style: black and grey realism. Pain: medium on the back and thigh. Ageing note: the eye patch is skin, so sun exposure on the back and outer thigh matters more here than on most designs. Make it yours by giving the piece a side profile, which shows the eye patch and dorsal fin together in a way a top-down view cannot.
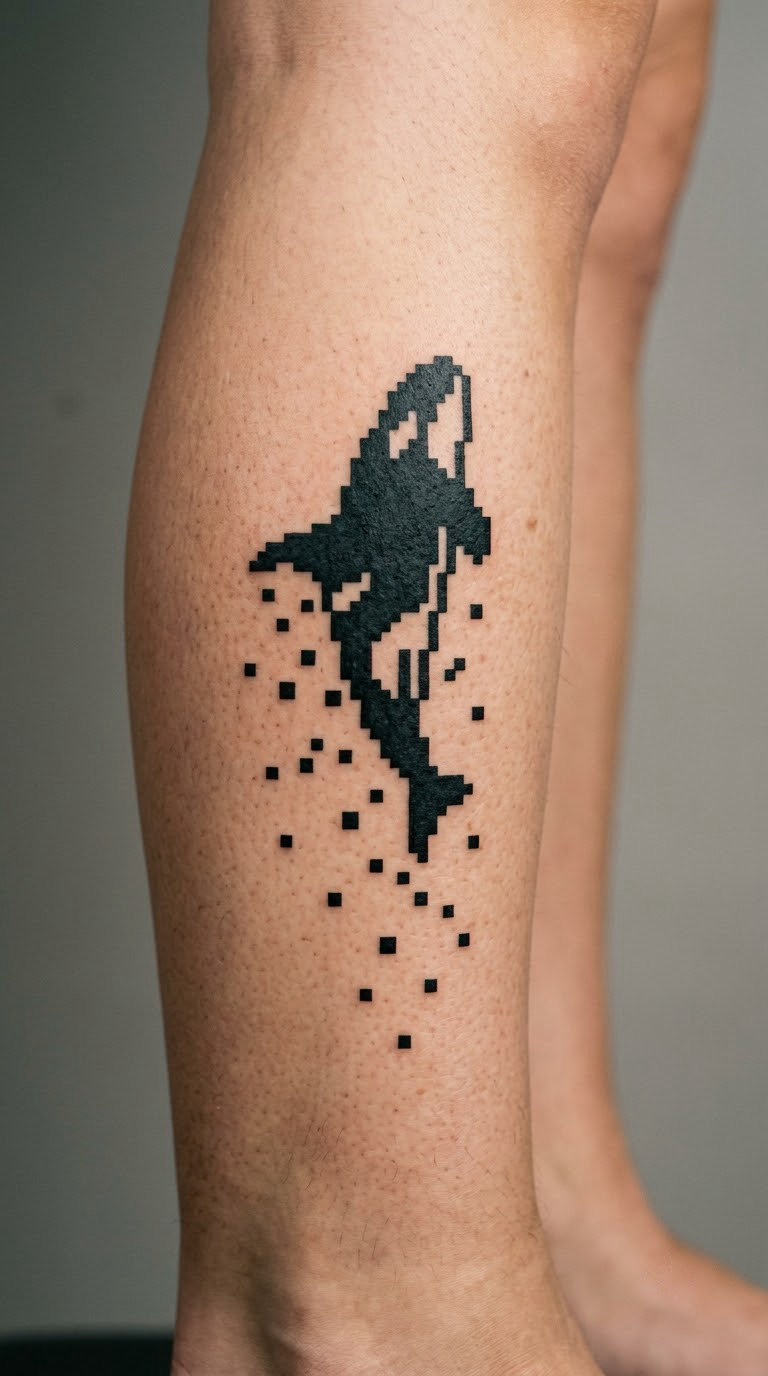
13. Pixelated Orca In Motion
An orca built from square pixels, with the front of the body rendered as clean squares and the rear third breaking apart into scattered blocks. There is no screen, no device, no brand reference. The image is simply an animal coming apart into geometry.
It reads as movement at arm’s length and as a concept piece up close, which is unusual for a subject most people tattoo for realism.
Placement: lower leg, forearm, or the outer upper arm. Size: about 3 inches wide. Style: pixel, illustrative. Pain: low. Ageing note: the isolated trailing squares can soften over time, so ask the artist to keep the separated blocks at a consistent size. Make it yours by choosing the block size, since a coarse grid looks different from a fine one even on the same design.
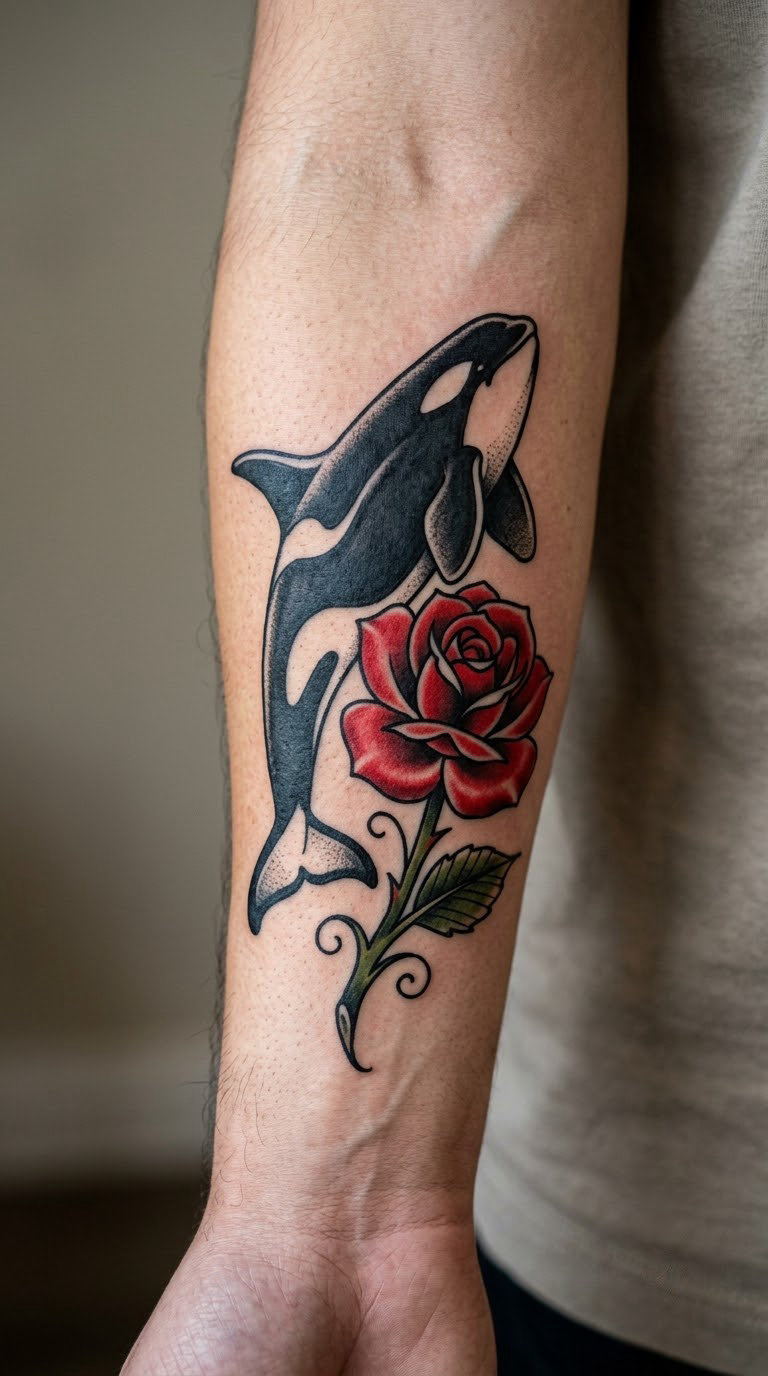
14. Traditional Orca With Rose
A bold orca drawn in neo-traditional style, with heavy even contouring and generous black areas, paired with a single red rose and a few leaves. The water is left out entirely. That restraint is what makes the composition work, because traditional flash rewards a clear subject over a busy scene.
A word of caution from r/traditionaltattoos: a killer whale in its natural black and white can feel out of place next to saturated old-school flash, and some traditional-only artists will say so. Ask before the design is finalised.
Placement: forearm, calf, or the upper arm. Size: 4 inches tall. Style: neo-traditional. Pain: medium. Ageing note: bold contour lines hold well, which is traditional work’s main advantage. Make it yours by picking the rose colour so it answers the orca’s black, rather than sitting beside it.
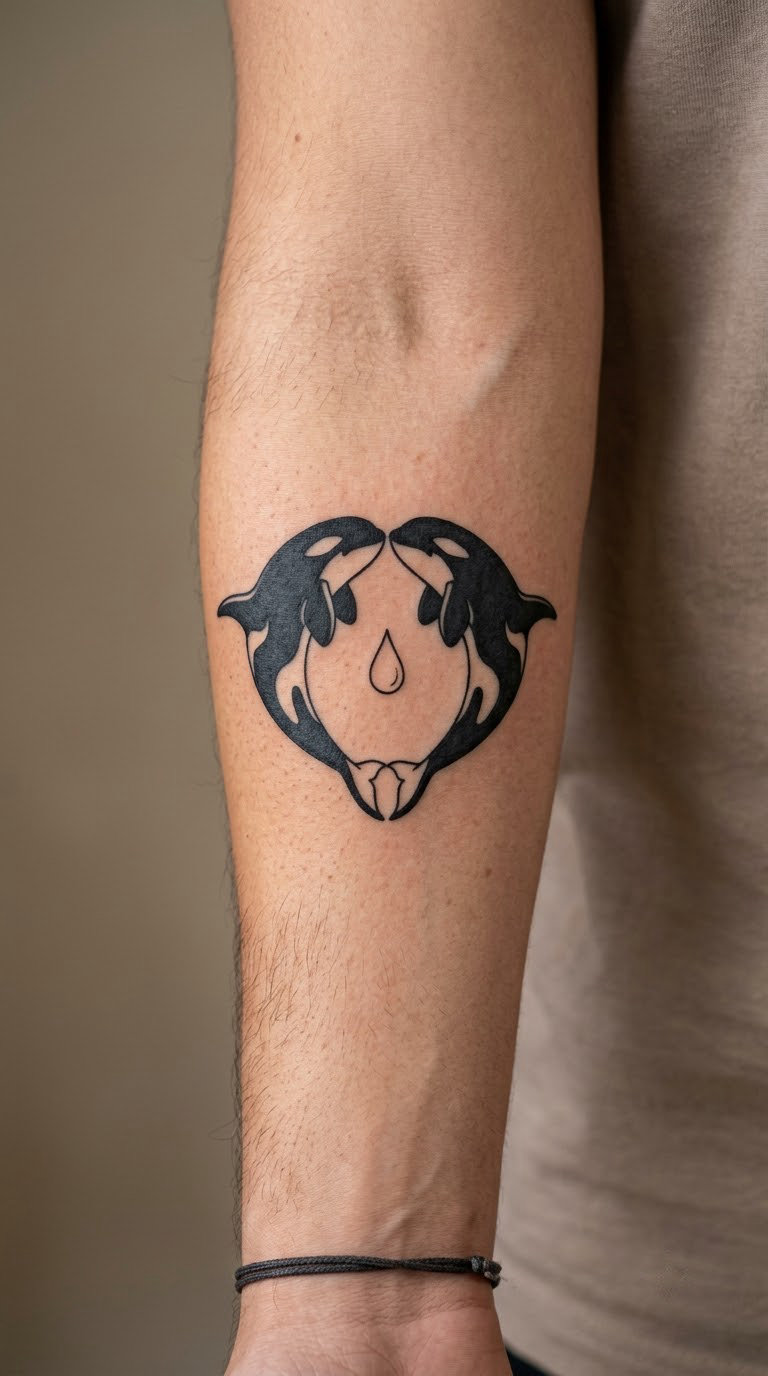
15. Orca Heart Design
Two orcas curve inward, nose to nose at the top, their bodies and tails drawing the two halves of a heart. At the centre, a small water drop is left as negative space. The symmetry is doing the emotional work here, so both orcas have to be mirrored properly rather than approximated.
The heart is an obvious relationship choice, and you can say so. It suits couples, families, and friendships, and it works just as well as a plain symmetrical design if the relationship framing is not for you.
Placement: inner forearm, chest, or the inner calf. Size: about 3 inches wide. Style: minimal black. Pain: low on the forearm, medium on the chest. Ageing note: the two innermost curves are the highest-contrast part of the design and will show wear first. Make it yours by adding a small initial inside the water drop at the centre.
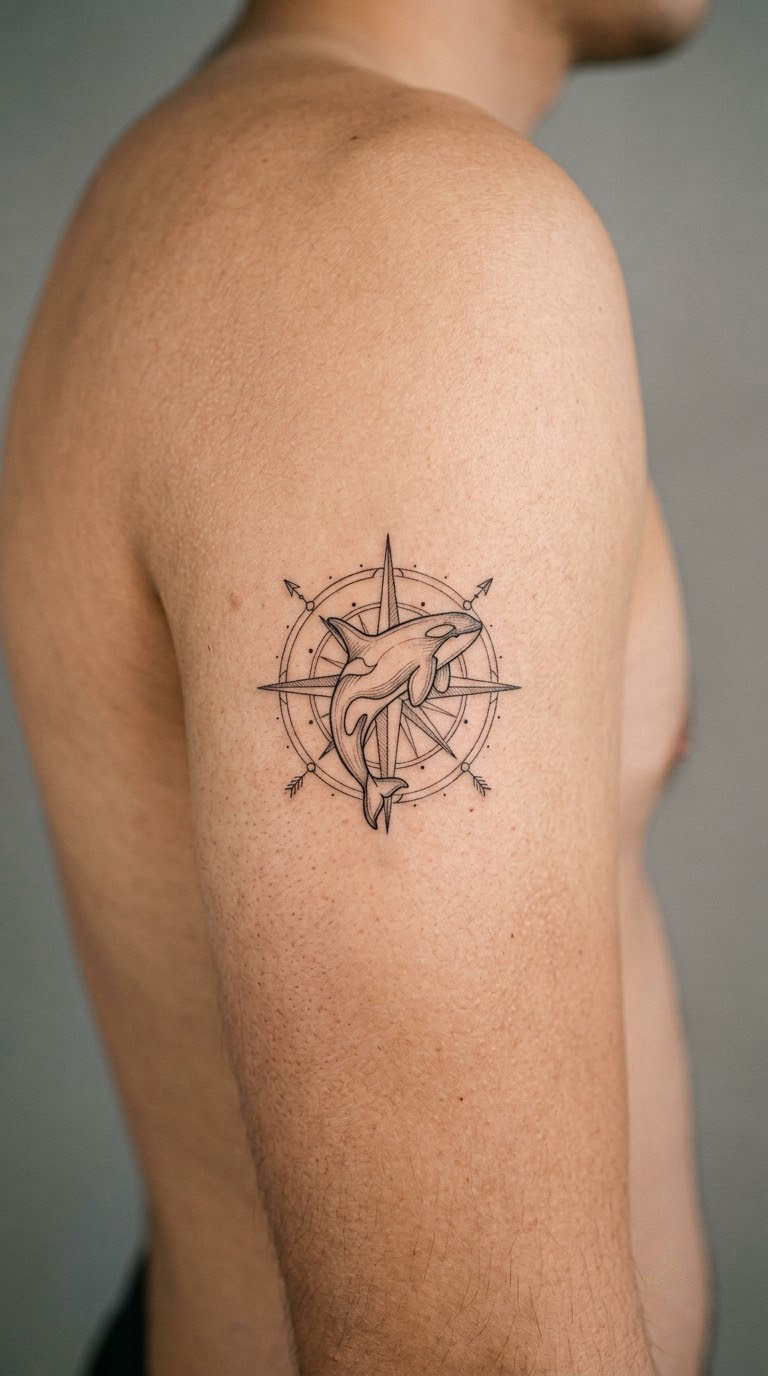
16. Orca Compass Rose
The orca forms the central arrow of a minimal compass rose, with four fine geometric points extending from it. Only the orca and the points are drawn. There is no circle, no lettering, and no decorative flourish, which keeps the design legible.
The ocean and navigation connection is obvious without needing a slogan, and this works as a small piece that reads like a symbol rather than a picture.
Placement: upper arm, forearm, or the outer calf. Size: about 3 inches wide. Style: fine line, geometric. Pain: low. Ageing note: the compass points are hairline elements and will be the first to soften, so keep them at an even weight. Make it yours by rotating the whole composition a few degrees, so the orca points somewhere slightly off north.
17. Infinity Orca Connection
One continuous line forms the infinity shape, and that same line doubles as the bodies of two orcas facing each other. A small open space sits at the centre where the tails meet. There is almost no shading, so the piece is defined by line quality and the two head shapes.
It is small enough to sit on a wrist and quiet enough to be invisible at work, which is a common reason people pick it.
Placement: wrist, inner ankle, or behind the ear. Size: about 2 inches wide. Style: minimal line. Pain: low on the wrist and ankle, medium behind the ear. Ageing note: this one fades faster than almost anything else on the list, so expect to have it refreshed. Make it yours by giving one orca a slightly larger head, so the pair reads as two individuals rather than a mirrored pattern.
18. Coordinate Point Markings
A small realistic orca sits above a single line of fine coordinate numerals, set in a plain serif or typewriter face. The animal is rendered with the eye patch and dorsal fin in miniature, and the numbers are the second element rather than an afterthought.
Use a coordinate that means something specific to you, and check it before you book. A wrong decimal in a coordinate tattoo is a permanent detail that most people only notice in photos.
Placement: bicep, rib side, or the inner forearm. Size: about 2 inches tall. Style: micro-realism with fine type. Pain: low on the arm, medium on the ribs. Ageing note: small numerals are the weak point and blur quickly, so ask for a minimum line weight on the type. Make it yours by running the coordinates along a wrist or forearm in a line, rather than stacking them under the animal.
19. Orca In A Kelp Forest
A full marine scene: an orca moving through tall kelp, with depth built from overlapping fronds in muted greens and blue-greys. The kelp strands in front of the animal are lighter, and the ones behind are darker, which is what sells the depth. It is the most involved composition in this guide.
The vertical format is the constraint here. This orca tattoo idea needs a placement where the body already runs vertically, otherwise the kelp gets compressed and the scene flattens out.
Placement: outer calf, outer thigh, or the back of the arm. Size: about 6 inches tall. Style: illustrative realism. Pain: medium on the calf and thigh. Ageing note: the lighter green fronds will fade first, so ask for depth built with density rather than with pale colour. Make it yours by reducing the number of kelp strands and giving the orca more space, which is what usually makes these scenes readable.
20. Matching Orca Trail For Collector
Two small orcas facing opposite directions, mirrored. They are designed to work as two separate tattoos or as one shared composition across both arms, and either way the proportions have to match exactly for the pairing to hold.
Ask your artist to stencil both before the second session so the sizes land identically. A quarter-inch difference is more obvious on a mirrored pair than on any other design on this list.
Placement: opposite forearms, both calves, or one wrist and one ankle. Size: about 1.5 inches long each. Style: minimal black. Pain: low on the arms, low to medium on the ankles. Ageing note: at this size the flukes are the first detail to blur, so keep the tail notch generous rather than fine. Make it yours by having one orca face forward and the other face slightly up, so the pair still reads as related without looking stamped.
How to Choose the Right Design
Pick the style that matches what is already on your body. If you have grey-heavy realism, a fine-line outline orca will sit on it awkwardly, and the same goes in reverse.
Cut the detail before you cut the size. Under two inches, an orca loses its flukes and the saddle patch turns to mush. A solid silhouette reads better small than a detailed animal does.
Follow the line of the body. An orca is a horizontal animal with a long, low body, so it wants a placement that also runs horizontally. Forearms, calves, and the space between the ribs all give it room; a wrist or the nape forces a vertical or cramped read.
Choose contrast you can live with. A piece built on solid black stays bold but lightens over time, and a piece built on fine grey lines loses definition. Neither is wrong, they just age differently.
Settle the personal reference before the session, not after. If the orca stands for a place, a person, or a date, decide what goes with it and cut the count. Most cluttered orca compositions come from adding waves, florals, and an anchor at once, and the animal loses.
Cost and Session Time
Micro and small pieces are the quickest and the least expensive. Anything under two inches often lands on the shop minimum, so the price barely moves with detail. Session length is set by your artist’s hourly rate and that minimum rather than by the design alone.
Medium pieces, roughly four to six inches, commonly take one to two sessions depending on how much grey shading is involved, and they sit in the middle of the range.
Large and wraparound pieces are a different project, and by a wide margin the most expensive thing on this list. A forearm wrap or a kelp scene at six inches is a multi-session job, and the artist will map it out first so the composition stays intact when the shading moves around the arm.
What pushes the number up: the shop minimum, the artist’s hourly rate, your city, how much reference detail you bring, and how many times the design has to be redrawn before it is right. Ask for the written estimate at the consultation, not the day of.
Aftercare Basics
Follow your artist’s aftercare instructions first. They know what they did, and this list is only a general backstop.
Wash gently with unscented soap and lukewarm water, then pat dry with a clean towel. Rubbing is the enemy here.
Keep the design away from friction and heavy sun while it settles. Loose clothing over a fresh piece helps more than people expect.
Skip swimming, pools, and hot tubs until the tattoo is fully healed, which usually takes six to eight weeks for a small piece and longer for a large one.
Contact the artist or a qualified clinician if something unexpected shows up, rather than trying to fix it at home with products you found online.
Frequently Asked Questions
Where should I place an orca tattoo?
Most orca tattoos sit on the forearm, calf, upper arm, or the side of the torso between the ribs, because the animal’s long horizontal body needs a placement that also runs horizontally. Small designs fit the inner wrist, inner ankle, or behind the ear. The upper back and outer thigh give you the most room for a large scene. Bring your references to the consultation and let the artist check how the design follows the body’s lines.
Should an orca tattoo be black or in color?
Black and grey suits most orca tattoo ideas because the animal’s real markings are already monochrome, and it heals with less risk of colour sitting unevenly. A single colour accent, like the muted orange in a sunrise piece, adds life without turning the design into a full colour piece. If a shop only does bold saturated flash, ask whether their style can handle a black and white subject before booking.
How big should a small orca tattoo be?
At least two inches long if you want the flukes and eye patch to stay readable. Under two inches, the tail notch fills in and the saddle patch turns to grey mush as the piece ages. Three to four inches is the sweet spot for a first orca tattoo: the silhouette still reads across a room and the detail is fine enough to execute in one session.
How long does an orca tattoo take?
A small orca of two to three inches is usually one short session. Something in the four to six inch range often takes one to two sessions because of the shading. A wraparound forearm piece or a kelp scene is a multi-session job, and the artist will map it out before the first sitting. Ask for the session plan at your consultation so the design survives the trip.
Are orca tattoos suitable for a first tattoo?
Yes, and they are a good first subject because the silhouette is distinctive and the black and white palette needs no colour to work. Start with a fine-line swimming orca or a solid black silhouette in the three inch range, both of which finish in a single short session. Avoid anything with heavy grey shading or a wrapped composition for a first piece, since both take far longer to sit through.
Which Orca Tattoo Idea Is Best for You?
For a first orca tattoo, the fine-line swimming orca or the minimal black silhouette will suit most people. Both are quick, both read clearly at three inches, and neither depends on shading that can blur.
If you are adding to an existing collection, the blackwork wraparound or the kelp forest scene gives you something substantial to plan around. Both need a proper consultation and more than one session.
Bring two or three references, know the placement you want, and confirm the final size with your artist before anything is stenciled. The difference between a good orca tattoo and a great one is mostly in that conversation.