
24 Daisy Tattoo Ideas: Best Floral Designs (October 2026)
A daisy tattoo is one of those designs that looks simple in a photo and demands real skill in person. The bloom is tiny, the petals are thin, and there is nowhere to hide a wobbling line. That is exactly why people keep choosing it. These 24 daisy tattoo ideas run from a single fine-line sprig to a full sleeve, and each one is broken down with the placement, realistic size, style, pain level and a way to make it your own.
People on r/tattooadvice keep asking the same question: how small can a daisy go before it turns into a grey blob? The honest answer is that a classic fine-line daisy wants to be at least an inch and a half across, and single-needle florals need a few weeks of careful aftercare before they settle. Most of the designs below list a size range for that reason. Updated for 2026, with a fresh look at what has been healing well for clients.
24 Daisy Tattoo Ideas: Quick Guide
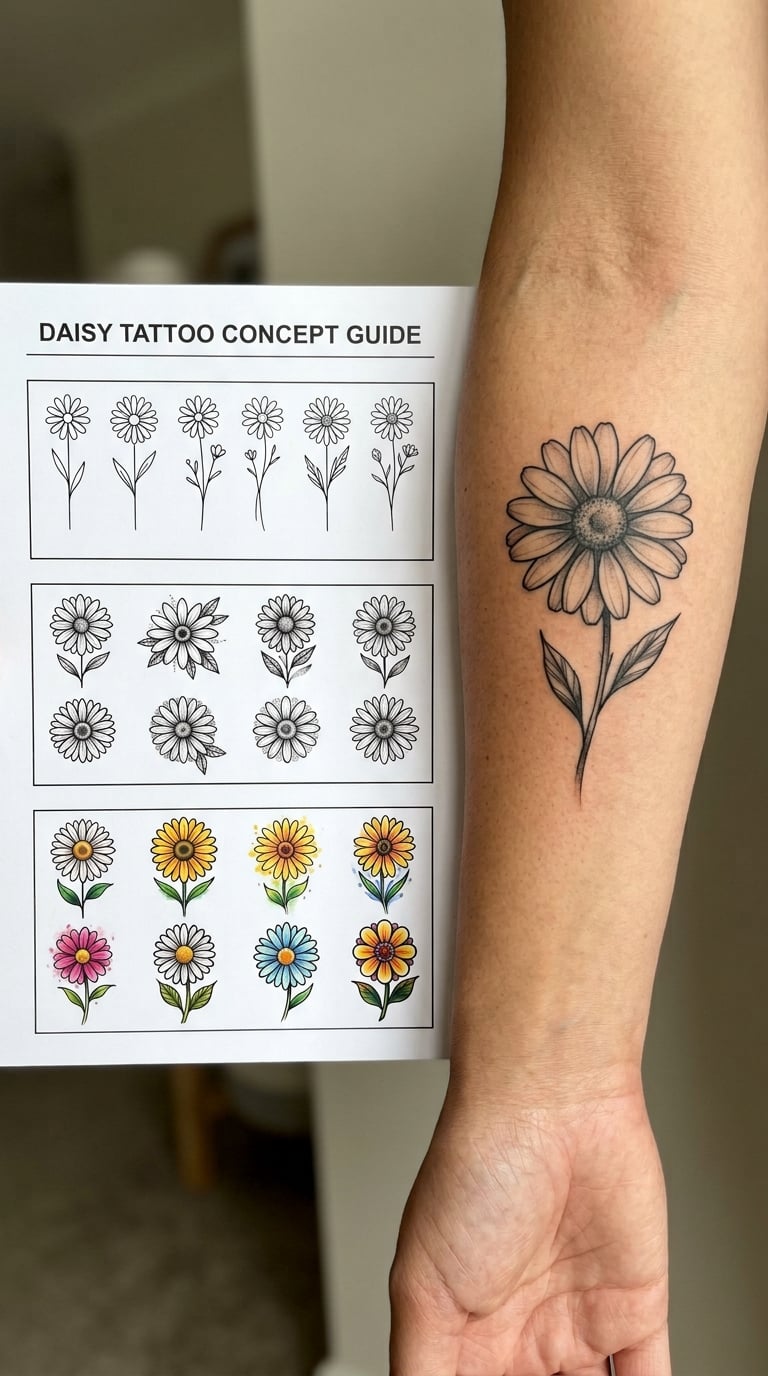
Here is the whole collection on one page. Style tells you how the linework and colour behave, and pain is scored for that specific placement, since a daisy on the inner arm and a daisy on the ribs are very different experiences.
| Idea | Style | Best placement | Size | Pain |
|---|---|---|---|---|
| 1. Fine-line sprig | Fine line | Inner wrist | 2-3 in | Low-medium |
| 2. Three-petal bloom | Minimal line | Behind the ear | 0.75-1 in | Low |
| 3. Shaded cluster | Black and grey | Inner forearm | 4-5 in | Medium |
| 4. Watercolor bouquet | Watercolor | Outer shoulder | 3-4 in | Medium |
| 5. Classic yellow bloom | Traditional | Upper arm | 3-4 in | Medium |
| 6. Tiny realistic daisy | Micro-realism | Finger or knuckle | 0.5-0.75 in | Medium-high |
| 7. Daisy and butterfly | Illustrative colour | Outer ankle | 2-3 in | Medium-high |
| 8. Dotwork mandala | Dotwork | Upper back | 4-6 in | Medium |
| 9. Single collarbone bloom | Fine line | Collarbone | 2-2.5 in | Medium |
| 10. Neon colour bloom | Colour pop | Forearm | 3-4 in | Medium |
| 11. Vintage bouquet | Neo-traditional | Outer thigh | 5-6 in | Medium |
| 12. Wrapping vine | Fine line | Forearm | 8-12 in path | Medium |
| 13. Circular wreath | Fine line | Inner arm | 3-4 in across | Medium |
| 14. Single red-ink daisy | Bold line | Back of hand | 2-3 in | Medium-high |
| 15. Stippled bloom | Stippling | Ribcage | 3-4 in | High |
| 16. Sprig with a date | Fine line and script | Inner forearm | 3-4 in | Medium |
| 17. Geometric bloom | Geometric | Outer calf | 3-4 in | Medium |
| 18. Pastel trio | Soft colour | Shoulder blade | 4-5 in | Medium |
| 19. Bouquet in a jar | Illustrative | Forearm | 4-5 in | Medium |
| 20. Bold blackwork bloom | Blackwork | Upper arm | 3-4 in | Medium-high |
| 21. Spine chain | Minimal line | Spine | 6-10 in path | Medium |
| 22. Daisy and sunflower | Botanical | Outer leg or thigh | 4-5 in | Medium |
| 23. Monoline rib staircase | Monoline | Side body | 3-4 in | High |
| 24. Full-colour sleeve | Colour sleeve | Upper arm | Sleeve scale | High over sessions |
1. Fine-Line Daisy Sprig on the Wrist
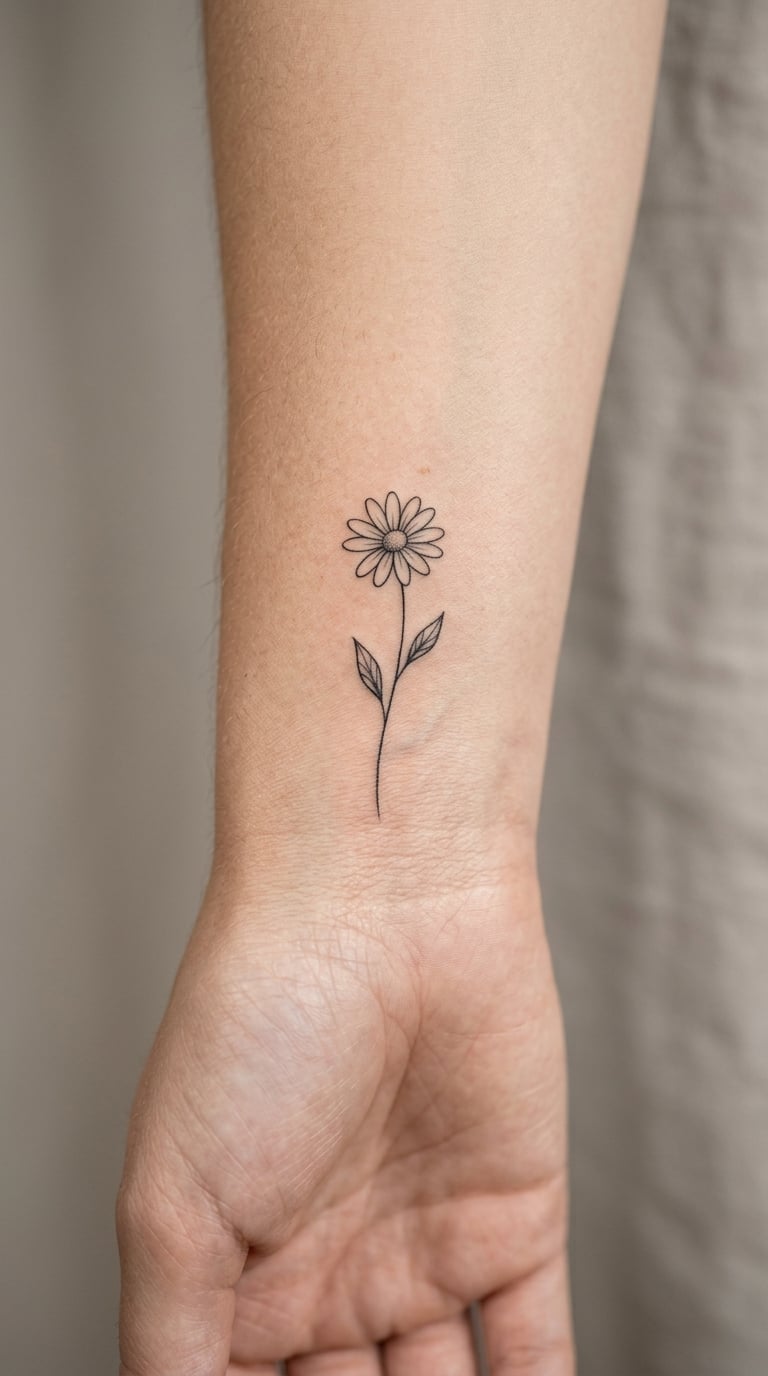
One thin stem, one bloom, a couple of leaves. The whole thing is drawn with a single-needle machine at a consistent weight, and the petals are left mostly empty so the skin does the shading. It reads clearly at arm’s length and still rewards a close look, which is why it keeps turning up in requests for a first daisy piece.
The mood is quiet and optimistic rather than sentimental. People usually pick it because it looks like a small piece of luck rather than a statement.
Placement: inner wrist, just above the pulse, or the outer wrist near the thumb joint. Size: 2-3 inches (5-7.5 cm) end to end. Style: fine line. Pain: low to medium, more a scratchy sting than anything dramatic, though wrist skin is thin and the wrist bone is right underneath. Fine lines on hands and wrists fade and soften noticeably over the years, so go slightly bolder than the reference photo looks.
Make it yours: add a tiny date along the stem, or tuck a small leaf shape into the negative space.
2. Minimal Three-Petal Daisy Behind the Ear
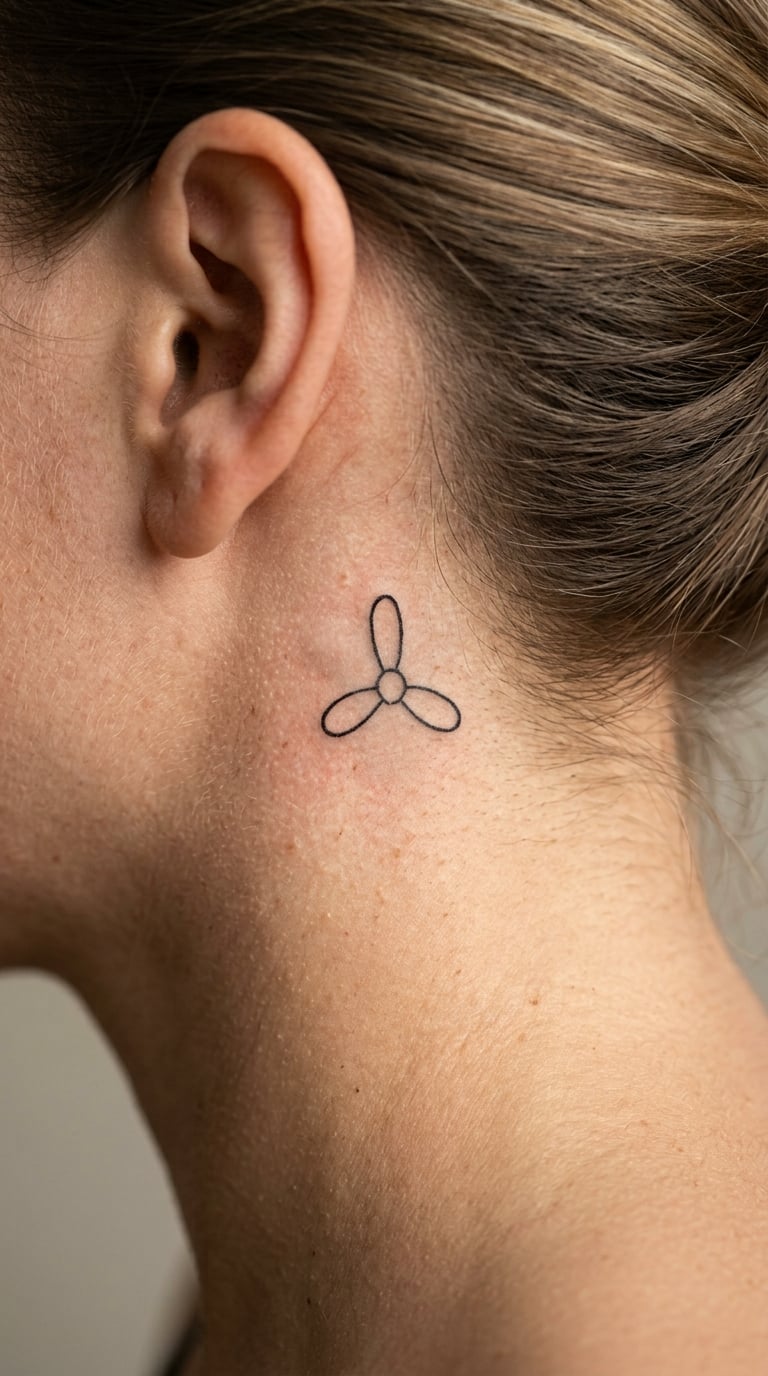
Three clean petals radiating from a small open circle, no stem, no shading. With so few lines there is very little to fill in, which is what makes a design this reduced hold its shape after healing. It reads as a flower without ever drawing attention.
Behind the ear is the placement people pick when they want a tattoo that is theirs and almost nobody else’s. A glance in a mirror or a hand through the hair reveals it.
Placement: just behind the ear on the neck, ideally 0.5 inch clear of the cartilage. Size: 0.75-1 inch (2-2.5 cm) across. Style: minimal line. Pain: low, one of the gentler spots on the body, though skin is thin there and you will feel every pass. Cartilage itself is a different story, so ask the artist to keep it on the neck side.
Make it yours: change the petal count to match a number that matters, or add a hairline crescent tucked behind the bloom.
3. Black-and-Grey Daisy Cluster on the Forearm
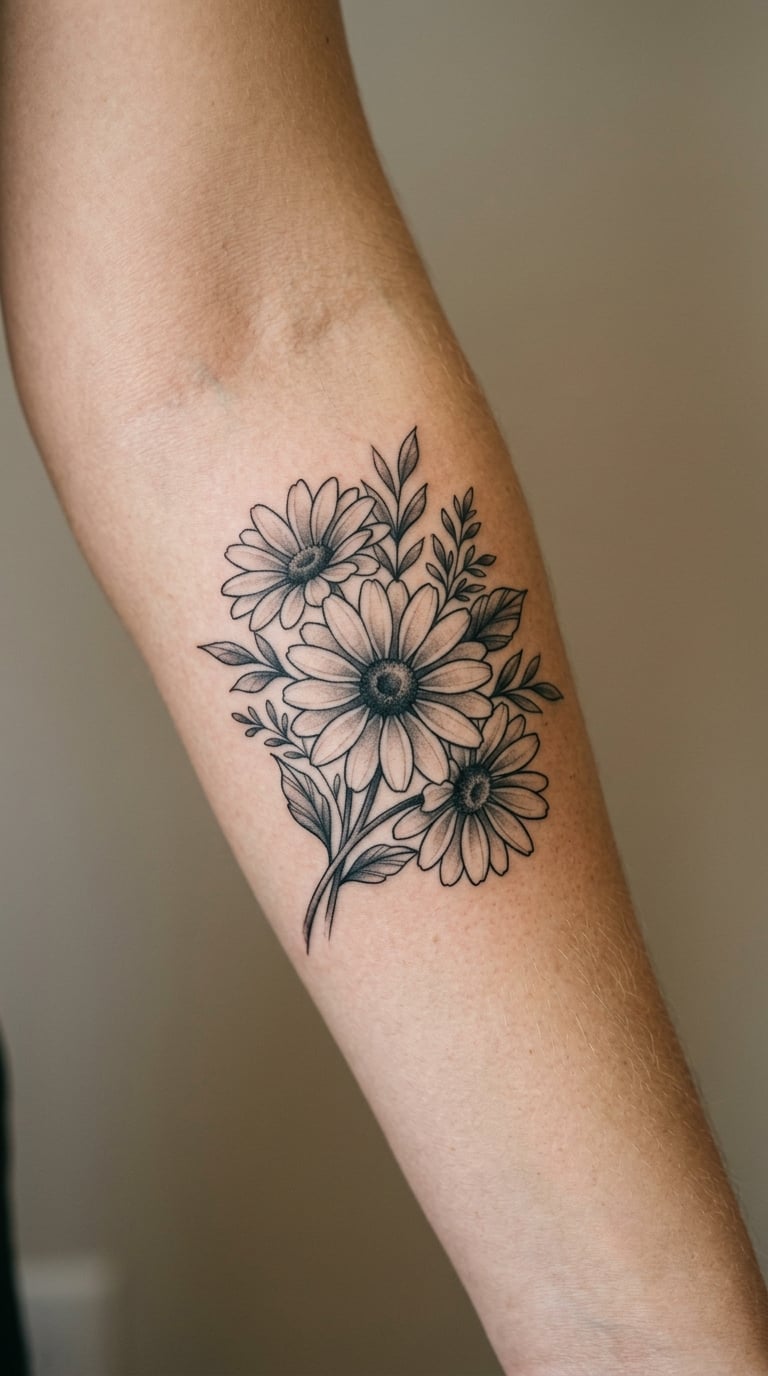
Three daisies at different angles, each with a soft grey wash in the petals and a darker outline, gathered with a few leaves into a loose cluster. The shading gives it weight without colour, so it still photographs as a botanical study rather than a cartoon flower.
Clusters tend to get chosen by people who want a floral tattoo that has some presence but is nowhere near a sleeve. The three-bloom count also reads as a small, balanced composition rather than a random scatter.
Placement: inner forearm, or the outer forearm below the elbow. Size: 4-5 inches (10-13 cm) across. Style: black and grey realism. Pain: medium, mostly from the shading passes rather than the outlines. The inner forearm has soft skin and a decent amount of flesh, which helps.
Make it yours: ask for one bloom in a single wash tone so it reads as the focal point, or plan a second cluster on the opposite arm later.
4. Watercolor Daisy Bouquet on the Shoulder
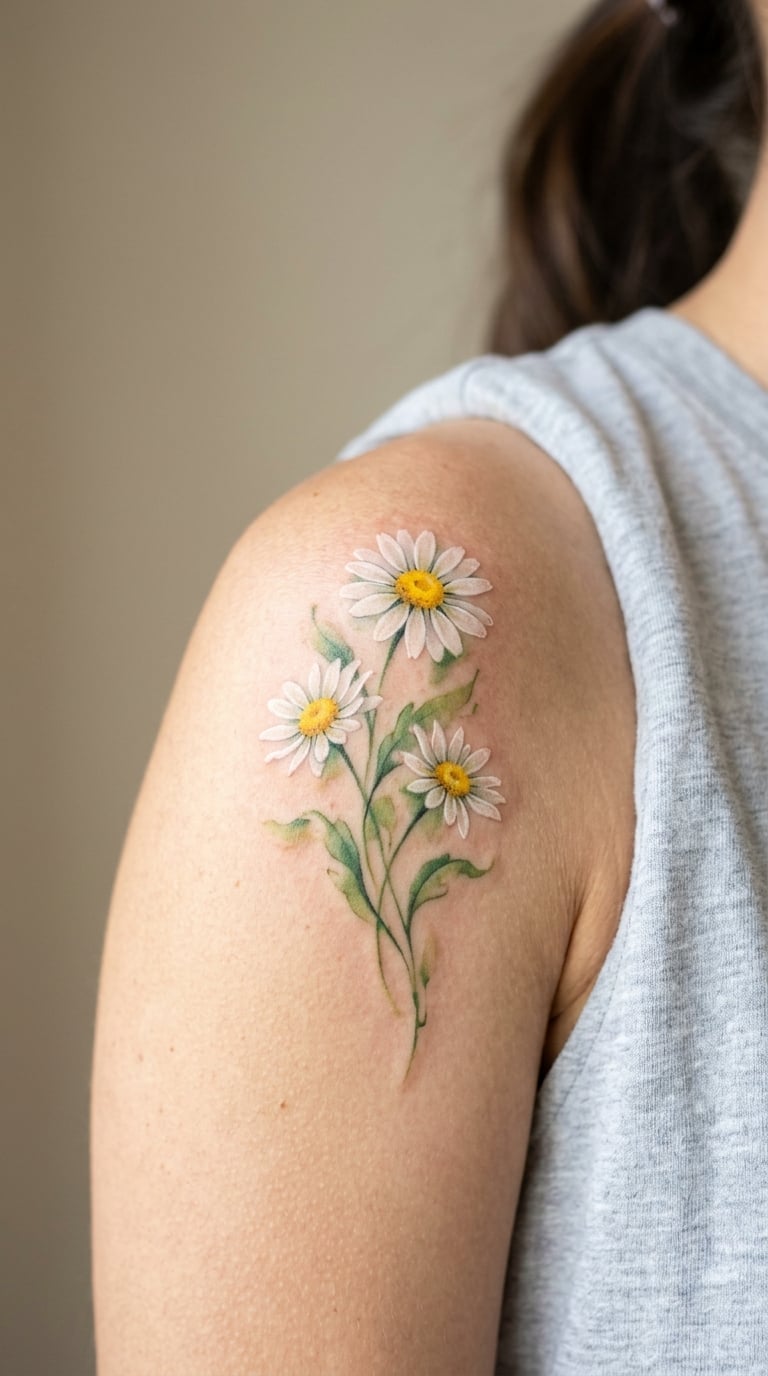
Loose washes with edges that bleed slightly outside the petal lines, yellow and white petals that overlap, and green stems that trail off rather than stop. Watercolor florals are less about precision and more about where the pigment pools, so the design usually has loose filler in the background to absorb the eye.
It is the friendliest version of the daisy for someone who finds bold traditional flowers a bit much. Plenty of clients also note that this style looks better settled than it does fresh, because the texture evens out during healing.
Placement: outer shoulder or upper back, where a broad flat surface lets the washes spread. Size: 3-4 inches (7.5-10 cm). Style: watercolor. Pain: medium, with a few passes over the same area as the artist layers colour. The shoulder moves constantly, so expect an odd stretchy feeling mid-session.
Make it yours: add one small saturated accent, like a single red bud or a touch of gold in the centre, to stop the palette going flat.
5. Traditional Yellow Daisy with Green Leaves
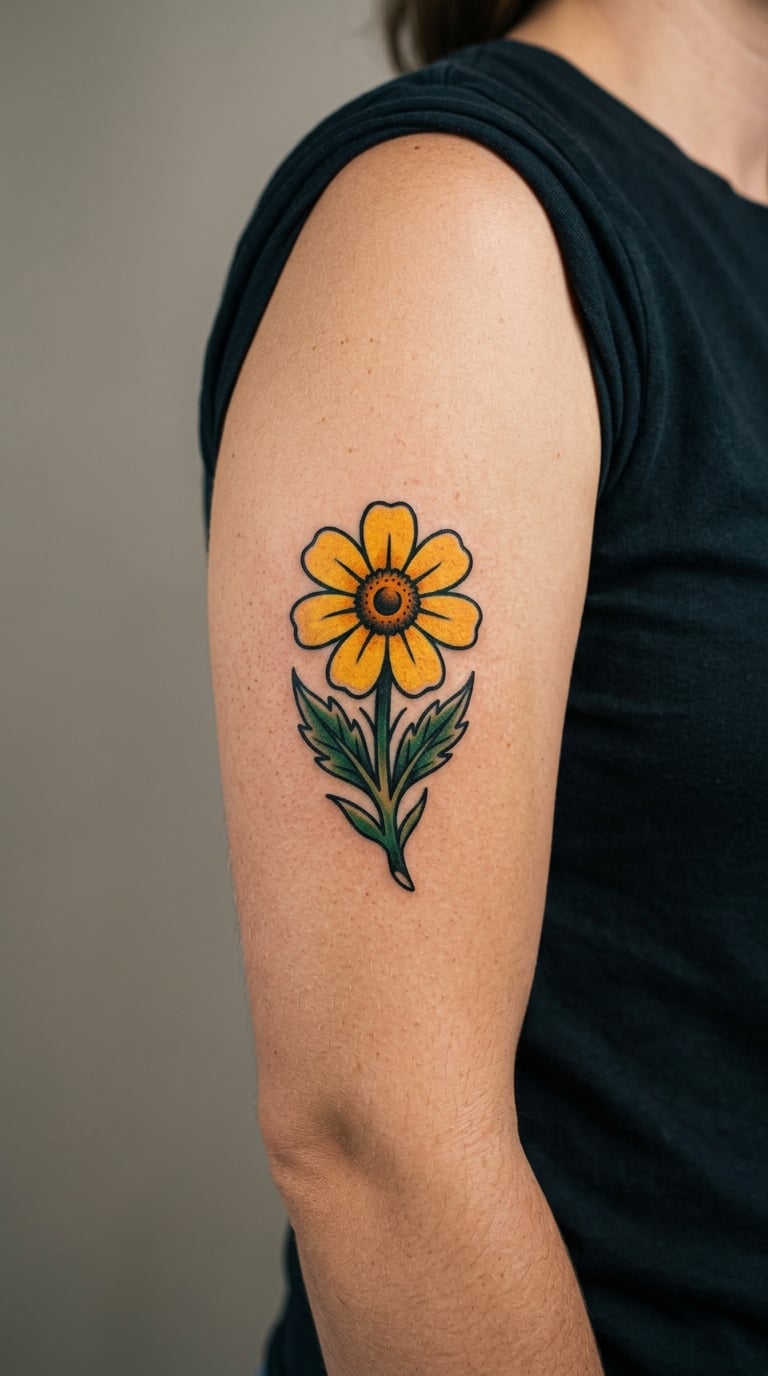
Bold black outlines, saturated yellow petals, solid green leaves and a warm golden centre. This is the old-school American traditional approach, done properly with even line weight and enough spacing between petals that the flower still reads at a distance.
Traditional daisies sit in a long line of flash flower designs, and the style rewards commitment. It flatters an upper arm, where there is a broad clean canvas, and it ages more gracefully than thin linework because the colour mass is large.
Placement: upper arm or outer shoulder. Size: 3-4 inches (7.5-10 cm) tall. Style: traditional. Pain: medium, mostly the solid colour fills. The upper arm is well padded, which makes it an easy place to sit through a longer session.
Make it yours: change the leaf shape, or tuck a banner with a short word underneath for a piece of traditional script.
6. Micro-Realism Daisy on the Finger
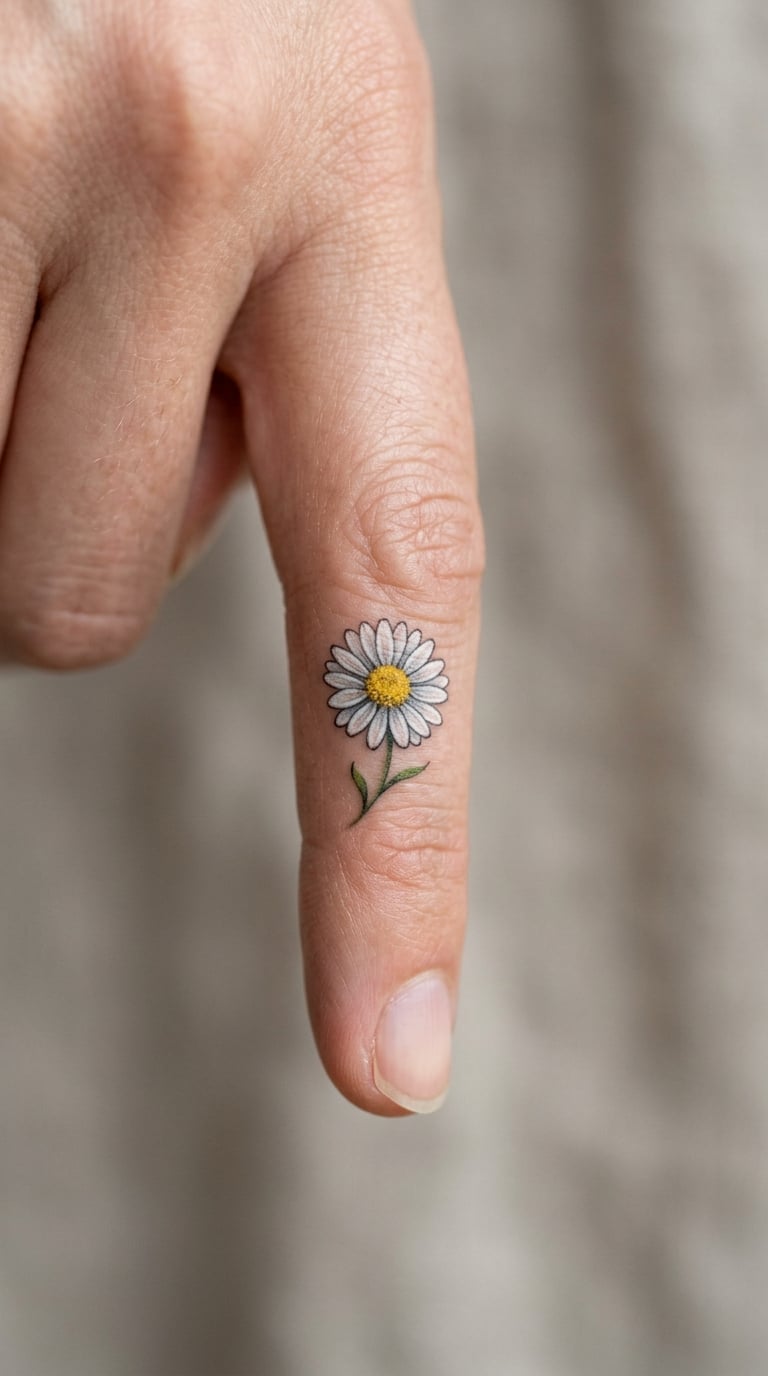
A genuinely small white daisy with a yellow centre, drawn with tiny shading transitions so the petals have a curve rather than a flat fill. It is a micro-realism piece, and it needs an artist who is comfortable at that scale rather than someone who simply draws small.
Finger daisies are usually about a friend, a family member, or a date that matters, and matching pairs on the same hand are a regular request. The honest warning is that hands change as you age, and fine detail on fingers blurs faster than anywhere else on the body.
Placement: side of the index or middle finger, or the knuckle. Size: 0.5-0.75 inch (1.25-2 cm). Style: micro-realism. Pain: medium to high, because finger skin is thin over bone and there is nowhere to brace. Short sessions are common for this reason.
Make it yours: match it with a small companion bloom on the other hand, or put a tiny date in the palm-side skin near the wrist.
7. Daisy and Butterfly Composition on the Ankle
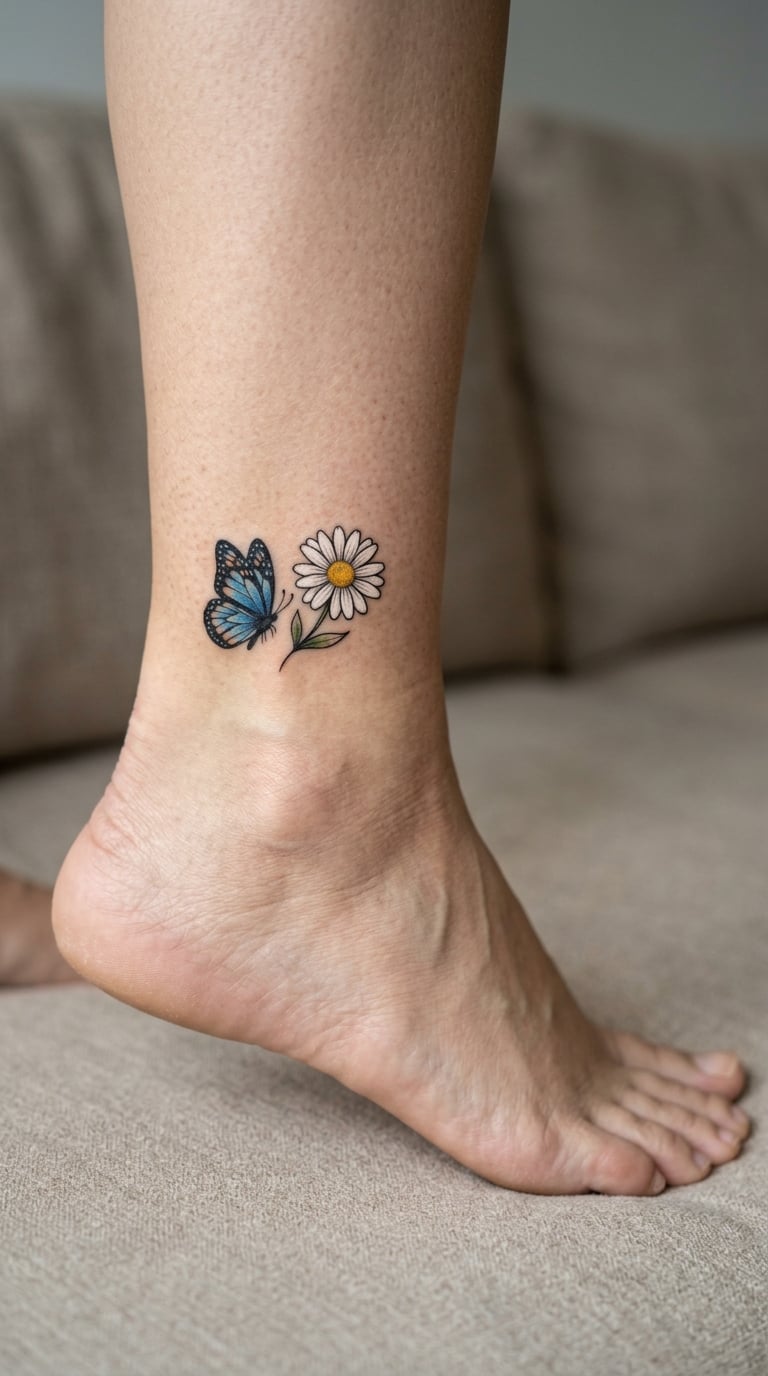
One daisy and one butterfly, angled so the butterfly appears to be moving away from the flower. The contrast in shape does the work here: a round bloom against a wide, open-winged insect, with a couple of leaves filling the gap between them.
Pairing a daisy with a butterfly is a common way to signal change or joy without saying it out loud. Just know that ankles rub against shoes, and this design will need a few extra weeks of careful clothing choices.
Placement: outer ankle above the bone, or the top of the foot. Size: 2-3 inches (5-7.5 cm) across. Style: illustrative colour with black line. Pain: medium to high. Ankles have thin skin over hard bone, and the bone itself is an unpleasant spot. Boots and trainers also mean constant friction on the design.
Make it yours: swap the butterfly for a hummingbird or a small bee, or add a trailing stem that runs above the ankle bone.
8. Dotwork Daisy Mandala on the Upper Back
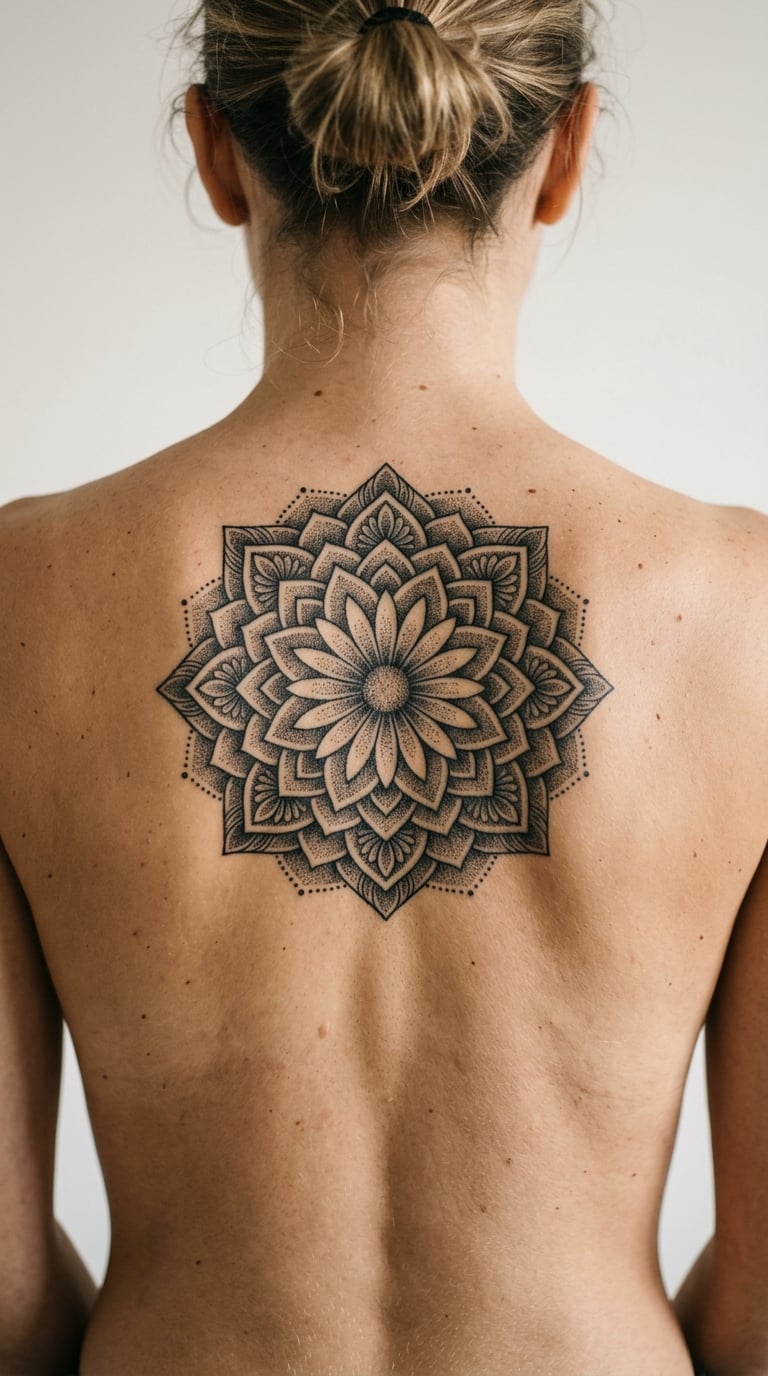
A symmetrical daisy built from repeated dots, with petal outlines doubling into a mandala pattern and the negative space between the dot fields left clean. Dotwork rewards patience, and the finished piece has a texture you cannot get from solid linework.
This is a bigger, slower design than most daisies on this list, and it suits people who like pattern more than realism. Because the back is a flat plane, symmetry holds up much better here than it would on a curve.
Placement: upper back between the shoulder blades, or the centre of the back. Size: 4-6 inches (10-15 cm) across. Style: dotwork and mandala. Pain: medium, though it is a long sitting. The upper back is fleshy and works well, and you can usually lie face down for it.
Make it yours: vary the dot density so the centre is dense and the outer petals fade, or reduce it to a half mandala to follow the curve of one shoulder.
9. Single Daisy Bloom on the Collarbone
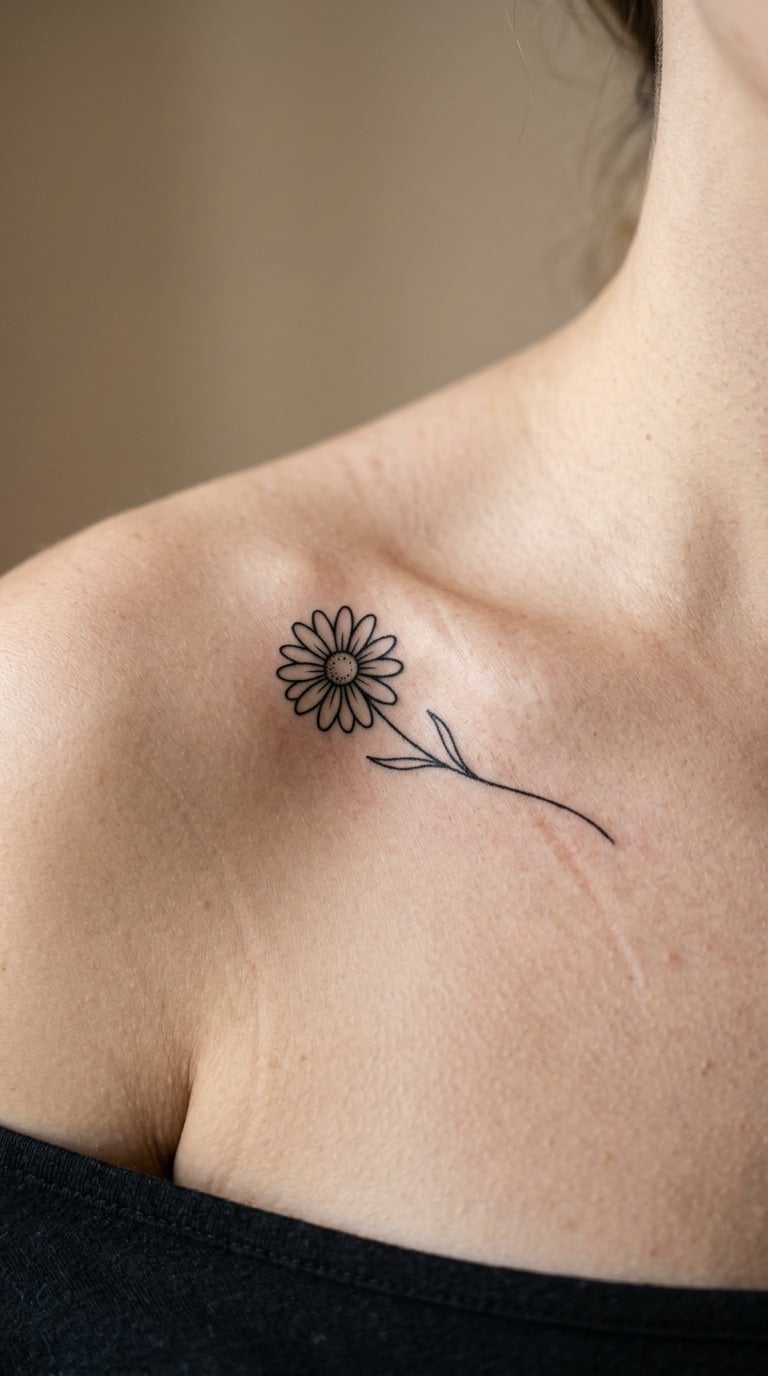
One bloom, a short stem, and nothing else. The whole design is scaled so the flower head sits between the two collarbones and the stem follows the hollow underneath, which gives the piece its balance without extra elements.
Collarbone daisies read as calm and open, and they show above most necklines. The bones there are prominent, so the line work sits over a ridge rather than a flat surface, and the artist will adjust the stencil to the exact angle of your collarbone.
Placement: along the collarbone, either centred or offset to one side. Size: 2-2.5 inches (5-6 cm) wide. Style: fine line. Pain: medium. Bone is close to the surface and skin is thin, so you will feel the needle more than on the upper arm. The area also tightens when you hunch, so try to keep the shoulder down.
Make it yours: add a small crescent or a second much smaller bud tucked behind the stem for asymmetry.
10. Neon Daisy on the Forearm
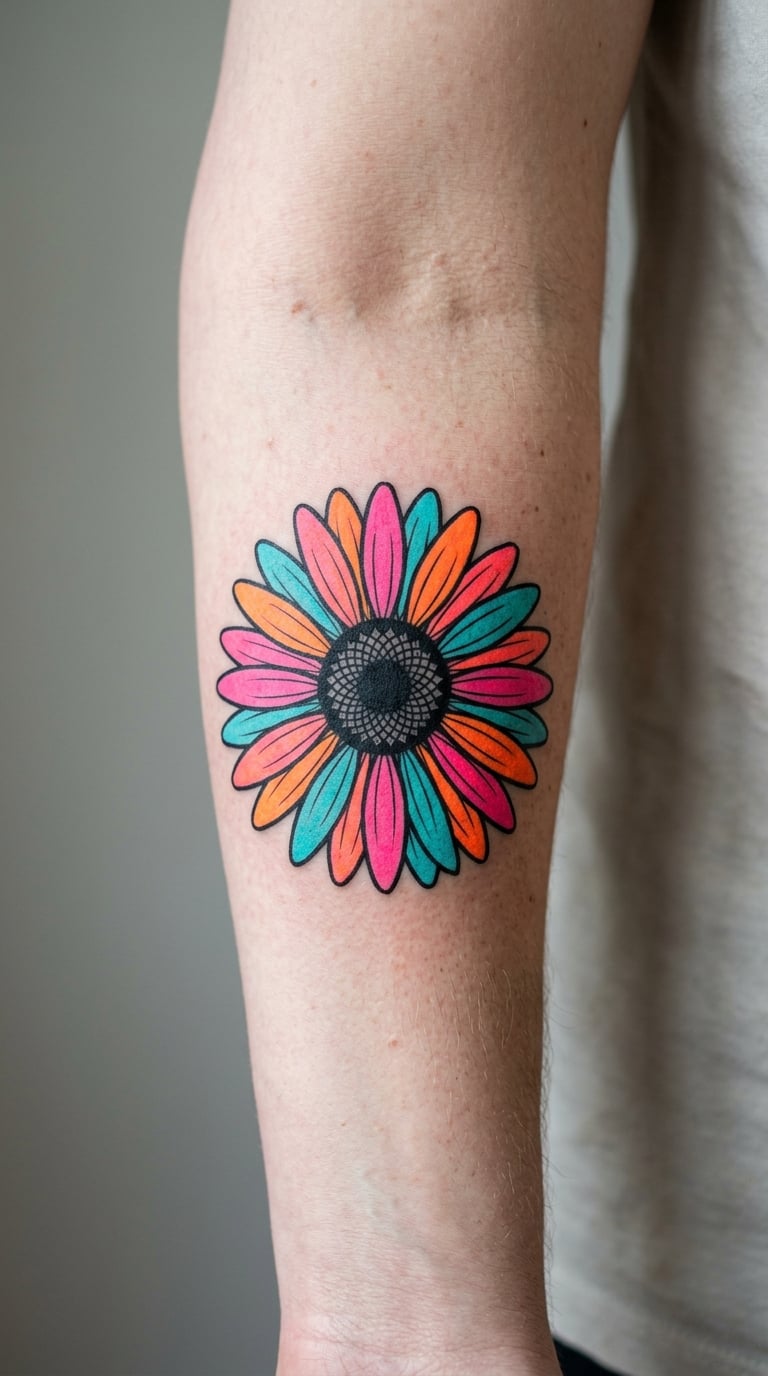
Saturated pink, orange and turquoise petals with a hard graphic outline and a flat black centre. Nothing in this design is subtle, and that is the point: it reads like pop art printed on skin rather than a botanical study.
People pick the neon version when they have plenty of colourful floral pieces already and want one that stands apart. Bright pigments are also more prone to fading over time than deep, saturated traditional inks, so think about whether you are happy to touch it up later.
Placement: outer or inner forearm, where there is room for the full petal spread. Size: 3-4 inches (7.5-10 cm) across. Style: colour pop. Pain: medium, and the full-colour fill takes more passes than a line-only piece. The forearm is a comfortable spot overall.
Make it yours: pick a two-colour version and let the petals alternate, or put a few matching daisy strokes in the same palette on your opposite wrist.
11. Vintage Daisy Bouquet on the Thigh
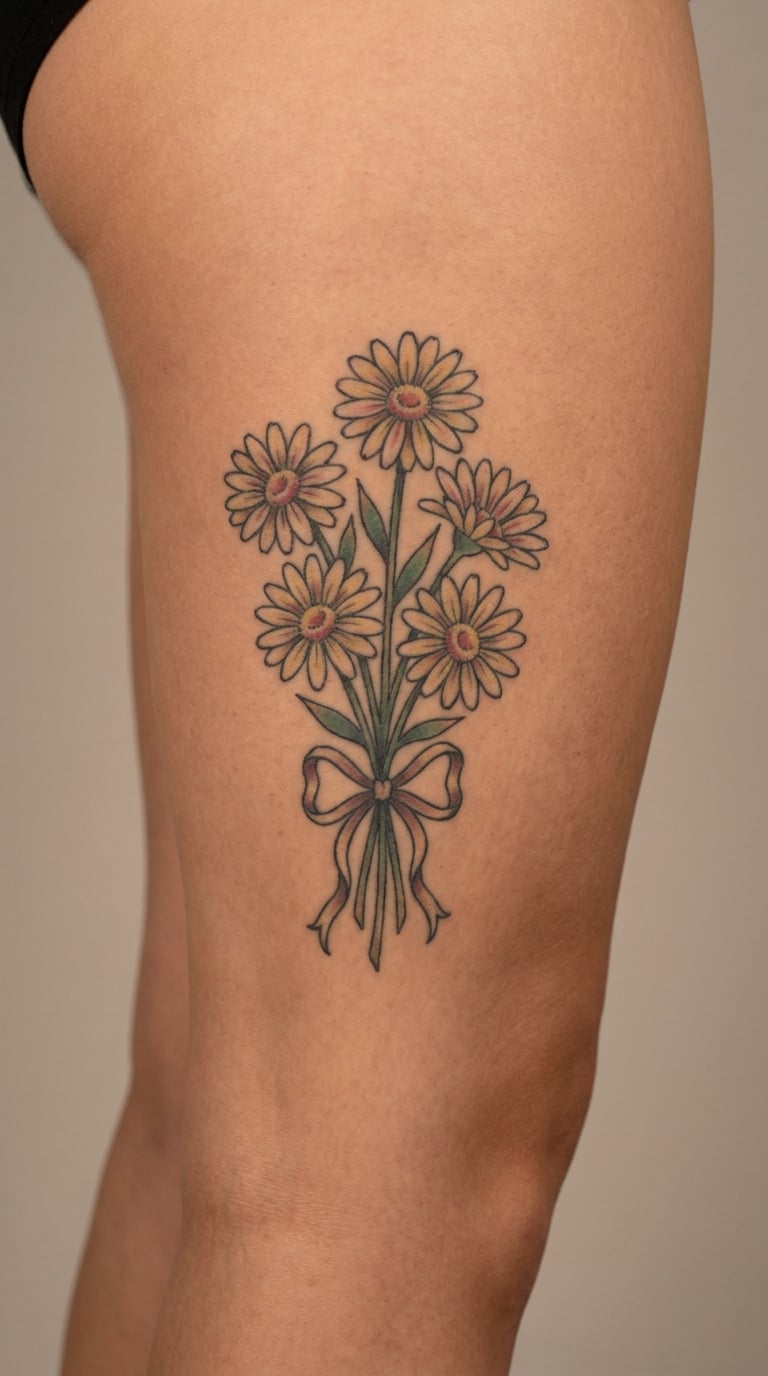
Five daisies gathered into a bound bouquet, with a ribbon at the stems and a slightly muted palette. The linework has a softened, aged look, sometimes with light shading and faded yellow that suggests a tattoo drawn decades ago.
Bouquets are what people choose for April birth flower tattoos, since the daisy is the April flower and the bunch format suits a gift or a birthday. The thigh gives you the surface area to do it properly rather than squeezing five blooms into three inches.
Placement: outer thigh, upper thigh, or hip. Size: 5-6 inches (13-15 cm) tall. Style: neo-traditional. Pain: medium, and the thigh has good padding, so a session this size is manageable. Sitting still for a few hours is the real challenge.
Make it yours: add a date under the ribbon in small script, or hide a set of initials inside the leaves so it only shows if someone is looking.
12. Fine-Line Daisy Vine Around the Arm
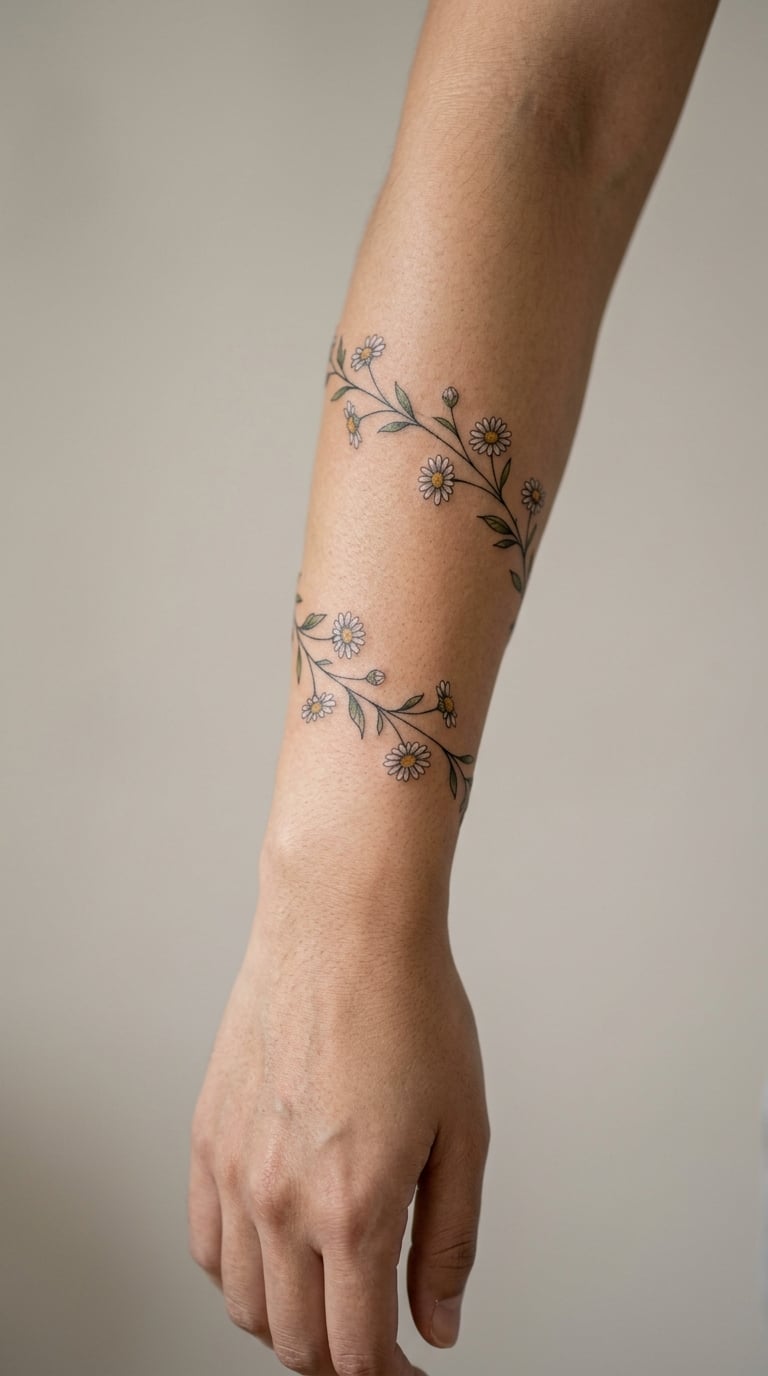
A thin trailing vine that curves around the forearm, with small daisies and leaves placed at intervals along the path rather than bunched together. The line follows the natural curve of the arm, so the piece changes shape every time you move.
Vines are a good second piece for someone who already has one small daisy. Wrapping motifs also work well as friendship sets, since you can adjust the number of blooms to match.
Placement: forearm, upper arm, or around the calf. Size: an 8-12 inch (20-30 cm) path, not a single measurement. Style: fine line. Pain: medium across the whole run. The artist will stencil the path in sections so the spacing stays even as the vine curves, and the wrap-around areas near the elbow or wrist are the sensitive spots.
Make it yours: add three blooms for three people, or thread a small name into the vine where the line is thickest.
13. Daisy Wreath on the Inner Arm
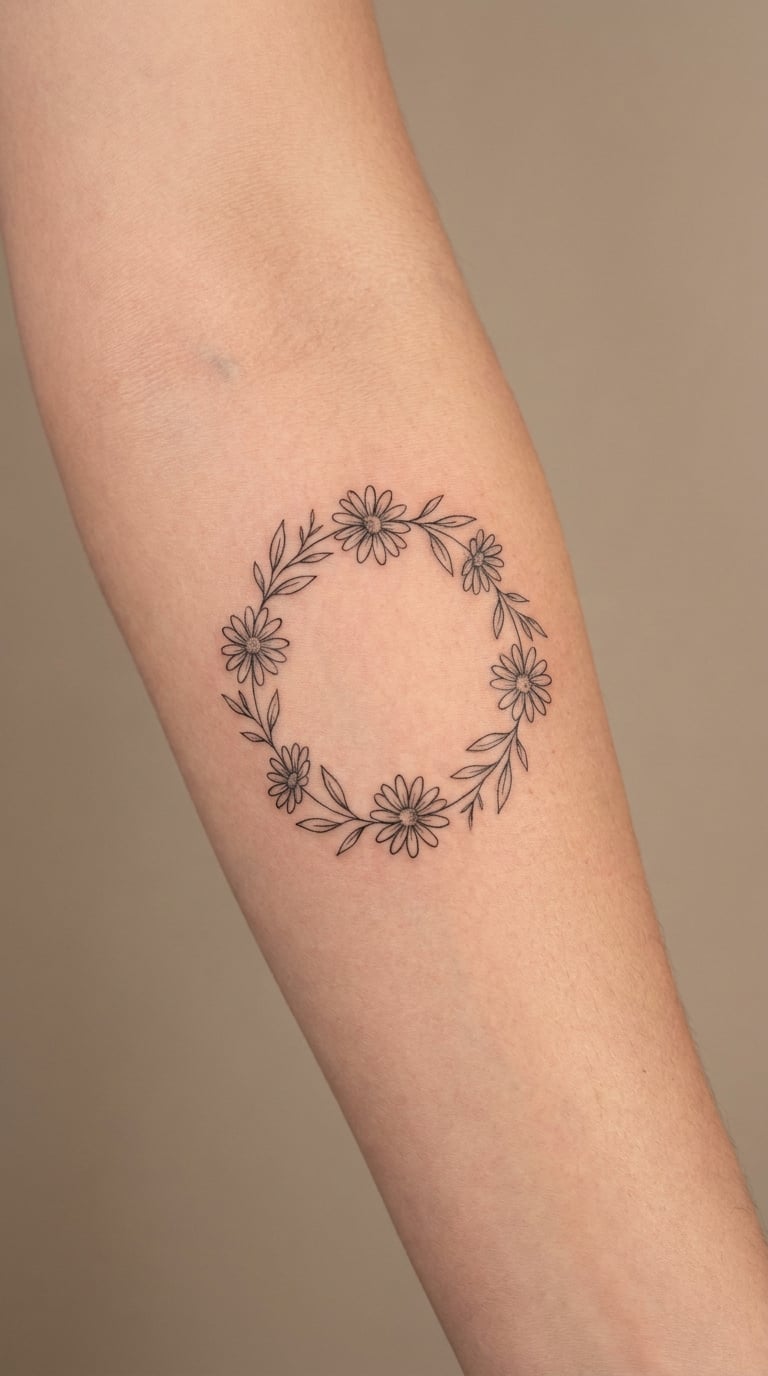
A closed circle of small daisies and leaves, arranged so the blooms face outwards and the leaves fill the gaps, with a clean line closing the shape. Circular wreaths are a classic matching design, and they hold their form better than an open vine because the border frames them.
A wreath reads as something finished, which suits a memorial piece, an anniversary, or a friend group. The symmetry means you need a good stencil, so find an artist whose healed work in this style looks even all the way around.
Placement: inner arm, outer arm, or the back of the calf. Size: 3-4 inches (7.5-10 cm) in diameter. Style: fine line. Pain: medium, with the least comfortable area being the side closest to your ribs when the arm is raised.
Make it yours: change the number of blooms to match a year, a family count, or a date, and leave one gap in the circle if you want it to feel unfinished rather than closed.
14. Red Ink Daisy on the Hand
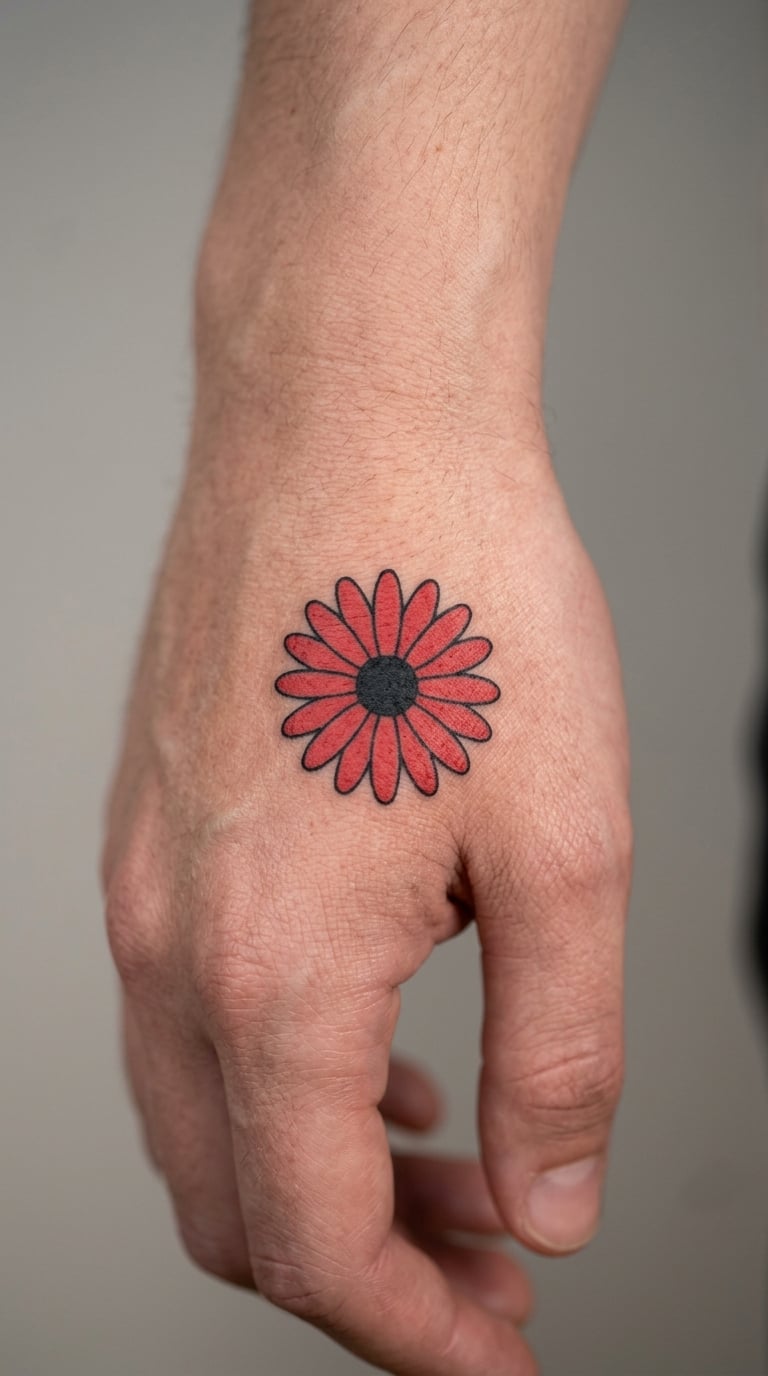
One daisy drawn entirely in red line work with a darker, denser centre, and nothing else on the hand. Single-colour florals like this are popular because they look graphic and deliberate rather than soft, and the red keeps a slight warmth after it heals.
It is a bold choice for a spot that people look at all day. Hands also change shape noticeably with age, and skin on the back of the hand thins, so any design there will look different in ten years. That is a fact, not a warning against it.
Placement: back of the hand, ideally below the knuckles. Size: 2-3 inches (5-7.5 cm) across. Style: bold single-colour line. Pain: medium to high, since there is very little tissue over the metacarpals and the skin moves constantly. Many people book this as a short break-from-the-shoulder session.
Make it yours: put a matching single daisy on the other hand in the same red, or change the colour to a deep green for a very different look.
15. Stippled Daisy on the Rib
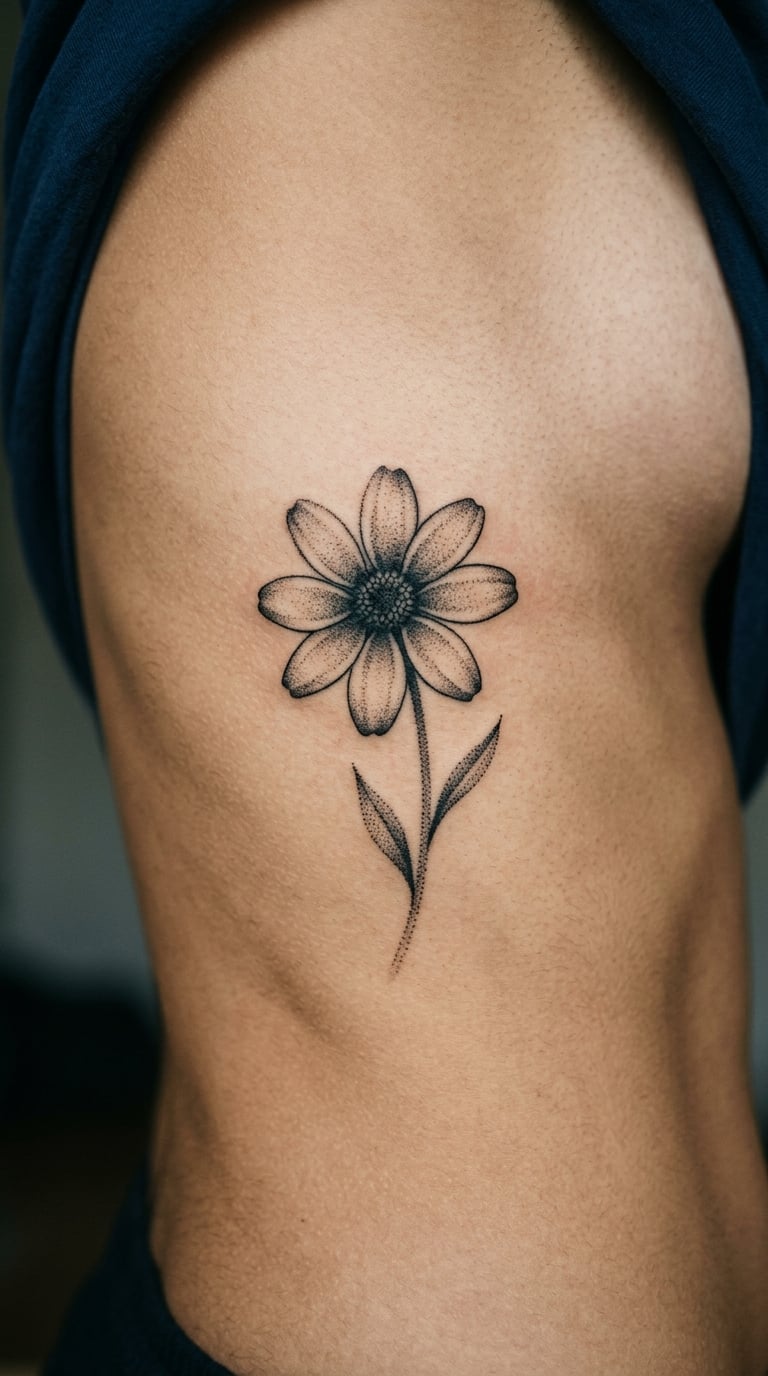
Built from dots rather than outlines, with density building up in the centre of the bloom and thinning towards the petal edges. The result has a soft handmade texture that photographs very differently from a clean outline.
People who get this one usually want a piece that shows only when they turn or wear a backless top. Ribs are a difficult spot for a first tattoo and most artists will say so honestly.
Placement: side of the ribcage, or the lower back. Size: 3-4 inches (7.5-10 cm) across. Style: stippling. Pain: high, and this placement is widely described as one of the worst for a beginner. Breathing makes it impossible to hold completely still, and skin stretches as the ribcage moves. If it is your first piece, pick a single bloom or a light sprig instead of anything dense.
Make it yours: add one much smaller daisy lower down the ribs at a different size so the composition follows the curve of the body.
16. Daisy Sprig with a Date on the Inner Arm
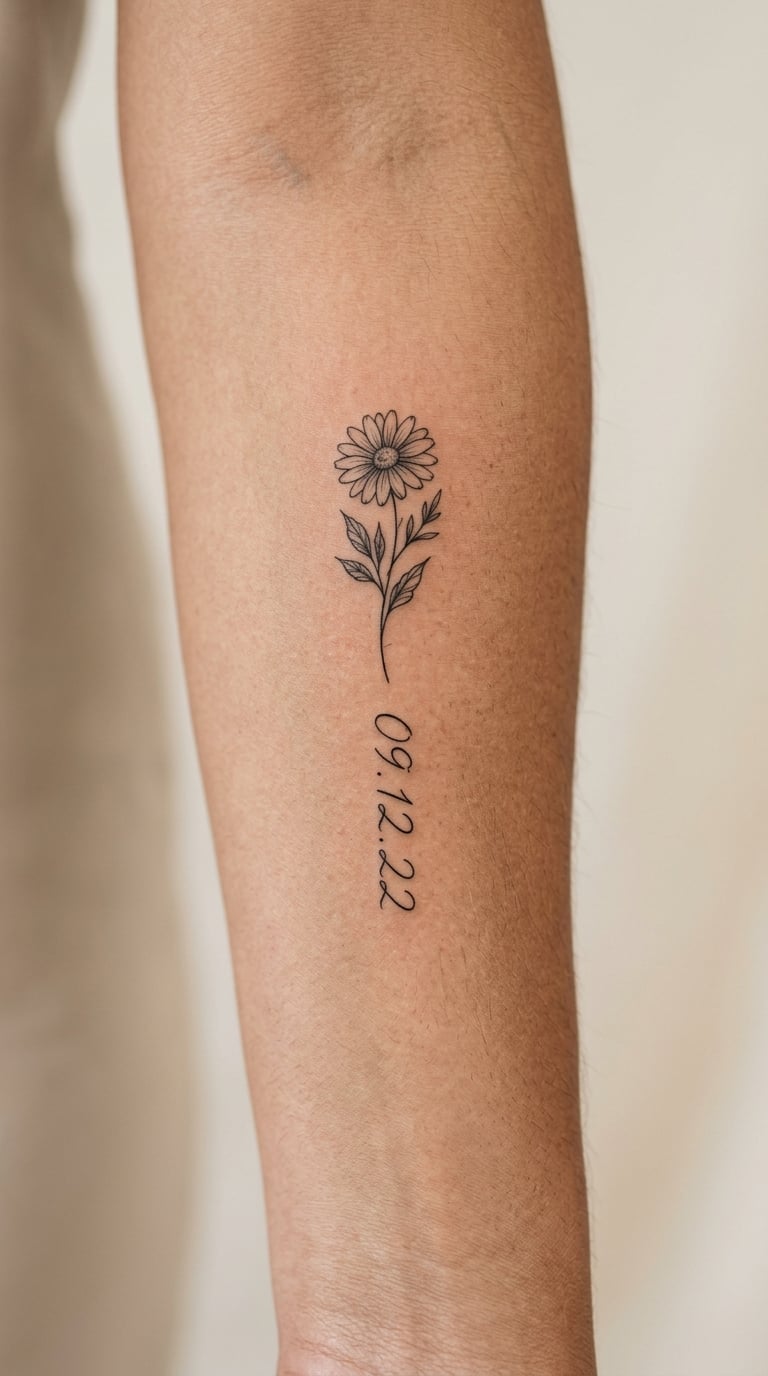
A vertical composition: a small daisy sprig at the top, a short line of neat script beneath it, and nothing else. Keeping the lettering small and slightly separated from the flower means both elements stay legible instead of merging into a smudge.
Dates in a daisy tattoo are usually a birthday, a wedding day, or a memorial marker. If the date is the point, tell the artist that clearly so they budget enough line weight for the lettering rather than treating it as an afterthought.
Placement: inner forearm, running lengthwise, or the inside of the upper arm. Size: 3-4 inches (7.5-10 cm) tall. Style: fine line with script. Pain: medium. The inner forearm is soft, but the forearm is a spot that bends, so a long composition may need to be tattooed in two sessions.
Make it yours: add a name beneath the date in a thinner line, or split the date across the sprig so the flower sits between the day and the year.
17. Geometric Daisy on the Calf
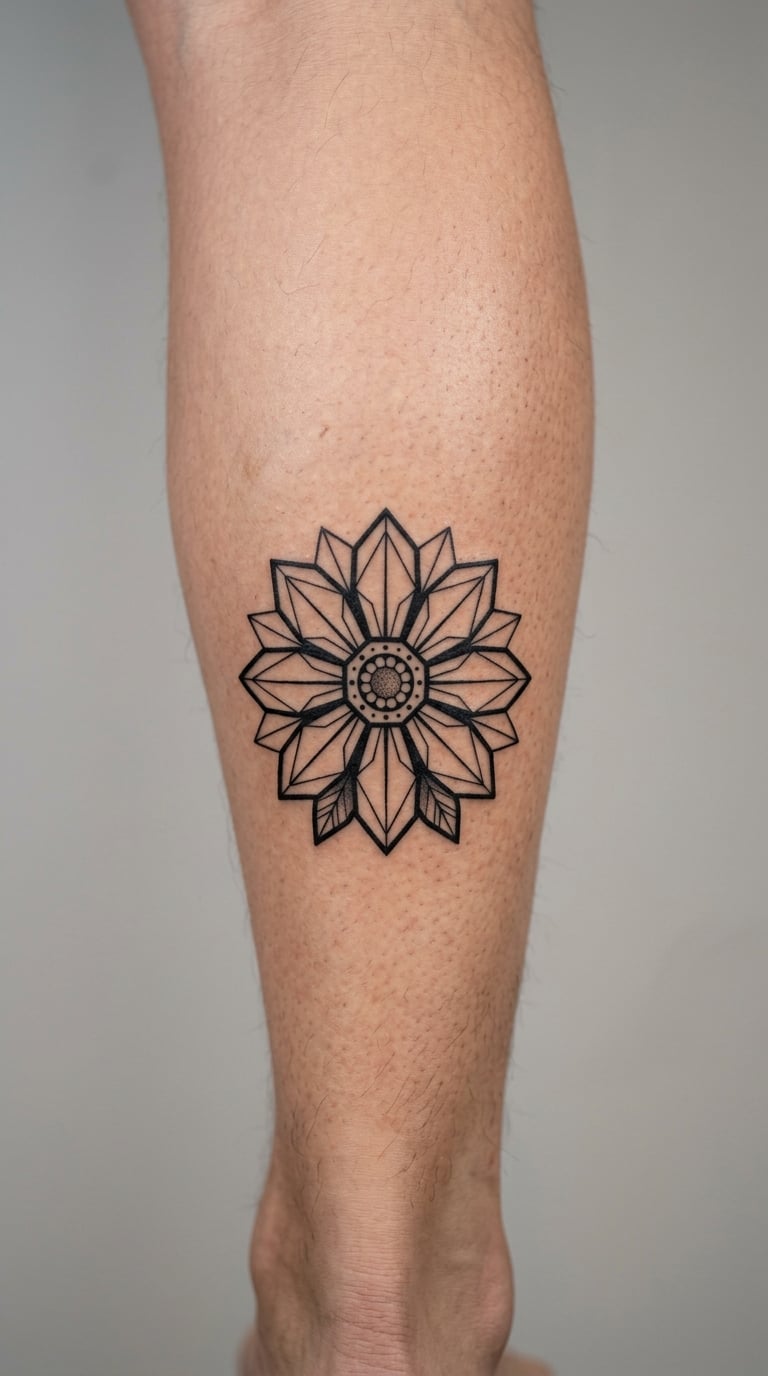
The daisy reduced to flat angular petals with straight edges and mirrored spacing, built around a perfect circle. It looks graphic and a little architectural, and it holds up well because every line is doing structural work.
Geometric florals work for people who like flowers but not softness. The calf gives a clean vertical surface, and because the design is symmetrical, an artist can stencil it accurately before a single line goes in.
Placement: outer calf, shin, or the flat of the forearm. Size: 3-4 inches (7.5-10 cm) wide. Style: geometric. Pain: medium, with the shin and lower calf closer to bone than the thigh. Calf skin also has more movement, so the artist may ask you to flex or relax the muscle between passes.
Make it yours: fill alternating petals with a solid block of colour for a two-tone version, or repeat the bloom twice at different scales down the calf.
18. Pastel Daisy Trio on the Shoulder Blade
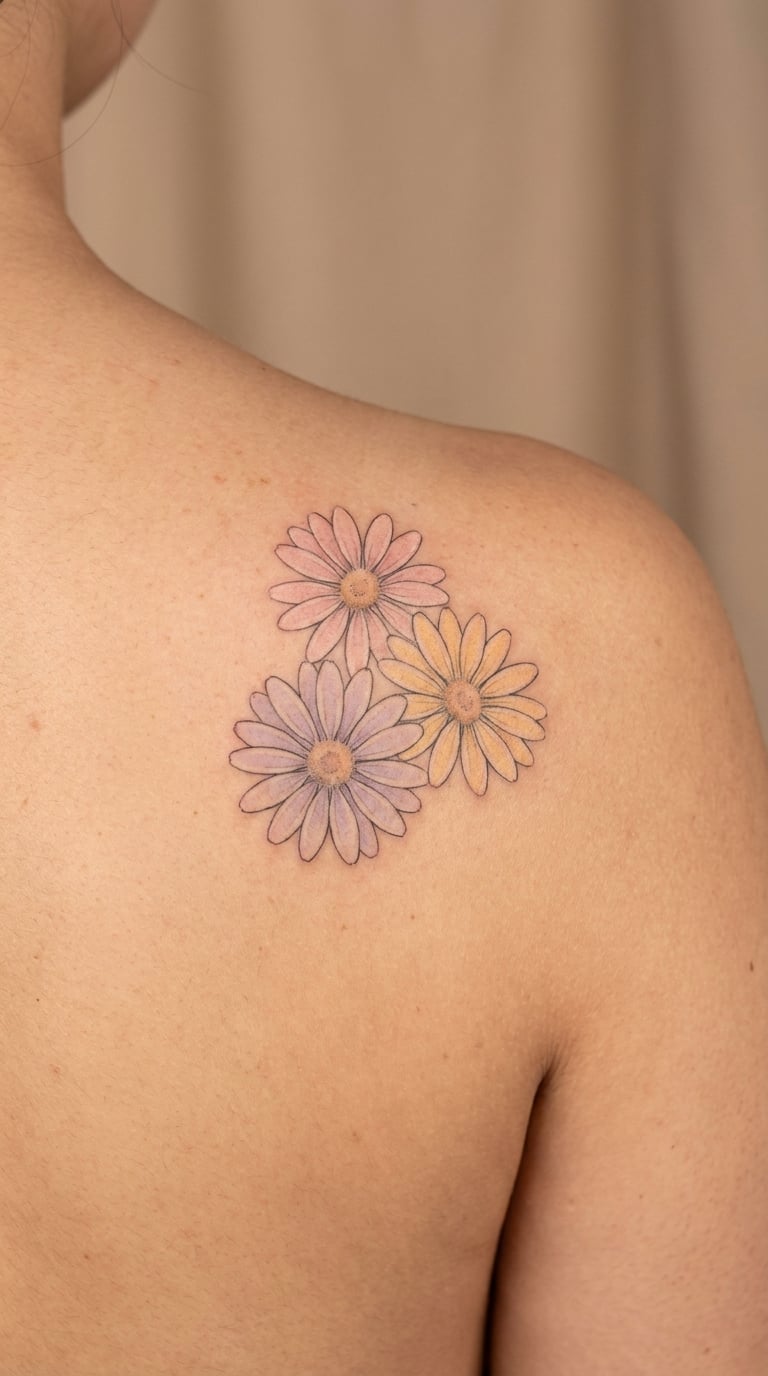
Three daisies in pale pink, lavender and soft yellow, each slightly different in size, arranged in a loose diagonal across the shoulder blade. Pastel work needs a light touch, and a good artist will build the colour in thin layers rather than flooding the petal.
This is a soft, romantic composition that works well as part of a larger floral collection. Light colours do fade faster than bold ink, so a lot of people add one saturated bloom somewhere in the set to hold the eye.
Placement: shoulder blade, upper back, or the outer shoulder. Size: 4-5 inches (10-13 cm) across. Style: soft colour realism. Pain: medium. The shoulder blade is bony at the top, so the top of the composition sits closer to the surface than the lower part.
Make it yours: match the palette to a colour you already wear, or add one small deep-red bud so the pastels have something to sit against.
19. Daisy Bouquet in a Jar on the Forearm
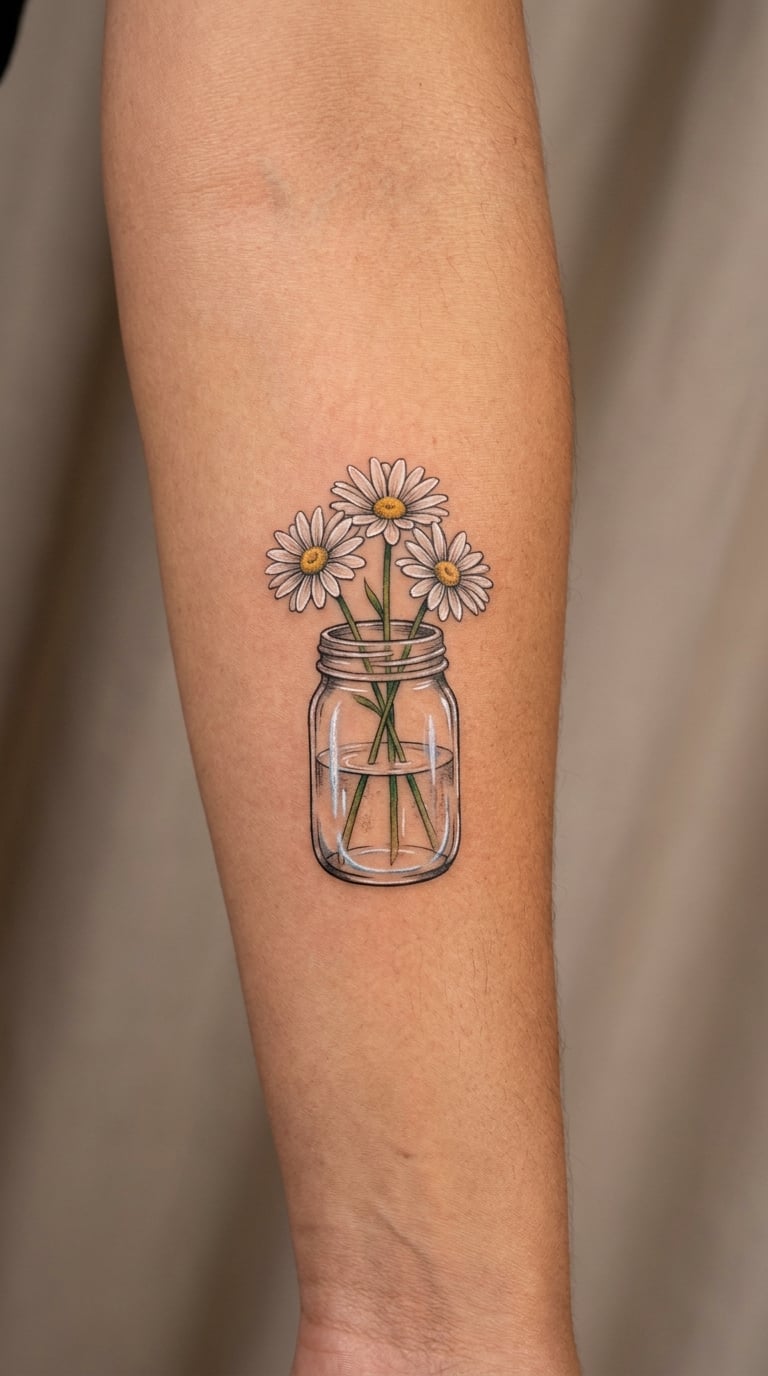
Three daisies standing in a simple glass jar, drawn as a small still life. The trick is the glass: thin highlight lines kept clear on the shaded side, a slight warp where the stems pass behind the rim, and a soft shadow under the base.
It is a more narrative design than a plain bouquet, and it reads like a small object rather than a pattern, which makes it a good choice for a forearm that needs some interest. The jar edges are where a rushed version falls apart, so the line work has to be deliberate.
Placement: inner or outer forearm, or the calf. Size: 4-5 inches (10-13 cm) tall. Style: illustrative realism. Pain: medium, with the light shading on the glass adding a few extra passes. The forearm is a forgiving place to sit for a session this size.
Make it yours: tie a ribbon around the jar neck with a date, or swap the daisies for a different stem to match a birth flower.
20. Blackwork Daisy with Negative Space
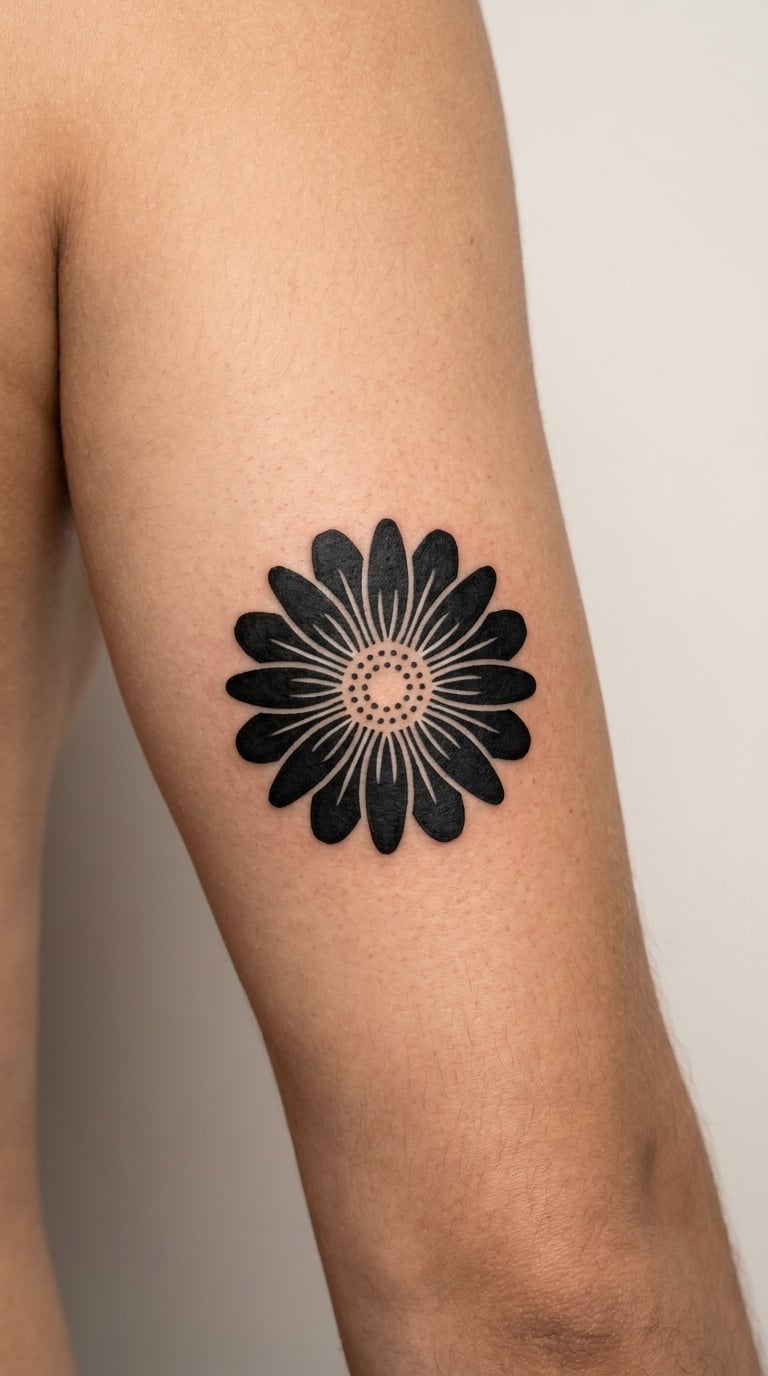
Solid black petals with the shape carved out by preserved skin, plus a hard-edged white highlight through the centre. High-contrast blackwork hides nothing and demands a confident hand, because there is no soft shading to soften a wobble.
It is a bold, graphic look that holds up well over time, since ink mass fades more slowly than a hairline. The negative space is what makes it readable once it is on skin rather than on paper.
Placement: upper arm, outer thigh, or the calf. Size: 3-4 inches (7.5-10 cm) across. Style: blackwork. Pain: medium to high, and the heavy black fills need more passes than the outline suggests. Filling solid black is repetitive work, and sore spots show up in the middle of it.
Make it yours: change the petal count so it reads as a specific number, or add a second bloom behind the first in a slightly smaller size for depth.
21. Daisy Chain Down the Spine
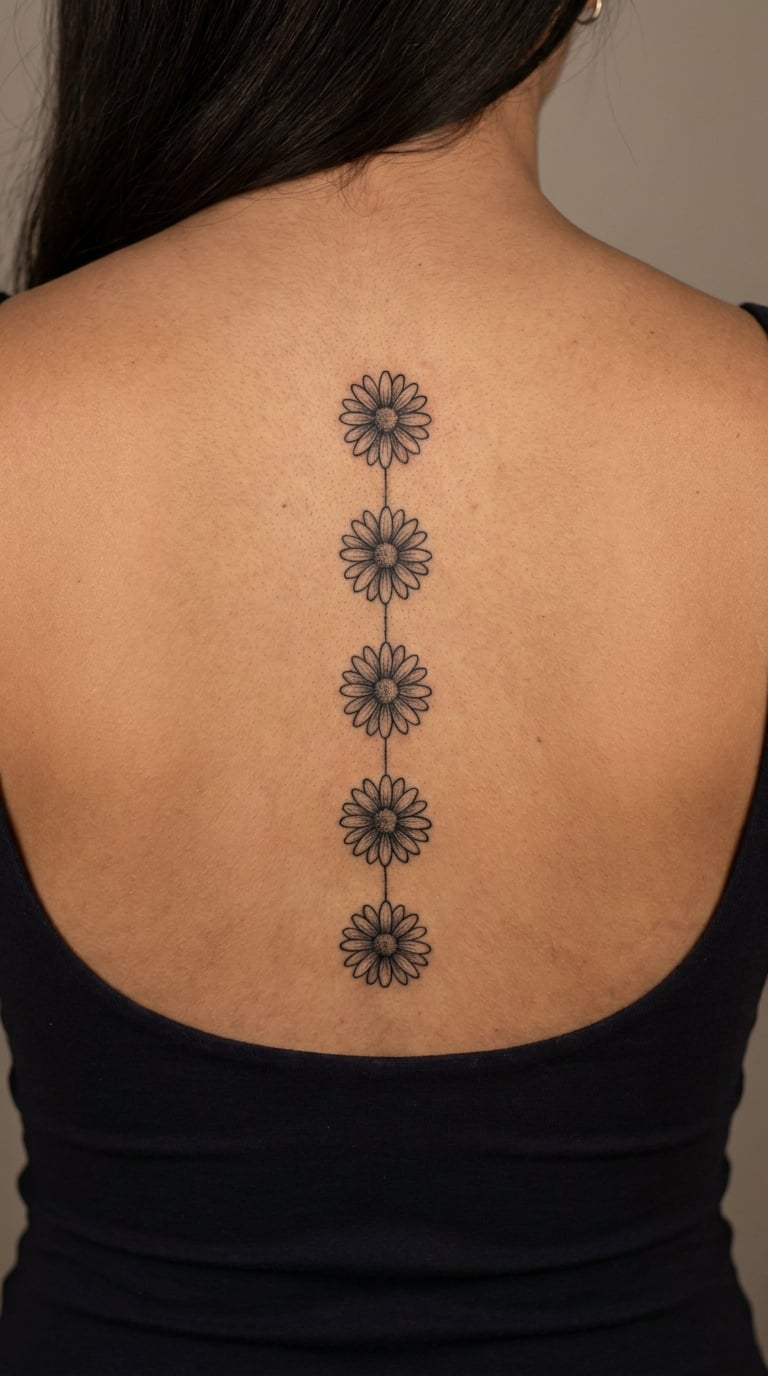
Five small daisies spaced evenly down the spine, each angled very slightly so the line follows the natural curve of the back. The spacing is the whole design: too close and it becomes a single blurry strip, too far apart and it loses the chain.
A spine chain is popular as an addition to an existing back piece or as a standalone. It shows when you wear a backless top, and it is a design that grows well, since you can add a bloom later to mark something.
Placement: down the centre of the spine, from the mid back to the lower back. Size: a 6-10 inch (15-25 cm) vertical run, bloom to bloom. Style: minimal line. Pain: medium, though the spine itself is a bony line and the ticklish spots between the shoulder blades are the hardest to relax. Many people fall asleep for part of it.
Make it yours: add a leaf or a tiny star between every other bloom, or make one bloom larger than the rest to mark a year.
22. Daisy and Sunflower Pairing on the Leg
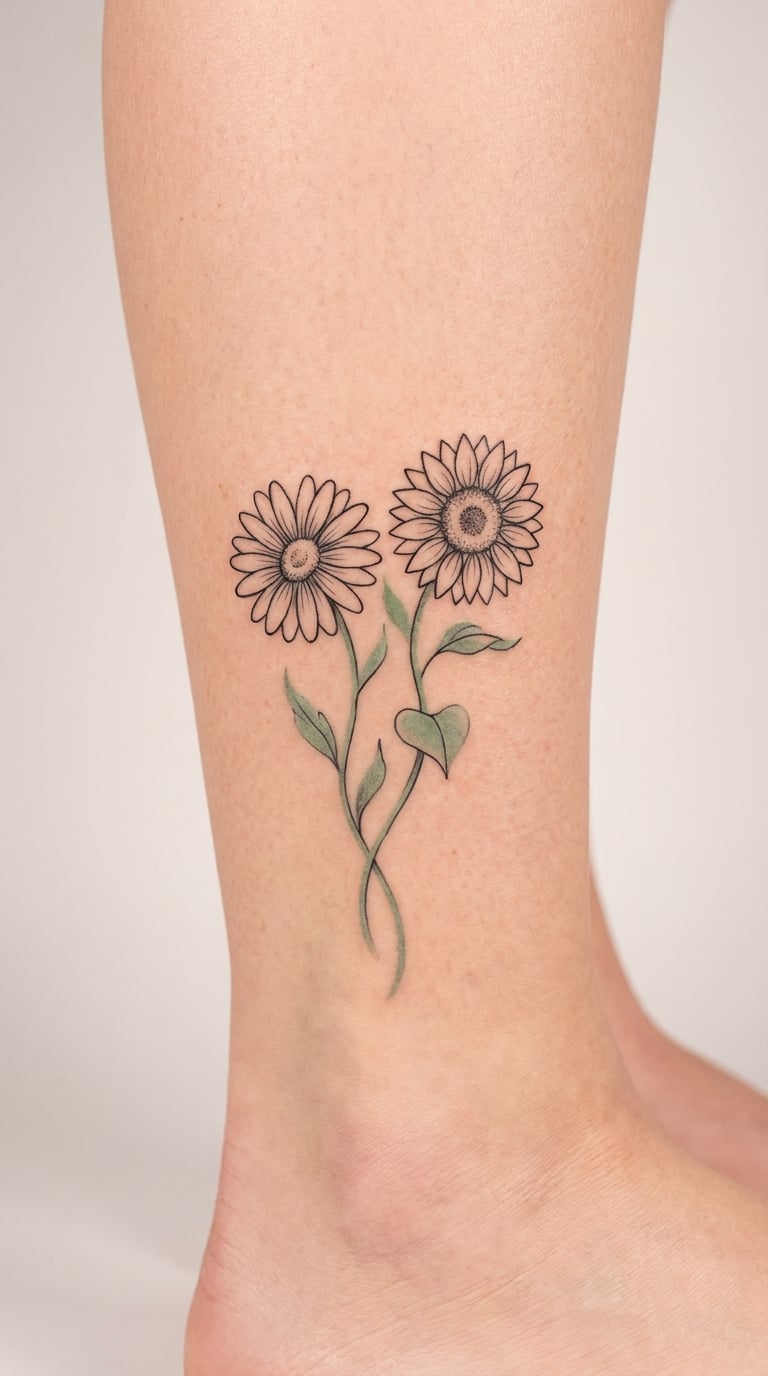
A daisy next to a simplified sunflower, with the two blooms scaled differently so the contrast reads clearly. The sunflower gets a heavier centre and bolder petals, the daisy stays open and light, and the stems tie them together at the base.
Pairings like this come up when someone wants a summer motif without committing to a single species. Keep the secondary flower simple: on a leg, a full bouquet plus a sunflower plus a daisy turns into visual noise fast.
Placement: outer leg, thigh, or the side of the calf. Size: 4-5 inches (10-13 cm) wide. Style: botanical line with soft shading. Pain: medium. The outer thigh and calf are among the more forgiving places, and the leg is a good surface for a two-flower composition because the shapes stay flat.
Make it yours: add a third small bloom underneath to balance the height difference, or add one bee between the two flowers.
23. Monoline Daisy Staircase on the Side of the Body
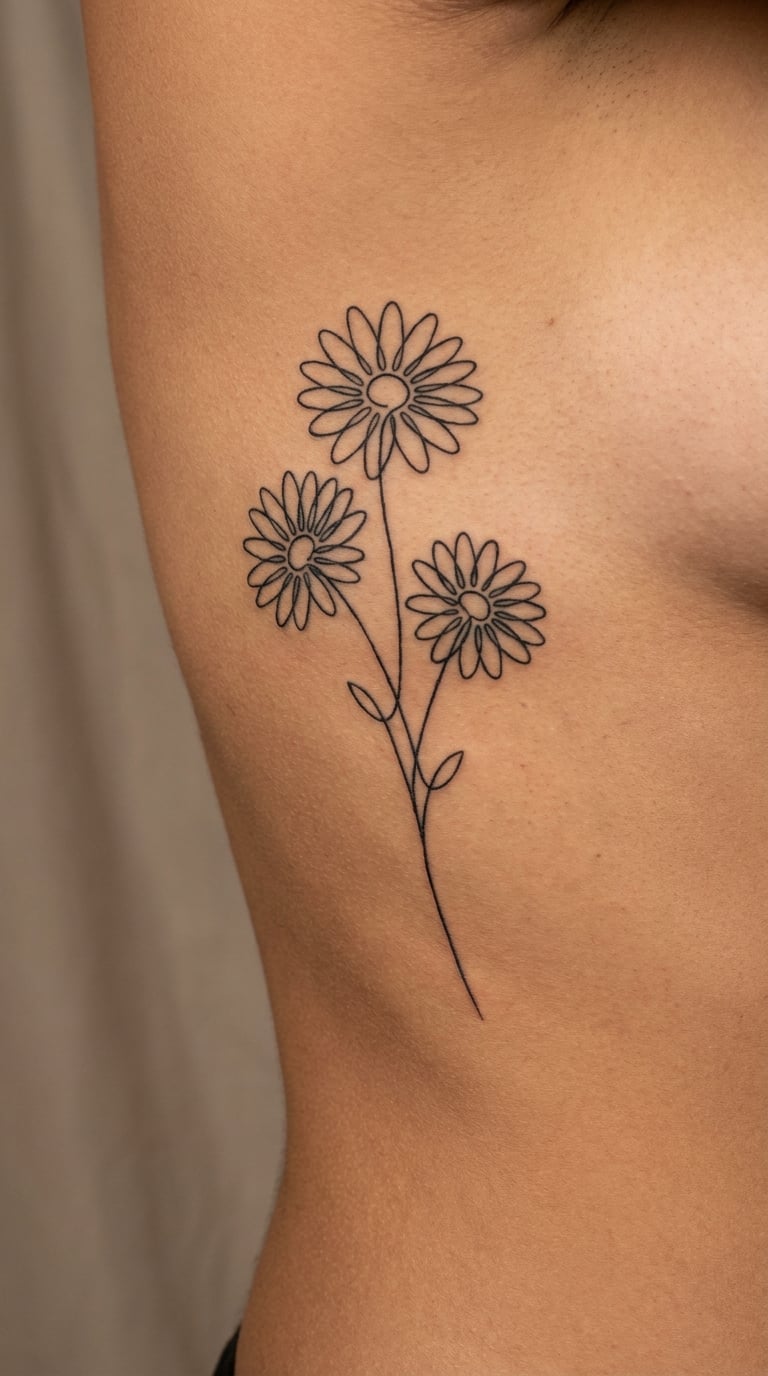
A single unbroken line that climbs diagonally across the ribs, with small daisy blooms and tiny leaves attached at intervals. Monoline work has no second pass to hide a mistake, which is why it is worth booking an artist who does it constantly rather than once.
The line can follow the natural curve of the ribs, or run with the grain of the waist instead. Either way, it is a piece that changes as you move, and it is usually tattooed lying down so the artist can reach the whole shape.
Placement: side body over the ribs, or the outer hip. Size: 3-4 inches (7.5-10 cm) tall, or longer if you want it to follow the ribs up toward the armpit. Style: monoline. Pain: high, the same honest answer as any side-body placement. The skin is thin, the area is sensitive, and breathing shifts the surface constantly. Ribs also age and stretch with weight change, so fine lines here will eventually follow that movement.
Make it yours: extend the line so it wraps toward the back like a belt, or add a second staircase of blooms mirroring the first.
24. Full-Color Daisy Sleeve on the Upper Arm
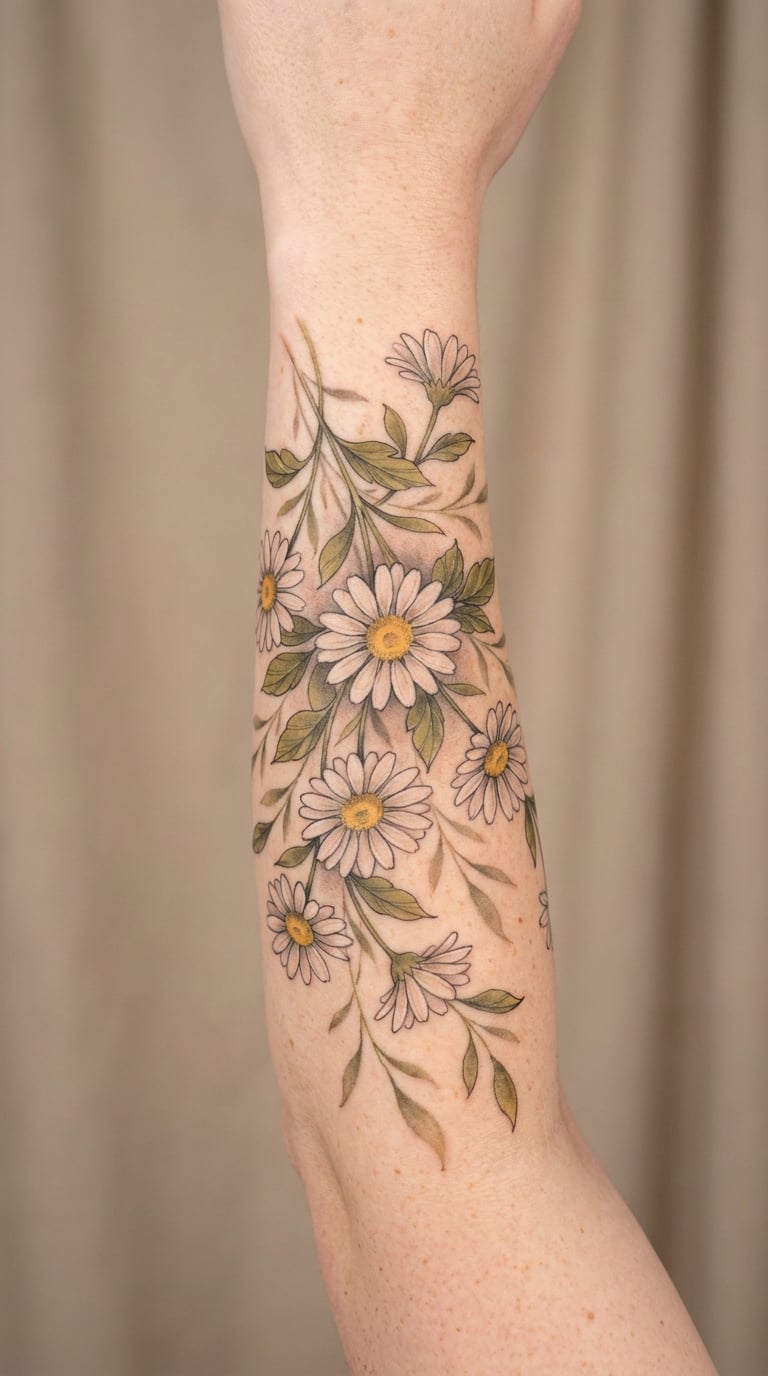
Daisies as the central motif of a full sleeve: layered blooms at different sizes, green foliage filling the gaps, and a soft background of leaves and stems so the arm reads as a garden rather than a pattern of stickers. Good sleeve planning starts with how the flowers sit as the arm moves.
This is the one idea here that is not a single sitting. Sleeves are planned across two or more sessions, with a break in between so you can see the healed piece before the next layer goes on. A sleeve of daisies and peonies has reportedly healed unevenly for some people, with the shaded background still looking fresh long after the flowers settled, so keep the shaded areas simple.
Placement: upper arm, ideally from shoulder to elbow. Size: sleeve scale, usually a large fraction of the arm. Style: colour sleeve. Pain: high across the whole run, and the sessions are long enough that breaks matter. The upper arm itself is one of the easier spots to sit through, but volume adds up over hours.
Make it yours: keep the background foliage and add one accent colour that only appears in a few places, or reserve a clear band at the wrist so the piece does not have to reach the elbow.
How to Choose the Right Design
Most wrong choices come down to three things: going too small, picking a style the artist does not specialise in, and choosing a placement that fights the design. Work through those in order and the rest gets easy.
- Give fine line more room than you think. A classic daisy wants a minimum of 1.5 inches across, and single-needle work with open petals needs closer to 2 inches. Below that, lines fill in while they heal.
- Match the artist to the style. Fine line, blackwork, traditional and micro-realism are four different skills. Look for healed work in the exact style you want, not fresh photos from last week.
- Think about where the design ages. Upper arm, forearm, thigh and calf hold linework far longer than hands, fingers and ankles.
- Decide about colour early. Colour adds a layer, a saturation choice and a touch-up conversation later. Black and grey is the simpler commitment.
- Keep small areas small. On ribs and the side body, one bloom or a light sprig works far better than a dense bouquet.
- Plan the second piece now. If this is your first floral, sketch where a matching piece would live before you commit to the first placement.
Daisy Tattoo Ideas by Placement
Here is a fast way to narrow all 24 daisy tattoo ideas down to the two or three that suit your spot. Read across the row for the placements people ask about most, then go back to the numbered entry for the full detail.
- Wrist and fingers: the fine-line sprig, the three-petal bloom, the micro-realism finger daisy, the red-ink hand piece. Small and intimate, and the spots that change most as you age.
- Collarbone and neck: the single collarbone bloom and the three-petal daisy behind the ear. Both are small, and both sit over bone, so agree a size that is not too tiny before you start.
- Forearm and inner arm: the shaded cluster, the wrapping vine, the wreath, the jar bouquet, the sprig with a date, the neon bloom.
- Shoulder, upper arm and back: the watercolor bouquet, the traditional yellow daisy, the pastel trio, the dotwork mandala, the blackwork bloom, the full-colour sleeve.
- Ribs and side body: the stippled daisy, the monoline staircase, and the single collarbone bloom if you want something quieter on a sensitive area.
- Ankle, calf and leg: the butterfly pairing, the geometric daisy, the vintage bouquet, the daisy and sunflower pairing.
Cost and Session Time
Tattoo pricing in the US is set by the shop and the artist, not by the design, so the honest way to talk about cost here is by relative scale. A single fine-line daisy sprig sits at the quick end because it takes minutes. The full-colour sleeve at number 24 sits at the other end by a wide margin, and shops usually quote it per session or per day rather than as one number.
Size sets the time. A one-inch bloom is often a 10 to 20 minute job, a three-inch shaded cluster runs 60 to 90 minutes, and a five-inch bouquet can take two to three hours or a second sitting. Detail counts as much as size does: stippling, dotwork, and anything with a light background shade all add passes over the same skin.
Placement changes the price too. Bony or awkward spots like the ankle, ribs, collarbone and fingers take longer because the artist is working carefully on a surface that moves. Shop minimums are common and can make a small extra design awkward to book, so if you want a second tiny daisy, ask about adding it during the first session.
Before you book, ask what the artist charges per hour and what the minimum is. Then ask what they recommend for your design’s minimum size, because going bigger usually costs more now and looks better for longer. If you are still choosing between these 24 daisy tattoo ideas, the price question is easier once the design and the placement are settled.
Aftercare Basics
Always start with your artist’s aftercare instructions, since they know exactly what they did. The basics below are the everyday version of that advice for fine-line and small floral work.
- Follow your artist’s aftercare instructions first. Everything else is a general fallback, and their guidance for your specific piece comes first.
- Wash it gently and often, twice a day for the first week or so. Lukewarm water, a mild unscented cleanser, and clean hands. Pat dry with something disposable rather than a towel.
- Moisturise in thin layers. A thin coat of a fragrance-free tattoo ointment or plain moisturiser, reapplied a few times a day. Thick layers trap heat and can irritate the skin under the ink.
- Protect it from sun, swimming and friction. Loose clothing over a fresh tattoo, no swimming or soaking for around two weeks, and sunscreen once healed. This matters most for fine line, pale pastel work and anything on an ankle or rib.
- Expect swelling, redness and an inked look for the first few days. Colour sits deeper than fresh watercolour in the skin, so the healed piece will be softer and slightly lighter than the day you got it.
- Contact the artist if something looks wrong. Ongoing heavy redness, a hot spot, spreading redness, yellow-green discharge, or a line that looks smeared weeks later are all worth a message to the shop. Do not wait it out.
Frequently Asked Questions
What does a daisy tattoo mean?
A daisy flower tattoo most often stands for innocence, purity and new beginnings, which is why it became a popular April birth flower design. People also choose it to mark a fresh start, a friendship, or a specific date. The meaning is personal rather than fixed, so the same design can read as hopeful to one person and purely decorative to another.
How small can a daisy tattoo go before it smudges?
A classic fine-line daisy holds best at 1.5 inches across, and single-needle work with open petals needs closer to 2 inches. Below that, thin lines can fill in while the tattoo heals, leaving a grey smudge instead of petals. Artists say the same thing repeatedly: going slightly larger and bolder costs more now and looks readable for years longer.
Where is the least painful place to get a daisy tattoo?
For a small daisy, the upper arm, inner and outer forearm, and thigh are the softest options, all sitting around the low to medium end. The ankle, collarbone, fingers, ribs and side body run noticeably higher because there is little padding over bone. Ribs are the one most artists will talk you out of for a first tattoo.
How long does a fine line daisy tattoo last?
It depends far more on placement than on style. Fine line work on the upper arm, forearm, thigh and calf usually still reads clearly after many years, while the same line weight on hands, fingers and ankles softens and blurs as skin changes. Colour fills last longer than hairlines, and sun exposure speeds up fading everywhere.
Do daisy tattoos heal lighter than the reference photo?
Yes, and almost every floral tattoo does. Fine line and watercolour work settle thinner and lighter once fully healed, and pale pastel colour loses the most saturation. A good artist will tell you this at the consult and can build the line weight or colour depth to account for it rather than matching the reference exactly on day one.
Conclusion
If this is your first tattoo, start with the fine-line sprig at number 1 or the single collarbone bloom at number 9. Both are small, both read clearly after healing, and neither asks an artist to do anything they do not do every day.
If you are already building a floral collection, the wrapping vine, the vintage bouquet or the full-colour sleeve give you room to add pieces that share a look. Whichever one of these 24 daisy tattoo ideas you pick, take a reference photo of healed work by the artist, agree the minimum size in the consult, and follow their aftercare instructions above everything else. That is the whole process, and it goes smoothly when you do not skip the conversation.