
20 Best Toe Tattoo Ideas, Sizing and Placement (September 2026)
A toe tattoo is ink placed on one of the five smallest canvases on your body, and that single fact decides almost everything about the design. Most toe tattoo ideas that look sharp on a phone turn to mush within a year, because toes have almost no fat between the skin and the bone, so ink has nowhere to settle. The rule that fixes it is simple: one shape or one unbroken line per toe, kept between 1 and 2 centimetres, placed well clear of the knuckle crease.
I have pulled these 20 together with the sizing, toe choice and care notes that gallery pages usually skip, because a photo tells you what a design looks like on day one and tells you nothing about how it looks after a summer of sandals and a walk to work. Every entry below names the size, the best toe, and the part that will need attention later.
Updated for September 2026, and planned for anyone booking a first toe tattoo before sandal season.
Quick Guide: Every Idea at a Glance
| Idea | Style | Best placement | Size | Pain |
|---|---|---|---|---|
| Paper plane | Fine line | Top of big toe | 1.5-2 inch | Medium |
| Single dot | Solid black | Outer side, pinky | Under 0.25 inch | Low |
| Crescent moon | Solid black | Top of second toe | 0.5-0.75 inch | Medium |
| Roman numeral | Block caps | Top of big toe | 1-1.25 inch | Medium |
| Infinity wrap | Solid black | Wraps second toe | 0.75 inch | Medium |
| Heart with white gap | Solid black | Top of second toe | 0.5-0.6 inch | Medium |
| Filled five-point star | Solid black | Top of pinky toe | 0.4-0.5 inch | Low |
| Double band | Single line | Second toe, ring style | 0.75-1 inch wide | Medium |
| Block initial | Slab serif | Side of big toe | 0.5 inch | Medium |
| Arrow wrap | Solid line | Wraps big toe | 1.25-1.5 inch | Medium |
| Single rose | Blackwork | Top of big toe | 1.5-2 inch | Medium |
| Lavender sprig | Fine line, grey wash | Top of second toe | 1.25-1.5 inch | Medium |
| Three mushrooms | Illustrative, dot texture | Top of third toe | 1 inch wide | Medium |
| Paw print | Solid black | Top of big toe | 0.75 inch | Medium |
| Ladybug | Black with red accent | Top of pinky toe | 0.5 inch | Low |
| Coiled snake | Traditional outline | Wraps second toe | 1.25 inch | Medium-high |
| Compass rose | Fine line | Top of big toe | 1-1.25 inch | Medium |
| Daisies meeting dots | Fine line | Side of big toe | 1.5 inch | Medium |
| Lace band | Solid single line | Wraps second toe | 1 inch wide | Medium |
| Open globe | Single line | Top of big toe | 1-1.25 inch | Medium |
1. Fine-Line Paper Plane on the Big Toe
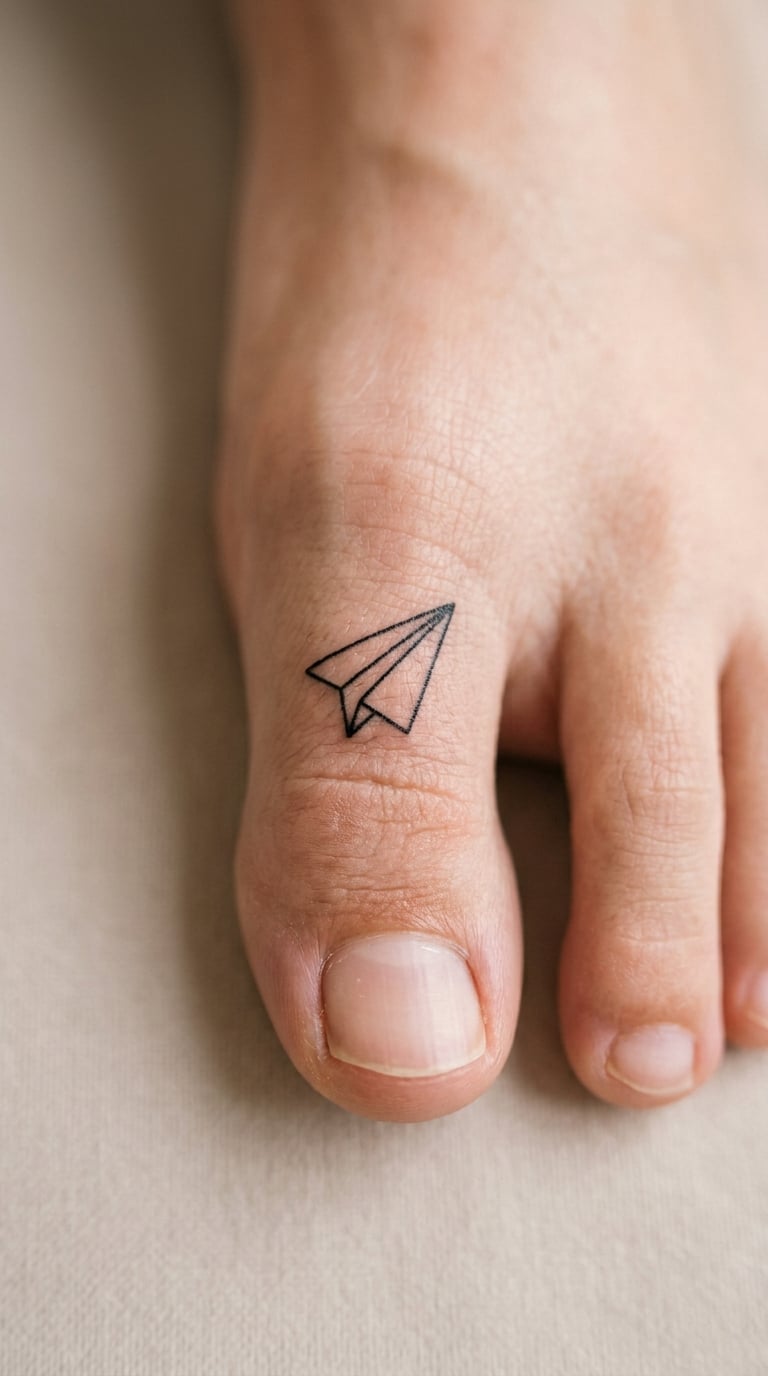
A paper plane drawn in one confident unbroken stroke, nose angled slightly to the outer side of the toe so it reads the same way from above. No shading, no drop shadow, no trail — the whole design is four or five lines meeting at two points. The big toe is the only toe with a wide enough flat top to hold it without the wings running down the curve.
Placement: top of the big toe, or the inner side of the second toe · Size: 1.5-2 inch (4-5 cm) long · Style: fine line
Pain: medium, and it stings more than it aches because the skin is thin over bone · Make it yours: add two tiny dots trailing behind the tail as a flight path.
2. Single Black Dot on the Side of a Pinky Toe
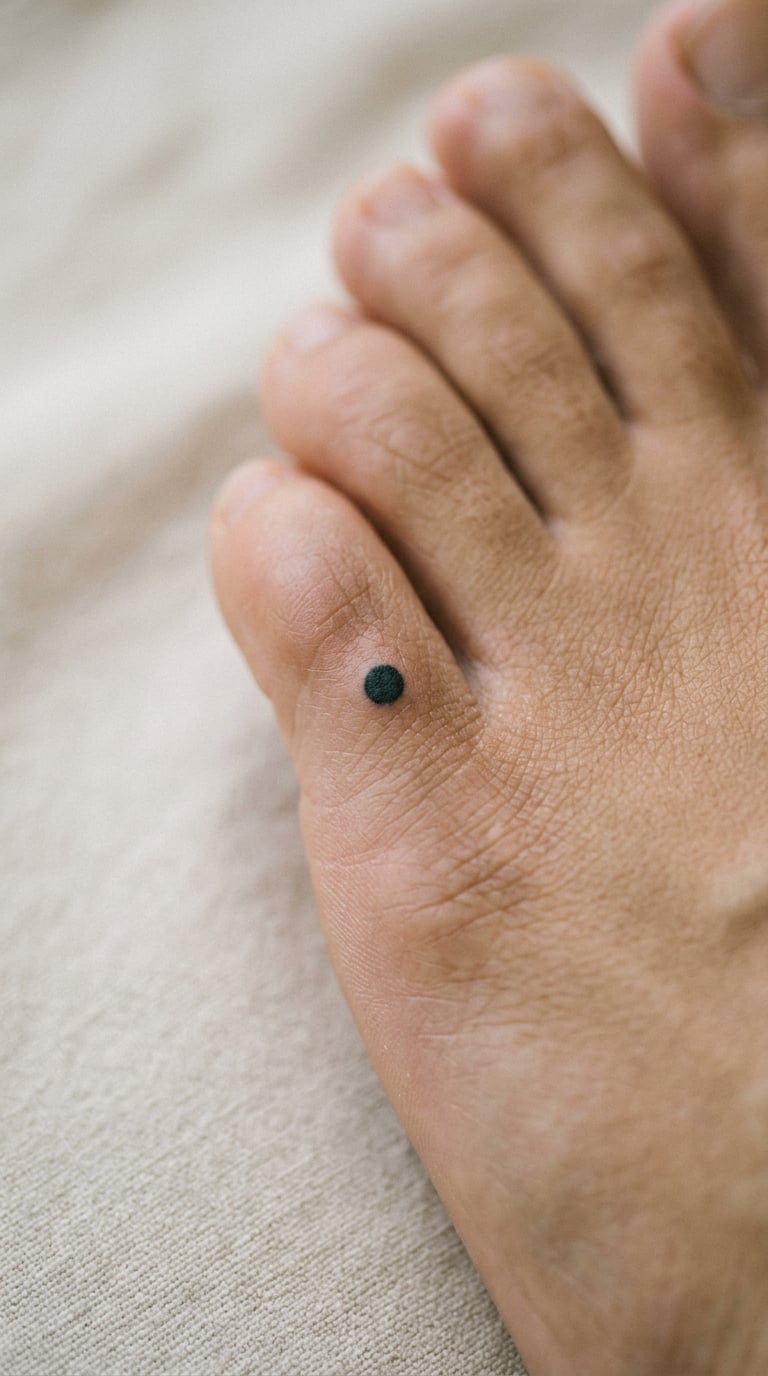
One solid black dot, filled rather than outlined, roughly the size of a grain of rice. It is the least demanding design on this list and the one that holds its shape longest, because a solid shape has no interior line to disappear. Artists often place it slightly behind the widest point of the toe so it stays visible rather than sliding toward the nail.
Placement: outer side of the pinky toe, or the base of any toe · Size: under 0.25 inch (6 mm) · Style: solid black minimalist
Pain: low — brief and sharp rather than sustained · Make it yours: get a matching dot on the same toe of the other foot, slightly closer to the nail for a deliberate mismatch.
3. Solid Black Crescent Moon on the Second Toe
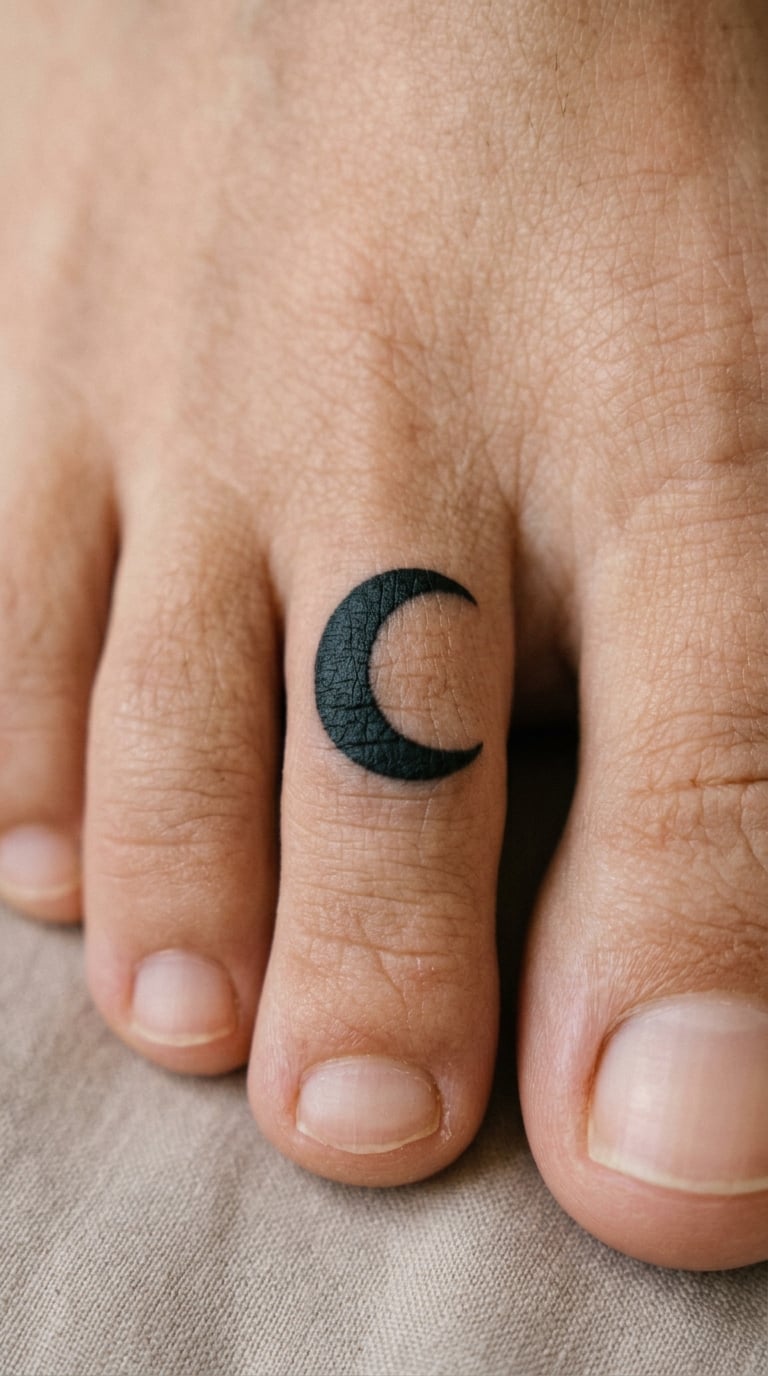
A crescent cut as one solid shape with a thick, even body and clean horns, tilted so the open side faces the big toe. The design reads as a moon because of the shape alone, which is exactly why it survives — there is nothing fine enough to blur. Keep the horns short; long thin points are the first thing to soften.
Placement: top of the second toe, angled across the knuckle · Size: 0.5-0.75 inch (1.3-1.9 cm) · Style: solid black minimalist
Pain: medium, and the knuckle area is the tender spot · Make it yours: tuck a scatter of three small dots inside the curve, or add a matching crescent on the other foot’s second toe.
4. Roman Numeral in Block Caps on the Big Toe
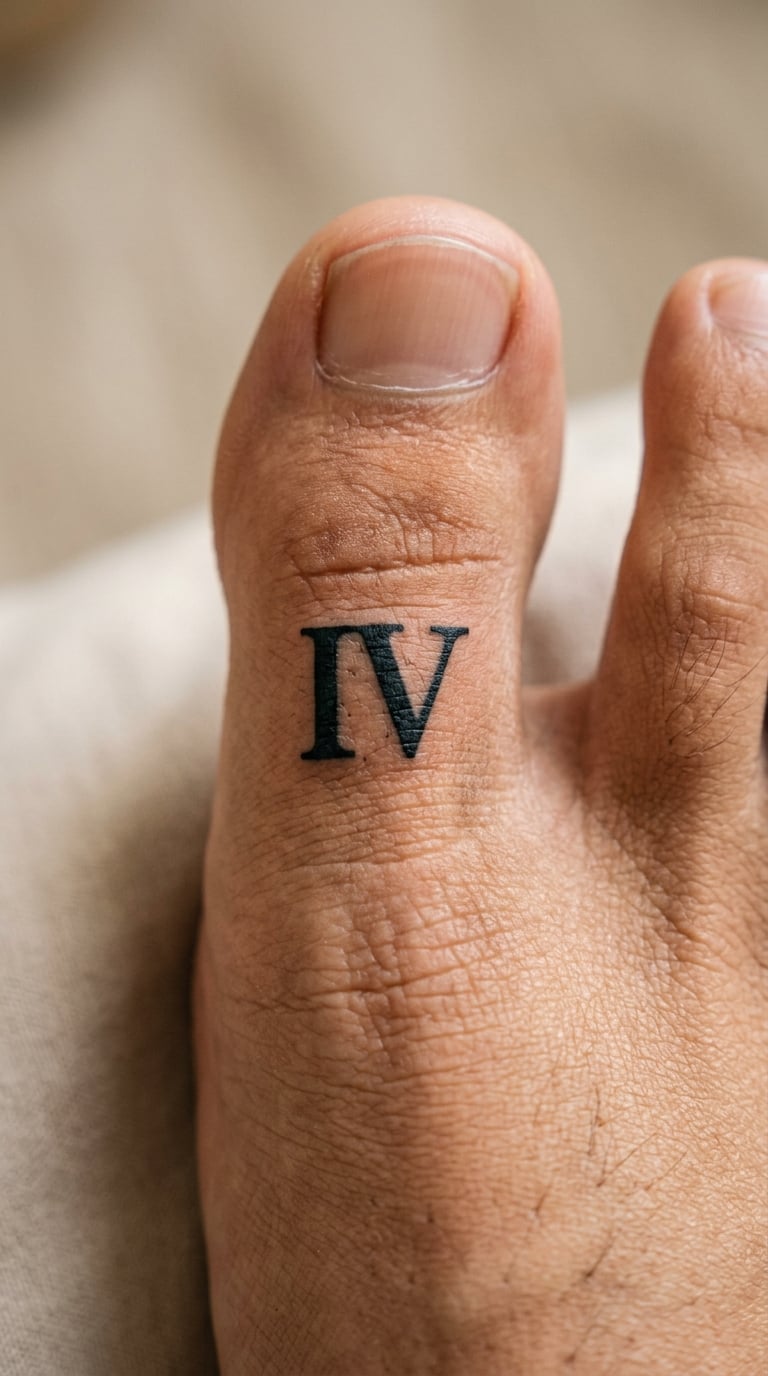
One numeral or character set in a heavy slab serif, filled solid, standing upright on the big toe. Block capitals matter here: cursive script loses its connection points within a year or two, while a filled serif keeps a defined edge. If you want a full date, four characters is the ceiling on one toe.
Placement: top of the big toe, or split across the big and second toe · Size: 1-1.25 inch (2.5-3 cm) tall · Style: block lettering, solid black
Pain: medium, and the knuckle crease pulls the skin tight under the needle · Make it yours: run a date in month-day order across two adjacent toes instead of squeezing it into one.
5. Infinity Symbol Wrapping the Second Toe
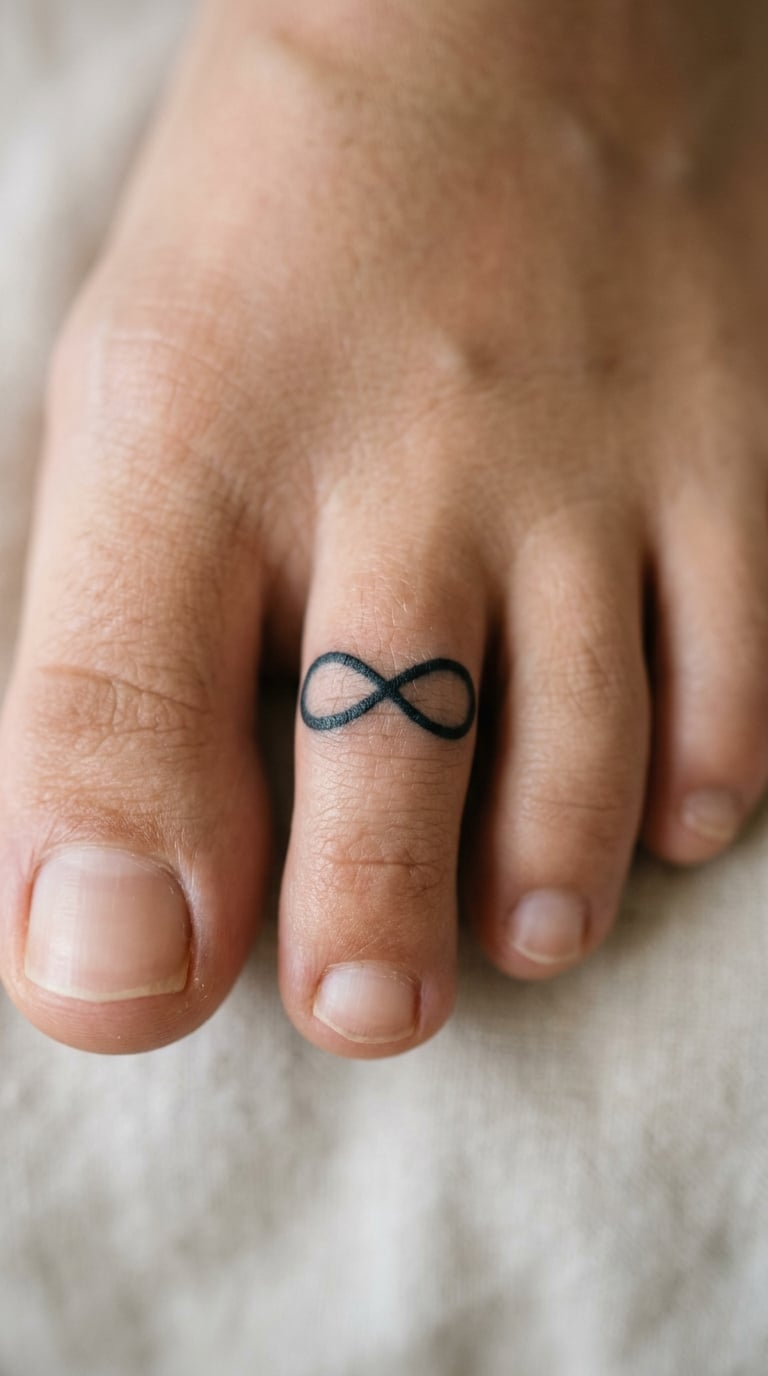
A solid black infinity drawn as a continuous loop that travels around the toe, with the crossover point sitting on top where you can see it. Wrapping designs look best on the second toe, which is round and straight enough that the line returns to itself cleanly. A wraparound on the big toe stretches every time you take a step.
Placement: wraps the second toe, crossover centred on top · Size: 0.75 inch (2 cm) wide, one line of consistent weight · Style: solid black minimalist
Pain: medium, and you feel every pass of the needle around the full circumference · Make it yours: place a tiny solid diamond at the crossover so the two loops lock together.
6. Solid Heart With One White Gap
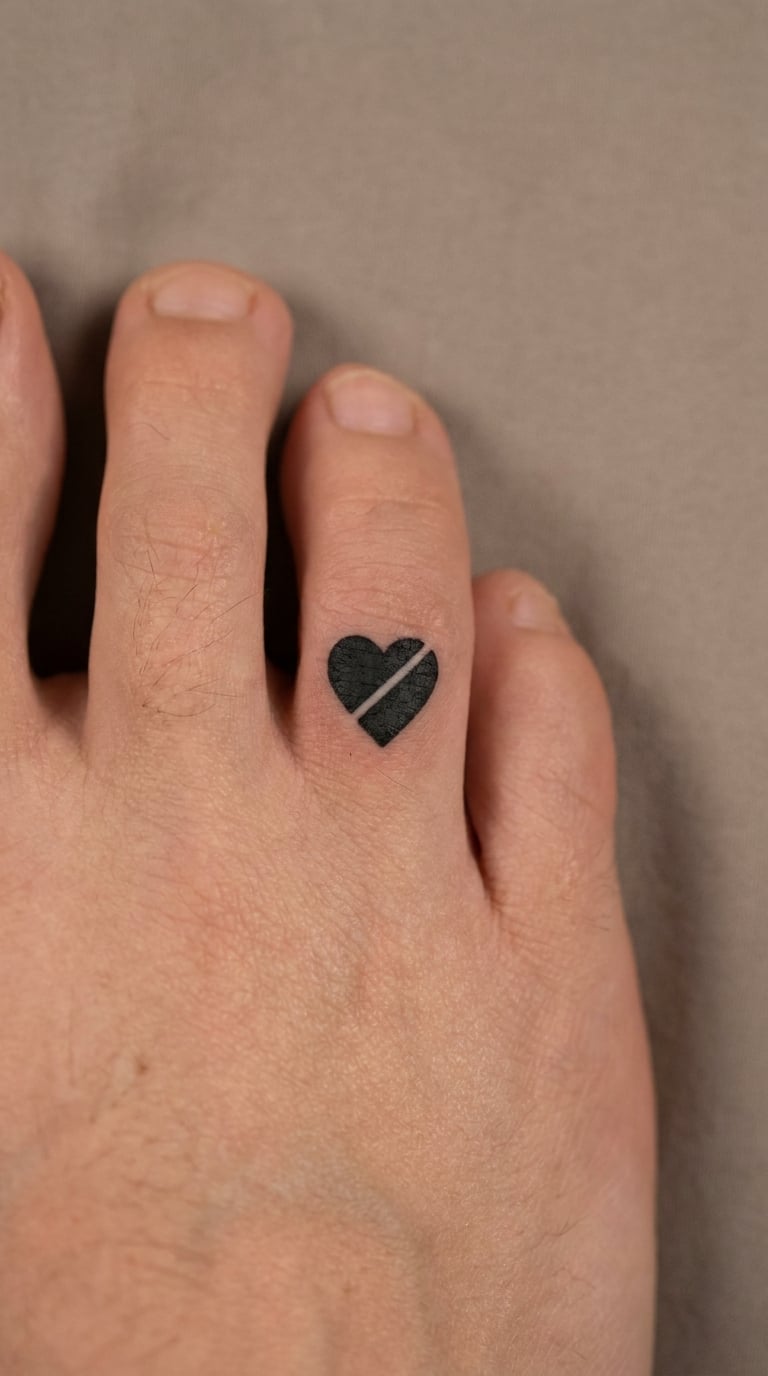
A filled black heart with a single hairline of untouched skin cutting through it at an angle, which gives you two halves without needing a second colour. It looks like an intentional graphic rather than a heart outline, and the negative space keeps the weight of the ink even across the whole shape. Best drawn slightly larger than feels reasonable.
Placement: top of the second toe · Size: 0.5-0.6 inch (1.3-1.5 cm) · Style: solid black with negative space
Pain: medium, on a quick nerve-heavy area · Make it yours: angle the white gap so the two halves only line up when your foot is pointed, or reverse the split for the other foot.
7. Filled Five-Point Star on a Pinky Toe
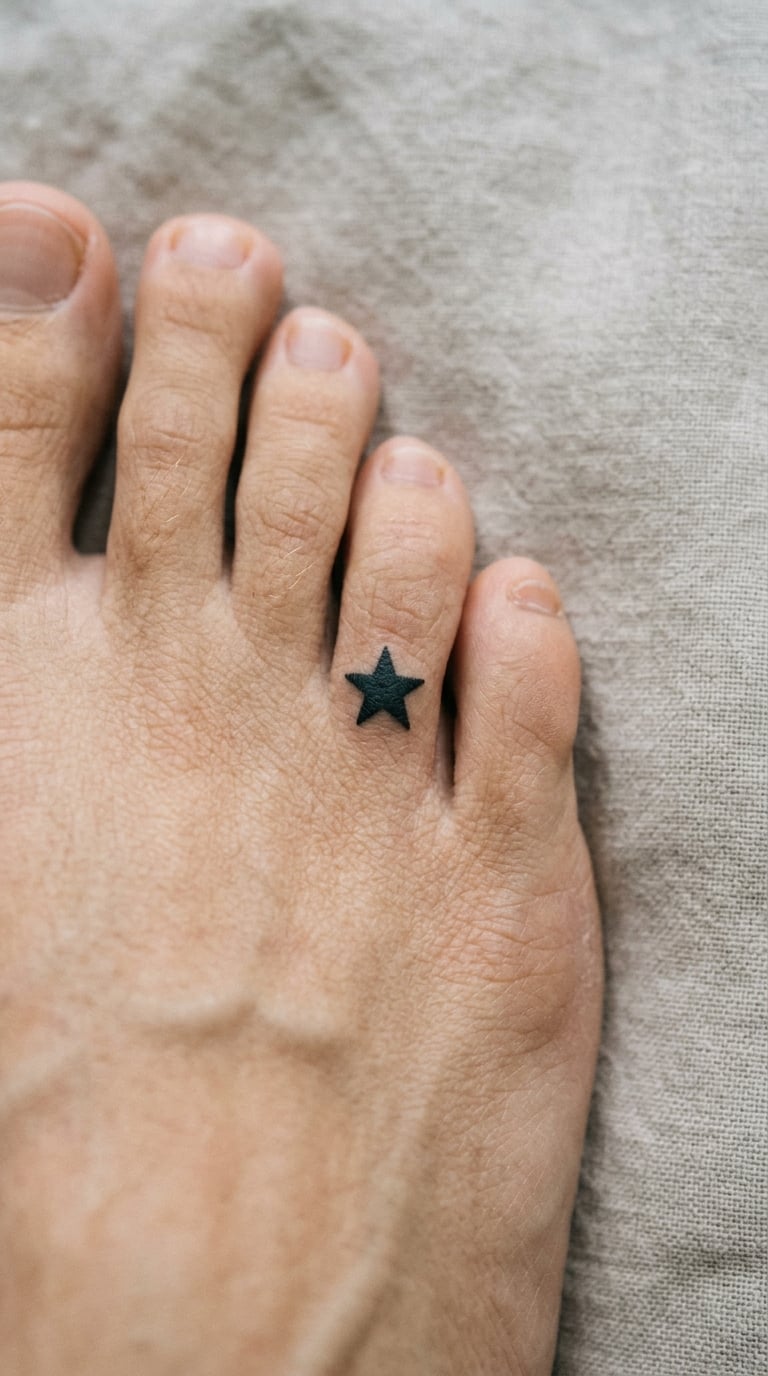
A five-point star filled solid with even, slightly rounded points, small enough that the whole shape fits between the knuckle crease and the nail. Filling it completely is the difference between a star that still reads at year five and an outline version that turns into a smudge. The pinky is short, so this is one of the few designs that fits it without drama.
Placement: top of the pinky toe, centred · Size: 0.4-0.5 inch (1-1.3 cm) · Style: solid black
Pain: low, the shortest session of the bunch · Make it yours: run three of them, one on each of the three outer toes, so they read as a row in sandals.
8. Double Band Toe Ring Tattoo
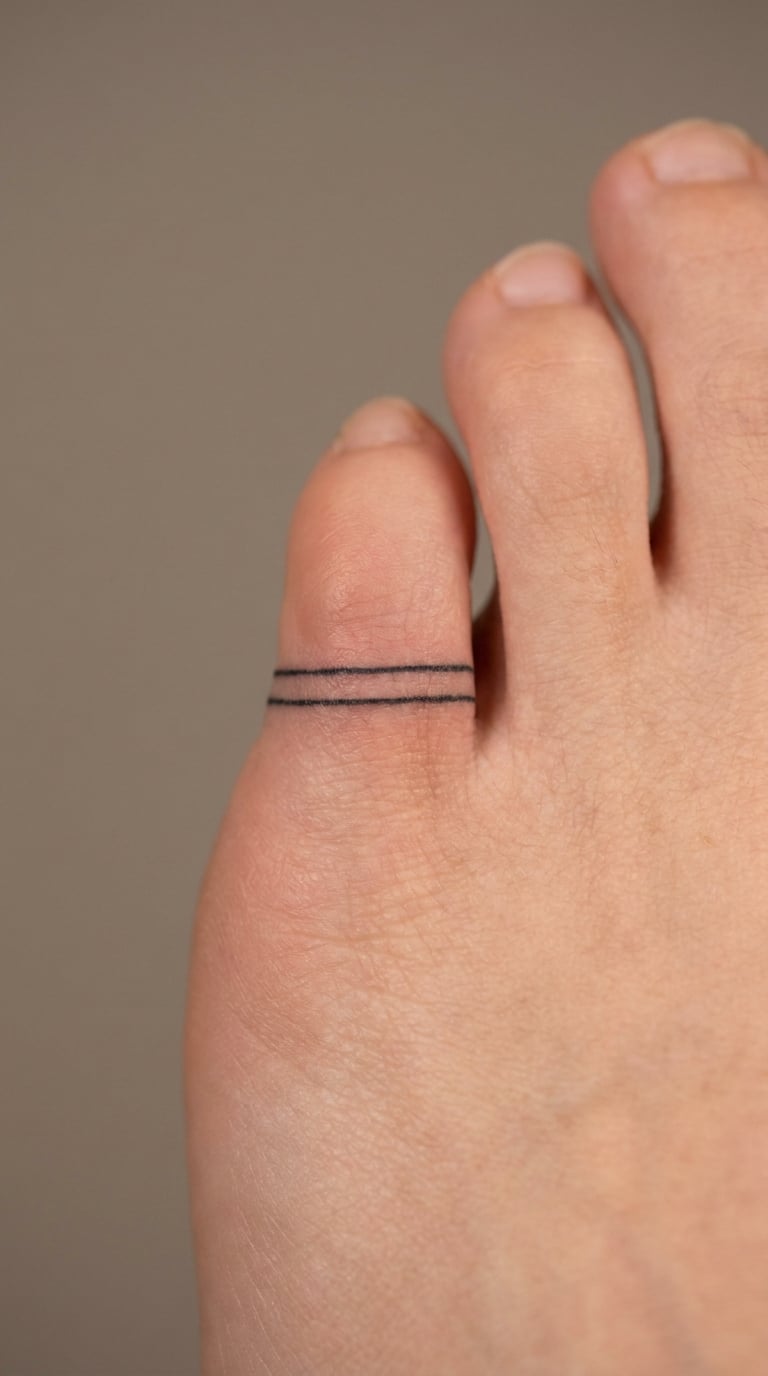
Two thin parallel lines circling the toe with a strip of bare skin between them, sitting where a toe ring would sit. It is the closest thing to jewellery you can get permanently, and it stays under a closed-toe shoe without anyone knowing. Even spacing matters more than size here, so ask for the lines to match weight from start to finish.
Placement: wraps the base of the second or third toe · Size: 0.75-1 inch (2-2.5 cm) band width · Style: single line
Pain: medium, and the band edges catch the needle twice · Make it yours: drop to one band with a tiny solid heart at the front, or a third thin line for a stacked look.
9. Block Letter Initial on the Side of the Big Toe
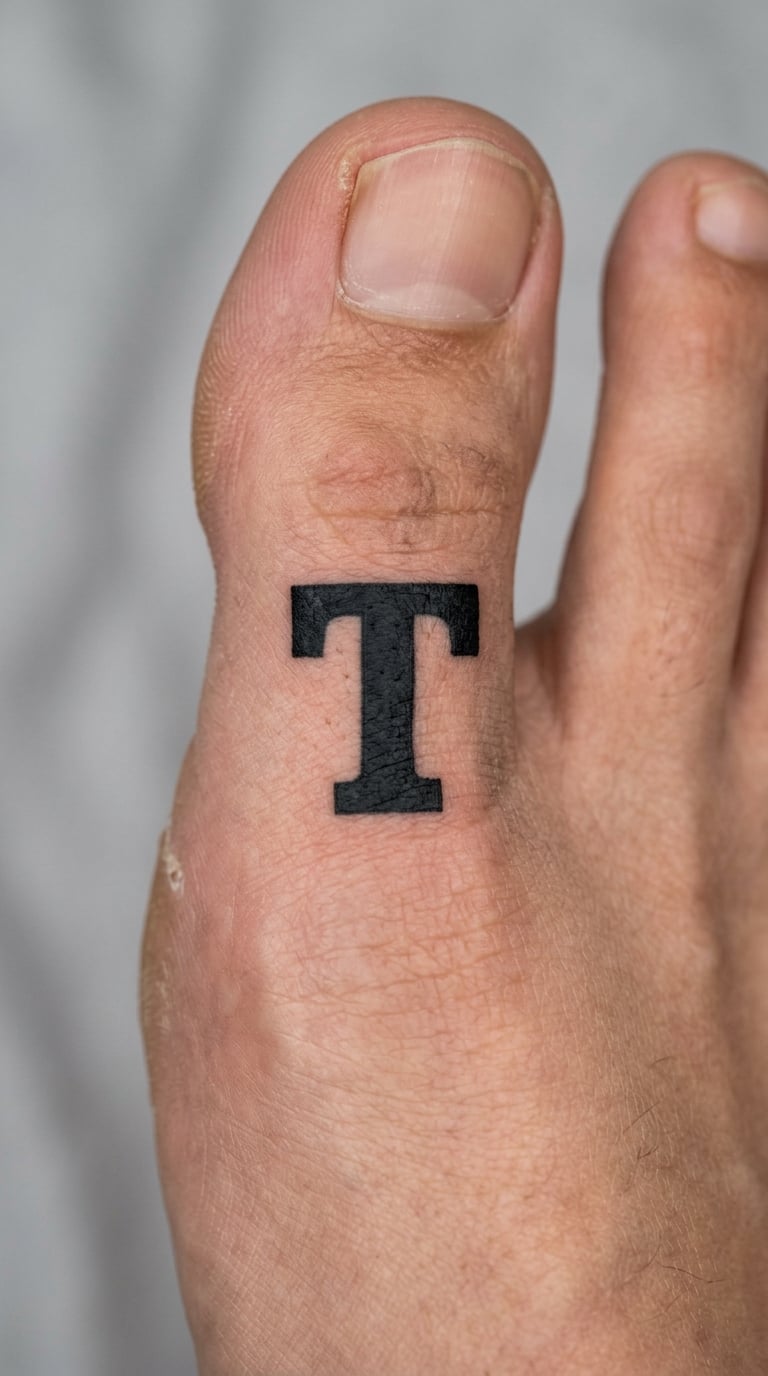
One letter in a heavy serif face, solid filled, standing upright on the inner side of the big toe. The side of the big toe is a flattier surface than the top, so a letter sits more squarely than it would elsewhere. Anything thin, script or outline will not make it — commit to a bold face or choose another idea.
Placement: inner side of the big toe, upright when the foot is pointed · Size: 0.5 inch (1.3 cm) tall · Style: slab serif, solid black
Pain: medium; the side catches light and nerve endings · Make it yours: use a surname initial instead of a first, or reverse it on the other foot so the pair reads together.
10. Arrow Wrapping the Big Toe
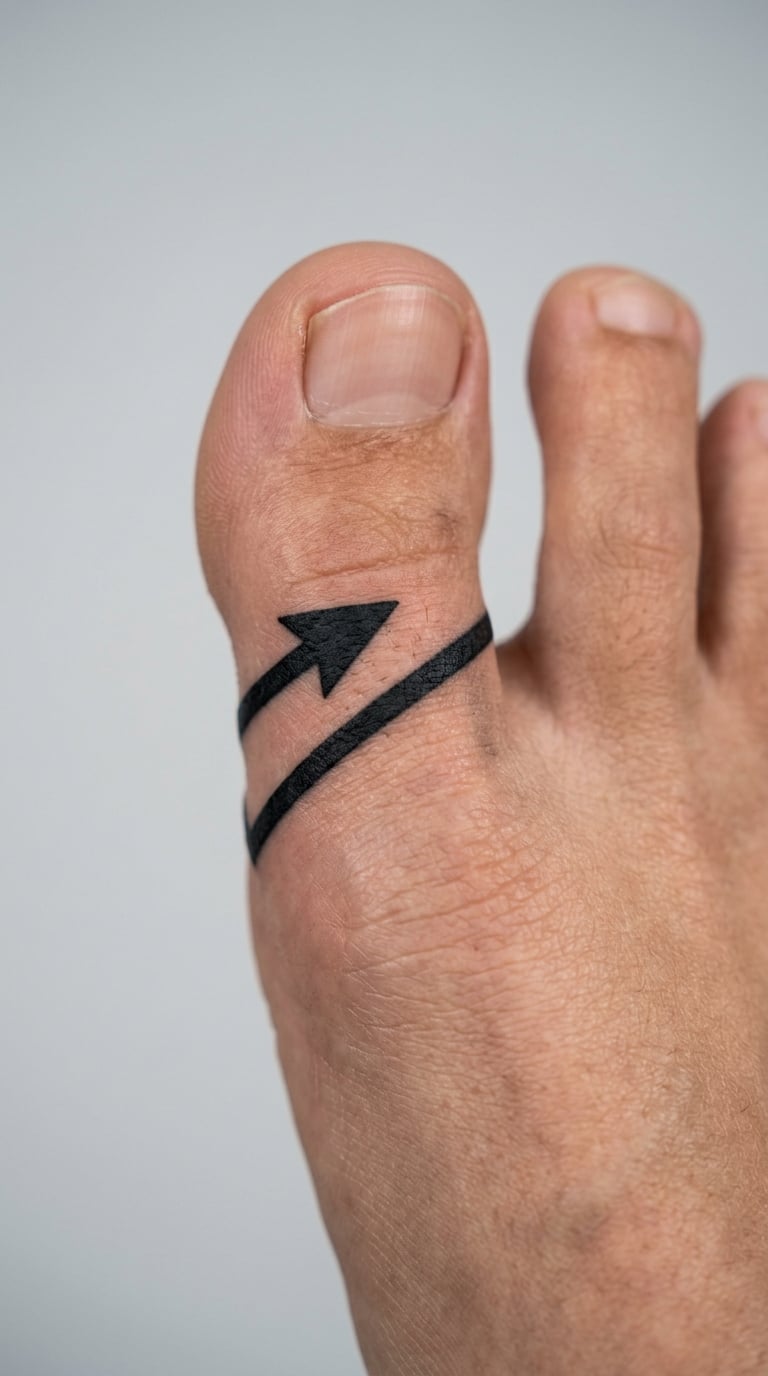
A single shaft with one solid triangular head, running diagonally around the big toe and meeting itself at the top. The arrow is a genuinely good fit for the wrap because its shape is a line plus a point, and both survive repetition. Diagonal placement on the big toe takes the least abuse from a shoe when it sits forward of the knuckle.
Placement: wraps the big toe on a diagonal · Size: 1.25-1.5 inch (3-4 cm) around the toe · Style: solid black line and fill
Pain: medium; the wrap means you feel the full rotation · Make it yours: make it double-headed, or add a small ribbon banner at the base of the shaft.
11. Single Rose in Blackwork on the Big Toe
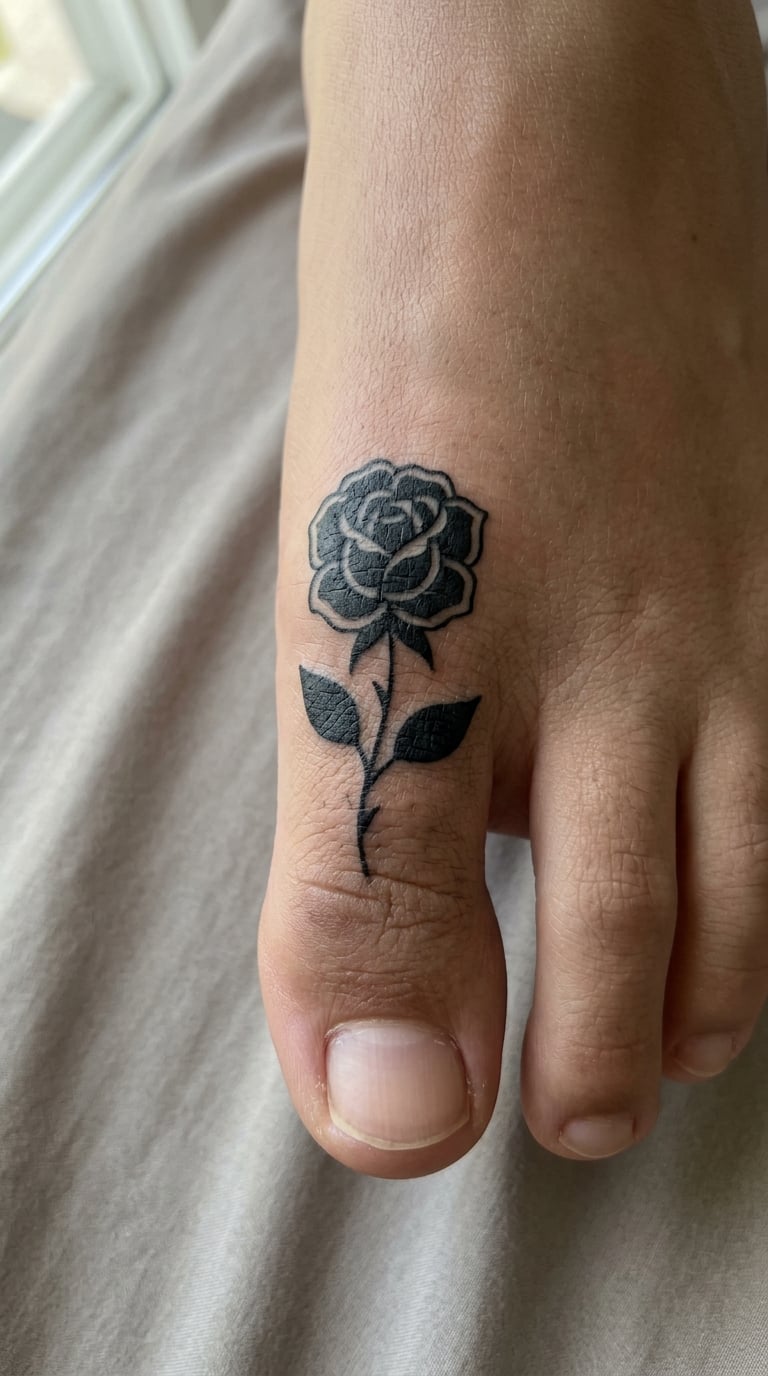
One bloom with a short stem and two leaves, drawn in blackwork so the petals are solid shapes separated by thin gaps rather than shaded gradients. One flower is the limit on a toe; a bouquet turns to mud inside a year because the eye cannot separate the petals. The big toe’s flat top gives the bloom room to sit square.
Placement: top of the big toe, bloom centred and stem running back toward the ankle · Size: 1.5-2 inch (4-5 cm) tall · Style: blackwork
Pain: medium, longer session than a single shape · Ageing note: filled black petals hold; the fine stem line is the first to soften, so plan on a touch-up · Make it yours: add a single thorn, or tint one outer petal in one colour.
12. Lavender Sprig on the Second Toe
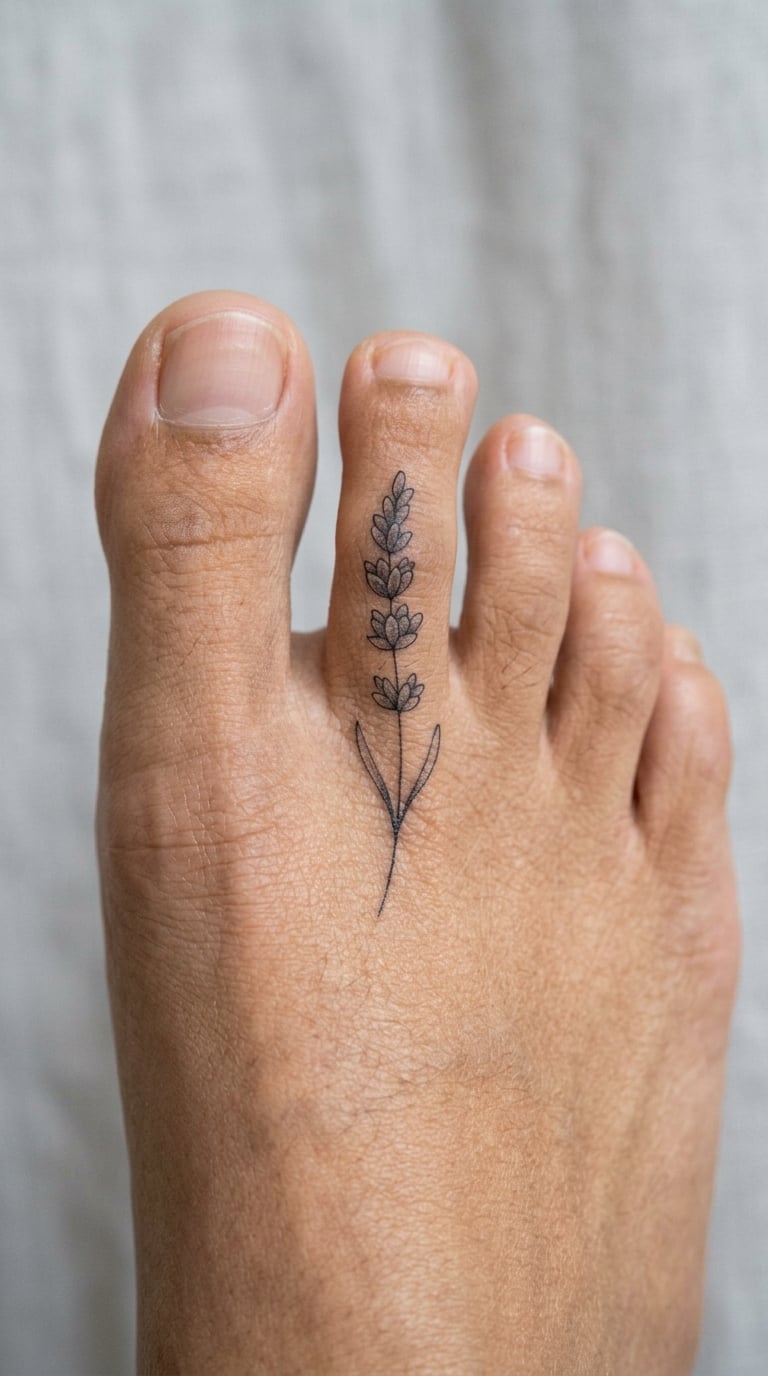
A single stem with paired buds climbing in a soft curve, linework light and a grey wash only in the bud heads so the piece has some weight without going solid. The top of the second toe takes a narrow vertical shape better than a wide one, which is why the sprig points lengthwise rather than across. Leave a bare finger-width of skin either side of the stem.
Placement: top of the second toe, running lengthwise · Size: 1.25-1.5 inch (3-4 cm) tall · Style: fine line with grey shading
Pain: medium, and the needle work over the knuckle is the sharp bit · Ageing note: grey shading on a toe greys out faster than it does on an arm, expect a top-up at 12 to 18 months · Make it yours: wrap the stem in a bandage-style strip so it runs fully around the toe.
13. Three Mushrooms on the Third Toe
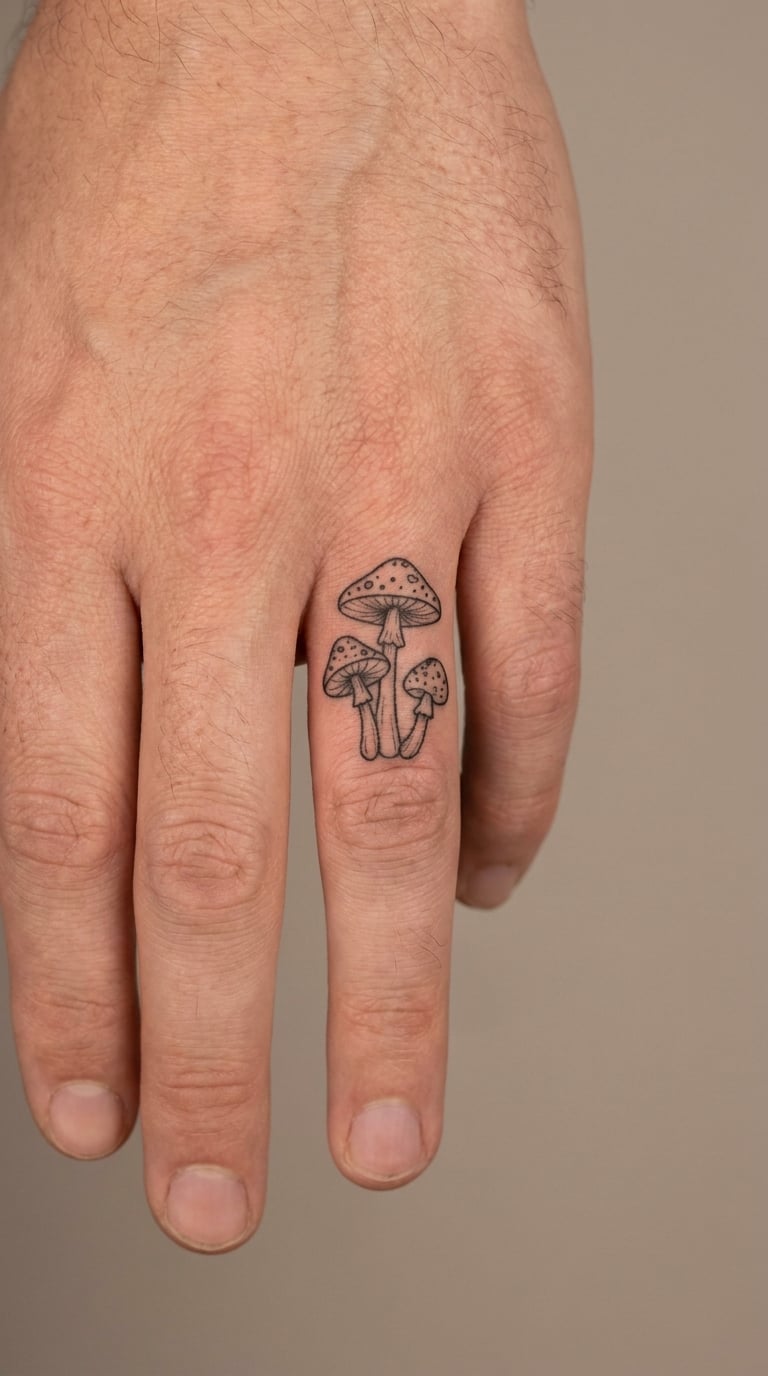
Three caps of different heights in a little cluster, each cap solid black with a scatter of white dots for texture and a thin stem. The dot texture is what stops the caps from reading as flat blobs, and it costs almost nothing in ink density. Keep the tallest cap in the middle so the silhouette stays balanced when seen from the front.
Placement: top of the third toe, cluster centred · Size: 1 inch (2.5 cm) wide · Style: illustrative with dot texture
Pain: medium, a longer session because of the dot work · Make it yours: colour the tallest cap red and leave the rest black, which is one small touch of colour rather than a full-colour piece.
14. Paw Print on the Big Toe
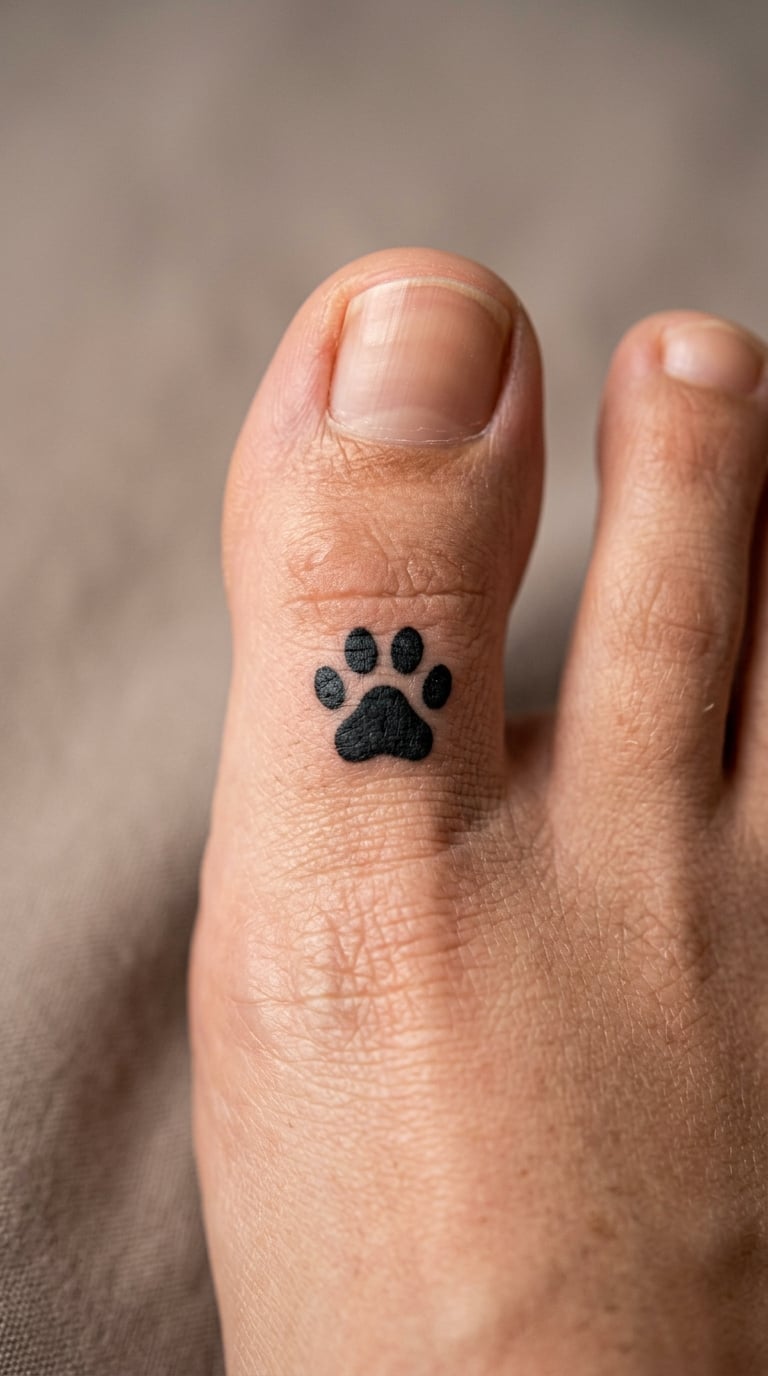
One pad shape with four separate beans above it, all solid black, spaced so the beans do not touch each other. Gaps are the whole trick: beans that merge during healing read as a blob, and a print with no negative space between pads looks like a smudge by month three. The big toe is the only one wide enough for the full set of five shapes.
Placement: top of the big toe, print centred with beans pointing forward · Size: 0.75 inch (2 cm) · Style: solid black
Pain: medium, five separate fills to sit through · Make it yours: tattoo only a single bean, then repeat the single bean on the next two toes so you get a trail of three across the foot.
15. Ladybug on the Pinky Toe
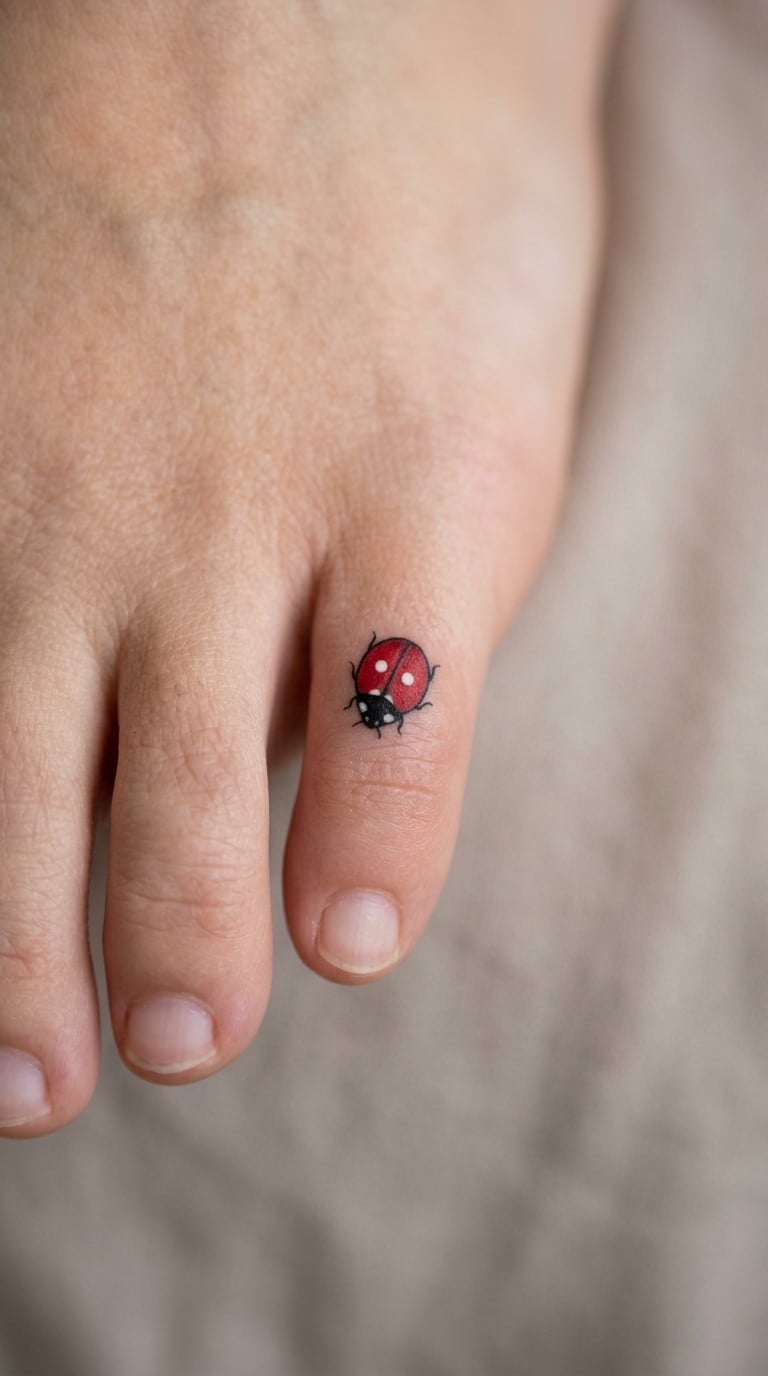
A round black body split down the middle, two small pale spots on each wing, and one red fill on the shell. This is the easiest way to carry a colour onto a toe: one small area of red, everything else black, so the colour has less surface to fade from. The pinky takes the small round shape without any stretching at the edges.
Placement: top of the pinky toe, just behind the nail · Size: 0.5 inch (1.3 cm) · Style: black with a single red accent
Pain: low, and quick · Make it yours: put a second ladybug on the other foot and rotate it a few degrees so the pair looks alive rather than stamped.
16. Coiled Snake Wrapping the Second Toe
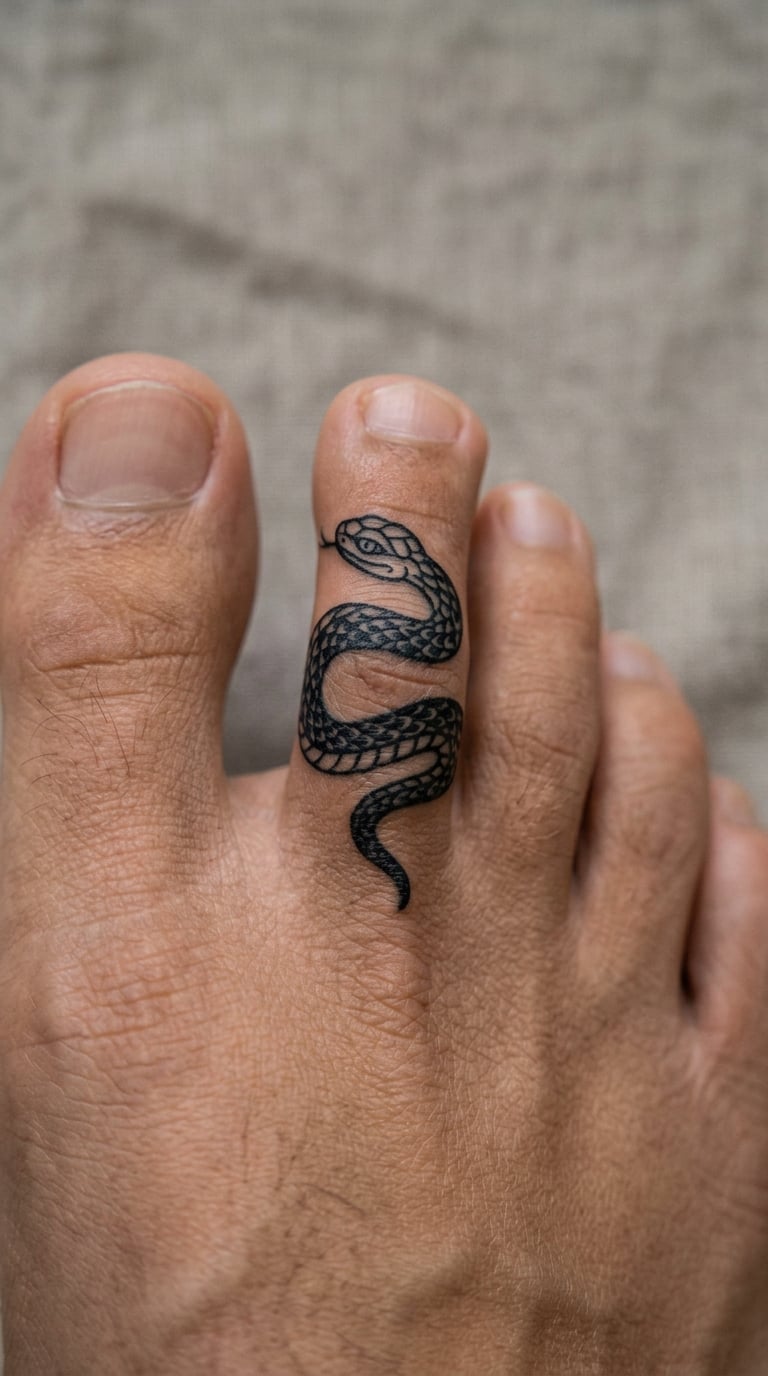
A snake with a solid black outline coiled twice around the toe, the body crossing itself once at the top, with a few short scale lines filled in between the coils. Traditional style works at this size because the outline carries the shape and the scale marks are optional extras. Keep the coil spacing even so the toes underneath still read as skin.
Placement: wraps the second toe, head resting on top · Size: 1.25 inch (3 cm) around the toe · Style: traditional, black outline with solid scale detail
Pain: medium to high, the longest and most sensitive session on this list · Ageing note: the scale hatching is fine line and will soften first, the outline holds · Make it yours: use a single drop of red for the tongue and nothing else coloured.
17. Compass Rose on the Big Toe
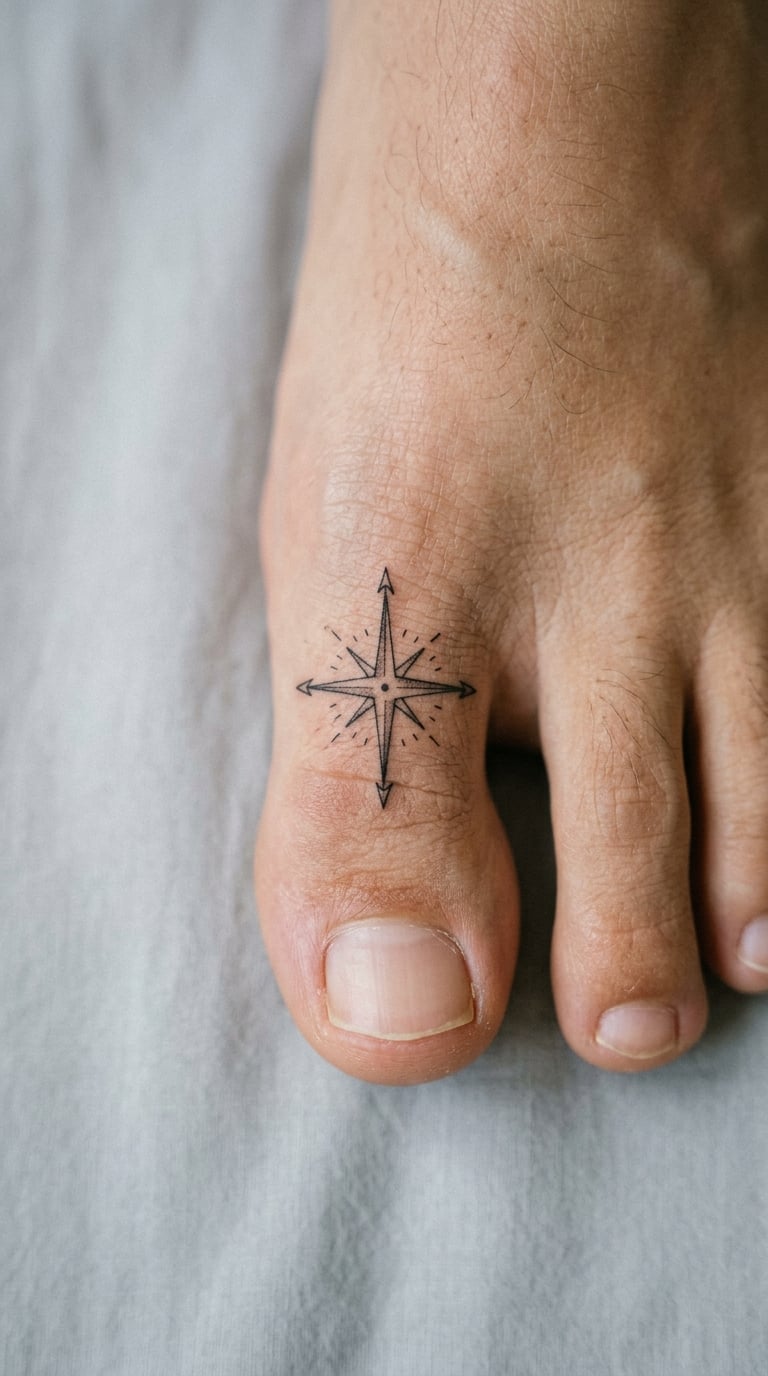
A four-point rose with one long point and three shorter ones, plus a small circle at the centre and short tick marks on the horizontal axis. Slim points are fine on the big toe because the surface is broad and flat, and there is no joint crease to fold them across. Keep the tick marks outside the rose itself, not stacked in the middle.
Placement: top of the big toe, long point aimed toward the ankle · Size: 1-1.25 inch (2.5-3 cm) across · Style: fine line
Pain: medium · Make it yours: colour the single long point in one solid red and leave the rest black, which keeps the detail readable at a glance.
18. Daisies Meeting Dots on the Side of the Big Toe
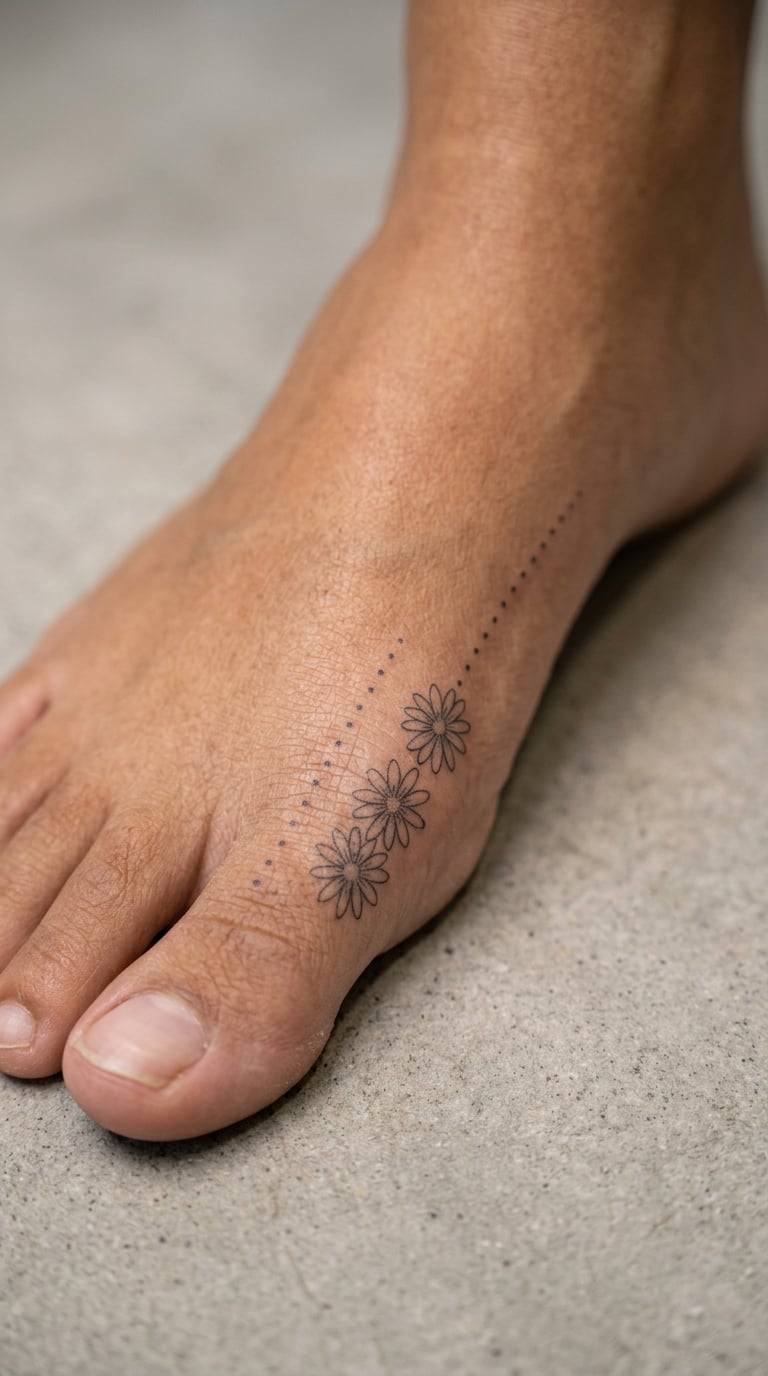
Three small daisies at one end and a run of six decreasing dots at the other, meeting in the middle on the side of the big toe. The dot run is what saves the piece; it carries visual weight into a tapered space where a full flower would have nowhere to go. This one suits someone who wants botanical work but not the commitment of a coloured bloom.
Placement: inner side of the big toe, running lengthwise · Size: 1.5 inch (4 cm) long · Style: fine line
Pain: medium · Make it yours: flip the composition on the other foot so the flowers face each other when your feet are side by side.
19. Lace Band Around the Second Toe
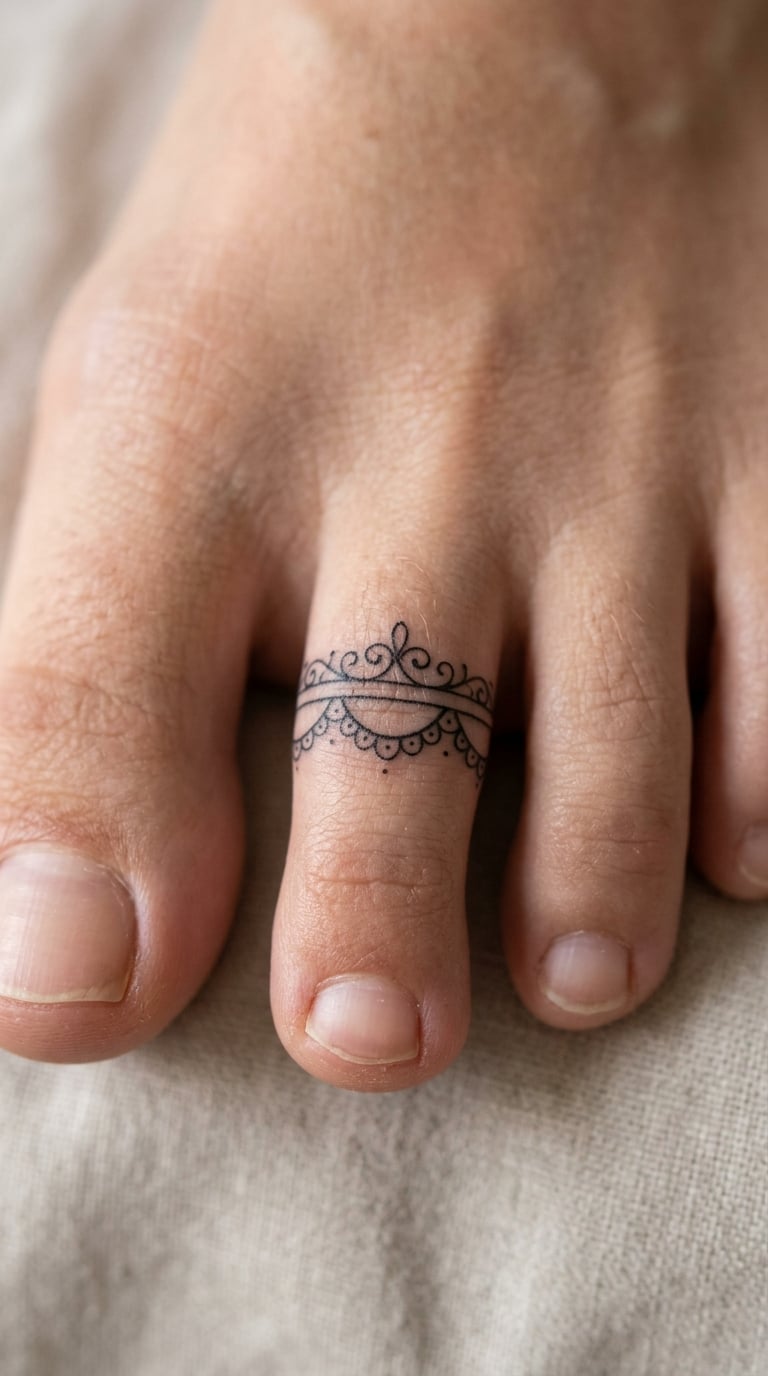
A solid single-line band that circles the toe, built from a straight centre line with scalloped arches and small loops on the outer edge. It looks like the edging of a handkerchief rather than a tattoo motif, which is the point — it gives you a decorative band in a space that only fits a band. Line weight must be steady so the arches stay evenly spaced all the way round.
Placement: wraps the second toe like a ring · Size: 1 inch (2.5 cm) band width · Style: solid single line
Pain: medium, and the loops mean more needle stops · Ageing note: the smallest loops are the first thing to fill in, so keep the arches wider than feels necessary · Make it yours: swap the scallops for a simple chain link, or a row of tiny solid hearts.
20. Open Globe on the Big Toe
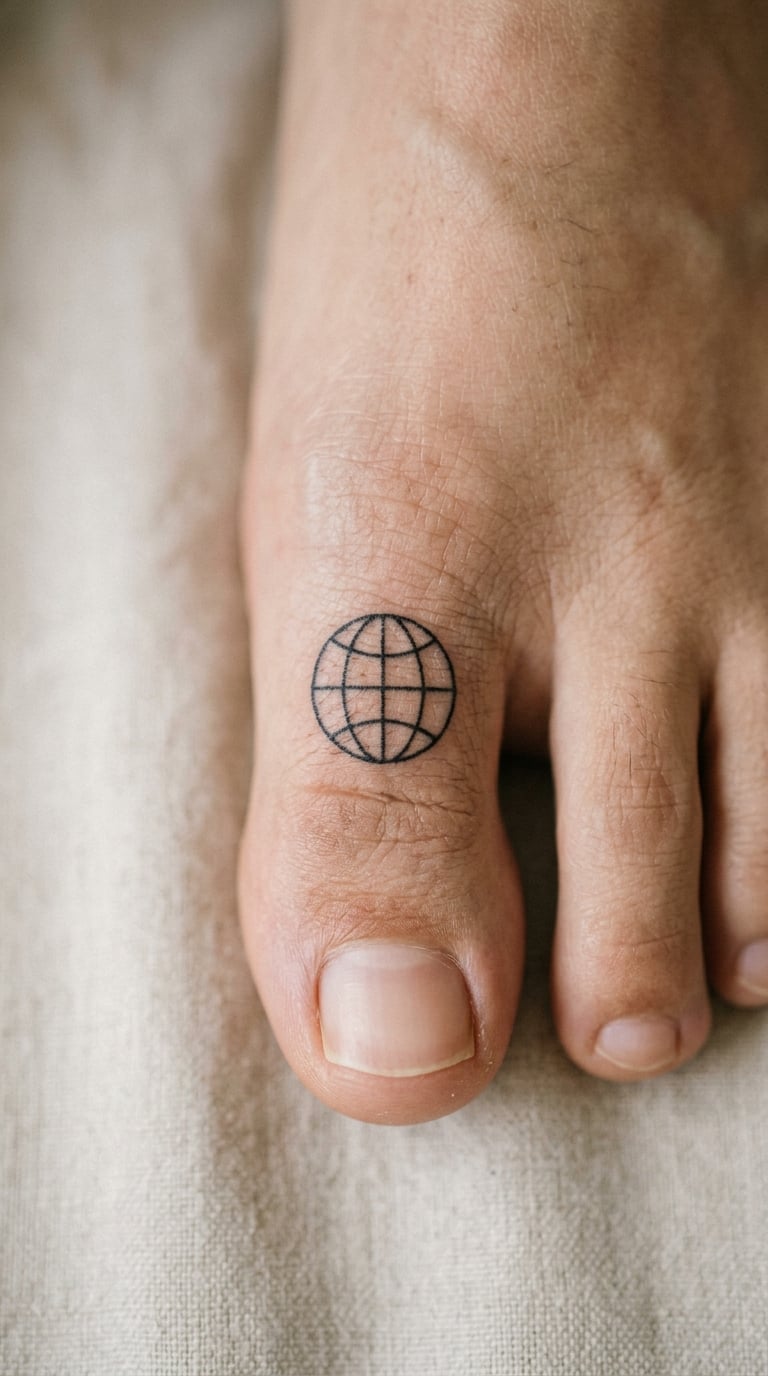
A circle drawn in one stroke, with two curved horizontal lines and two long curves inside it, so it reads as a globe without any continent detail. Continent maps are the classic mistake here; they turn into a scribble at this scale. The design works because it is a shape with evenly spaced lines inside, nothing more.
Placement: top of the big toe, circle centred forward of the knuckle · Size: 1-1.25 inch (2.5-3 cm) · Style: single continuous line
Pain: medium · Ageing note: the internal lines will tighten over the years and the spacing narrows, so a touch-up every year or two is normal · Make it yours: fill one single longitude line in solid black so the interior still reads once the fine lines soften.
How to Choose the Right Toe Tattoo
Placement anatomy: top, side, underside and between the toes
The top of a toe is the flattest surface and the best answer for almost any design. The sides work for narrow pieces running lengthwise, and they stay clear of the crease where a shoe flexes. The underside is rarely a good idea: it is the side that takes the most contact, the most sweat and the least light, so ink there fades fastest. Between the toes is a genuine option, but the skin is soft and mobile and a design there will smudge or stretch in a way nothing else will.
One thing to keep in mind on the underside and the between-toe skin: both sit in a crease that moves every time you take a step. Linework placed across a moving fold does not heal the way flat skin does, because the fold stretches the design while the new skin is still settling.
Which toe should you use
For a first toe tattoo, the big toe is the safest pick because it has the widest flat surface and takes the most readable designs. Pain sits in the middle of the range here, higher than an inner arm but well below what people expect from a foot.
| Toe | Canvas | Pain | Best for |
|---|---|---|---|
| Big toe | Widest flat top | 3/5 | Rose, compass, paw print, arrow, block initial |
| Second toe | Round, straight | 3/5 | Wraparounds, bands, moon, lavender sprig |
| Middle toes | Narrow, slight curve | 3/5 | Small clusters, mushroom groups, dotted runs |
| Pinky toe | Smallest | 2/5 | Single dot, filled star, ladybug, single bean |
| Between the toes | Soft, mobile fold | 2/5 | Single solid shape only, nothing detailed |
Size rules: the one-element rule and the 1-2cm ceiling
One element per toe is the whole sizing philosophy. A single shape, or a single unbroken line, reads clearly at 1-2cm across. Two elements is the practical maximum, and only when both are simple. A useful test before you book: look at the design on your phone, then cover all but one part of it. If the remaining part still tells you what it is, it will work on a toe.
Size sits between 1 and 2 centimetres for a simple shape, and the second toe gives you a little more room than the pinky. Nothing on a toe should be as large as it would be on an arm. Lettering is the hardest case: four characters is the practical limit, set in block capitals, never cursive.
What not to put on a toe
Cursive script is the first thing to go. The connecting strokes that make it readable on an arm break down on a toe within a year or two, and the letters stop holding their shape to each other. Next on the list is any multi-element floral — a bouquet, a garland, a wreath. Then tiny outline-only stars, which have no solid mass to keep them legible.
Colour-heavy illustration is the fourth. A full-colour piece on a toe puts a large amount of pigment into a small area of skin that flexes, sweats and rubs, and the colour goes first. If you want colour, the working approach is one solid area of a single colour inside an otherwise black design, the way the ladybug and the compass rose above do it.
Keep linework off the knuckle crease. The fold across the top of every toe opens and closes thousands of times a day, and a line drawn straight across it stretches, breaks and heals as a faded dash.
Toe tattoo ideas for men and for women
The placement does most of the work here, not the motif. Designs that read neutral and work for anyone include the arrow, the compass rose, the globe, the single dot and the filled star. Denser blackwork, a coiled snake or a solid black rose all read heavier and suit a bigger canvas, which points to the big toe.
Lighter options such as a lavender sprig, the daisy-and-dot run, a single initial or the lace band suit a pinky or a second toe. The single most useful split is this: bold and black for the big toe, fine and sparse for the outer toes, and you will never have to think about whether a design is too much for the foot it is on.
Cost and Session Time
A small toe tattoo is a short session. A single solid shape takes a few minutes; a full blackwork rose or a wraparound snake can run 30 to 60 minutes. Two toes in one sitting is normal and often cheaper than booking twice, because artists charge a shop minimum or an hourly rate rather than a flat fee per design.
Rates vary widely by city, shop and artist, and the shop minimum is the number that catches people out — a tiny design still gets billed at the minimum. Ask for the minimum and the hourly rate before you book, and ask whether the second toe is charged separately. No reputable artist will need more than an hour for anything on this list.
Aftercare Basics
Start from your artist’s aftercare instructions, because they know exactly how deep they went. On top of that, the toe-specific part of recovery is mostly about friction and time.
- Keep closed shoes off the toe for the first three to four weeks. Open sandals or loose slippers only, and clean socks if the weather allows.
- Skip barefoot on sand, grass and hot pavement while the skin is still settling, and stay out of salt water and swimming pools until the surface is fully closed.
- Hold off the gym for two to three weeks, and when you go back, skip the rower, the stair climber and heavy footwork where the toe presses and rubs.
- Wait at least six weeks before a pedicure, and tell the technician it is a fresh tattoo so the file and cuticles stay well clear of it.
- Do not soak the toe to soak it off. Long hot baths soften a fresh tattoo on the foot more than most people expect, because water sits there.
- Expect a touch-up somewhere in the one to two year range. Bring the design back to the same artist, who will know exactly how deep the ink went.
Frequently Asked Questions
Do toe tattoos hurt?
More than an arm, less than most people expect. Toes have very little fat between the skin and the bone, so the needle sits close to bone and the sensation is a sharp, bright sting rather than a dull ache. The big toe and second toe sit in the middle of the range, around 3 out of 5. The pinky is usually the mildest. Sessions are short, which keeps the discomfort brief.
How long does a toe tattoo take to heal?
Four to six weeks for the surface to settle, which is longer than most other placements for the same reason the fade is faster: the toe is inside a shoe, it flexes constantly, and it sweats. The first two weeks are the tender, shiny stage. By week three the skin should look normal again. Plan on open footwear for three to four weeks, and hold off pedicures for at least six.
Will a toe tattoo blur or fade faster than other tattoos?
Yes, noticeably faster. Toes have minimal fat cushioning over the bone, so ink has less tissue to settle into, and the constant movement of walking pushes pigment out of the healing skin. Shoes add friction and trapped sweat on top of that. Solid black shapes last longest, fine line softens fastest, and a touch-up somewhere in the one to two year range is normal for toes.
Which toe is best for a first toe tattoo?
The big toe, for a first one. It has the widest flat surface, so almost any design fits without curving down the sides, and it is the easiest to see when you check healing. The pinky is the easiest session but the least forgiving for detail. The second toe is the best option if you want a design that wraps around rather than one that sits on top.
How much does a toe tattoo cost?
It depends on the shop minimum and the hourly rate rather than the design, because a toe tattoo is small. Ask for both before you book. Most artists bill a single solid shape as a very short session, and a fuller blackwork piece such as a rose or a snake as a longer one. Booking two toes at the same time is usually cheaper than two appointments, since the shop minimum is already covered.
What size should a toe tattoo be?
Between 1 and 2 centimetres for a simple shape, and slightly larger on the second toe than the pinky. That is much smaller than the same design would be on an arm, and it is the size that decides whether it stays readable. Use the cover test: hide all but one part of the design on your screen. If what is left still says what it is, it will work on a toe.
Where to Start
If this is your first toe tattoo, start with a single solid black shape on the big toe, somewhere between 1 and 2 centimetres. It is the combination most likely to still look sharp in five years, and it tells you how much the placement suits you before you commit to something more personal.
If you are adding to an existing collection, the wraparound designs on the second toe give you room to build a set that reads as a set. Either way, bring a reference image and ask your artist what they would cut from it, because the design that works on a toe is rarely the design you saved.