
20 Wisteria Tattoo Ideas (October 2026): Floral Tattoo Designs
Wisteria grows in hanging flower clusters, and that shape is the whole reason it tattoos so well. A raceme drapes exactly the way skin drapes, so these 20 wisteria tattoo ideas run from a single stem on the inner wrist to a full cascade spilling off the shoulder cap. Every entry below has a real placement, a real size range, a style name you can say out loud at a consultation, and an honest note about pain and how the linework holds up.
Spring is booking season for floral work, and wisteria is the flower most people save a picture of when they decide they are ready. Whether you want a first tattoo or the next piece in a sleeve, the deciding factor is usually not the drawing but the size you are brave enough to commit to. Read all twenty, then take two or three you like to a consultation. If you are still deciding between a botanical theme and a landscape one, the mountain and ocean tattoo pairings we covered earlier work in a similar flow-versus-drape way.
20 Wisteria Tattoo Ideas: Quick Guide
| Idea | Style | Best placement | Size | Pain |
|---|---|---|---|---|
| 1. Fine-line hanging cluster | Fine line, single-needle black | Inner forearm | 2 x 3 inch | Low |
| 2. Realistic purple cascade | Realism, colour | Outer forearm | 3 x 5 inch | Low to medium |
| 3. Blackwork vine | Blackwork, heavy fill | Upper arm, wrapping | 3 x 6 inch | Medium |
| 4. Watercolour spray | Watercolour, no outline | Shoulder blade | 4 x 5 inch | Low |
| 5. Micro cascade on collarbone | Micro fine line | Collarbone | 1.5 x 2.5 inch | Medium |
| 6. Wisteria and peony bouquet | Colour botanical | Thigh | 5 x 7 inch | Low |
| 7. Crescent moon wisteria | Fine line with pale wash | Back of upper arm | 3 x 4 inch | Low |
| 8. Wisteria with small butterfly | Soft colour realism | Ankle | 2.5 x 3.5 inch | Medium |
| 9. Songbird in a branch | Illustrative fine line | Rib area | 4 x 5 inch | High |
| 10. Minimal stem on the wrist | Minimal fine line | Inner wrist | 1.5 x 3 inch | Medium |
| 11. Forearm garland | Horizontal colour botanical | Inner forearm | 8 x 2.5 inch | Low to medium |
| 12. Indigo to lavender gradient | Colour gradient, single raceme | Calf | 2 x 6 inch | Low |
| 13. Dotwork rain | Dotwork | Outer upper arm | 4 x 7 inch | Medium |
| 14. Geometric fan | Geometric with muted violet | Sternum | 5 x 6 inch | Medium |
| 15. Rib trail | Realistic colour | Side ribs | 8 x 4 inch | High |
| 16. Ankle trail | Fine line | Above the ankle bone | 4 x 3 inch | Medium to high |
| 17. Shoulder-cap cascade | Colour botanical | Outer shoulder cap | 9 x 6 inch | Medium |
| 18. Black and grey behind the ear | Black and grey realism | Behind the ear | 3 x 2 inch | Medium to high |
| 19. Matching mini pair | Micro fine line | Both inner forearms | 1.5 x 2.5 inch each | Medium |
| 20. Sculptural sleeve element | Sculptural realism, deep violet | Upper arm, sleeve | 12 x 8 inch | Medium to high |
1. Fine-Line Hanging Wisteria Cluster
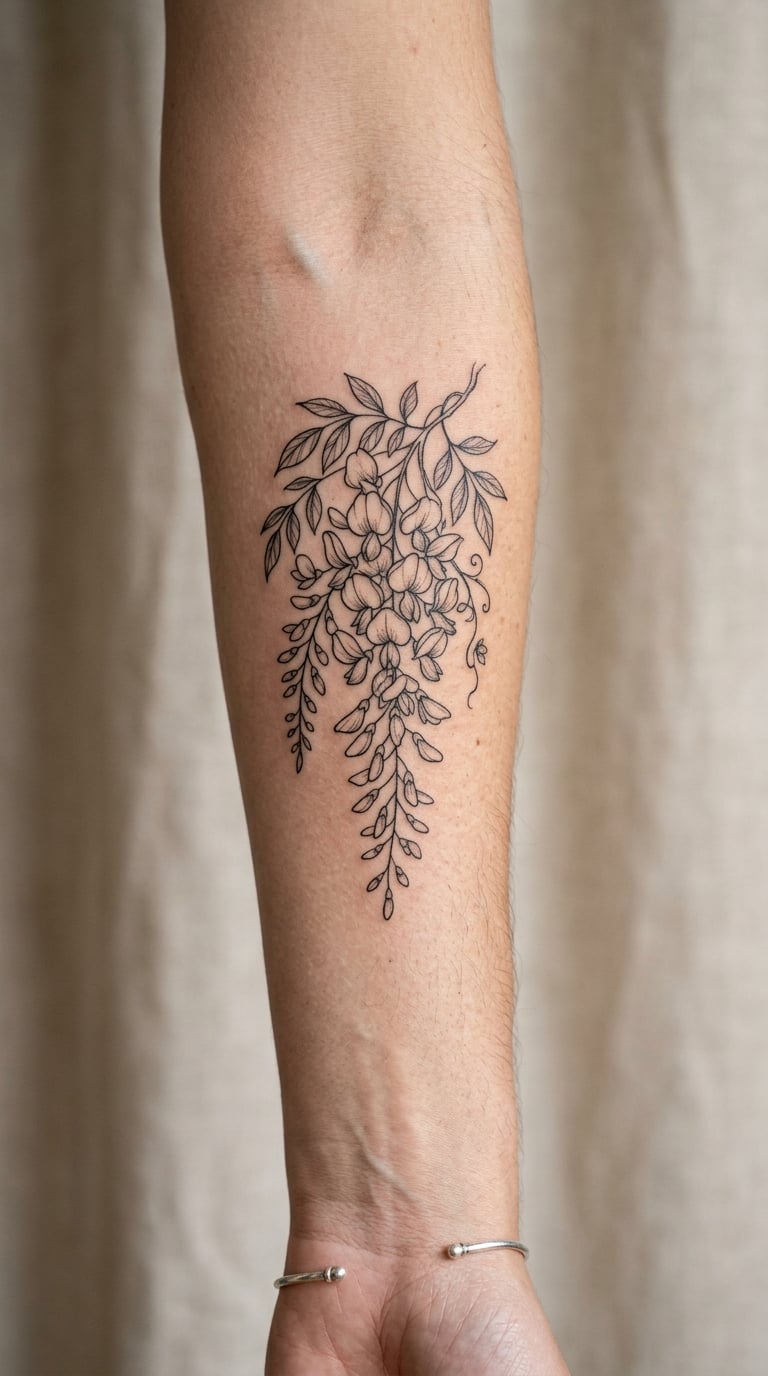
This is the one I send to people who tell me they want to start small. A single stem curves in from one side, three racemes hang off it at staggered lengths, and a few narrow leaves fill the gaps. Everything is single-needle black with no shading at all, which is what keeps the negative space doing the work.
Grace and patience are the readings people attach to it, largely because the flower clusters hang rather than reach. As a first floral tattoo it is forgiving, since there is little colour to muddy and no tiny detail below needle size.
Placement: inner forearm, upper inner arm, or the outer bicep on someone who does not want a wrist piece.
Size: 2 x 3 inch (5 x 7.5 cm) is the realistic minimum; anything under 2 inches tall turns to mush.
Style: fine line, single-needle black.
Pain: low. Inner forearm feels like a constant scratchy sunburn. Ageing note: hairlines on the inner arm soften within five years or so, so a touch more weight now saves you a touch-up later.
Make it yours: add one leaf in pale green and keep everything else black. A single colour accent reads deliberate rather than unfinished.
2. Purple Wisteria Cascade in Realism
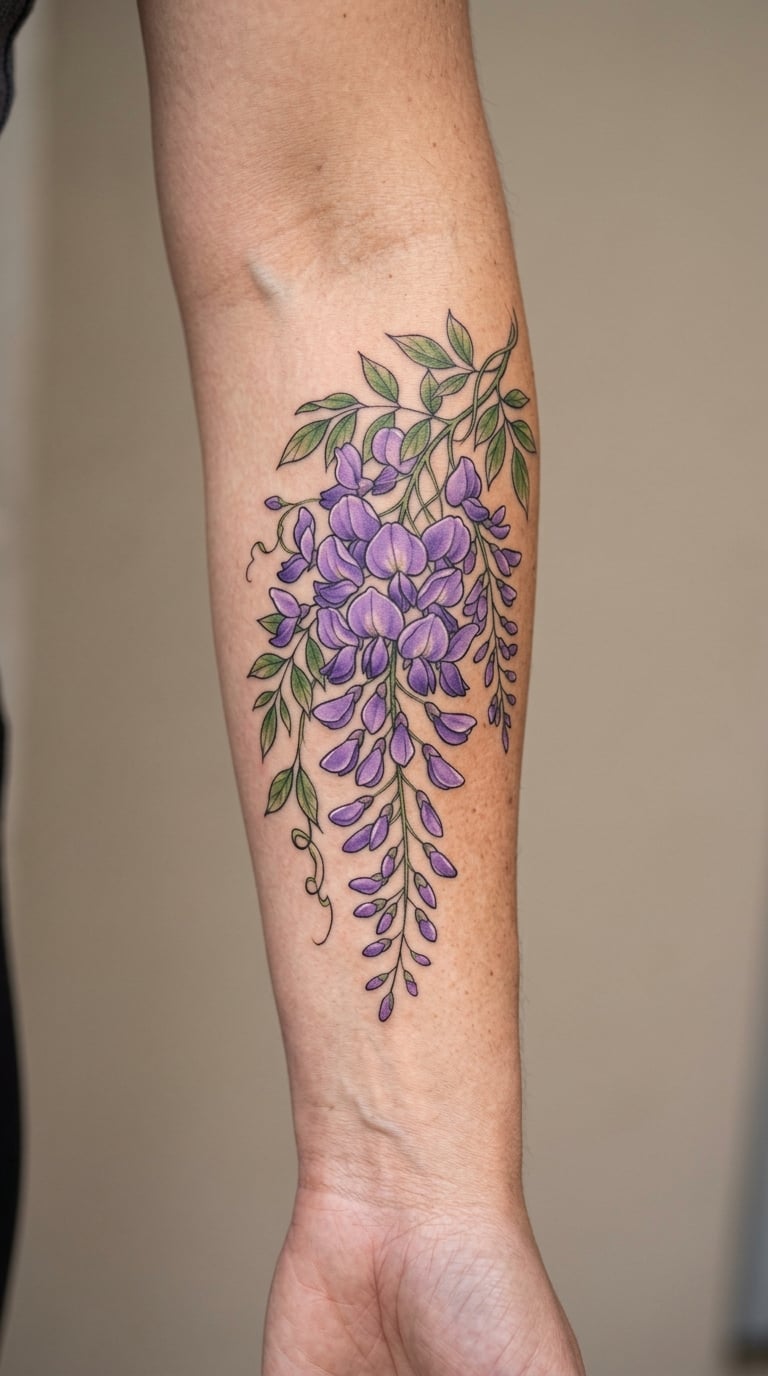
Here the petals are built up in layers: deep violet at the base of each bloom, lighter lavender toward the tips, a soft green leaf behind, and enough white space left unpainted that the flowers keep their edges. Shading is the whole trick, because realistic wisteria is not about detail so much as depth.
People choose this one when they want the flower to look alive rather than decorative. It suits a memorial piece too, since it reads like a real cutting someone clipped from a garden.
Placement: outer forearm running vertically, upper arm, or the back of the calf.
Size: 3 x 5 inch (7.5 x 12.5 cm) is where the shading has room to work.
Style: colour realism with soft shading.
Pain: low to medium. Colour packing over a shaded area is a deeper sting than linework but nothing dramatic. Ageing note: pale lavender is the first pigment to fade, so plan on a colour refresh every few summers.
Make it yours: bring a photo of a real wisteria arch you have walked under and let the artist copy the exact colour mix from it.
3. Blackwork Wisteria Vine
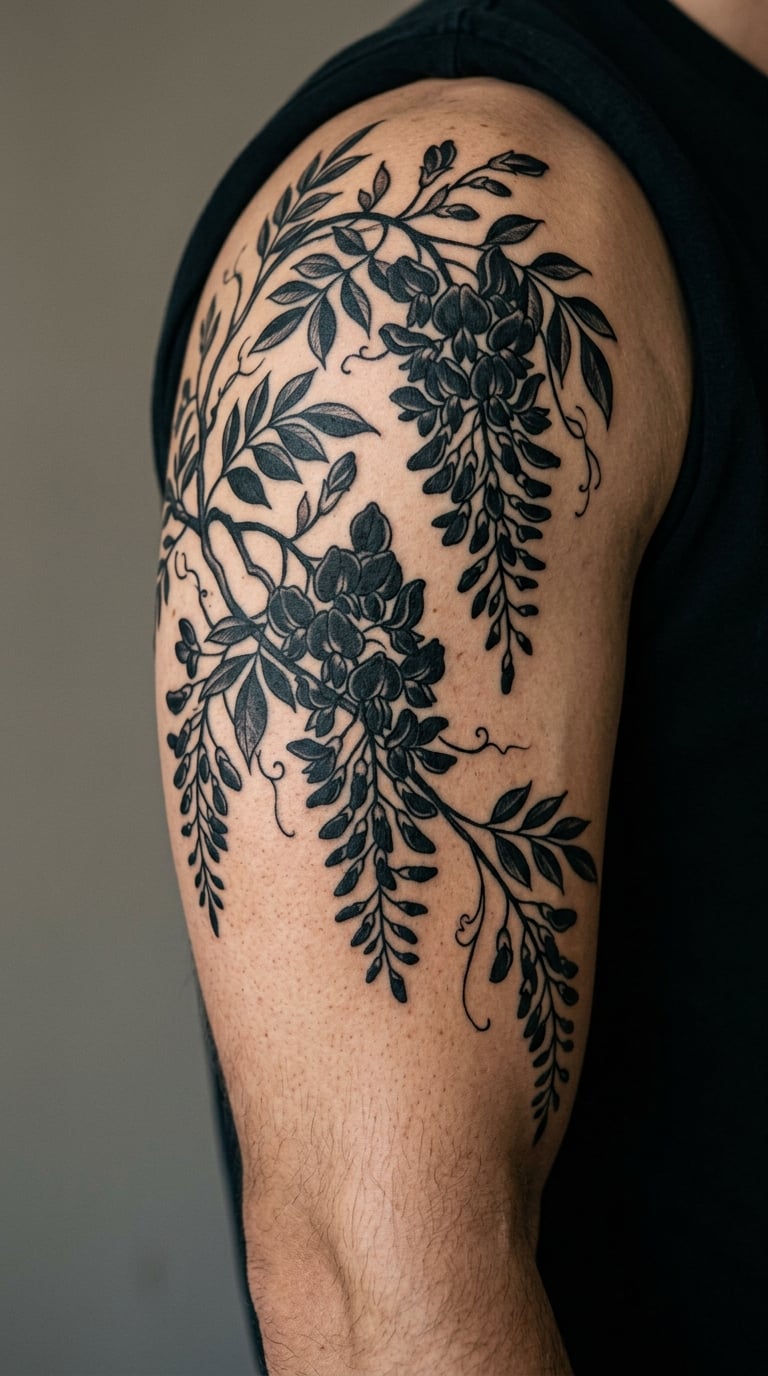
This one throws out the delicacy. Solid black petals, heavy stems, no shading gradients, and a thick twisted vine that wraps the arm so the design reads as one continuous line. The flowers become shapes rather than flowers, which is why it survives at almost any size.
It is the least romantic option and the boldest. If your existing ink is heavy and mostly black, this is the piece that will not look out of place next to it.
Placement: upper arm, wrapping, forearm, or calf. Wrapping pieces need a stencil map so the pattern flows around the limb rather than across it.
Size: 3 x 6 inch (7.5 x 15 cm) for a standalone vine, larger if it wraps.
Style: blackwork with solid fills.
Pain: medium. Large solid areas take longer and the needle has to keep moving to avoid a hot spot. Ageing note: black linework is the most durable ink you can ask for, so this is the safest of the twenty.
Make it yours: let the vine wrap the arm and put your birth year in the negative space where a stem forks.
4. Watercolour Wisteria in Purple and Blue
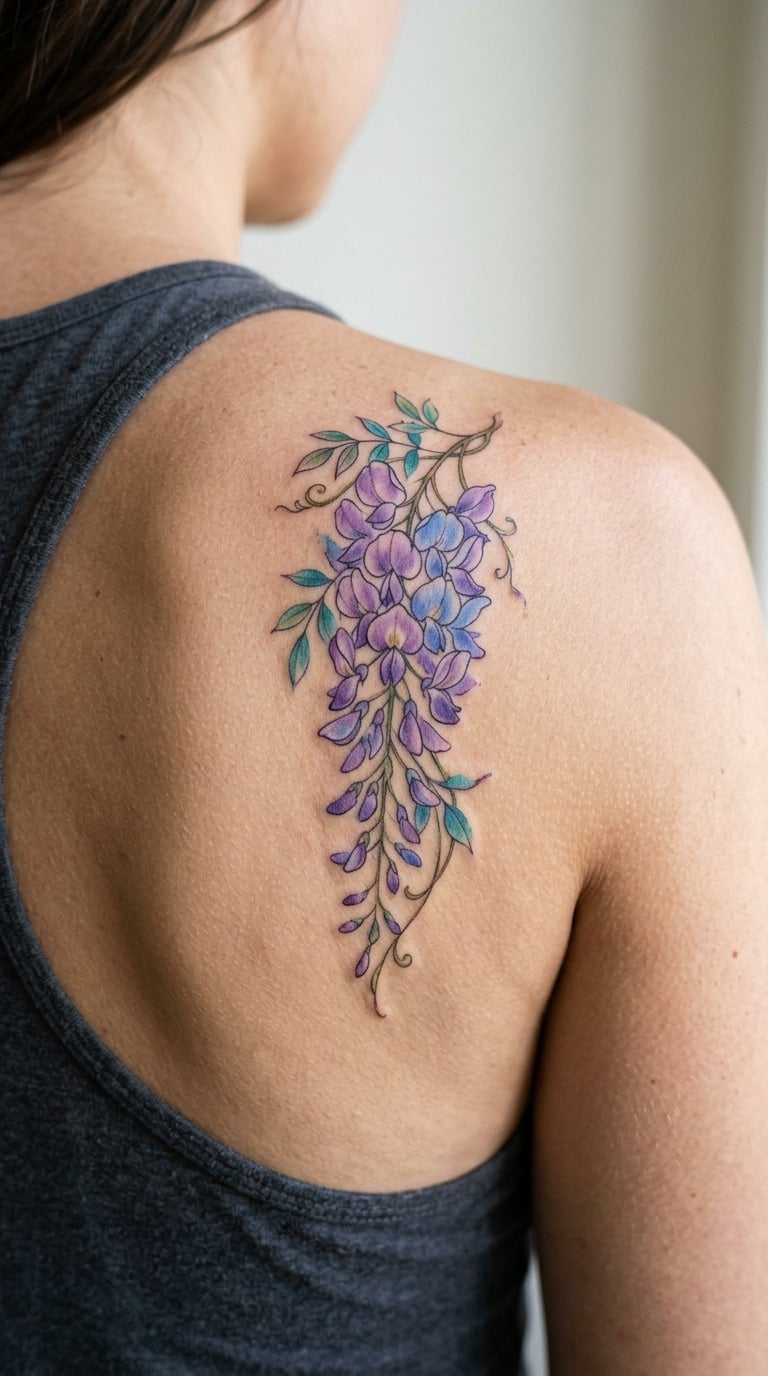
No outline at all here. Loose washes of violet and blue-violet bleed into each other, with a few darker pigment pools where the flowers overlap. It looks like the cluster was brushed on rather than drawn, and the edges stay soft.
Watercolour florals get chosen when someone wants colour without the heaviness of a fully rendered piece. It is a forgiving style for a placement that curves, because nothing needs to follow a hard edge.
Placement: shoulder blade, upper back, outer thigh, or the calf. Flat-ish planes of skin show the wash best.
Size: 4 x 5 inch (10 x 12.5 cm); larger if you want the bleed to run.
Style: watercolour, no outline.
Pain: low, since most of it is one pass of light wash. Ageing note: pale washes lose their edges first, so the soft look can drift toward a smudge over time.
Make it yours: pick two purples that you already own on another tattoo and ask the artist to match them exactly.
5. Micro Cascading Wisteria on the Collarbone
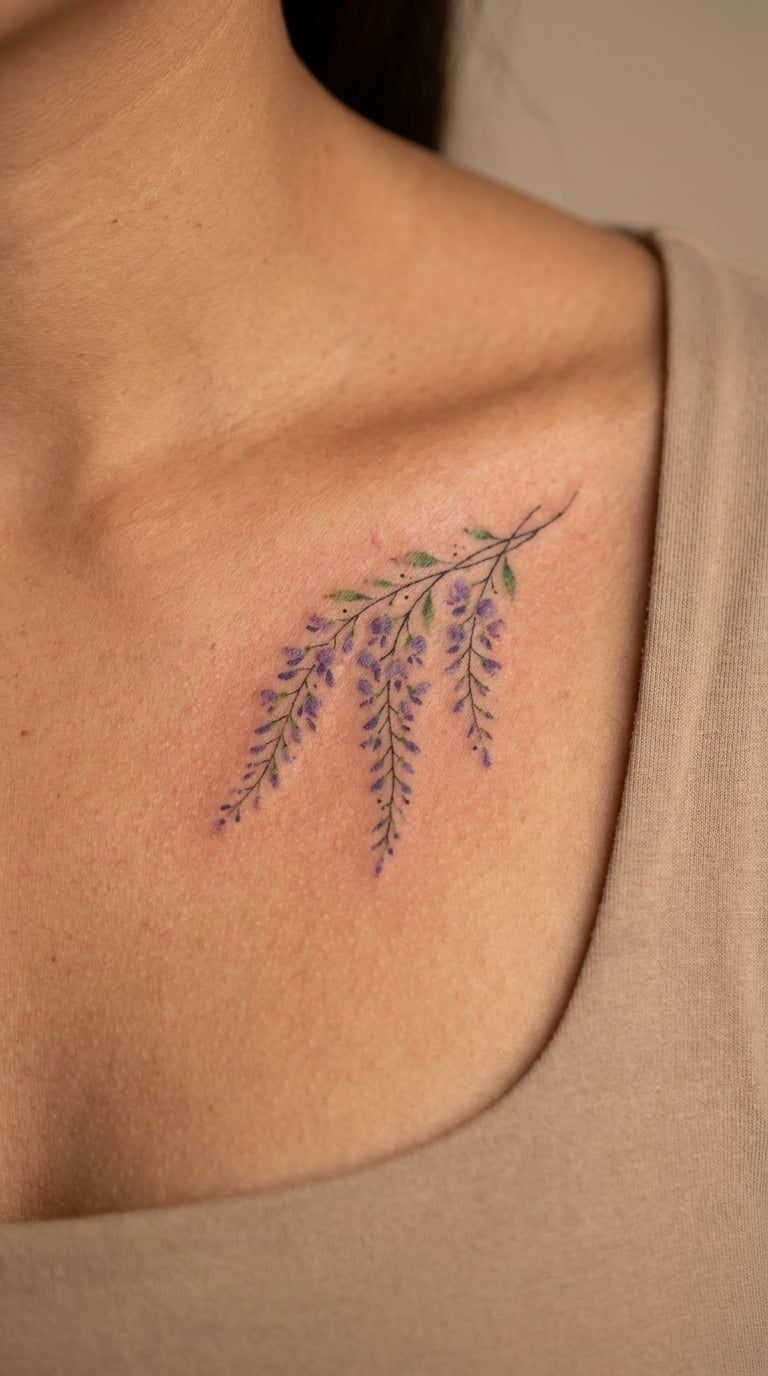
Three narrow trails, each one a few tiny blooms in a line, spaced evenly along the collarbone rather than bunched together. The trick here is proportion: micro work reads as elegant only when the gaps between elements are as deliberate as the elements themselves.
It is a visibility trade-off. Collarbone pieces look fantastic in a top with a wide neckline, and they sit in a spot that moves with every breath, which shifts the line slightly as you heal.
Placement: collarbone, sternum top, or the upper chest between the breasts.
Size: 1.5 x 2.5 inch (4 x 6 cm) for the full run of three trails.
Style: micro fine line.
Pain: medium. Bone-adjacent skin has very little padding, so expect more feedback than the size suggests. Ageing note: this is the first design on the list that will genuinely need a refresh in a few years.
Make it yours: have one trail a fraction longer than the others. Symmetry is what makes micro work look machine-made.
6. Wisteria and Peony Bouquet
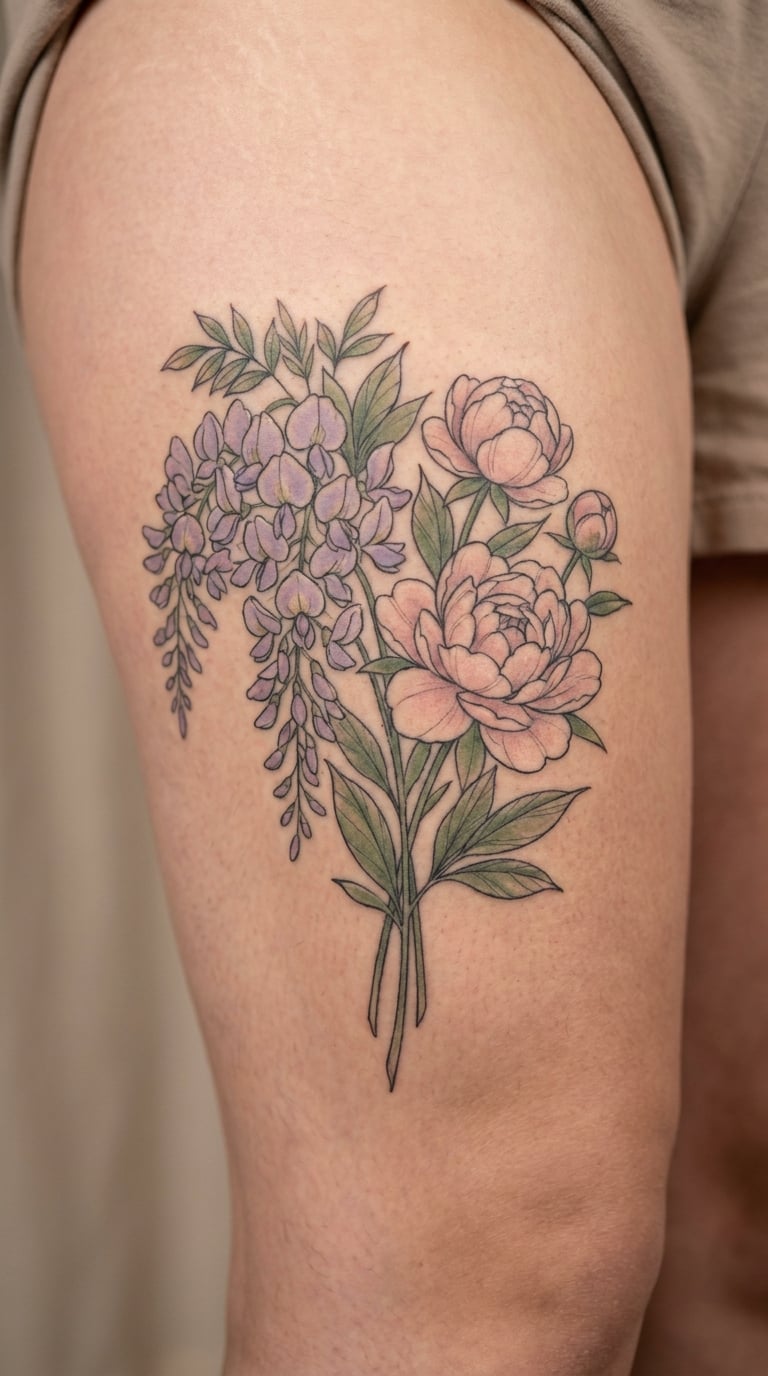
Two very different flowers sharing one composition: soft hanging wisteria behind big round peony blooms in blush pink, with a few eucalyptus-style leaves tying them together. The contrast between the drooping raceme and the heavy round peony is the entire point of the design.
Bouquet formats suit people who think of a tattoo as a keepsake rather than a symbol. If you are choosing a wisteria tattoo to sit inside a larger floral piece, this is the format that gives future filler flowers somewhere to go.
Placement: outer thigh, hip, upper arm, or lower back. A flat area gives the bouquet room to breathe.
Size: 5 x 7 inch (12.5 x 18 cm); smaller than this and the peonies lose their roundness.
Style: colour botanical with soft shading.
Pain: low. The thigh is one of the least reactive areas on the body, though large filled areas take time. Ageing note: pink and lavender shift tone at different rates, so expect a slightly warmer look after a few years.
Make it yours: add a third flower you actually want on skin, and tell your artist what the sleeve should grow into so the palette is set now.
7. Crescent Moon Wisteria
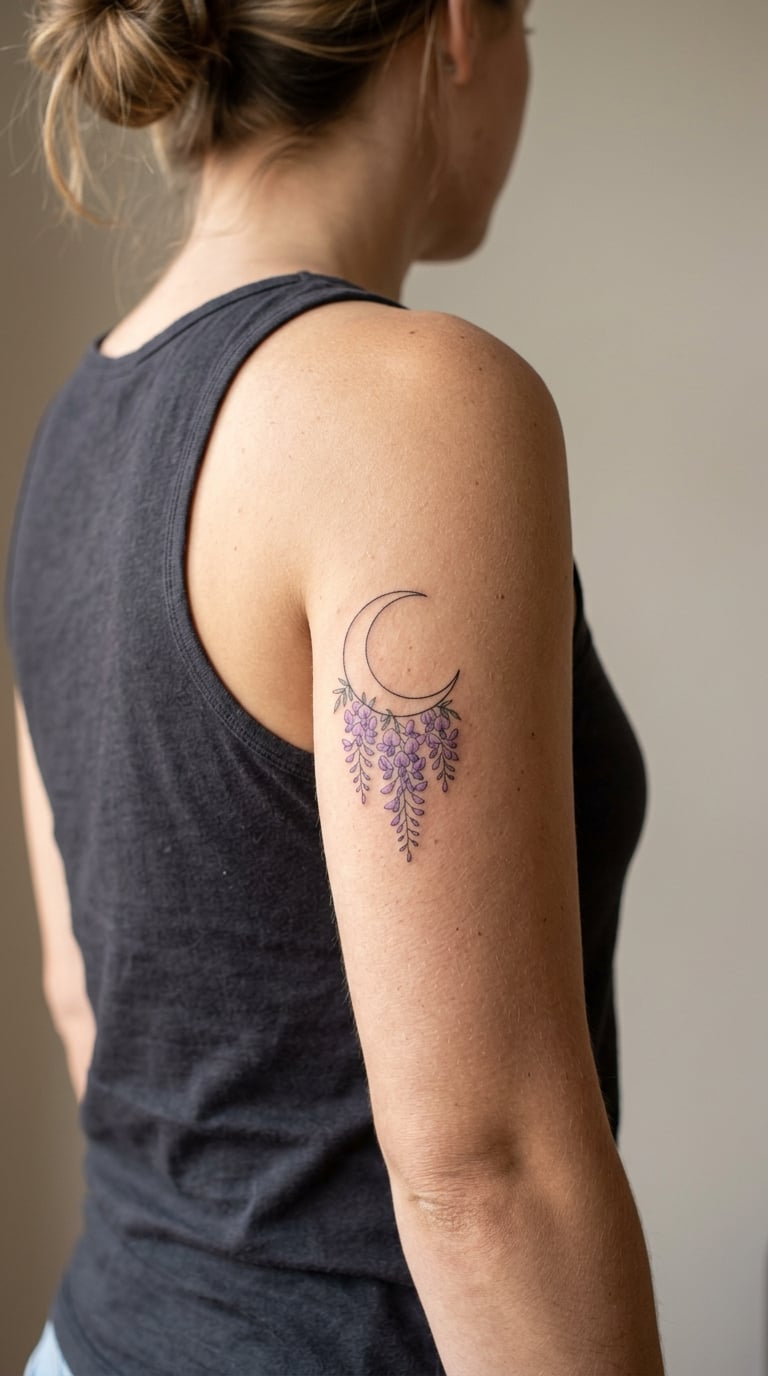
A thin crescent sits at the top, drawn as a single confident line, with three wisteria trails descending from its lower curve like moonbeams made of flowers. A very light lavender wash fills the petals while the moon stays black, so the contrast does the work without heavy ink.
The moon carries the meaning here, not the flower. Most people choose this for the lunar association rather than for wisteria symbolism, so the design ends up being about cycles and timing.
Placement: back of the upper arm, outer shoulder, or behind the calf. Anywhere with a soft curve that echoes the crescent.
Size: 3 x 4 inch (7.5 x 10 cm).
Style: fine line with a pale wash.
Pain: low. The upper arm is unremarkable. Ageing note: the crescent is a single thin line, so protect it or plan on a retrace.
Make it yours: place a meaningful date in the open space under the crescent in the same hairline weight.
8. Wisteria with a Small Butterfly
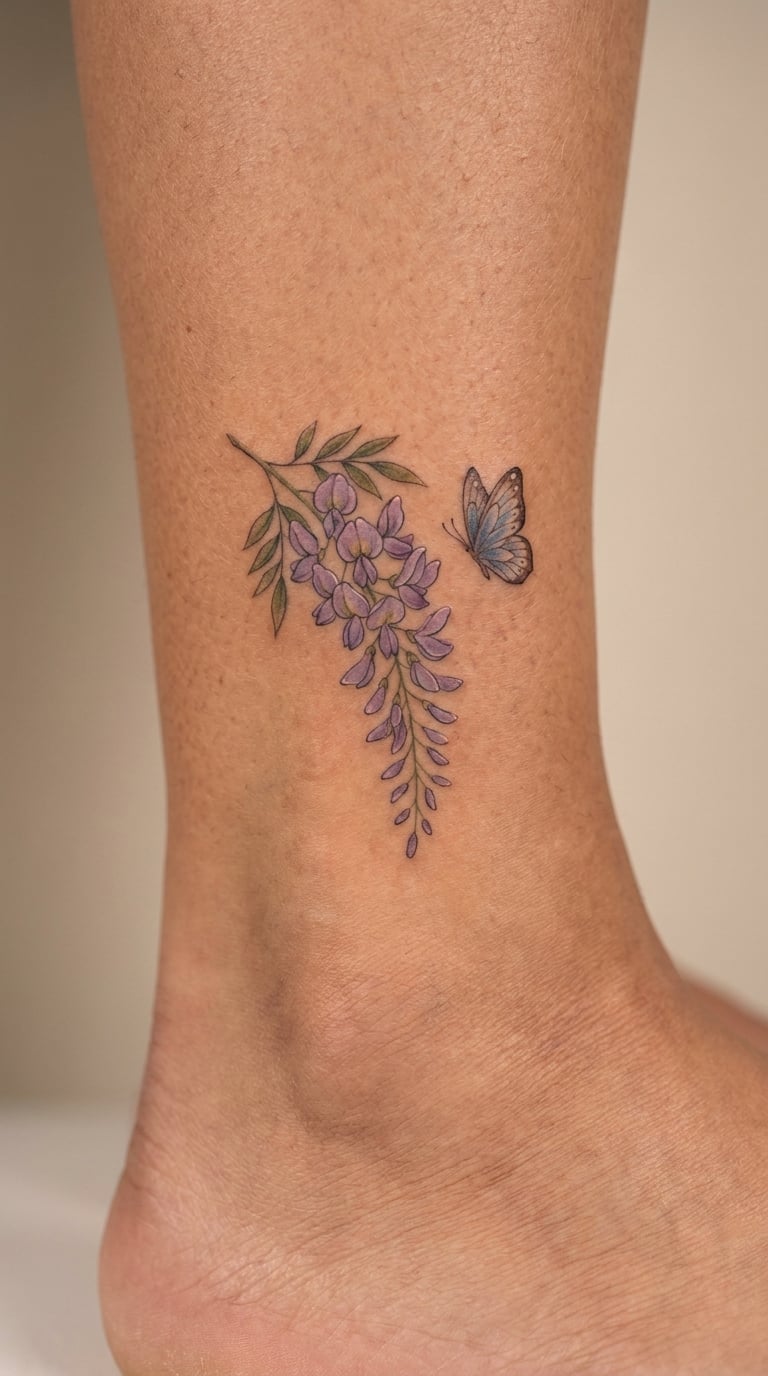
A short wisteria sprig, maybe five blooms, with one butterfly set slightly off to the side rather than centred in the flowers. The insect is small enough to stay secondary, which is what keeps this from turning into a novelty piece.
Butterfly motifs are usually chosen for change and transition, so this design tends to end up as a marker tattoo for a year or a chapter rather than a set piece. It is also one of the easiest of the twenty to add to later.
Placement: ankle, wrist, back of the hand, or behind the ear.
Size: 2.5 x 3.5 inch (6 x 9 cm).
Style: soft colour realism with light line detail.
Pain: medium. The ankle is close to bone and the skin there is thin and sensitive. Ageing note: ankles rub against shoes, so ask your artist to keep the butterfly outline above 1 mm.
Make it yours: match the butterfly to a real species you have seen rather than a generic shape. Small, and it stops looking like clip art.
9. Songbird in a Wisteria Branch
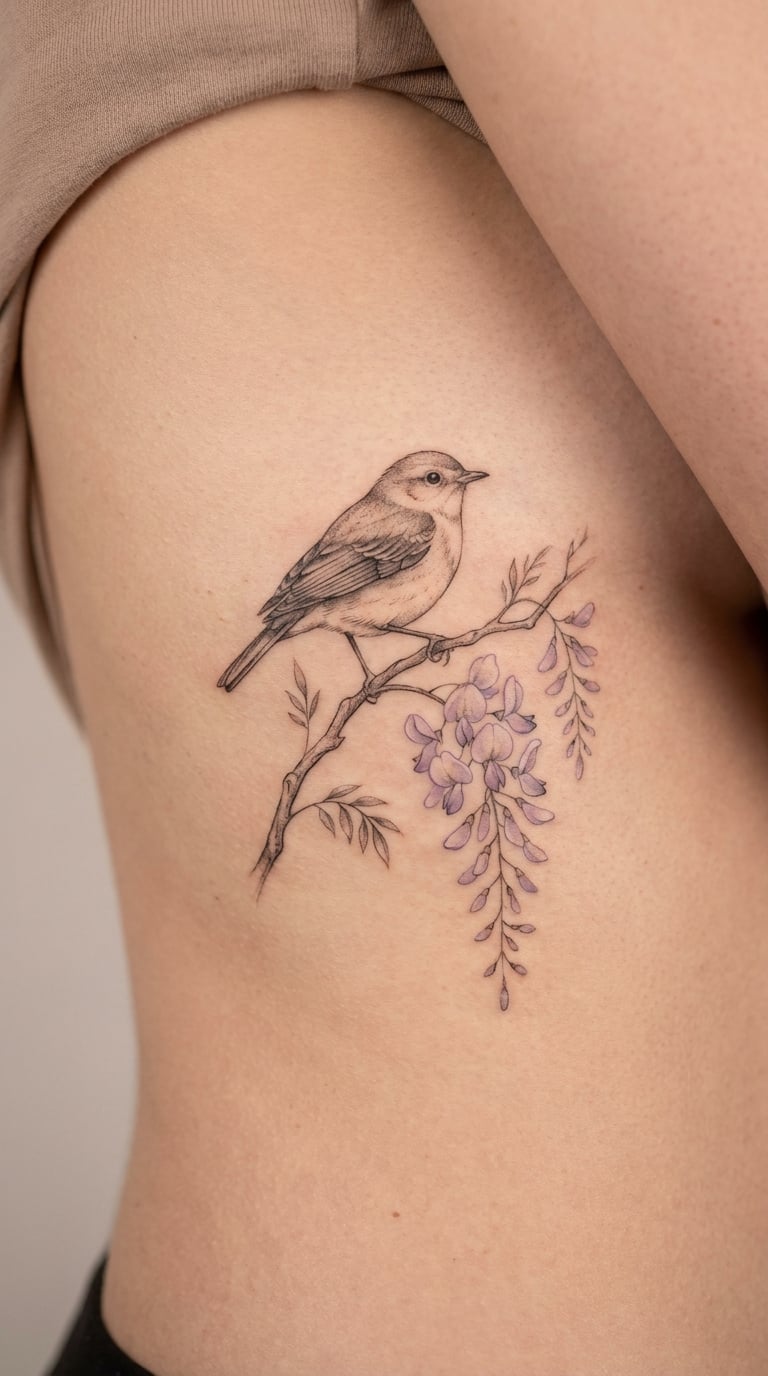
A small bird sits in the fork of a wisteria branch, drawn in illustrative fine line with a few feather strokes, while pale purple racemes hang above and below it. The stems curve around the bird rather than crossing it, so the eye lands on the bird first and the flowers second.
Flowers and birds together usually mean contentment and a settled life, so this is a design people give after a change of direction rather than during one. The narrative scene is the reason it needs more space than a plain cluster.
Placement: rib area, side thigh, upper arm, or the back of the shoulder. Avoid putting it over a joint.
Size: 4 x 5 inch (10 x 12.5 cm) minimum for the bird to hold its shape.
Style: illustrative fine line with light colour.
Pain: high. Ribs are the most consistently reported difficult spot on this list, and you cannot take a break without the design shifting. Ageing note: feather lines blur first, so keep the wing detail simple.
Make it yours: name the bird that actually visits your garden or window and have the artist sketch that species from a reference photo.
10. Minimal Wisteria Stem on the Wrist
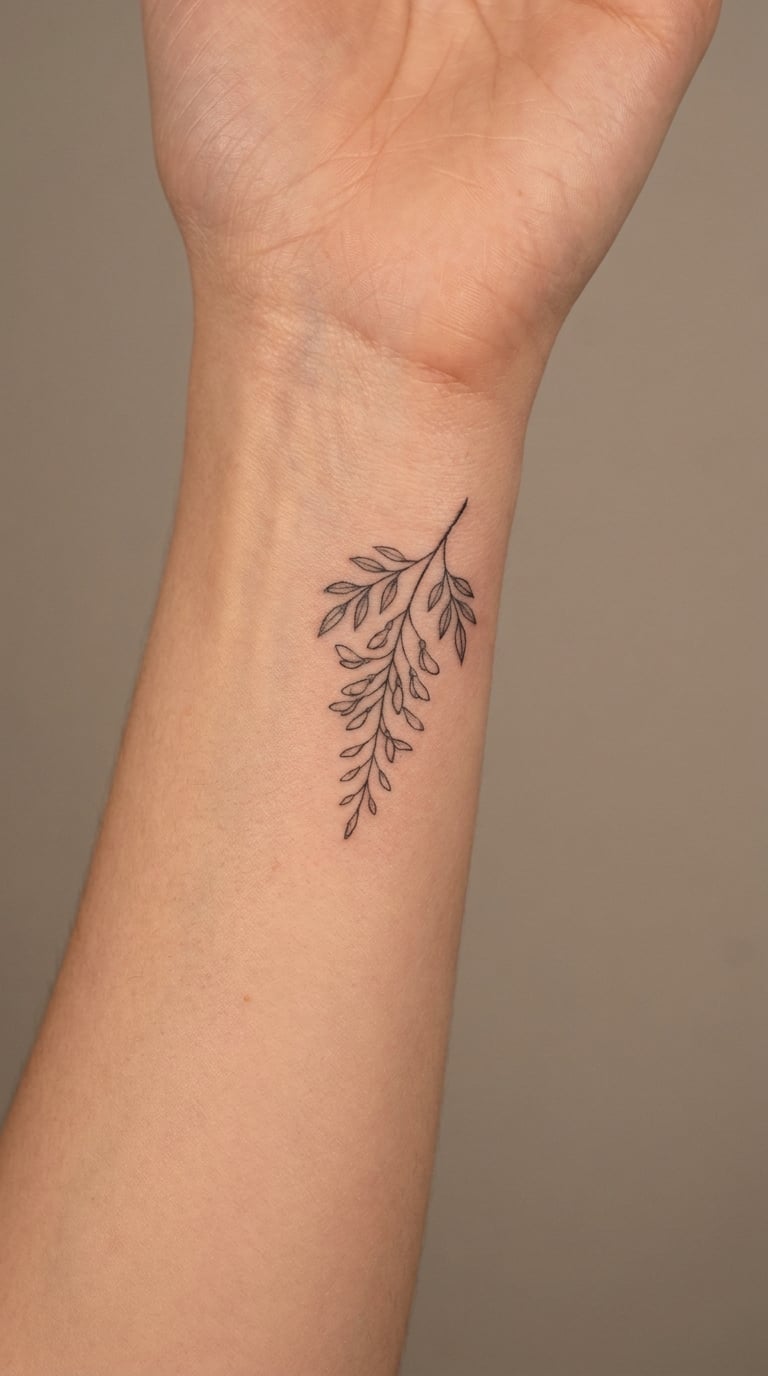
One stem, four or five small blooms, two leaves, nothing else. No shading, no wash, no background. It is the smallest piece on this list that still looks like a wisteria tattoo rather than a smudge, and that balance is genuinely difficult to draw.
Most people pick this as a first tattoo because it is quick and low commitment. The honest drawback is that inner wrist linework is the first place to blur, since that skin moves constantly and sees sun constantly.
Placement: inner wrist, the crease of the wrist, or the back of the wrist near the thumb.
Size: 1.5 x 3 inch (4 x 7.5 cm).
Style: minimal fine line.
Pain: medium. The inner wrist is a nerve-dense area and a small tattoo is often more uncomfortable than a large one on the arm. Ageing note: expect a refresh here. That is normal and not a sign of a bad tattoo.
Make it yours: run the stem along the wrist crease instead of across it, so bending your hand does not compress the line.
11. Forearm Wisteria Garland
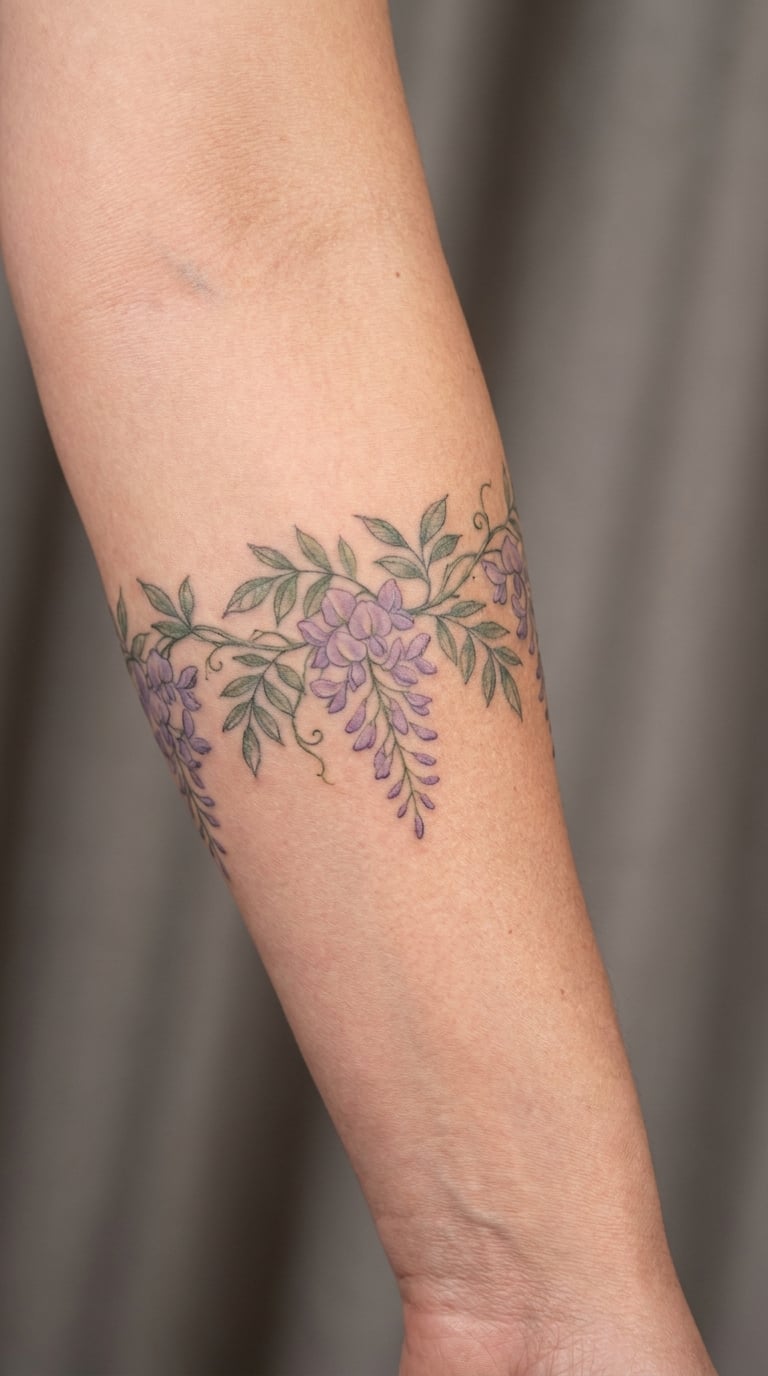
Linked racemes laid out horizontally along the forearm, each cluster slightly different in size and angle, with a thin connecting vine running under them. Horizontal is the point of this design. Most wisteria reference photos stack vertically, and a garland follows the arm instead of fighting it.
It reads well next to a small wrist tattoo because it starts above the wrist crease and leaves that space alone. If you are building a forearm piece over time, this is the segment that fills the middle section nicely. You might like the pine forest forearm tattoo ideas we put together for the same reasoning about how a forearm composition is laid out.
Placement: inner or outer forearm, running along the limb.
Size: 8 x 2.5 inch (20 x 6 cm) for a full inner-forearm run.
Style: horizontal colour botanical.
Pain: low to medium. Long sessions on the forearm get uncomfortable on muscle fatigue rather than sharp pain. Ageing note: the long thin vine is the weak point, so keep the lower clusters larger than the upper ones.
Make it yours: alternate two cluster sizes in a rhythm instead of a repeating pattern, and keep the vine running under every third cluster only.
12. Indigo-to-Lavender Gradient Raceme
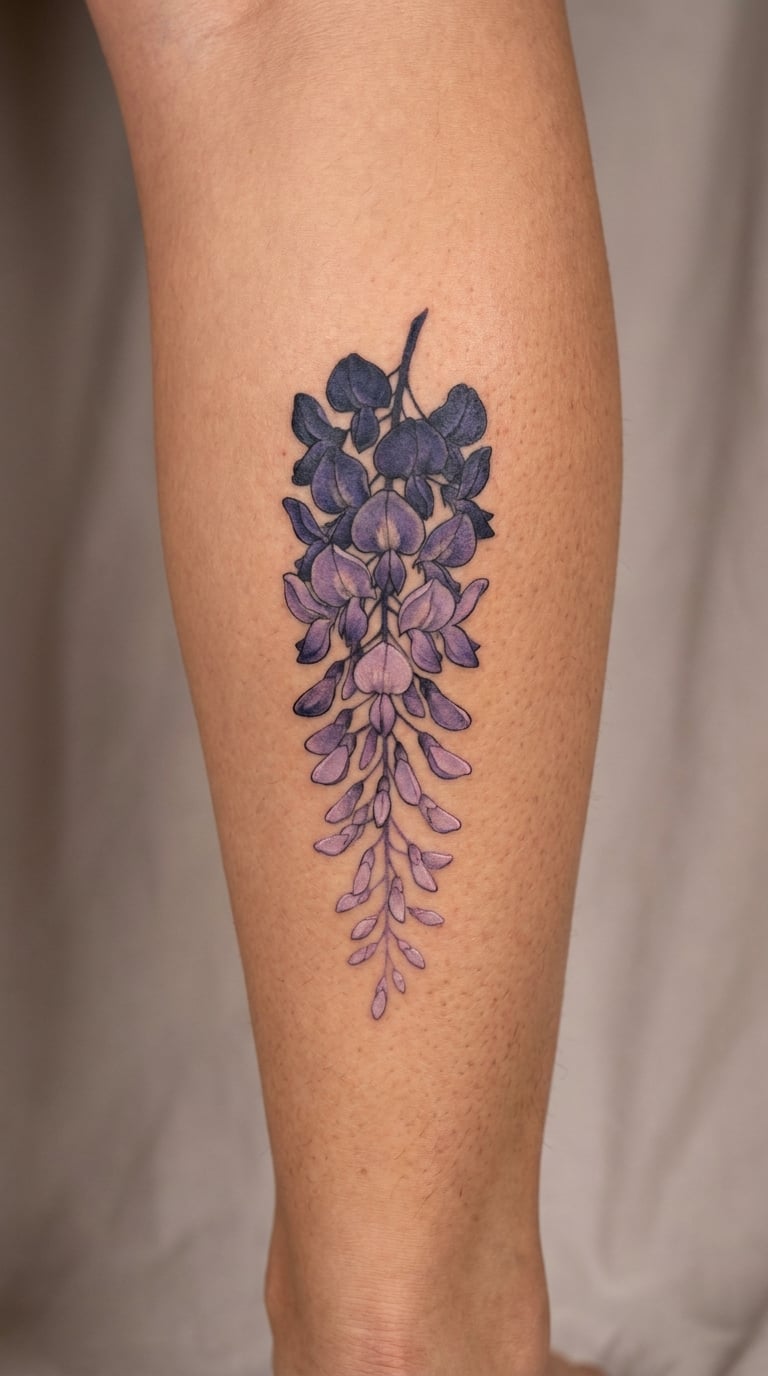
One raceme, six inches tall, that starts deep indigo at the stem and fades to almost white lavender at the tip. The blending has to be controlled because a transition that looks smooth on paper can band on skin if the artist lays the pigment too thick.
Colour gradation is chosen when someone wants a statement without a solid black block. It is also a good demonstration piece to bring a portfolio, since it shows the artist’s colour control more than most pieces do.
Placement: calf, outer forearm, or the side of the thigh, running vertically.
Size: 2 x 6 inch (5 x 15 cm).
Style: colour gradient on a single raceme.
Pain: low. The calf is well padded. Ageing note: the pale tip is the first part to wash out, so expect a touch-up on the light end sooner than the dark end.
Make it yours: reverse the gradient so it is light at the top and deep at the base, which reads as the flowers opening upward.
13. Dotwork Wisteria Rain
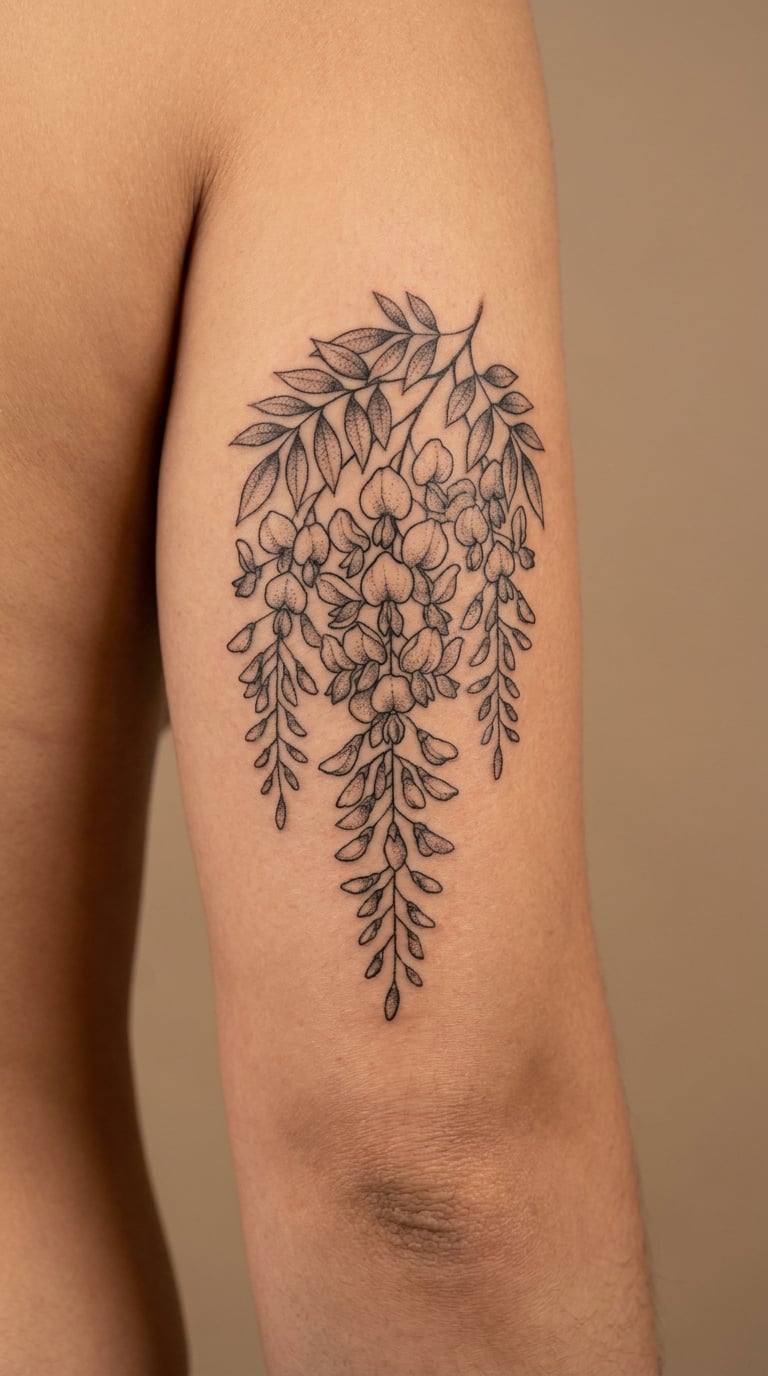
Made entirely of dots, with no lines at all. Density does the work: tight, dark dots at the top of each cluster, spaced further apart as they fall, so the design reads as petals dropping through air. It takes a long session and the result is very hard to photograph well, which is part of its charm.
People choose dotwork because it holds detail unusually well as the skin ages. It suits anyone who wants the wisteria shape without a traditional floral look.
Placement: outer upper arm, forearm, thigh, or back of the calf. Flat surfaces show dot gradation best.
Size: 4 x 7 inch (10 x 18 cm).
Style: dotwork, hand-stippled.
Pain: medium. The sensation is repetitive rather than sharp, and the length is the real challenge. Ageing note: dots spread very slightly with age, which softens the edges of the pattern. Plan for that.
Make it yours: have the lowest dots trail off into nearly nothing at the bottom, so the design dissolves instead of ending.
14. Geometric Wisteria Fan
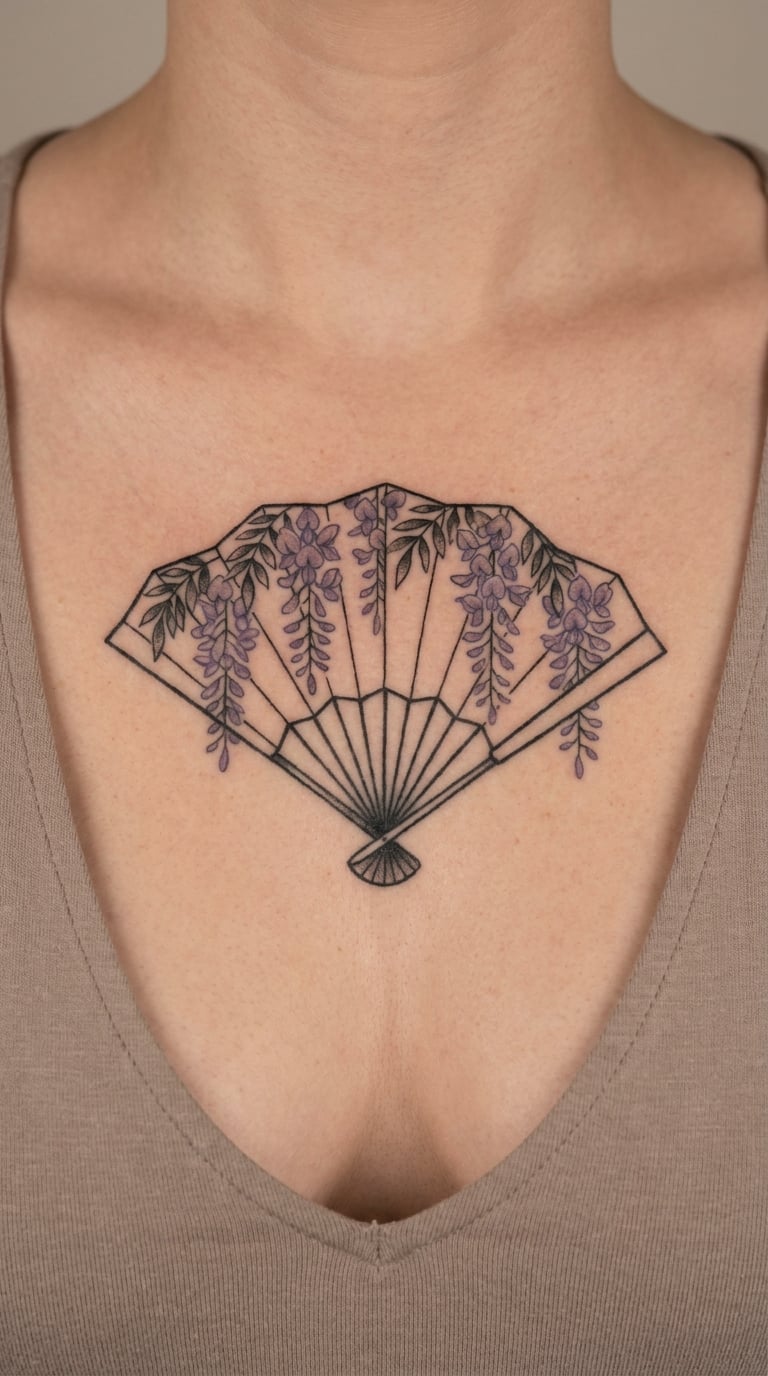
A symmetrical arch or fan of stylised wisteria, built from clean repeated shapes inside a defined border. The flowers are reduced to overlapping semicircles, with just a few muted violet fills breaking the black. It is the most modern option here.
Symmetry is often less about personality than about placement, because a sternum piece reads wrong if it tilts. This style solves that by being structured.
Placement: sternum, chest, or centre back between the shoulder blades.
Size: 5 x 6 inch (12.5 x 15 cm).
Style: geometric with muted colour accents.
Pain: medium. The sternum is bony, and centre chest placements also sit close to bone at the top. Ageing note: geometric linework stays crisp for years, while the pale violet fills fade first.
Make it yours: change the number of fan segments to match a number that means something to you. Three, five, seven all work.
15. Wisteria Curving Around the Ribs
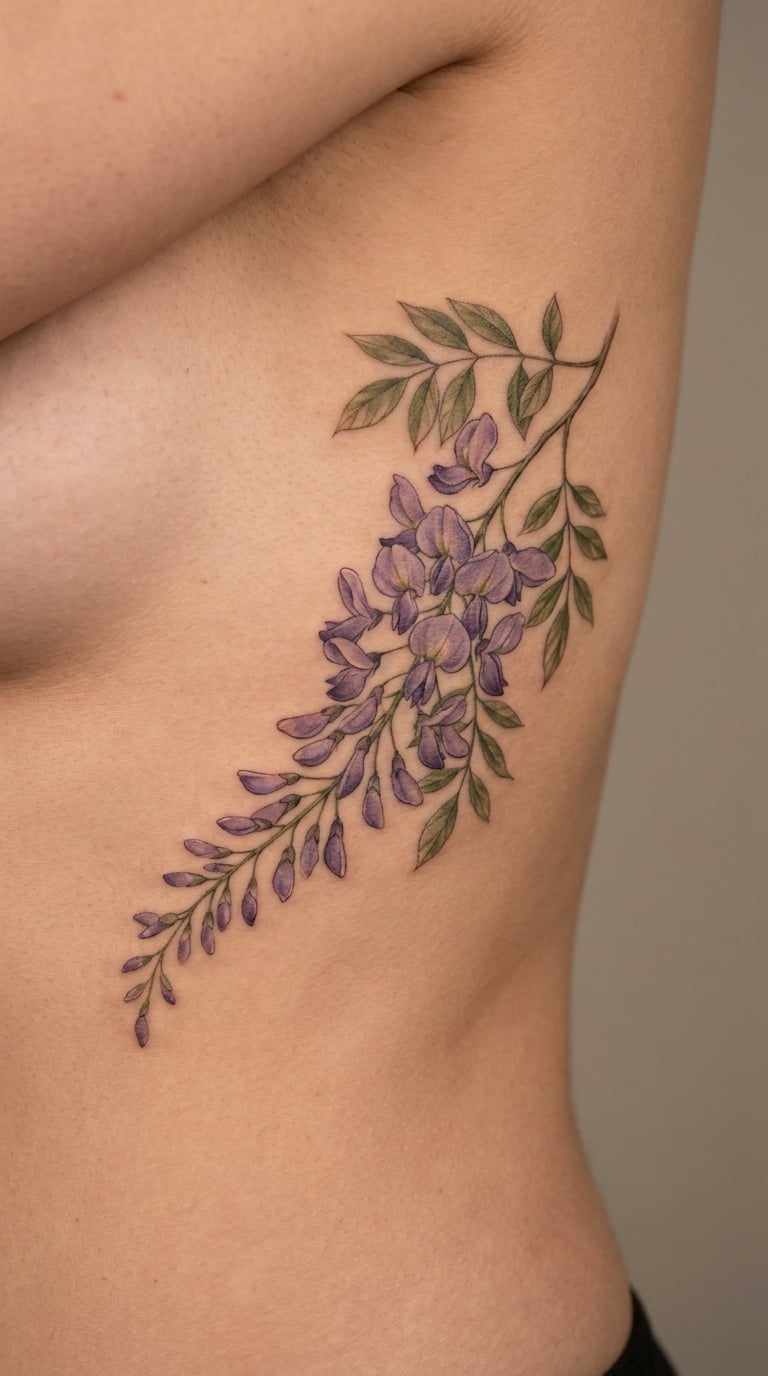
A long trail of realistic wisteria running from under the arm down and around toward the waist, following the curve of the ribcage. The spacing of the clusters is planned around the body curve so the piece looks like it is growing with you rather than sitting on top of you.
Flowing trails like this tend to be chosen as the main piece of a collection, so think about what sits beside it later. Scene-inspired pieces, the kind we cover in our mountain and ocean tattoo ideas, pair well with a rib trail because both depend on the same curve. If you want something more symbolic instead, read our guide to tattoo ideas that symbolise growth before you commit.
Placement: side ribs, wrapping from the side toward the back, or along the outer thigh.
Size: 8 x 4 inch (20 x 10 cm).
Style: realistic colour with light shading.
Pain: high, and it is worth planning for. Ribs and the waist crease are both difficult, and the piece may need two or three sessions with breaks. Ageing note: skin stretches here, so a design that looks tight while healing can settle into fine lines later.
Make it yours: start the trail at a point that means something and end it where you want that chapter to close. Direction carries meaning in a piece this long.
16. Trailing Wisteria Around the Ankle
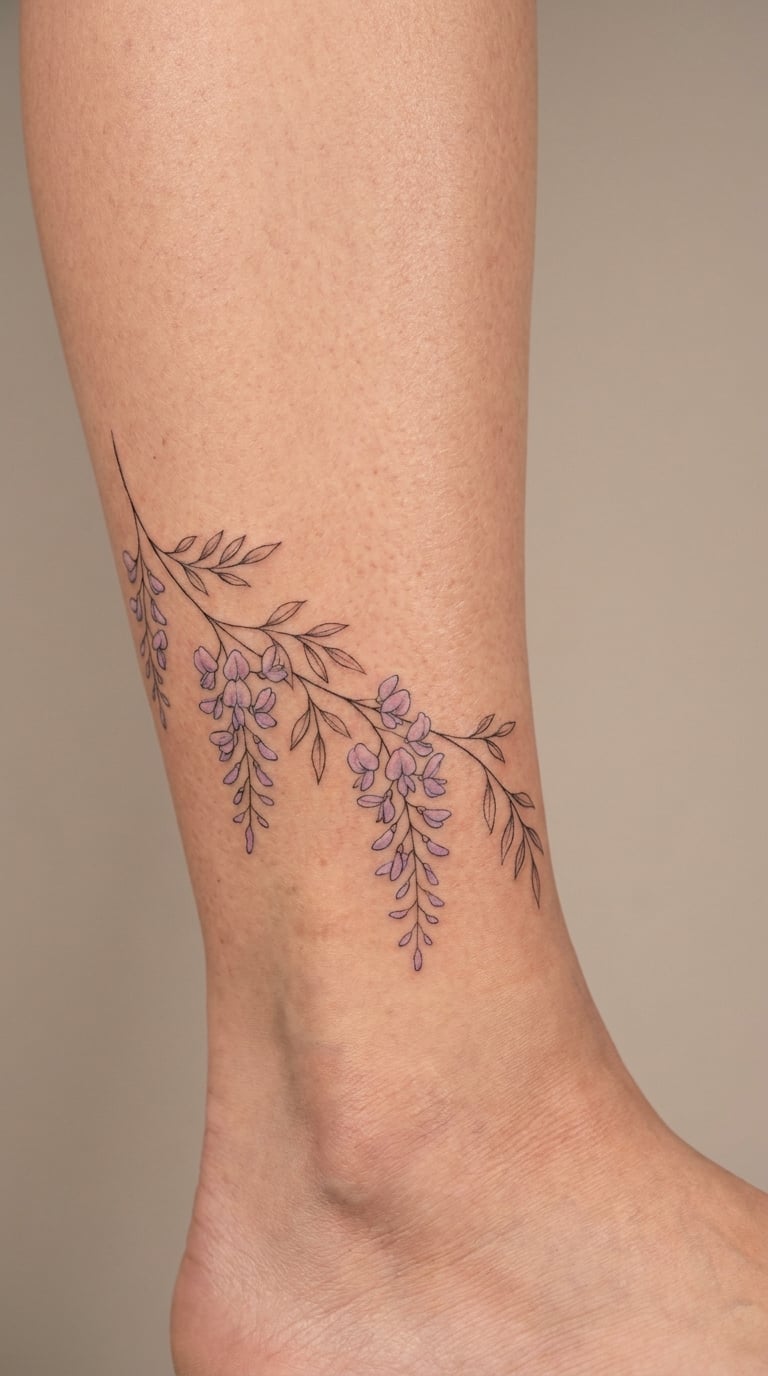
A curved trail that follows the line of the ankle bone, with four or five small clusters and plenty of open skin between them. Fewer details than a cascade and a deliberate arc instead of a drop, because the bone gives you a natural line to copy.
Ankle florals are popular partly for where they sit in a life. They are easy to hide at work, and they show when you want them to. The plant itself reads as patience and graceful endurance for people who chose it that way.
Placement: above the ankle bone on the inner or outer ankle, or running down toward the heel.
Size: 4 x 3 inch (10 x 7.5 cm).
Style: fine line with optional pale lavender.
Pain: medium to high. The ankle is thin-skinned over bone, and the foot in general is one of the more reactive areas. Ageing note: footwear rubs this spot daily, so this is the design most in need of a well-healed outline.
Make it yours: curve the trail to follow your own bone line. Stand in front of a mirror and trace the actual shape rather than a generic one.
17. Shoulder-Cap Wisteria Cascade
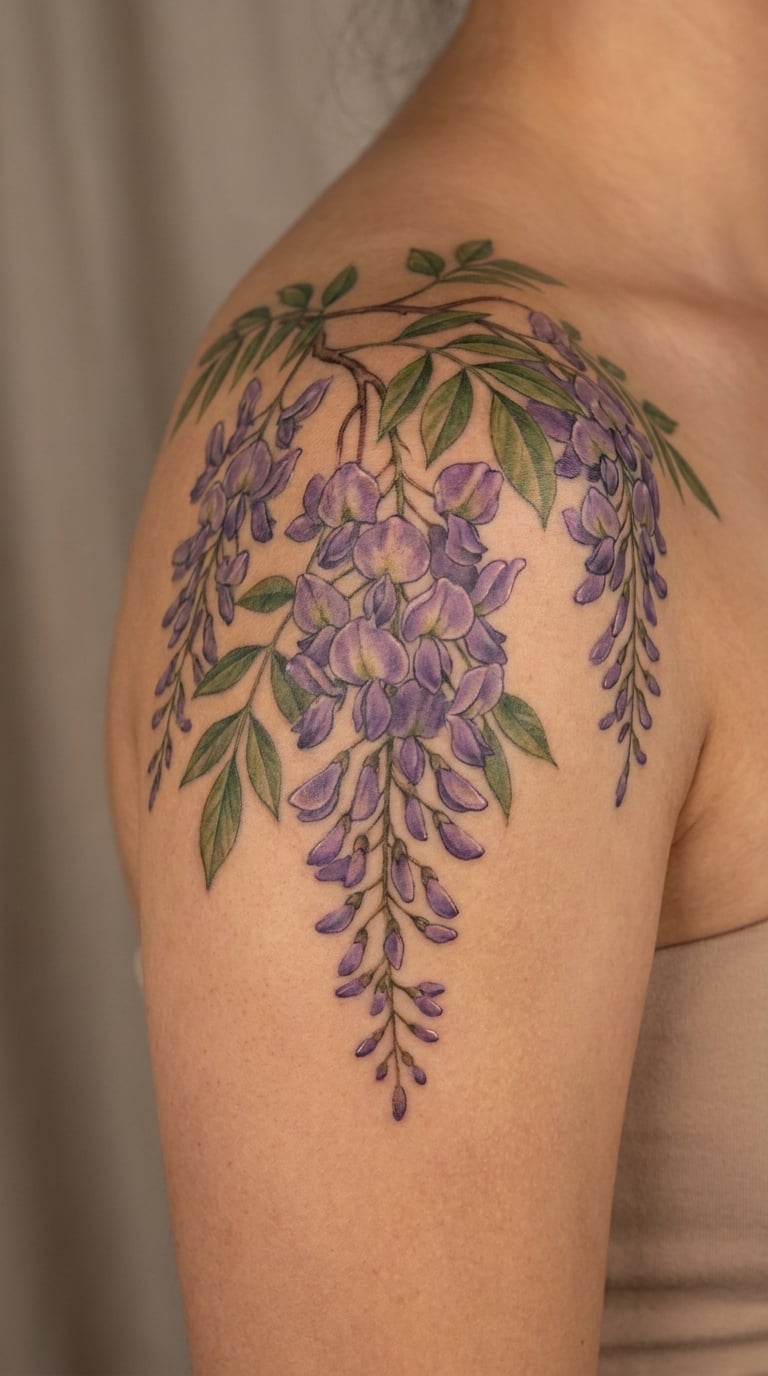
A dense cascade flowing down over the shoulder cap, with the heaviest clusters at the top and the trails thinning as they fall toward the upper arm. Colour work, real shading, and enough coverage that it reads as the shoulder of a floral sleeve from across a room.
People choose this when they are planning a sleeve, or when they have decided they want a piece big enough to change how they dress. It is the wisteria tattoo that most people show rather than hide, and the rounded placement supports the density naturally.
Placement: outer shoulder cap, continuing down the upper arm.
Size: 9 x 6 inch (23 x 15 cm) as a single piece.
Style: colour botanical, shaded.
Pain: medium. The shoulder moves a lot during a long session, and stretched skin over the deltoid stings more than anywhere else on the arm. Ageing note: the top of the cascade is exposed to sun constantly, so the darkest violets there will fade first.
Make it yours: decide your filler flowers now. Cherry blossom, roses and fern all sit comfortably with wisteria in a sleeve, and choosing them later means a palette that clashes.
18. Black-and-Grey Wisteria Behind the Ear
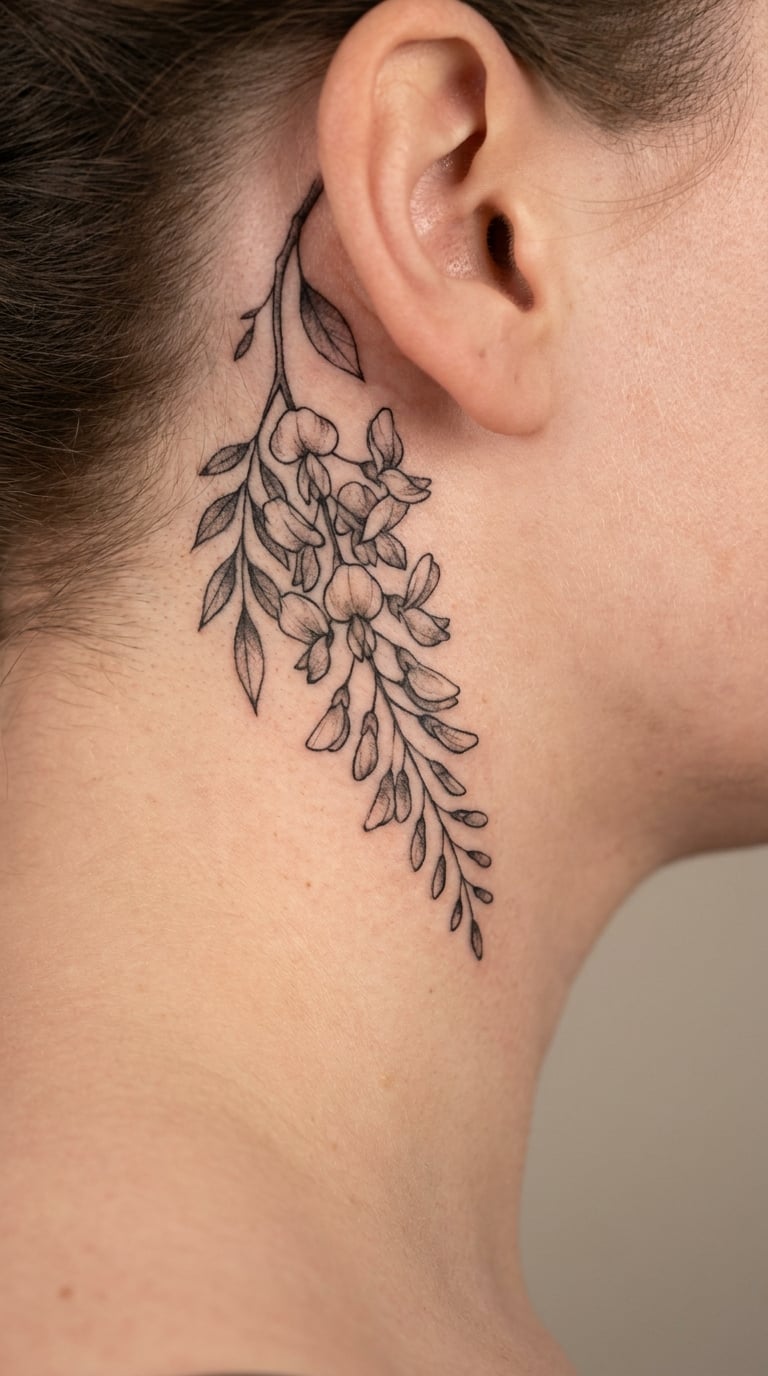
A short black-and-grey trail that emerges from behind the ear and curves down the neck, with a couple of clusters visible and the rest implied. There is no colour here, so the value range does the work: near-black at the base of each bloom, mid-grey through the petals.
Behind the ear suits anyone who wants floral work that stays out of a professional conversation. It also carries the everyday reminder, since it is the one piece almost nobody around you can see.
Placement: directly behind the ear, along the hairline, or tucking behind the ear lobe.
Size: 3 x 2 inch (7.5 x 5 cm).
Style: black and grey realism.
Pain: medium to high. The skin is thin, the area curves sharply, and hair in the way slows the session. Ageing note: hair regrowth pushes lines outwards, so expect a slight softening within a couple of years.
Make it yours: hide something in the trail. Half a small leaf, a single letter, anything that only reads when you tilt your head in the mirror.
19. Matching Mini Wisteria Pair
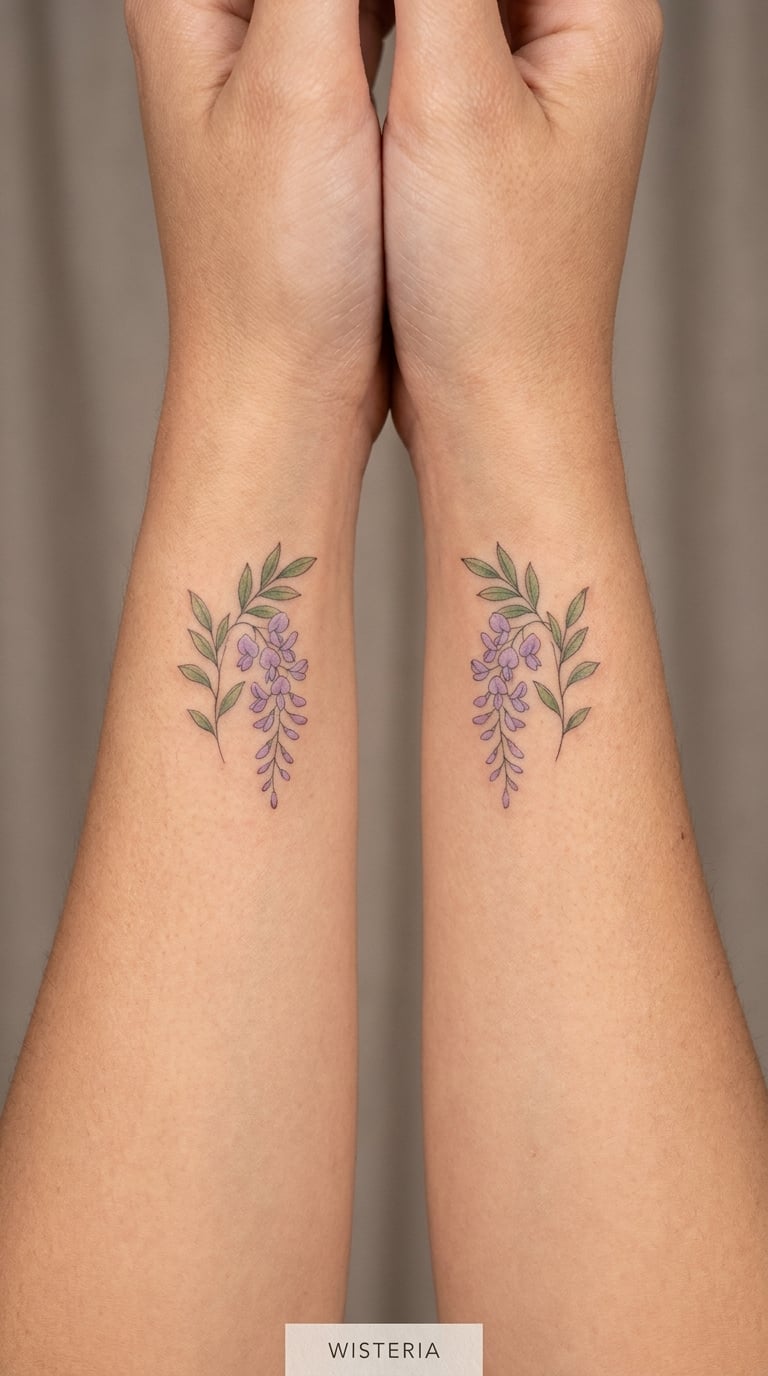
Two small racemes, one on each inner forearm, mirrored in position but not identical in shape. One leans slightly more than the other, the cluster counts differ by one, and the purple is mixed slightly differently on each. Matching tattoos that are not exactly identical always look like they were chosen by a person rather than a printer.
Matching sets are popular as couples tattoos, sisters, or just for someone who wants a piece to feel personal. The inner forearm placement keeps them visible when you want them seen.
Placement: both inner forearms at the same height, or both ankles.
Size: 1.5 x 2.5 inch (4 x 6 cm) each.
Style: micro fine line with pale lavender.
Pain: medium on both wrists, and you will feel the first one less than the second because you know what is coming. Ageing note: two pieces fade at different rates depending on which arm you sleep on.
Make it yours: give each side a different number of clusters and keep one shared element, like a matching leaf shape in the same spot on both.
20. Sculptural Purple Wisteria Sleeve Element
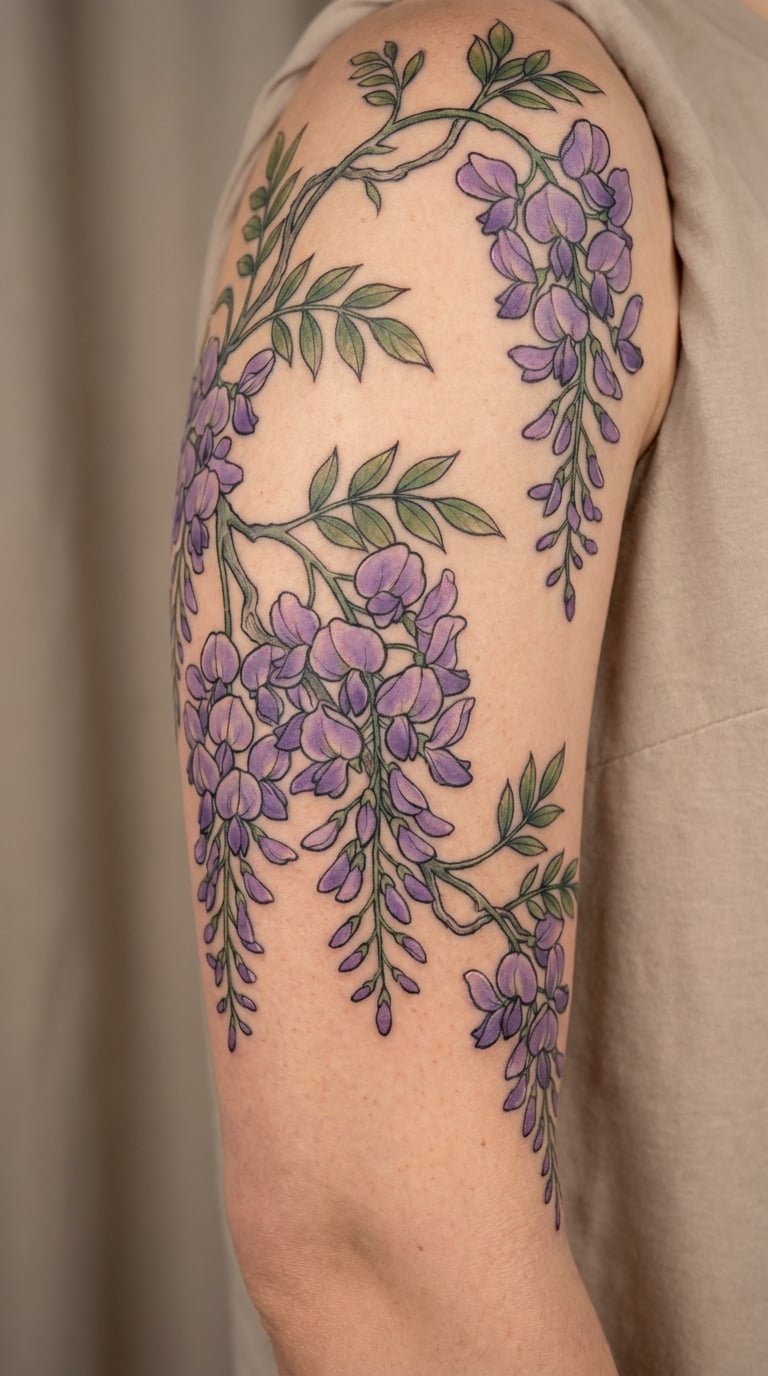
The heaviest piece here. Overlapping racemes in deep violet with strong highlights and near-black shadows, layered so the flowers look stacked in front of each other rather than printed on skin. This is a full upper arm commitment, not a standalone small tattoo, and it is meant to anchor a sleeve.
Sculptural realism is chosen by people who want their sleeve to have a focal point instead of being an even spread of similar flowers. It also takes the longest to heal, because saturated colour over that much area needs more sessions.
Placement: upper arm, as the centre piece of a botanical sleeve.
Size: 12 x 8 inch (30 x 20 cm) or larger.
Style: sculptural realism, deep violet palette.
Pain: medium to high, mostly from session length rather than sensitivity. Expect two to four sessions. Ageing note: deep purple is a lighter pigment than black or brown, so the darkest shadows need occasional reinforcement even when the rest holds.
Make it yours: write down the full sleeve concept before the first session, even the parts you are not getting yet. Colour decisions made on day one follow you for years.
How to Choose the Right Design
Five things decide whether a wisteria tattoo holds up, and all five are worth arguing about with your artist before the stencil goes on.
1. Style, honestly. Fine line suits someone who wants restraint and accepts touch-ups. Realism and colour suit someone who wants the flower to look alive. Blackwork suits someone whose existing ink is heavy. Be honest about which one you actually want, not the one that photographs best.
2. Detail level against size. This is where most disappointed wisteria tattoos come from. Fine dangling clusters need a minimum of about 2 inches of height to keep their shape, and a raceme squeezed into an inch reads as a purple smudge once healed. If the placement has to be small, ask for fewer, larger flowers instead of more, smaller ones.
3. Realistic size, not reference size. The photo in your saved folder is almost always a large healed piece. Measure your placement with a ruler, then ask the artist to draw at that exact scale before you commit to anything.
4. How the placement moves. Skin over the ribs, the waist crease, the collarbone and the inner wrist all stretch and shift. Fine linework drawn tight on those areas settles into a thinner, softer line after healing. Slightly looser spacing there prevents the design from looking sparse later.
5. Long-term ageing. Black holds. Deep colour holds reasonably. Hairline violet and pale lavender are the first to grey out. If your design is mostly fine purple linework, either accept a refresh every few years or let the artist build in more weight now.
How to choose a wisteria tattoo that will still read in ten years
Ten years is a fair test. Look at a design and ask whether its silhouette still makes sense without the colour: is there a clear shape, or is it detail-only? A dangling cluster with defined stems and reasonably sized blooms survives. Six tiny blossoms in a line does not, and no amount of careful aftercare changes that.
Bring your three favourite references to the consultation and say the style names out loud. If you have no vocabulary, that is a normal place to start, and any decent tattoo artist will happily talk you through fine line, neotraditional, blackwork, micro and freehand options in the first ten minutes.
Cost and Session Time
Tattoo pricing in the US usually works one of two ways: an hourly rate, or a flat price per piece. Either way, wisteria designs sit at the complex end because of how much detail sits in a small area, so most of the twenty above sit above a shop minimum.
Micro and small pieces — the wrist stem, the collarbone cascade, the matching pair — are usually the quickest sessions, often well under an hour each, and they attract shop minimum charges. Medium colour pieces — the realistic cascade, the bouquet, the ankle trail — commonly take one to three hours and may run over into a second session. Large pieces — the rib trail, the shoulder-cap cascade, the sleeve element — are almost always split, and a 12 x 8 inch colour piece can run to several sessions depending on how saturated the colour load is.
Fine line looks quick and takes forever, because single-needle line is slow work. Heavy blackwork and solid colour fill go faster but need more breaks. Either way, ask whether your quote covers one session or the whole piece before you book, and check what the shop charges to resume a piece later if you need to stop.
Aftercare Basics
Start with your artist’s aftercare instructions. They know what they did to your skin and how much pigment went in, so their advice beats anything general, including this list.
Wash gently, twice a day for the first week or so. Lukewarm water, a mild unscented soap, and clean hands. Pat dry with paper towel rather than a terry towel, and let the tattoo breathe rather than keeping it covered.
Moisturise thinly. A plain fragrance-free ointment or lotion in a thin layer keeps the skin from drying and cracking while it settles. Too much product traps heat and dulls fresh colour.
Protect it from sun for the whole life of the tattoo. This matters more for wisteria than most designs. Pale lavender and violet are among the first pigments to fade, sun is what does it, and once a purple linework greys out, a touch-up is far harder than prevention was.
Skip the sauna, the pool and the gym for the healing window. Chlorine, salt, heat and heavy sweating all affect fresh colour. Your artist will tell you how many days that means for your piece.
Watch for changes that need a call. Persistent redness spreading beyond the lines, heat, swelling or yellow fluid are all reasons to ring your artist first, then your doctor if it does not settle. Most normal healing involves some flaking, tightness and fading colour, so trust the timeline your artist gives you over anyone else’s, including this.
Frequently Asked Questions
What does a wisteria tattoo usually symbolize?
Wisteria most often reads as grace, patience and quiet devotion, because the plant hangs in long flower clusters rather than reaching outward. In the language of flowers it is also linked to beauty that does not last, which comes from Japanese wisteria (fuji) and the idea of impermanence. Many people choose it as a memorial piece, often in memory of a mother or grandmother, which is why it shows up so often as a spring booking.
Should I choose a coloured or black-and-grey wisteria design?
Go coloured if you want the flower to look alive and you are willing to book touch-ups, since pale lavender is among the first pigments to fade. Go black and grey if you already have heavy black work, or if the placement rubs daily such as an ankle or inner wrist. Black linework holds its shape far longer, so most people who want one small piece that stays crisp choose it.
What size should a wisteria tattoo be for the first session?
For a first session, aim for a design you can finish in two to three hours, which for most wisteria pieces means 2 x 3 inch (5 x 7.5 cm) to about 3 x 5 inch (7.5 x 12.5 cm). Anything larger usually needs a second sitting. Whatever the size, check that the smallest blooms still read clearly, because fine detail under half an inch of height blurs within a few years.
Will fine-line wisteria tattoos fade quickly?
They fade faster than most ink, and the purple goes first. Hairline violet and lavender turn grey within a few years, especially on the inner wrist, behind the ear and anywhere that catches sun or rubs against clothing. You can slow it down by keeping the piece covered in strong sun and moisturising while it heals, but plan on one refresh every few years rather than treating it as a failure.
Where is the best placement for a hanging wisteria design?
The shoulder blade is the strongest choice, because the fall of the racemes matches the natural line from shoulder to waist and the flat area gives detail room. The outer forearm works well too, especially for a single long cluster. The inner wrist and collarbone look beautiful but are high movement and high sun, so expect faster fading there, and avoid ribs unless you are prepared for a long, higher-pain session.
Conclusion
If this is your first tattoo, go with the fine-line hanging cluster from idea 1 or the crescent moon from idea 7. Both are small enough to finish in one sitting, forgiving if you are nervous, and they teach you how your skin handles ink without a long commitment.
If you are already building a floral collection, the forearm garland from idea 11 or the shoulder-cap cascade from idea 17 will fit the pattern you are already building. Start by saving the three designs you like most, then bring them to a consultation and ask the artist to draw one of them at the exact size of your placement. That one conversation will tell you more than another month of scrolling.