
20 Northern Lights Tattoo Ideas: Stunning October 2026
Northern lights tattoo ideas are usually sold with a photograph of a green swirl and no explanation of what happens to that swirl after it heals. So here is the honest version: the aurora is pure light in a black sky, which makes it one of the most striking motifs you can put on skin, and one of the hardest to keep crisp. These twenty designs run from a single emerald squiggle to a full-colour scene across the back, with the placement, size, style and pain level spelled out for each one.
Most people who book one of these have seen the real thing at least once, standing in the cold somewhere north of the tree line. If that is you, the design should hold a memory, not a stock gradient. If you have never seen it, the work is harder, because the sky you are copying is an idea rather than a memory — bring screenshots of real photographs, not the AI art, and your artist will thank you. Autumn and winter are booking seasons, since people plan these months ahead of a long trip north.
Northern Lights Tattoo Ideas: Quick Guide
Every design below appears in this table in the same order as the numbered sections, so you can scan placements and pain levels before reading the detail.
| Idea | Style | Best placement | Realistic size | Pain |
|---|---|---|---|---|
| 1. Flowing auroral ribbon | Fine-line colour wash | Inner forearm | 4-6 in | Low to medium |
| 2. Aurora over mountain ridge | Colour realism | Outer forearm | 5-7 in | Medium |
| 3. Fine-line waves behind ear | Fine line | Behind the ear | 1.5-2.5 in | Low to medium |
| 4. Green curtain of light | Illustrative colour | Outer upper arm | 3.5-5 in | Medium |
| 5. Blackwork aurora band | Blackwork | Mid upper arm | 2.5-3.5 in wide | Medium |
| 6. Watercolour sky on shoulder | Watercolour | Shoulder cap | 6-8 in | Medium |
| 7. Minimal green squiggle | Minimal fine line | Inner wrist | 1.5-2.5 in | Low |
| 8. Aurora and star map | Mixed fine line | Outer thigh | 4-6 in | Medium |
| 9. Blue and purple neon aurora | Illustrative colour | Outer calf | 5-7 in | Medium |
| 10. Arc framing a mountain | Black-and-grey realism | Upper chest | 7-9 in | Medium to high |
| 11. Dotwork northern lights | Dotwork | Shoulder blade | 4-6 in | Medium |
| 12. Flame-like aurora | Illustrative colour | Above collarbone | 3-4 in | Medium |
| 13. Aurora over water | Micro realism | Forearm | 5-6 in | Medium |
| 14. Traditional black swirls | Traditional blackwork | Outer forearm | 3-4.5 in | Medium |
| 15. Three-line micro aurora | Micro fine line | Behind the ear | About 1 in per stroke | Low |
| 16. Gradient aurora on the rib | Illustrative gradient | Side of the ribs | 6-8 in | High |
| 17. Aurora constellation | Micro fine line | Back of the hand | 1.5-2.5 in | High |
| 18. Aurora spiral | Illustrative realism | Outer hip | 4.5-6 in | Medium |
| 19. Aurora and black iris | Illustrative realism | Outer upper arm | 5-7 in | Medium |
| 20. Full-colour aurora scene | Colour realism | Upper back | 9-12 in | High |
1. Flowing Green Auroral Ribbon on the Forearm
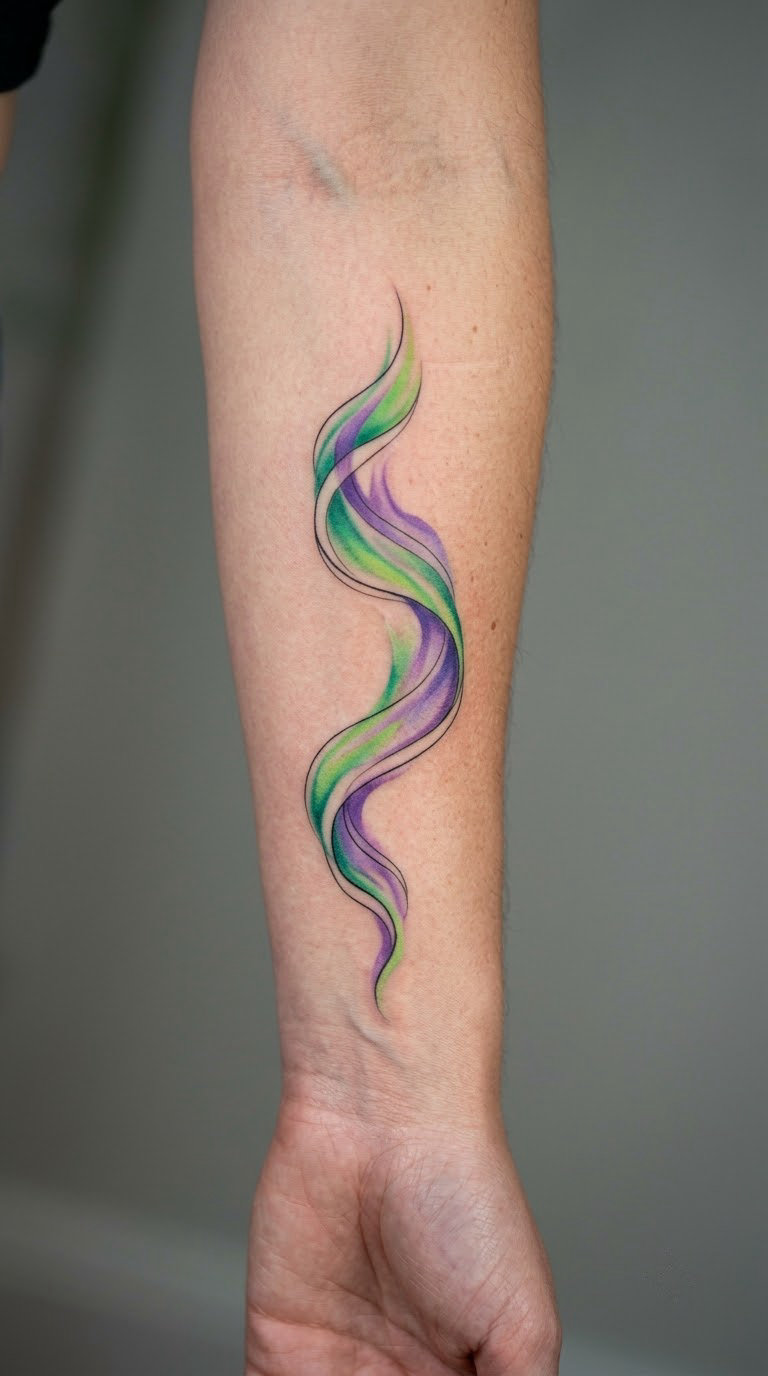
One continuous band, tapered at both ends, with green at its core and a violet edge bleeding into bare skin. Nothing else in the frame. The appeal is that a single ribbon reads as motion even when you are standing still, and it never turns into the green smudge people fear with heavy colour pieces.
Most wearers pick this one because it is a quiet record of a night they watched the sky, rather than a claim about anything.
Placement: Inner forearm along the tendon line, wrist to mid-forearm. Size: 4-6 in (10-15 cm). Style: Fine line with a loose colour wash. Pain: Low to medium, and the forearm takes colour predictably. The violet edge is the fragile part, so expect a touch-up within five or six years. Make it yours: Have the artist fade the ribbon into a scatter of tiny star dots at one end, or match a second thinner ribbon on the other forearm.
2. Realistic Aurora Over a Mountain Ridge
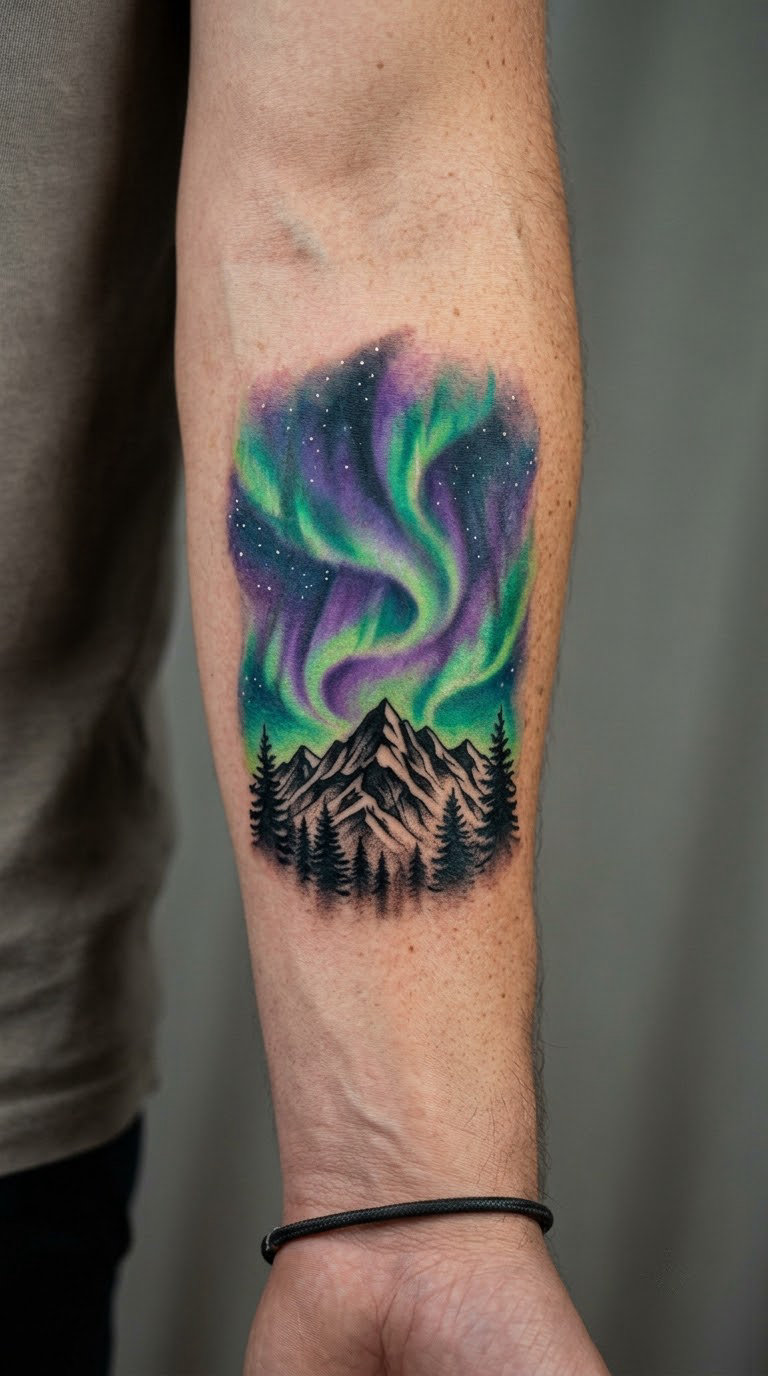
A photoreal sky that runs green at the horizon, blue-violet overhead, with a solid black ridgeline anchoring the bottom. The ridge is doing the heavy lifting: it gives the light something to be light against, and without it the whole thing can look like a stain.
This is the version most people bring to a consult after a trip, because a landscape gives a specific place a place in the design.
Placement: Outer forearm or the flat of the upper arm. Size: 5-7 in (13-18 cm) wide. Style: Colour realism with a black silhouette base. Pain: Medium. Saturated violet and green in the sky will soften noticeably, so treat a touch-up as part of the plan, not a failure. Make it yours: Swap in the outline of the range or shoreline you actually stood on.
3. Fine-Line Aurora Wavy Behind the Ear
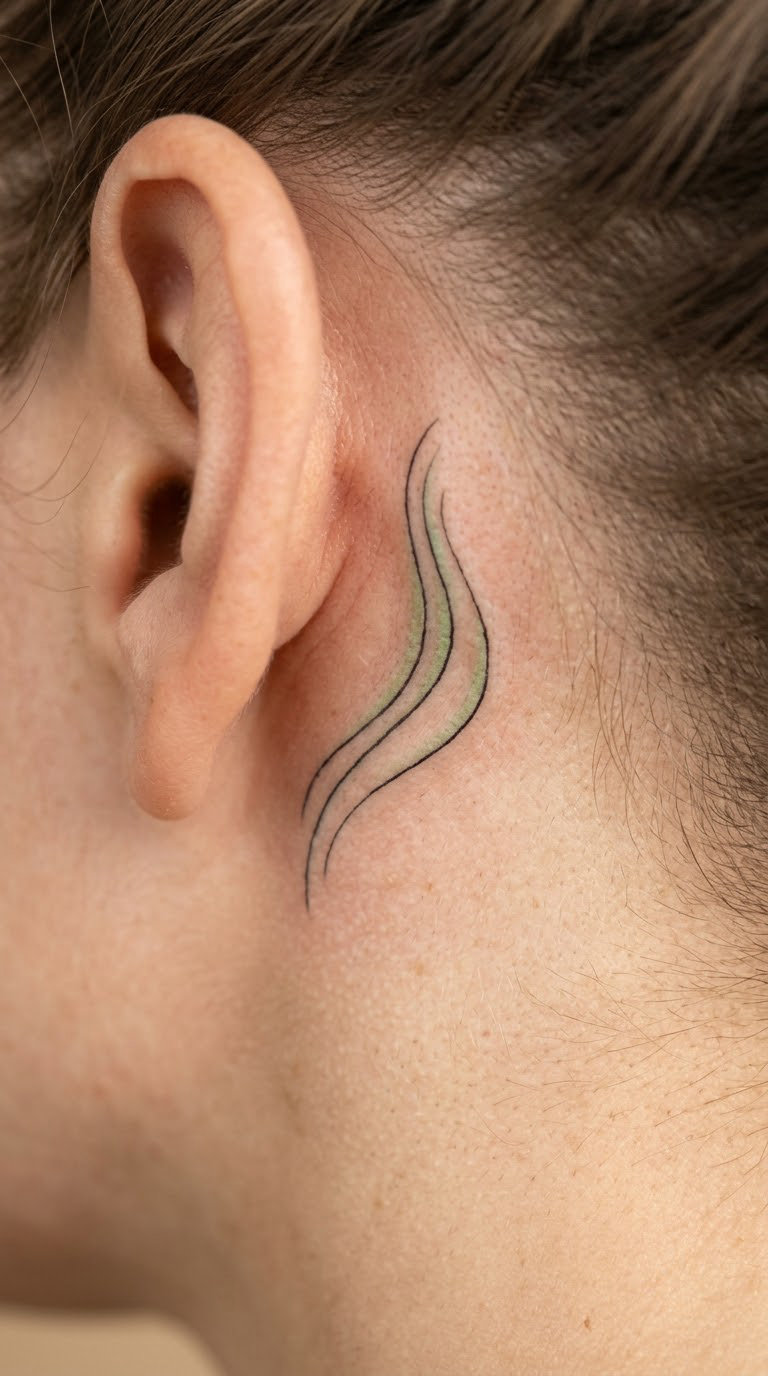
Three hairlines running parallel, the outer one tinted a pale green, following the curve from behind the ear toward the nape. At that scale the aurora becomes a rhythm rather than a picture, and that is exactly why it works.
People choose it for a spot that shows only when they push their hair back, which makes it personal in a way a forearm piece is not.
Placement: Behind the ear, or along the curve into the nape. Size: 1.5-2.5 in (4-6 cm). Style: Fine line, single-needle weight. Pain: Low to medium, mostly the bony edge of the ear cartilage. The tint fades first because it is only a wash, so keep the black lines strong enough to carry the design alone. Make it yours: Add one small solid star at the top of the arc.
4. Green Curtain of Light on the Upper Arm
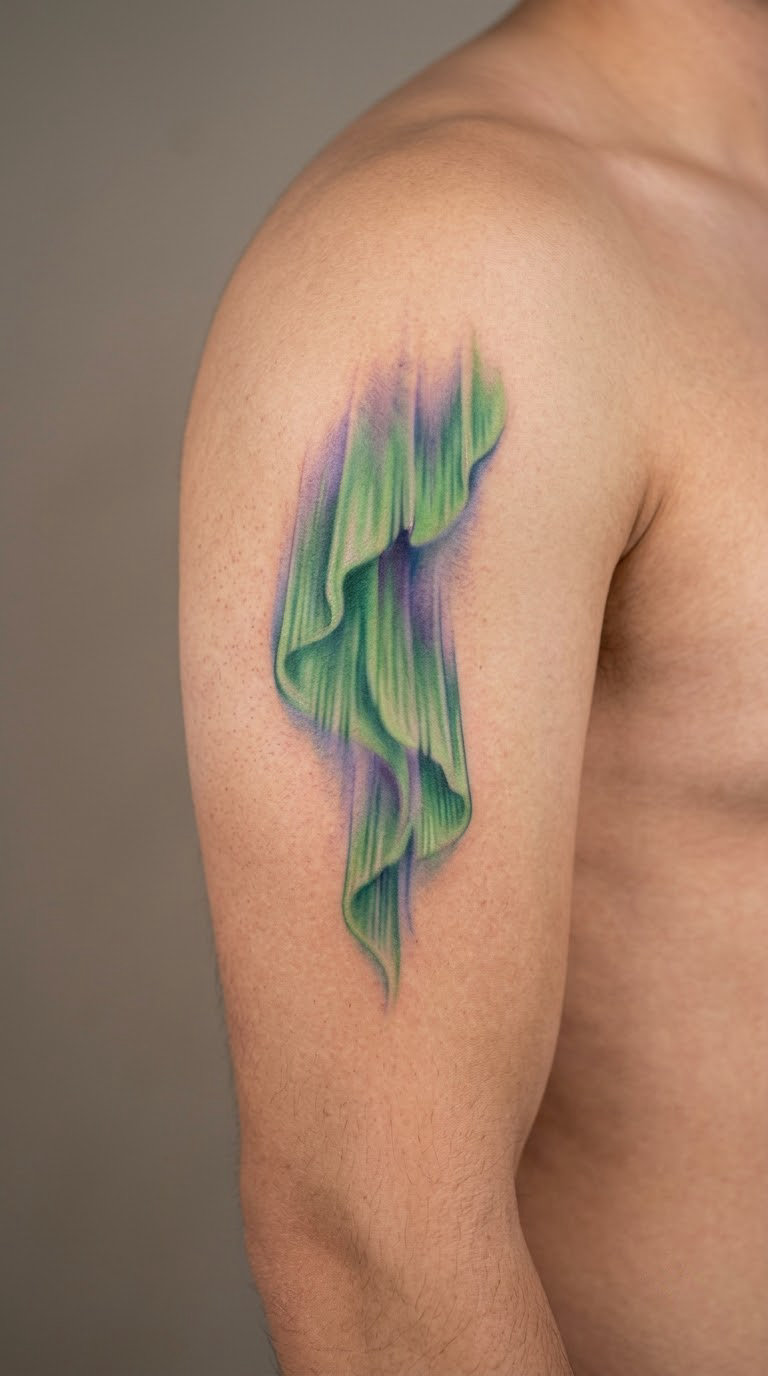
Vertical rays of varying length, brightest at the top, dissolving downward into nothing. Real auroral curtains have exactly this structure, with sharp lower edges sometimes, and mirroring that is what separates it from a generic glow.
It suits anyone who wants more presence than a single ribbon without committing to a full landscape.
Placement: Outer upper arm, running vertically. Size: 3.5-5 in (9-13 cm) tall. Style: Illustrative colour with soft edges. Pain: Medium, and the outer arm is one of the easier spots to sit through for a couple of hours. Bright green is the first colour to shift, so ask your artist to keep a darker green underneath. Make it yours: Reference the latitude where you saw it, since the curtain height changes with where you are.
5. Blackwork Aurora Band on the Arm
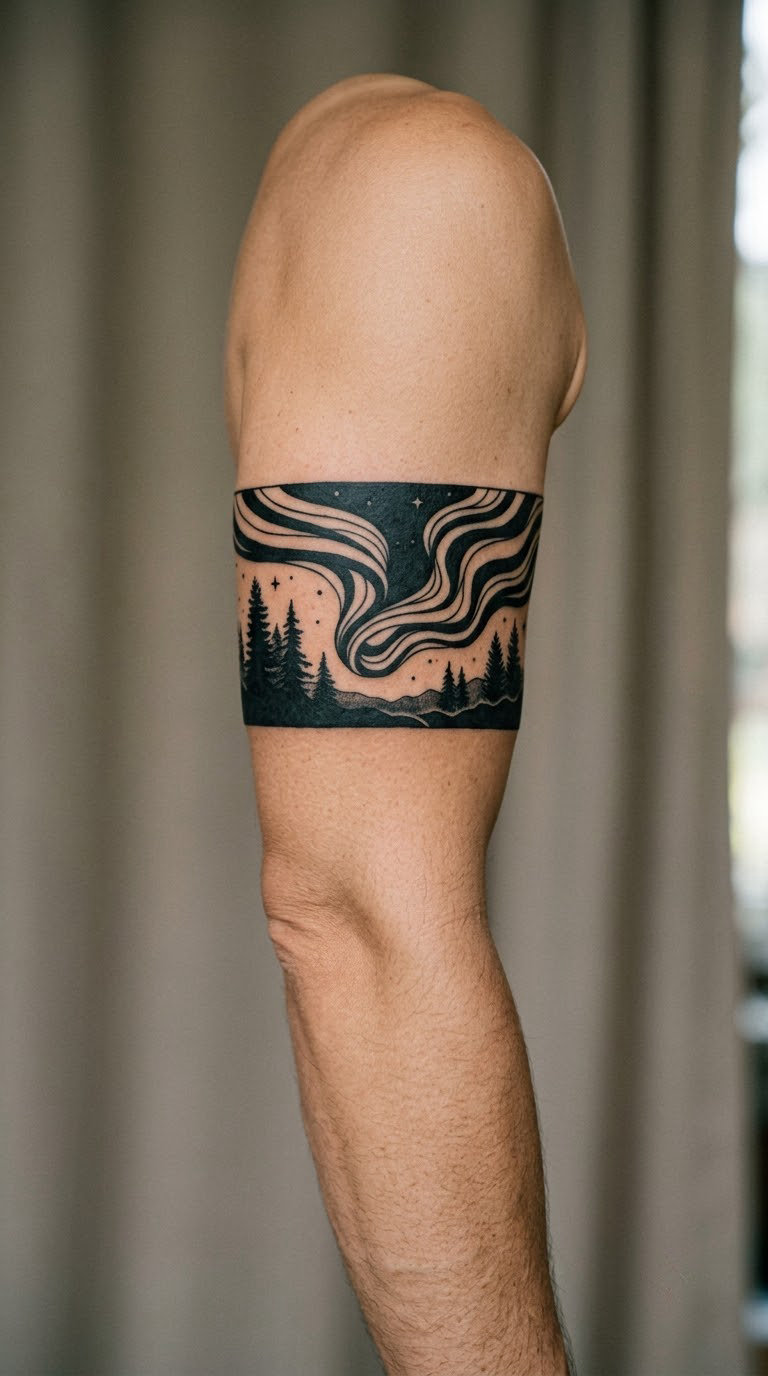
No colour at all. Dense parallel black ribbons with hard edges, alternating thick and thin, flowing around the arm like a current. Blackwork holds its line for decades, which makes this the longevity play in a family of designs that fades quickly.
Wearers usually describe it as the same feeling without the maintenance, which is a fair trade for people who would rather not book touch-ups.
If you are building out an arm rather than starting fresh, our guide to forearm band tattoo ideas covers how a wrapping band sits against work that is already there.
Placement: Mid upper arm, wrapping horizontally like a band. Size: 2.5-3.5 in (6-9 cm) wide, with the flow running around the arm. Style: Blackwork. Pain: Medium, and dense packing hurts more and takes longer than sparse line work. It settles and softens slightly as it heals, then stays largely where it lands. Make it yours: Have the outermost ribbon thin out to nothing on one side so the band looks worn rather than printed.
6. Watercolour Pink and Green Sky on the Shoulder
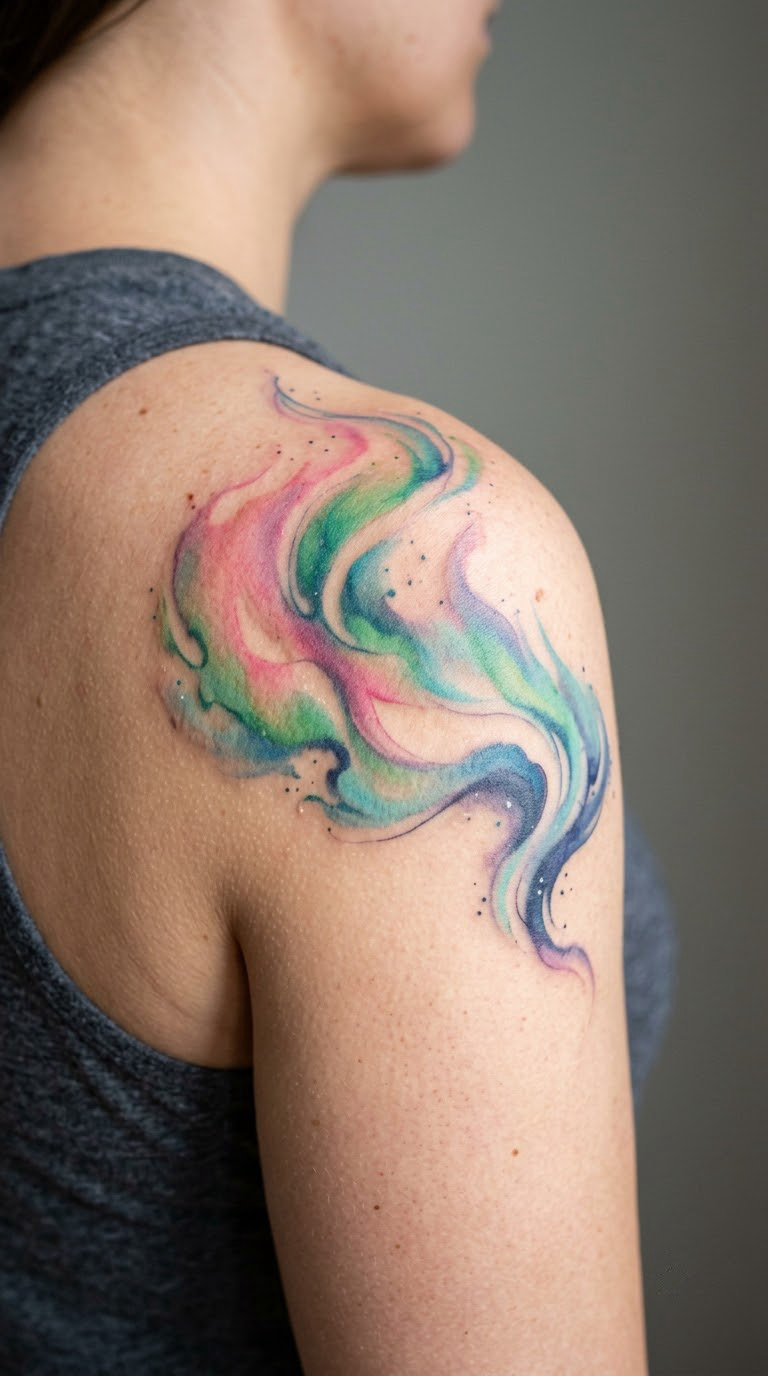
Loose washes of pink, green and blue bleeding into each other, with bare skin left as the brightest part. A strong aurora shows a red upper fringe above green, and this palette leans into that rarer combination rather than the usual green-and-purple.
It is the design people choose when they want the piece to look like a painting that happens to be ink.
Placement: Shoulder cap, following the round of the deltoid. Size: 6-8 in (15-20 cm). Style: Watercolour with deliberate negative space. Pain: Medium. Watercolour hides small imperfections after healing, which is a real advantage, but pale pink still needs a top-up sooner than deep green. Make it yours: Choose one band to keep fully saturated and let the rest stay pale.
7. Minimal Green Squiggle on the Wrist
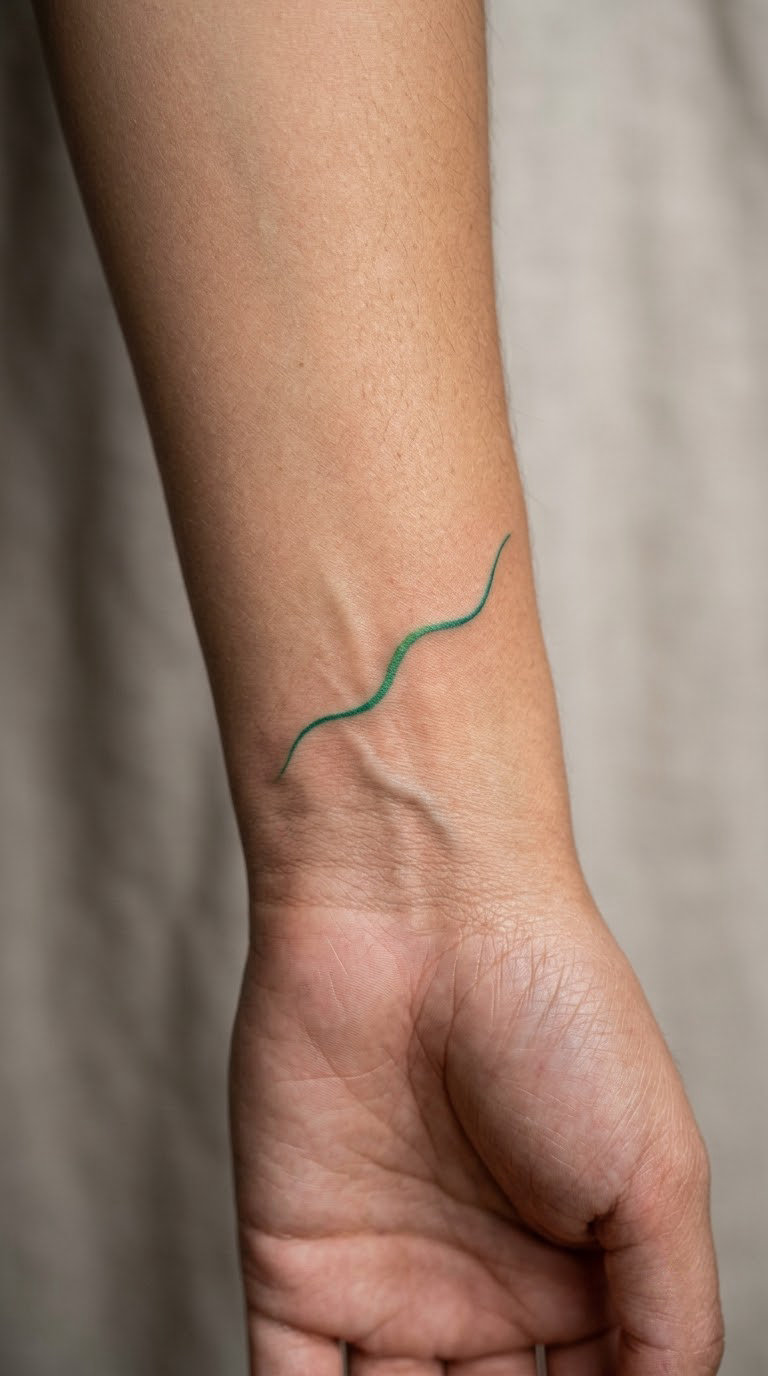
One thin emerald line, slightly wavy, tapering at both ends. At two inches there is no room for rays or stars, and that restraint is the whole point.
It works for a first tattoo because it is quick, cheap to correct if you dislike it, and still unmistakably an aurora to anyone who knows what they are looking at.
Restraint at this scale is a look in its own right, and our cat silhouette tattoo ideas are a good comparison if you want something that holds up at two inches.
Placement: Inner wrist, set diagonally so it follows the wrist line. Size: 1.5-2.5 in (4-6 cm). Style: Minimal fine line. Pain: Low, though wrists are twitchy and an unsteady hand makes a straight line wander. The inner wrist takes constant friction from sleeves and washing, so colour here fades fastest of anywhere on the body. Make it yours: Add a matching single line in a different colour at the same spot on the other wrist.
8. Northern Lights and Star Map on the Thigh
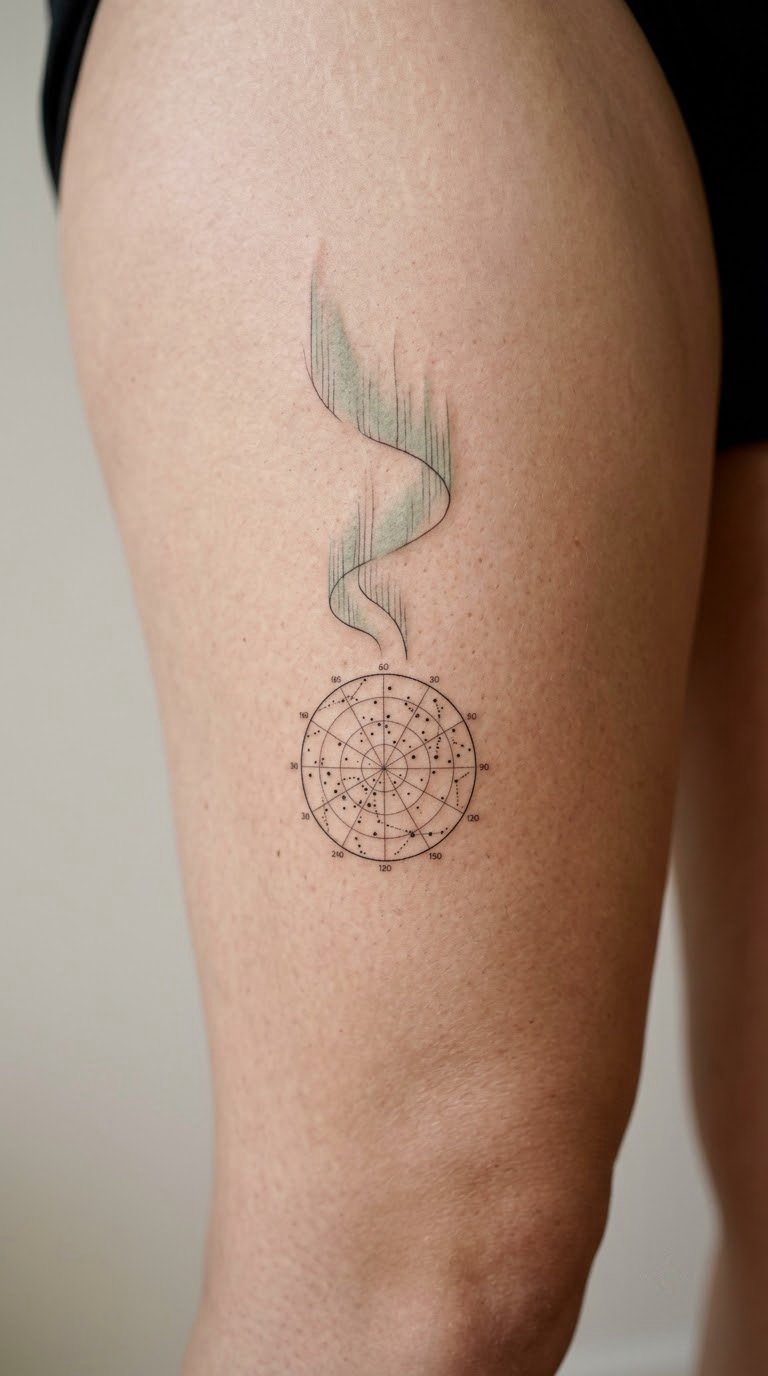
A pale green arc across the top, and beneath it a real or invented star field drawn in the style of a chart, with dots connected by thin lines. The sky above and the map below turn a pretty gradient into something with a place in it.
This is a favourite in the travel community, where people ink the sky they saw and the coordinates of where they saw it.
Placement: Outer thigh, where there is room to draw a chart. Size: 4-6 in (10-15 cm). Style: Mixed fine line, black work with a green accent. Pain: Medium, and the thigh is easy to sit through for a long sitting. Tiny chart numerals blur within about five years, so keep them fewer and larger than you think you need. Make it yours: Use the date and latitude of the night you stood outside.
9. Blue and Purple Neon Aurora on the Calf
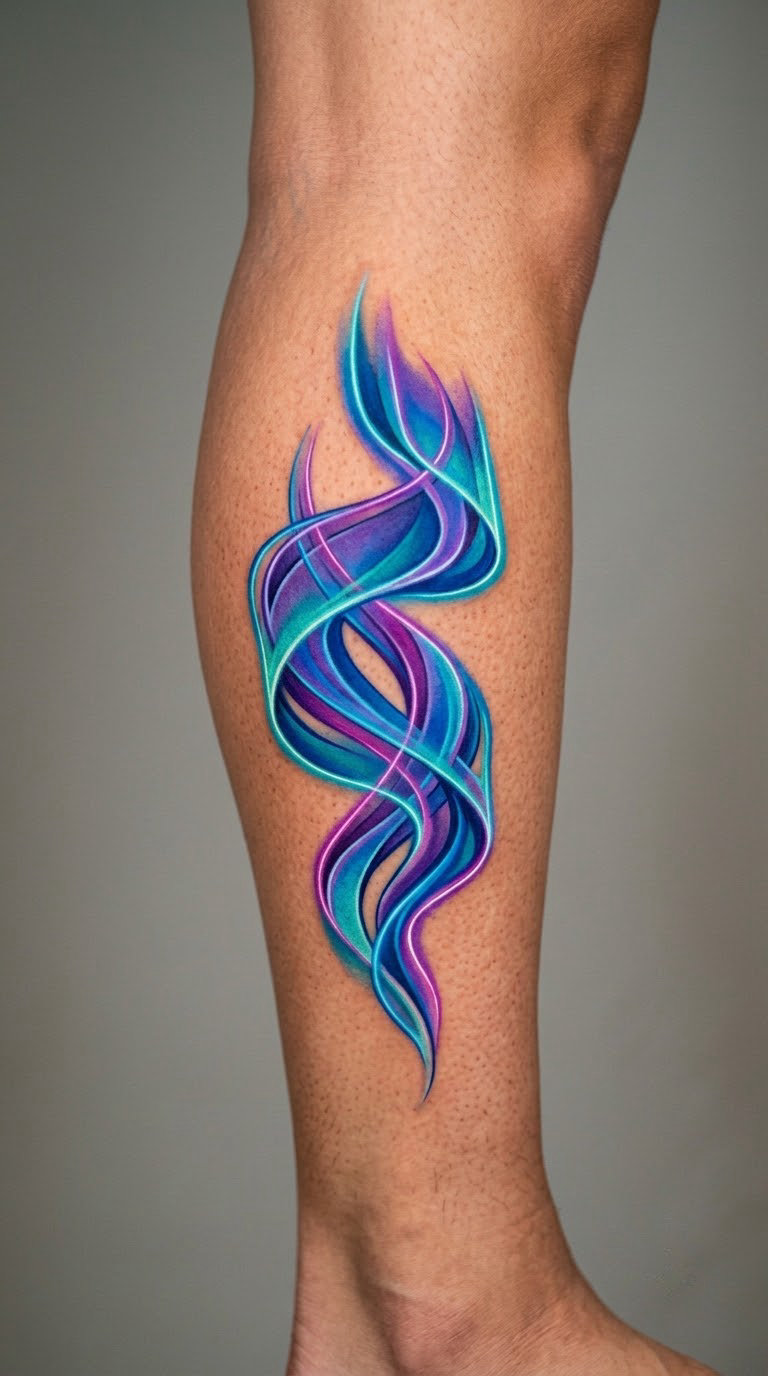
Overlapping ribbons in electric blue and violet, with hard bright edges and near-black gaps between them. It reads closer to neon signage than to a photograph, which is a deliberate choice and a refreshing one for people who find photoreal skies too soft.
Wearers tend to like graphic, high-contrast pieces, and this is the most graphic of the colour options.
Placement: Outer calf, running vertically to echo the muscle. Size: 5-7 in (13-18 cm). Style: Illustrative colour with crisp edges. Pain: Medium; the calf is fleshy and easy, the ankle below it much less so. Violet fades ahead of blue, so expect the piece to cool over the years rather than dull evenly. Make it yours: Repeat the ribbon shape at a smaller scale somewhere else, or wrap one ribbon around the ankle.
10. Aurora Arc Framing a Mountain on the Chest
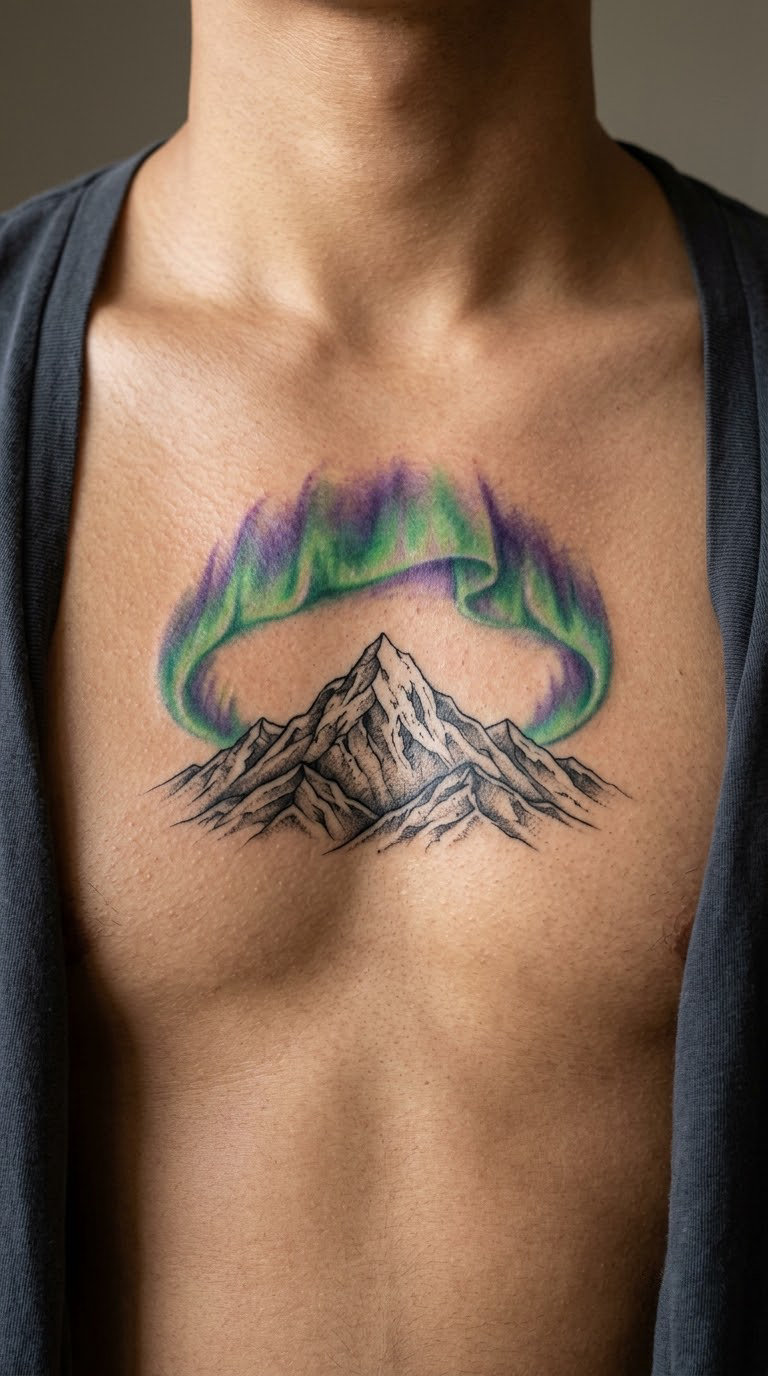
A symmetrical composition: one peak in black and grey at the centre, a green and violet arc curving over it like a held breath. Symmetry is harder on the chest than on an arm, because the sternum and the two pectorals are not quite mirrors, and your artist will adjust it to your frame rather than the drawing.
It is a piece people describe as protective without quite meaning it literally.
Placement: Upper chest, centred between the pectorals. Size: 7-9 in (18-23 cm) across. Style: Black-and-grey realism with a colour arc. Pain: Medium to high, because breastbone and collarbone are genuinely uncomfortable over a long sitting. The dark mountain stays sharp while the arc softens, so the two halves will drift apart in contrast over time. Make it yours: Name the range you want silhouetted, and let the artist scale it to the arc.
11. Dotwork Northern Lights on the Shoulder Blade
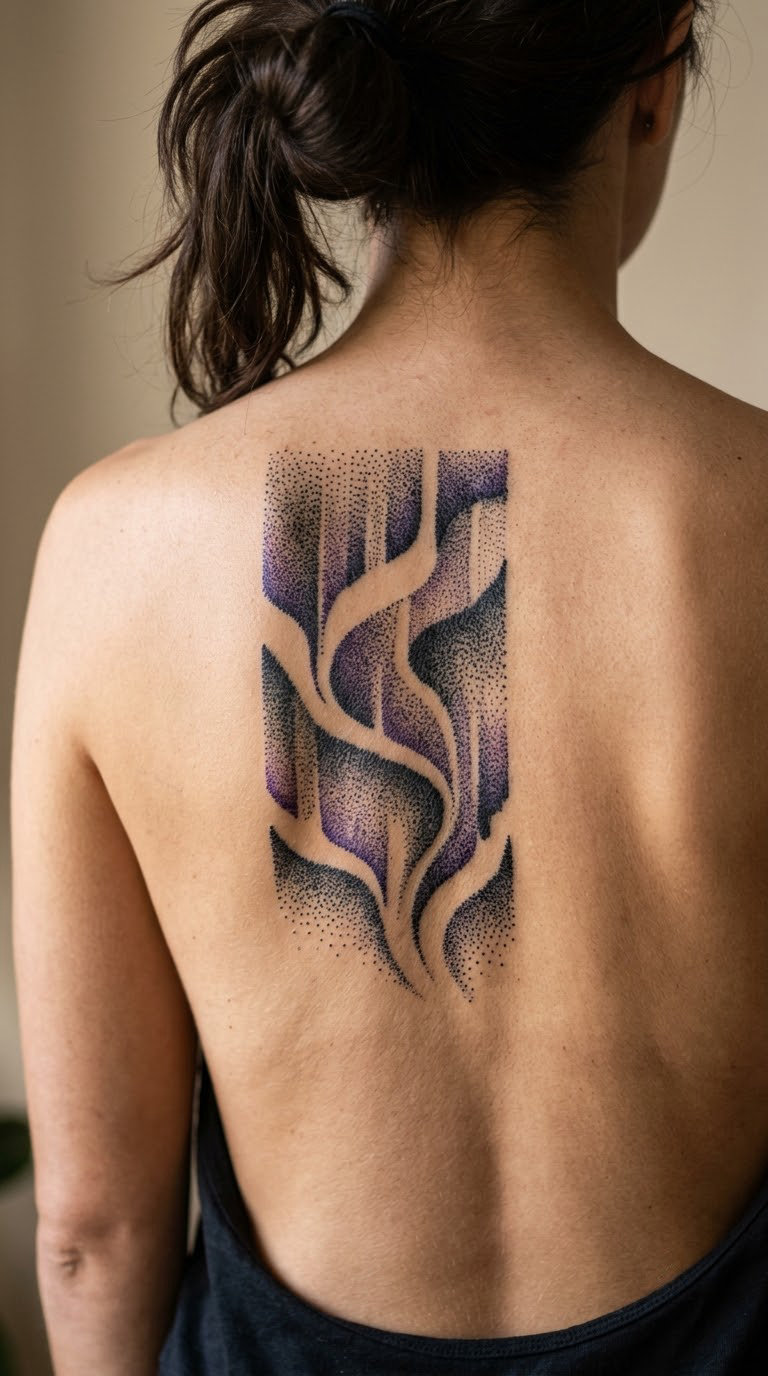
Shifted bands of clustered dots, dense in one area, sparse in another, with violet in a few clusters and skin left bare between them. Dotwork suggests movement without drawing an edge, so it reads as aurora from a distance and as texture up close.
It is the option for someone who wants a light effect without a large block of colour on their back.
Placement: Between the shoulder blade and the spine, where the flat planes sit well. Size: 4-6 in (10-15 cm). Style: Dotwork. Pain: Medium, and the shoulder blade shifts when you move, which slows the artist down. Individual dots spread slightly in the skin over the years, so expect the bands to soften into a glow rather than staying crisp. Make it yours: Tint one cluster green so the piece has a single point of colour.
12. Single Green Flame-Like Aurora on the Collarbone
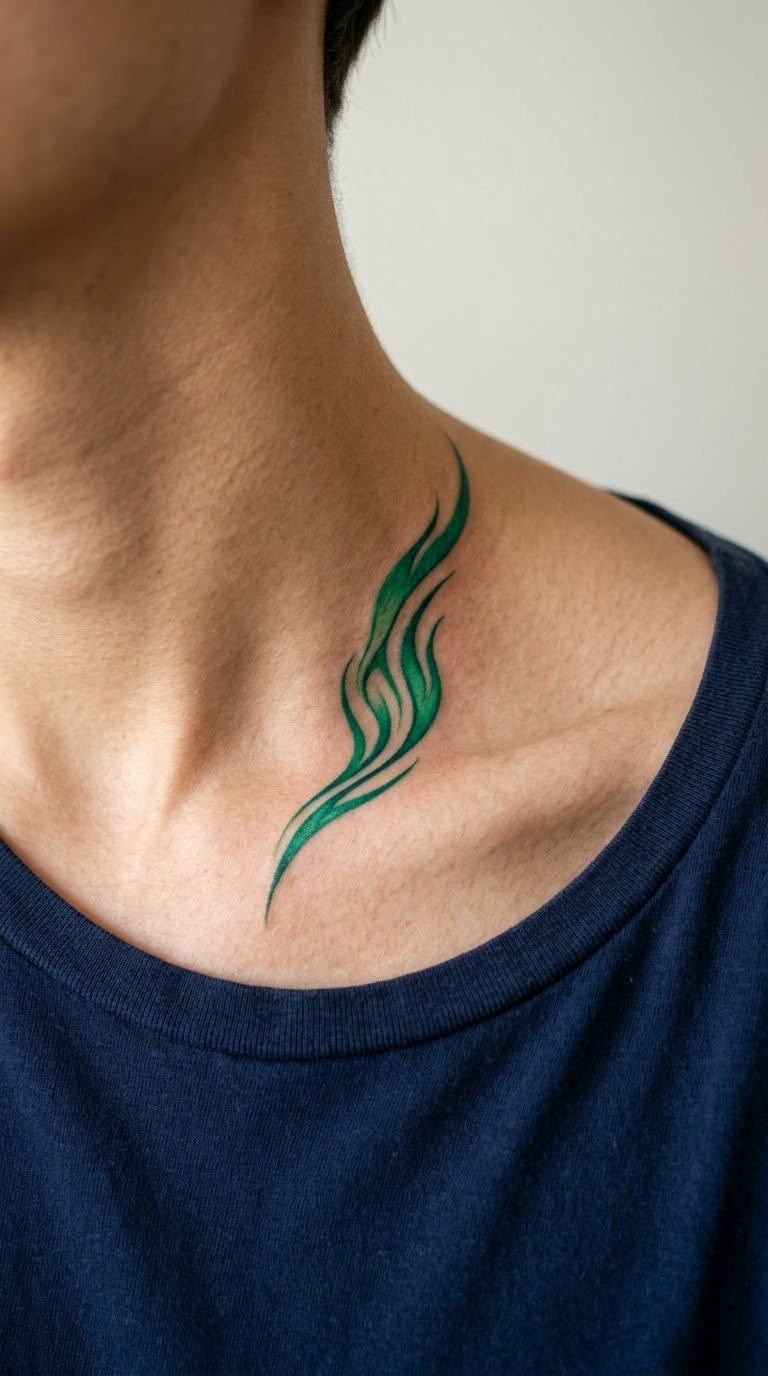
A narrow shape that rises and curls like a flame, bright green with a soft inner light, following the line of the collarbone. The flame read is a stylisation, and it gives the piece energy that a horizontal ribbon cannot.
People choose it when they want an aurora on a visible, elegant spot that still reads as small.
Placement: Just above the collarbone, angled with the bone. Size: 3-4 in (8-10 cm). Style: Illustrative colour. Pain: Medium; the collarbone is close to bone but the area is small, so it is over quickly. Pale interior shading is the first thing to fade, leaving a flatter green outline. Make it yours: Add a small crescent or dot cluster above it so the collarbone piece has a companion nearby.
13. Northern Lights Over the Water on the Forearm
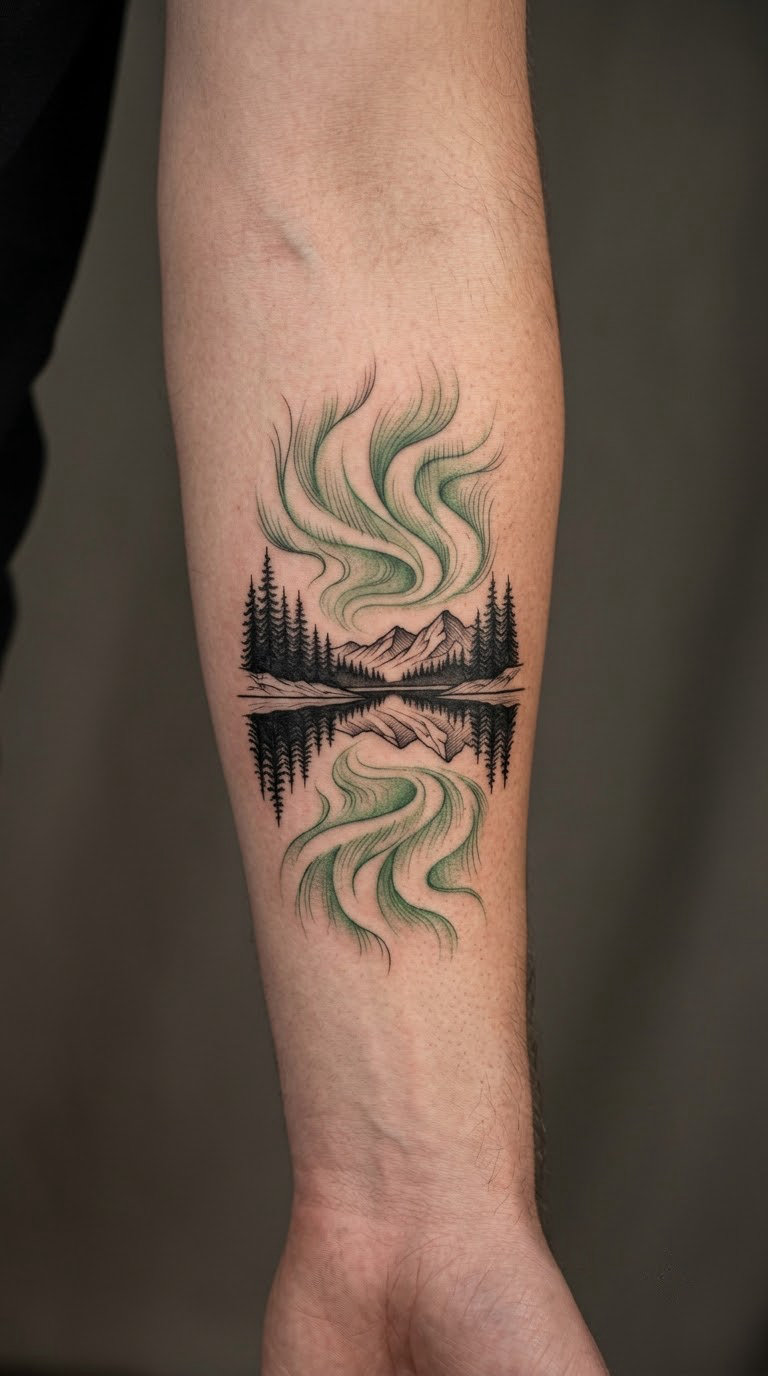
A low horizon with dark water beneath it, and the aurora repeated below the waterline as a broken, softer reflection. The doubled light is the whole trick, and it is what real reflections on still water actually look like.
It is the design people pick when the night they are marking involved standing by water.
Placement: Forearm, horizontal, so the horizon runs along the arm. Size: 5-6 in (13-15 cm). Style: Micro realism or fine line, depending on how much colour you want. Pain: Medium. The waterline is the weak point: the smallest horizontal details blur within a few years, so a strong horizon line matters more than detail below it. Make it yours: Tint the reflection a different hue from the sky so the two read as separate.
14. Traditional Black Aurora Swirls
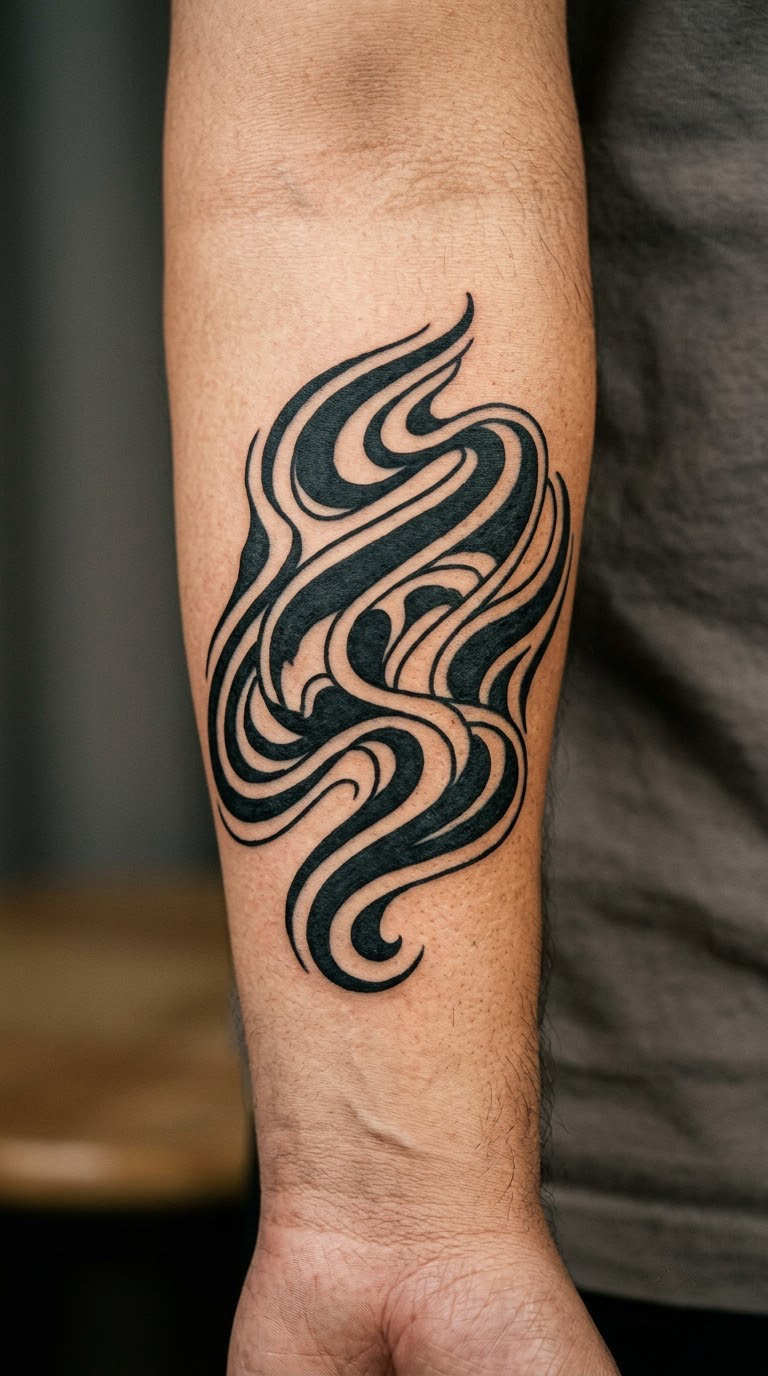
Thick black curves, hard outlines, and clean skin left as the light. Traditional tattooing has never needed literal scenery, and this is the aurora translated into pure shape: two or three heavy curves that flow and then stop.
It suits people who want an aurora with the same weight as a ship or a serpent, not a photograph.
Placement: Outer forearm. Size: 3-4.5 in (8-11 cm). Style: Traditional blackwork. Pain: Medium, and bold outline work on the forearm goes quickly. Black line holds its edge, though fine interior line shading will soften noticeably within five years. Make it yours: Let the artist add one red or green fill inside a single curve, and only that one.
15. Tiny Three-Line Aurora Behind the Ear
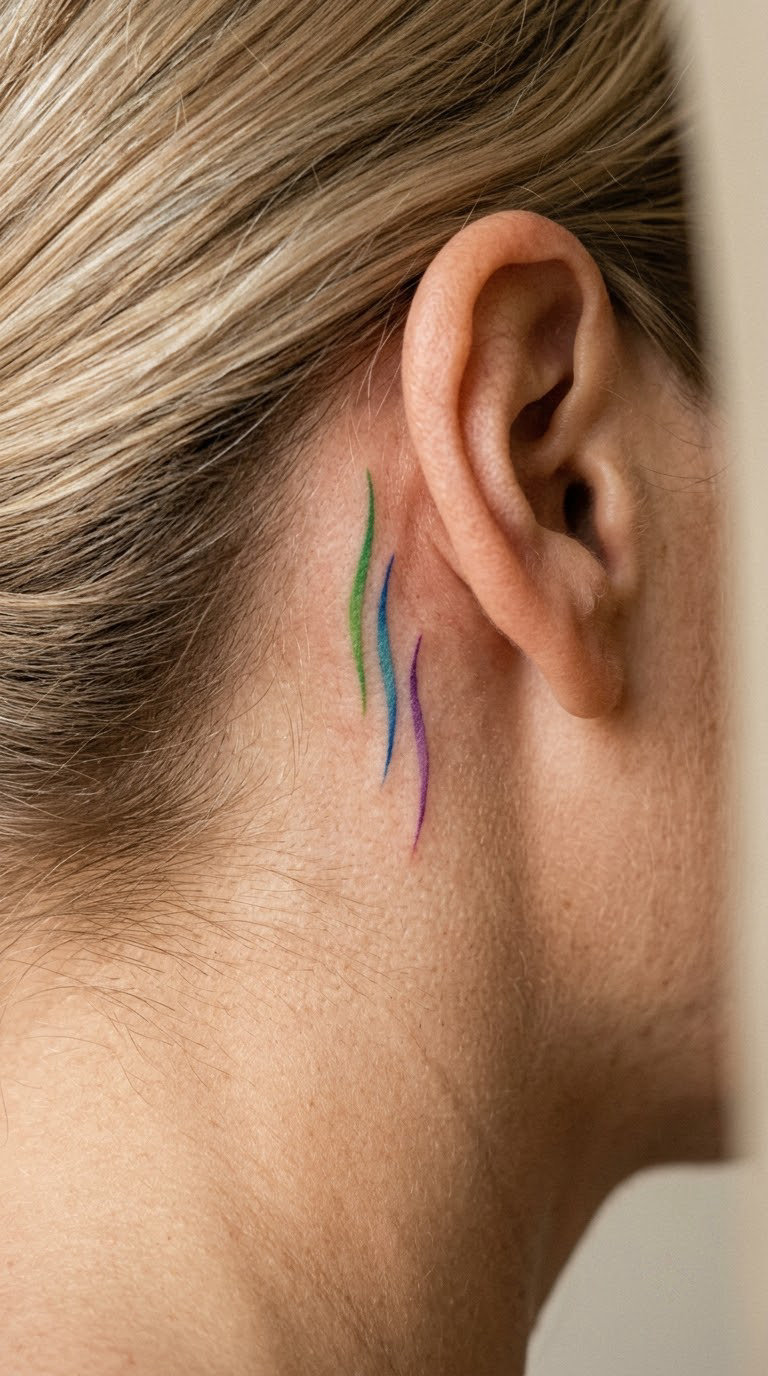
Three short strokes, one green, one blue, one violet, each about an inch long, slightly separated and at slightly different angles. No gradient, no stars, no shading. It is a colour swatch of the sky rather than a picture of it.
This is the smallest design here that still carries the idea, and the least demanding on a budget or a first-tattoo nerve.
Placement: Behind the ear, stacked or running along the curve. Size: About 1 in (2.5 cm) per stroke. Style: Micro fine line. Pain: Low, and it takes well under an hour. Fine coloured lines at this scale lose their crisp edge first, so expect a touch-up or a deliberate fade to a soft tint. Make it yours: Use the birthstone colour of a child or a sibling for the middle stroke.
16. Green-to-Purple Gradient Aurora on the Rib
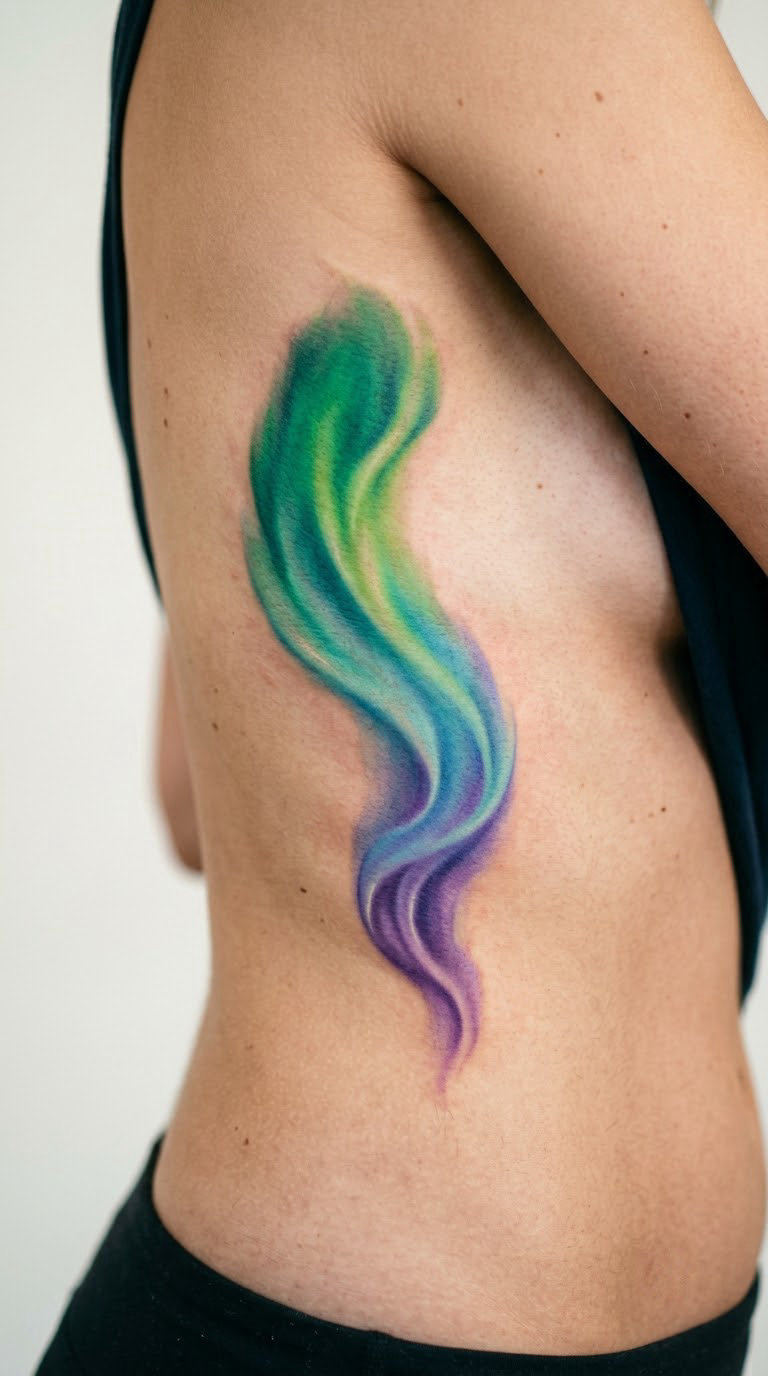
A broad wash that starts green at the top, moves through teal, and ends in violet at the bottom, with soft light in the middle where the pigment is thinnest. Ribs give a natural curve for a long gradient, and few placements do that better.
It is a body-hugging piece, which means it moves with you and reads differently depending on the angle.
Placement: Side of the ribs, following the cage, roughly 9th to 11th rib. Size: 6-8 in (15-20 cm). Style: Illustrative gradient, watercolour-adjacent. Pain: High, and ribs are the placement people mention most when they describe a long session. The skin stretches and the gradient shifts with it, so a touch-up after a year or two can be worth it. Make it yours: Mirror a smaller single-colour version on the opposite side rather than a copy of this one.
17. Northern Lights Constellation on the Hand
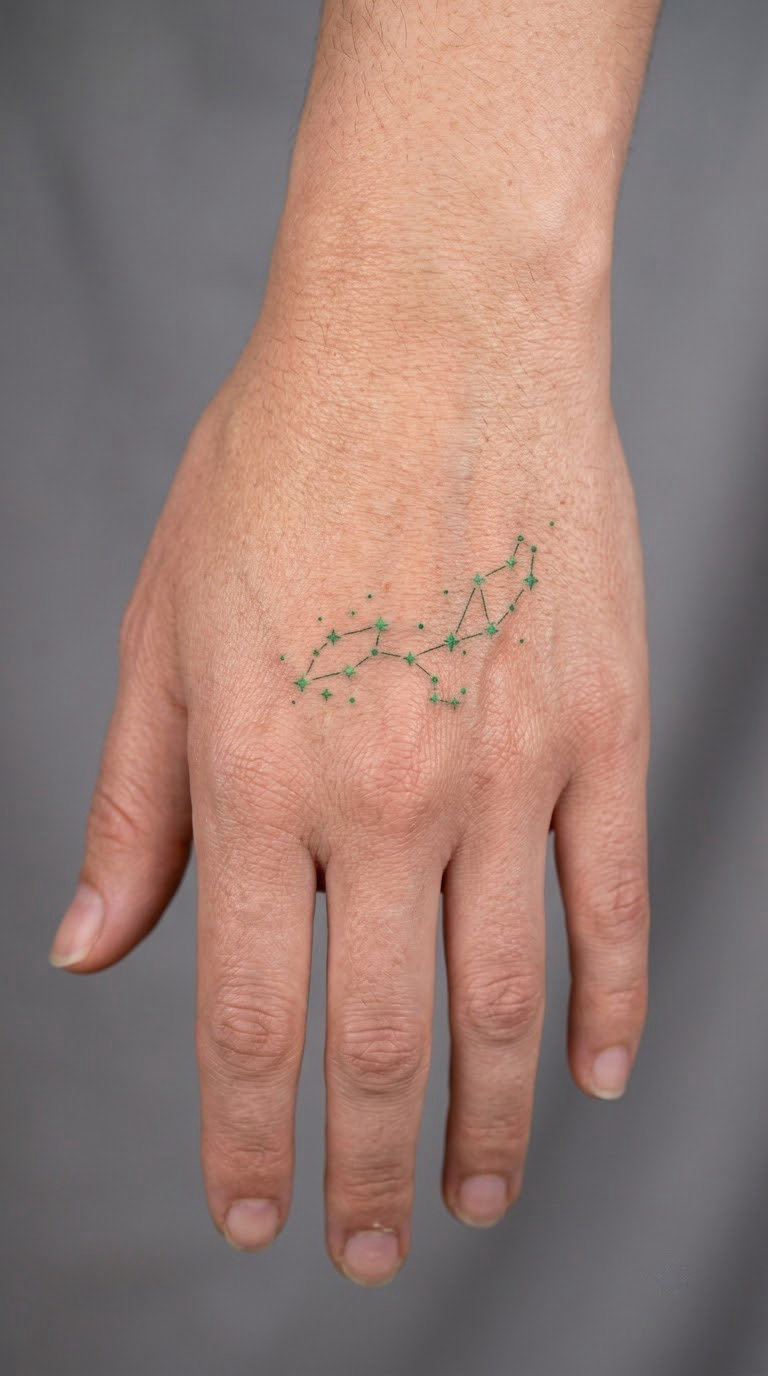
A handful of small green stars joined by hairlines, arranged as a custom constellation rather than a real one. No invented mythology required: the stars are yours, chosen from a sky you know, and the aurora is implied by colour alone.
Hand tattoos are the most committed placement in this whole list, and that is exactly why people book them.
If you want the same line-work logic in a different sky, our sun, moon and rising sign tattoo ideas use the same hairline approach on a similar scale.
Placement: Back of the hand, between knuckles and wrist. Size: 1.5-2.5 in (4-6 cm). Style: Micro fine line or micro dotwork. Pain: High, because hands are bony and the skin moves constantly. Hand ink fades and patches faster than anywhere else on the body, and sun exposure accelerates it, so plan on a refresh or on covering it in winter. Make it yours: Build the constellation from a date rather than from a real asterism.
18. Aurora Spiral on the Hip
A circular spiral of green, blue and purple light turning inward, with the centre kept dark or left open. The spiral form is not literal, but it reads as light rotating, and it fills a round space better than a ribbon ever could.
It is a good choice for a body area that curves in more than one direction, since a circle distorts gracefully.
Placement: Outer hip, angled so the top of the circle follows the iliac line. Size: 4.5-6 in (11-15 cm) diameter. Style: Illustrative realism. Pain: Medium, more an itch than a sting across the curve of the hip. Saturated blue and green in a spiral will even out over time, which suits this design better than it suits a landscape. Make it yours: Put a single small mark at the centre, or leave the middle bare and let the skin show through.
19. Black-Iris Northern Lights Sleeve Element
A black botanical iris rendered in solid dark linework, with a green and violet aurora flowing behind and around it. Putting a heavy black subject in front of a light effect gives the light something to wrap, which is the difference between this and two separate tattoos on one arm.
It is one of the most requested composite versions of this motif, and it sits well inside a larger sleeve plan.
Placement: Outer upper arm. Size: 5-7 in (13-18 cm) tall. Style: Illustrative realism. Pain: Medium, roughly two to three hours, more if it joins an existing sleeve. The black iris keeps its contrast while the colour behind it softens, so the two will separate in weight after a few years. Make it yours: Repeat the same iris in a smaller size as a matching piece.
20. Full-Colour Aurora Scene on the Back
The full statement: a wide sky with green, violet and blue light, a dark mountain range, a strip of still water, and star detail in the darkest corner. It is the only design here that tells a whole story rather than one gesture.
People get this one when they are building a piece meant to be seen across a room.
Placement: Across the upper back, centred between the shoulder blades. Size: 9-12 in (23-30 cm) wide. Style: Colour realism with a black landscape base. Pain: High, and this is a two-session job at most studios rather than a single sitting. Detail softens and colour shifts over five to seven years, so get healed photos of your artist’s colour work before you commit. Make it yours: Put a specific lake or coastline in the lower third so the wide sky stays yours.
How to Choose the Right Northern Lights Tattoo Design
Five things decide whether an aurora tattoo looks good in ten years or turns into a soft green shadow. Work through them before the consult, and bring what you have decided to your artist for adaptation.
Start with how much colour you will actually maintain
Bright green and violet are the least permanent colours in this family, which is worth knowing before you pick from a wall of northern lights tattoo ideas. If you want them, go in knowing a touch-up is likely, and choose an artist who can show healed work rather than fresh-day-one photographs. If you would rather not plan around a refresh, ideas 5 and 14 hold their shape far longer in solid black.
Match the size to the placement, not the reference image
A design that reads beautifully at ten inches can collapse into a streak at two. For every small option here, the rule is the same: fewer elements, larger line weight, one colour. Below about two inches, only the ribbon, the squiggle and the three-line piece still read as northern lights.
Check how the design handles your body’s curve
Any composition built around a straight horizon will distort on a shoulder, hip or calf. Ask to see the design drawn on the actual body area, not on paper. If it only works flat, pick a design based on flow or spiral, which tolerate curvature well.
Watch for a dark anchor
Light needs something dark behind it. Every colour piece on this list has a black base for that reason, whether it is a mountain, a ridge or an empty night sky. A pale design without an anchor is the one most likely to heal into a smudge.
Bring a reference sheet of northern lights tattoo ideas
Artists are much more able to work from a set of five to eight images than from one picture. Pull real photographs of the night you care about, note which colours you actually saw, and write down what you want kept. The artists who do strong aurora work are easy to identify once you know to look for healed gradient pieces in their portfolios.
Northern Lights Tattoo Cost and Session Time
US tattoo pricing runs on an hourly rate, so size and detail drive cost more than the motif does. A micro piece such as idea 15 usually falls in the 80 to 150 dollar range, and a small to medium design like ideas 1, 3 or 12 sits around 150 to 350 dollars.
Medium pieces with real colour gradients, like idea 2 or idea 19, typically run 350 to 750 dollars and take two to three hours. Large scenic work such as idea 20 starts around 800 dollars and can pass 2000 depending on the artist and the amount of colour in the sky.
Two things push the number up: the number of colours laid in, and how long the artist is willing to sit with you. Most studios have a shop minimum that a small piece still has to meet, and rates vary a lot by region and by how well booked a colour specialist is. For anything above roughly eight inches, book a separate session for it rather than trying to add it onto another appointment.
Aftercare Basics for an Aurora Tattoo
Always start with your artist’s own aftercare instructions, because they will know how their specific ink was laid in.
- Wash it gently. Clean water and a mild unscented soap, twice a day for the first few days, then pat dry with something soft rather than rubbing.
- Keep the colour area dry. No soaking, no swimming, no long hot showers while the surface is still healing.
- Reduce friction. Loose clothing over a fresh piece, and nothing tight across a wrist, rib or forearm design for the first couple of weeks.
- Leave the film alone. Peeling it early is the most common way people damage their own colour work.
- Protect it from sun. Once healed, cover a saturated green and violet piece when you are out in strong sun, since those pigments fade first.
- Wait before judging it. Colour settles over the first weeks and looks different from the day it was finished. Photograph it healed before you decide anything needs changing.
Frequently Asked Questions
What colour works best for a northern lights tattoo?
Green is the most recognisable aurora colour and the easiest to keep vivid, because the pigment is used heavily in that band. Violet and blue look striking but fade ahead of green, and pale pink goes first of all. If you want one colour to carry the piece, choose a deep green with a darker tone underneath it. If you want the full sky, expect a touch-up in five to seven years.
How small can a northern lights tattoo be?
Around one to two inches is the practical floor, and only the simplest designs survive there: a single ribbon, one wavy line, or three short colour strokes. Anything with a mountain, a reflection or a star map needs four inches or more, or the small elements blur into each other within a few years. Below two inches, use one colour and a heavier line weight.
Where is the least painful place to get an aurora tattoo?
The upper arm, the outer thigh and the calf are the most forgiving spots, because they have enough flesh and few sharp edges. The inner forearm and behind the ear are mild to medium, mostly because of bone and movement. Ribs, sternum, collarbone and the back of the hand are the hard ones. Placement matters more than size, so a small design on a rib hurts more than a large one on a thigh.
Will a fine-line northern lights tattoo fade quickly?
Faster than most, yes. Fine coloured lines and pale washes lose their edge before solid line work does, and any design on a hand, wrist or inner forearm will fade quicker still because of friction and sun. Keep the black line strong enough to hold the shape on its own, and expect a refresh rather than a redraw. Ask your artist about a session where a couple of colours are layered deeper.
Can I add a real sky or star map to an aurora design?
Yes, and it is the best way to make the design personal rather than generic. Give your artist the date and location, and they can build a star field or a coordinate line beneath the aurora. A real photograph of a night you actually watched works better than an illustration, because it tells the artist which colours were really there. Allow a few extra inches so the map is not squeezed under the sky.
If this is your first tattoo, start at idea 7 or idea 15. Both are small, quick, and honest about what they are, and either one leaves room for a bigger aurora later without looking crowded. If you are adding to a collection and want the piece to anchor an arm or a back, go straight to a design with a dark landscape base, like idea 2 or idea 20, and book it as its own project with the number of sessions written down in advance.